1
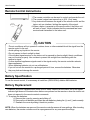
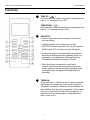
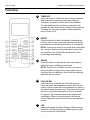
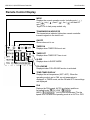
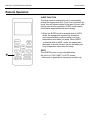
REMOTE CONTROLLER MANUAL VMH 09/12/18/24 SD Series Inverter Single Zone Ductless Mini-Split Heat Controller • 1900 Wellworth Ave. • Jackson, MI 49203 • (517)787-2100 • www.heatcontroller.com VMH 09,12,18,24 SD Remote Controller Heat Controller TABLE OF CONTENTS Batteries and Battery Specifications/Replacement........................................................ 3 Specifications and Features........................................................................................... 4 Functions........................................................................................................................ 5 Remote Control Display.................................................................................................. 8 Remote Operations........................................................................................................ 9 2 Heat Controller VMH 09,12,18,24 SD Remote Controller Remote Control Instructions 26 ft.(8 m) 1. The remote controller can be used to control and operate the unit 2. The remote’s signal can transmit up to 26 ft. (8 m) away. 3. Any obstructions between the signal of the remote control and the indoor unit can interfere, limiting the capacity of the signal. 4. When a button is pressed on the remote control, the indoor unit will emit a “beep”, which indicates that the command has been received and transmitted to the indoor unit. ! Caution • The air conditioner will not operate if curtains, doors or other materials block the signal from the remote control to the unit. • Avoid spilling any liquid into the remote. • Do not expose to direct sunlight or heat. • If the infrared signal receiver on the indoor unit is exposed to direct sunlight, the air conditioner may not function properly. Use curtains to prevent the sunlight from interferring with the receiver’s signal. • If other electrical appliances signals react to the signal sent by the remote controller relocate these appliances. • When replacing batteries, do not use old batteries •If you do not use the remote for a prolonged period of time, remove the batteries. Otherwise they may leak and damage the remote Battery Specification To use the remote control, it is necessary to install two (R03/LR03x2) alkaline AAA batteries. Battery Replacement 1. Batteries should be replaced when there is not a “beep” heard from the indoor unit or the signal indicator light does not illuminate when buttons are pressed on the remote or when the indoor unit does not respond to the remote controls commands. 2. To replace the batteries: A. Remove the cover by pressing and sliding off. B. Remove the old batteries and insert the new batteries, placing the (+) and (-) ends correctly. C. Reattach the cover by sliding it back into position. NOTE: When the batteries are removed, the remote controller erases all user settings. After inserting new batteries, the remote controller must be reprogrammed for any user specific settings. 3 VMH 09,12,18,24 SD Remote Controller Heat Controller Remote Controller Specifications Model Rated Voltage Signal Transmission Distance Operating Environment RG52A1/BGEFU1 3.0V 26ft (8m) with full batteries 23°F~ 140°F (-5~60°F) Performance Features 1. Operating Modes: AUTO, COOL, DRY, HEAT (heat pump models only) and FAN. 2. 24 hour timer 3. Temperature Range Selection: 62°F~ 86°F. 4. LCD (Liquid Crystal Display) NOTE: Remote controller can be set to display degrees in °C or °F. To alternate between unit of measure, press and hold the temp and button at the same time. Release buttons when the unit of measure changes. Repeat the process to revert back to the previous unit of measure. 4 Heat Controller VMH 09,12,18,24 SD Remote Controller Functions 1 2 ON/OFF Press this button to power on, which starts the unit’s operation. Push the button again to power off, which stops the unit’s operation. MODE Each time this button is pressed, a mode is selected in a sequence of AUTO, COOL, DRY, HEAT*, and FAN then repeat. * *Heat mode is applicable to heat pump models only. 3 FAN Press to select the fan speed in four intervals: 4 SLEEP Press this button to activate the SLEEP mode. Press it again to deactivate. This feature can only be selected when the unit is in COOL, HEAT*, or Dry mode. Use this feature for the most comfortable temperature control while you sleep and your body temperature rises. *Heat mode is applicable to heat pump models only. 5 TURBO Activates or deactivates the Turbo function. Press this button for Turbo function. Turbo function enables the unit to reach the set temperature in the shortest time. In the cooling mode, the unit will blow cold air at a super high fan speed. In heating mode*, the unit will blow hot air a super high fan speed. *Heat mode is applicable to heat pump models only. 6 SELF CLEAN This function helps to keep the inside of the unit dry and prevents mold from forming. It is particularly useful at the end of the season when the unit will not be in use for a long period of time. Press the self clean button to initiate the self cleaning function. 5 VMH 09,12,18,24 SD Remote Controller Heat Controller Functions 7 TEMP UP ( ) Push this button to increase the indoor temperature set point in 1°F increments up to 86°F. TEMP DOWN ( ) Push this button to decrease the indoor temperature set point in 1°F increments down to 62°F. 8 SHORTCUT • Used to restore the current settings or resume the previous setting. • The first time the unit is powered on and the SHORTCUT button is pressed, the unit will operate in AUTO mode, 80°F set temp, and auto fan speed. • Pushing this button will automatically revert back to the previous settings including operating mode, set temperature, fan speed level and sleep feature (if activated) and transmit the signal to the unit. • When this button is pressed for more than 2 seconds, the system will automatically restore the current operation settings including operating mode, set temperatures, fan speed and sleep feature (if activated). 9 TIMER ON Press the button to initiate the auto-on timer sequence. Each press will increase the auto-on timer setting in 30 minutes increments. When the set time displays 10, each addition time the button is pressed, it will increase the auto-on timer setting in 60 minute increments. To cancel the auto-on timer program, simply adjust the auto-on time to 0.0. 6 Heat Controller VMH 09,12,18,24 SD Remote Controller Functions 10 TIMER OFF Press the button to initiate the auto-off timer sequence. Each press will increase the auto-timer setting in 30 minutes increments. When the set time displays 10, each additional time the button is pressed it will increase the auto-timer setting in 60 minute increments. To cancel the auto-timer program, simply adjust the auto-off timer to 0.0. 11 DIRECT Press this button to direct the airflow by selecting the position of the louver on the unit. Each time the button is pressed the louver will open/close by 6° increments. NOTE: If the louver moves in a position that could affect the cooling or heating (heat pump models only) of the air conditioner, the unit will alter the direction of the louver angle automatically. 12 SWING Press this button to start/stop the auto swing feature, which the louver oscillates up and down. NOTE: If the louver oscillates or moves in a position that could affect heating (heat pump models only) or cooling of the air conditioner, the unit will automatically adjust the louver position. 13 FOLLOW ME Push this button to initiate the Follow Me mode. In follow me mode, the temperature sensor built into the remote control senses the room temperature in place of the sensor inside the indoor unit. This allows the remote control to control the temperature of the room where it is present. This feature helps prevent temperature stratification. When in follow me mode, the remote control display will show the actual room temperature it senses. 14 LED Disables/Activates the indoor \Display. When pushing the button, the indoor screen is cleared, press it again to turn on the light of the display. 7 VMH 09,12,18,24 SD Remote Controller Heat Controller Remote Control Display MODE Displays the current operation mode. Including auto ( ), cool ( ), dry ( ), heat* ( ), fan ( ) and back to auto ( ). *Applicable to heat pump models only TRANSMISSION INDICATOR This transmission indicator lights when remote controller transmits signals to the indoor unit. ON/OFF Shows when unit is on. TIMER ON Displays when TIMER ON time is set. TIMER OFF Displays when TIMER OFF time is set. SLEEP Displays when in SLEEP MODE. FOLLOW ME Displayed when FOLLOW ME function is activated. TEMP./TIMER DISPLAY Displays the set temperature (62°F~86°F). When the operating mode is set to FAN, no set temperature is displayed. In TIMER mode, set the ON and OFF time settings are displayed. FAN Displays the FAN speed, AUTO (no display) and three fan speed levels “ ” (LOW )“ ” (MED) “ ” (HIGH) can be indicated. The fan speed is AUTO when the operating mode is in AUTO or DRY. 8 Heat Controller VMH 09,12,18,24 SD Remote Controller Remote Operation AUTO OPERATION 1. Press the MODE button to select Auto. 2. Press the UP/DOWN button to set the desired temperature. The temperature can be set within a range of 62°F~86°F in 1°F increments. • In Auto mode, the unit will automatically select Cool, Fan or Heat* modes be sensing the difference between the actual ambient room temperature and the set temperature on the remote controller. • In the Auto mode, you can not charge the fan speed. It is being automatically controlled. COOLING/HEATING/FAN OPERATION If Auto mode is uncomfortable, you can manually override the setting by putting the unit in COOL, HEAT*, or FAN** ONLY mode. 1. Press the MODE button to select COOL, HEAT* (pump) or FAN** mode. 2. Press the temp UP/DOWN button to set the desired temperature. The temperature can be set within a range of 62°F~86°F in 1°F increments. 3. Press the FAN button to select the fan speed in four steps - Auto, Low, Med, or High. NOTE * Heat mode is applicable to heat pump models only. ** In the FAN mode, the set temperature is not displayed on the remote controller and you are not able to control the room temperature either. In this case, only the fan speed can be changed. 9 VMH 09,12,18,24 SD Remote Controller Heat Controller Remote Operation DRY OPERATION The DRY mode will automatically select the amount of dehumidification based on the difference between the set temperature and actual room temperature. The fan speed is automatically set to low. 1. Press the MODE button to select DRY mode. 2. Press the UP/DOWN buttons to set the desired temperature. The temperature can be set within a range of 62°F~86°F in 1°F increments. NOTE • In the Dry mode, you can not change the fan speed. It is ceing automatically controlled. • Due to the difference between the set temperature and the actual room temperature, the unit will automatically switch between COOL and FAN only mode while in DRY mode. ADJUSTING AIR FLOW DIRECTION Use the SWING or DIRECT button to adjust the desired airflow direction. 1. When the DIRECT button is pushed the horizontal louver changes in 6° degree angle increments. 2. When the SWING button is pushed the louver oscillates. 1 2 NOTE When the louver oscillates or moves in a position that could affect the cooling or heating (heat pump models only) of the air conditioner, the unit will automatically change the louver direction. 10 Heat Controller VMH 09,12,18,24 SD Remote Controller Remote Operation TIMER OPERATION Press the TIMER ON button to set the time the unit should automatically turn on. Press the TIMER OFF button to set the time the unit should automatically turn off. 1. Press the TIMER ON button. The remote controller show TIMER ON, the last Auto-on set time and the “H” icon will be shown on the LCD display. Now it is ready to reset the Auto-on time to START operation. 2. Push the TIMER ON button again to set desired Autoon time. Each time you press the button, the time increases by half an hour between 0 and 10 hours and by one hour between 10 and 24 hours. 3. After setting the TIMER ON, there will be a one second delay before the remote controller transmits the signal to the air conditioner. Then, after approximately another 2 seconds, the “H” icon will disappear and the set temperature will re-appear on the LCD display. TO SET THE AUTO-OFF TIME 1. Press TIMER OFF button. The remote controller show TIMER OFF, the last Auto-off setting time and the “H” icon will be shown on the LCD display area. Now it is ready to reset the LCD display area. Now it is ready to reset the Auto-off time to stop the operation. 2. Push the TIMER OFF button again to set desired Auto-off time. Each time you press the button, the time increases by half an hour between 0 and 10 hours and by one hour between 10 and 24 hours. 1 3. After setting the TIMER OFF, there will be a one second delay before the remote controller transmits the signal to the air conditioner. Then, after approximately another 2 seconds, the signal “H” will disappear and set the temperature will re-appear on the LCD display. 11 VMH 09,12,18,24 SD Remote Controller Heat Controller Remote Operation SLEEP FUNCTION The sleep function enables the unit to automatically change the temperature by 2°F per hour for the first two hours, then will remain steady for the next 5 hours, after that the unit will stop operating. SLEEP mode creates comfortable temperatures and saves energy. 1.When the SLEEP mode is selected while in COOL mode, the temperature increases to create the most uncomfortable conditions while your body temperature rises when you sleep. When SLEEP is selected while in HEAT* mode, the temperature deceases to ensure you don’t get too hot while your body temperature rises when you sleep. 1 NOTE The SLEEP function is only selectable when the unit is in COOL, HEAT* or AUTO modes. * Heat mode is applicable to heat pump models only. 12 Heat Controller VMH 09,12,18,24 SD Remote Controller 13 VMH 09,12,18,24 SD Remote Controller Heat Controller 14 Heat Controller VMH 09,12,18,24 SD Remote Controller 15 VMH 09,12,18,24 SD Remote Controller Heat Controller 'XHWRRQJRLQJSURGXFWLPSURYHPHQWVVSHFLILFDWLRQVDQGGLPHQVLRQVDUH VXEMHFWWRFKDQJHDQGFRUUHFWLRQZLWKRXWQRWLFHRULQFXUULQJREOLJDWLRQV'HWHUPLQLQJWKH DSSOLFDWLRQDQGVXLWDELOLW\IRUXVHRIDQ\SURGXFWLVWKHUHVSRQVLELOLW\RIWKHLQVWDOOHU $GGLWLRQDOO\WKHLQVWDOOHULVUHVSRQVLEOHIRUYHULI\LQJGLPHQVLRQDOGDWDRQWKHDFWXDOSURGXFW SULRUWREHJLQQLQJDQ\LQVWDOODWLRQSUHSDUDWLRQV ,QFHQWLYHDQGUHEDWHSURJUDPVKDYHSUHFLVHUHTXLUHPHQWVDVWRSURGXFWSHUIRUPDQFH DQGFHUWLILFDWLRQ$OOSURGXFWVPHHWDSSOLFDEOHUHJXODWLRQVLQHIIHFWRQGDWHRIPDQXIDFWXUH KRZHYHUFHUWLILFDWLRQVDUHQRWQHFHVVDULO\JUDQWHGIRUWKHOLIHRIDSURGXFW 7KHUHIRUHLWLVWKHUHVSRQVLELOLW\RIWKHDSSOLFDQWWRGHWHUPLQHZKHWKHUDVSHFLILF PRGHOTXDOLILHVIRUWKHVHLQFHQWLYHUHEDWHSURJUDPV :HOOZRUWK$YH-DFNVRQ0,3KZZZKHDWFRQWUROOHUFRP 12/2013 16