1
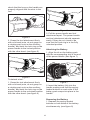
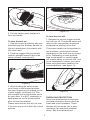
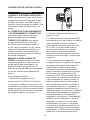
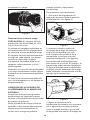
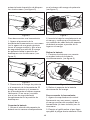
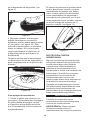
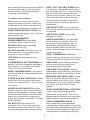
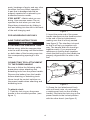
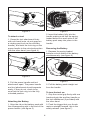
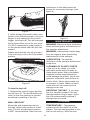
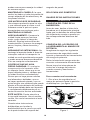
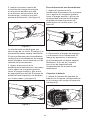
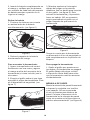
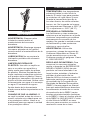
Operator’s Manual
Convertible Cordless
18V Power Handle
Model No. 71.74291
BEFORE returning this
product, first call:
(800) 539-6455
IMPORTANT
OPERATING HINT:
When starting unit, first push the thumb switch forward and then squeeze
the control trigger. It is NOT necessary to keep the thumb switch pushed
forward during use.
CAUTION:
• Safety
Before using this product, read this manual and follow all
its Safety Rules and Operating Instructions.
• Assembly
• Operation
• Maintenance
• Español
• Français
Sears, Roebuck and Co., Hoffman Estates, IL 60179, U.S.A.
www.craftsman.com
rev. 040908
TABLE OF CONTENTS:
Warranty...................................................................................................... 2
Safety Instructions...................................................................................... 2
Operation.................................................................................................... 4
Maintenance................................................................................................ 8
Storage........................................................................................................ 8
Accessories................................................................................................. 8
Service........................................................................................................ 9
Español..................................................................................................... 10
Français..................................................................................................... 19
WARRANTY
Craftsman One Year Full Warranty
If this Craftsman product fails due to manufacturer’s defects within one
year from the date of purchase, return it to any Sears store or other
Craftsman outlet in the United States for free replacement.
This warranty applies for only 90 days if this product is ever used for
commercial or rental purposes.
This warranty gives you specific legal rights, and you may also have other
rights which vary from state to state.
Sears, Roebuck and Co., Hoffman Estates, IL 60179
READ ALL INSTRUCTIONS
Please wash hands after handling the
cord.
SAFETY INSTRUCTIONS
CRAFTSMAN CONVERTIBLE
CORDLESS 18V TOOL SYSTEM
WARNING: Some dust created by
using power tools contains chemicals
known to the state of California to
cause cancer and birth defects or
other reproductive harm.
This product is for use only with the
Craftsman Convertible Cordless 18V
Tool System. Do not use the tool
attachments with any other system
or power source, and do not use any
tool attachment on the power handle
that is not intended for use with this
system.
WARNING TO CALIFORNIA
RESIDENTS: Handling the cord on
this units (or cords with accessories
sold for this product) will expose you
to lead, a chemical known to the State
of California to cause cancer, and birth
defects or other reproductive harm.
WARNING: When using this tool,
basic safety precautions should
2
wear proper eye protection, and use a
face or dust mask if operation is dusty.
always be followed to reduce the risk
of fire, electric shock, and personal
injury, including the following:
MAINTAIN UNIT WITH CARE - Keep
the unit clean for best performance
and to reduce the risk of injury. Follow
instructions for service. Keep handles
dry, clean, and free from oil and
grease.
To reduce risk of injury:
Before any use, be sure everyone
using this electric product reads and
understands all safety and operation
instructions contained in this manual.
UNINTENTIONAL STARTING Don’t carry any tool while holding the
switch area. The unit is shipped partly
charged, and may start inadvertently if
not handled properly.
Save these instructions and review
frequently prior to use. Store in wall
charger slot.
AVOID DANGEROUS
ENVIRONMENTS and weather
conditions when using this tool.
CHECK DAMAGED PARTS - If any
component of the system experiences
a hard impact, check that no parts
were damaged and verify that the
unit operates properly. Check for
misalignment or bending of moving
parts, breakage of parts, and any
other condition that may affect
operation. A part that is damaged
should be properly repaired or replaced by an authorized service
center.
KEEP CHILDREN AWAY - All
visitors should be kept at a safe
distance from work area.
STORE IDLE UNIT INDOORS - When
not in use, the unit should be stored
indoors in a dry location – out of reach
of children.
DON’T FORCE THE TOOL - It will do
the job better and with less likelihood
of a risk of injury at the rate for which it
was designed.
STAY ALERT - Watch what you are
doing. Use common sense. Do not
operate the tool when you are tired.
USE RIGHT TOOL - Do not use the
tool for any job except that for which it
is intended.
DON’T GRASP THE EXPOSED
CUTTING BLADES of the hedge
trimmer or pole saw when picking up
or holding the unit. Do not attempt to
remove cut material nor hold material
to be cut when blades are moving.
Make sure the unit’s switch is off and
the battery pack is removed before
clearing jammed material from blades.
WARNING: KEEP HANDS AND ALL
BODY PARTS AWAY from the blades.
The blade edges are sharp and can
cause injury even when the tool is
OFF.
DRESS PROPERLY - Do not wear
loose clothing or jewelry. They can
be caught in moving parts. Use of
gloves and substantial footwear is
recommended when working outdoors. Wear protective hair covering to
contain long hair.
DON’T GRASP MOVING LINE of the
line trimmer. Do not attempt to remove
cut material or hold material to be cut
when the line is moving. Make sure
the unit’s switch is off and the battery
pack is removed before clearing or
changing line.
DON’T OVERREACH - Maintain
proper footing and balance at all
times. Use both hands to operate unit
safely.
ATTACH LINE GUARD ON LINE
TRIMMER ATTACHMENT - Before
use, attach the line guard correctly.
USE SAFETY GLASSES - Always
3
See instructions on how to attach line
guard in the Operation section of the
line trimmer manual. Failure to attach
the line guard may pose a risk of
injury, may cause motor damage and
will void the warranty.
half and sliding into the slot in the back
of the wall charging rack.
USE A HARDHAT - Always wear a
hardhat when cutting branches overhead with the pole saw to reduce the
risk of injury from falling branches.
CHARGE BATTERY PRIOR TO
USE - The battery does not come
fully charged when purchased. Before
using the unit, the battery must be
charged. Before charging the battery,
read safety and charging instructions.
SAVE THESE INSTRUCTIONS
OPERATION
READ AND FOLLOW ALL SAFETY
WARNING printed in the various tool
attachment manuals.
PROPER RUN TIME AND
PERFORMANCE can only be
obtained with a fully charged battery.
To reduce risk when handling the
battery:
CHARGE TIME - Charging for
approximately 1 hour is sufficient to
replenish the battery to a full charge.
Initial use, long periods of inactivity, or
storage at extreme temperatures may
require extended charge time.
DO NOT dispose of the battery in a
fire. The cells may explode. Check
with local code for possible special
disposal instructions.
DO NOT open or mutilate the battery.
Released electrolyte is corrosive and
may cause damage to the eyes or
skin. It may be toxic if swallowed.
WALL CHARGE BRACKET - Before
charging the unit, make sure the
charge bracket is securely attached to
the wall; attach with screws to a wall
stud. The use of wall board anchors is
NOT recommended.
EXERCISE CARE in handling
batteries in order not to short the
battery with conducting materials
such as rings, bracelets and keys. The
battery or conductor may overheat
and cause burns.
To Charge Battery:
1. Plug the charger into a 120 Volt AC
outlet.
To reduce risk when using charger:
2. Place the Power Handle with
battery attached into the wall charge
bracket. It is not necessary to remove
the tool attachment when charging the
battery. (see figure 1)
DO NOT use charger outdoors or in
wet conditions; use inside only.
DO NOT charge the unit when the
temperature is below +40 F or above
+120 F. It may lessen the service life
of the battery.
This unit and its charger are designed
to work together. DO NOT charge the
battery with any other charger and DO
NOT use this charger with any other
yard tool or battery.
The charger is designed to operate on
120 volts. DO NOT attempt to use it at
any other voltage.
Store these instructions by folding in
Figure 1
4
the charge to each battery and shuts
of the charge when complete. The
batteries can be left in the charger
indefinitely and will not over-charge.
3. Charge for at least 1 hour.
4. The LED will glow red when the
battery is charging and green when
it is ready to use. If the LED does not
illuminate when the handle is placed in
the charge rack, check to make sure
that there is proper contact between
the handle and the charger base.
Longest life and best performance will
be obtained when charging at normal
room temperature.
Battery life is dependent on usage,
storage temperature and time.
5. A second charging bay is provided
on the charge rack to charge a second
battery (not included). To charge a
battery in this bay, insert the battery
until it locks in place and the LED
illuminates. (see figure 2) The LED
will glow red when the battery is
charging and green when it is ready
to use. When charging two batteries
(one in the handle and one directly in
the charger), the charger will charge
whichever battery was inserted
first. Then when that battery is fully
charged, it will automatically switch
and charge the other battery. Each
battery will take approximately 1 hour
to charge (a total of 2 hours for two
batteries).
CONNECTING TOOL ATTACHMENT
TO THE POWER HANDLE
Be sure to follow the following
safety precautions when attaching
and detaching tools from the power
handle.
Remove the battery from the handle
before attaching or detaching tools.
Never touch the control switches on
the power handle when attaching and
detaching tools
To attach a tool:
1. Twist the lock ring on the power
handle to the unlocked position. (see
figure 3)
Figure 2
Figure 3
Charging Notes:
2. Insert the male end of the power
handle interface into the female socket
in the end of the tool attachment
making sure that it is firmly seated.
(see figure 4) The interface is keyed
so that it will only go together one
way. The handle and tool should go
together easily. If you experience
resistance in putting them together,
CAUTION: The charger can only
be used with 60 cycle, 115-120 VAC
electricity.
The charger unit plugged into the AC
outlet will normally become warm to
the touch during charging.
The charger automatically controls
5
check that the keys on the handle are
properly aligned with the slots in the
tool.
Figure 6
2. Pull the power handle and tool
attachment apart. The power handle
and tool attachment should separate
easily. If they do not, check to be
sure that the lock ring is in the fully
unlocked position.
Figure 4
3. Grasp the tool attachment firmly
with one hand (note, do not grasp on
a rotating part such as the auxiliary
handle), and twist the lock ring on the
power handle to the locked position
with the other hand. (see figure 5)
Attaching the Battery
1. Align the rib on the battery pack
with the corresponding slot in the end
of the power handle. (see figure 7)
Figure 5
To detach a tool:
1. Grasp the tool attachment firmly
with one hand (note, do not grasp on
a rotating part such as the auxiliary
handle), and twist the lock ring on the
power handle to the unlocked position
with the other hand. (see figure 6)
Figure 7
2. Insert the battery fully into the
handle making sure that the springloaded buttons on each side of the
battery pack snaps into place in the
handle.
Removing the Battery
1. Depress the spring-loaded
buttons on both sides of the battery
simultaneously. (see figure 8)
6
Figure 8
Figure 10
2. Pull the battery pack straight out
from the handle.
To turn the tool off:
1. Release the control trigger and the
tool will turn off. The thumb switch will
return to the rear position to prevent
accidental re-starting of the tool.
To turn the tool on:
1. Grip the control grip firmly with one
hand and grip the auxiliary handle on
the tool attachment (if provided) with
the other hand.
The power handle can be operated in
two positions, normal and inverted,
depending on the work you are trying
to do. Depending on work position,
both thumb switch or control trigger
will release safety or activate tool, so it
is not necessary to contort your hand
when using the power handle in the
inverted position. (see figure 11)
2. Push the trigger that your thumb
rests on straight forward, this is the
safety release. (see figure 9)
Figure 9
3. While holding the switch under
your thumb in the forward position,
use your fingers to pull upward on the
control trigger. (see figure 10) This
will energize the tool and allow you to
do your work. It is NOT necessary to
keep pressure on the thumb switch
after the tool has started.
Figure 11
OVERLOAD PROTECTION
Some tool attachments incorporate
overload protection devices such as
fuses and circuit breakers. These
devices will cause the tool to stop
operating if an overload condition
exists. See the individual tool
Please note that the tool will not start
if the lock ring is not in the fully locked
position.
7
attachment manuals for instructions
regarding these overload protection
devices.
pipes, furnaces, etc. Do not store
where temperatures go below +40 F
or above +120 F.
See the manuals for the individual tool
attachments for specific instructions,
precautions and tips for using those
specific tools.
PREVENTING CORROSION Fertilizers and other garden chemicals
contain compounds that greatly
accelerate the corrosion of metals. Do
not store the appliance on or adjacent
to fertilizers or chemicals.
MAINTENANCE
See the manuals for the individual tool
attachments for maintenance of those
tools.
ACCESSORIES
REPLACEMENT PARTS - For
optimum cutting results and the
assurance of top performance, it
is recommended that only Sears
Craftsman replacement blades and
cutting line be used.
WARNING: Always remove the
battery when performing any
maintenance on the power handle or
a tool attachment that is connected to
the power handle.
WARNING: Use only Craftsman
accessories and replacement parts
available from Sears. Use of nonCraftsman accessories could be
hazardous. Call 1-800-366-PART.
WARNING: Always keep hands away
from the triggers when performing
maintenance on the power handle.
LUBRICATION - No periodic
lubrication of the power handle parts
is required.
BATTERY RECYCLING - To
preserve natural resources, please
recycle or dispose of this product’s
NICKEL-CADMIUM (NiCd) BATTERY
properly. Local, state and federal laws
prohibit disposal of NiCd batteries
in ordinary trash. The manufacturer
is a participant in the Rechargeable
Battery Recycling Corporation (RBRC)
recycling program. We have paid
a fee to allow for these batteries to
be properly disposed of via a RBRC
collection site (various retailers are
also RBRC participants). Please call
the RBRC toll free number at (800)
822-8837 or visit the RBRC web site
at www.rbrc.com to find a battery
collection center near you.
CLEANING OF PLASTIC PARTS
- Use only a dry brush or a cloth
with warm water and mild soap to
clean plastic parts. Many household
cleaners contain chemicals which
could damage the plastic. Never use
gasoline, turpentine, paint thinner or
similar fluids. Never spray-wash tool
or immerse in water. Water or liquid
inside the tool can cause serious
damage to the unit.
DROPPING THE UNIT - If you drop
the unit, carefully inspect it for any
damage before using it again. Have
the unit professionally repaired if
damage has occurred.
STORAGE
TEMPERATURE – Temperature
extremes limit the useful life of the
battery. The best storage place is one
that is cool and dry. Store the tool
away from direct sunlight, heating
8
SERVICE
If you see any condition that may
affect safe operation, or if you have
any questions, contact our customer
service number at: 1-800-539-6455
NEED MORE HELP?
You’ll find the answer and a more on managemyhome.com – for free!
Find this and all your other product manuals online.
Get answers from our team of home experts.
Get a personalized maintenance plan for your home.
Find information and tools to help with home projects.
9
ÍNDICE
Garantía.................................................................................................... 10
Instrucciones de seguridad....................................................................... 10
Operación.................................................................................................. 13
Mantenimiento........................................................................................... 16
Almacenamiento....................................................................................... 17
Accesorios................................................................................................ 17
Servicio..................................................................................................... 17
Español..................................................................................................... 10
Français..................................................................................................... 19
GARANTÍA
Garantía de un año de Craftsman
Si este producto Craftsman falla debido a un defecto de fábrica dentro
del año de la fecha de compra, devuélvalo a cualquier tienda Sears u
otro centro de ventas de Craftsman en los Estados Unidos para que lo
reemplacen sin cargo.
Si este producto se utiliza para propósitos comerciales o para su alquiler,
esta garantía se aplicará sólo por 90 días.
Esta garantía le otorga derechos legales específicos y usted también
puede tener otros derechos dependiendo del estado donde reside.
Sears, Roebuck and Co., Hoffman Estates, IL 60179
LEA TODAS LAS INSTRUCCIONES
expuesto al plomo, una sustancia
química que en el Estado de California
se conoce como causante de cáncer y
defectos de nacimiento u otros daños
reproductivos. Lávese las manos
después de manipular el cable.
INSTRUCCIONES DE SEGURIDAD
ADVERTENCIA: El polvo generado
por el uso de herramientas mecánicas
contiene sustancias químicas
que en el Estado de California se
conocen como causantes de cáncer y
defectos de nacimiento u otros daños
reproductivos.
SISTEMA DE HERRAMIENTAS
DE 18 VOLTIOS CRAFTSMAN
CONVERTIBLE CORDLESS
Este producto es para usar sólo con
el sistema de 18 voltios Craftsman
Convertible Cordless. No utilice los
accesorios de las herramientas con
ningún otro sistema ni fuente de
ADVERTENCIA PARA LOS
RESIDENTES DE CALIFORNIA: Al
manipular el cable de estos productos
(o los cables con accesorios que se
venden para este producto), quedará
10
alimentación ni los utilice en un mango
de potencia que no esté diseñado
para el uso con este sistema.
de las hojas son filosos y pueden
provocar lesiones aun cuando la
herramienta esté APAGADA.
ADVERTENCIA: Cuando use esta
herramienta, se deben seguir las
precauciones básicas de seguridad
para reducir el riesgo de incendios,
descargas eléctricas y lesiones
personales, entre las que se incluyen
las siguientes.
USE LA VESTIMENTA ADECUADA:
No use ropa suelta ni joyas porque
pueden quedar atrapadas en piezas
móviles. Cuando se trabaja en
exteriores, se recomienda el uso de
guantes y de calzado resistente. Use
un cobertor protector del cabello para
sostener el cabello largo.
Para reducir el riesgo de lesiones:
NO SE ACERQUE DEMASIADO:
Manténgase bien parado y con
equilibrio en todo momento. Use
ambas manos para manejar la unidad
de manera segura.
Antes de usar la herramienta,
asegúrese de que todas las
personas que usarán este producto
eléctrico lean y entiendan todas las
instrucciones de seguridad y de uso
que contiene este manual.
USE ANTEOJOS DE SEGURIDAD:
Use siempre protección para los ojos
y una máscara para el rostro o una
máscara contra el polvo si opera
herramientas que producen polvo.
GUARDE ESTAS INSTRUCCIONES y
revíselas con frecuencia antes de usar
la herramienta. Guárdela en la ranura
del cargador de pared.
MANTENGA LA UNIDAD
ADECUADAMENTE: Conserve la
unidad limpia para que funcione
mejor y para reducir el riesgo de
lesiones. Siga las instrucciones de
mantenimiento. Conserve los mangos
secos, limpios y libres de aceite y
grasa.
EVITE LAS CONDICIONES
CLIMÁTICAS y los ambientes
peligrosos cuando use esta
herramienta.
MANTENGA ALEJADOS A LOS
NIÑOS: Todos los visitantes deben
mantenerse a una distancia segura del
área de trabajo.
ARRANQUE NO INTENCIONAL:
No sostenga ninguna herramienta
desde el área del interruptor cuando
la transporta. La unidad se envía
parcialmente cargada y puede
arrancar desprevenidamente si no se
manipula correctamente.
GUARDE LA UNIDAD INACTIVA
BAJO TECHO: Cuando la unidad
no está en uso, debe permanecer
guardada bajo techo en un lugar seco,
y lejos del alcance de los niños.
NO FUERCE LA HERRAMIENTA:
Funcionará mejor y habrá menos
posibilidades de riesgo de
lesiones si funciona a la velocidad
para la que fue diseñada.
CONTROLE QUE NO HAYA
PIEZAS DAÑADAS: Si cualquier
componente del sistema sufre
un impacto fuerte, revise que no se
hayan dañado piezas y verifique que
la unidad funcione correctamente.
Revise que no haya piezas móviles
mal alineadas o dobladas, que no
se hayan quebrado piezas y que no
exista ningún otro problema que pueda
afectar el funcionamiento del producto.
Toda pieza dañada debe ser reparada
USE LA HERRAMIENTA
ADECUADA: No use la herramienta
para otras tareas que no sean aquellas
para las que fue diseñada.
ADVERTENCIA: MANTENGA LAS
MANOS Y EL RESTO DEL CUERPO
ALEJADOS de las hojas. Los bordes
11
o reemplazada debidamente por un
centro de servicio técnico autorizado.
Para reducir riesgos al manipular la
batería:
ESTÉ ALERTA: Preste atención a
lo que está haciendo. Use el sentido
común. No use la herramienta si está
cansado.
NO deseche la batería en una fogata
porque las células podrían explotar.
Verifique el código local para obtener
instrucciones sobre un posible modo
especial para desecharlas.
NO AGARRE LAS HOJAS DE
CORTE EXPUESTAS de la cortasetos
o cortarramas cuando levante o
sostenga la unidad. No intente retirar
el material de corte ni sostener el
material que se cortará cuando las
hojas estén en movimiento. Asegúrese
de que el interruptor de la unidad esté
apagado y de quitar el paquete de
batería antes de eliminar el material
atascado de las hojas.
NO abra ni corte la batería. El
electrolito liberado es corrosivo y
puede provocar daños en los ojos o la
piel. Puede ser tóxica si se ingiere.
TENGA CUIDADO al manipular
baterías para no poner en
cortocircuito la batería con materiales
conductores como anillos, pulseras
y llaves. La batería o el conductor
pueden sobrecalentarse y producir
quemaduras.
NO AGARRE LA TANZA MÓVIL de
la bordeadora con tanza. No intente
retirar el material de corte ni sostener
el material que se cortará cuando la
tanza esté en movimiento. Asegúrese
de que el interruptor de la unidad esté
apagado y de quitar el paquete de
batería antes de limpiar o cambiar la
tanza.
Para reducir el riesgo cuando utiliza un
cargador:
NO use el cargador a la intemperie o
en condiciones húmedas; utilícelo sólo
en el interior.
NO cargue la unidad cuando la
temperatura sea inferior a +40 F (4 ºC)
o superior a +120 F (49 ºC). Puede
reducir la vida útil de la batería.
CONECTE EL PROTECTOR DE
LA TANZA EN EL ACCESORIO DE
LA BORDEADORA CON TANZA:
Antes del uso, conecte el protector
de la tanza correctamente. Consulte
las instrucciones para saber cómo
conectar el protector de la tanza en la
sección Operación del manual de la
bordeadora con tanza. La conexión
incorrecta del protector de la tanza
puede representar un riesgo de
lesiones, puede provocar daños en el
motor y anulará la garantía.
Esta unidad y su cargador están
diseñados para funcionar juntos. NO
cargue la batería con ningún otro
cargador NI utilice este cargador con
ninguna otra herramienta de jardín o
batería.
El cargador está diseñado para operar
con 120 voltios. NO intente usarlo con
ningún otro voltaje.
Guarde estas instrucciones
doblándolas por la mitad y
deslizándolas por la ranura que está
en la parte trasera del soporte del
cargador de pared.
USE CASCO: Siempre use un casco
cuando corte ramas en altura con el
cortarramas para reducir el riesgo de
lesiones producidas por las ramas que
caen.
LEA Y SIGA TODAS LAS
ADVERTENCIAS DE SEGURIDAD
impresas en los diferentes manuales
de accesorios.
12
GUARDE ESTAS INSTRUCCIONES
OPERACIÓN
CARGUE LA BATERÍA ANTES DEL
USO: La batería no viene totalmente
cargada cuando se la compra. Antes
de usar la unidad, se debe cargar la
batería. Antes de cargar la batería, lea
las instrucciones de seguridad y de
carga.
EL TIEMPO DE FUNCIONAMIENTO
Y EL RENDIMIENTO CORRECTOS
sólo se pueden obtener con una
batería cargada en su totalidad.
Figura 1
3. Cargue la batería durante por lo
menos 1 hora.
4. El diodo electroluminiscente (LED)
encenderá la luz roja cuando la batería
esté cargando y se encenderá en
verde cuando ya esté lista para usar.
Si el LED no se enciende cuando
el mango se coloca en el soporte
del cargador, inspecciónelo para
asegurarse de que haya un contacto
correcto entre el mango y la base del
cargador.
TIEMPO DE CARGA: Una carga
de aproximadamente 1 hora es
suficiente para recargar la batería
en su carga completa. El uso inicial,
largos períodos de inactividad o su
almacenamiento en temperaturas
extremas pueden requerir un tiempo
de carga extendido.
MÉNSULA PARA CARGA DE
PARED: Antes de cargar la unidad,
asegúrese de que la ménsula para
carga esté fijada firmemente a la
pared. Sujétela con tornillos a un
pasador de pared. NO se recomienda
el uso de tirantes para tableros de
pared.
5. Se proporciona un segundo
compartimento de carga en el soporte
de carga para cargar una segunda
batería (no incluida). Para cargar
una batería en este compartimento,
inserte la batería hasta que se encaje
en su lugar y se encienda el LED.
(ver figura 2) El LED encenderá la luz
roja cuando la batería esté cargando
y se encenderá en verde cuando ya
esté lista para usar. Cuando cargue
las dos baterías (una en el mango y
otra directamente en el cargador), el
cargador cargará la batería que se
inserte primero. Una vez que la batería
esté totalmente cargada, se apagará
automáticamente y comenzará a
cargarse la otra batería. Cada batería
tardará aproximadamente 1 hora en
cargarse (un total de 2 horas para
dos baterías). Tenga en cuenta que
si inserta una segunda batería en el
cargador mientras se está cargando
otra batería, el LED no se encenderá
hasta que la primera batería haya
Para cargar la batería:
1. Enchufe el cargador en un
tomacorriente de CA de 120 voltios.
2. Coloque el Mango de potencia con
la batería conectada a la ménsula para
carga de pared. No es necesario quitar
el accesorio de la herramienta cuando
se carga la batería. (ver figura 1)
13
cuando conecte y desconecte
herramientas.
completado su carga.
Para conectar una herramienta:
1. Gire el aro de seguridad en el
mango de potencia hasta la posición
de desbloqueo. (ver figura 3)
Figura 2
Observaciones sobre la carga:
PRECAUCIÓN: El cargador sólo se
puede usar con electricidad de 115 a
120 VCA de 60 ciclos.
Figura 3
2. Inserte el extremo macho de
la interfaz del mango de potencia
en el enchufe hembra que está
en el extremo del accesorio de la
herramienta y verifique que esté
asentado firmemente. (ver figura 4).
La interfaz está acuñada para que
sólo encaje de un modo. El mango y la
herramienta deben encajar fácilmente.
Si tiene problemas para ensamblarlas,
verifique que los pasadores del mango
estén alineados correctamente con las
ranuras de la herramienta.
La unidad del cargador enchufada en
el tomacorriente de CA generalmente
se calentará al tacto durante la carga.
El cargador controla automáticamente
la carga en cada batería y se apaga
cuando la carga está completa.
Las baterías se pueden dejar en el
cargador indefinidamente y no se
sobrecargarán.
Obtendrá una vida útil más prolongada
y un mejor rendimiento cuando cargue
la batería a una temperatura ambiente
normal.
La vida útil de la batería depende del
uso, de la temperatura y del tiempo de
almacenamiento.
CONEXIÓN DEL ACCESORIO DE
LA HERRAMIENTA AL MANGO DE
POTENCIA
Asegúrese de seguir las siguientes
precauciones de seguridad cuando
conecte y desconecte las herramientas
del mango de potencia.
Figura 4
3. Agarre el accesorio de la
herramienta firmemente con una mano
(no lo agarre de una parte giratoria
como el mango auxiliar) y gire el aro
de seguridad que está en el mango de
Retire la batería del mango antes de
conectar o desconectar herramientas.
Nunca toque los interruptores de
control en el mango de potencia
14
en el extremo del mango de potencia.
(ver figura 7)
potencia hasta la posición de bloqueo
con la otra mano. (ver figura 5)
Figura 5
Figura 7
Para desconectar una herramienta:
2. Inserte la batería completamente en
el mango y verifique que los botones
con resortes de cada lado del paquete
de batería encajen a presión en su
lugar en el mango.
1. Agarre el accesorio de la
herramienta firmemente con una mano
(no lo agarre de una parte giratoria
como el mango auxiliar) y gire el aro
de seguridad que está en el mango
de potencia hasta la posición de
desbloqueo con la otra mano. (ver
figura 6)
Retirar la batería
1. Presione los botones con resorte
en ambos lados de la batería
simultáneamente. (ver figura 8)
Figura 6
2. Desconecte el mango de potencia
y el accesorio de la herramienta. El
mango de potencia y el accesorio
de la herramienta se deben separar
fácilmente. Si no es así, controle
que el aro de seguridad esté
completamente en la posición de
desbloqueo.
Figura 8
2. Retire el paquete de la batería
directamente del mango.
Para encender la herramienta:
1. Agarre la empuñadura de control
firmemente con una mano y agarre
el mango auxiliar del accesorio de la
herramienta (si viene incluido) con la
otra mano.
Conectar la batería
1. Alinee el reborde del paquete de
batería con la ranura correspondiente
2. Empuje el gatillo sobre el que tiene
apoyado el pulgar hacia adelante. Éste
15
El mango de potencia se puede operar
en dos posiciones, normal e inversa,
dependiendo del trabajo que desea
hacer. Ambos gatillos se accionarán
como disparadores de seguridad e
interruptores de activación, por lo que
no es necesario torcer la mano cuando
se usa el mango de potencia en la
posición inversa. (ver figura 11)
es el disparador de seguridad. (ver
figura 9)
Figura 9
3. Mientras sostiene el interruptor
debajo del pulgar en la posición
delantera, use los dedos para levantar
el otro gatillo. (ver figura 10). Esto
activará la herramienta y le permitirá
hacer su trabajo. NO es necesario
seguir presionando el gatillo con el
pulgar después de que arrancó la
herramienta.
Figura 11
PROTECCIÓN CONTRA
SOBRECARGA
Tenga en cuenta que la herramienta
no arrancará si el aro de seguridad no
está completamente en la posición de
bloqueo.
Algunos accesorios de herramientas
incorporan dispositivos de protección
contra sobrecarga como fusibles
y disyuntores. Estos dispositivos
detienen el funcionamiento de la
herramienta si existe una condición de
sobrecarga. Consulte los manuales
separados de los accesorios de
herramientas para conocer las
instrucciones sobre estos dispositivos
de protección contra sobrecarga.
Consulte los manuales para conocer
las instrucciones específicas de cada
accesorio de la herramienta, las
precauciones y los consejos para usar
estas herramientas específicas.
Figura 10
Para apagar la herramienta:
MANTENIMIENTO
1. Suelte el gatillo que presiona con
los dedos y la herramienta se apagará.
El gatillo debajo del pulgar volverá
a la posición hacia atrás para evitar
que la herramienta vuelva a arrancar
accidentalmente.
Consulte los manuales de los
accesorios de las herramientas para
conocer su mantenimiento.
ADVERTENCIA: Retire siempre
la batería cuando realice el
mantenimiento del mango de potencia
16
químicas o cerca de ellos.
o de un accesorio de la herramienta
que esté conectado al mango de
potencia.
ACCESORIOS
ADVERTENCIA: Mantenga siempre
las manos alejadas de los gatillos
cuando realice el mantenimiento del
mango de potencia.
PIEZAS DE REPUESTO: Para
obtener resultados óptimos de corte
y la seguridad de un rendimiento
superior, se recomienda usar sólo las
hojas y la tanza de bordeadora que
sean repuestos de Sears Craftsman.
LUBRICACIÓN: No se requiere la
lubricación periódica de las piezas del
mango de potencia.
ADVERTENCIA: Utilice sólo
accesorios y piezas de repuesto de
Craftsman disponibles en Sears. El
uso de accesorios que no son de
Craftsman puede ser peligroso. Llame
al 1-800-366-PART.
LIMPIEZA DE PIEZAS DE
PLÁSTICO: Use sólo un cepillo en
seco o un paño con agua tibia y
jabón suave para limpiar las piezas
de plástico. Muchos limpiadores del
hogar contienen sustancias químicas,
que pueden dañar el plástico. Nunca
use gasolina, trementina, diluyente de
pintura o fluidos similares. Nunca rocíe
la herramienta con agua ni la sumerja
en agua. El contenido de agua o
líquido dentro de la herramienta
puede causar daños importantes en la
unidad.
RECICLADO DE BATERÍAS: Para
conservar los recursos naturales,
recicle o deseche las BATERÍAS DE
NÍQUEL-CADMIO (NiCd) de este
producto en forma adecuada. Las
leyes locales, estatales y federales
prohíben la eliminación de las
baterías NiCd en la basura común. El
fabricante participa en el programa
de reciclado de la Corporación de
Reciclado de Baterías Recargables
(RBRC). Hemos pagado un arancel
para que estas baterías se desechen
correctamente a través de un centro
de recolección de la RBRC (varias
tiendas minoristas también participan
en la RBRC). Llame al número gratuito
de la RBRC al (800) 822-8837 o visite
el sitio Web de la RBRC en www.
rbrc.com para encontrar un centro de
recolección cerca de su área.
CUANDO SE CAE LA UNIDAD: Si
se cayó la unidad, antes de volver a
usarla, revísela con cuidado para ver
si se produjeron daños. Llame a un
profesional para que repare la unidad
si se produjeron daños.
ALMACENAMIENTO
TEMPERATURA: Las temperaturas
extremas limitan la vida útil de la
batería. El mejor lugar para guardar
la unidad es un lugar fresco y seco.
Guarde la herramienta lejos de la
luz solar directa, de caños calientes,
hornos, etc. No la guarde en lugares
con temperaturas inferiores a +40 F (4
ºC) o superiores a +120 F (49 ºC).
PREVENIR LA CORROSIÓN:
Los fertilizantes y otras sustancias
químicas que se emplean en el jardín
contienen compuestos que aceleran
intensamente la corrosión de los
metales. No guarde la unidad encima
de fertilizantes y otras sustancias
SERVICIO
Si observa alguna condición que
pueda afectar el uso seguro o si
tiene alguna duda, comuníquese con
el número de servicio al cliente al:
1-800-539-6455
17
NEED MORE HELP?
You’ll find the answer and a more on managemyhome.com – for free!
Find this and all your other product manuals online.
Get answers from our team of home experts.
Get a personalized maintenance plan for your home.
Find information and tools to help with home projects.
18
Get it fixed, at your home or ours!
Your Home
For expert troubleshooting and home solutions advice:
www.managemyhome.com
For repair – in your home – of all major brand appliances,
lawn and garden equipment, or heating and cooling systems,
no matter who made it, no matter who sold it!
For the replacement parts, accessories and
owner’s manuals that you need to do-it-yourself.
For Sears professional installation of home appliances
and items like garage door openers and water heaters.
1-800-4-MY-HOME®
(1-800-469-4663)
www.sears.com
Call anytime, day or night
(U.S.A. and Canada)
www.sears.ca
Our Home
For repair of carry-in items like vacuums, lawn equipment,
and electronics, call anytime for the location of the nearest
Sears Parts & Repair Service Center
1-800-488-1222 (U.S.A.)
www.sears.com
1-800-469-4663 (Canada)
www.sears.ca
To purchase a protection agreement on a product serviced by Sears:
1-800-827-6655 (U.S.A.)
Para pedir servicio de reparación
a domicilio, y para ordenar piezas:
1-888-SU-HOGAR®
(1-888-784-6427)
1-800-361-6665 (Canada)
Au Canada pour service en français:
1-800-LE-FOYERMC
(1-800-533-6937)
www.sears.ca
© Sears Brands, LLC
® Registered Trademark / TM Trademark / SM Service Mark of Sears Brands, LLC
® Marca Registrada / TM Marca de Fábrica / SM Marca de Servicio de Sears Brands, LLC
MC
Marque de commerce / MD Marque déposée de Sears Brands, LLC
Operator’s Manual
Convertible Cordless
18V Sweeper Attachment
Model No. 71.74292
BEFORE returning
this product, first call:
(800) 539-6455
IMPORTANT OPERATING HINT:
When starting unit, first push the thumb switch forward and then squeeze
the control trigger. It is NOT necessary to keep the thumb switch pushed
forward during use.
CAUTION:
• Safety
Before using this product, read this manual and follow
• Assembly
all its Safety Rules and Operating Instructions.
• Operation
• Maintenance
• Español
• Français
Sears, Roebuck and Co., Hoffman Estates, IL 60179 U.S.A.
www.craftsman.com
rev. 040908
TABLE OF CONTENTS:
Warranty...................................................................................................... 2
Safety Instructions...................................................................................... 2
Operation.................................................................................................... 4
Maintenance................................................................................................ 6
Storage........................................................................................................ 6
Service........................................................................................................ 7
Español....................................................................................................... 8
Français..................................................................................................... 15
WARRANTY
Craftsman One Year Full Warranty
If this Craftsman product fails due to manufacturer’s defects within one
year from the date of purchase, return it to any Sears store or other
Craftsman outlet in the United States for free replacement.
This warranty applies for only 90 days if this product is ever used for
commercial or rental purposes.
This warranty gives you specific legal rights, and you may also have other
rights which vary from state to state.
Sears, Roebuck and Co., Hoffman Estates, IL 60179
READ ALL INSTRUCTIONS
defects or other reproductive harm.
Please wash hands after handling the
cord.
SAFETY INSTRUCTIONS
WARNING: Some dust created by
using power tools contains chemicals
known to the state of California to
cause cancer and birth defects or other
reproductive harm.
CRAFTSMAN CONVERTIBLE
CORDLESS 18V TOOL SYSTEM
This product is for use only with the
Craftsman Convertible Cordless 18V
Tool System. Do not use the tool
attachments with any other system
or power source, and do not use any
tool attachment on the power handle
that is not intended for use with this
system.
WARNING TO CALIFORNIA
RESIDENTS: Handling the cord on
this units (or cords with accessories
sold for this product) will expose you
to lead, a chemical known to the State
of California to cause cancer, and birth
WARNING: When using this tool,
2
DON’T SET THE UNIT DOWN while
it is running – Be careful not to place
the unit down while on. This may clog
the air intake and damage the unit.
Debris such as gravel, sand, etc. may
also be picked up via the air intake
and propelled through the opening
causing serious injury to operator or
bystanders.
basic safety precautions should always
be followed to reduce the risk of fire,
electric shock, and personal injury,
including the following:
To reduce risk of injury:
Before any use, be sure everyone
using this electric product reads and
understands all safety and operation
instructions contained in this manual.
USE RIGHT TOOL - Do not use the
tool for any job except that for which it
is intended.
SAVE THESE INSTRUCTIONS and
review frequently prior to use. Store in
wall charger slot.
USE EXTRA CARE when using
sweeper on stairs.
AVOID DANGEROUS
ENVIRONMENTS and weather
conditions when using this tool.
DRESS PROPERLY - Do not wear
loose clothing or jewelry. They can
be caught in moving parts. Use of
gloves and substantial footwear is
recommended when working outdoors. Wear protective hair covering to
contain long hair.
DO NOT USE battery operated
appliance in the rain.
DO NOT ALLOW to be used as a toy.
Close attention is necessary when
used by or near children.
DON’T OVERREACH - Maintain
proper footing and balance at all times.
Use both hands to operate unit safely.
USE ONLY as described in this
manual.
KEEP HAIR, loose clothing, fingers,
and all parts of body away from
openings and moving parts.
IF SWEEPER IS NOT WORKING as it
should, has been dropped, damaged,
left outdoors, or dropped into water,
return it to a service center.
USE SAFETY GLASSES - Always
wear proper eye protection, and use a
face or dust mask if operation is dusty.
KEEP CHILDREN AWAY - All visitors
should be kept at a safe distance from
work area.
MAINTAIN UNIT WITH CARE - Keep
the unit clean for best performance
and to reduce the risk of injury. Follow
instructions for service. Keep handles
dry, clean, and free from oil and
grease.
STORE IDLE UNIT INDOORS - When
not in use, the unit should be stored
indoors in a dry location – out of reach
of children.
NEVER PLACE OBJECTS into the
blower tubes; be sure to direct debris
away from bystanders, animals, glass,
and other solid objects that may allow
debris to ricochet which may break
glass, hurt people or animals, or cause
other damage.
AVOID UNINTENTIONAL STARTING
- Don’t carry the appliance while
holding the switch area. The unit is
shipped partly charged, and may start
inadvertently if not handled properly.
CHECK DAMAGED PARTS - If
any component of the appliance
experiences a hard impact, check that
no parts were damaged and verify that
the unit operates properly. Check for
misalignment or bending of moving
DO NOT PUT any object into
openings. Do not use with opening
blocked; keep free of dust, lint, hair,
and anything that may reduce air flow.
3
parts, breakage of parts, and any other
condition that may affect operation.
A part that is damaged should be
properly repaired or re-placed by an
authorized service center.
STAY ALERT - Watch what you are
doing. Use common sense. Do not
operate the tool when you are tired.
Store these instructions by folding in
half and sliding into the slot in the back
of the wall charging rack.
Figure 1
2. Insert the male end of the power
handle interface into the female socket
in the end of the tool attachment
making sure that it is firmly seated.
(see figure 2) The interface is keyed
so that it will only go together one
way. The handle and tool should go
together easily. If you experience
resistance in putting them together,
check that the keys on the handle are
properly aligned with the slots in the
tool.
FOR HOUSEHOLD USE ONLY.
SAVE THESE INSTRUCTIONS
OPERATION
ATTACHING THE SWEEPER TUBE
Before using, slide the sweeper tube
onto the main housing until the buttons
on both sides of the housing snap into
the corresponding openings in the
tube.
CONNECTING TOOL ATTACHMENT
TO THE POWER HANDLE
Be sure to follow the following safety
precautions when attaching and
detaching tools from the power handle.
Remove the battery from the handle
before attaching or detaching tools.
Never touch the control switches on
the power handle when attaching and
detaching tools.
Figure 2
3. Grasp the tool attachment firmly
with one hand (note, do not grasp on
a rotating part such as the auxiliary
handle), and twist the lock ring on the
power handle to the locked position
with the other hand. (see figure 3)
To attach a tool:
1. Twist the lock ring on the power
handle to the unlocked position. (see
figure 1)
4
Figure 3
Figure 5
2. Insert the battery fully into the
handle making sure that the springloaded buttons on each side of the
battery pack snap into place in the
handle.
To detach a tool:
1. Grasp the tool attachment firmly
with one hand (note, do not grasp on
a rotating part such as the auxiliary
handle), and twist the lock ring on the
power handle to the unlocked position
with the other hand. (see figure 4)
Removing the Battery
1. Depress the spring-loaded
buttons on both sides of the battery
simultaneously. (see figure 6)
Figure 4
Figure 6
2. Pull the power handle and tool
attachment apart. The power handle
and tool attachment should separate
easily. If they do not, check to be
sure that the lock ring is in the fully
unlocked position.
2. Pull the battery pack straight out
from the handle.
To turn the tool on:
Attaching the Battery
1. Grip the control grip firmly with one
hand and grip the auxiliary handle on
the tool attachment (if provided) with
the other hand.
1. Align the rib on the battery pack with
the corresponding slot in the end of the
power handle. (see figure 5)
2. Push the trigger that your thumb
rests on straight forward, this is the
safety release. (see figure 7)
5
attachment in the wall bracket as
shown for convenient storage. (see
figure 9)
Figure 7
3. While holding the switch under your
thumb in the forward position, use your
fingers to pull upward on the control
trigger. (see figure 8) This will energize
the tool and allow you to do your work.
It is NOT necessary to keep pressure
on the thumb switch after the tool has
started.
WARNING: Always remove the battery
when performing any maintenance on
the sweeper attachment.
Please note that the tool will not start
if the lock ring is not in the fully locked
position.
WARNING: Always keep hands away
from the triggers when performing
maintenance on the sweeper.
Figure 9
MAINTENANCE
LUBRICATION - No periodic
lubrication of the sweeper attachment
is required.
CLEANING OF PLASTIC PARTS
- Use only a dry brush or a cloth
with warm water and mild soap to
clean plastic parts. Many household
cleaners contain chemicals which
could damage the plastic. Never use
gasoline, turpentine, paint thinner or
similar fluids. Never spray-wash tool
or immerse in water. Water or liquid
inside the tool can cause serious
damage to the unit.
Figure 8
To turn the tool off:
DROPPING THE UNIT - If you drop
the unit, carefully inspect it for any
damage before using it again. Have
the unit professionally repaired if
damage has occurred.
1. Release the control trigger and the
tool will turn off. The thumb switch will
return to the rear position to prevent
accidental re-starting of the tool.
STORAGE
WALL BRACKET
TEMPERATURE – Temperature
extremes limit the useful life of the
battery. The best storage place is one
that is cool and dry. Store the tool
Mount the wall bracket securely to
the wall; attach with screws to a wall
stud. The use of wall board anchors
is NOT recommended. Place the tool
6
away from direct sunlight, heating
pipes, furnaces, etc. Do not store
where temperatures go below +40 F or
above +120 F.
PREVENTING CORROSION Fertilizers and other garden chemicals
contain compounds that greatly
accelerate the corrosion of metals. Do
not store the appliance on or adjacent
to fertilizers or chemicals.
SERVICE
If you see any condition that may
affect safe operation, or if you have
any questions, contact our customer
service number at:
WARNING: Use only Craftsman
accessories and replacement parts
available from Sears. Use of nonCraftsman accessories could be
hazardous. Call 1-800-366-PART.
1-800-539-6455
BATTERY RECYCLING - To
preserve natural resources, please
recycle or dispose of this product’s
NICKEL-CADMIUM (NiCd) BATTERY
properly. Local, state and federal laws
prohibit disposal of NiCd batteries
in ordinary trash. The manufacturer
is a participant in the Rechargeable
Battery Recycling Corporation (RBRC)
recycling program. We have paid
a fee to allow for these batteries to
be properly disposed of via a RBRC
collection site (various retailers are
also RBRC participants). Please call
the RBRC toll free number at (800)
822-8837 or visit the RBRC web site
at www.rbrc.com to find a battery
collection center near you.
NEED MORE HELP?
You’ll find the answer and a more on managemyhome.com – for free!
Find this and all your other product manuals online.
Get answers from our team of home experts.
Get a personalized maintenance plan for your home.
Find information and tools to help with home projects.
7
ÍNDICE
Garantía...................................................................................................... 8
Instrucciones de seguridad......................................................................... 8
Operación.................................................................................................. 10
Mantenimiento........................................................................................... 13
Almacenamiento....................................................................................... 13
Servicio..................................................................................................... 14
Español....................................................................................................... 8
Français..................................................................................................... 15
GARANTÍA
Garantía de un año de Craftsman
Si este producto Craftsman falla debido a un defecto de fábrica dentro
del año de la fecha de compra, devuélvalo a cualquier tienda Sears u
otro centro de ventas de Craftsman en los Estados Unidos para que lo
reemplacen sin cargo.
Si este producto se utiliza para propósitos comerciales o para su alquiler,
esta garantía se aplicará sólo por 90 días.
Esta garantía le otorga derechos legales específicos y usted también
puede tener otros derechos dependiendo del estado donde reside.
Sears, Roebuck and Co., Hoffman Estates, IL 60179
LEA TODAS LAS INSTRUCCIONES
(o los cables con accesorios que se
venden para este producto), quedará
expuesto al plomo, una sustancia
química que en el Estado de California
se conoce como causante de cáncer y
defectos de nacimiento u otros daños
reproductivos. Lávese las manos
después de manipular el cable.
INSTRUCCIONES DE
SEGURIDAD IMPORTANTES
ADVERTENCIA: El polvo generado
por el uso de herramientas mecánicas
contiene sustancias químicas
que en el Estado de California se
conocen como causantes de cáncer y
defectos de nacimiento u otros daños
reproductivos.
SISTEMA DE HERRAMIENTAS
DE 18 VOLTIOS CRAFTSMAN
CONVERTIBLE CORDLESS
ADVERTENCIA PARA LOS
RESIDENTES DE CALIFORNIA: Al
manipular el cable de estos productos
Este producto es para usar sólo con
el sistema de 18 voltios Craftsman
Convertible Cordless. No utilice los
8
accesorios de las herramientas con
ningún otro sistema ni fuente de
alimentación ni los utilice en un mango
de potencia que no esté diseñado
para el uso con este sistema.
GUARDE LA UNIDAD INACTIVA
BAJO TECHO: Cuando la unidad
no está en uso, debe permanecer
guardada bajo techo en un lugar seco,
y lejos del alcance de los niños.
ADVERTENCIA: Cuando use esta
herramienta, se deben seguir las
precauciones básicas de seguridad
para reducir el riesgo de incendios,
descargas eléctricas y lesiones
personales, entre las que se incluyen
las siguientes.
NUNCA COLOQUE OBJETOS
adentro de los tubos sopladores. Dirija
los residuos alejados de transeúntes,
animales, vidrios u otros objetos
sólidos que puedan rebotar y, por
tanto, romper vidrios, lastimar a
personas o animales o provocar otros
daños.
Para educir el riesgo de lesiones:
NO COLOQUE ningún objeto en las
aberturas. No use la barredora con la
abertura obstruida. Manténgala libre
de pelusa, cabello y cualquier cosa
que pueda reducir el flujo de aire.
Antes de usar la herramienta,
asegúrese de que todas las
personas que usarán este producto
eléctrico lean y entiendan todas las
instrucciones de seguridad y de uso
que contiene este manual.
NO APOYE LA UNIDAD EN EL
SUELO mientras está funcionando.
Tenga cuidado de no poner en el suelo
la unidad mientras está encendida. Si
lo hace puede atascar la entrada de
aire y dañar la unidad. Los residuos
como grava, arena, etc. también
pueden ser aspirados a través de la
entrada de aire y pueden salir con
fuerza a través de la abertura, lo que
producirá daños graves al operador o
a los transeúntes.
GUARDE ESTAS INSTRUCCIONES y
revíselas con frecuencia antes de usar
la herramienta. Guárdela en la ranura
del cargador de pared.
EVITE LAS CONDICIONES
CLIMÁTICAS y los ambientes
peligrosos cuando use esta
herramienta.
NO utilice el aparato a baterías bajo la
lluvia.
USE LA HERRAMIENTA
ADECUADA: No use la herramienta
para otras tareas que no sean aquellas
para las que fue diseñada.
NO PERMITA que se use el aparato
como un juguete. Se debe prestar
mucha atención cuando los niños usan
el aparato o cuando se usa cerca de
ellos.
TENGA SUMO CUIDADO cuando use
la barredora en escaleras.
ÚSELO SOLAMENTE como se
describe en este manual.
USE LA VESTIMENTA ADECUADA:
No use ropa suelta ni joyas porque
pueden quedar atrapadas en piezas
móviles. Cuando se trabaja en
exteriores, se recomienda el uso de
guantes y de calzado resistente. Use
un cobertor protector del cabello para
sostener el cabello largo.
SI LA BARREDORA NO FUNCIONA
como debería, si se cayó, se averió,
se dejó a la intemperie o si se cayó
en el agua, devuélvala a un centro de
servicio.
MANTENGA ALEJADOS A LOS
NIÑOS: Todos los visitantes deben
mantenerse a una distancia segura del
área de trabajo.
NO SE ACERQUE DEMASIADO:
Manténgase bien parado y con
equilibrio en todo momento. Use
9
ambas manos para manejar la unidad
de manera segura.
cargador de pared.
MANTENGA EL CABELLO, la ropa
suelta, los dedos y todas las partes del
cuerpo alejadas de las aberturas y de
las piezas móviles.
SÓLO PARA USO DOMÉSTICO
GUARDE ESTAS INSTRUCCIONES
OPERACIÓN
USE ANTEOJOS DE SEGURIDAD:
Use siempre protección para los ojos
y una máscara para el rostro o una
máscara contra el polvo si opera
herramientas que producen polvo.
CONEXIÓN DEL TUBO DE LA
BARREDORA
Antes de usar, deslice el tubo de la
barredora en el alojamiento principal
hasta que los botones de ambos lados
del alojamiento encajen a presión en
las correspondientes aberturas del
tubo.
MANTENGA LA UNIDAD
ADECUADAMENTE: Conserve la
unidad limpia para que funcione
mejor y para reducir el riesgo de
lesiones. Siga las instrucciones de
mantenimiento. Conserve los mangos
secos, limpios y libres de aceite y
grasa.
CONEXIÓN DEL ACCESORIO DE
LA HERRAMIENTA AL MANGO DE
POTENCIA
ARRANQUE NO INTENCIONAL: No
sostenga el aparato desde el área del
interruptor cuando lo transporta. La
unidad se envía parcialmente cargada
y puede arrancar desprevenidamente
si no se manipula correctamente.
Asegúrese de seguir las siguientes
precauciones de seguridad cuando
conecte y desconecte las herramientas
del mango de potencia.
Retire la batería del mango antes de
conectar o desconectar herramientas.
CONTROLE QUE NO HAYA
PIEZAS DAÑADAS: Si cualquier
componente del aparato sufre
un impacto fuerte, revise que no se
hayan dañado piezas y verifique que
la unidad funcione correctamente.
Revise que no haya piezas móviles
mal alineadas o dobladas, que no
se hayan quebrado piezas y que no
exista ningún otro problema que pueda
afectar el funcionamiento del producto.
Toda pieza dañada debe ser reparada
o reemplazada debidamente por un
centro de servicio técnico autorizado.
Nunca toque los interruptores de
control en el mango de potencia
cuando conecte y desconecte
herramientas.
Para conectar una herramienta:
1. Gire el aro de seguridad en el
mango de potencia hasta la posición
de desbloqueo. (ver figura 1)
ESTÉ ALERTA: Preste atención a
lo que está haciendo. Use el sentido
común. No use la herramienta si está
cansado.
Guarde estas instrucciones
doblándolas por la mitad y
deslizándolas por la ranura que está
en la parte trasera del soporte del
Figura 1
10
Para desconectar una herramienta:
2. Inserte el extremo macho de
la interfaz del mango de potencia
en el enchufe hembra que está
en el extremo del accesorio de la
herramienta y verifique que esté
asentado firmemente. (ver figura 2).
1. Agarre el accesorio de la
herramienta firmemente con una mano
(no lo agarre de una parte giratoria
como el mango auxiliar) y gire el aro
de seguridad que está en el mango
de potencia hasta la posición de
desbloqueo con la otra mano. (ver
figura 4)
Figura 2
La interfaz está acuñada para que
sólo encaje de un modo. El mango y la
herramienta deben encajar fácilmente.
Si tiene problemas para ensamblarlas,
verifique que los pasadores del mango
estén alineados correctamente con las
ranuras de la herramienta.
Figura 4
2. Desconecte el mango de potencia
y el accesorio de la herramienta. El
mango de potencia y el accesorio
de la herramienta se deben separar
fácilmente. Si no es así, controle
que el aro de seguridad esté
completamente en la posición de
desbloqueo.
3. Agarre el accesorio de la
herramienta firmemente con una mano
(no lo agarre de una parte giratoria
como el mango auxiliar) y gire el aro
de seguridad que está en el mango de
potencia hasta la posición de bloqueo
con la otra mano. (ver figura 3)
Conectar la batería
1. Alinee el reborde del paquete de
batería con la ranura correspondiente
en el extremo del mango de potencia.
(ver figura 5)
Figura 3
Figura 5
11
2. Inserte la batería completamente en
el mango y verifique que los botones
con resortes de cada lado del paquete
de batería encajen a presión en su
lugar en el mango.
3. Mientras sostiene el interruptor
debajo del pulgar en la posición
delantera, use los dedos para levantar
el otro gatillo. (ver figura 8). Esto
activará la herramienta y le permitirá
hacer su trabajo. NO es necesario
seguir presionando el gatillo con el
pulgar después de que arrancó la
herramienta.
Retirar la batería
1. Presione los botones con resorte
en ambos lados de la batería
simultáneamente. (ver figura 6)
Figura 8
2. Retire el paquete de la batería
directamente del mango.
Tenga en cuenta que la herramienta
no arrancará si el aro de seguridad no
está completamente en la posición de
bloqueo.
Para encender la herramienta:
Para apagar la herramienta:
Figura 6
1. Agarre la empuñadura de control
firmemente con una mano y agarre
el mango auxiliar del accesorio de la
herramienta (si viene incluido) con la
otra mano.
1. Suelte el gatillo que presiona con
los dedos y la herramienta se apagará.
El gatillo debajo del pulgar volverá
a la posición hacia atrás para evitar
que la herramienta vuelva a arrancar
accidentalmente.
2. Empuje el gatillo sobre el que tiene
apoyado el pulgar hacia adelante. Éste
es el disparador de seguridad. (ver
figura 7)
MÉNSULA DE PARED
Monte la ménsula de pared firmemente
a la pared y conéctela con tornillos
a un pasador. NO se recomienda
el uso de tirantes para tableros de
pared. Coloque el accesorio de la
herramienta en la ménsula de pared
como se muestra en la figura para un
práctico almacenamiento. (ver figura 9)
Figura 7
12
ALMACENAMIENTO
TEMPERATURA: Las temperaturas
extremas limitan la vida útil de la
batería. El mejor lugar para guardar
la unidad es un lugar fresco y seco.
Guarde la herramienta lejos de la
luz solar directa, de caños calientes,
hornos, etc. No la guarde en lugares
con temperaturas inferiores a +40 F (4
ºC) o superiores a +120 F (49 ºC).
PREVENIR LA CORROSIÓN:
Los fertilizantes y otras sustancias
químicas que se emplean en el jardín
contienen compuestos que aceleran
intensamente la corrosión de los
metales. No guarde la unidad encima
de fertilizantes y otras sustancias
químicas o cerca de ellos.
Figura 9
MANTENIMIENTO
ADVERTENCIA: Siempre retire
la batería cuando realice el
mantenimiento del accesorio
barredora.
ADVERTENCIA: Mantenga siempre
las manos alejadas de los gatillos
cuando realice el mantenimiento de la
barredora.
ADVERTENCIA: Utilice sólo
accesorios y piezas de repuesto de
Craftsman disponibles en Sears. El
uso de accesorios que no son de
Craftsman puede ser peligroso. Llame
al 1-800-366-PART.
LUBRICACIÓN: No se requiere la
lubricación periódica del accesorio
barredora.
RECICLADO DE BATERÍAS: Para
conservar los recursos naturales,
recicle o deseche las BATERÍAS DE
NÍQUEL-CADMIO (NiCd) de este
producto en forma adecuada. Las
leyes locales, estatales y federales
prohíben la eliminación de las
baterías NiCd en la basura común. El
fabricante participa en el programa
de reciclado de la Corporación de
Reciclado de Baterías Recargables
(RBRC). Hemos pagado un arancel
para que estas baterías se desechen
correctamente a través de un centro
de recolección de la RBRC (varias
tiendas minoristas también participan
en la RBRC). Llame al número gratuito
de la RBRC al (800) 822-8837 o visite
el sitio Web de la RBRC en www.
rbrc.com para encontrar un centro de
recolección cerca de su área.
LIMPIEZA DE PIEZAS DE
PLÁSTICO: Use sólo un cepillo en
seco o un paño con agua tibia y
jabón suave para limpiar las piezas
de plástico. Muchos limpiadores del
hogar contienen sustancias químicas,
que pueden dañar el plástico. Nunca
use gasolina, trementina, diluyente de
pintura o fluidos similares. Nunca rocíe
la herramienta con agua ni la sumerja
en agua. El contenido de agua o
líquido dentro de la herramienta
puede causar daños importantes en la
unidad.
CUANDO SE CAE LA UNIDAD: Si
se cayó la unidad, antes de volver a
usarla, revísela con cuidado para ver
si se produjeron daños. Llame a un
profesional para que repare la unidad
si se produjeron daños.
13
SERVICIO
Si observa alguna condición que
pueda afectar el uso seguro o si tiene
alguna duda, comuníquese con el
número de servicio al cliente al:
1-800-539-6455
NEED MORE HELP?
You’ll find the answer and a more on managemyhome.com – for free!
Find this and all your other product manuals online.
Get answers from our team of home experts.
Get a personalized maintenance plan for your home.
Find information and tools to help with home projects.
14
Get it fixed, at your home or ours!
Your Home
For expert troubleshooting and home solutions advice:
www.managemyhome.com
For repair – in your home – of all major brand appliances,
lawn and garden equipment, or heating and cooling systems,
no matter who made it, no matter who sold it!
For the replacement parts, accessories and
owner’s manuals that you need to do-it-yourself.
For Sears professional installation of home appliances
and items like garage door openers and water heaters.
1-800-4-MY-HOME®
(1-800-469-4663)
www.sears.com
Call anytime, day or night
(U.S.A. and Canada)
www.sears.ca
Our Home
For repair of carry-in items like vacuums, lawn equipment,
and electronics, call anytime for the location of the nearest
Sears Parts & Repair Service Center
1-800-488-1222 (U.S.A.)
www.sears.com
1-800-469-4663 (Canada)
www.sears.ca
To purchase a protection agreement on a product serviced by Sears:
1-800-827-6655 (U.S.A.)
Para pedir servicio de reparación
a domicilio, y para ordenar piezas:
1-888-SU-HOGAR®
(1-888-784-6427)
1-800-361-6665 (Canada)
Au Canada pour service en français:
1-800-LE-FOYERMC
(1-800-533-6937)
www.sears.ca
© Sears Brands, LLC
® Registered Trademark / TM Trademark / SM Service Mark of Sears Brands, LLC
® Marca Registrada / TM Marca de Fábrica / SM Marca de Servicio de Sears Brands, LLC
MC
Marque de commerce / MD Marque déposée de Sears Brands, LLC