1
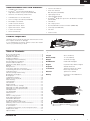
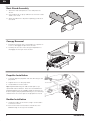
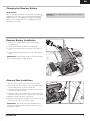
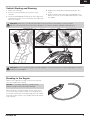
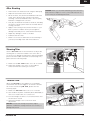
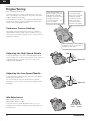
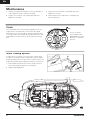
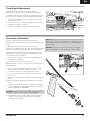
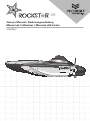
48
Owners Manual • Bedienungsanleitung
Manuel de l'utilisateur • Manuale dell'utente
PRB09000
EN
NOTICE
All instructions, warranties and other collateral documents are subject to change at the sole discretion of Horizon Hobby, LLC. For up-to-date
product literature, visit http://www.horizonhobby.com and click on the support tab for this product.
Meaning of Special Language
The following terms are used throughout the product literature to indicate various levels of potential harm when operating this product:
NOTICE: Procedures, which if not properly followed, create a possibility of physical property damage AND little or no possibility of injury.
CAUTION: Procedures, which if not properly followed, create the probability of physical property damage AND a possibility
of serious injury.
WARNING: Procedures, which if not properly followed, create the probability of property damage, collateral damage, and serious
injury OR create a high probability of superficial injury.
WARNING: Read the ENTIRE instruction manual to become familiar with the features of the product before operating.
Failure to operate the product correctly can result in damage to the product, personal property and cause serious injury.
Age Recommendation: Not for children under 14 years. This is not a toy.
This is a sophisticated hobby product and NOT a toy. It must be operated with caution and common sense and requires some
basic mechanical ability. Failure to operate this Product in a safe and responsible manner could result in injury or damage to the
product or other property. This product is not intended for use by children without direct adult supervision. Do not use with incompatible components or alter this product in any way outside of the instructions provided by Horizon Hobby, LLC. This manual
contains instructions for safety, operation and maintenance. It is essential to read and follow all the instructions and warnings in
the manual, prior to assembly, setup or use, in order to operate correctly and avoid damage or serious injury.
Safety Precautions and Warnings
As the user of this product, you are solely responsible for
operating in a manner that does not endanger yourself
and others or result in damage to the product or the
property of others.
•
•
•
When handling and/or transporting your boat, always
pick up the boat from the front, keeping all moving
parts pointed away from you.
Always keep a safe distance in all directions around
your model to avoid collisions or injury. This model
is controlled by a radio signal subject to interference
from many sources outside your control. Interference
can cause momentary loss of control.
•
Always carefully follow the directions and warnings
for this and any optional support equipment (chargers,
rechargeable battery packs, etc.).
•
Always keep all chemicals, small parts and anything
electrical out of the reach of children.
•
Always avoid water exposure to all equipment not
specifically designed and protected for this purpose.
Moisture causes damage to unprotected electronics.
•
Never place any portion of the model in your mouth
as it could cause serious injury or even death.
•
Never operate your model with low transmitter
batteries.
Always operate your model in open spaces away from
full-size vehicles, traffic and people.
Introduction
Pro Boat® RC models look as good as they perform. Our boats, which include everything from scale sailboats to
fully licensed powerboats, exceed expectations and provide years of radio control fun and excitement. Whether your
passion leads you towards the pure serenity of sailing or the all-out speed of a Deep-V, Pro Boat models fit your taste,
budget and lifestyle. You can count on us to be available any time you need help—the brand is backed by Horizon
Hobby, one of the world’s largest distributors of hobby-grade RC products. The Pro Boat brand will help you turn your
boating passion into a reality, whether you’re new to the hobby or an old pro.
Please read this manual for operation and maintenance instructions.
Register your boat online at www.proboatmodels.com.
2
RockStar 48
EN
Recommended Tools and Materials
•
•
•
Sealable Fuel Container
Evolution® 2-Cycle Oil (EVOX1001Q) or
High Performance 2-Cycle Oil (DYNE4100)
Gasoline (+87 Octane), Ethanol-free
•
•
•
•
•
•
•
•
4 AA batteries for the transmitter
3-in-1 Tuning Screwdriver (DYN3048)
#1 Phillips Screwdriver
Small Crescent Wrench
Open-end wrench: 8mm
Open-end wrench: 10mm
1.5mm Hex Wrench
2mm Hex Wrench
•
•
2.5mm Hex Wrench
4mm Hex Wrench
Ball link pliers (RV01005)
•
•
•
Spark plug wrench
Spark plug gap gauge
Dynamite® Prophet™ Sport LiPo AC Balance Charger
(DYNC2005)
Threadlock
CA or Epoxy Glue
Pro Boat® Marine Grease and Gun (PRB0100)
Clear tape (DYNM0102)
Car Wax
Clean Towels
•
•
•
•
•
•
Product Inspection
Carefully remove the boat and radio transmitter from the
box. Inspect the boat for damage.
If you find damage is present, please contact the retailer
where you purchased your boat.
Table of Contents
Boat Stand Assembly ...................................................... 4
Canopy Removal .............................................................. 4
Propeller Installation ........................................................ 4
Rudder Installatiton ......................................................... 4
Charging the Receiver Battery......................................... 5
Receiver Battery Installation ............................................ 5
Antenna Tube Installation................................................. 5
Spektrum DX2E Radio System ........................................ 6
Binding ........................................................................... 7
Range Check ................................................................... 7
Fuel Safety and Use Instructions..................................... 8
Fuel Mixing Precautions and Guidelines ......................... 8
Fueling the Boat .............................................................. 8
Vehicle Starting and Running........................................... 9
Breaking in the Engine .................................................... 9
Boating Tips ....................................................................10
Stopping the Engine .......................................................10
When you are Finished...................................................10
After Boating...................................................................11
Steering Trim ...................................................................11
Throttle Trim ....................................................................11
Engine Tuning ................................................................ 12
Carburetor Factory Settings ......................................... 12
Adjusting the High Speed Needle ................................ 12
Adjusting the Low Speed Needle ................................ 12
Idle Adjustment ............................................................ 12
Flooded Engine ............................................................. 13
Maintenance .................................................................. 14
Clutch............................................................................. 14
Water Cooling System ................................................... 14
Prop Angle Adjustment ................................................. 15
Drivetrain Lubrication..................................................... 15
Troubleshooting Guide ................................................... 16
Engine Troubleshooting Guide ........................................17
Warranty and Service Contact Information ................... 19
FCC Information ............................................................ 20
IC Information ................................................................ 20
Compliance Information for the European Union .......... 20
Replacement Parts ........................................................ 77
Optional Parts ................................................................ 77
RockStar 48
Specifications
Length
48 in (1219mm)
Beam (width)
17.3 in (440mm)
Weight
20.15 lb (9.14 kg)
Hull Material
Hand Laid Fiberglass
Engine
Dynamite 26cc Marine Engine
Propeller
Transmitter
2-blade aluminum
Spektrum DX2E V3 2.4GHz
Pistol Grip Transmitter
Spektrum™ SR410
Receiver
Battery
Dynamite 7.4V 5200mAh 2S
15C Li-Po
17.3 in
(440mm)
48 in (1219mm)
3
EN
Boat Stand Assembly
1. Attach the side stand pieces to the end pieces as
shown.
2. Use medium CA or epoxy adhesive to secure the side
stand to the ends.
3. Allow the adhesive to dry before placing your boat on
the stand.
Canopy Removal
1. Push down and turn the 2 knurled pins one quarter of
a turn to disengage the pins from the hull.
2. Carefully lift the rear of the canopy and pull back to
disengage the front pin from the hull.
Propeller Installation
1. Correctly align the propeller with the drive dog on the
prop shaft.
2. Tighten the nut on the prop shaft.
3. Disassemble in reverse order.
Tip: Propeller balancing can add several mph to top
speed and reduce vibration. There are several different
propeller balancing tools available. Read the instructions
that accompany the propeller balancing tool, as removing
material from the correct part of the propeller is crucial.
Rudder Installation
1. Install the rudder in the mount using 2 screws and 2
locknuts as shown.
2. Connect the tube from the back of the boat to the
barbed fitting on the top of the rudder.
4
RockStar 48
EN
Charging the Receiver Battery
Instructions
Choose a charger designed to charge the included 7.4V
5200mAh 2S 15C LiPo. We recommend the Dynamite®
Prophet Sport Li- Po AC Balance Charger (DYNC2005).
Refer to your charger manual for charging instructions
and safety information.
NOTICE: Never charge a battery in the boat or damage
may result.
Receiver Battery Installation
1. Remove the 2 clips and the lid from the battery
compartment.
2. Install the battery in the battery compartment.
3. Connect the battery EC3™ connector to the R.O.S.S
unit.
4. Install the lid on the box and secure the lid using the
clips.
IMPORTANT: After boating, always remove the battery
before transporting or storing the boat.
Antenna Tube Installation
1. Remove the 3 clips and the 2 lids from the boxes.
2. Remove the set screw using a 1.5mm hex driver and the
antenna tube from the side of the radio box.
3. Feed the antenna through the antenna mount and into
the antenna tube as shown.
4. Install the tube in the antenna mount, then secure the
tube with a 3mm set screw using a 1.5mm hex driver.
5. Replace the lids and clips on the boxes.
6. Guide the antenna tube through the hole in the canopy
and install the cap on the antenna tube.
IMPORTANT: The antenna must be installed above
the boat's waterline to get the best reception of your
transmitter's signal.
RockStar 48
5
EN
Spektrum DX2E Radio System
For more information on the transmitter, go to
www.spektrumrc.com and click on the support tab to find the
full manual for the DX2E transmitter.
3
1. Steering Wheel controls direction (left/right) of the model.
6
2. Throttle Trigger controls speed.
5
3. Antenna transmits the signal to the model.
4. ON/OFF Switch turns the power ON/OFF for the
transmitter.
5. Indicator Lights
4
7
•
Solid green light indicates adequate battery power.
•
Flashing green light indicates the battery voltage is
critically low. Replace batteries.
6. ST. Trim adjusts the “hands off” direction of the model.
8
1
2
7. TH. Trim adjusts the motor speed to idle at neutral.
8. Steering Dual Rate adjusts the amount the rudder moves
when the steering wheel is turned left and right.
9. BIND Button puts the transmitter into Bind Mode and
starts or stops the engine using R.O.S.S.
10. ST. REV reverses the function of the steering when the
wheel is turned left or right.
11. TH. REV reverses the function of the speed control when
pulled back or pushed forward.
Installing the Transmitter Batteries
9
10 11
1. Push in the battery
cover a small
amount to release
the retaining tab,
then remove the
cover.
2. Install 4 AA
batteries, taking
care to align
battery polarity to
the diagram in the
transmitter’s battery
case.
3. Carefully reinstall the battery cover by aligning the tabs
with the slots on the transmitter.
CAUTION: NEVER remove the transmitter batteries
while the vehicle is powered on, as loss of control,
property damage or injury may result.
6
RockStar 48
EN
Binding
Binding is the process of programming the receiver to
recognize the GUID (Globally Unique Identifier) code of a
single specific transmitter. The included transmitter and
receiver are bound at the factory. If you need to rebind,
follow the instructions below.
1. Ensure the transmitter and vehicle are both powered
OFF.
The receiver will keep the binding to the transmitter until
another binding is done.
If you encounter problems, obey binding instructions and
refer to the troubleshooting guide for other instructions. If
needed, contact the appropriate Horizon Product Support
office.
2. Remove the radio box cover and install the bind plug
in the BIND/battery port of the receiver. Power the
receiver through any other port.
NOTICE: Do not attempt to bind the transmitter and
receiver if there are other compatible transmitters in bind
mode within 400 feet. Doing so may result in unexpected
binding.
3. Power ON the vehicle. The receiver LED will blink
green.
Failsafe
4. Stand approximately 8–12 feet (2.4–3.7m) from the
vehicle. With the steering wheel and throttle trigger
in the failsafe positions (neutral), press and hold
the bind button and power ON the transmitter. The
transmitter's green LED will blink after 3 seconds,
indicating it is in bind mode.
5. Release the bind button when the green LED flashes.
Continue holding failsafe positions until the binding
process is complete.
6. The receiver LED will glow solid when the transmitter
and receiver are bound.
7. Power OFF the vehicle, then the transmitter.
8. Remove the bind plug and store it in a convenient
place.
9. Reinstall the radio box cover.
In the unlikely event that the radio connection is lost
during use, the receiver will drive the servos to their pre
programmed failsafe positions (normally no throttle and
straight steering).
If the receiver is powered on before powering on the
transmitter, the receiver will enter this failsafe mode.
When the transmitter is powered on, normal control is
resumed.
IMPORTANT: Failsafe activates only in the event
that signal is lost from the transmitter. Failsafe will
NOT activate in the event that receiver battery power
decreases below the recommended minimums or power
to the receiver is lost.
Range Check
IMPORTANT: Perform a range check at the beginning of
each boating session, after repair or after installation of
new batteries.
Ensure the receiver antenna is extended properly and all
batteries are fully charged.
1. With the radio system powered on and connected,
while the engine is off, walk away from your boat 90
feet (32 m).
2. Have an assistant remain with the boat to check for
proper control movement of the rudder and throttle
servos in response to your transmitter input.
3. If everything appears to be operating correctly, place
the boat in the water, start the engine, and increase
throttle to 1⁄3 throttle near the shore.
NOTICE: Do not operate the engine without water
cooling circulation or damage may result.
4. Check steering and throttle on the transmitter. While
the boat is moving forward, ensure water flows out of
the coolant outlets.
5. If the boat does not operate correctly, retrieve the boat
and perform repairs.
RockStar 48
7
EN
Fuel Safety and Use Instructions
•
•
•
•
•
•
•
•
Always observe all warnings, precautionary
statements and instructions supplied by the fuel
manufacturer/provider.
Fuel is a fire accelerant. Never operate your vehicle
near open flames. Never smoke while operating your
vehicle or while handling fuel.
Always only use a mixture of gasoline and two-cycle
oil for fuel. Do not use glow (nitro) fuel.
Always use caution when handling gasoline.
Always run your model engine in a well-ventilated
area. Model engines produce harmful carbon
monoxide fumes.
Always drain your engine after you have finished
running your vehicle. Do not store the vehicle with
fuel in the gas tank.
Never handle model engines and mufflers until they
have had time to cool. They become extremely hot
when in use.
Always store your fuel in a safe place well away from
sparks, heat or anything that can ignite.
•
•
•
•
•
•
•
Always ensure that gasoline and fuel are stored in a
clearly marked container well away from the reach of
children.
Always mix and store your fuel safely in a sealed,
water-resistant container specifically made for
gasoline.
Always store fuel in a cool, dry location. Do not
allow fuel containers to come in direct contact with
concrete, as the fuel may absorb moisture.
Always responsibly discard fuel if there is
condensation and/or water inside the fuel container.
Never allow fuel to come into contact with eyes
or mouth. Gasoline and other fuels used in model
engines are poisonous.
Never return unused fuel from the fuel tank back into
the fuel container.
Contact your local waste disposal authorities for more
information about discarding fuel waste responsibly.
Fuel Mixing Precautions and Guidelines
•
•
•
Only use gasoline mixed with two-cycle engine oil.
Only use pre-mix two-cycle engine oil. Do not use any
other kind of oil.
Always use 92–98 Octane RON (Europe) and 87–93
Octane AKI (US) gasoline.
Gasoline
2-Cycle Engine Oil
25 : 1
•
•
•
Always blend gasoline with two-cycle engine oil at a
25:1 ratio.
Never use a 40:1 or 32:1 gas-oil ratio.
Never use glow (nitro) fuel.
Gasoline
: 2-Cycle Engine Oil
1 gallon
: 5.1 fl oz
1/2 gallon
: 2.6 fl oz
1/4 gallon
: 1.3 fl oz
4 liters
: 160 ml
2 liters
: 80 ml
1 liter
: 40 ml
Fueling the Boat
Remove the fuel tank cap and fill the fuel tank. Tighten
the fuel tank cap securely back in place.
8
RockStar 48
EN
Vehicle Starting and Running
1. Remove the canopy.
2. Power on your transmitter, then power on the
receiver.
3. Press the priming bulb several times until it becomes
filled with fuel. This is not necessary if the engine has
been run recently.
4. Replace the canopy before placing the boat in the
water.
5. With the boat in the water, press the Bind/R.O.S.S
button on the top of the included transmitter to start
the engine.
CAUTION: Make sure you understand all engine instructions before attempting to start the engine.
Failure to follow all instructions can lead to damage to your vehicle, property damage and bodily injury.
CAUTION: Always keep all body parts, hair and dangling or loose items away from a spinning propeller, as these
could become entangled.
Breaking in the Engine
Break in the engine by running slowly for the first half
tank of fuel (about 25 minutes).
NOTICE: Do not adjust carburetor settings during
break-in. Doing so will cause engine damage.
When the boat is moving forward, ensure water flows
out of the coolant outlets. If water is not flowing out of
the coolant outlets remove any blockage from the rudder
inlet and coolant system or the engine and tuned muffler
may overheat.
RockStar 48
9
EN
Boating Tips
Avoid boating near other watercraft, stationary objects,
waves, wakes and other rapidly moving water, wildlife,
floating debris or overhanging trees. You should also be
careful to avoid boating in areas where there are many
people, such as swimming areas, park waterways or
fishing areas. Consult local laws and ordinances before
choosing a location to pilot your boat.
When making turns, decrease the throttle to reduce the
probability of flipping the boat over.
Maximum speeds are only achieved when the water
conditions are smooth and there is little wind. A sharp
turn, wind or waves can turn over a boat when it is
moving quickly. Always pilot your boat for the wind and
water conditions so that the boat does not turn over.
NOTICE: When running at full speed in choppy waters,
the prop may exit and re-enter the water repeatedly and
very quickly, subjecting the propeller and flex shaft to
some stress. Frequent stress may damage the propeller
and flex shaft.
When running your boat for the first time, we
recommend calm wind and water conditions so that
you can learn how the boat responds to your control.
CAUTION: Never operate your boat in extreme
temperatures or turbulent water.
Never operate your boat in less than 12 inches (30.5 cm)
of water.
If you need to retrieve your boat from the water, use
fishing equipment or another boat.
CAUTION: Never attempt to retrieve a downed
boat by swimming.
Stopping the Engine
Any time you want to stop the engine, especially if there
is a problem with the engine, stop the engine by pressing
the Bind/ R.O.S.S button on the transmitter or the Stop
switch on the hull.
CAUTION: Do not touch the engine and muffler.
They become extremely hot during operation and
can cause injury or fire.
When you are Finished
1. Power off the receiver.
2. Power off the transmitter.
3. Disconnect and remove the battery from the boat.
CAUTION: Never power off the transmitter or
receiver before stopping the engine. You will lose
control of your vehicle.
Tip: Always remove the canopy before storage or
moisture may allow mold and mildew to grow in the boat.
10
RockStar 48
EN
After Boating
•
Drain water from inside the hull using the drain plug
•
Wipe exhaust residue from the boat
•
Rinse the deck, hull, and metal hardware with fresh
water, then dry them with a clean towel. After
cleaning, coat metal hardware with a silicone spray
lubricant to help prevent corrosion
•
Fully dry the inside and outside of the boat, including
the water cooling system. Remove the hatch before
storing your boat
•
Apply a wax coating for automotive finishes to your
boat to prevent oxidation and to protect against
damage caused by fuel or other harmful chemicals
•
Repair any damage or wear to the boat
•
Lubricate the flex shaft
•
Make note of lessons learned from the trimming of
your boat, including water and wind conditions
NOTICE: When you are finished boating, never leave the
boat in direct sunlight or in a hot, enclosed area such as
a car. Doing so can damage the boat.
Steering Trim
Use the ST. Trim knob on the transmitter to adjust the
steering trim to center the rudder. If the servo arm is
not close to its desired neutral position after the binding
process and the rudder cannot be centered using trim,
please take the following steps:
1. Make sure the ST. Trim knob is set to "0" or neutral.
2. Adjust the linkage to the servo so the rudder is
centered when the steering is at neutral.
Throttle Trim
Adjust the TH. Trim so the carburetor is completely
closed when the throttle trigger is at neutral. If throttle
can not be closed using TH. Trim, please take the
following steps:
1. Make sure TH. Trim knob is set to "0" or neutral.
2. Use needle-nose pliers or ball link pliers (RVO1005) to
remove or install a link on a control horn.
3. Turn the linkage clockwise or counterclockwise until
the throttle is closed.
4. Attach the linkage to the control horn after
adjustment.
NOTICE: Throttle trim change may affect engine
operation. Carburetor settings must be set correctly or
damage may result.
RockStar 48
11
EN
Engine Tuning
Before making adjustments:
• Ensure there are no leaks or obstructions in the fuel
tank, fuel tubing or the carburetor. Any faults can affect
engine operation and tuning.
• The carburetor needle is very sensitive. Adjusting the
needle even 1/16 of a turn is a significant change. Be
careful when making adjustments.
High-Speed Needle (on
the left side). Close the
high-speed needle by
turning it clockwise until
it stops, then turn it
counterclockwise 1 1/2
turns out (open).
Low-Speed Needle
(on the right side).
Close the low-speed
needle by turning
it clockwise until it
stops, then turn it
counterclockwise 1
1/4 turns out (open).
Carburetor Factory Settings
The engine can be tuned from the factory settings to
optimize performance under various conditions. If you
lose track of the engine settings, return to these factory
carburetor settings.
Idle Screw (below the needles).
Center the screw so the slot is
straight up and down.
Adjusting the High Speed Needle
1/16
If the top speed is slow, turn in the high-speed needle
1/16 turn and test. Do not exceed 1/4 turn in from factory
setting (minimum 1 1/4 turn out from closed) or the
engine will be damaged.
Max 1/4
Adjusting the Low Speed Needle
If the vehicle accelerates slowly, turn in the low-speed
needle 1/16 turn and test.
1/16
Do not exceed 1/4 turn in from the factory setting
(minimum 1 turn out from closed) or the engine will be
damaged.
Max 1/4
Idle Adjustment
RPM Lower (Arrow to left)
RPM Higher (Arrow to right)
If the idle is set too high (propeller turns) or too low
(engine does not stay running), adjust the idle speed on
the carburetor.
12
RPM
Lower
RPM
Higher
RockStar 48
EN
Spark Plug Test
CAUTION: Before testing the spark plug, clean up
spilled fuel and close fuel containers. Failure to do
can result in injury, fire or damage.
0.6–0.7mm
0.24–0.27 in
Remove the spark plug from the engine and attach the
plug wire and boot to the spark plug. Place the threaded
end of the spark plug against the muffler. Press the Bind/
R.O.S.S button to turn over the engine and ensure there
is a spark.
If there is no spark:
• Adjust the spark plug gap to 0.6–0.7mm (0.24–0.27 in)
• Install a new spark plug (LOSR5017)
CAUTION: Do not test the spark plug near the
spark plug hole or residual fuel may ignite.
Flooded Engine
The engine will not start if too much fuel is in the
cylinder. Excess fuel can be expelled by following the
steps below.
1. Disconnect and remove the spark plug.
2. Press and hold the R.O.S.S. button for two seconds.
3. Replace the spark plug and make sure the boot is
tightly secured.
NOTICE: Always clean up spilled fuel. Failure to do so
may result in injury or damage.
RockStar 48
13
EN
Maintenance
1. Inspect the engine and engine mounts for damage or
wear. Replace, clean or repair as needed.
3. Inspect the tuned muffler for damage and leaks.
Tighten the screws.
2. Inspect the condition of the spark plug and wire.
Replace as needed.
4. Clean and check the carburetor for leakage and
smooth operation.
Clutch
The centrifugal clutch automatically engages when the
engine rpm is increased. Be sure that the idle speed
adjustment is set low enough so that the propeller does
not rotate at idle. Periodically disassemble the clutch and
clean debris from the clutch shoes and the inner clutch
bell.
1mm
If worn to within
1mm, replace with
PRB292003. Note the
direction of operation
(arrows).
Water Cooling System
If water does not stream out of the water outlets while
the boat is moving forward, immediately stop the engine
and clean obstruction from the water cooling system. The
engine and muffler have separate circulation connections.
1. Disassemble and clean the water cooling system to
remove blockage and prevent overheating.
2. Replace damaged parts.
14
RockStar 48
EN
Prop Angle Adjustment
Raising the prop strut increases speed, but also
decreases steering response and increases cavitation.
Lowering the prop strut increases steering response, but
also increases steering sensitivity and decreases speed.
1. Remove 3 bolts and 3 nuts on the prop strut on the
bottom of the boat.
2. Slide the strut up or down to change the angle of the
propeller in relation to the hull.
3. Adjust as desired and tighten the nuts and bolts.
Drivetrain Lubrication
Always replace the drivetrain parts when they are
damaged or show visible wear or injury and damage may
result.
NOTICE: Running the boat in saltwater could cause some
parts to corrode. If you run the boat in saltwater, rinse it
thoroughly in freshwater after each use and lubricate the
drive system.
Lubricating the flex shaft is vital to the life of the
drivetrain. The lubricant also acts as a water seal, keeping
water from entering the hull through the stuffing tube.
NOTICE: Because of its corrosive effects, running RC
boats in saltwater is at the discretion of the modeler.
Lubricate the flex shaft and all moving parts after every
30 minutes of operation. Lubricate the prop shaft after
every 90 minutes of operation.
1. Remove 3 nuts and 3 screws from the prop strut on
the bottom of the boat.
2. Slide the strut down out of the mount.
Tip: Use paper or cloth to touch the flex shaft and other
lubricated parts.
3. Remove the flex shaft by sliding it out of the clutch,
the stuffing tube and the prop shaft. Mark or
otherwise note the flex shaft end in the clutch.
4. Loosen the set screw of the drive dog using a 2mm
hex driver.
5. Remove the nut, propeller and drive dog from the prop
shaft.
6. Remove the prop shaft and 2 bushings from the prop
strut.
7. Wipe lubricant and material from the shafts. Lubricate
the flex shaft, prop strut and prop shaft using marine
grease (PRB0101 or PRB0100).
NOTICE: Ensure the correct flex shaft end is inserted in
the clutch. Failure to do so may result in damage.
8. Assemble in reverse order. Tighten the drive dog set
screw on the flat spot on the prop shaft, applying
threadlock as needed.
RockStar 48
15
EN
Troubleshooting Guide
Problem
Possible Cause
Solution
Boat will not respond
to throttle but responds
to other controls
Throttle channel is reversed
Reverse throttle channel on transmitter
Extra noise or extra
vibration
Reduced run time or
boat underpowered
Boat will not Bind
(during binding) to
transmitter
Boat will not connect
(after binding) to
transmitter
Damaged propeller, shaft or engine
Replace damaged parts
Propeller is out of balance
Balance or replace propeller
Receiver battery charge is low
Completely recharge battery
Receiver battery is damaged
Replace battery and follow battery instructions
Blocking or friction on shaft or propeller
Boat conditions may be too cold
Battery capacity may be too low
for conditions
Disassemble, lubricate and correctly align parts
Make sure battery is warm before use
Drive dog is too close to the prop strut
Loosen drive dog and move out away from the
prop strut a small amount
Too little lubrication on flex shaft
Fully lubricate flex shaft
Vegetation or other obstacles block
the rudder or propeller
Transmitter is too near boat during
binding process
Boat or transmitter is too close to
large metal object, wireless source
or another transmitter
Receiver battery/Transmitter battery
charge is too low
Receiver switch is off
Transmitter is too near boat during
connecting process
Boat or transmitter is too close to
large metal object, wireless source
or another transmitter
Receiver battery/transmitter battery
charge is too low
Receiver switch is off
Remove vegetation or obstacles from rudder or
propeller
Move powered transmitter a few feet from boat,
disconnect and reconnect battery to boat
Boat tends to dive in the The boat hull is not completely closed
water or takes on water
Prop angle is incorrect
Boat tends to turn one
Rudder or rudder trim is not centered
direction
Rudder, linkage or servo damage
Rudder does not move
Servo wire is damaged or connections
are loose
Transmitter is not bound correctly
Receiver switch is off
Controls reversed
Transmitter settings are reversed
Engine overheats
Blocked water cooling system
Erratic control
Transmitter is too near boat during
binding process
16
Replace battery or use a larger capacity battery
Move boat and transmitter to another location and
attempt binding again
Replace/recharge batteries
Power on Receiver switch
Move powered transmitter a few feet from boat,
disconnect and reconnect battery to boat
Move boat and transmitter to another location and
attempt connecting again
Replace/recharge batteries
Power on Receiver switch
Dry out the boat and ensure the hatch is fully
closed on the hull before returning the boat
to the water
Adjust prop angle
Repair rudder or adjust rudder and rudder trim
for straight running when control is at neutral
Replace or repair damaged parts and adjust controls
Do a check of wires and connections, connect
or replace as needed
Re-bind receiver to the transmitter
Power on receiver switch
Do the Control Direction Test and adjust controls
on transmitter appropriately
Clean or replace parts in the water cooling
system
Move powered transmitter a few feet from boat,
disconnect and reconnect battery to boat
RockStar 48
EN
Engine Troubleshooting Guide
Problem
Possible Cause
Solution
Out of fuel
Refill the tank and follow starting instructions
Wiring is disconnected or damaged
Receiver switch is off
Remove the spark plug. Hold R.O.S.S. button for 2
seconds. Replace and test
Mix fresh fuel per instructions
Repair or replace the spark plug
Check servo operation. Set it to neutral and reset
the linkage according to your radio and model
manufacturer's specifications
Return the carburetor to the factory settings and
retune if necessary
Check and replace the stop switch if necessary
Check the piston and cylinder for wear or damage
and replace if necessary
Connect wiring, repair or replace damaged parts
Power on receiver switch
Out of fuel
Refill the tank and follow starting instructions
Engine flooded
Fuel mixture is old or bad
Spark plug is not working
Throttle servo failed/Setup is wrong
Engine Does not Start
Carburetor is incorrectly adjusted
Engine stop switch is malfunctioning
Piston and cylinder is worn
Clutch or flex shaft cannot turn
Clutch is slipping or locked-up
Let the engine cool. Reset the carburetor to factory
settings and restart
Follow the instructions to increase idle speed
Return the carburetor to the factory settings and
retune if necessary
Repair or replace the clutch
Mix fresh fuel per instructions
Set the servo to neutral and reset the linkage
according to radio and model manufacturer's
specifications
Repair or replace damaged parts
Replace damaged parts
Clutch or flex shaft is damaged
Replace damaged parts
Engine may be overheated
Engine idle is too low
Carburetor is incorrectly adjusted
Engine starts then stalls
Clutch is slipping or locked-up
Fuel mixture is old or bad
Throttle servo is improperly set up
Engine is running, but
vehicle does not move
RockStar 48
17
EN
LIMITED WARRANTY
What this Warranty Covers
Horizon Hobby, LLC, (Horizon) warrants to the original
purchaser that the product purchased (the "Product") will
be free from defects in materials and workmanship at the
date of purchase.
What is Not Covered
This warranty is not transferable and does not cover
(i) cosmetic damage, (ii) damage due to acts of God,
accident, misuse, abuse, negligence, commercial
use, or due to improper use, installation, operation or
maintenance, (iii) modification of or to any part of the
Product, (iv) attempted service by anyone other than a
Horizon Hobby authorized service center, (v) Product
not purchased from an authorized Horizon dealer, or
(vi) Product not compliant with applicable technical
regulations.
OTHER THAN THE EXPRESS WARRANTY ABOVE,
HORIZON MAKES NO OTHER WARRANTY OR
REPRESENTATION, AND HEREBY DISCLAIMS ANY AND
ALL IMPLIED WARRANTIES, INCLUDING, WITHOUT
LIMITATION, THE IMPLIED WARRANTIES OF NONINFRINGEMENT, MERCHANTABILITY AND FITNESS
FOR A PARTICULAR PURPOSE. THE PURCHASER
ACKNOWLEDGES THAT THEY ALONE HAVE
DETERMINED THAT THE PRODUCT WILL SUITABLY
MEET THE REQUIREMENTS OF THE PURCHASER’S
INTENDED USE.
Purchaser’s Remedy
Horizon’s sole obligation and purchaser’s sole and
exclusive remedy shall be that Horizon will, at its option,
either (i) service, or (ii) replace, any Product determined
by Horizon to be defective. Horizon reserves the right
to inspect any and all Product(s) involved in a warranty
claim. Service or replacement decisions are at the sole
discretion of Horizon. Proof of purchase is required
for all warranty claims. SERVICE OR REPLACEMENT
AS PROVIDED UNDER THIS WARRANTY IS THE
PURCHASER’S SOLE AND EXCLUSIVE REMEDY.
Limitation of Liability
HORIZON SHALL NOT BE LIABLE FOR SPECIAL,
INDIRECT, INCIDENTAL OR CONSEQUENTIAL
DAMAGES, LOSS OF PROFITS OR PRODUCTION OR
COMMERCIAL LOSS IN ANY WAY, REGARDLESS OF
WHETHER SUCH CLAIM IS BASED IN CONTRACT,
WARRANTY, TORT, NEGLIGENCE, STRICT LIABILITY
OR ANY OTHER THEORY OF LIABILITY, EVEN IF
HORIZON HAS BEEN ADVISED OF THE POSSIBILITY
OF SUCH DAMAGES. Further, in no event shall the
liability of Horizon exceed the individual price of the
Product on which liability is asserted. As Horizon has no
control over use, setup, final assembly, modification or
misuse, no liability shall be assumed nor accepted for
any resulting damage or injury. By the act of use, setup
or assembly, the user accepts all resulting liability. If you
as the purchaser or user are not prepared to accept the
liability associated with the use of the Product, purchaser
is advised to return the Product immediately in new and
unused condition to the place of purchase.
WARRANTY SERVICES
Questions, Assistance, and Services
Your local hobby store and/or place of purchase cannot
provide warranty support or service. Once assembly,
setup or use of the Product has been started, you must
contact your local distributor or Horizon directly. This
will enable Horizon to better answer your questions
and service you in the event that you may need any
assistance. For questions or assistance, please visit
our website at www.horizonhobby.com, submit a
Product Support Inquiry, or call the toll free telephone
number referenced in the Warranty and Service Contact
Information section to speak with a Product Support
representative.
Inspection or Services
If this Product needs to be inspected or serviced and is
compliant in the country you live and use the Product
in, please use the Horizon Online Service Request
submission process found on our website or call Horizon
to obtain a Return Merchandise Authorization (RMA)
number. Pack the Product securely using a shipping
carton. Please note that original boxes may be included,
but are not designed to withstand the rigors of shipping
without additional protection. Ship via a carrier that
provides tracking and insurance for lost or damaged
parcels, as Horizon is not responsible for merchandise
until it arrives and is accepted at our facility. An Online
Service Request is available at http://www.horizonhobby.
com/content/_service-center_render-service-center. If
you do not have internet access, please contact Horizon
Product Support to obtain a RMA number along with
instructions for submitting your product for service.
When calling Horizon, you will be asked to provide your
complete name, street address, email address and phone
number where you can be reached during business
hours. When sending product into Horizon, please include
your RMA number, a list of the included items, and a
brief summary of the problem. A copy of your original
sales receipt must be included for warranty consideration.
Be sure your name, address, and RMA number are
clearly written on the outside of the shipping carton.
NOTICE: Do not ship LiPo batteries to Horizon. If you
have any issue with a LiPo battery, please contact the
appropriate Horizon Product Support office.
Warranty Requirements
For Warranty consideration, you must include
your original sales receipt verifying the proof-ofpurchase date. Provided warranty conditions have been
met, your Product will be serviced or replaced free of
charge. Service or replacement decisions are at the sole
discretion of Horizon.
Law
These terms are governed by Illinois law (without regard
to conflict of law principals). This warranty gives you
specific legal rights, and you may also have other rights
which vary from state to state. Horizon reserves the right
to change or modify this warranty at any time without
notice.
18
RockStar 48
EN
Non-Warranty Service
Should your service not be covered by warranty,
service will be completed and payment will be
required without notification or estimate of the
expense unless the expense exceeds 50% of the retail
purchase cost By submitting the item for service you are
agreeing to payment of the service without notification.
Service estimates are available upon request. You
must include this request with your item submitted for
service. Non-warranty service estimates will be billed a
minimum of ½ hour of labor. In addition you will be billed
for return freight. Horizon accepts money orders and
cashier’s checks, as well as Visa, MasterCard, American
Express, and Discover cards. By submitting any item
to Horizon for service, you are agreeing to Horizon’s
Terms and Conditions found on our website http://
www.horizonhobby.com/content/_service-center_renderservice-center.
ATTENTION: Horizon service is limited to Product
compliant in the country of use and ownership.
If received, a non-compliant Product will not be
serviced. Further, the sender will be responsible for
arranging return shipment of the un-serviced Product,
through a carrier of the sender’s choice and at the
sender’s expense. Horizon will hold non-compliant
Product for a period of 60 days from notification, after
which it will be discarded.
Warranty and Service Contact Information
Country of
Purchase
United States of
America
Horizon Hobby
Contact Information
Horizon Service Center
(Repairs and Repair
Requests)
servicecenter.horizonhobby.
com/RequestForm/
Horizon Product Support
(Product Technical
Assistance)
www.quickbase.com/db/
bghj7ey8c?a=
GenNewRecord
Address
4105 Fieldstone Rd
Champaign, Illinois, 61822 USA
888-959-2306
Sales
United Kingdom
Germany
Service/Parts/Sales:
Horizon Hobby Limited
[email protected]
888-959-2306
[email protected]
+44 (0) 1279 641 097
Horizon Technischer
Service
[email protected]
Sales: Horizon Hobby
GmbH
+49 (0) 4121 2655 100
France
Service/Parts/Sales:
Horizon Hobby SAS
[email protected]
China
Service/Parts/Sales:
Horizon Hobby – China
[email protected]
RockStar 48
+33 (0) 1 60 18 34 90
+86 (021) 5180 9868
Units 1–4 , Ployters Rd, Staple Tye
Harlow, Essex, CM18 7NS, United
Kingdom
Christian-Junge-Straße 1
25337 Elmshorn, Germany
11 Rue Georges Charpak
77127 Lieusaint, France
Room 506, No. 97 Changshou Rd.
Shanghai, China 200060
19
EN
FCC Information
This device complies with part 15 of the FCC rules.
Operation is subject to the following two conditions:
(1) This device may not cause harmful interference, and
(2) This device must accept any interference received,
including interference that may cause undesired
operation.
CAUTION: Changes or modifications not expressly
approved by the party responsible for compliance could
void the user’s authority to operate the equipment.
This product contains a radio transmitter with wireless
technology which has been tested and found to be
compliant with the applicable regulations governing
a radio transmitter in the 2.400GHz to 2.4835GHz
frequency range.
IC Information
This device complies with Industry Canada licenceexempt RSS standard(s). Operation is subject to the
following two conditions: (1) this device may not cause
interference, and (2) this device must accept any
interference, including interference that may cause
undesired operation of the device.
Compliance Information for the European Union
AT
EE
IE
PL
IS
BE BG
ES FI
IT LT
PT RO
LI NO
CZ CY DE DK
FR GR HR HU
LU LV MT NL
SE SI SK UK
CH
Declaration of Conformity
(in accordance with ISO/IEC 17050-1)
No. HH2013091305
Product(s):
Item Number(s):
Equipment class:
PRB Rockstar 48-inch Gas Powered
RTR Catamaran (Spektrum DX2E
transmitter and SR410 receiver
included)
PRB09000
2
The object of declaration described above is in conformity
with the requirements of the specifications listed below,
following the provisions of the European R&TTE directive
1999/5/EC:
Instructions for Disposal of WEEE by
Users in the European Union
This product must not be disposed of with other
waste. Instead, it is the user’s responsibility to dispose of
their waste equipment by handing it over to a designated
collection point for the recycling of waste electrical
and electronic equipment. The separate collection and
recycling of your waste equipment at the time of disposal
will help to conserve natural resources and ensure that it
is recycled in a manner that protects human health and
the environment. For more information about where you
can drop off your waste equipment for recycling, please
contact your local city office, your household waste
disposal service or where you purchased the product.
EN 300-328
V1.7.1: 2006
EN 301 489-1 V1.9.2: 2012
EN 301 489-17 V2.1.1: 2009
EN60950-1:2006+A11:2009+A1:2010+A12: 2011
Signed for and on behalf of:
Horizon Hobby, LLC
Champaign, IL USA
Sep 13, 2013
20
Robert Peak
Chief Financial Officer
Horizon Hobby, LLC
RockStar 48
Replacement Parts / Ersatzteile / Pièces de rechange / Pezzi di ricambio
Part #
English
Deutsch
Français
Italiano
DYNE1000
26cc Marine Gas
Engine
Dynamite 26cc Marine
Benzinmotor
Moteur 26cc essence
pour bateau : Rockstar
48
Motore marino a
benzina 26cc
DYNE1220
R.O.S.S. control box
R.O.S.S. Steuergerät
Boîtier de commande
R.O.S.S.
R.O.S.S Centralina
DYNE1222
R.O.S.S. Marine Relay
R.O.S.S. Marine Relais
Relais R.O.S.S. pour
bateau
R.O.S.S Interruttore
marino
DYNE1226
R.O.S.S. Mechanical
Starter System, 1/5 Car
& Marine
R.O.S.S. Mech. Starter
System, 1/5 Car &
Marine
Système de démarrage
R.O.S.S. pour voiture
1/5 et bateau
Avviamento ROSS, 1/5
Auto e Scafi
DYNE1227
Gear Set, R.O.S.S.
Mech Strtr Sys, 1/5 Car
& Marine
Getriebeset R.O.S.S.
Mech. Starter System,
1/5 Car & Marine
Set de pignons pour
système de démarrage
R.O.S.S. pour voiture
1/5 et bateau
Set ingranaggi
avviamento ROSS, 1/5
Auto e Scafi
DYNE1228
Flywheel, R.O.S.S.
Mech Strtr Sys, 1/5 Car
& Marine
Schwungrad Mech.
Starter System, 1/5 Car
& Marine
Volant moteur pour
système de démarrage
R.O.S.S. pour voiture
1/5 et bateau
Puleggia avviamento
ROSS, 1/5 Auto e Scafi
DYNE1229
Gear Box, R.O.S.S.
Mech Strtr Sys, 1/5 Car
& Marine
Getriebegehäuse
R.O.S.S. Mech. Starter
System, 1/5 Car &
Marine
Carter pour système
de démarrage R.O.S.S.
pour voiture 1/5 et
bateau
Scatola ingranaggi
avviamento ROSS, 1/5
Auto e Scafi
DYNB0500
7.4V 5200mAh 2S 15C
LiPo: R.O.S.S
Dynamite 7.4V
5200mAh 2S 15C
LiPo R.O.S.S
Batterie Li-Po 2S 7.4V
5200mA 15C
LiPo 7.4V 5200mAh 2S
15C: R.O.S.S.
PRB291000
Hull and Decals:
Rockstar 48
ProBoat Rockstar 48:
Rumpf u. Dekorbogen
Coque avec décoration:
Rockstar 48
Carena e adesivi:
Rockstar 48
PRB291001
Canopy: Rockstar 48
ProBoat Rockstar 48:
Kabinenhaube
Cockpit : Rockstar 48
Capottina: Rockstar 48
PRB291002
Radio Tray: Rockstar 48
ProBoat Rockstar 48: RC
Box
Platine radio : Rockstar
48
Supporto radio: Rockstar
48
PRB291004
Fuel Tank: Rockstar 48
ProBoat Rockstar 48:
Kraftststofftank
Réservoir à carburant :
Rockstar 48
Serbatoio: Rockstar 48
PRB291005
Rudder: Rockstar 48
Proboat Rockstar 48:
Ruder
Gouvernail : Rockstar
48
Timone: Rockstar 48
PRB291006
Rudder Pushrod Set:
Rockstar 48
ProBoat Rockstar 48:
Rudergestänge
Tringlerie de gouvernail :
Rockstar 48
Set comandi timone:
Rockstar 48
PRB296001
Prop Strut: Rockstar 48
ProBoat Rockstar 48:
Propellerstrebe
Chaise d'hélice :
Rockstar 48
Piede elica: Rockstar 48
PRB292000
Flex shaft, drive dog
and nut: Rockstar 48
ProBoat Rockstar 48:
Flexwelle, Mitnehmer u.
Mutter
Flexible, Noix
d'entraînement et écrou
: Rockstar 48
Albero flex, trascinatore
e dado: Rockstar 48
PRB292001
Stuffing Tube Liner:
Rockstar 48
ProBoat Rockstar 48:
Schlauchdichtung
Gaine de guidage :
Rockstar 48
Premistoppa tubo:
Rockstar 48
PRB292002
Propeller: 70mm x 1.5
ProBoat Rockstar 48:
Propeller 70mm x 1.5
Hélice 70mmx1.5 :
Rockstar 48
Elica: 70mm x 1.5
PRB292003
Clutch: Rockstar 48
ProBoat Rockstar 48:
Kupplung
Embrayage : Rockstar
48
Frizione: Rockstar 48
PRB296000
Vibration damper
Vibrationsdämpfer
Amortisseur antivibration
Ammortizzatore
anti-vibrazione
RockStar 48
77
Part #
English
Deutsch
Français
Italiano
LOSB0886
S901T 1/5 Scale
Throttle Servo MG
Stoßdämpferkolben
m. Innengewinde u.
Kolben, hinten
Servo de gaz S901T
à pignons métal pour
véhicule 1/5
S901T Servo motore
scala 1/5 c/ingranaggi
metallici
LOSR5012
Piston & Ring Set, Losi
26cc
Kolben u. obenringset,
Losi 26cc
Piston & Ring Set, Losi
26cc
Set pistone e egmento,
Losi 26cc
LOSR5013
Piston Ring Only, Losi
26cc
Kolbenring, Losi 26cc
Piston Ring Only
Piston Ring Only, Losi
26cc
Solo segmento, Losi
26cc
LOSR5016
Ignition Coil & Screws,
Losi 26cc
Ignition Coil & Screws,
Losi 26cc
Bobina accensione e
viti, Losi 26cc
Calentador bujía y
tornillos, Losi
LOSR5017
Spark Plug
LOSI Zündkerze, LOSI
26cc
Bougie
Candela
LOSR5018
Kill Switch
LOSI Notaustaster, LOSI
26cc
Coupe circuit
Interruttore
spegnimento
LOSR5031
Exhaust gasket
LOSI Auspuffdichtung,
LOSI 26cc
Joint d'échappement
Guarnizione scarico
LOSR5033
Carb Mounting Gasket
LOSI Vergaserdichtung,
LOSI 26cc
Joint d'embase de
carburateur
Guarnizione carburatore
SPMS604
7.4V Servo, 3kg, plastic
gear, WP, 23t
Spektrum 7,4 Volt 3Kg
Kunststoffgetriebe
Spritzwassergeschützt
23T.
Servo 3Kg, pignons
plastique, étanche
Servo 7.4V, 3kg, ingr. in
plastica, WP, 23t
SPMSR410
SR410 4-Ch DSMR
Sport Surface Receiver
Spektrum 4-Kanal
DSMR Sport Auto
Empfänger
Récepteur SR410 4
voies
Ricevitore sport SR410
4-Ch DSMR
SPM2322
DX2E 2-Channel DSMR
Surface Radio Systemt
Spektrum DX2E 2 Kanal
DSMR Fernsteuerung
Emetteur DX2E 2 voies
DSMR
Radiocomando DX2E
2-canali DSMR
Optional Parts / Diverse Teile / Pièces optionnelles / Pezzi opzionali
Part #
English
Deutsch
Français
Italiano
PRB0100
Marine Grease
Proboat Marine Fett m.
Applikator 5 oz
Graisse marine
Grasso marino
DYN5500
Motor Spray
Dynamite
Magnum Force
Motorreinigungsspray.
390ml
Spray nettoyant moteur
Spray motore
DYNC2005
Prophet Sport LiPo
Dynamite Prophet Sport
LiPo 35W AC LadegerätEU
Chargeur Prophet Sport
LI-Po
LiPo Prophet Sport
RVO1005
Ball Link Pliers
Revolution Deluxe
Kugelkopfzange
Pince à chapes
Pinza attacchi a sfera
DYNE4100
High Performance
2-Cycle Oil
Dynamite 2Takt Öl
100cc
Huile 2 temps hautes
performances
Olio 2 tempi alte
prestazioni
78
RockStar 48
40814.1 Created: 04/2014
©2014 Horizon Hobby, LLC
Pro Boat, the Pro Boat logo and the Horizon Hobby logo, Evolution, Dynamite, EC3, Prophet are trademarks
or registered trademarks of Horizon Hobby, LLC
The Spektrum trademark is used with permission of Bachmann Industries, Inc.
Rockstar and the Double Star Mark are trademarks or registered trademarks of Rockstar, Inc. and are used
under license by Horizon Hobby, LLC Patents pending.
PRB09000