1
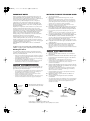
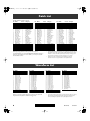
SRX-98_e 1 ページ 2007年1月5日 金曜日 午前9時38分
201a
Before using this unit, carefully read the sections entitled: “USING THE UNIT
SAFELY” and “IMPORTANT NOTES” (p. 2; p. 3). These sections provide
important information concerning the proper operation of the unit. Additionally,
in order to feel assured that you have gained a good grasp of every feature
provided by your new unit, Owner’s Manual should be read in its entirety. The
manual should be saved and kept on hand as a convenient reference.
Welcome to the SRX-98 “Analog Essentials” Special SRX Board 2006
Congratulations on owning this special collection of sounds. All SRX-98 waveforms have been newly
sampled, and are derived from world-famous analog synthesizers such as Roland’s Jupiter-8. The entire
range of notes from each synth has been multisampled for the ultimate in realism and playability. In
some instances, up to 92 consecutive notes have been sampled per instrument.
We hope you will enjoy these authentic and superb sounds!
* This SPECIAL SRX BOARD 2006 SRX-98 is not for sale.
* The SRX-98 is compatible with following Roland products. No other products can be used.
Fantom-X6/X7/X8/XR/Xa
JUNO-G
Fantom-S/S88
Fantom (FA-76)
XV-5080/5050
Fantom-S/S88 users
If the instrument in which you want to install the SRX-98 is running system program version 1.05 or
earlier, you must update the system before you can use the SRX-98.
For information regarding the system update program, please access the Roland website or contact
the nearest Roland Service Center.
962b
* In the interest of product improvement, the specifications and/or contents of this package are subject to change
without prior notice.
202
Copyright © 2005 ROLAND CORPORATION
All rights reserved. No part of this publication may be reproduced in any form without the written
permission of ROLAND CORPORATION.
1
SRX-98_e 2 ページ 2007年1月5日 金曜日 午前9時38分
USING THE UNIT SAFELY
The
symbol alerts the user to important instructions
or warnings.The specific meaning of the symbol is
determined by the design contained within the
triangle. In the case of the symbol at left, it is used for
general cautions, warnings, or alerts to danger.
Used for instructions intended to alert
the user to the risk of death or severe
injury should the unit be used
improperly.
Used for instructions intended to alert
the user to the risk of injury or material
damage should the unit be used
improperly.
* Material damage refers
other adverse effects
respect to the home
furnishings, as well
animals or pets.
The
symbol alerts the user to items that must never
be carried out (are forbidden). The specific thing that
must not be done is indicated by the design contained
within the circle. In the case of the symbol at left, it
means that the unit must never be disassembled.
to damage or
caused with
and all its
to domestic
The ● symbol alerts the user to things that must be
carried out. The specific thing that must be done is
indicated by the design contained within the circle. In
the case of the symbol at left, it means that the powercord plug must be unplugged from the outlet.
001
013
• Before using this unit, make sure to read the
instructions below, and the Owner’s Manual.
• In households with small children, an adult
should provide supervision until the child is
capable of following all the rules essential for the
safe operation of the unit.
..........................................................................................................
..........................................................................................................
002a
• Do not open or perform any internal modifications on the unit.
..........................................................................................................
003
• Do not attempt to repair the unit, or replace parts
within it (except when this manual provides
specific instructions directing you to do so). Refer
all servicing to your retailer, the nearest Roland
Service Center, or an authorized Roland
distributor.
..........................................................................................................
014
• Protect the unit from strong impact.
(Do not drop it!)
..........................................................................................................
022c
• Before installing the SRX-98, you must first
always turn off the unit (Fantom-X6/X7/X8/XR/
Xa, JUNO-G, Fantom-S/S88, Fantom (FA-76), and
XV-5080/5050) and unplug its power cord.
..........................................................................................................
004
• Never use or store the unit in places that are:
• Subject to temperature extremes (e.g., direct
sunlight in an enclosed vehicle, near a heating
duct, on top of heat-generating equipment); or
are
• Damp (e.g., baths, washrooms, on wet floors);
or are
• Humid; or are
• Exposed to rain; or are
• Dusty; or are
• Subject to high levels of vibration.
..........................................................................................................
011
• Do not allow any objects (e.g., flammable
material, coins, pins); or liquids of any kind
(water, soft drinks, etc.) to penetrate the unit.
106
• Never climb on top of, nor place heavy objects on
the unit.
..........................................................................................................
115b
• Install the circuit board only into the specified
unit (Fantom-X6/X7/X8/XR/Xa, JUNO-G,
Fantom-S/S88, Fantom (FA-76), and XV-5080/
5050). Remove only the specified screws during the
installation.
..........................................................................................................
118a
• Should you remove screws, keep them in a safe
place out of children’s reach, so there is no chance
of them being swallowed accidentally.
..........................................................................................................
..........................................................................................................
This product must be disposed of separately at your local waste recycling centre.
Do not dispose of in household waste bin.
2
SRX-98_e 3 ページ 2007年1月5日 金曜日 午前9時38分
INSTALLING THE WAVE EXPANSION BOARD
IMPORTANT NOTES
When you purchase the SRX-98 Special SRX Board 2006 from an
authorized Roland dealer, the included sounds and samples are
licensed, not sold, to you by Roland Corporation, for commercial use
in music production, public performance, broadcast, etc.
You may use any of the included phrases and/or samples in a
commercial or non-commercial recording without paying any
additional license fees. However, you must strictly adhere to the
following crediting guidelines on any music recording that utilize
material from SRX-98.
Reproduction or duplication of this collection or any of the sound
recording contained in the SRX-98, either as they exist on this
expansion board or by any means of reformatting, mixing, filtering,
re-synthesizing, processing, or otherwise editing for use in another
product or for re-sale, is strictly prohibited without the express
written consent of Roland. All unauthorized giving, trading,
lending, renting, re-issue, re-distribution, or re-sale of the sounds
included in the SRX-98 are expressly prohibited.
In Plain English: Be creative in your application of the SRX-98
sounds, and keep this library for your use only. DO NOT COPY IT.
Roland constantly monitors other soundware releases to check for
copyright infringements, and will prosecute all piracy and copyright
violations to the fullest extent of the law.
THIS LIBRARY IS GUARANTEED TO BE 100% COPYRIGHT
CLEAN.
*
Turn off your instrument.
1. Remove the cover located on the top (or rear) of your
instrument.
*
*
When turning the unit upside-down, get a bunch of newspapers or
magazines, and place them under the four corners or at both ends to
prevent damage to the buttons and controls. Also, you should try to
orient the unit so no buttons or controls get damaged.
When turning the unit upside-down, handle with care to avoid
dropping it, or allowing it to fall or tip over.
2. Insert the Wave Expansion Board connector into a connector
for an SRX Series slot, while simultaneously inserting the
board holders into the holes in the Wave Expansion Board.
*
*
Do not touch any of the printed circuit pathways or connection
terminals.
Never use excessive force when installing a circuit board. If it doesn’t
fit properly on the first attempt, remove the board and try again.
3. Use the supplied Installation Tool to turn the holders in the
LOCK direction, so the board will be fastened in place.
*
(To remove the Wave Expansion Board, turn the board holders
in the UNLOCK direction, and lift up the board.)
When circuit board installation is complete, double-check your work.
4. Using the screws removed in Step 1, refasten the cover in its
original position.
5. Check if the Wave Expansion Board is correctly installed.
*
If the “EXP” display cannot be selected (doesn’t appear) in the
Waveform Selection Screen (refer to the owner’s manual of the
instrument you use), remove the Wave Expansion Board and install it
properly.
*
Éteindre l’instrument.
In addition to the items listed under “USING THE UNIT
SAFELY” on page 2, please read and observe the following:
Handling the Board
To avoid the risk of damage to internal components that can be
caused by static electricity, please carefully observe the following
whenever you handle the board.
*
Before you touch the board, always first grasp a metal object (such as a
water pipe), so you are sure that any static electricity you might have
been carrying has been discharged.
When handling the board, grasp it only by its edges. Avoid touching
any of the electronic components or connectors.
Save the bag in which the board was originally shipped, and put the
board back into it whenever you need to store or transport it.
*
*
Veuillez suivre attentivement les instructions suivantes quand vous
manipulez la carte afin d’éviter tout risque d’endommagement des
pièces internes par l’électricité statique.
*
Toujours toucher un objet métallique relié à la terre (comme un tuyau
par exemple) avant de manipuler la carte pour vous décharger de
l’électricité statique que vous auriez pu accumuler.
Lorsque vous manipulez la carte, la tenir par les côtés. Évitez de
toucher aux composants ou aux connecteurs.
Conservez le sachet d’origine dans lequel était la carte lors de l’envoi et
remettez la carte dedans si vous devez la ranger ou la transporter.
*
*
1. Retirer le couvercle situé sur le dessus (ou á l’arrière) de
l’instrument.
2. Inserer le connecteur de la carte dans un des creneaux pour
la serie SRX tout en enfoncant les supports a carte dans les
trous de celle-ci.
*
*
3. Utiliser l’outil d’installation fourni pour tourner les clips de
retenue vers la position de blocage (LOCK) de façon á ce que
la carte soit retenue en place.
*
2
Screwdriver
Tournevis
(Pour retirer la carte d’expansion Wave, tourner les clips de
retenue de la carte vers la position déblocage (UNLOCK) et
retirer la carte en la soulevant.)
Quand l’installation de la carte de circuits imprimés est terminée,
revérifiez si tout est bien installé.
4. Remettre la plaque a sa place et la fixer a l’aide des vis
enlevees a l’etape 1.
5. S’assurer que la carte d’expansion Wave est installée
correctement.
*
1
Ne pas toucher aux circuits imprimés ou aux connecteurs.
Ne jamais forcer lors de l’installation de la carte de circuits imprimés.
Si la carte s’ajuste mal au premier essai, enlevez la carte et
recommencez l’installation.
S’il est impossible de sélectionner l’affichage “EXP” (il n’apparaît pas)
á l’écran de sélection Waveform (se reporter au guide du propriétaire
de l’instrument utilisé), retirer la carte d’expansion Wave et la
réinstaller correctement.
Wave Expansion Board (SRX series)
Carte d'extension Wave (serie SRX)
3
LOCK
Connector
Connecteur
Board holder
Support à carte
Installation tool
Outil d'installation
Position them as shown before you install the board.
Avant l’installation, orienter les supports à carte tel qu’indiqué sur le schéma.
3
SRX-98_e 4 ページ 2007年1月5日 金曜日 午前9時38分
Patch List
(BANK SELECT MSB:93; LSB:98)
No. Name
1
2
3
4
5
6
7
8
9
10
11
12
13
14
15
16
17
18
19
20
21
22
23
24
25
26
Voices Category
[RealAnaSaw]
[FullAnaSaw]
[Forever]
[StringsEns]
[DryMG Lead]
[EPw/GtrAMP]
[TrancySaw1]
[Distorted]
[Sweep Saw]
[MG Bass 1]
[Dist Saw]
[C-Piano]
[Retro Flt]
[UnisonSaws]
[90’s EP]
[SawBrs2006]
[LoFi Ambi]
[Saw Lead]
[MagicPiano]
[Synth Key]
[SquLead 06]
[Old EP]
[HimalayaFl]
[Curse]
[Echo EP]
[Big Sect]
1
1
4
2
2
2
6
4
1
1
2
1
1
4
4
4
5
2
2
2
4
1
3
4
1
7
No. Name
OTHER SYNTH
OTHER SYNTH
SOFT PAD
STRINGS
SOFT LEAD
EL.PIANO
OTHER SYNTH
HARD LEAD
OTHER SYNTH
SYNTH BASS
SYNTH BASS
AC.PIANO
FLUTE
STRINGS
EL.PIANO
SYNTH BRASS
SYNTH FX
HARD LEAD
SYNTH FX
OTHER SYNTH
SOFT LEAD
EL.PIANO
FLUTE
SYNTH FX
EL.PIANO
STRINGS
27
28
29
30
31
32
33
34
35
36
37
38
39
40
41
42
43
44
45
46
47
48
49
50
51
52
Voices Category
[Flare Pad]
[MG Bass 2]
[MG SawLead]
[Dry Str]
[Poly Synth]
[Blue EP]
[Reso Bass]
[DetuneBrs]
[5th EP Pad]
[SquareBass]
[Hybrid Str]
[Old Phaser]
[SuperSaw 1]
[Pluck Clav]
[101 Bass]
[Solo Sine]
[Arie EP]
[SftDist Ld]
[Tre EP]
[Vinyl Str]
[Cave 2006]
[Motion]
[JP8 Square]
[Creation]
[Super-S]
[Saw Brass]
4
1
2
5
2
2
1
4
4
1
3
1
2
2
1
1
3
2
2
6
4
5
4
5
5
4
No. Name
SOFT PAD
SYNTH BASS
HARD LEAD
STRINGS
OTHER SYNTH
EL.PIANO
SYNTH BASS
SYNTH BRASS
SOFT PAD
SYNTH BASS
STRINGS
EL.PIANO
OTHER SYNTH
KEYBOARDS
SYNTH BASS
SOFT LEAD
EL.PIANO
SOFT LEAD
EL.PIANO
STRINGS
OTHER SYNTH
SOFT PAD
SOFT LEAD
SYNTH FX
BRIGHT PAD
SYNTH BRASS
When playing patches on the expansion board, we
recommend that you set all the EFFECTS ON/OFF settings to
“ON.” If such settings are set to “OFF,” you may not obtain
the intended sound.
*
53
54
55
56
57
58
59
60
61
62
63
64
65
66
67
68
69
70
71
72
73
74
75
76
77
78
Voices Category
[Phase EP]
[Phase Bs]
[SuperSaw2]
[TrancySaw2]
[POP EP]
[Treck Pad]
[Dyno Str]
[JP8 SquPad]
[Phase Pad]
[JP-8 Lead]
[Tekno Bass]
[Magma]
[Old Days]
[TapeEchoEP]
[FlareSweep]
[Sweep Saw2]
[Saw Stack]
[Retro Str]
[EP w/SP]
[StrMachine]
[Saw/SquPad]
[Power Saws]
[70’s EP]
[Reso Lead]
[Phase Saws]
[Explosion]
1
2
4
6
5
8
3
4
4
2
2
4
4
1
4
2
3
4
2
4
4
4
2
2
3
2
EL.PIANO
SYNTH BASS
OTHER SYNTH
OTHER SYNTH
EL.PIANO
PULSATING
STRINGS
SOFT PAD
SOFT PAD
HARD LEAD
SYNTH BASS
SYNTH FX
SOFT PAD
EL.PIANO
SOFT PAD
OTHER SYNTH
OTHER SYNTH
STRINGS
EL.PIANO
STRINGS
SOFT PAD
OTHER SYNTH
EL.PIANO
SOFT LEAD
OTHER SYNTH
HIT&STAB
Note that the Release Time has been set to a fairly long value for some of
the patches. As a result, if your sound generator has been set so “Patch
Remain” is “ON,” the release portion of a previously sounding patch
may continue to be heard even after switching to a new patch.
Refer to the owner’s manual for your instrument for specific
instructions on how to play Patches on the expansion board.
*
Waveform List
No. Name
No. Name
No. Name
No. Name
1
2
3
4
5
6
7
8
9
10
11
12
13
14
15
16
17
18
19
20
21
22
23
24
25
26
27
28
29
30
31
32
33
34
35
36
37
38
39
40
41
42
43
44
45
46
47
48
49
50
51
52
53
54
55
56
57
58
59
60
61
62
63
64
65
66
67
68
69
70
71
72
73
74
75
76
77
78
[Str2006A L]
[Str2006A R]
[Str2006B L]
[Str2006B R]
[Str2006C L]
[Str2006C R]
[SuperSawAL]
[SuperSawAR]
[SuperSawBL]
[SuperSawBR]
[SuperSawCL]
[SuperSawCR]
[XT Fazz A]
[XT Fazz B]
[XT Fazz C]
[JP-8 Brs A]
[JP-8 Brs B]
[JP-8 Brs C]
[EP MkI ppA]
[EP MkI ppB]
[EP MkI ppC]
[EP MkI mpA]
[EP MkI mpB]
[EP MkI mpC]
[EP MkI mfA]
[EP MkI mfB]
[EP MkI mfC]
[EP MkI ffA]
[EP MkI ffB]
[EP MkI ffC]
[XT EP A L]
[XT EP A R]
[XT EP B L]
[XT EP B R]
[XT EP C L]
[XT EP C R]
[C.Grand pA]
[C.Grand pB]
[C.Grand pC]
[C.Grand fA]
When you create a Patch using the waveforms stored in the
Expansion Board, observe the following points:
[C.Grand fB]
[C.Grand fC]
[SynBass1 A]
[SynBass1 B]
[SynBass1 C]
[SynBass2 A]
[SynBass2 B]
[SynBass2 C]
[SynBass3 A]
[SynBass3 B]
[SynBass3 C]
[SynBass4 A]
[SynBass4 B]
[SynBass4 C]
[101NovaBsA]
[101NovaBsB]
[101NovaBsC]
[Hover Bs A]
[Hover Bs B]
[Hover Bs C]
*
[XT Flute A]
[XT Flute B]
[XT Flute C]
[EstnLead A]
[EstnLead B]
[EstnLead C]
[ClickLeadA]
[ClickLeadB]
[ClickLeadC]
[FlarePadAL]
[FlarePadAR]
[FlarePadBL]
[FlarePadBR]
[FlarePadCL]
[FlarePadCR]
[Real MGSaw]
[TunedMGSaw]
[XT Sine]
If you make a Patch with a single voice and then later play it in a chord,
the sound may be distorted with certain settings for the Effects and
TVA. If this happens, adjust the level of the Effects and TVA.
4
04128189
*
0
4
1
2
8
1
8
9
-
0
2
*
07-01-2N