1
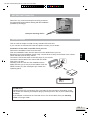
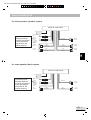
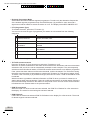
MD 4295 Autoradio BDA_GB 06.12.2002 12:27 Uhr Seite 1
C
M
Y
CM
MY
CY CMY
K
FUNCTIONS
1. PTY:
2. TA:
3.
4.
5.
6.
7.
8.
9.
10.
11.
12.
13.
14.
15.
16.
AF/REG:
EJECT:
CD tray:
MODE:
RELEASE:
DISPLAY
POWER:
SEL (MULTIJOG):
^:
v:
BND/LOU:
Station keys 1-6
DSP/0:
-<< :
17. +>>:
18. AMS/MP3:
19.
20.
21.
22.
23.
24.
25.
26.
27.
P. EQ:
PAU:
SCN:
RPT:
SHF:
–
–
Red LED
RESET:
GB 2
Programme Type Code
Includes programmes such as news, music, sport, etc., dependent on
the radio station.
Traffic Announcement Identification. Identification data on traffic
announcements that can be broadcast.
To switch on the RDS mode and/or the regional programme mode
CD eject
To load the CD
Switch-over radio/CD/MP3/number key 7
Removal of operating panel
On/Off switch
Settings of volume, bass, trebles, balance and fader
Increase volume
Reduce volume
Selection frequency range/loudness
To scan settings of programme, time, frequency and PTY/number key 0.
Tune/station search
backwards/number key 8
Tune/station search
forwards/number key 9
Automatic station memory / switch-over
frequency display/station name
Equalizer
Pause button (for CD/MP3)
Scan button (plays the CD track/MP3 for approx. 10 sec.)
Repeats a track (CD/MP3)
Random Playback (CD/MP3)
(Theft protection LED)
Reset to the works settings
MD 4295 Autoradio BDA_GB 06.12.2002 12:27 Uhr Seite 2
C
M
Y
CM
MY
CY CMY
K
SAFETY PRECAUTION
• Place the unit into the corresponding slot or choose a place where it can be installed without impeding
the driver in his usual driving job.
• Shortly connect the cables before finally installing the unit. Make sure that they are correctly connected
and that the system works properly.
• If any changes at the car are necessary, contact your car dealer / service shop.
• Install the unit in a way that nobody will by injured when the car is suddenly stopped.
• If the unit is installed at an angle of more than 30° from horizontal it may no longer give an optimum
performance.
30°
GB
• Avoid installing the unit in the vicinity of high temperatures (e.g. caused by direct sunlight or hot air
from the heating system), dust, dirt or excessive vibrations.
GB 3
MD 4295 Autoradio BDA_GB 06.12.2002 12:27 Uhr Seite 3
C
M
Y
CM
MY
CY CMY
K
CONTENTS
FUNCTIONS...................................................................................................................................2
SAFETY PRECAUTION.................................................................................................................3
BEFORE SWITCHING ON.............................................................................................................5
INSTALLATION..............................................................................................................................5
INSTALLATION OF THE RADIO IN THE ISO SLOT OF YOUR CAR..........................................5
• Detaching and attaching the operating panel..............................................................................6
ISO ADAPTER PLUG ....................................................................................................................6
• Aerial relay cable.........................................................................................................................6
• Stereo Cinch output.....................................................................................................................6
CABLE CONNECTIONS................................................................................................................7
BASIC OPERATION ......................................................................................................................8
• Switching on/off ...........................................................................................................................8
• Volume ........................................................................................................................................8
• Bass ............................................................................................................................................8
• Trebles.........................................................................................................................................8
• Balance .......................................................................................................................................8
• Fader ...........................................................................................................................................8
• Loudness.....................................................................................................................................8
• Display.........................................................................................................................................8
• Mode ...........................................................................................................................................8
• Equalizer .....................................................................................................................................8
• Reset ...........................................................................................................................................8
RADIO ............................................................................................................................................9
• Selecting the frequency range.....................................................................................................9
• Selecting a station .......................................................................................................................9
• Preset stations.............................................................................................................................9
• Pre-setting stations......................................................................................................................9
• Recall preset station....................................................................................................................9
• Automatic memory system (AMS)...............................................................................................9
• Scanning of preset stations .........................................................................................................9
• Regional Programme Mode ......................................................................................................10
• PTY (Programme Type).............................................................................................................10
• TA Traffic announcements .........................................................................................................10
• EON TA local mode ...................................................................................................................10
• EON DX Mode...........................................................................................................................10
• RDS (Radio Data System) ........................................................................................................11
CD PLAYER .................................................................................................................................12
• Inserting and removing of CDs..................................................................................................12
• Skipping tracks ..........................................................................................................................12
• Pause CD ..................................................................................................................................12
• Fast forward and reverse ..........................................................................................................12
• Playback of all tracks.................................................................................................................12
• Repeating a track ......................................................................................................................12
• Random Playback .....................................................................................................................12
MP3 PLAYBACK .........................................................................................................................13
• Search for tracks (numbers)......................................................................................................13
• Search for interpreters...............................................................................................................13
• Keys table of allocations ............................................................................................................14
ID3-TAG FUNCTION ....................................................................................................................14
TROUBLESHOOTING .................................................................................................................15
SPECIFICATIONS ........................................................................................................................16
GB 4
MD 4295 Autoradio BDA_GB 06.12.2002 12:27 Uhr Seite 4
C
M
Y
CM
MY
CY CMY
K
BEFORE SWITCHING ON
Remove in any case both transport securing screws at
the upper radio housing before starting with the installation
(marked by red flags)!
transport secuting device
INSTALLATION
Installation of the radio in the ISO slot of your car.
Remove the installation frame from the radio.
Push the installation frame into the radio slot in the dashboard of your car.
Bend the lugs in the installation frame using a screw driver to firmly fix the frame in the vehicle.
Check that the frame is firmly seated.
Connect the ISO socket block to the ISO plugs of your vehicle.
Connect the aerial cable of the vehicle with the aerial
plug of the car radio.
Carefully push the radio into the installation frame.
Make sure that you do not pinch the cables! Push the
RESET button (27) with a ball-point pen. Attach the
operating panel.
28
GB
This car radio is simple to install in every standard ISO radio slot.
If your car has no standard ISO radio slot please contact you car dealer.
27
ATTENTION!
Please use the ISO connections of the car radio for the connection. Depending on the
car model, the matching ISO adapter plugs (counter-pieces in the car) are commercially
available.
If the adapter connections are removed from or cut off the cable, then your warranty
claim is no longer valid!
GB 5
MD 4295 Autoradio BDA_GB 06.12.2002 12:27 Uhr Seite 5
C
M
Y
CM
MY
CY CMY
K
DETACHING AND ATTACHING THE OPERATING PANEL
Press the RELEASE button (7) and remove the operating panel. Always keep the operating panel
in the transport bag supplied with the unit.
When the operating panel has been removed, a red LED (26) flashes.
To install the operating panel place it with the right side first into the frame. Then firmly press the
left side until it snaps into place. Check that the operating panel is seated correctly and firmly. If
the operating panel is not installed properly the display shows wrong information and/or some
keys show malfunctions.
Front panel
ISO Adapter plug
Caution!
Use the ISO adapter plug of the car radio to ensure a safe electrical connection.
Important notes!
Ensure that the pink backup cable is attached to the permanent plus pole (for the station memory).
After all connections have been made, press the RESET button (27).
Aerial relay cable
The yellow cable is supplied for a relay-controlled aerial.
The relay will automatically extend the aerial when the unit is switched on and retracts it when it is
switched off.
Caution:
Do not connect the yellow cable to the motor cable, this may damage the unit.
Stereo Cinch output
External units (e.g. amplifier) can be connected to these terminals (red and white chinch output).
GB 6
MD 4295 Autoradio BDA_GB 06.12.2002 12:27 Uhr Seite 6
C
M
Y
CM
MY
CY CMY
K
CABLE CONNECTIONS
for a four-speaker (quadro) system
REAR OF CAR RADIO
Aerial connection
Important notes!
Memory back-up
must be connected
to the permanent
plus pole for the
station memory.
Ignition switch red
(B+)
Memory
Back-up
Earth
connection
(B-)(earth)
Powered
aerial
RCA cable
pink
right red
left white
black
yellow
green
front left
speaker
grey
green/black
blue
white
blue/black
white/black
front right
speaker
rear right
speaker
GB
rear left
speaker
grey/black
for a two-speaker (dual) system
REAR OF CAR RADIO
Aerial connection
Important notes!
Memory back-up
must be connected
to the permanent
plus pole for the
station memory.
Ignition switch red
(B+)
Memory
Back-up
Earth
connection
(B-)(earth)
Powered
aerial
left
speaker
RCA cable
pink
right red
left white
black
yellow
green
grey
blue/black
white/black
right
speaker
GB 7
MD 4295 Autoradio BDA_GB 06.12.2002 12:27 Uhr Seite 7
C
M
Y
CM
MY
CY CMY
K
BASIC OPERATION
• Switching on / off
Press the PWR button (9) to switch on/off the unit.
• Volume
Adjust the volume by pressing buttons ^ (11) and v (12).
Control the volume only to a level that you are still able to hear the acoustic signals of approaching
ambulances / fire service / police cars!
• Bass
Press SEL button (10) once to set the bass. Press the buttons ^ (11) or v (12) to increase or lower the
bass.
• Trebles
Press SEL button (10) twice to set the trebles. Press the buttons ^ (11) or v (12) to increase or lower the
trebles.
• Balance
Press SEL button (10) three times to set the balance. Press the buttons ^ (11) or v (12) to set the balance
of the right and left speakers.
• Fader
Press SEL button (10) four times to set the fader. Press the buttons ^ (11) or v (12) to set the fader of the
front and rear speakers.
• Loudness
Keep the BND/LOU button pressed until you hear a signal sound. The display shows LOUD ON or LOUD
OFF. This increases the deep frequencies at low volume to a psychoacoustically correct listening level.
• Display
Press the DSP/0 button (15) to scan the following information:
Programme name
Frequency
Time (is set automatically with RDS reception)
PTY settings
(These RDS functions are broadcast by the radio stations in differing quality and contents. You find more
information in the chapter RADIO under RDS).
• Mode
You can switch between radio and CD by pressing the MOD button (6).
• Equalizer
FLAT
CLASSICS
POP M
ROCK M
DSP OFF
• Reset
To reset your car radio to the works settings, press the RESET button (28) using a ball-point pen. You find
this button behind the operating panel!
Press the RESET button
– before using the unit for the first time after connecting all the cables,
– if all the function buttons are not working correctly,
– if an error message appears in the display.
GB 8
MD 4295 Autoradio BDA_GB 06.12.2002 12:27 Uhr Seite 8
C
M
Y
CM
MY
CY CMY
K
RADIO
• Selecting the frequency range
Press the LOU/BND button (13) to change between VHF (F1, F2, F3), medium wave (MW) and long
wave (LW). You can memorise six radio stations in each band.
• Selecting a station
Give the Tune buttons I<< (16) or >>I (17) a short press, and the unit will automatically search for
the next station. If you press one of the TUNE button for two seconds, it switches to a manual search
for stations. The display shows MANUAL.
Now you can select and save the station by pressing the TUNE button. After a short waiting period,
the unit switches back into the automatic station-search mode.
• Preset stations
In each wave band up to six stations can be memorised and recalled using the station
buttons 1-6 (14).
GB
• Pre-setting stations
1. Press the BND/LOU button (13) to select the frequency range.
2. Press the TUNE button I<< (16) or I>> (17) to select a station.
3. Keep one of the station buttons 1-6 (14) pressed for approx. 3 seconds. A signal sound confirms
the storage of the station.
• Recall preset station
1. Press the BND/LOU button (13) to select the frequency range.
2. Press the station button (14) to recall the preset station.
• Automatic memory system (AMS)
Keep the AMS/MP3 button (18) pressed until you hear a signal sound. The display shows SEARCH.
The station search stops for approx. 5 sec. at each found station. The number flashing in the display
shows the number of the station key where the corresponding station is to be stored.
The tuner automatically scans past stations with a weak reception.
• Scan of preset stations
Automatic scanning of the preset stations in the wave band.
1. Press the BND/LOU button (13) to select the frequency range.
2. Give the the AMS/MP3 button (18) a short press. Now all stations are played for some seconds.
When the desired station is reached, give the AMS/MP3 button (18) a short press.
GB 9
MD 4295 Autoradio BDA_GB 06.12.2002 12:27 Uhr Seite 9
C
M
Y
CM
MY
CY CMY
K
• Regional Programme Mode
Some stations broadcast different regional programmes. To select only the alternative frequencies
of the desired regional programme keep the AF/REG button (3) pressed for some time until a
signal sound will be audible to switch the mode on or off. The display shows REG ON/REG OFF.
• PTY (Programme Type)
To activate the menu, press the PTY button (1).
You can now choose the type of programme your station is to broadcast from the following
categories:
MUSIC
1 POP M, ROCK M
LANGUAGE
NEWS, AFFAIRS, INFO
2 EASY M, LIGHT M
3 CLASSICS,
OTHER M
4 JAZZ, COUNTRY
5 NATION M, OLDIES
SPORT, EDUCATE, DRAMA
CULTURE, SCIENCE,
VARIED
WEATHER, FINANCE,
CHILDREN
SOCIAL, RELIGION, PHONE IN
6 FOLK M
Travel, Leisure, Document
(The information given depends on the radio station)
• TA Traffic announcements
Press the TA button (2) for a short time to switch the TA mode on or off.
When the TA mode is switched on and traffic announcements are broadcast, and the unit has been
switched to CD or AUX, the unit is automatically switched to radio reception. The unit temporarily
switches to the EON network station, if EON finds a traffic announcement on a different programme.
If the volume has been reduced to below the threshold, it will be increased. The TA function during
the traffic announcements is interrupted by pressing the TA button (2). This does not switch off the
TA mode. If the TA button (2) is pressed for longer, the EON TA LOCAL / EON TA DISTANCE mode
is selected.
With this mode it is possible to allocate information to EON TA when you listen for instance to a
station without traffic announcements. If there is a traffic announcement on another station frequency
the unit automatically switches to this station for this period of time. As soon as the announcement
is finished the unit switches back to the previous station.
• EON TA local mode
When the EON TA LOCAL mode has been selected, the EON TA LO flashes for a few seconds in
the display. The mode for the local region has been selected.
• EON DX mode
If the EON DX mode was selected EON TA DX flashes in the display for a few seconds. The mode
for distant regions has been selected.
GB 10
MD 4295 Autoradio BDA_GB 06.12.2002 12:27 Uhr Seite 10
C
M
Y
CM
MY
CY CMY
K
• RDS (Radio Data System)
RDS is a service of the radio stations. Besides the usual music and text pieces, additional information
is broadcast in form of encoded digital signals which can be evaluated by the car radio.
Press the AF/REG button (3) to switch the RDS mode on and off. When the RDS mode is active,
the symbol AF appears in the display. When a station is received, the name of the programme and
other information is shown on the display (8).
This information given depends on the radio station.
PI:
Program Identification Code
The radio can identify the received station using the PI code.
PS:
Program Service Name
With the feature Program Service the station name can be displayed.
AF:
Alternative Frequencies
The radio automatically selects the alternative frequency of the same programme with the
best reception.
GB
Different RDS services are offered:
TP/TA:Traffic Program/Traffic Announcement
EON: Enhanced Other Networks Information
If there is any traffic announcement it is switched over to a station with traffic announcements
within the station chain when you listen to a non-traffic announcement station.
PTY: Program Type Code
Using Program Type the radio can look for stations with programme contents which can be
preselected, e.g. sport, news, rock, pop,.....
GB 11
MD 4295 Autoradio BDA_GB 06.12.2002 12:27 Uhr Seite 11
C
M
Y
CM
MY
CY CMY
K
CD-PLAYER
• Inserting and removing of CDs
Insert the CD in the slit (5). CD playback starts.
The display shows S--CDP (i.e. "search track"). To remove the CD, press the EJECT button (4).
Playback stops and the CD is ejected. The unit switches to radio mode.
• Skip tracks
Press the TUNE button |<< (16) or button >>| (17) to skip to the next track.
The number of the track is shown in the display (8).
• CD pause
During playback, press the PAU button (20) and the CD playback is paused. When the
PAU button (20) is pressed again, the CD restarts.
• Fast forward and fast backward
Press the TUNE button |<< (16) or button >>| (17) during playback for longer to start fast forward /
backward .
• Playback of all tracks
Press the SCN button (21) and the first 10 seconds of every track are played. Press the SCN button
(21) again to restart normal playback.
• Repeating a track
Press the RPT button (22) to continuously repeat the track. Press the RPT button (22) again to
deactivate this function.
• Random Playback
Press the SHF button (23) to shuffle between all tracks on the CD in a random order.
Note:
• Driving on bumpy roads could cause the CD to skip. A short play time improves the performance.
Skipping does not cause damage to the CD.
• Moisture and high humidity can cause malfunctions of the CD player. Switch on the car heating,
and allow moisture to evaporate before operating.
• Do not subject the CD player to any extremely high or low temperatures.
• Do not drive with an ejected CD in the slit.
GB 12
MD 4295 Autoradio BDA_GB 06.12.2002 12:27 Uhr Seite 12
C
M
Y
CM
MY
CY CMY
K
MP3 PLAYBACK
The playback starts automatically when a MP3 CD-ROM is inserted. You find the individual key functions
in the chapter CD Player.
You can directly select the track or interpreter. Please take into account that most of the MP3 functions
are dependent on the type of creation of the MP3 CD.
• Search for tracks (numbers)
Press the AMS/MP3 button (18) once. The display shows MP3T ..... .
Enter the number of the desired track by pressing the keys given in the table.
Press the BND/LOU button (13) to confirm the input or wait for approx. 5 sec. until the unit automatically
skips to the selected track.
GB
• Search for interpreters
Press the AMS/MP3 button (18) twice.The display shows a flashing ....... .
Enter the name of the desired interpreter by pressing the keys given in the table.
Observe that the SEL button (10) must be pressed after the input of every character before the next
one can be entered (character shift).
Press the BND/LOU button (13) to confirm the input.
Now, the unit searches for the corresponding track.
Press the BND/LOU button once again if the unit has found the desired interpreter. The track is
played now.
Note:
The search function depends on the created MP3 CD.
GB 13
MD 4295 Autoradio BDA_GB 06.12.2002 12:27 Uhr Seite 13
C
M
Y
CM
MY
CY CMY
K
• Table keys of allocations
AMS/MP3 (18)
BND/LOU (13)
1 (14)
2 (14)
3 (14)
Select settings
Confirm
A, B, C, 1
D, E, F, 2
G, H, I, 3
4 (14)
5 (14)
6 (14)
MODE (6)
|<< (16)
>>| (17)
J, K, L, 4
M, N, O, 5 / 10 track down
P, Q, R, 6 / 10 track up
S, T, U, 7
V, W, X, 8
Y, Z, space, 9
SEL (10)
DISP/0 (15)
Character shift to the right
0,_, -, +,
(11)
(12)
Scroll function A-Z / 0-9
Note:
If you create MP3 CD-ROM please make sure that the tracks are stored individually or in
directories. Never mix tracks or directories since it could lead to problems during the playback.
All standard codings are suitable for playback.
ID 3-TAG FUNCTION
You can store additional information when creating a MP3 CD. This can be information on the interpreter,
track, album name or year of publication of the piece of music or a short comment. We recommend
an ID3-tag editor to enter this information.
This information is shown in the display after the scanning during the playback.
So it is possible to display, besides the track number, the name of the track or interpreter during the
playback of MP3 CDs (dependent on the stored information on the MP3 CD).
To scan it press the DSP/0 button (15). The ID3-tag entry of the current playback is shown after each
keypress:
TRACK - INTERPRETER - ALBUM NAME - YEAR OF PUBLICATION - COMMENT
GB 14
MD 4295 Autoradio BDA_GB 06.12.2002 12:27 Uhr Seite 14
C
M
Y
CM
MY
CY CMY
K
TROUBLESHOOTING
Problem
Cause
Solution
The unit cannot be switched on. The ignition is not switched on. Switch on the ignition by turning
the key.
The fuse is defect.
The CD cannot be loaded or
ejected.
Change the fuse.
There is already a CD in the unit. Remove the CD from the player,
then insert a new CD.
Always insert the CD with the
The CD has been inserted
writing facing upwards.
upside-down.
The CD is very dirty or defect.
Clean the CD or try to play
another one.
No sound
Function buttons do not work.
Condensation.
Switch off the unit for a few hours
and then try again.
Volume set to minimum.
Turn up the volume to the
desired level.
The cables are not correctly
connected.
Check the cable connections.
The built-in microcomputer
cannot function due to noise.
Press RESET button.
GB
Temperature in the car is too high. Allow to cool until the ambient
temperature is back to normal.
The operating panel is not seated Check that the operating panel
correctly.
is seated correctly and firmly.
CD skips.
The installation angle of the unit Adjust the installation angle to
is greater than 30°.
less than 30°.
The CD is very dirty or defect. Clean the CD or try to play
another one.
Defective self-burned CDs
Radio not functioning.
Automatic station selector not
functioning.
Check the CD in another unit
The aerial cable is not correctly
Firmly plug in the aerial cable.
connected.
The broadcast signals are too Select the transmitter manually.
weak.
Station memory not functioning. The pink cable is not connected Check the cable connections.
to the permanent plus pole.
GB 15
MD 4295 Autoradio BDA_GB 06.12.2002 12:27 Uhr Seite 15
C
M
Y
CM
MY
CY CMY
K
SPECIFICATIONS
General
Operating voltage:
Housing dimensions:
DC 12V, negative earth connection
178 x 155 x 50mm (WxDxH)
Power:
Peak music power output 4 x 25W R.M.S.
Fuse:
0.5 Ampere (red), 15 Ampere (pink)
MP3/CD-Player
MPEG Rate
Frequency range
MP3 Playback
64-320 K
20Hz~20kHz
ISO 9660 & Joliet format of MP3
Radio
For 3 frequency bands
Frequency range
IF
Sensitivity
(Signal-to-noise ratio = 30 dB)
Stereo separation
Frequency range
IF
(Signal-to-noise ratio = 30 dB)
Stereo separation 32 dBu
Frequency range
IF
Sensitivity
(Signal-to-noise ratio = 30 dB)
FM
87.5 to 108 MHz
10.7 MHz
3 µV
> 30dBu
MW
522 to 1620 MHz
45 kHz
LW
144 to 288 MHz
450 kHz
35 dBu
COMPACT
CD-Player
Use only CDs labelled as follows:
Laser class 1
Subject to technical modifications.
GB 16
DIGITAL AUDIO