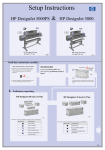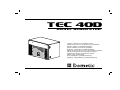
1
TEC 40d
DIESEL GENERATOR
Operation, maintenance and installation manual
Libretto istruzioni per l’uso, la manutenzione e l’installazione
Betriebs-, Wartungs- und Installationsanleitung
Manuel d’utilisation, d’entretien et d’installation
Bedienings-, onderhouds- en installatiehandleiding
Manual de instrucciones para el uso, mantenimiento e instalación
Manual de instruções de uso, manutenção e instalação
Handbok för användning, underhåll och installation
Käyttö-, huolto- ja asennusohje
Bruks- vedlikeholds- og installasjonsanvisning
Betjenings-, vedligeholdelses- og installationsvejledning
ENGLISH
With Dometic at home everywhere. Thank you for your decision to buy an Dometic product.
They all have been specially conceived for your vehicle, matching totally the requirements of
leisure on wheels - with more than 75 years of experience, the most advanced technology,
first-rate materials, superb workmanship, functional design and a care for the environment.
The unique Dometic EuroService Guarantee offers you additional peace of mind - ensuring
that you will derive comfort everywhere from your Dometic products
ITALIANO
Con Dometic come a casa, ovunque. Vi ringraziamo per averci scelto. I prodotti Dometic sono
stati espressamente concepiti per il Vostro veicolo; soddisfacendo completamente le esigenze
del tempo libero, sui mezzi mobili, con un’esperienza di oltre 75 anni, la tecnologia più avanzata,
materiali di prima qualità, superba squadra di tecnici nonché design funzionale ed attenzione
per l’ambiente. Usufruite del Servizio di Garanzia Europea che Vi offre completa tranquillità
assicurandoVi che trarrete grande comfort ovunque grazie ai “Vostri” prodotti Dometic
DEUTSCH
Mit Dometic überall wie zu Hause. Wir danken Ihnen für Ihre Wahl. Die Dometic-Produkte
wurden speziell für Ihr Fahrzeug entwickelt und tragen den Erfordernissen der Freizeit auf
Rädern voll Rechnung - mit einer mehr als 75-jährigen Erfahrung, modernster Technologie,
erstklassigen Materialien, einem hervorragenden Technikerteam, funktionellem Design und
Umweltfreundlichkeit. Nutzen Sie die EuroService-Garantie, mit der Sie ganz ruhig fahren und
die Ihnen überall dank “Ihren” Dometic-Produkten größten Komfort sichert
FRANÇAIS
Partout avec Dometic. Merci d’avoir choisi un produit Dometic. Il a été spécialement conçu
pour votre véhicule complétant totalement la gamme d’équipements de votre véhicule de loisirs.
Dometic, c’est aussi, 75 ans d’expérience, une technologie avancée, du matériel de premier
choix, un design fonctionnel et la protection de l’environnement. La garantie Européenne
Dometic vous offre, où que vous soyez, la possibilité de profiter partout de votre matériel.
NEDERLANDS
Met Dometic voelt u zich overal thuis. Wij danken u voor uw besluit een product van Dometic aan te schaffen. Al onze producten zijn speciaal ontworpen voor uw voertuig en voldoen
volledig aan de vereisten die worden gesteld aan een vakantie onderweg - met meer dan
75 jaar ervaring, de meest geavanceerde technologie, uitstekende materialen, voortreffelijk
vakmanschap, functioneel design en zorg voor het milieu. Bovendien biedt de unieke Dometic
EuroService Garantie u extra zekerheid - zodat u er zeker van bent dat u overal kunt genieten
van het comfort die producten van Dometic u bieden.
ESPAÑOL
Con Dometic en todas partes como en casa. Le agradecemos su elección. Los productos
Dometic han sido expresamente concebidos para su vehículo; satisfaciendo totalmente las
exigencias del tiempo libre, en medios móviles, con una experiencia de más de 75 años, la
tecnología más avanzada, materiales de primera calidad, soberbio equipo de técnicos así como
design funcional y respeto al medio ambiente. Disfruten del Servicio de Garantía Europea que
le ofrece tranquilidad absoluta, asegurándole que obtendrá gran confort en cualquier lugar
gracias a sus productos Dometic. La garantie Européenne Dometic vous offre, où que vous
soyez, la possibilité de profiter partout de votre matériel.
PORTUGUÊS
Com Dometic, em todo o lado como em casa. Agradecemos a sua escolha. Os produtos
Dometic foram expressamente concebidos para o seu veículo; satisfazendo totalmente as
exigências do tempo livre, em meios móveis, com uma experiência de mais de 75 anos, a
tecnologia mais avançada, materiais de primeira qualidade, uma excelente equipa de técnicos
e um design funcional e respeito pelo ambiente. Aproveite o Serviço de Garantia Europeia,
que lhe oferece uma tranquilidade absoluta e lhe assegura que obterá um grande conforto
em qualquer lugar graças aos seus produtos Dometic.
SVENSKA
Med Dometic är Du hemma överallt. Tack för Ditt beslut att köpa en Dometicprodukt. De
har utvecklats speciellt för Din husvagn eller husbil och lever upp till alla de krav för fritid på
hjul -med mer än 75 års erfarenhet, avancerad teknologi, förstklassigt material, oöverträffat
hantverk och design samt omtanke om miljön. Den unika Dometic Europagararantin ger Dig
trygghet om något skulle hända.
SUOMI
Dometic - kotonaan kaikkialla. Olemme iloisia siitä, että olet valinnut Dometic tuotteen.
Tuotteemme on kehitetty yli 75 vuoden kokemuksella liikkuvan lomanviettäjän tarpeisiin ja
valmistettu ensiluokkaisista materiaaleista uusimmalla, ympäristöä säästävällä tekniikalla,
toimivalla muotoilulla ja korkealla ammattitaidolla. Dometic tuotteita voit käyttää luottavaisin
mielin.Ainutlaatuinen Dometic EuroService -takuu ja laaja huoltoverkosto varmistavat., että
saat apua ongelmatilanteissa myös matkasi varrella.
NORSK
Med Dometic kan du føle deg hjemme overalt. Takk for at du bestemte deg for å kjøpe
et produkt fra Dometic. Alle våre produkter er utviklet spesielt for ditt kjøretøy og lever fullt
opp til alle krav om bekvemmelighet i din fritid - basert på mer enn 75 års erfaring, den mest
avanserte teknologi, førsteklasses materialvalg og håndverk, funksjonelt design og omtanke
for miljøet. Den unike Dometic EuroService-garantien gir deg trygghet og sikrer komfort uansett
hvor du måtte befinne deg.
DANSK
Med Dometic kan du føle dig hjemme overalt. Tak for din beslutning om at købe et Dometic
produkt. De er alle blevet specielt udviklet til dit køretøj og lever fuldt ud op til kravene om
fritid på hjul med mere end 75 års erfaring, den mest avancerede teknologi, førsteklasses
materialer, uovertruffent håndværk, funktionelt design og omtanke for miljøet. Den unikke
Dometic EuroService Garanti giver dig yderligere ro i sjælen og sikrer, at du takket være dine
Dometic produkter vil opleve stor komfort, uanset hvor du befinder dig.
©DOMETIC - 2007 All rights reserved - Printed in Italy No part of this manual may be reproduced, copied or transmitted in any form or
by any means without prior written permission from DOMETIC.
Figures, descriptions, references and technical data contained in this manual
are given as mere example and are not binding.
In pursuing a policy of constant product and safety improvement, DOMETIC
reserves the right to effect changes at any time without undertaking to give prior
notice or to update this manual every time.
Keep this document for future reference.
“The product is warranted in accordance with the enforced Law and regulations implementing the Directive 1999/44/EC.”
The Manufacturer’s warranty does not extend to Product failures, defects or damage arising from and/or
attributable to a wrong installation.
The Consumer is entitled to let the Product be installed by an authorised dealer, not bound by Dometic.
The warranty extends to failures or defects in the gen-sets which shall become apparent within the warranty period. The warranty shall cease to have effect if, during the two-year warranty period, the gen-set
is used for more than 1,000 hours or if the recommended service schedule is not completed.
Operation, Maintenance and
Installation manual
Generator
Index
1
1.1
1.2
1.3
1.4
1.5
1.6
1.7
1.8
1.9
1.10
1.11
1.12
1.13
1.14
2
2.1
2.2
2.3
2.4
3
3.1
3.2
3.3
General informations
Purpose of the manual ................................................... 4
Data Plate ....................................................................... 4
Safety..................................................................... 5
Noise ........................................................................... 5
Decription of the generator ................................................. 6
Recommendations for use .............................................. 6
Fuel .............................................................................. 6
Operating description ............................................ 7
External control panel ................................................ 8
Internal control panel ................................................. 8
Technical data ................................................................ 9
Display messages ............................................................. 10
Routine maintenance .................................................. 11
Oil level check ............................................................... 11
Installation istructions
Instructions for fixing the generator .........................
Instructions for installing the exhaust system........
Instructions for installing the fuel tank ........................
Instructions for the electrical connection ........................
12
14
15
16
Troubleshooting, maintenance, recycling
Faults, causes, solutions .................................................18
Checks - nature and service intervals...............................19
Extraordinary maintenance ............................................ 20
TEC 40D wiring diagram ............................................... 22
Connection to the external power supply........................ 23
Libretto istruzioni per l’uso, la manutenzione e
l’installazione
Generatore
GB
I
Bedienungs- und
Wartungsanleitung
Generator
D
Mise en route, entretien et
installation
Generateur
F
Handleiding voor bediening,
onderhoud en installatie
Generator
NL
Manual de instrucciones para el uso, la manutención
y la instalación
Generador
E
Livrete de instruções para uso, manutenção
e instalação
Gerador
P
Handbok för drift, underhåll och
installation
Generator
S
Käyttö-, huolto- ja
asennusohje
Generaattori
Brukerveiledning og manual
til vedlikehold og installasjon
Generator
Brugervejledning og manual
til vedligeholdelse og installation
Generaattori
FIN
N
DK
1 General informations
GB
1.1 Purpose of the manual
1.2 Data plate
This manual has been made up by the Manufacturer and is an
integrated part of the generator’s equipment.
The information, if respected, will guarantee the correct use of
the generator.
The part of the manual reserved for the users is indicated by the
symbol
while the part reserved for the experts installing the
generator is indicated by the symbol
The following symbols have been used to highlight some parts
of the text:
The operation can be dangerous.
Useful suggestions.
Information on the protection of the environment.
Manufacturer’s data
Conformity marking
Model/Serial number
Year of manufacture
Technical data
TEC 40D
4
Manufactured by
WTA v.Virgilio,3 Forlì-Italy
E24
10R-020308
PRODUCT No.
MODEL
SERIAL
958 500 300
TEC 40D
xxxxxxxx
Date
Voltage
Frequency
Power Factor
Weight
2007
V230
Hz 50
Cos 1
kg 96,5
Output max
Output
D.C. 12V
W4000
W3500
A 10
user’s manual
General informations 1
The company Dometic is not responsible for any damage caused by
generator malfunctions.
•
1.3 Safety
•
•
The generator is installed in a closed casing. Therefore, there is no danger of accidental contacts with moving parts or wires under voltage.
The door is fitted with a key lock which shall be kept out of reach by
children or non-authorised people.
•
•
•
•
•
•
•
•
•
•
•
•
•
Warning
Check the generator before using it every time. In this way it is
possible to prevent accidents or damage to the motor.
To prevent fire hazards and to keep the generator in an efficient
working condition, do not close the same in a case or an enclosed
space such as an alcove but install it in a well-ventilated area.
Keep children and animals away from the generator when it is
running, as it can heat up and cause burns and injuries, both
directly and through the systems it is supplying.
Learn how to turn the generator off quickly and how to use the
controls. Never leave the generator in the hands of people who
are not trained to use it.
The generator must only be used with the generator door closed.
Keep flammable substances away from the generator such as for
example: petrol, paints, solvents etc.
Make sure that the hot parts of the generator do not come into
contact with materials that could catch fire.
Fill the generator with fuel in a well-ventilated area with the generator turned off. Petrol is highly flammable and can explode.
Never overfill the fuel tank. There should not be fuel in the tank
filling throat. Check that the cap is tightly closed.
If you spill any fuel, clean it up thoroughly and wait for the fumes
to evaporate before starting the engine.
user’s manual
•
•
Exhaust gases contain carbon monoxide, an extremely poisonous
gas, which is odourless and colourless. Avoid inhaling exhaust
gases. Do not run the engine of the generator in a closed garage
or room without very good ventilations.
Do not touch the generator or the connections with wet hands.
Do not replace fuses or thermal cutouts with others of a higher
amperage.
Any checks carried out on the electric parts should be done by
authorised personnel with the engine turned off.
Install the generator in a stable area. Do not incline the generator
by more than 20° with respect to the vertical plane.
Sudden braking or acceleration, or curves taken abruptly with the
vehicle can cause problems in the pumping system of the generator
and make it stall.
When storing the generator up for a long period of time, start it
at least once every 30 days and leave it running for at least 15
minutes.
Leave the generator on for a few minutes without charge after use
before switching it off.
The generator is made to meet the safety regulations indicated in the
declaration of conformity.
1.4 Noise
The generator has been tested for noise emissions at the qualified
independent laboratory DNV Modulo Uno which has issued the EECcertificate based on EC-DIRECTIVE 2000/14.
GUARANTEED AND MEASURED SOUND POWER LEVEL:
TEC 40D ..................................................................... LwA 89
----------------------------------------------------------------------------SOUND POWER LEVEL measured from 7mt .... dB(A) 64
5
TEC 40D
GB
1 General informations
GB
1.5 Description of the generator
1.7 Fuel
Warning
The TEC 40D generator has been designed and produced to be used
only on caravans, motor homes and commercial vehicles.
Therefore it has not been designed to be used on other types of vehicles
or on any kind of watercraft. The company Dometic, as it is impossible
to envisage every possible use and type of installation, declines any
responsibility for every type of use and installation which is not explicitly
mentioned.
All diesel oils which satisfy the following specifications are suitable:
EN 590 or
DIN 51601 - DK or
BS 2869 A1 / A2 or
ASTM D975 -1D / 2D
At temperatures below 0°C, winter-grade fuel should be used or paraffin
added to the fuel well in advance.
The generator has been designed to produce alternating current at
230V and 50 Hz, capable of supplying power to various systems.
Therefore it is fitted with an inverter, so that it can supply systems that
are very sensitive to the quality of the energy supplied, such as personal
computers for example.
The generator is installed in a sheet metal steel casing which is insulated
and soundproofed with special soundproofing materials.
Lowest ambient
temperature when
1.6 Recommandations for use
To use the generator in the best way it is a good idea to pay attention
to even small overloads, which if prolonged, will cause the protective
thermal cutouts to trip.
When running in it is important not to put the new engine under a load
that exceeds 70 % of the nominal load, at least for the first 50 working
hours; then we recommend a normal use of the generator with a load
equal to roughly 3/4 of the maximum declared continuous load, this in
order to prolong the life of the generator and maximize efficiency.
TEC 40D
6
Paraffin content for:
starting (°C)
Summer
fuel
Winter
fuel
0 a -10
20%
-
-10 a -15
30%
-
-15 a -20
50%
20%
user’s manual
General informations 1
1.8 Operation description
GB
The main elements of the TEC 40D generator are: an engine (a), a permanent magnet alternator (b), an inverter (c), an internal control panel (d),
a terminal board (e) and an external control panel (f).
When the engine runs it drives the alternator to which it is solidly connected, which in turn generates alternating current that supplies the inverter.
The inverter “converts” the voltage supplied into a higher quality, perfectly stable voltage of 230 V and 50Hz supply.
The terminals, the socket where the extension of the external control panel is connected and the safety switch are located on the internal control
panel.
The external control panel is equipped with:
ALTERNATOR
UNIT
(B)
- buttons to start and stop the generator
- a back lit LCD screen showing the main electrical properties, an indicator shows that the generator is working
properly and an hour counter is also displayed. In the
case of problem the alarm messages are displayed on
this screen.
- LED indicators indicate low levels of petrol and oil.
ENGINE (A)
Start sequence:
1) Push the red main switch
2) Wait “GEN OFF” on the display
3) Push and release the START button
INTERNAL
CONTROL
PANEL
(D)
INVERTER CONTROL
CARD
(C)
user’s manual
Turn-off sequence:
1) Push the red main switch
EXTERNAL
CONTROL
PANEL
(F)
TERMINAL
BOARD (E)
7
TEC 40D
1 General informations
GB
1.9 External control panel
1.10 Internal control panel
DISPLAY
OIL
INDICATOR
EMERGENCY
STOP SWITCH
MAIN SWITCH
PETROL
INDICATOR
START
BUTTON
POWER DELIVERED
VOLTAGE DELIVERED
WORKING HOURS
BATTERY’S DC
VOLTAGE
GENERATOR
STATUS
CUT OUT SWITCH
Operation description
MAIN SWITCH:
START BUTTON:
PETROL INDICATOR:
OIL INDICATOR:
EMERGENCY STOP SWITCH:
CUT OUT SWITCH:
TEC 40D
turns the panel on/stops the generator
starts the generator
indicates that you are using the fuel reserve
indicates a low oil level and the engine automatically stops
stops the generator immediately in an emergency
continuous current thermal cut out protection
8
user’s manual
General informations 1
1.11 Technical data
370
490
455,4
457
320
25
520
41
99,25
467
574
89,25
762,5
DESCRIPTION
UNIT OF MEASURE
VALUE
VOLTAGE SUPPLIED
V
230 ± 10%
MAX CONTINUOUS POWER
W
3500 ± 5%
FREQUENCY
Hz
50 ± 1%
V/A
12 / 10
%
1
g/HPh
190/200
kg
96.5
DIRECT CURRENT POWER
THD
CONSUMPTION
WEIGHT
user’s manual
GB
765
9
TEC 40D
1 General informations
GB
1.12 Table describing the alarm messages appearing on the display
DISPLAYED MESSAGE
LOW BATTERY
OIL CHANGE
NO FUEL
OIL ALERT
GENERATOR ALERT!
OVERLOAD!
SHORT CIRCUIT
OVER TEMPERATURE
LOW POWER ENGINE
RESTART GEN?
GEN CAL
GEN WAIT
GEN ON
GEN OFF
TEC 40D
DESCRIPTION
Indicates that the battery voltage is below the minimum value necessary to start the generator.
GENERATOR BEHAVIOUR
The generator does not start.
ACTIONS
Check the efficiency of the battery before starting
the generator.
This message appears every time the hour counter
of the machine reaches the service interval pre-set to The generator continues to run.
change the engine oil.
Change the oil (see p.20) before restarting the
generator by holding the start button down for
longer.
Indicates that you are using the fuel reserve.
The generator continues to run.
Refuel.
There is no more oil in the oil tank.
The generator stops.
Fill up (see page 11).
General alarm message; it is displayed for instance
when the check ring of the carburettor throttle (step
The generator stops.
motor) is defective and the M110 module cannot check the motor speed
SeeTroubleshooting table on page 18. If the
problem persists, address to the nearest service
centre.
Indicates an output overload of the supplied systems.
The inverter stops and voltage is no longer
supplied, but the engine continues to run for a
correct cooling of the internal parts.
Reduce the connected load, wait a few minutes
to cool down the generator. Stop the engine by
pressing the main switch button. Then restart
the generator.
Indicates an output short of the supplied systems.
The inverter stops and voltage is no longer
supplied, but the engine continues to run for a
correct cooling of the internal parts.
Check all the connected systems, wait a few
minutes to cool down the generator. Stop the
engine by pressing the main switch button.
The inverter stops and voltage is no longer supThis message is displayed in the event of a thermal plied. The engine continues to run for a correct
overload.
cooling of the internal parts, then stops and the
message displayed is “RESTART GEN?”.
Signals a reduction of the voltage supplied to the
The generator stops.
inverter.
This message appears after any stop of the geThe generator stops.
nerator.
Let the generator cool down, wait a few minutes
and restart the unit.
Reduce the connected load and restart the
generator.
Turn off and restart the generator.
This message appears at the generator start-up and
indicates the calibration phase preceding any start- The generator run but voltage is not supplied.
up. The generator does not produce current yet.
Wait a few seconds.
Message displayed between one start attempt and
the other.
The generator not run.
Wait until the message goes off before attempting a new start.
The generator not run.
Push the start button if you want to restart the
generator
Indicates that the generator is running.
Indicates that the generator not run or is ready to
start
10
user’s manual
General informations 1
1.13 Routine maintenance
1.14 Checking the oil level
To perform these checks you should open the door of the generator
taking the following precautions:
Remove the oil filler and clean the dipstick with a cloth.
Refit by screwing the dipstick.
Remove the dipstick and check that the oil level is between the two
(min. and max.) marks.
Add oil if necessary through the filler. Use only the oil recommended
by the manufacturer!
The generator must not be running and all of the parts must be cold.
Set the safety switch on the internal control panel to “O” (OFF).
Disconnect the positive pole (+) of the vehicle’s battery
Refit the plug.
IMPORTANT: Use only genuine spare parts. The generator may
get damaged if other than genuine parts having a different quality
IMPORTANT:
Perform all of the checks making sure the generator is in a horizontal
position.
standard are used.
IMPORTANT:
Remember to reconnect the positive pole (+) of the vehicle’s battery and
set the switch back to “I” (ON) once you have finished the checks.
user’s manual
11
TEC 40D
GB
2 Installation instructions
GB
2.1 Instructions for fixing the generator
1
2
3
4
TEC 40D
12
user’s manual
5
6
7
8
GB
�
�
�
�
�
�
�
user’s manual
13
�
TEC 40D
Installation instructions 2
GB
2.2 Instructions for installing the exhaust system
We recommend positioning the elbow of the exhaust pipe in line with the length of the casing (as shown in the figure) so more vibrations can be
absorbed.
Use the exhaust extension (AG125) to extend the position of the muffler. Fix the exhaust extension to the vehicle using flexible elements to reduce
vibrations (extension fixing is avalaible as accessory upon request - Ref. AG163).
WARNING
Do not make any sharp bends in the hose which could obstruct the exhaust gas.
EXTENSION FIXING
AG163 (OPTIONAL)
EXHAUST
EXTENSION
AG125
TEC 40D
14
user’s manual
2 Installation instructions
2.3 Instructions for the installation of the tank
GB
Generator TEC 40D is equipped as standard with an electric pump for pumping fuel. The following should be done.
The fuel tank should be installed with the tank basis at a maximum depth of 1.5 meters below the lower edge of the
generator box. For safety reasons ensure not to mount the generator box top edge higher than the tank top edge.
TANK MAXIMUM LOWER EDGE
Generator
Tank
Max 1.5m
TANK MAXIMUM TOP EDGE
Generator
user’s manual
3m
Tank
15
TEC 40D
Installation instructions 2
GB
2.4 Instructions for the electrical connection
The Dometic generator is a source of alternate 230V 50Hz tension,
able to cope with various power needs.
Cross-section mm2
230V
(power cables)
Cross-section mm2
12V
(battery charger)
Cross-section mm2
Lenght up to 6m
(battery connection)
Cross-section mm2
Lenght > 6m
(battery connection)
4
2.5
16
25
Electrical connection to the external network
The on board electrical system must be fitted with a relay or switch (e.g.
Dometic switch cod. AG113, available on request) to prevent damage
to the generator when the external power supply network is connected;
in this case, it is suggested that the generator be connected in such a
way as to give it priority with respect to the external network.
Electric wiring must be effected in conformity with the existing laws and
regulations in force in the user’s country.
For correct installation performed by the final user, use preventive
technical assistance by your seller or by a skilled technician.
For the 230 V, use an approved cable with the section indicated in the
table. For connection of the Dometic switch cod. AG113 refer to the
instructions and diagram on the following pages.
Electrical connection of the battery charger
230 V
plug
Earth wire
External control
panel socket
12 V plug
for battery
charger
Socket for
tank float
wire
Emergency
stop switch
The unit is set up to provide for automatic battery recharging. If this
function is to be used, proceed as follows.
Use a cable finding the correct section in the chart on the right.
Connect the cable to the connecting terminal and to the positive pole
of the battery to be charged.
Should the battery be others than that used to start the generator, then
connect the negative pole of this battery to the proper mass point of the
generator (see picture on page 17).
NB:The negative pole of the battery should be grounded with the
vehicle’s frame.
TEC 40D
Cut out switch
Connecting the fuel indicator
Only use the indicator connection if there is a fuel level probe in the
tank used for the generator. Connect the proble cable (e.g. float) to the
relevant terminal (see figure above).
16
user’s manual
2 Installation instructions
Battery connection
GB
N.B.
To start the generator it is necessary to use a 12VDC battery, with a minmum
capacity of 60Ah.
�
To start the generator, connect it to the positive pole of the vehicle’s battery
with a sheathed cable of a suitable cross-section as shown in the table. The
ground cable must have the same cross-section and be connected or as
shown in the figure to the side or from the inserts to the frame of the vehicle.
Make sure that the contact is good. If necessary remove paint or rust from
the surface of the frame and protect the connection with grease.
To protect the DC wiring use a 100 Amp fuse closed to the plus pole
of the battery.
(-) negative
pole
External control panel connection
Choose the desired position inside the vehicle, use the extension
lead (supplied) to connect the external control panel to the internal
control panel of the generator.
(+) Plus
pole
user’s manual
17
TEC 40D
Troubleshooting, maintenance, recycling 3
Too much oil in the engine
Electric pump unfed/out of order
The starter shaft is dirty
Low battery charge
Load over 3.5 kW
Inverter is damaged
The Air intakes are obstructed
The air filter is dirty
No fuel received from injectors
Check the load supplied
No fuel
The generator earth wire (or fuse) is broken
The electrical cables are broken
Operations to be carried
out by qualified technicians
The starter is not powered up
Operations to be carried
out by the user
The emergency stop switch is not to ON
3.1 Faults, causes and solutions
SOLUTION
GB
CAUSE
By operating the main switch, the
panel does not switch on
By pushing the start button, the
generator does not start (the
starting motor does not run)
The starting motor runs but the
generator does not start
The generator tends to stall
The generator runs but it does not
produce current
The generator starts, then stops and
display “generator alert!” message
The produced current oscillates
TEC 40D
18
user’s manual
3 Troubleshooting, maintenance, recycling
3.2 Check list and time intervals
GB
Maintenance chart
Maintenance work required
8-15
Every 8-15 operating hours, or before each
Check oil level
daily startup
Check combustion and cooling air intake zone.
250
Every 250 operating hours
Change engine oil (In any case at least once a year)
Check and adjust valve clearances.
Clean cooling air area.
Check screw connections.
500
Every 500 operating hours
1000
Every 1000 operating hours
Clean the oil filter
Once a year
Vibration-proof fixing point
user’s manual
Change fuel filter element.
Dry-type air cleaner maintenance.
19
TEC 40D
Troubleshooting, maintenance, recycling 3
3.3 Extraordinary maintenance
°F
°C
122
50
Changing the oil
40
32
0
14
-10
-4
-20
-22
-30
-40
-40
40
30
10
20W/20
20
50
15W/40
68
10W/40
30
10W/30
86
10W
104
OIL : SAE
5W/40
For some maintenance operations there is the possibility of pulling
the generator out by sliding the entire bottom of the generator on
the guides fixed to the sidewalls of the casing. To set the generator basis free loosen the harness and unscrew the 4 fastening
screws. The generator unit will be extractable by ¾ of its depth.
To come to a complete extraction put the generator basis on firm
ground to protect it against possible falls and unscrew the 2 limit
stop screws. Alternatively tighten the generator basis inserting
screws in inner position.
5W/30
GB
Warning
Hot oil can burn your skin!
Check the oil level with the engine turned off.
Important
Old oil moust not be disposed of in the environment, but left
to a station specialised in the disposal and/or recycling of the
same, respecting the laws in the country where the operations
are carried out.
Use oil recommended for 4-stroke Diesel engines of these types:
CCMC-D4-D5-PD2 or API-CD-CE-CF-CG or SHPD (this indication is
on the oil can).
SAE 10W-30 oil is recommended for general use at all temperatures.
If you use monograde oil, choose the appropriate viscosity on the
basis of the average temperature of the place where the generator is
installed.
To drain the old oil easier you should run the generator for roughly 3/5
minutes, in this way the oil is more fluid and will drain better through the
drain tube when you remove the drain plug. Refill the generator with oil
of the recommended type, through the oil filler.
The quantity of oil is:
1.1 Litres
TEC 40D
Oil drain plug
20
user’s manual
3 Troubleshooting, maintenance, recycling
Air filter maintenance
GB
Warning
Do not use diesel or solvents with a low evaporation point to clean the
air filter element as it could catch fire or explode.
Important
If the air filter is dirty this reduces the flow of air to the engine. Therefore,
to prevent malfunctions we recommend checking the state of the filter
periodically, and more often if you are using the TEC 40D in particularly
dusty areas.
Never use the engine without the air filter. The engine would wear
quickly.
Operations:
Remove the air cleaner cover.
Unscrew and remove knurled nut and take off air cleaner element.
Clean the filter compartment and the cover.
Dirt and other foreign bodies must not be allowed to enter the engine’s
air inlet points.
The filter cartridge should either be renewed or, depending upon the
degree of contamination, cleaned, or checked, as follows:
Air cleaner cover
Knurled nut
Air cleaner element
Cleaning the filter cartridge
Dry contamination
Use compressed air to blow through the filter cartridge from the inside outwards, until no further dirt emerges.
Important ! The pressure must not exceed 5 bar.
Moist or oily contamination
Renew the filter cartridge.
Checking the filter cartridge
Check filter cartridge’s gasket surface for damage, Check the filter cartridge for cracks or any other type of damage to the paper filter by holding
it inclined towards the light or by shining a light source through it.
Important ! The slightest damage to the paper filter rules out it being used any longer. Re-assemble the filter cartridge in the reverse order of
work.
user’s manual
21
TEC 40D
WIRING DIAGRAM - TEC 40D
GB
RED
2
YELLOW
21
1
GREY
3
24
26
2
1
2 3 4 5 6
-
25
+
6
+ +
R3
8
+ +
+ +
R3
R2
R1
R2
R1
28
1
2
3
4
5
6
7
8
9
10
11
12
15
+
27
22
RED
23
12
5
4
3
2
1
13
+
9
8
P
20
19
10
M
DIESEL
PUMP
10
9
8
9
8
7
6
5
4
4
3
3
2
2
1
1
16
18
BLACK
BLACK
1
29
2 3 4
14
MOTORE HATZ
TEC 40D
22
6
5
4
3
2
1
GRE E N
BROW N
YELLOW
BLACK
RED
PINK
VIOLE T
GRE Y
WHIT E
BLUE
YELLOW
YELLOW
GREY
RE D
BLACK
7
5
WHITE
WHITE
6
6
ORANGE
1
7
BLA CK
YELLOW
BR O WN
GR E E N
BLUE
WHIT E
GR E Y
RE D
VIOLE T
PINK
2
ORANGE
BLACK
BLUE
VIOLET
PINK
PINK
BROWN
17
3
8
B
4
9
12
5
11 10
230
6
12
230
PINK
ORANGE
12
11 10
-
7
2
1
BLU
WHITE
YELLOW
DESCRIPTION
BLU
WHITE
BLACK
BLACK
BLACK
GREY
CYAN
RED
4
5
9 8 7 6 5 4 3 2 1
9 8 7 6 5 4 3 2 1
CYAN
RED
11
CYAN
1
1
THREE-PHASE WINDING
2
AUXILIARY WINDING
3
AUXILIARY WINDING
4
INVERTER MODULE
5
9-PIN CONNECTOR
6
12V REGULATOR
7
0/1 EMERGENCY STOP SWITCH
8
PRESSURE CONTROL DEVICE
9
START RELAY
10
STARTING MOTOR
11
9-PIN CONNECTOR
12
HATZ 6-PIN CONNECTOR M
13
HATZ 6-PIN CONNECTOR F
14
INTERNAL CONTROL PANEL
15
THERMAL SWITCH
16
12-PIN CONNECTOR
17
ELECTROSTOP
18
10-PIN CONNECTOR
19
PREHEATING GLOW PLUG
20
TEMPERATURE SENSOR
21
2-PIN CONNECTOR
22
VEHICLE CONTROL PANEL
23
12-PIN CONNECTOR
24
AUXILIARY WINDING
25
CONNECTOR
26
PREHEATING RELAY
27
PUMP RELAY
28
MOTOR START RELAY
29
4-PIN CONNECTOR
CONNECTION TO THE EXTERNAL POWER SUPPLY
GB
AG113 SWITCHING ACCESSORY
(available on demand)
1) Use cables of suitable section (see table in paragraph “electrical connection”).
2) Fix the AG113 switch in a position that
facilitates connection.
3) Break the cable connecting the mains
input with the cut-out on the control panel,
so that it is possible to make the connections as shown in the wiring diagram.
4) Connect the cables to the switch, it is
necessary to insert a jumper between terminal 1 and R1 and between terminal 3
and R3.
5) In positions R2 and R4, connect the
cables from the generator 230 V terminal
board.
LOAD
1 R1
2
R2
R3
R4
A2
3
4
A1
MAINS
AG113
1
230
BATTERY
230
12
GENERATOR
23
TEC 40D
ST095 r0
DOMETIC
Via Virgilio, 3 - 47100 Forlì - Tel. 0543/754213 Fax.0543/756631