1
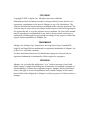
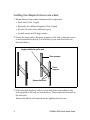
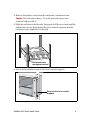
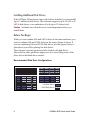
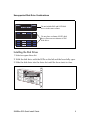
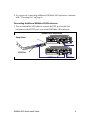
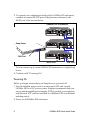
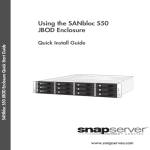
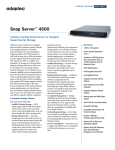
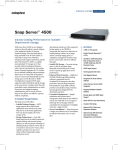
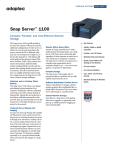
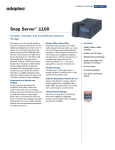
SANbloc S50 JBOD Enclosure Quick Start Guide
Using the SANbloc S50
JBOD Enclosure with
Snap Servers
Quick Install Guide
www.snapserver.com
COPYRIGHT
Copyright © 2007, Adaptec, Inc. All rights reserved worldwide.
Information in this document is subject to change without notice and does not
represent a commitment on the part of Adaptec or any of its subsidiaries. The
software described in this document is furnished under a license agreement. The
software may be used only in accordance with the terms of the license agreement.
It is against the law to copy the software on any medium. No part of this manual
may be reproduced or transmitted in any form or by any means, electronic or
mechanical, including photocopying and recording, for any purpose without the
express written permission of Adaptec, Inc.
TRADEMARKS
Adaptec, the Adaptec logo, Snap Server, the Snap Server logo, GuardianOS,
SnapOS, and Snap Disk are trademarks or registered trademarks of Adaptec, Inc.
in the U.S.A. and other countries.
Products mentioned herein are for identification purposes only and may be
registered trademarks or trademarks of their respective companies.
REVISIONS
Adaptec, Inc. provides this publication “as is” without warranty of any kind,
either express or implied, including but not limited to the implied warranties of
merchantability or fitness for a particular purpose. Adaptec and its subsidiaries
reserve the right to revise this publication and to make changes in the content
hereof without the obligation of Adaptec to notify any person of such revision or
changes.
SANBloc S50 Quick Install
Guide
The SANbloc S50 JBOD enclosure supports up to 12 Serial Attached SCSI
(SAS), 12 Serial ATA (SATA) disk drives, or a combination of SAS and
SATA drives (up to 12 drives total). A maximum of seven (7) S50s can be
chained to each Snap Server.
This Quick Installation Guide describes how to install the SANbloc S50
enclosure and connect it to a 500/600 Series Snap Server.
Note To connect the SANbloc S50 enclosure, your Snap Server must be
installed with a Serial Attached SCSI (SAS) host adapter.
1
SANBloc S50 Quick Install Guide
Enclosure Features and Accessories
11
2
1
3
4
5
3
6
12
HOST
EXP
FAULT !
SEP MASTER
7
8
9
14
10
13
Q
In uic
Gu stal k
ide l
1
Pre-installed disk drives (4 or 12) and
pre-installed drive carrier blanks (8
blanks if 4 drives are pre-installed)
8
SAS I/O controller status LEDs
2
Enclosure status LEDs
9
SAS HOST connector
3
Advanced Power and Cooling units
(two)
10 SAS EXP connector
4
On/off switch
11 Rackmount kit
5
Power connector
12 Power cables for all regions (6
total)
6
APC unit status LEDs
13 External 4x SAS cable
7
SAS I/O controller
14 Quick Install Guide
SANBloc S50 Quick Install Guide
2
Installing Your Adaptec Enclosure into a Rack
1 Ensure that you have these rackmount kit components:
• Front rails (1 left, 1 right)
• Rear rails, two different lengths (2 left, 2 right)
• 20 nuts (10 each of two different types)
• 4 small screws and 10 large screws
2 Secure the front rails to the front supports of the rack, using the screws
or nuts included in the kit. (Use the nuts if your rack does not have
threaded holes.)
)
Secure rear rail, using rail
length suitable for your rack
Rear support
Front
support
Secure front rail
3 Select the right length of rails for your rack, then secure them to the
rear supports of the rack, as shown above. Then secure the front rails to
the rear rails.
Ensure that all the rail connections are tightened and secure.
3
SANBloc S50 Quick Install Guide
4 Remove the plastic covers from the enclosure’s rackmount ears.
Caution The enclosure is heavy. To avoid personal injury, have
someone help you lift it.
5 Slide the enclosure onto the rails, then push it all the way back until the
rackmount ears are flush against the front vertical supports and the
enclosure rests completely on the rails.
Rackmount ears
rest against vertical
6 Secure both rackmount ears to the front vertical supports.
Secure to the front vertical
supports
SANBloc S50 Quick Install Guide
4
Installing Additional Disk Drives
If the SANbloc S50 enclosure came with 4 drives installed, you can install
up to 8 additional disk drives. The enclosure supports up to 12 SAS or 12
SATA disk drives, or a combination of both (up to 12 drives total).
Caution Acclimate new disk drives to room temperature before you
install them.
Before You Begin
While you can combine SAS and SATA drives in the same enclosure; you
cannot combine SAS and SATA drives in the same column of drives. If
you are combining SAS and SATA disk drives, use the figures below to
plan where you will be placing the disk drives.
These figures represent enclosures fully-loaded with disk drives.
However, the same guidelines apply even if you are filling some of the
drive slots with blank drive carriers.
Recommended Disk Drive Configurations
SAS Disk Drives
SATA Disk Drives
5
SANBloc S50 Quick Install Guide
Unsupported Disk Drive Combinations
Do not include SAS and SATA disk
drives in the same column.
Do not place a column of SATA disk
drives between two columns of SAS
disk drives.
Installing the Disk Drives
1 Select an open drive slot.
2 Hold the disk drive with the LEDs on the left and the lever fully open.
3 Slide the disk drive into the drive slot until the lever starts to close.
SANBloc S50 Quick Install Guide
6
4 Gently push the lever until it meets the latch on the left side of the
drive slot and clicks into place.
5 Repeat for all remaining disk drives.
Note To maintain proper airflow and cooling, a disk drive or a blank
drive carrier must be installed in every slot of the enclosure.
Connecting to Your Snap Server
Follow the instructions appropriate for your configuration.
Connecting One SANbloc S50 Enclosure
1 Power off your Snap Server.
2 Use the included 4x SAS cable to connect your Snap Server to the HOST
port on the SANbloc S50 enclosure.
Snap Server
SANbloc S50 Enclosure
SAS Port
HOST
EXP
FAULT !
SEP MASTER
HOST Port
7
SANBloc S50 Quick Install Guide
3 If you are not connecting additional SANbloc S50 enclosures, continue
with “Powering On” on page 9.
Connecting Additional SANbloc S50 Enclosures
1 Use an external 4x SAS cable to connect the EXP port on the first
enclosure to the HOST port on a second SANbloc S50 enclosure.
SANbloc S50 Enclosures
Snap Server
HOST
EXP
FAULT !
SEP MASTER
SAS Port
HOST
HOST Port
SANBloc S50 Quick Install Guide
EXP
FAULT !
SEP MASTER
EXP Port
8
2 To expand your configuration with multiple SANbloc S50 enclosures,
continue to connect the EXP port of the previous enclosure to the
HOST port of the next enclosure.
SANbloc S50 Enclosures
HOST
EXP
FAULT !
SEP MASTER
Snap Server
HOST
EXP
FAULT !
SEP MASTER
SAS Port
HOST
EXP
FAULT !
SEP MASTER
HOST Port
EXP Port
You can connect up to seven SANbloc S50 enclosures to a single Snap
Server.
3 Continue with “Powering On”.
Powering On
Before you begin, ensure that your Snap Server is powered off.
1 Use the included power cords to connect each APC unit on each
SANbloc S50 to an AC power source. Adaptec recommends that you
use an uninterruptible power supply (UPS) to protect your enclosure,
and that each APC unit be connected to a different UPS on a different
building circuit.
2 Power on all SANbloc S50 enclosures.
9
SANBloc S50 Quick Install Guide
3 When all SANbloc S50 enclosures are fully powered on, power on the
Snap Server.
Verifying that an Enclosure is Online
To verify that a SANbloc S50 enclosure is online:
1 Launch a Web browser and enter the Server name or IP address of the
Snap Server to which the SANbloc S50 enclosure is connected.
2 Click the Administration link and log in as admin with your
administrator password.
3 Navigate to the Storage > Disks/Units screen.
The Disks/Units screen is a graphic representation of the RAID
configuration on your server. Your SANbloc S50 enclosure appears as a
12-disk drive chassis; disk drives installed in the enclosure appear as
online disk drives in correct physical position; unpopulated drive slots
appear as offline disk drives.
By default, the disk drives installed in the SANbloc S50 enclosure are
unassigned (not part of an array).
Registering Your SANbloc S50
To register your SANbloc S50, go to the Server > Registration page of the
GuardianOS Administration Tool for your Snap Server, then follow the
online instructions.
Note If your server is already registered, re-registering the server will
register the S50 as well.
SANBloc S50 Quick Install Guide
Getting Help
For additional information about the SANbloc S50 SAS JBOD enclosure,
refer to your Snap Server Administrator Guide or Configuration and
Hardware Options Guide (on your Snap Server User CD), or the
GuardianOS WebUI Help for your Snap Server.
Service and Technical Support
For an immediate response to a service inquiry, use our Expert
Knowledge Base System at http://www.snapserver.com/kb. Type in
your question to view a list of possible resolutions to known issues. If
none of the listed topics resolves your inquiry, you can forward the
question to our Technical Support department, who will then email you a
response.
To obtain additional service or technical support for your SANbloc S50
enclosure, call 1-408-934-7274.
11
SANBloc S50 Quick Install Guide
Adaptec, Inc. Worldwide Limited Warranty
The Snap Server Storage Solution hardware carries a Limited Warranty
from the date of purchase as follows:
Subject to the conditions below and during the Hardware Warranty
Period, Adaptec will repair or replace Warranted Hardware, at Adaptec’s
election, with a new or refurbished equivalent if a Warranted Hardware
failure occurs due to defects in material and workmanship. The
Warranted Hardware and the applicable Hardware Warranty Period are
as follows:
SANbloc S50 Expansion Array: 3 Years parts and labor
This Limited Warranty is also subject to the following conditions:
• You must be the original end-user purchaser (this Limited Warranty is
non-transferable);
• You must be able to provide proof of purchase showing the date and
place of purchase with your Limited Warranty claim;
• You must contact Adaptec during the Hardware Warranty Period, and
upon request, ship the defective hardware with any additional
requested documentation to Adaptec or other address provided by
Adaptec at your expense;
• The warranty does not cover damage caused by abuse on your part,
such as dropping the Warranted Hardware, using incorrect electrical
current, misuse, accident, failure to follow instructions, negligence,
exposure to magnetic fields, external environmental causes, shock, or
unauthorized maintenance or repair;
• This Limited Warranty does not cover any software used with,
installed on, or accompanying the Warranted Hardware.
EXCEPT AS SET FORTH ABOVE, WITH RESPECT TO THE
WARRANTED HARDWARE AND THE ASSOCIATED SOFTWARE,
ADAPTEC MAKES NO WARRANTIES, EXPRESS, IMPLIED, OR
STATUTORY AND DISCLAIMS ANY IMPLIED WARRANTY OR
CONDITION OF MERCHANTABILITY, FITNESS FOR A PARTICULAR
SANBloc S50 Quick Install Guide
PURPOSE, OR NON-INFRINGEMENT, OR A WARRANTY THAT THE
PRODUCT WILL OPERATE ERROR FREE.
IN NO EVENT SHALL ADAPTEC, INC. BE LIABLE FOR THE COST OF
PROCUREMENT OF SUBSTITUTE HARDWARE, SOFTWARE, OR
SERVICES, LOST PROFITS, LOST DATA, OR ANY SPECIAL,
INDIRECT, CONSEQUENTIAL, OR INCIDENTAL DAMAGES,
HOWEVER CAUSED AND ON ANY THEORY OF LIABILITY ARISING
IN ANY WAY OUT OF THIS AGREEMENT OR THE SERVER. THIS
LIMITATION SHALL APPLY EVEN IF ADAPTEC, INC. HAS BEEN
ADVISED OF THE POSSIBILITY OF SUCH DAMAGES, AND
NOTWITHSTANDING ANY FAILURE OF ESSENTIAL PURPOSE OF
ANY LIMITED REMEDY PROVIDED HEREIN.
Some jurisdictions do not allow warranty or liability exclusions or
limitations of liability for consequential or incidental damages, so the
above provisions may not apply to you.
This Limited Warranty will be governed in accordance with the laws of
the State of California, without reference to its choice of law rules, and the
United States of America.
New and reconditioned parts may be used to repair the hardware and
replace existing parts; except as provided above, these replacement parts
do not extend the Hardware Warranty Period. Adaptec will own all parts
removed from repaired products for which a replacement was provided.
Prior to any return of your hardware to Adaptec for warranty service,
back up all data and remove any confidential or personal information.
Adaptec, Inc. offers additional service and support, but makes no
guarantees about the availability of extended warranties, support, or
service beyond that set forth in this Limited Warranty. For information on
availability of service and warranty upgrades, please visit:
http://www.snapserver.com/support.
13
SANBloc S50 Quick Install Guide
FCC Notification
Authorized Service
Only an authorized service representative can service the Server. Failure
to comply with this requirement will void the warranty.
WARNING to Service Personnel
The SANbloc S50 has been tested and found to comply with the limits for
a Class “A” digital device, pursuant to part 15 of the FCC Rules. These
limits are designed to provide reasonable protection against harmful
interference when the equipment is operated in a commercial
environment. This equipment generates, uses, and can radiate radio
frequency energy and, if not installed and used in accordance with the
instruction manual, may cause interference to radio communications.
Operation of this equipment in a residential area is likely to cause
harmful interference, in which case the user will be required to correct the
interference at their own expense.
Changes or modifications not expressly approved by Adaptec could void
the user’s authority to operate the equipment.
Safety Precautions
Note The maximum current draw is printed on the label on the back of
the storage subsystem.
Caution Before touching any enclosure components, ground yourself and
take antistatic precautions. Adaptec recommends that you use an
antistatic wrist strap and a grounding wire as minimum precautions.
Environmental Conditions — Make sure the conditions of the environment
in which the server resides fall within the specifications for your model.
Installing the Server — During installation, make sure the server is always
placed on a surface capable of supporting its weight.
SANBloc S50 Quick Install Guide
Connecting to the Main Power — Install the server near an easily accessible
power source. Make sure the power source is the proper voltage for your
model. Place the power cord out of the way of traffic; do not place any
object over the power cord. Each storage subsystem must have a good
electrical ground connection through each power cord, through the
building power grid to the point of origin for the building power source
entry.
If the server is taken offline for an extended period, disconnect it from the
power source to avoid possible damage from a power surge.
Enclosure Openings — Openings in the enclosure ensure proper airflow
and prevent overheating; do not cover these openings. Never place
liquids on or near the server to avoid spillage; liquid entering an
enclosure opening could cause fire or electrical shock.
Earthing — When installing the server in any location (including rack
mounting), the installer must validate that the AC input grounding is
adequate and that the AC circuit capacity is sufficient and does not create
a circuit overload situation. Reliable earthing of rack-mounted equipment
should be maintained. Particular attention should be given to supply
connections other than direct connections to the branch circuit (for
example, use of power strips).
Circuit Overloading—Consideration should be given to the connection of
the equipment to the supply circuit and the effect that overloading of
circuits might have on overcurrent protection and supply wiring.
Appropriate consideration of equipment nameplate ratings should be
used when addressing the concern.
Cleaning the Server — Before cleaning the server, be sure to disconnect all
cabling. Do not use any liquid or spray cleaning agents to clean the
server; use only a damp sheet or cloth.
Servicing the Server — Never open the Snap Server. For safety reasons,
the server should only be opened by qualified service personnel.
Do not attempt a remedy if one of the following situations arises; contact
Adaptec technical support for assistance:
• The power cord or plug is damaged.
15
SANBloc S50 Quick Install Guide
• Liquid has penetrated the server.
• The server has been exposed to moisture.
• The server continues to operate in an unexpected manner even after
solutions suggested in the Administration Guide have been followed.
Installation Cautions and Notes
Caution To prevent personal injury and equipment damage, have
someone assist you during installation. Ensure the mounting hardware
and tools are easily accessible. If necessary, reduce the weight of the
storage subsystem by removing the drive carriers and APC modules.
Note Remove all of the components from the packaging and place them
on an antistatic surface until you are ready to use them. If you are using
new disk drives, allow them to acclimate to room temperature before you
install them in the enclosure and power on the system. Before beginning
the installation, inspect the components for shipping damage.
Note Ensure that your equipment rack is placed in a dust-free, well
ventilated area close to a UPS. Leave enough room behind the rack for
servicing and to allow for sufficient airflow.
Note For equipment racks with single or multiple storage subsystems
installed, the TMRA (manufacturers maximum recommended ambient
temperature) is 40 °C.
Note Elevated Operating Ambient Temperature—When installed in a
closed or multi-unit rack assembly, the operating ambient temperature of
the rack environment may be greater than the room ambient. Therefore,
consideration should be given to installing the equipment in an
environment compatible with the manufacturer's maximum
recommended ambient (TMRA).
Note Mechanical Loading—Prevent instability by installing heavier
items into the bottom of the equipment rack. Mounting of the equipment
in a rack should be such that a hazardous condition is not achieved due to
uneven mechanical loading.
SANBloc S50 Quick Install Guide
691 Milpitas Blvd.
Milpitas, CA 95035 USA
408-957-2550
www.snapserver.com
©2007 Adaptec, Inc.
All rights reserved. SnapServer, Adaptec and the SnapServer
logo are trademarks of Adaptec, Inc. which may beregistered
in some jurisdictions.
Part Number: 70990915-001 Rev A