1
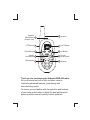
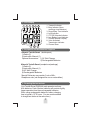
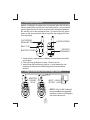
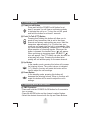
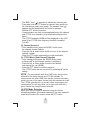
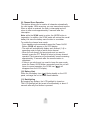
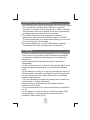
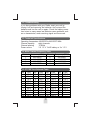
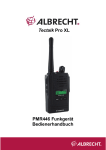
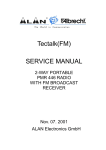
Tectalk smart
User Manual
Speaker
Microphone/ 1
Charger Jack
PTT Button 2
Down Button 3
Mode/
Lock Button 4
Microphone 5
6 Antenna
7 LCD Display
8 Up Button
Power/
9 Scan Button
10 Speaker
Thank you for purchasing this Albrecht PMR 446 radio.
All our products are built to offer excellent value by
combining advanced features, great design and
manufacturing quality.
To ensure you are familiar with the operation and features
of your radio and in order to obtain the best performance,
please read this manual carefully before operation.
1. Contents
1. Contents
2. CAUTION
3. LCD Display
4. Equipment and Accessories Supplied
5. Powering the transceiver
6. Installing the batteries
7. Charge Information
8. Control Buttons
(1) Power on-off button
(2) Push-To-Talk (PTT) button
(3) Up button
(4) Down button
9. Operating Modes and Features
(1) PMR Operation
(2) Channel Selection
(3) CTCSS Mode Selection
(4) VOX Mode Selection
(5) Roger Beep Tone
(6) Button Beep (Keytone)
(7) Call Ringer
(8) Keypad Lock
(9) Channel Scan Operation
(10) Battery Alert
(11) Backlighting
10. Note for Good Communication
11. Warning
12. Troubleshooting
13. Technical Specifications
14. Main Channel Frequency Table
15. CTCSS Tone Subcode Table
16. CE Declaration
17. Safety Requirement
3
3
5
6
6
6
6
7
7
7
7
7
8
8
8
8
8
8
9
9
10
10
10
10
10
11
11
12
12
12
12
13
13
2. CAUTION
NEVER ATTEMPT TO CHARGE ALKALINE OR
DRYCELL BATTERIES, AS BATTERIES MAY BURST
CAUSING PERSONAL INJURY AND DAMAGE TO
THE PRODUCT. WHEN RECHARGING NICKEL
METAL HYDRIDE (Ni-MH) BATTERIES WITH THE
SUPPLIED CHARGER AND WALL ADAPTOR,
USE ONLY APPROVED RECHARGEABLE
BATTERIES. USE OF CHARGERS WITH
OTHER BRANDS OF BATTERIES IS NOT
RECOMMENDED, AS BATTERY CHARGING TIMES
WILL VARY WITH DIFFERENT BRANDS. AVOID
PLACING THE TECTALK SMART TRANSCEIVER
FOR PROLONGED PERIODS OF TIME IN DIRECT
SUNLIGHT OR TEMPERATURES BELOW -20ºC OR
ABOVE 60ºC.
KEEP THE ANTENNA AT 1 INCH (2.5cm) AWAY
FROM YOUR HEAD AND BODY. DO NOT USE YOUR
TECTALK SMART RADIO TRANSCEIVER WITH A
DAMAGED ANTENNA.
4
3. LCD Display
1
2
3
4
7
5
8
1. Transmit Indicator
2. Busy Indicator (Upon
receiving a transmission)
3. Roger Beep Tone Indicator
4. Lock Indicator
5. CTCSS Subcode Indicator
6. Low Battery Level Indicator
7. Channel Number Display
8. Voice Activated
Tansmission indicator
9. Channel Scan
6
9
4. Equipment and Accessories Supplied
Albrecht Tectalk Smart (double pack)
1) Radio (2)
2) Instruction Manual (1)
Optional Accessories : 1) AC Wall Charger
2) Rechargeable Batteries
Albrecht Tectalk Smart (complete set package)
1) Radio (2)
2) Instruction Manual (1)
3) AC Wall Charger
4) Rechargeable Batteries
Special Deliveries may contain 2 sets of MicHeadphone sets (not designed for use on motor-bikes)
5. Powering the transceiver
Your Tectalk Smart PMR 446 radio operates on three
AAA batteries. Fresh Alkaline batteries will provide slightly
longer operation time than rechargeable batteries.
When using rechargeable batteries, battery charging
time is typically 12-15 hours. (You are recommended
to charge two radios at the same time.)
5
6. Installing the batteries
Battery installation is made more convenient when the belt clip is
either rotated left or right to the horizontal position, or is removed.
simply rotate the clip in either direction to the horizontal position.
Be careful not to use excessive force. To remove the clip, press
down on the spring release tab and pull the clip straight out from
the radio body.
CLIP SPRING
RELEASE TAB
COVER ARROW
BELT CLIP
POSITIVE
TERMINALS
BATTERY COVER
1. Using thumb, press down on battery cover at arrow and slide
cover down.
2. Then lift cover at bottom to open. Remove cover.
3. Insert three AAA batteries (positive (+) end toward the top
begining at left side and alternating positive terminals as
shown).
7. Charge Information (For Set Package version)
ADAPTOR
POWER
PLUG
INPUT : 230VAC
OUTPUT : 6VDC
NOTE: Only ALAN / Albrecht
recommended rechargeable
batteries shall be recharged in
the radio transceiver.
6
8. Control Buttons
(1) Power on-off Button
Press and hold the POWER on/off button for at
least 2 seconds.You will hear a confirming melody
to indicate the unit is on. To turn the unit off, press
and hold the button for at least 2 seconds.
(2) Push-To-Talk (PTT) Button
Pressing and holding this button will allow you to
speak to any transceiver that is set to the same
channel and privacy code setting as yours. Hold the
transceiver approximately 2 to 3 inches from your
mouth as you speak into the built in microphone. After
you have finished speaking, release the PTT Button to
allow reception of incoming signals. Whenever the
button is pressed, the transmit icon ( ) will appear.
When receiving an incoming signal, the BUSY ( )
icon will appear. The PTT button can also be used as
a two-way call ringer. Pressing the button twice
quickly will call another party on the same channel.
(3) Up Button
In the standby mode, pressing this button will increase
the listening volume. The current volume is indicated
(1-7). When in function edit mode this button will be
used to adjust the unit's settings.
(4) Down Button
In the standby mode, pressing this button will
decrease the listening volume. When in function edit
mode this button will be used to adjust the unit's
settings.
9. Operating Modes and Features
(1) PMR Operation
- Press and hold the POWER On/Off button for 2 seconds to
turn on power.
- Press the MODE button so the channel number flashes.
- Select the desired channel with the Up and Down Buttons.
7
The BUSY icon ( ) appears to indicate an incoming call.
- Press and hold the PTT button to transmit, then speak into
the microphone clearly and slowly. The transmit icon ( )
appears on the display while the button is pressed.
- Release PTT button to receive.
- Communication can only be accomplished when the channel
and CTCSS tone frequency of at least two parties are the
same .
- The CTCSS subcode (01-38) will be displayed on the LCD
panel if the CTCSS tone frequency function is enabled
(not oF).
(2) Channel Selection
- From standby mode, press the MODE button once;
the channel number flashes.
- Press the Up or down button briefly to move to the desired
channel number.
- Press the PTT button momentarily to confirm selection.
(3) CTCSS Mode (Sub-Channel) Selection
- From standby mode,press the MODE Button twice;
a flashing oF or sub-channel number is displayed.
- Press the Up or Down button to select the desired
sub-channel for use (01-38).
- Press the PTT button to confirm selection.
- The CTCSS mode can be turned off by selecting oF as the
setting.
NOTE : To communicate with other PMR units, they must be
switched to the same channel and CTCSS subcode. To
communicate with other PMR units that do not have subcodes,
switch your unit to the same channel with the subcode set to oF.
The CTCSS subcodes do not prevent others from hearing you
transmisstion.This will only allow you to ignore all traffic on a
given channel not using the same subcode.
(4) VOX Mode Selection
When your voice or signal is detected using the internal
microphone/headset (purchased separately), the radio transmits
automatically without the need to press the PTT button.
8
To enable the VOX operation:
- From standby mode, press the MODE button 3 times unitil the
blinking VOX icon (
) appears with on or oF.
- Press the Up or Down button to select the VOX on or oF as
desired.
- Press the PTT button momentarily confirm selection.
- When enabled, the VOX icon (
) appears.
(5) Roger Beep Tone
The Roger Beep is a tone which is automatically transmittied
whenever the PTT button is released.
To enable and disable the Roger Beep tone:
- From standby mode, press the MODE Button 4 times unitil
the flashing Roger Beep icon ( ) appears with on or oF.
- Press the Up or Down Button to select the tone on or off as
desired.
- Press the PTT button momentarily to confirm selection.
- When enabled, the Roger beep icon ( ) appears.
(6) Button Beep (keytone)
This feature allows the transceiver to sound a confirmation
tone whenever the following keys are pressed: Power On/Off/
Scan Button, Up/Down Buttonsand MODE Button. This feature
is always on.
(7) Call Ringer
The transceiver provides a transmit call ring melody to alert
other users of an incoming call. From standby mode, pressing
the PTT button twice in quick succession will transmit the call
ringer melody.
(8) Keypad Lock
The lock function is to avoid the accidental changes of radio
settings. The POWER On/Off, PTT and Volume Up/Down
button will supercede the lock function.
To set the keypad lock operation :
- From standby mode, press and hold the MODE button for 2
seconds or until the lock icon ( ) appears on the display.
- To disable the lock operation, press and hold the MODE
button for at least 2 seconds ; the lock icon ( ) will disappear.
9
(9) Channel Scan Operation
This feature allows you to monitor all channels automatically
for valid signals. While scanning, you can transmit and receive.
When a signal is received, the scan is interrupted and will
return to scan mode approximately 5 seconds after the
interruption.
Note: while the SCAN mode is active, the MODE button is
inoperative. In addition, the SCAN mode will reduce the overall
battery life since the battery save function is overridden.
To enable the channel scan mode:
- From standby mode,momentarily press the Power On/Off
Button; SCAN will appear on the LCD display.
- The radio will automatically display each channel (1-8) in
ascending order to find an active main channel.
- When the unit doesn't find any signals and you want to
transmit, press the PTT Button to return to primary channel
operation.The transceiver will automatically resume scanning
approximately 15 seconds after the communication is
completed.
- If there is no activity and you want to leave the scan mode,
press the Power On/Off button momentarily and the unit will
return to normal operation; the SCAN icon (
) will
disappear from the LCD display.
(10) Battery Alert
When the low battery icon (
) blinks steadily on the LCD
panel, recharge the unit or install fresh batteries.
(11) Backlighting
By pressing any buttons, the LCD backlight is turned on.
The LCD backlight will be turned off automatically in about 5
seconds after any final button is pressed.
10
10. Notes for Good Communication
1.The PMR446 radio channels are shared on a 'take turns' basis.
This means other groups may be talking on any of the
channels. A common code of courtesy is to switch to another
vacant channel and not to attempt to talk over someone who
is already using the channel you first selected.
2.The Tectalk Smart has been designed to maximize
performance and improve transmission range in the field.
To avoid interference, it is recommended that you do not use
the units closer than 5 feet apart.
3.To increase battery life, use the SCAN feature sparingly.
This feature will reduce operating time considerably.
11. Warning
Remove the batteries from the transceiver if it is not expected
to be used for long periods.This will eliminate the possibility
of chemicals leaking from the batteries and corroding the
transceiver.
Avoid exposing the transceiver to water or extremes of
temperature.
Do not use this device in or near a mining facility, which uses
remotely triggered explosives or in areas labeled "Blasting
Area".
Do not attempt to modify or in any way increase the output of
this transceiver. Its output is designed to meet the legal limits.
Do not use this device or charge its batteries in potentially
explosive atmospheres.
Turn your transceiver off wherever posted notices restrict the
use of radios or cellular telephones.
Facilities such as hospitals may use equipment that is
sensitive to RF energy.
Turn your transceiver off on board aircraft when requested to
do so.
Do not place your radio in front of a vehicle's air-bag. If the
air-bag deploys, it could propel the transceiver like a
projectile causing bodily injury.
11
12. Troubleshooting
If you have problems with your Radio, reset your unit by
turning it off and removing the batteries. And re-insert the
batteries and turn the unit on again. Check the battery power
level since in many cases low batteries cause problems such
as no transmission, weak receiving signal and low sound.
13. Technical Specifications
Operating frequencies 446.00625 to 446.09375 MHz
Channel capacity
eight channels
Channel spacing
12.5KHz
Power source
3 X 1.5 V ' AAA' battery or 3 x 1.2 V
14. Main Channel Frequency Table
Channel
1
2
3
4
Frequency (MHz)
446.00625
446.01875
446.03125
446.04375
Channel
5
6
7
8
Frequency (MHz)
446.05625
446.06875
446.08125
446.09375
15. CTCSS Tone Subcode Table
No.
1
2
3
4
5
6
7
8
9
10
Freq.
67.0
71.9
74.4
77.0
79.7
82.5
85.4
88.5
91.5
94.8
No.
11
12
13
14
15
16
17
18
19
20
Freq.
97.4
100.0
103.5
107.2
110.9
114.8
118.8
123.0
127.3
131.8
No.
21
22
23
24
25
26
27
28
29
30
12
Freq.
136.5
141.3
146.2
151.4
156.7
162.2
167.9
173.8
179.9
186.2
No.
31
32
33
34
35
36
37
38
OF
Freq.
192.8
203.5
210.7
218.1
225.7
233.6
241.8
250.3
0
16. CE Declaration
The CE marking on the product label
demonstrates, that the product complies
with the essential requirements of the
European R&TTE (Radio and
Telecommunication Terminal Equipment)
Directive 1999/5/CE.
This warning symbol indicates that this
equipment operates in non-harmonised
frequency bands and / or may be subject to
licensing conditions in certain countries.
Be sure to check the country list printed on
the gift box. If You do not find Your country
symbol, You may probably not be allowed
to use the radio in Your country. Please find
.
the original declaration
in German manual.
As of October 2005, the unit can be used free of charges in:
Austria, Denmark, Finland, France, Germany, Great Britain,
Greece, Hungary, Ireland, Iceland,Luxemburg, Netherlands,
Norway, Portugal, Spain, Sweden, Switzerland. Belgium and
Italy still request licence from residents, for travellers use is
free.
17. Safety Requirements for Charger
For charging the rechargeable batteries, only CE-approved AC
adaptor must be used in compliance with the following
specifications (never use adaptors with defective parts or cables):
* INPUT : AC 230V 50Hz 30mA
* OUTPUT : DC 6V 300mA
13