1
NVR 8004X
4CH / 8CH / 16CH Tower NVR with 4HDD Bays
User’s Manual
Copyright © EverFocus Electronics Corp,
Release Date: July, 2013
Notice: This content is subject to be changed without notice.
EVERFOCUS ELEC TRONICS CORPORATION
NVR8004X
User’s Manual
2013 EverFocus Electronics Corp
www.everfocus.com
All rights reserved. No part of the contents of this manual may be reproduced or transmitted in any form
or by any means without written permission of the EverFocus Electronics Corporation.
Release Date: July, 2013
QuickTime is a registered trademark of the Apple Computer, Inc.
Windows is a registered trademark of the Microsoft Corporation.
Linksys is a registered trademark of the Linksys Corporation.
D-Link is a registered trademark of the D-Link Corporation.
DynDNS is a registered trademark of the DynDNS.org Corporation.
Other product and company names mentioned herein may be the trademarks of their respective owners.
Warranty
Based on the RMA policy, EverFocus Electronics Corporation ("EverFocus") will repair or
replace, at no charge to the purchaser, any merchandise found to be defective in material
or workmanship.
The NVR hardware is covered with a 2-year limited hardware warranty.
The supplied adaptor is covered with an 1-year limited hardware warranty.
Safety Precautions
Refer all work related to the installation of this product to qualified service personnel or
system installers.
Do not block the ventilation openings or slots on the cover.
Do not drop metallic parts through slots. This could permanently damage the appliance.
Turn the power off immediately and contact qualified service personnel for service.
Do not attempt to disassemble the appliance. To prevent electric shock, do not remove
screws or covers. There are no user-serviceable parts inside. Contact qualified service
personnel for maintenance. Handle the appliance with care. Do not strike or shake, as this
may damage the appliance.
Do not expose the appliance to water or moisture, nor try to operate it in wet areas. Do
take immediate action if the appliance becomes wet. Turn the power off and refer servicing
to qualified service personnel. Moisture may damage the appliance and also may cause
electric shock.
Do not use strong or abrasive detergents when cleaning the appliance body. Use a dry cloth
to clean the appliance when it is dirty. When the dirt is hard to remove, use a mild
detergent and wipe gently.
Do not overload outlets and extension cords as this may result in a risk of fire or electric
shock.
Do not operate the appliance beyond its specified temperature, humidity or power source
ratings. Do not use the appliance in an extreme environment where high temperature or
high humidity exists. Use the NVR at temperatures within 0°C~40°C / 32°F~104°F (Storage).
The input power source is 19 VDC / 90W.
ii
Read Instructions
All the safety and operating instructions should be read before the unit is operated.
Retain Instructions
The safety and operating instructions should be retained for future reference.
Heed Warnings
All warnings on the unit and in the operating instructions should be adhered to.
Follow Instructions
All operating and use instructions should be followed.
Cleaning
Unplug the unit from the outlet before cleaning. Do not use liquid cleaners, abrasive or
aerosol cleaners. Use a damp cloth for cleaning
Attachments
Do not use attachments not recommended by the product manufacturer as they may
cause hazards.
Water and Moisture
Do not use this unit near water-for example, near a bath tub, wash bowl, kitchen sink, or
laundry tub, in a wet basement, near a swimming pool, in an unprotected outdoor
installation, or any area which is classified as a wet location.
Servicing
Do not attempt to service this unit by yourself as opening or removing covers may expose
you to dangerous voltage or other hazards. Refer all servicing to qualified service
personnel.
Power Cord Protection
Power supply cords should be routed so that they are not likely to be walked on or pinched
by items placed upon or against them, playing particular attention to cords and plugs,
convenience receptacles, and the point where they exit from the appliance.
Object and Liquid Entry
Never push objects of any kind into this unit through openings as they may touch
dangerous voltage points or short-out parts that could result in a fire or electric shock.
Never spill liquid of any kind on the unit.
iii
ATTENTION! This is a class A product which may cause radio interference in a
domestic environment; in this case, the user may be urged to take adequate measures.
Federal Communication Commission Interference Statement
This equipment has been tested and found to comply with the limits for a Class B digital
device, pursuant to Part 15 of the FCC Rules. These limits are designed to provide
reasonable protection against harmful interference in a residential installation. This
equipment generates, uses and can radiate radio frequency energy and, if not installed
and used in accordance with the instructions, may cause harmful interference to radio
communications. However, there is no guarantee that interference will not occur in a
particular installation. If this equipment does cause harmful interference to radio or
television reception, which can be determined by turning the equipment off and on, the
user is encouraged to try to correct the interference by one of the following measures:
•Reorient or relocate the receiving antenna.
•Increase the separation between the equipment and receiver.
•Connect the equipment into an outlet on a circuit different from that to which the
receiver is connected.
•Consult the dealer or an experienced radio/TV technician for help.
FCC Caution: Any changes or modifications not expressly approved by the party
responsible for compliance could void the users’ authority to operate this equipment.
This Product is RoHS compliant.
WEEE
Your EverFocus product is designed and manufactured with high quality materials and
components which can be recycled and reused. This symbol means that electrical and
electronic equipment, at their end-of-life, should be disposed of separately from your
household waste. Please, dispose of this equipment at your local community waste
collection/recycling centre. In the European Union there are separate collection systems
for used electrical and electronic product.
Please, help us to conserve the environment we live in!
The information in this manual was current upon publication. The manufacturer reserves the right
to revise and improve his products. Therefore, all specifications are subject to change without prior
notice. Manufacturer is not responsible for misprints or typographical errors.
Please read this manual carefully before installing and using this unit. Be sure to keep it handy for
later reference.
iv
TABLE OF CONTENTS
1.
Introduction .......................................................................................................................1
1.1
1.2
1.3
1.4
1.5
1.6
2.
Overview ....................................................................................................................2
Features .....................................................................................................................2
Packing List .................................................................................................................3
Optional Accessory .....................................................................................................3
Front Panel .................................................................................................................4
Rear Panel ..................................................................................................................5
Installation .........................................................................................................................6
2.1 Hard Disk Drive Installation .........................................................................................6
2.1.1 Hard Disk Compatibility List ..............................................................................8
2.2 Basic Connection ........................................................................................................9
2.3 USB Dongle Connection ............................................................................................10
2.4 Turning On / Off the Power.......................................................................................10
2.5 Connecting the NVR to the Network .........................................................................11
2.5.1 Router or LAN Connection ..............................................................................11
2.5.2 Direct High-Speed Connection ........................................................................14
2.5.3 One-to-One Connection .................................................................................15
2.6 Checking the Dynamic IP Address .............................................................................19
3.
Remote Access to the NVR ..............................................................................................22
3.1 Accessing the NVR ....................................................................................................22
3.2 Installing JAVA Runtime ............................................................................................24
3.3 Browser Security Setting ...........................................................................................25
3.3.1 Installing ActiveX Controls ..............................................................................25
3.3.2 Enabling ActiveX Controls ...............................................................................26
4.
Remote Live View and Configuration ..............................................................................29
4.1 Camera .....................................................................................................................31
4.1.1 Auto Search ....................................................................................................31
4.1.2 Add Camera Manually ....................................................................................32
4.1.3 Advanced Setting ...........................................................................................34
4.1.4 Camera Setting ...............................................................................................35
4.1.4.1 Camera .............................................................................................35
4.1.4.2 PTZ ...................................................................................................37
4.2 Record ......................................................................................................................44
4.3 Event ........................................................................................................................45
4.3.1 Disconnect .....................................................................................................45
v
4.4
4.5
4.6
4.7
4.8
4.9
4.10
4.11
5.
4.3.2 Motion ...........................................................................................................46
4.3.3 Other..............................................................................................................48
Hard Disk ..................................................................................................................52
4.4.1 Disk ................................................................................................................52
4.4.2 Lock / Format .................................................................................................53
Network....................................................................................................................54
4.5.1 LAN ................................................................................................................54
4.5.2 Email ..............................................................................................................57
4.5.3 DDNS ..............................................................................................................58
4.5.4 FTP .................................................................................................................61
4.5.5 Alarm Server ..................................................................................................62
Schedule ...................................................................................................................63
4.6.1 Express Setup .................................................................................................63
4.6.2 Holidays .........................................................................................................64
4.6.3 Schedule.........................................................................................................65
System Setting ..........................................................................................................68
4.7.1 Date / Time ....................................................................................................68
4.7.2 Daylight Saving ...............................................................................................69
4.7.3 User Group .....................................................................................................70
4.7.4 User Management..........................................................................................71
4.7.5 EKB200 ...........................................................................................................74
4.7.6 Miscellaneous ................................................................................................76
System Information ..................................................................................................77
4.8.1 Configuration .................................................................................................77
4.8.2 Log .................................................................................................................78
Copy .........................................................................................................................79
4.9.1 Copy ...............................................................................................................79
4.9.2 Quick Archive .................................................................................................80
Search.......................................................................................................................81
4.10.1 Time Search ..................................................................................................81
4.10.2 Event Search .................................................................................................82
PTZ ...........................................................................................................................83
Specifications ...................................................................................................................85
Appendix A: Network Overview ...............................................................................................87
Appendix B: Linksys & D-Link Port Forwarding.........................................................................91
vi
NVR8004X
Chapter
1.
1
Introduction
EverFocus NVR8004X is a professional standalone network video server designed for small and
medium-sized businesses (SMB) and enterprises. Operating on a Linux-based system, the NVR
offers quick PC-less configuration, network-based surveillance connection, megapixel recording
as well as playback, up to 12 TB storage capacities and more. It also supports industry standard
compression codec, such as H.264, MPEG4 and M-JPEG. The device is compatible with all
EverFocus IP cameras.
Other cutting-edge functions available on EverFocus NVR8004X include multi-channel playback
at multiple speed options and easy data search by event date and time. With the newly
improved Event Management function, users are now supplied with a much larger range of
supported event types and handling options in the database. Suspicious activities and behaviors
can be detected and responded to on a much more accurate and timely manner. In addition,
EverFocus has further strengthened users’ account management for secure access control in
vertical markets, such as residential communities, parking lot, retails stores, shopping malls,
banks, hospitals, offices, factories and much more. Users may enable and perform the specified
functions through the web-based GUI by the IE browser.
EverFocus NVR8004X NVR is the best choice for a complete network-based surveillance solution.
It is versatile, flexible and well caters to the needs of the industry.
USB Dongle
The channel number of the NVR depends on the dongle you purchase. The dongle options
include 4CH / 8CH / 16CH. Contact the local EverFocus office or agents if you want to upgrade
the dongle or increase the number of channels on your current dongle.
1
NVR8004X
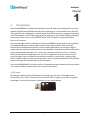
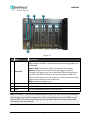
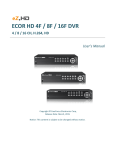
1.1 Overview
Front View
Rear View
Power Supply
USB3.0
Key
USB2.0
Hub
Internal HDDs (Optional)
Dongle / Mouse /
USB Memory Stick
Network
IP Camera
Web Remote
Client
PowerVideo Plus
(CMS)
Figure 1-1
1.2 Features
•
•
•
•
•
•
•
•
•
•
•
•
•
Linux embedded – free from PC crash and virus attack
Support EverFocus of IP cameras and ONVIF IP cameras
Support mobile client – iOS and Android
Support megapixel camera recording and H.264 compression format
Server-client architecture
Support multi web-browser (IE 8 and later versions, Chrome, Safari and Firefox)
Online GUI schedule recording
Playback system with intelligent search
4-bay hot swap data HDD (up to 12TB storage capacity)
Dual Gigabit LAN ports
Dual video streams
Multi-languages
ONVIF compliant
2
NVR8004X
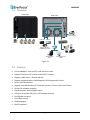
1.3 Packing List
• NVR x 1
• CD x 1 *see note 3
• Quick Guide x 1
• Mouse x 1
• Power Cord x 1
• Dongle x 1 (4CH / 8CH / 16CH)
• Adaptor x 1
• Standard RJ45 cable x 1
• Sticker x 1 *see note 4
• Screw x 16 *see note 4
• Key x 2 *see note 4
Note:
1. Equipment configurations and supplied accessories vary by country. Please consult your
local EverFocus office or agents for more information. Please also keep the shipping
carton for possible future use.
2. Contact the shipper if any items appear to have been damaged in the shipping process.
3. The CD contains the IP Utility software and User’s Manual.
4. The Sticker, Screws and Keys are contained in the HDD trays respectively.
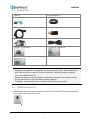
1.4 Optional Accessory
•
EKB200 (USB controller keyboard: connect to the PC to control the PTZ camera connected
to the NVR). Please refer to 4.11 PTZ.
3
NVR8004X
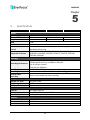
1.5 Front Panel
1
2
3
4
Figure 1-2
No. Name
1
Status LED
2
3
4
Power
HDD Tray
Lock
Description
SYS: Indicates the system is working.
EXT: Indicates the NVR is connected to the external storage device or
USB dongle.
LAN1 / LAN2: Indicates the NVR is connected to the network.
HDD1~4: Indicates the internal HDD is activating, but the LED
indicators will light up only if you install the HDDs before turning on
the NVR. If the NVR is already on and you hot-swap the HDDs, the
HDD1~4 LED indicators will still remain on / off as the previous status,
please see the example in the note below.
PWR: Indicates the power is on.
Press to turn on / off the NVR.
Pull the HDD tray out to install the HDD.
Use the supplied key to lock / unlock the NVR.
Note: For example, if the HDD1 is installed before turning on the NVR, the HDD1 LED indicators
will emit light once the NVR is powered on. Then, if you hot-swap either one of HDD1~4, still
only the HDD1 LED indictor remains light up. You can reboot the NVR manually and the HDD
LED indication will be corrected.
4
NVR8004X
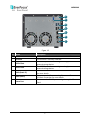
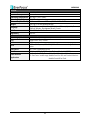
1.6 Rear Panel
1
2
3
4
5
6
7
Figure 1-3
No. Name
1
Reset
2
VGA Port
3
USB3.0 Port
4
USB2.0 Port
5
LAN2 (Static IP)
6
LAN1 (DHCP)
7
Power Port
Description
Insert a tool into the reset hole to reset the NVR.
The function is currently reserved.
The USB3.0 ports for connecting to a dongle, mouse or
external storage device.
The USB2.0 ports for connecting to a dongle, mouse or
external storage device.
Connects to the Network. Please see 2.2 Basic Connection
for more details.
Connects to a hub for connecting IP cameras. Please see
2.2 Basic Connection for more details.
Connects to the 19 VDC power using the supplied Power
Cord.
5
NVR8004X
Chapter
2
2.
Installation
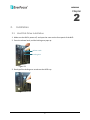
2.1 Hard Disk Drive Installation
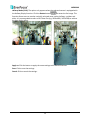
1. Make sure the NVR is power-off, and open the cover on the front panel of the NVR.
2. Press the release latch, and the locking arm pops up.
Release Latch
Locking Arm
Figure 2-1
3. Gently pull the locking arm to take out the HDD tray.
Figure 2-2
6
NVR8004X
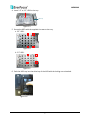
4. Insert 2.5” or 3.5” HDD in the tray.
HDD Tray
Figure 2-3
5. Secure the HDD with the supplied 4 screws to the tray.
a. 3.5” HDD:
Figure 2-4
b. 2.5” HDD:
Figure 2-5
6. Push the HDD tray into the drive bay of the NVR with the locking arm unlatched.
Figure 2-6
7
NVR8004X
7. Close the locking arm until you hear a click.
Figure 2-7
8. Close the cover of the NVR.
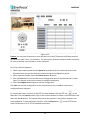
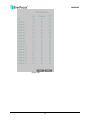
2.1.1 Hard Disk Compatibility List
Please use the hard disk models recommended in the list below to ensure your hard disks will
be compatible.
SATA Hard Disk
Seagate
Western Digital
Model
SV35.5 SATA2 / ST3500410SV
SV35.5 SATA2 / ST31000525SV
SV35.5 SATA3 / ST3500411SV
SV35.5 SATA3 / ST31000526SV
SV35 SATA3 / ST2000VX002
Barracuda SATA3 / ST500DM002
Barracuda SATA3 / ST1000DM003
WD10EVDS SATA2
WD10EURS SATA2
WD20EVDS SATA2
WD20EURS SATA2
WD1600AVVS SATA
WD3200AVVS SATA
WD5000AVVS SATA
WD7500AVVS SATA
WD10EVVS SATA
Capacity
500GB
1TB
500GB
1TB
2TB
500GB
1TB
1TB
1TB
2TB
2TB
160GB
320GB
500GB
750GB
1TB
Note: If using two or more hard disks, please choose the hard disks with the same capacity.
8
NVR8004X
2.2 Basic Connection
The instructions below describe the connection for the NVR8004X.
Front View
Rear View
5
Power Supply
4
USB3.0
1
Internal HDDs (Optional)
USB2.0
3
2
Dongle / Mouse /
USB Memory Stick
Hub
Network
IP Camera
Web Remote
Client
PowerVideo Plus
(CMS)
Figure 2-8
1. Install 1 to 4 HDDs (Please refer to 2.1 Hard Disk Installation).
2. Connect a Dongle to the NVR and optionally connect a Mouse and USB Memory Stick to
the NVR.
3. To manage the NVR over network, connect the supplied standard RJ-45 cable from your
network to LAN2 (Static IP) port. Please see 4.5.1 LAN for more details.
4. To connect IP cameras, please use a hub to connect between NVR and IP cameras. It’s
recommended to connect the hub to the LAN1 (DHCP) of the NVR. Please see 4.5.1 LAN
for more details.
5. Using the supplied Power Cord, connect one end to the 19 VDC port on the NVR and the
other end to the power outlet.
Note: Before powering on the NVR, please connect the USB Dongle and install the HDDs first.
Please see 2.3 USB Dongle Connection and 2.4 Turning On / Off the Power for more details.
9
NVR8004X
2.3 USB Dongle Connection
Please connect your USB Dongle before powering on the NVR. If you turn on the NVR without
connecting the USB Dongle, the following window will pop up when accessing the NVR’s web
page. Please insert the USB Dongle and click Yes to continue the NVR.
Figure 2-9
This message window will pop up as long as the NVR cannot detect the USB Dongle. If so,
make sure the Dongle has been properly inserted and click Yes to continue.
If you increase the number of channels on your USB Dongle, you need to turn off the NVR
before inserting the USB Dongle. If you insert the Dongle while the NVR is on, you need to
reboot the NVR or else it cannot detect the added channels.
2.4 Turning On / Off the Power
Before powering on the NVR, please make sure the internal HDDs have been installed
properly, and the USB Dongle has been connected to the NVR. When you have completed the
basic cable connections, you are ready to turn on the NVR.
Once connect the supplied Power Cord to the power outlet, the NVR will be powered on. All
of the LED indicators on the front panel will light up for a second, but the System and Power
LED will remain light up. To turn off the power, simply unplug the Power Cord from the power
outlet. You can also press the Power button inside the front panel to turn on and off the NVR
without unplugging the Power Cord.
10
NVR8004X
2.5
Connecting the NVR to the Network
There are three methods to connect the NVR to the network: Router or LAN Connection, Direct
High‐Speed Connection and One‐to‐One Connection. For more information of the network,
please refer to Appendix A. Network Overview.
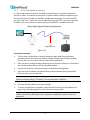
2.5.1
Router or LAN Connection
This is the most common connection in which the NVR is connected to a router and allows
multiple users on and off site to see the NVR on a LAN/WAN (Internet). The NVR must be
assigned an IP address that is compatible with its LAN. By setting up port forwarding on the
router, you can remotely access the cameras from outside of the LAN via the Internet. To
remotely access the Web interface, please refer to 3. Remote Access to the NVR. To set up
port forwarding, please consult the manual of the router or refer to Appendix B: Linksys &
D-Link Port Forwarding.
Straight-through LAN patch cable
Right: Pinout of a straight-through cable.
Figure 2-10
11
NVR8004X
Connection Procedure:
The First step is to purchase or make a straight through cable. We recommend
purchasing one if you have never made a straight through cable. Please remember
you can not use a cross-over network cable for this application.
Once you have a straight through cable, plug one end into the LAN port on the back
of the recorder and the other into the router.
Log into the EverFocus NVR menu and go to the Network Setting Menu.
To let the router automatically assign an address:
Set the Network Type to DHCP. Make sure to write down the IP address and the
Gateway.
Exit from the Menu to save settings.
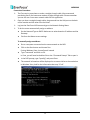
To manually assign an address:
Go to a computer connected on the same network as the NVR.
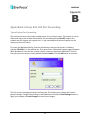
Click on the Start button and choose Run.
If using Windows Vista, choose Search instead.
Type “command” and click on OK.
In Vista, you will need to double-click on the “Command Prompt” file to open it.
In the DOS prompt, type “ipconfig” and press Enter.
The network information will be displayed on a screen similar to the one below.
In Windows Vista, look for the information that says “IP v4”.
Figure 2-11
12
NVR8004X
Take the values for Subnet Mask and Default Gateway and input them into the
NVR; these values should be exactly the same in both devices. However, you
should change the last number of the IP address. For example, if the IP address
of the computer is 192.168.2.101, the NVR’s IP address should be 192.168.2.50.
To access the NVR from a computer simply open Internet Explorer and in the address
bar type:
http:// (IP address of the NVR)
Note: The NVR’s IP address will only work at the location of the NVR. To connect
from a different location over the Internet, see below.
To set the NVR for Internet Connection through router:
The next step is to open ports within your router. Log into the router using a PC and
open the following ports.
Ports to open: 80
If your Internet service provider blocks port 80, you can change it to a different
port in the NVR’s Network Menu Setup; open/forward that port instead.
If you are using a Linksys or D-Link router, see Appendix B for basic support on
setting up ports. For any other router, you will need to contact the manufacturer
for support.
To access the NVR from a computer simply open Internet Explorer and in the address
bar type:
http:// (the IP address given by your internet service provider)
Note: If you changed to a different port other than 80, you will need to include this
at the end of the IP address:
http:// (the IP address given by your internet service provider):port number
If you have a WAN Dynamic IP address and have opened the ports, go to 6.7.3 DDNS
Setup to configure the DDNS settings.
13
NVR8004X
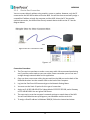
2.5.2
Direct High-Speed Connection
In a Direct High‐Speed Connection, the NVR connects directly to a modem without the
need for a router. You need to set the static or dynamic WAN IP address assigned by your
ISP (Internet Service Provider) in the NVR’s configuration web pages. To access the NVR,
just type “http://xxx”, where xxx is the IP address given by your ISP. If you have a dynamic
IP address, this connection may require that you use DDNS for a reliable connection.
Figure 2-12
Connection Procedure:
The first step is to purchase or make a straight through cable. We recommend
purchasing one if you have never made a straight through cable. Please remember
you can not use a cross-over network cable for this application
Once you have a straight through cable plug one end into the LAN port on the back of
the recorder and the other into the high speed modem.
Log into the EverFocus NVR menu and go to the Network Setting Menu.
Input the Static IP address, the Subnet Mask, and the Gateway that you obtained
from the internet service provider.
Note: If you have a dynamic IP address, you can set the NVR to DHCP to automatically
detect the network settings. Therefore, it can use a dynamic IP address.
Exit from the NVR’s Menu to save the settings.
To access the NVR from a computer, open Internet Explorer and in the address bar
type: http:// (IP address given by your internet service provider)
Note: When using this type of connection, only one device can be connected to the
modem at a time. You will need to use a computer at a different location to test the
connection s.
14
NVR8004X
2.5.3
One-to-One Connection
You can connect directly without using a switch, router or modem. However, only the PC
connected to the NVR will be able to view the NVR. You will also have to manually assign a
compatible IP address to both the computer and the NVR. Unless the PC has another
network connection, the NVR will be the only network device visible to the PC. See the
diagram below:
Right: Pinout of a crossed-over cable.
Figure 2-13
Connection Procedure:
The First step is to purchase or make a cross-over cable. We recommend purchasing
one if you have never made a cross-over cable. Please remember you can not use a
straight through network cable for this application.
Once you have a cross-over cable, plug one end into the LAN port on the back of the
NVR and the other into the network card on the back of the computer.
Log into the EverFocus NVR menu and go to the Network Setting Menu.
You must use the Static IP option for this type of connection.
Assign an IP of 192.168.001.003, a Subnet Mask of 255.255.255.000, and a Gateway
of 192.168.001.001. You can ignore DNS Server.
The next step is to set the computer’s network settings to match those of the NVR.
You will need Administrator privileges on your Windows machine to do this.
To assign a fixed IP address in Windows 2000/XP, follow the instructions below:
15
NVR8004X
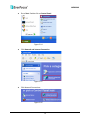
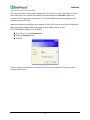
Go to Start. Double-click on Control Panel.
Figure 2-14
Click Network and Internet Connection.
Figure 2-15
Click Network Connections.
Figure 2-16
16
NVR8004X
Right-click on Local Area Connection and select Properties.
Figure 2-17
Click on Internet Protocol (TCP/IP) and then click Properties.
Figure 2-18
Select Use the following IP address. Assign an IP address of 192.168.1.2, a
Subnet Mask of 255.255.255.0, and a Default Gateway of 192.168.1.1 and then
click OK.
Restart both of the computer and the NVR.
17
NVR8004X
To access the NVR from the computer, simply open Internet Explorer and in the
address bar type: http://192.168.1.3
Figure 2-19
Select Use the following IP address. Assign an IP address of 192.168.1.2, a
Subnet Mask of 255.255.255.0, and a Default Gateway of 192.168.1.1 and then
click OK.
Restart both of the computer and the NVR.
To access the NVR from the computer, simply open Internet Explorer and in the
address bar type: http://192.168.1.3
18
NVR8004X
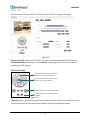
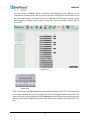
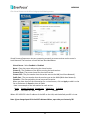
2.6 Checking the Dynamic IP Address
You can look up the IP address and access the Web interface of the NVR using the IP Utility
(IPU) program, which is contained in the CD. It can also be downloaded from EverFocus’
Website: http://www.everfocus.com/tools.cfm. Please connect the NVR in the same LAN of your
computer.
1. Install and then start the IPU program
. The following dialog box appears.
Figure 2-20
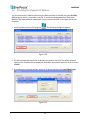
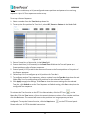
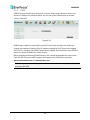
2. IPU will automatically search the IP devices connected in the LAN. The default network
values of the IP devices will be displayed. By default, the network protocol of the IP device
is DHCP.
3. To configure the network settings, select an IP device and then click Login/Multi Login.
Figure 2-21
19
NVR8004X
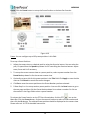
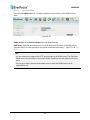
4. Type the user ID and password. Click OK.
Note:
1. The default user ID is admin and the default password is 11111111.
2. If you select more than one NVRs that have the same user ID / password, you will
be able to log in several NVRs at once.
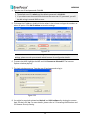
5. To change the IP address, double-click the values in the column and type the numbers or
select an option. Click Set IP Address to save the settings.
Figure 2-22
Note: Most networks uses DHCP to assign IP address, if you are unsure of your network
settings, please consult your network administrators for configuration details.
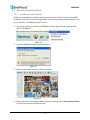
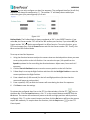
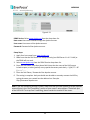
6. To access the NVR, highlight the NVR and click Connect to Selected IP. The Internet
Explorer window pops up.
7. The Login window pops up. Type the user ID and password to log in.
Figure 2-23
8. You might be required to download ActiveX and JAVA software for viewing the camera
feed. If asked, click Yes. For more details, please refer to 3.2 Installing JAVA Runtime and
3.3 Browser Security Setting.
20
NVR8004X
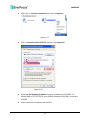
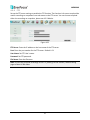
9. When first connecting to the NVR’s IP address, the following dialog may appear. Please
check the “Always trust content from this publisher” box and click the Run button to run
the EverFocus Viewer application.
Figure 2-24
10. You may need to turn User Account Control off if you still can’t see the Remote Live View.
11. On the computer, click Start > Control Panel > System and Security > Action Center (click
Change User Account Control Settings), the User Account Control Settings window
appears. Adjust the slide bar to Never Notify and then click OK. Restart your computer if
requested.
Figure 2-25
21
NVR8004X
Chapter
3
3. Remote Access to the NVR
3.1 Accessing the NVR
Follow the steps below to access the NVR from a computer.
1.
Open an Internet Explorer window and in the address bar type the IP address.
Local connection:
http:// (IP address from the NVR’s Network Menu): IP port used
e.g. http://192.168.1.163:2468
Internet connection:
http:// (IP address given by your Internet Service Provider): IP port used
e.g. http://57.182.67.204:2468
2.
The Login window pops up. Type the User Name and Password. The default User Name is
admin, while the password is 11111111. Click OK.
Figure 3-1
22
3.
4.
NVR8004X
You might be required to download ActiveX and JAVA software for viewing the camera
feed. If asked, click Yes. For more details, please refer to 3.2 Installing JAVA Runtime and
3.3 Browser Security Setting.
When first connecting to the NVR’s IP address, the following dialog may appear. Please
check the “Always trust content from this publisher” box and click the Run button to run
the EverFocus Viewer application.
Figure 3-2
5.
You may need to turn User Account Control off if you still can’t see the Remote Live View,
please see the step below.
6.
On the computer, click Start > Control Panel > System and Security > Action Center (click
Change User Account Control Settings), the User Account Control Settings window
appears. Adjust the slide bar to Never Notify and then click OK. Restart your computer if
requested.
Figure 3-3
23
NVR8004X
3.2 Installing JAVA Runtime
You need to install the latest JAVA software for stable operation.
1. When first connecting to the NVR’s IP address, the following dialog will show up if you
didn’t install the JAVA software or its latest version on your computer.
Figure 3-4
2. Please click Update to go to the JAVA website http://www.java.com/en/, and
download the latest version of the JAVA software.
3. After installation is completed, connect the NVR’s IP address again and the yellow bar
may pop up on the top of the window. Please click it to run the JAVA application.
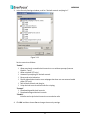
4. If there is an alert dialog popping up, please go to the Control Panel > JAVA Control
Panel to change settings.
5. Click Advanced tap on the top of the window, and scroll to “Mixed code (sandboxed vs.
trusted) security verification”, and select the Enable – hide warning and run with
protections.
Figure 3-5
6. If you can’t find the JAVA in the Control Panel, please go to Program Files > Java > jre7 >
bin and double-click the javacpl (JAVA Control Panel). Then, configure the setting as
described in the step 5.
24
NVR8004X
3.3 Browser Security Setting
3.3.1
Installing ActiveX Controls
Follow the steps below to install the ActiveX Controls when you first connect to the NVR’s
IP address. If you do not see the images below, your security settings may be too high. If so,
go to “Section 3.3.2 Enabling ActiveX Controls.”
1. You may also prompt to install the MSXML file. Please right-click the yellow bar and
select “Run Add-on…”
Figure 3-6
2. Install the MSXML file when prompted to do so.
Figure 3-7
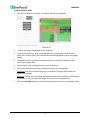
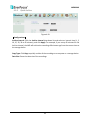
3. Now you will be able to see the remote live page.
Figure 3-8
4. Please refer to 3.1 Accessing the NVR to adjust the settings of the User Account Control
if you still can’t see the remote live view.
25
NVR8004X
3.3.2
Enabling ActiveX Controls
Note this section is only necessary if you DO NOT see the image (Figure 3-6) popping up
when you first connect to the NVR.
1. At the top of the Internet Explorer Window, click on Tools and then select Internet
Options.
Figure 3-9
2. Click the Security tab at the top of the window and then click Custom Level….
Figure 3-10
26
NVR8004X
3. In the Security Settings window, scroll to “ActiveX controls and plug-ins”.
Figure 3-11
Set the controls as follows:
“Enable”:
Allow previously unused ActiveX controls to run without prompt (Internet
Explorer 7 only)
Allow scriptlets (IE7 only)
Automatic prompting for ActiveX controls
Binary and script behaviors
Display video and animation on a webpage that does not use external media
player (IE7 only)
Run ActiveX controls and plug-ins
Script ActiveX controls marked safe for scripting
“Prompt”:
Download signed ActiveX controls
Download unsigned ActiveX controls
“Disable”:
Initialize and script ActiveX controls not marked as safe
4. Click OK and then choose Yes to change the security settings.
27
NVR8004X
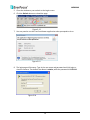
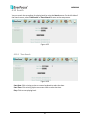
5. Close the window so you are back at the login screen.
6. Click the Refresh button to reload the page.
Figure 3-12
7. You may need to run the EverFocusViewer application when prompted to do so.
Figure 3-13
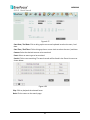
8. The login page will show up. Type in the user name and password and click Login to
view the cameras. The default User Name is admin, while the password is 11111111.
Figure 3-14
28
NVR8004X
Chapter
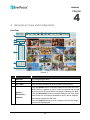
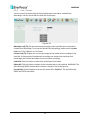
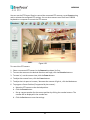
4. Remote Live View and Configuration
4
Live View:
1
2
3
4
5
6
7
Figure 4-1
No.
1
2
3
Name
Menu Bar
Layout
Sub / Main
4
Speaker /
Microphone /
Snapshot
Description
For configuring the NVR.
Click a desired layout.
Click to switch between the Main stream and Sub stream.
Click the Speaker button to transfer audio to the client side from
NVR if there is a speaker on the PC and a microphone and preamp
attached to the NVR, and audio recording is enabled on the NVR.
Click the Microphone button to transfer audio to NVR from client
side if there is a microphone attached to the PC and an amplifier
and speaker attached to the NVR.
Click the Snapshot button to save a snapshot of the video image
currently being displayed.
29
NVR8004X
5
Channel Buttons
Click on the number to display the channel in full screen.
6
Status Highlight
Black Circle: Indicates the NVR is recording in sub-stream.
Red Circle: Indicates the NVR is recording in main-stream.
White: Indicates the live view is in a normal status.
Orange: Indicates a motion is being detected.
Blue: Indicates video loss.
Red: Indicates an alarm / event is triggered.
Grey: Indicates the live view is disabled.
7
Live View Window
Double-click on a camera image to enlarge the current display to
full screen; double-click again to return to the normal view.
Menu Bar:
1
2
3
4
5
7
6
8
9
10
11
12
Figure 4-2
No. Name
Description
1
2
3
4
5
6
7
Live View
Camera
Record
Event
Hard Disk
Network
Schedule
8
System
Setting
9
System
Information
Click to display the live view window.
Click to configure the camera settings. Please refer to 4.1 Camera.
Click to configure the record settings. Please refer to 4.2 Record.
Click to configure the alarm / event settings. Please refer to 4.3 Event.
Click to display the HDD information. Please refer to 4.4 Hard Disk.
Click to configure the network settings. Please refer to 4.5 Network.
Click to configure the recording schedule. Please refer to 4.6 Schedule.
Click to configure the NVR time / user privilege / IO control / UI
language or upgrading firmware and etc. Please refer to 4.7 System
Setting.
Displays the system information. Please refer to 4.8 System
Information.
10
Copy
Click to archive the recordings from the NVR to the client PC. Please
refer to 4.9 Copy.
11
12
Search
PTZ
Search the recordings for remote playback. Please refer to 4.10 Search
Click to control the connected PTZ cameras. Please refer to 4.11 PTZ.
30
NVR8004X
4.1 Camera
Users can automatically search and add the cameras in the Auto Search setting page, or add
the cameras manually in the Add Camera Manually and Advanced Setting pages. In the
Camera Setting page, users are able to configure the detailed settings and PTZ settings of the
cameras.
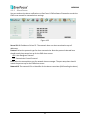
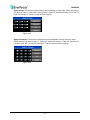
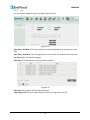
4.1.1 Auto Search
The function allows users to automatically search and add cameras in the same network.
Figure 4-3
To search cameras:
1. Click the Search button.
2. The system will list all the currently available cameras under the Camera List.
To add cameras:
1. Click Auto assign to assign all the available cameras to the Channel List.
2. If you only want to add certain cameras, just drag the desired cameras in the Camera List
and drop it onto the Channel List.
3. You can remove the any one of the cameras in the Channel List by clicking the Remove
button.
4. Click OK to add the cameras; click Cancel to remove the selected cameras.
31
NVR8004X
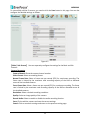
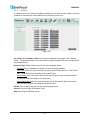
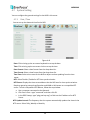
4.1.2 Add Camera Manually
You can also add the IP camera manually by typing its IP Address, Port, ID, Password and other
settings.
Figure 4-4
Address: Type the IP address of the camera.
Port: The default port is 80.
ID: Enter the account username of the camera.
Password: Enter the password of the camera.
Add to Channel: Select a channel number to add this camera to that channel.
Protocol: The data transmission protocol.
Brand: The brand of the camera.
Model: The model type of the camera.
Auto Detection: After entering the IP address, port, ID, password and selecting a channel, click
this button to auto detect the protocol, brand and model of the camera.
Add: Click to add the camera, and bring up the detailed setting page (please see Figure 4-5 and
the instructions below).
Cancel: Click to cancel the changes and return to the previous settings.
32
NVR8004X
To successfully add the IP camera, you need to click the Save button in this page. You can also
configure the detailed settings as follows.
Figure 4-5
【Main / Sub Stream】 You can separately configure the settings for the Main and Sub
Streams.
Camera Parameter
Camera Channel: Show the camera channel number.
Video Format: Select an encoding format.
Normal Frame Rate: Select a frame rate per second (FPS) for continuous recording. The
frame rate is limited by the maximum total recording capacity of the NVR as allocated
across all the installed cameras.
Event Frame Rate: Select a frame rate per second (FPS) for continuous recording. The frame
rate is limited by the maximum total recording capacity of the NVR as allocated across all
the installed cameras.
Resolution: Select a desired recording resolution.
Quality: Select an image quality of the camera.
Record Audio: Select to enable or disable the audio recording function.
Save: Click to add the camera and save the current settings.
Cancel: Click to cancel eth settings and return to the previous setting page.
33
NVR8004X
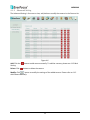
4.1.3
Advanced Setting
The Advanced Setting is for users to view, add, delete or modify the cameras in the Camera List.
Figure 4-6
Add: Click the
Setting.
Delete: Click
button to add camera manually. To add the cameras, please see 4.1.2 Basic
button to delete the camera.
button to modify the settings of the added camera. Please refer to 4.1.2
Modify: Click
Add Camera Manually.
34
NVR8004X
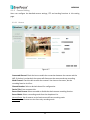
4.1.4
Camera Setting
Users can configure the detailed camera settings, PTZ and tracking functions in this setting
page.
4.1.4.1 Camera
Figure 4-7
Connected Channel: Check the box to enable the connection between the camera and the
NVR. If the box is unchecked, the system will disconnect the camera and stop recording.
Mask Channel: Check the box to mask the camera’s live view on the screen, but the
recording function is still on.
Channel Number: Select a desired channel for configuration.
Device Title: Enter a camera title.
Record Dual Stream: Select to enable or disable the dual streams recording function.
Record Mode: Select a recording mode from the drop-down list.
Normal+Event: Set all cameras to the Continuous and Event recording mode.
Event Only: Set all cameras to the Event only recording mode.
35
NVR8004X
Hallway Mode (9:16): The option only appears when the selected camera is equipped with
the Hallway Display function. Click the Rotate button
to rotate the live image. This
function allows users to monitor vertically-oriented areas such as hallway, corridors and
aisles. It’s recommended to select a 16:9 View Size (e.g. 1920x1080 / 1024x768) to achieve
the best display effect.
Apply to: Click the button to apply the same settings to the desired cameras.
Save: Click to save the settings.
Cancel: Click to cancel the settings.
36
NVR8004X
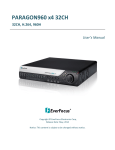
4.1.4.2 PTZ
You can set up the Preset, Auto Pan, Tracking, Pattern and Tour settings in this page.
Figure 4-8
【Camera (1~16)】: Shows the PTZ camera live view. You need to select the PTZ camera from
the Channel Number drop-down list in the Camera setting page (see 4.1.4.1 Camera) before
configuring the PTZ settings.
【PTZ Control Pad】:
Click the direction buttons to force the
camera to turn into that direction
Click to stop thet current action, such
as Auto Pan, Tour or Pattern
Click to Zoom In/Out or Focus Near/Far
Click to widen/narrow down the IRIS
opening
Figure 4-9
【Speed】: Select a pan and tilt speed from the Speed drop-down list for the camera to move to
the directions when you use the direction buttons during the configuration period
37
NVR8004X
Preset: Click the Preset button to set up the Preset Position or the Auto Pan function.
Figure 4-10
Preset: You can configure up to 192 preset positions in this field.
To set up a Preset Positions:
1.
Adjust the camera view to a desired position using the direction button. You can select the
pan / tilt speed from the Speed drop-down list for controlling the direction buttons. Adjust
zoom, focus and Iris if necessary.
2.
To set up the current camera view as a preset position, select a preset number from the
Preset No drop-down list for the current camera view.
3.
Optionally set up a title for this preset position in the Title field .Click Apply to save the title
name or click Cancel to cancel the current changes.
4.
Click Set to save the current position as the Preset Number you have selected.
5.
Follow Step 1 to 4 to set up another preset position. You can click the Next button to go to
the next page and then click the Preset No drop-down list to select a number. Or click on
the number in the Page field to select a preset number.
To activate the Preset function on the PTZ Live View window, click the PTZ
icon on the
Menu Bar. Click the Preset button, click on the numeric buttons to select a Preset number and
then click the Go button. The selected Preset position should be displayed on the camera view.
Please refer to 4.11 PTZ for detailed instructions.
38
NVR8004X
Auto Pan: You can only configure one Auto Pan sequence. The configured Auto Pan (A to B Pan)
sequence will always be numbered as “1”. The number “2” will always be an endless pan
around the given (not preconfigured) X/Y tilt axis.
Figure 4-11
Endless Mode: The Endless Mode is always numbered as “99” in the PRESET function. If you
select On, the Preset number “99” will be the 360° endless pan function; if you select Off, the
Preset number “99” will be the preconfigured A to B Pan function. To use the function, go to
PTZ live view page first. Click the Preset button and click the Preset number “99”. Finally, click
Go to activate the Endless Mode.
To set up an Auto Pan Sequence:
1. Using the direction buttons to adjust the camera view to a desired position where you want
to set up the position as the Left Position. You can select the pan / tilt speed from the
Speed drop-down list for controlling the direction buttons. Adjust zoom, focus and Iris if
necessary.
2.
Click the Set Left Position button to save the current position as the Left Position.
3.
Follow Step 1 to set up the Right Position and then click the Set Right Position to save the
current position as the Right Position.
4.
Enter a dwell time (1~99 seconds) for the Left and Right positions (the time that the
camera will pause at each position).
5.
Enter a speed (1~255) at which the camera will move during the Auto Pan sequence.
6.
Click Save to save the settings.
To activate the configured Auto Pan on the PTZ Live View window, click the PTZ
icon on
the Menu Bar. Click the Auto Pan button, click “1” on the numeric buttons and then click the
Go button. The camera will continuously move to the left and right positions which you have
configured. Click “2” on the numeric buttons and then click the Go button will force the camera
to pan 360° endlessly. To stop the Auto Pan function, click the Stop button
Control panel.
39
on the PTZ
NVR8004X
Tracking: Click the Tracking button to set up the tracking function which is functional only when
the selected PTZ camera is equipped with the tracking function.
Figure 4-12
To set up the Auto Tracking function:
1.
Auto Tracking Start Point: Check the box to enable a camera position to which the camera
will return to after a tracking operation. Use the direction buttons to adjust the camera
view to a desired position where you want to set up the position as the Auto Tracking Start
Point. You can select the pan / tilt speed from the Speed drop-down list for controlling the
direction buttons. Adjust zoom, focus and Iris if necessary. Click Set to set the position as
the Auto Tracking Start Point.
Note: If the user did not set up a start point or the start point is disabled, the camera will
go back to track/monitor the initial point instead of the Auto Tracking Start Point, once
the tracked object exits in the camera’s field of view.
2.
Pan/Tilt Limit: Check the box if you want to create a zone where the camera will track the
movement inside the zone only. Before clicking the Upper/Lower/Right/Left buttons, use
the direction buttons to adjust the camera view to a desired position where you want the
camera to track the movement in that zone. You can select the pan / tilt speed from the
Speed drop-down list for controlling the direction buttons. Adjust zoom, focus and Iris if
necessary. Click the Upper/Lower/Right/Left buttons to set up the Pan/Tilt limits (Left and
Right for the Pan limit; Upper and Lower for the Tilt limit).
40
NVR8004X
Note: Please note that if enabling the Pan/Tilt Limits function, the position of the Start
Point should be within the range of the Pan/Tilt Limits, or there will be a pop-up message
showing “Setting error: Start Point is not inside Pan/Tilt Limits”.
Zoom control on tracking:
Keep current zoom ratio: the current zoom ratio will stay fixed during the tracking
process.
Multi-step zoom function: the zoom ratio will change according to the distance of the
object against the camera. When the object is moving further away, the camera will
keep zooming in to track; on the other hand, when moving closer, the camera will zoom
out to check whether it should track the object or not.
Tracking Duration: User can set the tracking time duration of the camera (0~600
seconds). When the Tracking Duration is up, the camera will return to the Start Point.
The function is used to prevent the camera from tracking an object which is intentionally
set to lure the camera away.
When the object is lost on the screen: User can select a tracking mode when the object
is lost on the screen. The options are:
Keep tracking: The camera will stop at the current position and wait for another moving
object in the camera's field of view. Then, the camera will track the new object without
changing zoom ratio.
Zoom out and look for a new object: The camera will zoom out at the current position
immediately for expanded the field of view and restart tracking a new moving object
appearing in the camera's field of view.
Stop tracking and zoom out: The camera will stop auto tracking and stay at the current
position. Then, the camera will zoom out for expanded the field of view.
In sec and Back to Start Point: Set up a period of time for the camera to stay at the
current position before returning to the Start Point (0 is returning to Start Point without
any waiting).
Resume from manual stop: The function is used to set up the Auto Tracking restart time
(0~600 seconds). If user manually operates the PTZ function during auto tracking
process, the auto tracking function will stop. When the manual operation ceases, the
camera will resume to “Auto Tracking Start Point” after a given period of time. Setting of
value 0 indicates do not restart.
Note: In the on-going auto tracking process after object is identified, the PTZ function
keeps the moving object in the center of the screen. But the PTZ function may stop if the
object moves too slow and stays in center of the screen too long. In case like this the auto
tracking may incorrectly assume the object is lost and ends the tracking process.
41
NVR8004X
Pattern Tour:
Figure 4-13
Pattern: You are given 90 seconds to move the camera (via the PTZ buttons) to different positions
(and different zoom / focus / Iris positions). The camera then saves that sequence under the Pattern
No. you’ve selected. Up to 4 Patterns can be configured.
To set up a Pattern Sequence:
1. Select a pan and tilt speed from the Speed drop-down list for the camera to move to the
directions when you use the direction buttons during the configuration period.
2. Select a pattern number from the Pattern No drop-down list.
3. Click the Set button to start the 90-second configuration period. Use the direction / zoom /
focus / Iris buttons to move the camera in the desired sequence.
4. Click the Complete button again to end the configuration.
Click Clear can void the configuration for the entered Pattern No. Click Go to view/test the
configured Pattern sequence.
To activate the Pattern function on the PTZ Live View window, click the PTZ icon
on the
Menu Bar. Click the Pattern button, click on the numeric buttons to select a Pattern number and
then click the Go button. The camera will move to the positions in the Pattern sequence you
have configured. To stop the Pattern function, click the Stop button
panel. Please refer to 4.11 PTZ for detailed instructions.
42
on the PTZ Control
NVR8004X
Tour: You can combine up to 16 preconfigured camera positions and patterns into one long
sequence. Up to 16 Tour sequences can be set up.
To set up a Pattern Sequence:
1. Select a number from the Tour No drop-down list.
2. To set up the first position for Tour No.1, select OFF, Preset or Pattern in the Mode field.
Figure 4-14
3. Enter a Preset No. or Pattern No. in the Value field.
4. Enter a dwell time (1~99 seconds) in the Dwell Tour field that the Tour will pause at a
Preset position or after a Pattern sequence.
5. Enter a speed (1~255) at which the camera will move to the Preset position or first point of
the Pattern sequence.
6. Follow Step 3 to 5 to configure up to 16 positions for Tour No.1.
7. To configure another Tour sequences, select a number from the Tour No drop-down list and
follow Step 3 to 6 to configure up to 16 positions for the selected Tour number.
8. Click Apply to apply the settings. Click Clear to clear the current settings for the selected
Tour No.; click Default to set the Tour Sequence to Default setting; click Go to view/test the
configured Tour sequence.
To activate the Tour function on the PTZ Live View window, click the PTZ icon
on the
Menu Bar. Click the Tour button, click on the numeric buttons to select a Tour number and then
click the Go button. The camera will move to the positions in a long sequence you have
configured. To stop the Pattern function, click the Stop button
Please refer to 4.11 PTZ for detailed instructions.
43
on the PTZ Control panel.
NVR8004X
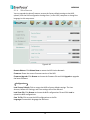
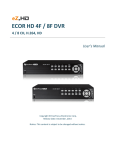
4.2 Record
You can configure the basic recording settings on the hard disk.
Figure 4-15
Record Overwrite: Check the box to overwrite the hard disk when it is full. Note that
unless this box is checked, or the NVR will stop recording when the hard disk is full. The use
of record overwrite is strongly recommended. If you do not use this feature, please be sure
to enable the Event setting for Disk Full for notification (see 4.3.3 Other).
Schedule Record: Check the box to record by the schedule. Please see 4.6.3 Schedule for
more details.
Auto Erase Video: The hard disk will automatically erase video after it has been on the
hard drive for the selected number of days. To use the maximum hard drive space, choose
“OFF”. (See Record Overwrite and notes above.) This feature is useful if local rules and
regulations require recorded video to be discarded after a specific number of days, or to
limit the retention of older recorded video to clear space in anticipation of event recording.
Estimation Result: Shows the remaining storage space.
44
NVR8004X
4.3 Event
4.3.1
Disconnect
You can enable the Disconnect Event function and configured the disconnect event
notifications in this menu.
Figure 4-16
Camera: Select a camera to be configured.
Enable: Check the box to enable the Disconnect event settings for the selected camera.
Log: Check the box to record Disconnect events to log data.
Email Notify: Check the box to send email notification when a Disconect event is detected.
Email operation requires valid email entered in the Email setup menu (see 4.5.2 Email).
Network Alarm: Check the box to send out a network alarm to a client PC when Disconnect
event occurs. This feature works with EverFocus’ CMS software. You will need to configure
the Alarm Server for the NVR to send network alarms to the client PC (see 4.5.5 Alarm
Server).
Apply To: Click the button to apply the same settings to the desired cameras.
45
NVR8004X
4.3.2
Motion
You can enable the Motion Event function and configured the related settings including
motion event notifications and motion areas in this menu.
Figure 4-17
Camera: Select a camera to be configured.
Enable: Check the box to enable the Motion Event settings for the selected camera.
Log: Check the box to record motion events to log data.
Pre-alarm Record: Check the box to start copying the recordings to the hard disk from 5
seconds before the motion event occurs. Note that the pre-alarm recording rate will follow
the Normal Speed configured in the above section (see 4.1.2 Add Camera Manually).
Email Notify: Check the box to send email notification when a motion event is detected.
Email operation requires valid email entered in the Email setup menu (see 4.5.2 Email).
Network Alarm: Check the box to send out a network alarm to a client PC when motion
occurs. This feature works with EverFocus’ CMS software. You will need to configure the
Alarm Server for the NVR to send network alarms to the client PC (see 4.5.5 Alarm Server).
Auto Lock: Check the box and the events will be recorded in a write protected segment of
the hard disk (will not be overwritten). The NVR will lock a period of time when the alarm
occurs. The length of the time depends on NVR setting (see 4.4.2 Lock / Format).
FTP Upload: Check the box to enable uploading recordings to the FTP server function. To
setup the FTP server, please refer to 4.5.4 FTP.
FTP Upload File Type: Select MP4 file type to upload videos to FTP server; select JPEG file
type to upload snapshots to the FTP server.
Edit Motion Grid: Press the button to bring up the Motion Setting menu. To edit the
motion grids, please refer to the instructions later in this section.
Apply To: Click the button to apply the same settings to the desired cameras.
46
NVR8004X
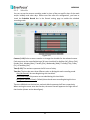
To Edit the Motion Grids:
1.
Click the Edit Motion Grid button, the Motion Setting menu appears.
Figure 4-18
2.
Click on the image and the grid will be displayed.
3.
To set up a motion area, drag a rectangle with your mouse (from top to bottom /
upper- left to lower-right). The selected areas will be highlighted in green (see image
below).
4.
To delete a motion area, drag a rectangle with your mouse (from bottom to top /
lower-right to upper-left).
5.
Follow Step 3 to set up multiple motion areas if necessary.
6.
Sets up the Sensitivity, Min Area and Motion Delay for the motion grids.
Sensitivity: Sets up the motion sensitivity for the grids. The larger the number, the
higher the sensitivity.
Min Area: This function is designed to prevent false detections caused by small objects.
If you select 2, only the object size larger than 2-grid size can be detected.
7.
Click the Save & Back button to save the settings and then return to the Motion menu.
47
NVR8004X
4.3.3
Other
You can configure the event settings and enable the Buzzer or Email alert for notifications.
The event options include: Fan Failure, Disk Temperature, Disk Failure, Disk Full, Disk Off,
Power Loss and Network Loss.
4.3.3.1
Disk Temperature
Figure 4-19
Log: Check the box to record alarm events to log data.
Email Notify: Check the box to send email notification when system / Hard Disk’s (HD)
temperature is over the “Temp. Warning Limit”. Email operation requires valid email
entered in the Email setup menu (see 4.5.2 Email).
Network Alarm: Check the box to send out a network alarm to a client PC. This feature
works with EverFocus’ CMS software. You will need to configure the Alarm Server for the
NVR to send network alarms to the client PC (see 4.5.5 Alarm Server).
Stop Recording: Check box to stop recording when System / HD’s temperature is over the
“Temp. Warning Limit”.
Temp. Warning Limit: Sets the trigger temperature for System / HD Temperature event
actions. Choose between 45°C /113°F and 70°C /158°F.
48
NVR8004X
4.3.3.2
Disk Failure
Figure 4-20
Log: Check the box to record alarm events to log data.
Email Notify: Check the box to send email notification when HD fails. Email operation
requires valid email entered in the Email setup menu (see 4.5.2 Email).
Network Alarm: Check the box to send out a network alarm to a client PC when HD fails.
This feature works with EverFocus’ CMS software. You will need to configure the Alarm
Server for the NVR to send network alarms to the client PC (see 4.5.5 Alarm Server).
4.3.3.3
Disk Full
Figure 4-21
Log: Check the box to record alarm events to log data.
Email Notify: Check the box to send email notification when HD fails. Email operation
requires valid email entered in the Email setup menu (see 4.5.2 Email).
Network Alarm: Check the box to send out a network alarm to a client PC when HD fails.
This feature works with EverFocus’ CMS software. You will need to configure the Alarm
Server for the NVR to send network alarms to the client PC (see 4.5.5 Alarm Server).
49
NVR8004X
4.3.3.4
Disk Off
Figure 4-22
Email Notify: Check the box to send email notification when Hard Disk (HD) is off. Email
operation requires valid email entered in the Email setup menu (see 4.5.2 Email).
Network Alarm: Check the box to send out a network alarm to a client PC when HD is off.
This feature works with EverFocus’ CMS software. You will need to configure the Alarm
Server for the NVR to send network alarms to the client PC (see 4.5.5 Alarm Server).
4.3.3.5
Power Loss
Figure 4-23
Log: Check the box to record alarm events to log data.
Email Notify: Check the box to send email notification when power has been restored.
Email operation requires valid email entered in the Email setup menu (see 4.5.2 Email).
Network Alarm: Check the box to send out a network alarm to a client PC when power has
been restored. This feature works with EverFocus’ CMS software. You will need to
configure the Alarm Server for the NVR to send network alarms to the client PC (see 4.5.5
Alarm Server).
Note: As alarms and emails cannot be transmitted without power, the log entry is made
when power is restored, and any notifications cannot be made until that time.
50
NVR8004X
4.3.3.6
Network Loss
Figure 4-24
Log: Check the box to record alarm events to log data.
51
NVR8004X
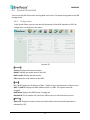
4.4 Hard Disk
The Disk menu is used to review the NVR’s hard drive settings and status. No value in this
menu can be configured by the operator.
4.4.1
Disk
Figure 4-25
Record Time (Start): Shows the earliest recording time of the NVR.
Record Time (End): Shows the latest or most current time on the NVR.
Disk: Select a disk number.
Health Status: Displays the current status of the selected disk.
Disk Temperature: Displays the current temperature of the selected disk.
Disk Size (Total): Shows the total space of the selected disk.
Disk Size (Usage): Shows the used space of the selected disk.
52
NVR8004X
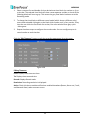
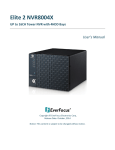
4.4.2
Lock / Format
You can control the percentage of the hard disk space reserved for Locked Event
Recordings. You can also format the hard disk if necessary.
Figure 4-26
Maximum Lock (%): Sets the maximum percentage of the hard disk space reserved for
Locked Event Recordings. To set up the Locked Event Recordings, please select the Auto
Lock item in 6.4.3 Motion or 6.4.1 Alarm.
Current Lock (%): Displays the current percentage of the locked event recordings in the
hard disk. If the amount of locked event recordings has reached the maximum lock
percentage, the NVR will be unable to lock new event recordings.
Unlock All: Click this button to unlock the locked part of hard disk.
Delete All: Click this button to delete all the unlocked data in the hard disk. WARNING: This
will effectively ERASE the hard disk’s contents, except for the locked portion.
Format Disk: Click this button to format the whole HDD. WARNING: This will effectively
ERASE the ENTIRE hard disk!!
53
NVR8004X
4.5 Network
The NVR allows you to use a Web browser to remotely view and manage the system. You can
also receive live video streaming from the NVR using your smartphone. Please download our
mobile applications: MobileFocus for Android and iOS mobile device or MobileFocusHD for
iPad.
Note: Since every Network Configuration is different, please check with your Network
Administrator or ISP to see if your NVR should use specific IP addresses and/or port numbers.
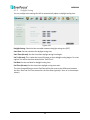
4.5.1
LAN
Figure 4-27
Lan Port: Select LAN1 or LAN2 from the drop down list. Lan 1 port can be configured for
using DHCP or Static IP network connection type while Lan 2 can be set up for using Static
IP or PPPoE.
Install: Check the box to enable the network connection.
Network Type: Three options are selectable: Static IP, DHCP and PPPoE.
Static IP: User can set a fixed IP for network connection.
DHCP: DHCP server in LAN will automatically assign an IP configuration for the network
connection (The option is only for Lan1 port).
PPPoE: For direct connection to the DSL only. Verify with your ISP if they use PPPoE (The
option is only for Lan2 port).
IP address: Displays the NVR’s current IP Address. A static IP address must be set manually.
If DHCP is selected, this value will be assigned automatically.
54
NVR8004X
Subnet Mask: Displays the subnet mask for your network so the NVR will be recognized
within the network. If DHCP is selected, this value will be assigned automatically.
Gateway: Displays the gateway on your network for the NVR to use when communicating
with any devices not on the local network. If DHCP is selected, this value will be assigned
automatically.
DNS Server 1: Displays the primary DNS server for your network. If DHCP is selected and an
internet connection is available, this value should be assigned automatically. This field
must have a valid DNS address in order to use the DDNS feature (see 4.5.3 DDNS).
DNS Server 2: This field shows the secondary DNS server for your network.
HTTP Port: Port number for HTTP/WEB communication.
Bandwidth Limit (Kbps): Specify, disabled / 128 K/ 256 K / 512 K / 768K / 1M / 3M bps. This
is the maximum bandwidth that the NVR is allowed to use on the network. This is a useful
function when connecting the NVR to busy or heavily loaded networks, or when accessing
the NVR(s) over a WAN.
Additional information:
1. Set up the NVR Network Menu according to the instructions detailed in the Networking
chapter of this NVR’s manual.
a. If using DHCP, all settings will be detected automatically. While DHCP is a useful
tool for determining the network settings, if you set up your NVR in this manner its
IP address may change at different times for different reasons, particularly after a
power failure. If the IP address of the NVR changes, you may have difficulties
accessing your NVR locally and/or remotely. It is strongly recommended that you
assign a fixed (static) IP address to your NVR, and that in order to avoid address
conflicts the IP address assigned be outside of the DHCP range of addresses your
router issues to DHCP clients. Please do not set the DHCP address issued to the NVR
by the router as its static IP address unless you take specific steps that program
your router to prevent such address conflicts.
b. If using a Fixed IP (recommended), you will need to input the information manually.
In order for DDNS to work, you must enter valid data, compatible with your
network, for all four of the network setting fields: IP address, subnet mask, default
gateway and the DNS Address (depending on your network hardware and IP
configuration this may be the IP address of your router/gateway, or it may be the
actual IP address of the local DNS server). The DNS server IP is required because
your DNS server provides critical information necessary for the NVR to
communicate with the DDNS server.
You can obtain the actual DNS IP from your Internet Service Provider (ISP); or, from
a PC located on the same LAN as the NVR, go to http://www.dnsserverlist.org/ to
55
NVR8004X
obtain a list of the IP addresses of their recommendation of the best servers to use
for your location.
2. If you are connecting through a router, make sure that you have ‘opened up’ all the
required network ports in the port forwarding section of your router’s setup options.
That is, you have directed the router to send any incoming traffic using those IP ports
to the LAN IP address of the NVR. Useful information about router port forwarding can
be found at www.portforward.com . Different routers may use different terms for port
forwarding function. For instance, D-Link calls it virtual server, Netopia calls it pinholes.
The default port for the NVR is: 80
Note: Port 80 is the default port used for Web browsing. Because of this, in order to
prevent the average user from hosting a Web server, most ISPs BLOCK traffic using port
80 from reaching the average site. If you only plan to view your NVR on a LAN, you can
use port 80, and don’t have to concern yourself with DDNS or routers. However, if you
desire remote access to your NVR, perhaps using DDNS (optional), you MUST select
functional ports and set up the port forwarding in your router. Other ports, such as
8080 and 8000 are sometimes blocked by ISPs as well.
What port(s) should be used? There are 65,535 valid IP ports to choose from. These are
broken down into three groups:
•
Well Known Ports 0 thru 1023
•
Registered Ports 1024 thru 49151
•
Dynamic and/or Private Ports 49152 thru 65535
So, rather than encounter a port conflict by choosing a port commonly used for
another purpose (like port 25 for SMTP mail or port 448 for secure sockets), choose an
‘unusual’ port number. For example, add 50,000 to your house number: 50,123 is less
likely to lead to a port conflict. For a list of the known and registered ports, see
http://www.iana.org/assignments/port-numbers
56
NVR8004X
4.5.2
Email
Figure 4-28
SMTP Server: Assign the SMTP (e-mail) server’s name. Note that for more reliable email
service, use the server’s IP address.
SMTP Port: Assign the port number used by the SMTP server.
Authentication: Check this box if the SMTP server requires authentication (user name /
password).
SSL: Check the box if mail server needs communication to be encrypted by SSL.
User Name: Input the login user name if the SMTP server requires authentication.
Password: Input the password if the SMTP server requires authentication.
Sender Email: Input the e-mail address of the sender (the NVR). Sender’s e-mail address
has to match the user name and password above.
Receiver Email 1: Input the first e-mail address that event messages are sent to.
Receiver Email 2: Input the second e-mail address that event messages are sent to.
Receiver Email 3: Input the third e-mail address that event messages are sent to.
Email Subject: Input email subject.
57
NVR8004X
4.5.3
DDNS
DDNS (Dynamic Domain Name System) is a service used to map a domain name to the
dynamic IP address of a network device. You can set up the DDNS service for remote
access to the NVR.
Figure 4-29
DDNS assigns a domain name (URL) to the NVR, so that the user does not need to go
through the trouble of checking if the IP address assigned by DHCP Server has changed.
Once the IP is changed, the NVR will automatically update the information to the DDNS to
ensure it is always available for remote access.
Before enabling the following DDNS function, user should have applied for a host name
from the DDS service provider’s website. We support four DDNS server providers:
www.everfocusddns.com and www.dyndns.com.
Note: We highly recommend that you use xxxx.everfocusddns.com for the simplicity of
setting up your NVR.
58
NVR8004X
4.5.3.1
EverFocus DDNS
Note that the DNS Server 1 (6.7.1 LAN) should be set up correctly or the DDNS will not
work.
Figure 4-30
DDNS Service: Select EverfocusDDNS from the drop-down list.
NVR Name: Input the desired name for the NVR. Note that the name of the NVR cannot
include a space, or a dot (period) or any special characters particularly ~ ! @ # $ % ^ & * ( )
+<>";:.,
Note:
1. It is not necessary to append the HTTP port number to the DDNS name. The EverFocus
DDNS server not only keeps track of your NVR’s IP address, but also keeps track of the
ports.
2. You can go to http://www.everfocusddns.com to check the DDNS name can be
registered or not.
59
NVR8004X
4.5.3.1
www.dyndns.org
Figure 4-31
DDNS Service: Select www.dyndns.org from the drop-down list.
Host name: Host name created through the dyndns account.
User name: User name of the dyndns account.
Password: Password of the dyndns account.
Setup Steps:
1. Apply for a host name from www.dyndns.org.
2. Make sure that the DNS Server 1 is set up correctly (see DNS Server 1 in 4.5.1 LAN) or
the DDNS will not work.
3. Select www.dyndns.org from the DDNS Service drop-down list.
4. Enter the host name in the Host Name field. Note that the name of the NVR cannot
include a space, or a dot (period) or any special characters particularly ~ ! @ # $ % ^ & *
()+<>";:.,_
5. Enter the User Name / Password of the dyndns account.
6. The setting is complete. And you should now be able to remotely connect the NVR by
typing the name you created into the address bar. Example:
http://hostname.dyndns.com
Note: If you are connecting through a router, make sure that you have opened up all the required
network ports in the “Port Forwarding” section of your router’s setup options. The default port
of the NVR is 80. To set up Port Forwarding, please consult the manual of the router.
60
NVR8004X
4.5.4
FTP
Set up the FTP server settings to enable the FTP function. The function is for users to upload the
motion recordings or snapshots from sub stream to the FTP server. You can choose to upload
either the recordings or snapshots, please see 4.3.2 Motion.
Figure 4-32
FTP Server: Enter the IP address or the host name of the FTP server.
Port: Enter the port number for the FTP server. Default is 21.
User Name: Set FTP User’s name.
Password: Set FTP password.
File Name: Enter the file name.
Note: If you want to upload recordings to the FTP, please go to the Remote / Mobile setting
page to select H.264 codec.
61
NVR8004X
4.5.5
Alarm Server
You can send out the alarm notifications to EverFocus’s CMS software. Please also consult the
CMS’s user manual for network alarm settings.
Figure 4-33
Server IP1~3: IP address of client PC. The network alarm can be transmitted to up to 3
addresses.
Protocol: Select the protocol type for alarm transmission. Note the protocol selected here
should match the protocol set up for the CMS alarm server.
UDP: User Datagram Protocol.
TCP: Transmission Control Protocol.
Port: Select the transmission port for network alarm messages. The port setup here should
match the port set up for the CMS alarm server.
Network ID: The network ID is an identifier for the alarm transmitter (NVR sending the alarm).
62
NVR8004X
4.6 Schedule
You can set up the recording schedule with the desired time, event types or FPS.
4.6.1
Express Setup
You can set up a weekly recording schedule for the NVR to automatically record videos.
Figure 4-35
Weekend Start: Select a start date and time for the weekend.
Weekend End: Select an end date and time for the weekend.
Daytime Start: Select a weekday start time (Nighttime schedule ends when Daytime
begins).
Daytime End: Select a weekday end time (Nighttime schedule ends when Daytime ends).
Record Type: Select a recording type for each time period.
Disable: No recording during the scheduled time period.
Normal+Event: Continuous and Event recordings.
Event Only: Event recordings only.
Action: Check the box to enable the Buzzer, Alarm Out, E-mail and Network actions
selected in 6.4 Event when an event occurs during the selected time period.
Note: For Holiday and Others, you can set up the recording schedule in 6.8.2 Holidays.
63
NVR8004X
4.6.2
Holidays
In addition to set up a weekly recording schedule, you can also set up a holiday recording
schedule to automatically record videos on a specific day of the year.
Figure 4-36
Date Type: Select Holiday or Others if you have configured the settings in 6.8.1 Express
Setup. The Holiday and Others are two different groups designed for you to assign special
days independently.
Recurrent Type: Select a date layout for the selected group above.
Disabled: Select to disable the Holiday / Others recording schedule.
One time: Select this option and then set up the specific date and year in the Details
field. The NVR will start recording on this specific date.
Month/date: Select this option and then set up the specific date in the Details field.
The NVR will start recording on this date yearly.
Month/Weekday: Select this option and then set up the specific date in the Details
field. The NVR will start recording on this specific date.
Details: Click to specify the date for the selected group above.
Previous: Previous Page (30 Holidays Total)
Next: Next Page (30 Holidays Total)
64
NVR8004X
4.6.3
Schedule
You can set up the camera recording mode by time of day on specific days of the week
and/or holidays and other days. Please note that after the configuration, you have to
check the Schedule Record box in the Record setting page to enable the schedule
recording mode.
Figure 4-37
Camera (1~16): Select a camera number to change the schedule for the selected camera.
Each camera can be controlled during a 24-hour time block for Holiday (Hol), Other (Oth),
Sunday (Sun), Monday (Mon), Tuesday (Tue), Wednesday (Wed), Thursday (Thu), Friday
(Fri), or Saturday (Sat).
Time (0~23): The numbers represent the 24 hours of a day.
Time Bar: The time bar uses three different colors to distinguish each recording mode.
Gray (No Record): No recording during this time block.
Pink (Event Only): Only events are recorded during this time block.
Blue-green (Normal+Event): (Default) Normal and event recording during this time
block.
There are 48 blocks on the time bar, and each block represents half hour respectively.
When moving the cursor onto the time bar, the exact time will appear at the right side of
the time bar (shown as the above figure).
65
1.
NVR8004X
Select a camera first and double-click on desired start time block (no number on it) on
a time bar. The selected time block will show a new sequence number on it and all the
following blocks will turn to gray. This means the grey time blocks has been set to No
Recording mode.
2.
To change the time blocks to different record mode (which shows a different color),
users need to double-click again on the block (with number on it) of any section. Every
time the user clicks the first block of a section, the color switches from gray->pink
->blue-green.
3.
Repeat the above steps to configure the record modes. You can configure up to six
record modes on each time bar.
Click the “Edit Timezone” button to edit the recording parameters for a time zone.
Figure 4-38
Editing Timezone:
From: Displays time zone start time.
To: Displays time zone end time.
Record: Displays Record mode.
Resolution: Recording resolution is displayed.
Action: Check this box to enable notifications enabled elsewhere (Buzzer, Alarm out, E-mail,
and Network Alarm) when an event occurs.
66
NVR8004X
Apply to Days: This button can be used to copy schedules to other days. Select which days
you wish to copy to. "Select All" selects all days, “Clear All” deselects all days. Click “OK” to
copy the settings or "Cancel" to exit without copying.
Figure 4-39
Apply to Cameras: This button can be used to copy schedules to other cameras. Select
which cameras you wish to copy to. "Select All" selects all cameras, “Clear All” deselects all
cameras. Click “OK” to copy the settings or "Cancel" to exit without copying.
Figure 4-40
67
NVR8004X
4.7 System Setting
You can configure the general settings for the NVR in this menu.
4.7.1
Date / Time
You can set up the date and time for the NVR.
Figure 4-41
Date: Click to bring up the on-screen keyboard to set up the date.
Time: Click to bring up the on-screen clock to set up the time.
Date Format: Select a date format from the drop-down list.
Time Format: Select a time format from the drop-down list.
Time Zone: Select a time zone for the NVR to adjust to when updating from the time
server.
NTP: Select Disable / Enable for NTP time synchronization.
NTP Server: Displays the time server address that the NVR uses for time synchronization.
Requires operating network configuration and WAN or LAN access to a compatible NTP
server. To find a compatible NTP address, follow the steps below:
a. Use a computer connected to the Network.
b. Click Start > Run > type “command” and then click OK.
c. In the DOS Prompt, type “ping pool.ntp.org” to find out the IP address of an NTP
Server.
NTP Update Interval: The frequency that the system automatically updates the time via the
NTP server. Select Daily, Weekly or Monthly.
68
NVR8004X
4.7.2
Daylight Saving
You can configure the settings for NVR to automatically adjust to daylight saving time.
Figure 4-42
Daylight Saving: Check the box to enable automatic daylight saving time (DST).
Start Date: Set the start date for daylight saving time.
Start Time (hh:mm): Set the time when daylight saving time begins.
Set To (hh:mm): This is what the time will change to when daylight saving begins. For most
regions, this will be one hour ahead of the “Start Time”.
End Date: Set the end date for daylight saving time.
End Time (hh:mm): Set the time when daylight saving time ends.
The time change difference on the End Date will be the same as the difference between
the Start Time and End Time entered for the Start Date (typically 1 hour as in the example
shown).
69
NVR8004X
4.7.3
User Group
This setting page is used for configuring the privilege of the three access levels:
Administrator, Manager and Operator. Check the boxes under an access level to enable
the privileges of that access level. For example, if you check the Clear Log box under the
Operator access level, only the Operator has the privilege to clear log.
Figure 4-43
Manage User at Own Level: Check this box for the user of an access level to be able to
configure other users’ settings of the same level at the User Management setting page
(see 4.7.4 User Management). For example, if this box under the Operator level has been
checked, any user with the Operator privilege can go to the User Management setting
page to set up the settings of other Operators.
User Management: Check this box under an access level to enable the users of that level
to access the User Management and User Group setting page.
Note: Users with the Administrator account have full privileges, so the checkboxes under
the Administrator access level will always be grayed out. The Administrator can grant
privileges to both the Manager and Operator while the Manager can only give privileges to
the Operator. The Operator has no right to configure this page.
70
NVR8004X
4.7.4
User Management
You can create multiple user accounts (max: 20 user accounts) with different privileges.
The NVR has default user accounts which you can choose to copy, edit, add or delete, and
the default password is 11111111.
Figure 4-44
Copy: Click the
user account.
button to copy the settings of an existing user account to a new
Edit: Click the
button to edit the settings of an existing user account.
Add: Click the
button to add a new user.
Delete: Click the
button to delete
Login: Check the box to enable the User Login function after logging out the NVR.
Auto User Log Off: Check the box to automatically logoff the NVR after 3 minutes of
inactivity.
Previous: Click to return to the previous page.
Next: Click to enter the next page.
71
NVR8004X
You can further configure each user account and its settings individually, see the steps
below:
1.
Click on a user account (Figure 4-44).
2.
Click the Add, Copy or Edit button, and the following page appears.
Figure 4-45
User Name: Click to bring up the keyboard and input the desired user name.
User Group: Select a user group (access level).
Status: Select to enable or disable the user account.
Password: Input the password.
Confirm: Enter the same password again to confirm.
Camera Access: Click to bring up a new setting page (figure 4-46), and check the
boxes to enable the live, playback or PTZ functions of the cameras for local or remote
access.
User Right: Check the boxes to enable the functions for the user account.
72
NVR8004X
Figure 4-46
73
NVR8004X
4.7.5
EKB200
You can connect an EKB200, which is EverFocus’ USB keyboard, to the USB port on the
computer to remotely control the Iris, focus or the pre-configured PTZ control functions of
the connected cameras. For details on how to configure the PTZ control functions on the
Web interface, including Preset Position, Auto Pan, Tour and Pattern, please refer to
4.1.4.2 PTZ.
Figure 4-47
The control keys on the EKB200
Figure 4-48
After connecting the EKB200 keyboard to the NVR and configuring the PTZ control functions
on the Web interface, you need to configure the above setup page to define the function for
each control key on the keyboard. Click the Save button to save the settings. Once you press
the control key on the keyboard, the camera will do the action which you’ve defined for the
key.
74
NVR8004X
【Key No】 The control key number on the keyboard.
【Action】 Select an item from the drop-down list to define the function for each key on the
keyboard.
Set Preset: You can use the joystick on the keyboard to select a position and then press
this key to save the position as the Preset Position.
Go to Preset: Press this key to let the camera go to the Preset Position number specified in
the Value column.
Go to Home: Press this key and the camera will go to the Preset Position 1.
Clear Preset: Press this key to clear the Preset Position number specified in the Value
column.
Run Auto Pan: Press this key to start the AutoPan number specified in the Value column.
Stop Auto Pan: Press this key to stop the AutoPan number specified in the Value column.
Tour Run: Press this key to start running the Tour number specified in the Value column.
Tour Stop: Press this key to stop running the Tour number specified in the Value column.
Pattern Run: Press this key to start running the Pattern number specified in the Value
column.
Pattern Stop: Press this key to stop running the Pattern number specified in the Value
column.
Set Auto Tracking: Press this key to switch On / Off the Auto-Tracking function.
Select Tracking Object: Press the key to display the tracking crosshairs on the screen. Use
the joystick on the keyboard to select the desired tracking object and press this key again
to save the selection.
Toggle Full Screen: Press this key to toggle between the full screen and current screen.
【Value】 Type in the number for the selected Action item. For example, selecting Go to
Preset from the Action drop-down list and typing in 2 in the Value column represents the
Preset Position 2.
To activate the EKB200 keyboard on the PTZ Live View window, click the PTZ
icon on
the Menu Bar. Click the Connect button to connect the EKB200 keyboard, and then you
are able to control the PTZ camera over the EKB200 keyboard (please refer to 4.11 PTZ).
75
NVR8004X
4.7.6
Miscellaneous
You can upgrade the latest firmware, restore the factory default settings to the NVR,
upload / save the NVR configuration settings from / to the USB / computer or change the
language in this setup menu.
Figure 4-49
Remote Reboot: Click Reboot Now to restart the NVR via the Network.
Firmware: Shows the current firmware version of the NVR.
Firmware Upgrade: Click Browse to choose the firmware file and click Upgrade to upgrade
the latest firmware.
【Configurations】
Load Factory Default: Click to restore the NVR to factory default settings. The User
Account, Network IP Settings, and Time settings will not be affected.
Load From File: Click Browse to choose the NVR configurations file and Click Load to
upload the NVR configurations.
Save To File: Click to save the NVR configurations to the file.
Language: Choose which language the NVR uses.
76
NVR8004X
4.8 System Information
You can see the NVR information and Log data in this menu. Or export the log data to the USB
storage device.
4.8.1
Configuration
In the System Menu, you can only see the information of the NVR, Network or HDD. No
configuration can be done in this menu.
Figure 4-50
【System】
Version: Displays the firmware version.
Model: Displays the model name of the NVR.
Web Version: Display the web version.
S/N: Display the serial number of the NVR.
【LAN】
IP 1 / IP 2: Displays the IP address of LAN 1 / LAN 2 set up in the Network or Express menu.
MAC 1 / MAC 2: Displays the MAC address of LAN 1 / LAN2. This option cannot be
changed.
NVR Name: Displays the DDNS name if configured.
Network ID: The ID number for EverFocus’ CMS as set up in the Alarm Server menu.
【Status】
Disk (1~4): Displays the status of the internal hard disks. Normal hard disk operation is
indicated by “OK”.
77
NVR8004X
4.8.2
Log
You can choose, display or export log data using this menu.
Figure 4-51
Start Date / End Date: Click to bring up the on-screen keyboard to set up the start / end
date.
Start Time / End Time: Click to bring up the on-screen clock to set up the start / end time.
Log Type: Select the desired log types.
View Log: Click to bring up the Log List shown as below.
Figure 4-52
Clear Log: Click to delete all the selected log data.
Export Log to File: Click the Export button to export the log data to the file.
78
NVR8004X
4.9 Copy
4.9.1
Copy
You can archive the recordings or log data (event and motion) to the computer.
Figure 4-53
Camera: Select the desired cameras.
Data Type: You can copy the recordings of selected cameras from main stream or sub stream.
Start Date / Time: Click to bring up the on-screen keyboard / clock to select the start date /
time.
End Date / Time: Click to bring up the on-screen keyboard / clock to select the end date /
time.
Data Size: Shows the size of the data which you want to copy.
Copy: Click to start archiving.
Cancel: Click to cancel the archiving process.
Download Player: Click to download EFPlayer program to your computer. You can use the
EFPlayer on a computer to play back the recordings.
79
NVR8004X
4.9.2
Quick Archive
Figure 4-54
【Configurations】
Archive Interval: Click the Archive Interval drop-down list and select an interval time (1, 5,
10, 15, 20, 30 or 60 minutes), and click Apply. For example, if you set up 60 minutes for the
Archive Interval, the NVR will archive the recordings 60 minutes ago from the current time to
the storage device.
Copy Type: Click Copy to quickly archive all the recordings to a computer or a storage device.
Data Size: Shows the date size of the recordings.
80
NVR8004X
4.10 Search
You can search the recordings for playing back by using the Search menu. On the left side of
the Search menu, select Time Search or Event Search to enter to the setup menu.
Figure 4-55
4.10.1 Time Search
Figure 4-56
Start Date: Click to bring up the on-screen keyboard to select the date.
Start Time: Click to bring up the on-screen clock to select the time.
Play: Click to start playing back.
81
NVR8004X
4.10.2 Event Search
Figure 4-57
Start Date / End Date: Click to bring up the on-screen keyboard to select the start / end
date.
Start Time / End Time: Click to bring up the on-screen clock to select the start / end time.
Camera: Select the desired cameras to be searched.
Event: Select an event type to be searched.
Search: Click to start searching. The search results will be listed in the Event List menu as
shown below.
Figure 4-58
Play: Click to playback the selected items.
Back: Click to return to the search page.
82
NVR8004X
4.11 PTZ
You can use the PTZ Control Panel to control the connected PTZ cameras, to set Preset setting
and to activate the configured PTZ settings. You can also connect to an EverFocus’ EKB200
keyboard to a computer to control the PTZ camera.
Figure 4-59
To control the PTZ camera:
1. Select a connected PTZ camera in the Camera drop-down list first.
2. To move the camera to the desired direction and angle, click the Direction buttons.
3. To zoom in / out the camera view, click the Zoom buttons.
4. To adjust the camera focus, click the Focus buttons.
5. To adjust the Iris open to increase / decrease the amount of light in, click the Iris buttons.
6. To program a Preset Position (if supported by the camera):
a. Move the PTZ camera to the desired position.
b. Click the Preset button.
c. Set up a preset number for the current position by clicking the number buttons. The
number will be displayed in the number box.
d. Click the Set button to save the settings.
83
NVR8004X
7. To jump to a Preset Position:
a. Click the Preset button.
b. Click the desired Preset number.
c. Click the Go button.
8. Shortcut for Preset 1 ~ 9:
a. Click digit 1 ~ 9 button without clicking any other buttons.
b. The camera will seek that Preset Position.
9. To delete a Preset Position (if supported by the camera):
a. Click the Preset button.
b. Click the desired Preset number.
c. Click the Delete button.
10. To operate the Auto Pan function, click the Auto Pan button.
11. To operate the Pattern function, click the Pattern button. The Pattern is the “0” Tour in
EverFocus and Pelco PTZ cameras.
12. To operate the Tour function:
a.
b.
c.
Click the Tour button.
Click the desired Tour number.
Click the Go button.
13. To remove a pre-configured Tour (if supported by the camera):
a.
Click the Tour button.
b.
Click the desired Tour number.
c.
Click the Delete button.
Click C to clear the entered number in the Number Box.
Note: Before start using the Auto Pan, Pattern and Tour functions, you have to configure the
related settings for the connected PTZ cameras. Please refer to 4.1.4.2 PTZ or the User’s
Manual of your PTZ cameras.
Control PTZ Camera over EKB200 Keyboard:
When using an EKB200 keyboard, you need to click the Connect button on the PTZ Control
Panel. Please note that you need to configure the PTZ control functions and define the
function for each control key on the keyboard before controlling the PTZ camera over the
EKB200 keyboard (see 4.1.4.2 PTZ and 4.7.5 EKB200). For information about the installation of
the EKB200 keyboard, please refer to your EKB200 keyboard User’s Manual.
84
NVR8004X
Chapter
5.
5
Specifications
Model Name
System
Operating System
Number of Channels
Playback Channels
RAM
Dual Streams
Remote Live View
Control
Supported IP Camera
NVR8004X-04
NVR8004X-08
NVR8004X-16
Embedded Linux
4 CH
8 CH
16 CH
4 CH
8 CH
16 CH
2 GB
Yes
Live View, Preset/Go, PTZ, Snapshot, Multi-view, Digital PTZ,
Bandwidth Monitoring
EAN3120, EAN3220, EAN3300, EDN3160, EDN3260, EDN3340,
EHN3160, EHN32260, EHN3340, EPN4122, EPN4220, EZN3160,
EZN3260, EZN3340
Recording
Recording Performance
Recording Format
Recording Modes
Audio & video
Recording
Storage
Internal 3.5” HDD
Max Storage
RAID Level
Network
Ethernet
LAN Speed
Protocol
Interface
USB
Ethernet
VGA
Support 1.3M, 2M, 3M and above IP cameras.
General performance up to 480fps at 2M pixel
(Up to 5M per channel)
Total bit rate:100Mbps
MPEG-4 / M-JPEG / H.264 (depends on IP camera)
Continuous Record / Scheduled Record / Event Trigger Record
Synchronized audio and video recording
4 x SATA II HDD
12 TB
N/A
2 x Gigabit Ethernet
10 / 100 / 1000 Mbps (2 x RJ45)
TCP-IP / DHCP / PPPoE / DDNS / HTTP
4 (2 x USB 3.0 port, 2 x USB 2.0 port)
2 x RJ-45
1 x D-Sub socket
85
NVR8004X
General
Power Input
Power Consumption
Operating Temperature
Operating Humidity
Dimensions (W x D x H)
Weight
19 VDC, 4.74A
90W max.
0°C~40°C / 32°F~104°F
20~80% non-condensing
140 mm x 183 mm x 219 mm / 5.51" x 7.2" x 8.62"
2.97 kg / 6.55 lbs (without HDDs)
English, Japanese, Simplified / Traditional Chinese, Spanish, German,
Language
French, Russian, Portuguese (Brazil), Dutch
ONVIF
ONVIF 2.0, Profile S
Regulatory
CE, FCC
Remote Client System Minimum Requirement
Operating System
Windows XP (32-bit) / Win7 (32 and 64-bit)
CPU
Intel Core 2 Duo, 2.6GHz
RAM
2GB
AGP or PCI-Express, 800x600 (1280x1024 recommended), 32-bit
VGA
color
LAN Speed
10 / 100 / 1000 Mbps (RJ45)
Web Browser
Windows (IE 8, 9, 10, Chrome, Firefox, Safari), MAC (TBD)
1. EverFocus’ CMS: Power Video Plus (Windows AP)
Other Remote
2. EverFocus’ mobile app: MobileFocus for iOS and Android devices
Application
MobileFocusHD for iPad.
86
NVR8004X
Appendix
A
Appendix A: Network Overview
This chapter will give you a basic instruction on how to set up the NVR for network connection.
It is highly recommended that you have a working knowledge of what a network is and how it
works. This will be helpful in completing the networking process.
Introduction to TCP / IP
TCP/IP is the group of protocols used by the Internet and most Local Area Networks (LANs)
throughout the world. In TCP/IP, every computer or other communications device that is
connected to the network has a unique IP address. By doing this you are giving your device a
unique address similar to the address of your house. An IP address is composed of four octets
(numbers in the range of 0 to 255) separated by decimal points. The IP address is used to
uniquely identify a host or computer on the LAN. For example, one computer on a network
could have an IP address of 192.168.1.127.
You should never give two or more devices the same exact IP address, but the first three octets
of an IP address is often the same for all computers in the local area network. For example, if a
total of 253 computers exist in a single LAN, the IP addresses could be assigned starting with
192.168.1.x, where x represents a number in the range of 2 to 254. In IPP address could be
compared with a telephone number.
Subnet Masks
Each host in a LAN has a subnet mask. The subnet mask is a set of octets that is used to
determine which LAN or class it belongs to. The number 255 is usually used to represent the
network address portion of the IP address and a zero is placed at the end to identify the host
portion of the address. Basically the subnet mask tells the devices how the network addresses
are organized, and helps to determine which addresses are local and which are remote (on the
other side of the router).
87
NVR8004X
Gateway Address
Addressees are either local or remote. A gateway address is composed of four octets separated
by decimal points. The gateway address is used to uniquely identify the device on the LAN that
has access to the communications links connecting to other LANs, WANs and/or the Internet
(access to the ‘remote’ addresses).
Virtual Ports
A port number represents a "channel" or entryway for network communications. Port numbers
allow different computers to utilize network resources without interfering with each other. Port
numbers most commonly appear in network programming, particularly socket programming.
Sometimes, though, port numbers are made visible to the casual user. For example, some
websites on the Internet use a URL like the following:
http://www.sitename.com:8100/
In this example, the number 8100 refers to the port number used by the browser to connect to
the web server. The standard port number used by web sites is 80, so this number does not
need to be included with the URL (although it can be). In IP networking, port numbers can
theoretically range from 0 to 65535. Most popular network applications, though, use port
numbers at the lower end of the range (such as 80 for HTTP). Ports are similar to doors and
windows of your house, with port 80 acting as the front door. If these are not open you could
not enter the house. This is the same case with ports on a network. If the ports for a specific IP
address are not open then you could not gain access to that IP address.
Note: The term port also refers to several other aspects of network technology. A port can
refer to Ethernet connection points, such as those on a hub, switch, or router. The term port is
also used to refer to a physical connection point for peripheral devices such as serial, parallel,
and USB ports.
Another analogy would be: if a WAN IP address is similar to the phone number identify a site, IP
ports are similar to telephone extensions, in that they allow communication with specific
devices within a site that all share the same external (WAN) IP address. A router is a device
which allows multiple computers and other IP enabled equipment to share that single WAN IP
address. It functions like a “switchboard operator” – opening ports creates an association
between those port numbers and the LAN IP address of specific equipment on the LAN behind
the router. When the router sees a ‘call’ for a specific ‘extension’ (port), it directs that data
stream to the (LAN IP address of the) equipment associated with that ‘extension’ (port).
88
NVR8004X
Pre-Installation
Before beginning the installation, please answer the following questions:
Do you have Hi-speed Internet?
______________
There are many types of high speed Internet available. The most common ones are T1,
Cable, and DSL (in order of speed). The NVR is not compatible with a dial-up connection.
Note: EverFocus suggests having a minimum upload speed of 256KBps. This can be addressed
by your Internet Service Provider.
What type of modem/router do you have?
_________________________
Modem/router model name/ #
The modem/router was either installed by your Internet service provider or purchased by
you to establish a connection to the Internet. A router assigns different internal IP
addresses to local computers; this allows multiple computers to access the Internet
through the same external IP address.
Do you have a static IP address?
______________
A Static IP address means you use the same IP address every time you connect to the
Internet. With a static IP address, other Internet users always know the address of your
location and can easily connect with it. This makes it much simpler to host a website, email
server, or other type of server connection. Everfocus suggests using a static IP address. If
this is not available, you will need to use a dynamic IP address. This is explained below.
Do you have a dynamic IP address?
______________
A Dynamic IP address means your IP address changes each time you connect to the
Internet. We recommend asking your Internet service provider for a Static IP address. If
this is not a possibility, you may use the DDNS feature of the NVR. DDNS stands for
Dynamic Domain Name Server, a service that provides a central database where IP
information can be stored and retrieved. It allows those using a dynamic IP address to be
registered centrally so users can connect to it by name. See 4.5.3 DDNS for details on using
EverFocus DDNS.
89
NVR8004X
Pre-Installation
Everfocus’ NVR can operate using one of three types of networking connections.
Simple One to One Connection: A simple one to one connection is the simplest type of network
connection. It uses a cross-over cable to make a direct connection from one computer to
another (or in this case a computer to a NVR).
Direct High Speed Modem Connection: A direct modem connection uses a standard network
cable to connect the modem directly to a computer (or in this case a modem to the NVR). This
type of connection only covers single-port modems. For a combination modem/router, use the
setup described below.
Router or LAN Connection – A local area network connection requires either a router or a
pre-existing LAN connection. This is the most common type of connection. A router allows
multiple computers and NVR’s to access each other as well as the Internet. It assigns different
internal IP addresses to the computers.
90
NVR8004X
Appendix
B
Appendix B: Linksys & D-Link Port Forwarding
Typical Linksys Port Forwarding
This section will cover a few simple configurations for the Linksys router. This chapter is only to
offer some help to the installer and end user. Please understand we DO NOT support this
product and will not give tech support on it. If you need additional technical support on this
router you must call Linksys.
To access the Web-based Utility, launch a web browser and type the Router’s IP address,
typically 192.168.1.1, in the address bar. Then press Enter. A password request page will appear.
(Non-Windows XP users will see a similar screen.) Leave the User Name field blank. The first
time you access the router, use the default password admin. Click the OK button to continue.
The first screen that appears displays the Setup tab. This allows you to change the Router's
general settings. Change these settings as described here and click the Save Settings button to
apply your changes or Cancel Changes to cancel your changes.
91
NVR8004X
Click on the “Applications & Gaming” tab.
Applications and Gaming allows you to set up public services on your network, such as web
servers, ftp servers, e-mail servers, or other specialized Internet applications. (Some Internet
applications may not require any forwarding) To forward a port, enter the information on each
line for the criteria required. Descriptions of each criterion are described here.
Application - In this field, enter the name you wish to give the application.
Start/End - Enter the starting number of the range under Start and the ending number under
End.
Protocol - Enter the protocol used for this application, either TCP or UDP, or Both.
IP Address - For each application, enter the IP Address of the PC running the specific
application.
Enable - Click the Enable checkbox to enable port forwarding for the relevant application.
When finished making changes, click the Save Settings button to apply your changes or Cancel
Changes to cancel them.
Here is an example for how the port information might look:
HTTP 80 to 80
Both 192.168.1.50 Enable
Where 192.168.1.50 is the IP address of the NVR on the LAN, and the default port 80 is in use.
Note: If you changed port 80 in the NVR’s Network Menu, open that port instead of 80.
92
NVR8004X
Typical D-Link Port Forwarding
This section will cover a few simple configurations for the D-Link router. This chapter is only to
offer some help to the installer and end user. Please understand we DO NOT support this
product and will not give tech support on it. If you need additional technical support on this
router you must call D-Link.
Whenever you want to configure your network or the DI-624, you can access the Configuration
Menu by opening a web-browser and typing in the IP Address of the DI-264.
The DI-264 default IP Address is 192.168.0.1.
Type “admin” in the User Name field
Leave the Password blank
Click OK
The first screen that shows up is the Home Tab. This is the starting point for all the router’s
settings and functions.
93
NVR8004X
Click Virtual Servers on the left to bring up the following screen.
Virtual Servers allows users who are connecting remotely to access services on the router’s
Local Network. The functions of each field are described below.
Virtual Server - Select Enabled or Disabled
Name - Enter the name referencing the virtual service
Private IP - The IP address of the device running the local services.
Protocol Type - The protocol used for the virtual service.
Private Port – The port number that the service uses on the LAN (Local Area Network).
Public Port - The port number that the services uses on the WAN (Wide Area Network).
Schedule – The time period the virtual server will be active.
When you have input all the information for a virtual server, click on Apply to add it to the
list at the bottom or Cancel to clear all fields.
Here is an example of the information for each service:
Name Private IP Protocol Private Port Public Port
Schedule
HTTP
192.168.1.50 Both
80
80
Enable
Where 192.168.1.50 is the IP address of the NVR on the LAN, and the default port 80 is in use.
Note: If you changed port 80 in the NVR’s Network Menu, open that port instead of 80.
94
EverFocus Electronics Corp.
EverFocus Taiwan:
12F, No.79, Sec. 1, Shin-Tai Wu Road,
Hsi-Chih, Taipei, Taiwan
TEL: +886 2 2698 2334
FAX: +886 2 2698 2380
www.everfocus.com.tw
[email protected]
EverFocus Europe - Germany:
Albert-Einstein-Strasse 1, D-46446
Emmerich, Germany
TEL: +49 2822 93940
FAX: +49 2822 939495
www.everfocus.de
[email protected]
EverFocus China - Beijing:
Room 609, Technology Trade Building,
Shangdi Information Industry Base,
Haidian District, Beijing 100085, China
TEL: +86 10 6297 3336~39
FAX: +86 10 6297 1423
www.everfocus.com.cn
[email protected]
EverFocus China - Shenzhen:
4F, No. 2, D4 Building, Wan Yelong
Industrial Park, Tangtou Road, Shiyan,
Baoan, Shenzhen, Guangdong 518101, China
TEL: +86 755 2765 1313
FAX: +86 755 2765 0337
www.everfocus.com.cn
[email protected]
EverFocus USA - California:
1801 Highland Avenue, Unit A, Duarte, CA 91010, USA
TEL: +1 626 844 8888
FAX: +1 626 844 8838
www.everfocus.com
[email protected]
EverFocus USA - New York:
415 Oser Avenue, Unit S, Hauppauge, NY 11788, USA
TEL: +1 631 436 5070
FAX: +1 631 436 5027
www.everfocus.com
[email protected]
EverFocus Japan:
5F, Kinshicho City Building, 2-13-4
Koto-Bashi,Sumida-Ku, Tokyo, 130-0022, Japan
TEL: +81 3 5625 8188
FAX: +81 3 5625 8189
www.everfocus.co.jp
[email protected]
EverFocus Europe - UK:
Unit 12, Spitfire Business Park,
Hawker Road, Croydon Surrey, CR0 4WD, UK
TEL: +44 20 8649 9757 / +44 845 430 9999
FAX: +44 20 8649 9907
www.everfocusuk.co.uk
[email protected]
EverFocus India:
Suite 803, Housefin Bhavan, C-21,
Bandra Kurla Complex, Bandra (East),
Mumbai 400051, India
TEL: +91 22 6128 8700
FAX: +91 22 6128 8705
www.everfocus.in
[email protected]
Your EverFocus product is designed and
manufactured with high quality materials
and components which can be recycled
and reused.
This symbol means that electrical and
electronic equipment, at their end-of-life,
should be disposed of separately from
your household waste.
Please, dispose of this equipment at your
local community waste
collection/recycling centre.
In the European Union there are
separate collection systems for used
electrical and electronic product.
Please, help us to conserve the
environment we live in!
Ihr EverFocus Produkt wurde entwickelt
und hergestellt mit qualitativ
hochwertigen Materialien und
Komponenten, die recycelt und wieder
verwendet werden können.
Dieses Symbol bedeutet, dass elektrische
und elektronische Geräte am Ende ihrer
Nutzungsdauer vom Hausmüll getrennt
entsorgt werden sollen.
Bitte entsorgen Sie dieses Gerät bei Ihrer
örtlichen kommunalen Sammelstelle oder
im Recycling Centre.
Helfen Sie uns bitte, die Umwelt zu
erhalten, in der wir leben!
P/N: 4605PNV804B020A