1
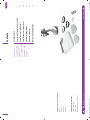
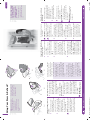
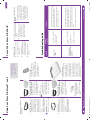
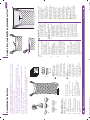
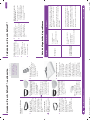
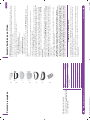
Sistema de cuidado para prendas
™
Garment Care System
User’s Guide
GS500 series
Manual del usario
www.sharkclean.com
*6BVHULHVB,%B(6BLQGG
$0
2
TOLL FREE: 1-800-798-7398
POLARIZED PLUG:
This appliance has a polarized plug (one blade
is wider than the other). As a safety feature,
this plug will fit into a polarized outlet only one
way. If the plug does not fit fully into the outlet,
reverse the plug. If it still does not fit, contact
a qualified electrician. Do not attempt to
defeat this safety feature.
4. Use of any substances other than
manufacturer’s recommended accessories will
automatically void your warranty.
DANGER OF SCALDING
Please use caution when using the fabric
steamer directly or with the attachments. The
Wrinkle Eraser™ pressing bar and the steam
emitted are very hot.
The Wrinkle Eraser™ is not controlled by the
steam trigger and is hot as long as the unit
is turned on.
12. The fabric steamer can be used in a vertical
or horizontal motion. NEVER hold the steam
head down while at rest or tilt it in a backward
position as this may result in hot water
discharge and possibly injury.
11. This appliance and the accessories become
hot during use. Exercise care when changing
accessories and follow removing and changing
instructions as outlined in the manual. Use
caution while changing frames while in use,
Wrinkle Eraser™ is hot.
h. DO NOT pull or carry by power cord, use
power cord as a handle, close a door on the
g. DO NOT handle plug or fabric steamer with
wet hands or operate without shoes.
f. DO NOT disassemble or attempt to repair
the fabric steamer. Return the system
to EURO-PRO Operating LLC for
examination and repair. Incorrect reassembly
or repair can cause a risk of electrical shock
or injury to persons when the fabric steamer
is used.
e. DO NOT operate the system with a
damaged cord or plug, or if the appliance
or any other part of the system has been
dropped or damaged.
10. DO NOT use on leather, suede, vinyl, plastic or
other delicate, steam sensitive materials. Always
determine the colorfastness of any fabric before
using the fabric steamer by testing it on a small
portion of the garment’s underside.
9. DO NOT put any objects into openings or
operate with any opening blocked.
8. DO NOT allow to be used as a toy.
d. DO NOT use extension cords or outlets with
inadequate current carrying capacity. If
an extension cord is absolutely necessary,
use a 15-ampere cord. Cords rated for
less amperage may overheat. Use care to
arrange the cord so that it cannot be pulled
or tripped over.
c. DO NOT pull power cord to disconnect
from outlet; instead, grasp plug and pull to
disconnect.
b. DO NOT immerse any part of the system in
water or other liquids.
a. To avoid circuit overload, DO NOT operate
another appliance on the same socket
(circuit) as the fabric steamer.
15. To protect against a risk of fire, electric shock,
or injury:
14. NEVER attempt to steam clothing while on a
body.
13. When cleaning the fabric steamer, unplug the
power cord and clean with a dry or damp cloth.
DO NOT pour water or use alcohol, benzene or
paint thinner on the unit.
7. Always unplug the power cord from the
electrical outlet when not in use, when filling
the water tank and before servicing.
6. DO NOT leave the appliance unattended when
plugged in.
5. DO NOT use outdoors.
3. DO NOT add cleaning solutions, scented
perfumes, oils, or any other chemicals to the
water used in this appliance as this may damage
the unit or make it unsafe for use.
2. ONLY USE WATER. To extend the life of your
Press & Refresh™ Garment Care System, we
recommend using distilled water especially if you
live in an area with hard tap water.
1. USE THE SYSTEM ONLY FOR ITS INTENDED
USE AS DESCRIBED IN THIS MANUAL.
READ ALL INSTRUCTIONS BEFORE USING
YOUR PRESS & REFRESH™ GARMENT
CARE SYSTEM.
WHEN USING YOUR SHARK®
PRESS & REFRESH™ GARMENT CARE
SYSTEM, BASIC SAFETY PRECAUTIONS
SHOULD ALWAYS BE FOLLOWED,
INCLUDING THE FOLLOWING:
For Household Use Only
IMPORTANT SAFETY INSTRUCTIONS
SAVE THESE INSTRUCTIONS
www.sharkclean.com
s. Keep out of the reach of children.
r. Let the system cool completely before
putting away.
q. Keep your work area well lit.
3
p. Store your appliance indoors in a cool, dry
area out of the reach of children.
o. DO NOT operate in the presence of
explosive and/or flammable fumes.
n. DO NOT operate the fabric steamer while
under the influence of drugs, alcohol or
medications.
m. NEVER aim or direct steam towards people,
animals, or plants. The steam is very hot
and can cause burns. Burns can occur from
touching hot metal parts, hot water, steam,
steam bonnets or fabric frames.
l. NEVER turn the appliance over or on its
side when in use.
k. NEVER attempt to fill this unit under a
water faucet. Always use the filling flask that
is provided.
j. ALWAYS disconnect system from electrical
outlet when filling with water or emptying
and when not in use.
i. DO NOT allow power cord to touch hot
surfaces.
power cord, or pull the power cord around
sharp corners or edges.
English
With the pointed end of the
frame pointed down, gently
attach the top of the frame
2
3
TIP: Wipe away condensation
from the steam guard on the
bottom of the frame after
extended use.
To remove the frame, gently
pull on the pointed end and lift
the frame off the unit.
over the unit, above the wrinkle
eraser. Next, secure the pointed
end of the frame around the
bottom of the unit (Fig. 1).
4
TOLL FREE: 1-800-798-7398
Upholstery/Delicate
Fabric Frame & Upholstery Steam Bonnet
Upholstery/Delicate
Fabric Frame & Delicate Steam Bonnet
Lint Brush Frame
Bristle Brush Frame
FRAME/ACCESSORY
Attach the desired frame.
1
The unit comes assembled with a
small steam bonnet attached. This
steam bonnet should always be in
place during use.
Attaching the appropriate
accessory:
Fig. 1
4 The steam bonnet should only
be removed for cleaning.
Not only great on garments, the Press & Refresh™ can be used anywhere around the home:
upholstery, bedding, curtains and more!
The Wrinkle Eraser™ heat bar simulates the soleplate of an iron and presses the fabric for a crisp finish.
The Press & Refresh™ Garment Care System brings your fabrics back to life without a trip to
the dry cleaners! Shark® Steam Technology provides continuous powerful vertical steam that deeply
penetrates fabrics and renews fibers.
Welcome to the next wave of garment care!
Upholstered fabrics: Bedding,
mattress, curtains, baby bedding,
plush toys, high chairs, car seats, sofa,
and arm chairs
Garments: Lace, velvet, embellished
items. For extremely embellished
garments, turn the garment inside out
and steam
Garments: Dress shirts, dresses,
blouses, tunics, delicate fabrics when
Wrinkle Eraser™ is needed
Fabric: Cotton, Wool, Rayon, Polyester,
Silk, Satin, Cashmere
www.sharkclean.com
Specifically designed to refresh any soft
good around your home!
Specifically designed to deodorize and
press delicate garments
Use for removing wrinkles and creating a
crisp finish
Steam and Press the details- great for
removing wrinkles and refreshing
Create pleats in skirts and pants
Use for removing wrinkles and creating a
crisp finish
The bristle brush frame improves steam
penetration without leaving water marks
Fabric: Cotton, Wool, Rayon, Linen, Denim
Garments: Jeans, dress shirts, dresses,
blouse, skirt, pants, suits, blazers
TIPS & HELPFUL HINTS
2 There are web hooks on either
side of the press pad that
provide you with a larger surface
area for pressing. The Velcro™
clips assist in the positioning of
garments on the press pad.
room and leave it setup for quick
touch ups whenever you need
them (Fig. 2).
USAGE
1 The vertical press pad eliminates
the hassle of setting up an
ironing board. Setup on any door
and it is virtually invisible when
the door is closed. You can setup
the pad on the back of your
closet door or in your laundry
Helpful Tips on using the
Vertical Press Pad and Velcro™
Clips:
Fig. 2
5
English
6
TOLL FREE: 1-800-798-7398
Water Capacity: 200 mL (6.5 fl. oz.)
Power: 1580 W
Voltage: 120V., 60Hz.
TECHNICAL SPECIFICATIONS
GS500W 11
GS500CO 11
GS500A 11
GS500 11
This manual covers model numbers:
Thank you
for purchasing
the Shark®
Press & Refresh™
Garment Care
System.
10
13
13
14
15
Using Your Press & Refresh™
Care Of Your Press & Refresh™
Troubleshooting Guide
Replacement Parts
Warranty And Registration
7
9
Assembly Of The Vertical Press Pad
www.sharkclean.com
8
English
Getting Started
Contents
e
c
f
d
8
i
Vertical Press Pad
Support Rods (x2)
Garment Hook
Heat Protection Panels (x8)
Velcro™ Clips (x3)
Filling Flask
h
*Note: Model GS500W also includes
1 Accessory Bag, a 2 oz. bottle of Linen
Water and a 1 oz. Stain Stick.
g
h
i
j
k
l
g
TOLL FREE: 1-800-798-7398
First things first, you need to
know what’s in the box you
just opened:
a Fabric Steamer with small
steam bonnet attached
b Bristle Brush Frame
c Upholstery/Delicate Fabric
Frame
d Lint Brush Frame
e Upholstery Steam Bonnet
f Delicate Steam Bonnet
b
a
IMPORTANT: When
assembling your fabric steamer,
there may be a little water in
the water tank. This is because
we test all our fabric steamers
100% before you buy them, so
you get a quality Shark® Steam
product.
IMPORTANT: Always check
the fabric care labels for
recommendations. Test the
fabrics for colorfastness in an
inconspicuous place such as
an inside seam. Some articles
of clothing are better steamed
from the underside.
l
k
j
The vertical press pad makes garment care easy! Simply setup the pad onto any door, hang your
garment and Press & Refresh™!
Not only great on garments, the Press & Refresh™ can be used anywhere around the home:
upholstery, bedding, curtains and more!
The Wrinkle Eraser™ heat bar simulates the soleplate of an iron and presses the fabric for a crisp
finish. Press the Wrinkle Eraser™ directly onto the garment for a crisp finish. Hold the steam trigger for
continuous steam.
The Press & Refresh™ Garment Care System brings your fabrics back to life without a trip to
the dry cleaners! Shark® Steam Technology provides continuous powerful vertical steam that deeply
penetrates fabrics and renews fibers.
Getting Started
4 Do not add cleaning solutions,
scented perfumes, oils, or
any other chemicals to the
water used in this appliance
as this may damage the unit
or make it unsafe for use. Use
of any substances other than
manufacturer’s recommended
accessories will automatically
void your warranty.
Only use water. To extend the
life of your Press & Refresh™
Garment Care System, we
recommend using distilled
water if you live in an area with
hard tap water.
READ ALL INSTRUCTIONS
BEFORE USING YOUR PRESS
& REFRESH™ GARMENT CARE
SYSTEM.
2
3
Safely remove contents of the
Press & Refresh™ Garment Care
System and lay them out on a
flat surface to see that you have
all the components to complete
the assembly.
1
Assembly & use instructions:
Fig. 2
Fig. 1
1
Insert the garment hook into
the top of the vertical press
pad (Fig. 1). Insert one of the
support rods into the opening
on the side of the Vertical
Press Pad making sure that it
is inserted firmly into the hook
(Fig. 2). Do the same with the
other support rod from the
other side.
Assembling the vertical
press pad:
IMPORTANT: Always make
sure the fabric steamer is
UNPLUGGED from the electrical
outlet when not in use. Never
fill the water reservoir when the
unit is plugged in.
3
2
Assembly of the Vertical Press Pad
www.sharkclean.com
9
TIP: The straps can be adjusted
to fit any door using the buckle
to adjust the strap lengths.
Slip the webbing bands at the
top of the vertical press pad
over either side of any door
with the terry cloth side facing
away from the door. With
the door open, loop the band
around the corner of the door
and repeat on the opposite
side. Gently tug on the pad
to make sure it is secure and
shut the door completely to
ensure the Vertical Press Pad is
stable for pressing. Be careful
not to close the door on your
fingers. Adjust the straps on
the webbing to the appropriate
height for comfort (Fig. 3).
The Vertical Press Pad comes
asembled with heat protection
panels in the pockets on the
back. These panels protect your
door from heat damage and
should be in place at all times
during use.
Fig. 3
English
10
Open the water cap and hold
the fabric steamer horizontally
and fill using the filling flask
provided. Be careful not to
overfill. Replace the cap by
pushing it in making sure that it
closes firmly. (Fig. 1)
2
Choose your desired frame. The
point of the frame should be
pointed down. Attach the top
flat area of the frame to the
unit and then gently push the
pointed end of the frame on
securely. (Fig. 2)
IMPORTANT: Use caution
when changing the frames
4 Attach the desired bonnet to
the frame, then attach the
frame to the unit. Pull the
2 tabs on either side of the
bonnet over the top of the
frame and secure the bottom
of the bonnet to the frame
using the bottom tab (Fig. 3).
Then attach the frame to the
garment steamer as described
above (Fig. 4).
When using the upholstery/
delicate fabric frame:
3
Attaching the accessories:
Fig. 2
Practice makes perfect! It
takes time to get used to
and master the garment
steaming techniques.
TOLL FREE: 1-800-798-7398
NOTE: The water tank does not
have to be completely full for
the fabric steamer to generate
steam. However, make sure
that the water tank is at least
half way full for optimal results.
Never fill the fabric steamer
while it is plugged into an
electrical outlet. Disconnect the
power cord before refilling.
1
Filling and refilling the water
reservoir:
Fig. 1
Always check the fabric
labels for recommendations
from the manufacturer.
Test the fabric in an
inconspicuous part of the
garment such as an inner
seam.
Using Your Press & Refresh™
To reattach the bonnet, gently
snap the frame over the steam
nozzle and press gently to lock
in place (Fig. 5).
To remove the small steam
bonnet, remove the frame on
the unit if one is in place, then
gently pull on either side of
the steam bonnet and pull the
bonnet frame off the unit.
The small steam bonnet should
be attached to the unit at all
times during usage. Remove
the steam bonnet when the
unit has cooled for cleaning
only. The bonnet is permanently
attached to the bonnet frame
and should never be removed
from it.
when the unit is on, the Wrinkle
Eraser™ bar gets very hot. Use
the steam guard on the bottom
of the frame to remove safely.
Fig. 5
Fig. 4
Fig. 3
Once the selected accessory is
placed on the fabric steamer,
turn the On/Off switch to the
“On” position, a blue LED
light will illuminate (Fig. 3).
It will take approximately 1
minute for the unit to heat up
and be ready for steaming and
pressing.
Hang the garment that is to
be steamed onto the garment
hook on the vertical press pad.
(Fig. 2)
Hang the vertical press pad on
a door. (Fig. 1)
4 Holding the fabric steamer in
the vertical position with the
steam nozzle pointing away
from you, press and hold the
steam trigger for continuous
steam and begin steaming
your garments in a vertical or
horizontal motion. Begin at the
top of the garment and move in
a downward direction pressing
3
2
1
Using the Press & Refresh™ and
vertical press pad:
The vertical press pad has two
web hooks on either side. You
can use these hooks to position a
garment for better results and a
larger pressing are when steaming
sleeves. Use caution when holding
the sleeves of garments while
steaming (Fig. 4).
7
When finished using the Fabric
Steamer, turn the appliance
“Off” and let it cool before
emptying the water tank and
removing the bonnets and
frames.
6 When steaming lightweight
garments, pants and skirts
you can use the Velcro™ clips
to hold the garment on the
vertical pressing pad.
5
CAUTION: Do not hold the
unit in a fixed position on
delicate fabrics and upholstered
items.
CAUTION: Do not over tilt the
unit when steaming overhead.
the Wrinkle Eraser™ directly
onto the fabric.
www.sharkclean.com
11
WARNING: Never steam any
article of clothing while it is
being worn.
CAUTION: The Wrinkle Eraser™
is hot. Use caution when
removing the frames. DO NOT
put your hands directly onto the
Wrinkle Eraser™.
10 In a horizontal position, move
the steamer continuously over
the upholstered item.
9 Attach the upholstery/delicate
frame and upholstery pad to the
unit.
8 The Press & Refresh can be
used to deodorize, sanitize, and
refresh upholstered items: sofa,
baby bedding, mattress, car
seat, drapes, and more.
Using the Press & Refresh
horizontally:
Intermittently wipe away
condensation from the
steam guard with extended
use
Hold the steam trigger
for continuous steam.
The steam will stop
emiting once you let
go of the button.
English
12
5 Small Steam Bonnet –
provides evenly distributed
steam and prevents
condensation on the garments/
fabrics.
4 Upholstery/Delicate
Fabric Frame & Upholstery
Steam Bonnet – refresh
and deodorize upholstered
items like sofas and chairs as
well as curtains, bedding, and
mattresses
TIP: When steaming a
delicate garment with many
embellishments such as a
sequin dress, turn the garment
inside out and steam from the
inside to deodorize and refresh.
Fabric Recommendations:
Silk, satin, embellished
garments.
3 Upholstery/Delicate Fabric
Frame & Delicate Steam
Bonnet – to refresh and
deodorize delicate items safely.
TOLL FREE: 1-800-798-7398
Fabric Recommendations:
Silk, polyester, cotton, wool,
rayon.
2 Lint Brush Frame – use to
remove hair, lint and pet fur
while steaming your garments.
Always use the lint frame with
the small steam bonnet over the
steam nozzle.
CAUTION: Do not use the
bristle brush on delicate fabrics.
Fabric Recommendations:
Cotton, wool, canvas, denim.
1 Bristle Brush Frame – is the
standard frame to use when
steaming garments. It offers
better steam penetration for
heavy fabrics without leaving
water marks. Always use the
bristle brush frame with the
small bonnet over the steam
nozzle.
When to use the different
accessories:
The small steam bonnet
should always be in place
over the steam nozzle when
steamer is in use
7 Vertical Press Pad –
Convenient way to steam and
press garments. Eliminates the
hassle of an ironing board.
The Vertical Press Pad can be
used on any type of door and
is virtually invisible when the
door is closed for easy access
to the pad for last minute touch
ups. The Vertical Press Pad also
has web hooks on either side,
to provide convenience when
pressing sleeves and creating a
larger pressing surface.
6 Velcro™ Clips –
Easy detachable clips may be
used on the vertical pressing
pad for positioning garments for
steaming. They can also be used
to hold lightweight garments
directly on to the pad
Using Your Press & Refresh™ - cont.
6 Bundle up the power cord and
secure it with the Velcro™
strap that is attached to the
power cord. Always store your
appliance in a cool, dry area.
5 Wipe the exterior of the fabric
steamer with a damp cloth and
wipe dry.
The nozzle leaves
water drops on the
garment.
There is no
steam.
PROBLEM
The frame has condensation.
The steam bonnet is
too wet.
You are not using the steam
bonnet.
www.sharkclean.com
Let the appliance cool and wipe the frame off.
13
After letting the steam nozzle cool, remove the
steam bonnet and let it dry out before using
again.
It is recommended to use the steam bonnet on
the nozzle to prevent water drops being left on
the garment and to improve performance.
Verify that the water line is above the “Refill”
line. If not, add more water to the tank.
Verify that the blue light on the unit is lit. If not,
check that the unit is plugged in and the on/off
button is raised and in the “On” position.
The steamer is not turned on.
There is not enough
water in the unit.
SOLUTIONS
7 The steam bonnet is attached
to a frame on the nozzle. Gently
pull the frame off of the nozzle.
Hand wash the bonnet in cold
water with a mild detergent
after each use and let air dry
completely before using again.
Do not dry in clothes dryer.
Care & use of steam nozzle
bonnets
English
POSSIBLE
REASONS
Troubleshooting Guide
4 Empty the water from the
water tank.
3 Let the appliance cool
completely for approximately
30 minutes before emptying the
water from the water tank.
2 Unplug the appliance from the
electrical outlet.
1 Turn the fabric steamer “Off”.
Cleaning & storing
Care of Your Press & Refresh™
14
TOLL FREE: 1-800-798-7398
To order additional parts and accessories,
feel free to contact us at www.sharkclean.com
or call 1-800-798-7398.
Ordering replacement parts:
Replacement Parts
PART NO.
XT500BW
1060SO
XUP500
XDF500
1062SO
1059SO
1057SO
PART
a Small Steam Bonnet
b Upholstery/Delicate
Fabric Frame
c Upholstery Steam Bonnet
d Delicate Steam Bonnet
e Lint Brush Frame
f Bristle Brush Frame
g Velcro™ Clips
g
f
e
d
c
b
a
English
www.sharkclean.com
15
The registration will enable us to contact you in the unlikely event of a product safety notification. By registering
you acknowledge to have read and understood the instructions for use, and warnings set forth in the accompanying
instructions.
Please visit www.sharkclean.com or call 1-800-798-7398 to register your new Shark® product within ten (10)
days of purchase. You will be asked to provide the store name, date of purchase and model number along with your
name and address.
Product Registration
*IMPORTANT: Carefully pack item to avoid damage in shipping. Be sure to include proof of purchase
date and to attach tag to item before packing with your name, complete address and phone number
with a note giving purchase information, model number and what you believe is the problem
with item. We recommend you insure the package (as damage in shipping is not covered by your
warranty). Mark the outside of your package “ATTENTION CUSTOMER SERVICE”. We are constantly
striving to improve our products, therefore the specifications contained herein are subject to change
without notice.
This warranty gives you specific legal rights, and you may also have other rights which vary from state to state or
province to province.
This warranty is extended to the original purchaser of the unit and excludes all other legal and/or conventional
warranties. The responsibility of EURO-PRO Operating LLC if any, is limited to the specific obligations expressly
assumed by it under the terms of the limited warranty. In no event is EURO-PRO Operating LLC liable for incidental
or consequential damages of any nature whatsoever. Some states do not permit the exclusion or limitation of
incidental or consequential damages, so the above may not apply to you.
The liability of EURO-PRO Operating LLC is limited solely to the cost of the repair or replacement of the unit
at our option. This warranty does not cover normal wear of parts and does not apply to any unit that has been
tampered with or used for commercial purposes. This limited warranty does not cover damage caused by misuse,
abuse, negligent handling or damage due to faulty packaging or mishandling in transit. This warranty does not cover
damage or defects caused by or resulting from damages from shipping or repairs, service or alterations to the product
or any of its parts, which have been performed by a repair person not authorized by EURO-PRO Operating LLC.
Non-durable parts including, without limitation, filters, brushes and electrical parts which normally require
replacement are specifically excluded from warranty.
If the appliance is found to be defective in material or workmanship, EURO-PRO Operating LLC will repair or
replace it free of charge. Proof of purchase date and $14.95 to cover the cost of return shipping and handling must
be included.*
• Canada: EURO-PRO Operating LLC
4400 Bois Franc, St. Laurent, Québec H4S 1A7
• U.S.: EURO-PRO Operating LLC
For customer service support call 1-800-798-7398
or visit www.sharkclean.com
If your appliance fails to operate properly while in use under normal household conditions within the warranty period,
return the complete appliance and accessories, freight prepaid to:
EURO-PRO Operating LLC warrants this product to be free from defects in material and workmanship for a
period of one (1) year from the date of the original purchase, when utilized for normal household use, subject to the
following conditions, exclusions and exceptions.
Euro-Pro One (1) Limited Warranty
removes fine dust, hair
and dirt.
provides 30% more suction for
more powerful cleaning.
makes cleaning easier.
and crevice, the SV780
motorized brush, dusting
options; direct suction,
Offering 4 direct cleaning
dust cup effectively
New 18v Hand Vac
brush & cyclonic suction
The powerful motorized
whole house use.
& Stick Vac designed for
2-in-1 Cordless Hand Vac
Cordless VX63
StikVac
Homecare Cleaning Solutions
to clean better, faster & easier
both sides.
and sanitize on
cleaning pockets clean
Look for these and other
innovative Shark® products at
your favorite retailers or
online at www.sharkclean.com
floor surfaces.
faces.
really sanitize
nitize your hard
and then
n steam mop to
use the unit to vacuum first
As the name
ame implies, simply
cleaning
g system.
is the complete
omplete bare-floor
2 in 1
Vac-then-Steam
then-Steam™
Doublesided microfiber
with its XL water tank.
cleaning time and power
provides maximum
Steam Pocket™
Mop
18
LLAMADA SIN COSTA: 1-800-798-7395
ENCHUFE POLARIZADO:
Este artefacto tiene un enchufe polarizado
(una de las patas es más ancha que la otra).
Como medida de seguridad, este cable entrará
únicamente en un tomacorriente polarizado. De
no ser así, inviértalo. Si aún no entra, llame a
un electricista calificado. No intente alterar
este dispositivo de seguridad.
PELIGRO DE QUEMADURAS
Tenga cuidado al usar el vaporizador de
telas directamente o con los accesorios. La barra
de presión del borrador de arrugas y el vapor que
emite son muy calientes. El borrador de arrugas
no está controlado por el gatillo del vapor y
permanece caliente mientras la unidad esté
encendida.
LEA TODAS LAS INSTRUCCIONES ANTES
DE USAR SU SISTEMA DE CUIDADO PARA
PRENDAS PRESS & REFRESHMR.
AL USAR SU SISTEMA DE CUIDADO
PARA PRENDAS PRESS & REFRESHMR
DE SHARK®, SIEMPRE DEBE SEGUIR
PRECAUCIONES BÁSICAS DE SEGURIDAD,
INCLUYENDO LAS SIGUIENTES:
11. Este artefacto y sus accesorios se calientan
durante el uso. Tenga cuidado al cambiar los
accesorios y siga las instrucciones de este
manual para removerlos y cambiarlos. Tenga
cuidado al cambiar los bastidores mientras los
usa, el Wrinkle EraserMR se calienta.
10. NO los use en cuero, gamuza, vinílicos,
plásticos u otros materiales delicados
o sensibles al vapor. Siempre pruebe la
decoloración de todas las telas en la parte
interna de la prenda antes de usar el
vaporizador.
9. NO introduzca ningún objeto por las aberturas
ni lo use con alguna abertura bloqueada.
8. NO permita que se utilice como un juguete.
7. Siempre desenchufe el cable de alimentación
del tomacorriente cuando no lo use, al llenar el
tanque de agua y antes de repararlo.
6. NO deje el artefacto desatendido cuando esté
enchufado.
5. NO lo use en el exterior.
4. El uso de cualquier sustancia que no esté
recomendada por el fabricante anulará
automáticamente su garantía.
3. NO agregue soluciones limpiadoras, perfumes
aromáticos, aceites o cualquier otro químico
al agua usada en este artefacto ya que podría
dañar la unidad y tornarla insegura.
2. USE ÚNICAMENTE AGUA. Para prolongar la
vida de su sistema de cuidado para prendas Press
& Refresh™, le recomendamos usar agua destilada,
especialmente si vive en un área con agua corriente
dura.
1. USE EL SISTEMA ÚNICAMENTE PARA LO
QUE FUE DISEÑADO, COMO SE INDICA EN
ESTE MANUAL.
Para uso doméstico solamente
INSTRUCCIONES IMPORTANTES DE SEGURIDAD
CONSERVE ESTAS INSTRUCCIONES
f. NO desarme o intente reparar el vaporizador
de telas. Retorne el sistema a EURO-PRO
Operating LLC para que sea examinado y
reparado. El armado o reparación incorrecta
puede crear riesgo de descarga eléctrica o
heridas a personas al utilizar vaporizador de
telas.
e. NO use el sistema con un cable o enchufe
dañado, o si el artefacto o cualquiera de sus
partes se han caído o dañado.
d. NO use cables de extensión o
tomacorrientes de capacidad inadecuada. Si
es absolutamente necesario, use un cable
de extensión de 15 amperes. Los cables
de capacidad menor pueden recalentarse.
Tenga cuidado al colocar el cable para que
nadie lo tironee o se tropiece con el.
c. NO tire del cable para desenchufarlo,
agárrelo y tire del enchufe.
b. NO sumerja ninguna parte del sistema en
agua o ningún otro líquido.
a. Para evitar la sobrecarga del circuito, NO
utilice otro artefacto en el mismo enchufe
(circuito) con el vaporizador de telas.
15. Para protegerse contra el riesgo de incendio,
descarga eléctrica o daños personales:
14. NUNCA intente vaporizar prendas mientras las
use.
13. Al limpiar el vaporizador de telas, desenchufe
el cable de alimentación y límpielo con un trapo
seco o húmedo. NO vierta agua o use alcohol,
bencina o diluyente de pintura en la unidad.
12. El vaporizador de telas se puede usar en
posición vertical u horizontal. NUNCA sostenga
el vaporizador boca abajo cuando esté en
reposo ni lo incline hacia atrás ya que podría
hacer que despida agua caliente causando
heridas.
www.sharkclean.com
19
s. Manténgalo fuera del alcance de los
niños.
r. Deje que el artefacto se enfríe antes de
guardarlo.
q. Mantenga el área de trabajo bien iluminada.
p. Guarde su artefacto en el interior, en un
lugar fresco y seco, fuera del alcance de los
niños.
o. NO lo utilice en lugares con explosivos y/o
vapores inflamables.
n. NO use el vaporizador de telas cuando
esté bajo la influencia de drogas, alcohol o
medicación.
m. NUNCA apunte o dirija el vapor hacia
personas, animales o plantas. El vapor es
muy caliente y puede ocasionar quemaduras.
El tocar partes metálicas calientes, agua
caliente, vapor, gorras de vapor o bastidores
puede causar quemaduras.
l. NUNCA de vuelta o acueste el artefacto
mientras lo esté usando.
k. NUNCA intente llenar la unidad debajo de
una llave de agua. Use siempre el frasco de
llenado incluido.
j. SIEMPRE desenchufe el sistema del
tomacorriente al llenarlo con agua o al
vaciarlo, o cuando no se use.
i. NO deje que el cable de alimentación entre
en contacto con superficies calientes.
h. NO lo arrastre o transporte del cable, no lo
utilice como manija, no lo apriete con una
puerta, o tire del cable a través de esquinas
o bordes filosos.
g. NO toque el enchufe o el vaporizador de
telas con las manos húmedas o lo utilice
descalzo.
Español
Coloque el bastidor deseado
y la gorra de vapor en el
vaporizador de telas. Para
colocar la gorra de vapor, tire
de las dos pestañas a ambos
2
20
Con la parte con punta del
bastidor mirando hacia abajo,
coloque suavemente la parte
de arriba del bastidor sobre la
unidad, por arriba del borrador
de arrugas. Luego asegure la
parte con punta del bastidor
extremos de la gorra de vapor
por encima de la boquilla
de vapor y asegure la parte
de debajo de la gorra con la
pestaña de abajo.
LLAMADA SIN COSTA: 1-800-798-7395
Bastidor para tapizados/telas
delicadas y gorra para tapizados
Bastidor para tapizados/telas
delicadas y gorra de vapor delicada
Bastidor para pelusa
Bastidor para cepillo de cerdas
BASTIDOR/ACCESORIO
1
La unidad viene armada con una
gorra de vapor colocada. Esta
gorra de vapor debe estar siempre
colocada mientras la use.
Colocando el accesorio
adecuado:
3
CONSEJO: Seque la
condensación de la cubierta de
vapor en la parte inferior del
bastidor luego de usarlo mucho
por tiempo.
Para sacar el bastidor, tire con
cuidado de la parte con punta
y levante el bastidor fuera de la
unidad.
alrededor de la parte de debajo
de la unidad (Fig. 1).
No solo es ideal para prendas, el Press & RefreshMR se puede usar en cualquier lugar de la casa:
tapizados, sábanas, cortinas ¡y mucho más!
La barra calefactora simula la base de una plancha y presiona la tela para obtener un acabado
consistente.
¡El sistema de cuidado de prendas Press & RefreshMR le devuelve la vida a sus telas sin llevarlas
a la tintorería! La tecnología de vapor Shark® provee un poderoso vapor vertical continuo que penetra
profundamente en las telas y renueva las fibras.
¡Bienvenido a la nueva onda en el cuidado de prendas!
¡Diseñado específicamente para
desinfectar cualquier artículo suave de
la casa!
Telas de tapicería: Sábanas, colchones,
cortinas, sábanas de bebé, juguetes de
peluche, sillas altas, asientos de bebé
para el auto, sofás y sillones
www.sharkclean.com
Diseñado específicamente para
desodorizar y planchar prendas
delicadas
Prendas: Encaje, terciopelo,
artículos de adorno. Para prendas
extremadamente adornadas, dé vuelta
la prenda y luego use el vaporizador
Úselo para remover arrugas y lograr un
acabado consistente
Vaporice y planche los detalles - ideal
para remover arrugas y refrescar
Cree pliegos en polleras y pantalones
Tela: Algodón, lana, rayón, poliéster,
seda, satén, cachemir
Prendas: Polleras de vestir, vestidos,
blusas, túnicas, telas delicadas cuando
necesite el Wrinkle Eraser™
Úselo para remover arrugas y lograr un
acabado consistente
Prendas: Jeans, camisas de vestir, vestidos,
blusas, polleras, pantalones, trajes, blazers
El bastidor para cepillo de cerdas mejora la
penetración del vapor sin dejar marcas de agua
Tela: Prendas de algodón, lana, rayón, hilo,
mezclilla
21
3 Los ganchos de VelcroMR también
se pueden usar en lugar de una
percha. Use los ganchos para
colocar las prendas directamente
en la almohadilla. Esto también
le permite combinar prendas y
planchar el conjunto completo
directamente sobre la almohadilla.
CONSEJOS ÚTILES
2 Tiene ganchos en ambos lados
de la almohadilla de planchado,
lo que le proporciona una gran
superficie para planchar. Los
ganchos de VelcroMR le ayudan
a sostener las prendas en la
almohadilla de planchado.
en un cuarto de lavado y dejarla
preparada para realizar retoques
rápidos cuando lo necesite
(Fig. 2).
Fig. 2
USO
1 La almohadilla de planchado
vertical elimina el problema de
preparar una tabla de planchar.
Se coloca en cualquier puerta y
es virtualmente invisible cuando
se cierra la puerta. Puede colocar
la almohadilla en la parte de
atrás de la puerta de su ropero o
Consejos útiles para usar la
almohadilla de planchado
vertical y los ganchos de
VelcroMR:
Fig. 1
Español
22
LLAMADA SIN COSTA: 1-800-798-7395
Capacidad de agua: 200 mL (6,5 oz. líquidas)
Potencia: 1580 W
Voltaje: 120V., 60Hz.
ESPECIFICACIONES TÉCNICAS
GS500W 11
GS500CO 11
GS500A 11
GS500 11
Este manual cubre el modelos:
Gracias por
comprar el
sistema de
cuidado para
prendas Press
& RefreshMR
de Shark®
26
29
29
30
31
Usando su Press & Refresh™
Cuidado de su Press & Refresh™
Guía de diagnóstico de problemas
Partes de reemplazo
Garantía y registro
23
25
Armado de la almohadilla de planchado vertical
www.sharkclean.com
24
Español
Procedimientos iniciales
Contenido
e
c
f
d
24
i
Nota: El modelo GS500W también incluye
1 bolsa para accesorios, una botella de
2 oz. de agua aromatizada y una barra
quitamanchas de 1 oz
h Barras de soporte (x2)
i Gancho para prendas
j Paneles protectores contra el
calor (x8)
k Ganchos de VelcroMR (x3)
l Frasco de Llenado
h
LLAMADA SIN COSTA: 1-800-798-7395
Primero lo primero, usted
necesita saber qué contiene la
caja que acaba de abrir:
a Vaporizador de telas con gorra
de vapor
b Bastidor para cepillo de cerdas
c Bastidor para tapizados/telas
delicadas
d Bastidor para cepillo de pelusa
e Gorra de vapor para tapizados
f Gorra de vapor delicada
g Almohadilla de planchado
vertical
b
a
g
IMPORTANTE: Al armar su
vaporizador de telas, puede
encontrar un poco de agua
dentro del tanque. Esto pasa
porque nosotros probamos
el 100% de nuestros
vaporizadores antes de
ponerlos a la venta, de ese
modo usted recibe un producto
de alta calidad Shark®.
IMPORTANTE: Verifique
siempre las etiquetas del
cuidado de las prendas por
recomendaciones. Haga una
prueba de decoloración de
la tela en un lugar no visible,
como en una costura interna.
Algunas prendas se pueden
vaporizar mejor desde la parte
de adentro.
l
k
j
¡La almohadilla de planchado vertical facilita el cuidado de las prendas! ¡Simplemente coloque la
almohadilla en cualquier puerta, cuelgue su prenda y Press & RefreshMR!
No solo es ideal para prendas, el Press & RefreshMR se puede usar en cualquier lugar de la casa:
tapizados, sábanas, cortinas ¡y mucho más!
La barra calefactora simula la base de una plancha y presiona la tela para obtener un acabado
consistente. Presione el borrador de arrugas directamente contra la prenda para obtener un acabado
consistente. Mantenga apretado el gatillo para un flujo constante de vapor.
¡El sistema de cuidado de prendas Press & RefreshMR le devuelve la vida a sus telas sin llevarlas
a la tintorería! La tecnología de vapor Shark provee un poderoso vapor vertical continuo que penetra
profundamente en las telas y renueva las fibras.
Procedimientos iniciales
Instrucciones de armado y de
uso:
1 Saque con cuidado el contenido
del sistema de cuidado de
prendas Press & RefreshMR
y acomódelos sobre una
superficie plana para poder ver
todos los componentes para
realizar el armado.
2 LEA TODAS LAS
INSTRUCCIONES ANTES
DE USAR SU SISTEMA DE
CUIDADO PARA PRENDAS
PRESS & REFRESHMR.
3 Use únicamente agua. Para
prolongar la vida de su sistema
de cuidado para prendas Press
& RefreshMR, le recomendamos
usar agua destilada si vive en
un área con agua corriente
dura.
4 No agregue soluciones
limpiadoras, perfumes
aromáticos, aceites o cualquier
otro químico al agua usada
en este artefacto ya que
podría dañar la unidad y
tornarla insegura. El uso de
cualquier sustancia que no esté
recomendada por el fabricante
anulará automáticamente su
garantía.
Fig. 2
Fig. 1
IMPORTANTE: Verifique
siempre que el vaporizador de
telas esté DESENCHUFADO
del tomacorriente cuando no
lo use. Nunca llene el tanque
de agua cuando la unidad esté
enchufada.
Armado de la almohadilla de
planchado vertical:
1 Inserte el gancho para prendas
en la parte de arriba de la
almohadilla de planchado
vertical (Fig. 1). Inserte una
de las barras de soporte en
la abertura del costado de
la almohadilla de planchado
vertical, verificando que quede
bien insertada dentro del
gancho (Fig. 2). Haga lo mismo
con la otra barra de soporte
desde el otro costado .
2 La almohadilla de planchado
vertical viene armada con
paneles de protección contra
el calor en los bolsillos de la
parte de atrás. Estos paneles
protegen su puerta contra
daños por calor y deben estar
instalados todas las veces que
la use.
3
Español
www.sharkclean.com
25
Deslice las bandas de soporte
de la parte de arriba de la
almohadilla de planchado
vertical por encima de
cualquiera de los lados de
una puerta con el lado de
toalla apuntando hacia usted,
no contra la puerta. Con la
puerta abierta, enganche la
banda alrededor de la esquina
de la puerta y haga lo mismo
con el lado opuesto. Ajuste
suavemente la almohadilla
para asegurarse de que
esté bien colocada y cierre
completamente la puerta
para asegurarse de que la
almohadilla de planchado
vertical sea estable para
planchar. Tenga cuidado de no
agarrarse los dedos cuando
cierra la puerta. Ajuste las
cintas del soporte a la altura
que le sea cómoda (Fig. 3).
CONSEJO: Las bandas se
pueden ajustar para colocarlas
en cualquier puerta usando la
hebilla para ajustar el largo de
las bandas.
Fig. 3
Armado de la almohadilla de planchado vertical
26
Abra la tapa del agua y
sostenga el vaporizador de
telas inclinado hacia adelante y
llénelo con el frasco de llenado
incluido. Tenga cuidado en
no llenarlo de más. Vuelva a
colocar la tapa empujándola
hacia adentro y verificando que
quede bien cerrada (Fig. 1).
2
Escoja el bastidor deseado.
La punta del bastidor debe
apuntar hacia abajo. Coloque
la parte plana de arriba del
bastidor en la unidad y luego
empuje suavemente la parte del
bastidor con punta para fijarlo
(Fig. 2).
4 Coloque la gorra deseada en
el bastidor, luego coloque el
bastidor en la unidad. Tire
de las dos pestañas a ambos
lados de la gorra por encima
del bastidor y fije la parte de
debajo de la gorra al bastidor
con la pestaña de abajo (Fig.
3). Luego coloque el bastidor
en el vaporizador de prendas
como se indicó anteriormente.
Al usar el bastidor para
tapizados/telas delicadas:
3
Instalación de accesorios:
Fig. 2
¡La práctica hace la
perfección! Lleva tiempo
el acostumbrarse y el
dominar las técnicas de
vaporización de prendas.
LLAMADA SIN COSTA: 1-800-798-7395
NOTA: El tanque de agua no
necesita estar completamente
lleno para que el vaporizador
de telas genere vapor. Sin
embargo, verifique que el
tanque de agua esté lleno hasta
la mitad por lo menos para
obtener los mejores resultados.
Nunca llene el vaporizador
de telas mientras esté
enchufado en un tomacorriente.
Desconecte el cable de
alimentación antes de
rellenarlo.
1
Llenado y rellenado del tanque
de agua:
Fig. 1
Verifique siempre las
etiquetas de las prendas
por recomendaciones
del fabricante. Haga una
prueba de la tela en un
área no visible de la prenda,
como una costura interna.
Usando su Press & RefreshMR
NOTA: La gorra de vapor
viene colocada en la
unidad y debe estar
en su lugar siempre
que se use. La gorra de
vapor está colocada
permanentemente en
un bastidor y se puede
sacar de la boquilla de
vapor para limpiarla. De
vez en cuando, empape
la gorra en agua fría y
un detergente suave,
enjuáguela y extiéndala
para que se seque.
IMPORTANT: Tenga cuidado al
cambiar los bastidores cuando
la unidad está encendida, la
barra del Wrinkle EraserMR se
calienta mucho.
Fig. 5
Fig. 4
Fig. 3
Usando el vaporizador de telas
y la almohadilla de planchado
vertical:
1 Cuelgue la almohadilla de
planchado vertical de una
puerta. (Fig. 1)
2 Cuelgue la prenda que
vaporizará en el gancho de
la almohadilla de planchado
vertical. (Fig. 2)
3 Una vez que el accesorio
seleccionado se haya
colocado en el vaporizador
de telas, coloque la llave de
encendido en la posición “On”
y un LED azul se encenderá
(Fig. 3). La unidad tardará
aproximadamente 1 minuto en
calentar y en estar lista para
vaporizar y planchar.
4 Sosteniendo el vaporizador de
telas en posición vertical con la
boquilla de vapor no apuntando
hacia usted, mantenga
presionado el gatillo para
obtener un vapor continuo
y comience a vaporizar sus
prendas con movimientos
verticales u horizontales.
Comience por la parte de arriba
de la prenda y muévase hacia
abajo presionando suavemente
el borrador de arrugas contra la
tela.
CUIDADO: No incline
demasiado la unidad al
vaporizar en zonas altas.
CUIDADO: No mantenga
la unidad en el mismo lugar
cuando trabaja telas delicadas y
artículos tapizados.
5 La almohadilla de planchado
vertical tiene dos ganchos en
ambos lados. Puede usar estos
ganchos para colocar una prenda
y obtener los mejores resultados y
un área más grande de planchado
para vaporizar las mangas. Tenga
cuidado al sostener las mangas
de las prendas mientras vaporiza
(Fig. 4).
6 Al vaporizar prendas livianas,
pantalones y polleras,
puede usar los ganchos de
VelcroMR para sostenerlas en
la almohadilla de planchado
vertical.
7 Cuando termine de usar el
vaporizador de telas, apague el
artefacto y deje que se enfríe
www.sharkclean.com
27
antes de vaciar el tanque de
agua y de sacarle las gorras y
los bastidores.
Usando la Press & RefreshMR de
forma horizontal:
8 La Press & RefreshMR se
puede usar para desodorizar,
desinfectar y refrescar artículos
tapizados: sofá, sábanas de
bebé, colchones, asientos de
bebé para auto, cortinas y
mucho más.
9 Coloque el bastidor para tapizados/delicado y la almohadilla
para tapizados en la unidad.
10 En posición horizontal, mueva
el vaporizador constantemente
sobre el artículo tapizado.
ADVERTENCIA: El Wrinkle
EraserMR se calienta. Tenga
cuidado cuando saque los bastidores. NO ponga sus manos
directamente sobre el Wrinkle
EraserMR.
ADVERTENCIA: Nunca intente
vaporizar prendas mientras las
use.
Seque inmediatamente la
condensación de la cubierta
de vapor cuando la use por
mucho tiempo.
Mantenga apretado
el gatillo para un flujo
constante de vapor.
El vapor dejará de
salir cuando suelte el
botón.
Español
28
5 Gorra pequeña de
vapor – proporciona vapor
uniformemente distribuido y
evita la condensación en las
prendas / telas.
4 Bastidor para gorra y gorra
para tapizados – refresque y
desodorice artículos tapizados
como sofás y sillones, así como
también cortinas, sábanas y
colchones
CONSEJO: Al vaporizar una
prenda delicada con muchos
adornos como un vestido con
lentejuelas, dé vuelta la prenda
y vaporícela por su interior para
desodorizarla y refrescarla.
Telas recomendadas:
Seda, satén, prendas
adornadas.
3 Bastidor para gorra y gorra
para telas delicadas – para
refrescar y remover arrugas de
sus artículos más delicados.
LLAMADA SIN COSTA: 1-800-798-7395
Telas recomendadas:
Seda, poliéster, algodón, lana,
rayón.
2 Bastidor de pelusa – úselo
para remover cabellos, pelusa
y pelo de mascotas al vaporizar
sus prendas. Use siempre el
bastidor de pelusa con la gorra
pequeña de vapor sobre la
boquilla de vapor.
CUIDADO: No use el cepillo de
cerdas en telas delicadas.
Telas recomendadas:
Algodón, lana, lona, jeans.
1 Bastidor para cepillo
de cerdas – es el bastidor
estándar que se usa al vaporizar
las prendas. Ofrece mejor
penetración del vapor para telas
pesadas sin dejar marcas de
agua. Use siempre el bastidor
para cepillo de cerdas con la
gorra pequeña sobre la boquilla
de vapor.
Cuándo usar los diferentes
accesorios:
7 Almohadilla de planchado
vertical –
Forma conveniente de vaporizar
y planchar prendas. Elimina
el inconveniente de una tabla
de planchar. La almohadilla
de planchado vertical se
puede usar en cualquier tipo
de puerta y es virtualmente
invisible cuando la puerta está
cerrada, es de fácil acceso para
retoques de último momento.
La almohadilla de planchado
vertical también tiene ganchos
en ambos lados para mayor
comodidad al planchar mangas
y crear una amplia superficie de
planchado.
6 Ganchos de VelcroMR –
Ganchos fáciles de sacar que se
pueden usar en la almohadilla
de planchado vertical para
sostener las prendas al
vaporizarlas
La gorra pequeña de
vapor debe estar siempre
colocada sobre la boquilla
al usar el vaporizador.
Usando su Press & RefreshMR - continuación
6 Enrolle el cable de alimentación
y engánchelo con la cinta
de VelcroMR que viene con el
mismo. Siempre guarde su
artefacto en un lugar fresco y
seco.
5 Repase el exterior del
vaporizador de telas con un
trapo húmedo y séquelo.
La boquilla deja gotas
de agua en la prenda.
No hay vapor.
PROBLEMA
Hay condensación en el bastidor.
La gorra de vapor está
demasiado mojada.
No está usando la gorra
de vapor.
No hay suficiente agua en la
unidad.
El vaporizador no está
encendido.
CAUSAS POSIBLES
Español
7 Lave la gorra a mano con agua
fría y un detergente suave
después de cada uso y deje que
se seque completamente antes
de volver a usarla. No la seque
en la secadora.
Cuidado y uso de las gorras de
la boquilla de vapor
www.sharkclean.com
29
Deje que el artefacto se enfríe y limpie el bastidor.
Luego de dejar que la boquilla de vapor se enfríe,
saque la gorra de vapor y deje que se seque antes
de volver a usarla.
Le recomendamos usar la gorra de vapor en la
boquilla para evitar que deje gotas de agua en la
prenda y para mejorar el rendimiento.
Verifique que el nivel de agua esté por encima
de la línea de “Refill”. Si no lo está, agregue más
agua al tanque.
Verifique que la luz azul de la unidad esté encendida. Si no lo está, verifique que la unidad esté
enchufada y que la llave de encendido esté en la
posición “On”.
SOLUCIONES
Guía de diagnóstico de problemas
4 Vacíe el tanque de agua.
3 Deje que se enfríe
completamente por unos 30
minutos antes de vaciar el
tanque de agua.
2 Desenchufe la unidad del
tomacorriente.
1 Apague el vaporizador de telas.
Cuidado y almacenamiento
Cuidado de su Press & RefreshMR
30
LLAMADA SIN COSTA: 1-800-798-7395
Para ordenar partes y accesorios adicionales, póngase
en contacto con nosotros en www.sharkclean.com
o llame al 1-800-798-7395.
Ordenando partes de reemplazo:
Partes de reemplazo
XT500BW
1060SO
XUP500
XDF500
1062SO
1059SO
1057SO
b Bastidor para tapizados/
telas delicadas
c Gorra para telas delicadas
d Gorra para tapizados
e Bastidor para cepillo de pelusa
f Bastidor para cepillo de cerdas
g Ganchos de VelcroMR
PARTE NO.
a Gorra pequeña de vapor
PARTE
g
f
e
d
c
b
a
Español
www.sharkclean.com
31
El registro nos permitirá contactarnos con usted en caso de existir alguna notificación de seguridad con respecto al
producto. Al registrarlo, usted reconoce haber leído y comprendido las instrucciones de uso y advertencias incluidas
en estas instrucciones.
Visite www.sharkclean.com o llame al 1-800-798-7395 para registrar su nuevo producto Shark® dentro de los
diez (10) días siguientes a la compra. Se le preguntará el nombre de la tienda, la fecha de compra y el número de
modelo, junto con su nombre y su dirección.
Registro del producto
*IMPORTANTE: Embale el producto cuidadosamente para evitar daños durante el transporte.
Asegúrese de incluir un comprobante de la fecha de compra y de colocarle una etiqueta al producto
con su nombre, dirección completa y número de teléfono, una nota proporcionando información de la
compra, número de modelo y una descripción del problema que tenga la unidad. Le recomendamos
asegurar el paquete (puesto que la garantía limitada no cubre daños de envío). Escriba en el exterior
del paquete “ATTENTION CUSTOMER SERVICE”. Nosotros nos esforzamos constantemente en mejorar
nuestros productos, por lo tanto las especificaciones aquí indicadas pueden cambiar sin previo aviso.
Esta garantía limitada le otorga derechos legales específicos, y usted puede también tener otros derechos los que
varían de estado a estado o de provincia a provincia.
Esta garantía limitada es válida para el comprador original del producto y excluye cualquier otra garantía legal,
implícita y/o convencional. La responsabilidad de EURO-PRO Operating LLC, de existir, se limita a las obligaciones
específicas asumidas expresamente bajo los términos de esta garantía limitada. Bajo ninguna circunstancia EUROPRO Operating LLC será responsable por daños incidentales o indirectos a cualquiera, de ninguna clase. Algunos
estados no permiten la exclusión o limitación de daños consiguientes o incidentales, por lo tanto lo anterior puede no
ser válido para usted.
La responsabilidad de EURO-PRO Operating LLC se limita únicamente al costo de reparación o reemplazo de la
unidad, a nuestro criterio. Esta garantía limitada no cubre el desgaste normal de las partes y no cubre ninguna unidad
que haya sido alterada o utilizada con fines comerciales. Esta garantía limitada no cubre daños ocasionados por
uso inadecuado, abuso, negligencia o daños causados por embalaje inapropiado o maltrato durante el transporte.
Esta garantía limitada no cubre daños o defectos causados o resultantes durante el transporte para su reparación
o alteraciones del producto o cualquiera de sus partes, realizadas por una persona no autorizada por EURO-PRO
Operating LLC.
Los insumos tales como, sin limitación, filtros, cepillos y partes eléctricas que normalmente necesitan ser
reemplazados son explícitamente excluidos de la garantía.
Si el artefacto presenta un defecto de materiales o mano de obra, EURO-PRO Operating LLC lo reparará o
remplazará sin cargo. El envío debe incluir un comprobante de la fecha de compra y $14,95 para cubrir los gastos de
envío.*
• Canadá: EURO-PRO Operating LLC
4400 Bois Franc, St. Laurent, Québec H4S 1A7
• EE.UU.: EURO-PRO Operating LLC
Por servicio al cliente, llame al 1-800 -798-7395
o visite www.sharkclean.com
Si su artefacto no funciona correctamente al utilizarlo bajo condiciones domésticas normales dentro del período de
garantía, devuelva el artefacto completo y los accesorios, pagando el envío, a:
EURO-PRO Operating LLC garantiza este producto contra defectos de materiales y mano de obra por un término
de un (1) año a partir de la fecha de compra original, siempre que sea utilizado para uso doméstico normal, sujeto a
las siguientes condiciones, exclusiones y excepciones.
Garantía limitada de un (1) año
Euro-Pro Operating LLC
US: Newton, MA 02459
CAN: Ville St-Laurent, QC H4S 1A7
English: 1-800-798-7398
Español : 1-800-798-7395
www.sharkclean.com
Copyright © 2010 Euro-Pro Operating LLC
Printed in China / Impreso en China
Illustrations may differ with actual product.
El dibujo puede no ser igual al producto real.
GS500.series.ES.100616
*6BVHULHVB,%B(6BLQGG
$0