1
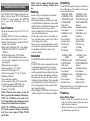
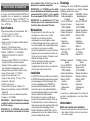
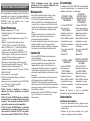
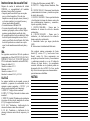
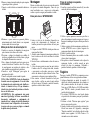
3. Connect the battery pack wire to the battery terminal on the keypad.
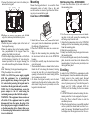
Latch
Mounting
Holes
Tamper
Switch
Latch
AC Plug
Mounting
Mount the keypad where it is accessible from
designated points of entry. Once a dry and
secure location is selected, perform the following steps to mount the keypad.
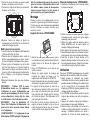
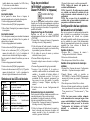
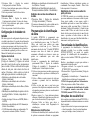
Desk Stand - WTK5504DMK
Wall Mounting Plate - WTK5504BRK
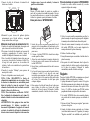
1.Locate the screw holes (4) at each corner of
the mounting plate.
Screw
Wire
Channel
Mounting
Tabs
Mounting
Holes
4. Reattach the back of the plastic case, bottom
edge first, and snap both latches in place.
Apply AC Power
1.Locate the power adaptor jack at the back of
the keypad housing.
2. Place the adaptor plug in the housing indentation, perpendicular to the keypad. Insert the
adaptor plug firmly into the jack.
3. Pivot the adaptor plug downwards so it fits flush
with the housing. Guide the AC wire along the
channel provided in the keypad housing; the
wire will extend through the bottom of the housing.
4. See ‘Mounting’ for keypad mounting options.
5. Plug the adaptor into a wall outlet.
NOTE: Use ONLY the power supply supplied
with this equipment. Use of unauthorized
power supplies may damage the keypad. The
AC socket/outlet powering the keypad must be
located near the keypad and easily accessible.
NOTE: For UL listed installations, secure the
power adaptor to the AC outlet using the
restraining means provided with the adapter.
WARNING: This equipment has no mains on/
off switch. If the equipment must be quickly
disconnected from the mains, the plug of the
direct plug-in power supply is intended to serve
as the disconnecting device. Ensure that access
to the mains plug and associated socket/outlet
is never obstructed.
Screw
Screw
1.Insert the two rubber feet (found in the hardware pack) into the indentations provided in
the bottom of the desk stand.
2. Place the WTK5504 face down on a secure surface.
3. Align the four mounting tabs protruding from
the desk stand with the slots in the WTK5504
housing.
4. Firmly but carefully snap the desk stand down
onto the keypad.
5. The desk stand features a channel in the bottom.
Guide the AC wire along this channel, twisting
to keep the wire flat, so it extends through the
opening in the back of the stand. Gently pull the
wire to remove any slack.
6. To fasten the keypad securely onto the desk
stand, locate the hole in the bottom centre of the
desk stand. Using the screw provided, screw the
keypad to the desk stand.
Screw
2. Use the four screws provided to affix the mounting plate to the wall; ensure the mounting tabs
are facing away from the wall.
3. Align the four mounting slots in the WTK5504
housing with the four mounting tabs protruding
from the mounting plate.
4. Slide the keypad into place.
5. Firmly but carefully snap the keypad down onto
the mounting plate.
6. To fasten the keypad securely onto the mounting
plate, locate the screw hole in the bottom of the
mounting plate. Using the screw provided, screw
the keypad into place.
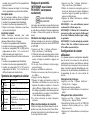
Enrolling
In order for the WTK5504 to communicate with
the alarm panel, it must be enrolled on the system.
1.Apply power to the control panel. Keypad
enrollment is active during the first two minutes of system power up. Note that the panel’s
Ready and AC LEDs (onboard LED for
TR5164) will be flashing for this two-minute
period.
2. A WTK5504 must be turned on during this twominute period for it to be assigned to the panel.
3. Press the ‘Press to Enroll’ button to start the
enrollment process.
4. When the keypad has been successfully enrolled
on the system (this should take less than 5 seconds), the message ‘Enrollment Successful’ will
be displayed on the keypad screen for five sec-