1
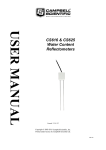
AM16/32B Relay Multiplexer
Revision: 1/09
C o p y r i g h t © 1 9 8 7 - 2 0 0 9
C a m p b e l l S c i e n t i f i c , I n c .
Warranty and Assistance
The AM16/32B RELAY MULTIPLEXER is warranted by CAMPBELL
SCIENTIFIC, INC. to be free from defects in materials and workmanship
under normal use and service for twelve (12) months from date of shipment
unless specified otherwise. Batteries have no warranty. CAMPBELL
SCIENTIFIC, INC.'s obligation under this warranty is limited to repairing or
replacing (at CAMPBELL SCIENTIFIC, INC.'s option) defective products.
The customer shall assume all costs of removing, reinstalling, and shipping
defective products to CAMPBELL SCIENTIFIC, INC. CAMPBELL
SCIENTIFIC, INC. will return such products by surface carrier prepaid. This
warranty shall not apply to any CAMPBELL SCIENTIFIC, INC. products
which have been subjected to modification, misuse, neglect, accidents of
nature, or shipping damage. This warranty is in lieu of all other warranties,
expressed or implied, including warranties of merchantability or fitness for a
particular purpose. CAMPBELL SCIENTIFIC, INC. is not liable for special,
indirect, incidental, or consequential damages.
Products may not be returned without prior authorization. The following
contact information is for US and International customers residing in countries
served by Campbell Scientific, Inc. directly. Affiliate companies handle
repairs for customers within their territories. Please visit
www.campbellsci.com to determine which Campbell Scientific company
serves your country. To obtain a Returned Materials Authorization (RMA),
contact CAMPBELL SCIENTIFIC, INC., phone (435) 753-2342. After an
applications engineer determines the nature of the problem, an RMA number
will be issued. Please write this number clearly on the outside of the shipping
container. CAMPBELL SCIENTIFIC's shipping address is:
CAMPBELL SCIENTIFIC, INC.
RMA#_____
815 West 1800 North
Logan, Utah 84321-1784
CAMPBELL SCIENTIFIC, INC. does not accept collect calls.
AM16/32B Relay Multiplexer
Table of Contents
PDF viewers note: These page numbers refer to the printed version of this document. Use
the Adobe Acrobat® bookmarks tab for links to specific sections.
1. Function........................................................................1
1.1 Typical Applications.................................................................................1
1.2 Compatibility ............................................................................................2
2. Physical Description ...................................................2
3. AM16/32B Specifications ............................................3
4. Operation......................................................................5
4.1 The Control Terminals..............................................................................5
4.1.1 Reset................................................................................................6
4.1.2 Clock ...............................................................................................6
4.1.2.1 Mode A..................................................................................7
4.1.2.2 Mode B ..................................................................................7
4.1.2.3 Datalogger Connection/Instruction........................................8
4.1.3 Ground ............................................................................................9
4.1.4 Power Supply ..................................................................................9
4.2 Measurement Terminals .........................................................................10
4.2.1 COM Terminals ............................................................................11
4.2.2 Sensor Input Terminals .................................................................11
5. Datalogger Programming..........................................12
5.1 CRBasic Programming ...........................................................................13
5.1.1 CR1000, CR800, and CR850 Programming .................................14
5.1.2 CR5000 and CR3000 Programming .............................................16
5.2 Edlog Programming................................................................................17
5.2.1 Single Loop Instruction Sequence.................................................17
5.2.2 Multiple Loop Instruction Sequence .............................................23
5.3 General Programming Considerations ....................................................25
6. Sensor Hook-up and Measurement Examples........25
6.1 Single-Ended Analog Measurement without Sensor Excitation .............26
6.2 Differential Analog Measurement without Sensor Excitation ................27
6.3 Half Bridge Measurements .....................................................................27
6.3.1 Half Bridge Measurement with Completion Resistor at Datalogger...27
6.3.2 Potentiometer Measurement..........................................................28
6.3.3 Four Wire Half Bridge (Measured Excitation Current).................29
6.4 Full Bridge Measurements......................................................................30
6.5 Full Bridges with Excitation Compensation ...........................................30
6.6 Thermocouple Measurement ..................................................................31
6.6.1 Measurement Considerations ........................................................31
i
AM16/32B Relay Multiplexer Table of Contents
6.6.2 Single-ended Thermocouple Measurement .................................. 33
6.6.3 Differential Thermocouple Measurement .................................... 34
6.7 Mixed Sensor Types............................................................................... 34
6.7.1 Mixed Sensor Example: Soil Moisture Blocks and Thermocouples34
7. General Measurement Considerations ....................38
8. Installation ..................................................................38
8.1 Mounting Tabs ....................................................................................... 39
8.2 Controlling Humidity ............................................................................. 39
Appendix
A. AM16/32B Improvements........................................ A-1
Figures
1. AM16/32B Relay Multiplexer ................................................................... 3
2. AM16/32B Relay Actuation Time vs. Temperature and Battery
Voltage.................................................................................................... 5
3. AM16/32B to Datalogger Power/Control Hookup using CABLE4CBL
or MUXPOWER Cable........................................................................... 6
4. Diagram Showing Advancement of Channels using Clocking Mode B .... 8
5. Power and Ground Connections for External Power Supply ................... 10
6. Typical AM16/32B to Datalogger Signal Hookup (4x16 Mode)
using CABLE4CBL or MUXSIGNAL Cable....................................... 11
7. SCWIN (Short Cut for Windows Program Builder) ................................ 13
8. Example “4x16” Mode Program Loops for CR23X, CR10(X), 21X
and CR7 Loggers .................................................................................. 21
9. Example “2x32” Mode Program Loops for CR23X, CR10(X), 21X
and CR7 Loggers .................................................................................. 22
10. Wiring Diagram for Strain Gages and Potentiometers........................... 23
11. Single-ended Measurement without Excitation...................................... 26
12. Differential Measurement without Excitation ........................................ 26
13. Half Bridge (Modified 107 Temperature Probe) Hook-up and
Measurement......................................................................................... 28
14. Potentiometer Hook-up and Measurement (using CABLE4CBL or
MUXSIGNAL cable)............................................................................ 28
15. Four Wire Half Bridge Hook-up and Measurement............................... 29
16. Full Bridge Measurement....................................................................... 30
17. Full Bridge Measurement with Excitation Compensation ..................... 31
18. Differential Thermocouple Measurement with Reference Junction
at the Datalogger ................................................................................... 32
19. Differential Thermocouple Measurement with Reference Junction
at the AM16/32B................................................................................... 32
20. AM16/32B Aluminum Cover Plate........................................................ 33
21. Thermocouple and Soil Block Measurement for CR10X Example ....... 35
22. Mounting Tab Hole Pattern.................................................................... 39
Table
1. Single Loop Instruction Sequence............................................................ 18
ii
Cautionary Notes
The AM16/32B is not designed to multiplex power. Its intended function is to
switch low level analog signals. Switched currents in excess of 30 mA will
degrade the relay contacts involved, rendering that channel unsuitable for
further low level analog measurement. Customers who need to switch power
are directed to Campbell Scientific’s SDM-CD16AC, A6REL-12, or
A21REL-12 relays.
Changing the setting of the mode switch from “4x16” to “2x32” connects
COM ODD H to COM EVEN H and also COM ODD L to COM EVEN L.
After wiring AM16/32B, exercise due care to avoid inadvertently putting
excess voltage on a line or short circuiting a power supply which might
damage datalogger, wiring panel, sensor or multiplexer (not covered under
warranty).
iii
This is a blank page.
AM16/32B Relay Analog Multiplexer
1. Function
The primary function of the AM16/32B Multiplexer is to increase the number
of sensors that can be measured by a CR1000, CR3000, CR800, CR850,
CR23X, CR10(X), 21X, or CR7 datalogger. The AM16/32B is positioned
between the sensors and the datalogger. The AM16/32B is a replacement for
CSI’s AM16/32 model. The hardware is the same as the AM16/32A model.
The AM16/32B adds a mode to address an individual relay. Mechanical relays
in the AM16/32B connect each of the sensor channels in turn to a common
output destined for the datalogger. The user program advances the multiplexer
through the sensor channels making measurements and storing data.
A slide switch located on the AM16/32B’s top panel selects one of two modes
of operation. In “2x32” mode the multiplexer can scan 32 sensor input
channels, each with two lines. In “4x16” mode it can scan 16 input channels
with four lines a piece. The datalogger program is written according to the
selected mode and the sensors to be measured.
The maximum number of sensors that can be multiplexed by an AM16/32B
depends primarily on the type(s) of sensors to be scanned. The following
guidelines assume identical sensors:
Up to 32 single-ended or differential analog sensors that do not require
excitation. For example: pyranometers and thermocouples (see Sections 6.1,
6.2, and 6.6).
Up to 32 single-ended sensors that require excitation. Example: some half
bridges (see Section 6.3.1).
Up to 16 single-ended or differential sensors that require excitation.
Examples: full bridges and four-wire half bridge with measured excitation (see
Section 6.3.3 and 6.4).
In conjunction with a second AM16/32B, up to 16 six-wire full bridges
(Section 6.5).
1.1 Typical Applications
The AM16/32B is intended for use in applications where the number of
required sensors exceeds the number of datalogger input channels. Most
commonly, the AM16/32B is used to multiplex analog sensor signals, although
it can also be used to multiplex switched excitations, continuous analog
outputs, or even certain pulse counting measurements (i.e., those that require
only intermittent sampling). It is also possible to multiplex sensors of
different, but compatible, types (e.g., thermocouples and soil moisture blocks,
see Section 6.7.1).
1
AM16/32B Relay Analog Multiplexer
NOTE
For a discussion of single-ended versus differential analog
measurements, please consult the Measurement section of your
datalogger manual.
As purchased, the AM16/32B is intended for use in indoor, non-condensing
environments. An enclosure is required for field or high humidity use. In
applications where one or two multiplexers are deployed, the ENC 10/12
(10” x 12”) enclosure is recommended.
1.2 Compatibility
The AM16/32B is compatible with Campbell’s CR5000, CR800, CR850,
CR3000, CR1000, CR23X, CR10(X), 21X, and CR7 dataloggers.
The AM16/32B is compatible with a wide variety of commercially available
sensors. As long as relay contact current maximums are not exceeded (see
Cautionary Notes, page iii), and no more than four lines are switched at a time,
system compatibility for a specific sensor is determined by sensor-datalogger
compatibility.
In CR1000, CR800, CR850, CR3000, CR23X, and CR10(X) applications the
AM16/32B may be used to multiplex up to 16 Geokon vibrating wire sensors
through one AVW1 vibrating wire interface. The AM16/32B can also be used
to multiplex vibrating wire sensors connected to the AVW200 or AVW206.
2. Physical Description
The AM16/32B is housed in a 10.2 cm x 23.9 cm x 4.6 cm (4.0” x 9.4” x 1.8”)
anodized aluminum case (Figure 1). The aluminum case is intended to reduce
temperature gradients across the AM16/32B’s terminal strips. An aluminum
cover plate is also included to this end. This is extremely important if
thermocouples are being multiplexed (Section 6.6).
The case can be opened for inspection/cleaning by removing two phillips-head
screws located on the under-side of the case. Mounting tabs are provided so the
AM16/32B can be fastened to a flat surface or an enclosure plate (Section 8).
All connections to the AM16/32B are made on the top panel terminal blocks.
The island of four terminals located near the mode switch are dedicated to the
connecting of datalogger power and control lines (Section 4.1). The four
“ODD” and “EVEN” “COM” terminals on the other side of the mode switch
carry shielded multiplexed sensor signals destined for datalogger analog
inputs. The remaining terminals on the AM16/32B are for sensor and sensor
shield connection (Section 4.2). All of the inputs of the AM16/32B are
protected with gas tubes. The terminals accept stripped and tinned lead wires
up to 16 AWG or 1.6 mm in diameter. Datalogger-to-AM16/32B cabling
requires a minimum of six and as many as nine individually insulated wires
with shields.
2
AM16/32B Relay Analog Multiplexer
FIGURE 1. AM16/32B Relay Multiplexer
3. AM16/32B Specifications
Power*:
Unregulated 12 VDC
Minimum Operating Voltage:
from –55C to +40C = 11.3 VDC;
from +40C to +85C = 11.8 VDC
(See Figure 2 for relay actuation times vs.
temperature and supply voltage.)
Current Drain:
Quiescent: < 210 uA
Active: 6 mA typical in “2 x 32” mode
11 mA typical in “4 x 16” mode
Reset*:
A continuous signal between 3.3 VDC and 8 VDC
holds the AM16/32B in an active state (where a
clock pulse can trigger a channel advance). A
signal voltage < 0.9VDC deactivates the
AM16/32B (clock pulse will not trigger a scan
advance; AM16/32B is also reset).
Clock*:
Operational
Temperature:
On the transition from <1.5 V to >3.3 V, a scan
advance is actuated on the leading edge of the clock
signal; clock pulse should be a minimum of 1 ms
wide; maximum voltage is 8 VDC.
Standard: -25oC to +50oC
Extended: -55oC to +85oC
Operational
Humidity:
0 - 95%, non-condensing
Dimensions:
Length – 23.9 cm (9.4")
Width - 10.2 cm (4.0")
Depth - 4.6 cm (1.8")
3
AM16/32B Relay Analog Multiplexer
Weight:
1.5 lbs. (approx.), 693 g.
Mounting Tab
Hole Spacing:
Expandability**
(nominal):
1 inch x 3 inches x 9 inches. Up to 1/8 inch or 3
mm diameter screws (see Figure 22).
Maximum Cable
Length:
Depends on sensor and scan rate. In general, longer
lead lengths necessitate longer measurement delays.
Refer to datalogger manual for details.
Maximum Switching
Current***:
2 AM16/32Bs per CR800/CR850
4 AM16/32Bs per CR3000
4 AM16/32Bs per CR5000
4 AM16/32Bs per CR1000
4 AM16/32Bs per CR23X
4 AM16/32Bs per CR10(X)
4 AM16/32Bs per 21X
8 AM16/32Bs per CR7 725 Card
500 mA
Contact
Specifications:
Initial contact resistance: <0.1 ohm max.
Initial contact bounce: <1 ms
Contact material: Gold clad silver alloy
Wiper to N.O. contact capacitance: 0.5 pF
Typical low-current (<30 mA) life: 5 x 10⁷
operations
Relay Switching
Thermal emf: 0.3 µV typical; 0.5 µV maximum
Characteristics
(applying 11.3 – 14
VDC):
Operate time: <10 ms over temperature and supply
ranges
Break-before-make guaranteed by design.
Relays disengage from previous selected channel
before engaging next channel.
ESD:
Air Discharge: complies with IEC61000-4-2, test
level 4 (±15 kV)
Contact Discharge: complies with IEC61000-4-2,
test level 4 (±8 kV)
Surge:
Complies with IEC61000-4-5, test level 3 (±2 kV,
2 ohms coupling impedance)
* Reset and clock protected by 8V varistors; +12V input is protected by +16V transzorb.
** Assumes sequential activation of multiplexers and that each datalogger channel is uniquely
dedicated. If your application requires additional multiplexing capability, please consult CSI for
application assistance.
*** Switching currents greater than 30 mA (occasional 50 mA current is acceptable) will degrade
the contact surfaces of the mechanical relays (increase their resistance). This will adversely affect
the suitability of these relays to multiplex low voltage signals. Although a relay used in this
manner no longer qualifies for low voltage measurement, it continues to be useful for switching
currents in excess of 30 mA.
4
AM16/32B Relay Analog Multiplexer
10.0
8.0
6.0
4.0
16
17.3
15.6
16.9
15.2
16.5
14.8
16.1
14
15.3
14.4
15.7
13.6
14.9
13.2
14.5
12.8
14.1
12
13.3
12.4
13.7
11.6
12.9
11.2
12.5
12.1
10.8
11.3
10
0.0
11.7
10.4
2.0
10.9
9.6
RELAY ACTUATION TIME (ms)
12.0
POWER SUPPLY VOLTAGE
65C
50C
25C
-25C
FIGURE 2. AM16/32B Relay Actuation Time vs.
Temperature and Battery Voltage
4. Operation
Subsection 4.1 discusses the terminals that control operation of the
multiplexer. These terminals are located at the left-hand side of the
multiplexer as shown in Figure 1. Subsection 4.2 discusses the use of sensor
measurement terminals.
4.1 The Control Terminals
Either the CABLE4CBL cable or MUXPOWER cable may be used to connect
the control terminals. The biggest difference between these cables is that the
CABLE4CBL has a Santoprene jacket and the MUXPOWER has a PVC
jacket. The Santoprene jacket is more rugged.
The CR5000, CR3000, CR800, CR850, CR1000, CR23X, CR10(X), 21X, and
CR7 dataloggers connect to the AM16/32B as shown in Figure 3 (“4x16”
mode). Figure 3 depicts control connections. Measurement connections are
discussed in Section 6. The power, ground, reset, and clock connections
remain essentially the same regardless of datalogger used.
With the CR5000, CR3000, CR800, CR850, CR1000, CR23X and CR10(X),
the datalogger 12 VDC supply and ground terminals are connected to the
AM16/32B 12V and ground terminals. One control port is required for
clocking and a second control port for reset. The cable’s shield is grounded on
both ends as illustrated in Figure 3.
5
AM16/32B Relay Analog Multiplexer
12V
GND
CLK
RES
MUXPOWER
CABLE
SHIELD
N
O
CR800,
CR850
CR10X,
CR3000,
CR1000
G
G
12 V
CR23X,
CR5000
21X
CR7
12 V
12 V
+12 V
12 V
G
G
G
C1-C4
C1-C8
C1-C8
EXCIT 1-4
EXCITATION
C1-C4
C1-C8
C1-C8
C1-C8
725 Card
Control
FIGURE 3. AM16/32B to Datalogger Power/Control Hookup using CABLE4CBL or MUXPOWER Cable
With the 21X or CR7 the AM16/32B connects to the 12 VDC and “ ”
terminals for power. One control port is used for reset, and one switched
excitation channel is used for clock (on 725 card with CR7). If a switched
excitation port is not available, an additional control port can be used to
provide clock pulses to the multiplexer.
4.1.1 Reset
The reset (“RES”) line is used to activate the AM16/32B. A signal in the
range of +3.3 to +8 VDC applied to the reset terminal activates the multiplexer.
When this line drops lower than +0.9 VDC, the multiplexer enters a quiescent,
low-current-drain state. In the quiescent state the common (“COM”) terminals
are electrically disconnected from all of the sensor input channels. Reset
should always connect to a datalogger control port. The CR800, CR850,
CR3000, CR5000, and CR1000 use the PortSet instruction to control the reset
line. Instruction 86 (option code 41 - 48 to activate, and 51 - 58 to deactivate)
is generally used to activate/deactivate the multiplexer when using an Edlog
datalogger; however, in the case of the 21X or CR7 with older PROMS,
Instruction 20 is commonly used.
4.1.2 Clock
Pulsing the AM16/32B “CLK” line high (‘RES” line already high) advances
the channel. The voltage level must fall below 1.5 VDC and then rise above
3.3 VDC to clock the multiplexer.
The AM16/32B operates in one of two clocking modes:
Mode A—sequentially advances through each relay channel (as long as
RESET is HI, relays are closed on each rising CLK edge). A more detailed
description of Mode A is provided in section 4.1.2.1.
Mode B—uses a relay address to go directly to a specific channel (see Figure
4). This reduces power consumption and wear on the relay switches. When
6
AM16/32B Relay Analog Multiplexer
multiple sensor types are connected to the AM16/32B, Mode B allows one
sensor type to be measured more frequently than the other sensor types. A
more detailed description of Mode B is provided in section 4.2.1.2.
The AM16/32B detects a certain sequence on the RESET and CLK inputs to
determine if it should operate in Mode A or Mode B; it does this every time the
RESET line goes from LO to HI.
4.1.2.1 Mode A
The AM16/32B operates in Mode A under the following circumstances:
•
RESET HI for more than 9 ms.
•
A CLK pulse occurs while RESET is HI.
When reset first goes high, the common terminals (ODD H, ODD L and
EVEN H, EVEN L) are disconnected from all sensor input terminals. When
the first clock pulse arrives, the “COM” terminals are switched to connect with
sensor input channel 1 (blue lettering) consisting of 1H, 1L, 2H, and 2L.
When a second clock pulse arrives, the common lines are switched to connect
to channel 2 (3H, 3L, 4H, 4L). The multiplexer advances on the leading edge
of the positive going clock pulse.
NOTE
The CLK pulse should be at least 1 ms long. A delay (typically
10 to 20 ms) is inserted between the beginning of the CLK pulse
and the measurement instruction to ensure sufficient settling time
to relay contacts.
4.1.2.2 Mode B
To go into Mode B, the RES line must be set HI for 5 ms (±1 ms) without any
clocking. Then, the RES line needs to be set LO. After the RESET has been
set low, the AM16/32B counts the number of CLK pulses that occur before the
RES line is activated again. This number is the relay address. After getting
into Mode B, the rising edge of RESET (<75 msec after last CLK pulse)
activates the addressed relay. Once the addressed relay is activated, the
AM16/32B advances to the next relay with each CLK pulse (see Figure 4).
NOTE
If the time between the falling edge of the 5 ms RESET pulse
and the next rising edge of RESET or CLK is longer than 125
ms, the AM16/32B will go into Mode A.
Section 4.1.2.3 includes a portion of a CR1000 program that shows the
instructions used to go into Mode B and jump to channel 6.
7
AM16/32B Relay Analog Multiplexer
5 ms (±1 ms)
(0 -–100m
75 ms)
mss the
(0
s) Note:
No te:ifif>>125
100m
th e B
B Address
Add ress mode
m ode
is Aborted.
mss
Abo rted. Also,
Also, Abort
Abortcan
canhappen
happ enifif>>125
100m
time
tim ebetween
b etw eenClk’s.
Clk's
5m s (+-2m s)
To Enter B
T o Enter B
Address Mode
Address M ode
Reset
> 1m s
Clk
> 1m s
En ters B addressing
m o de
Address=Chan 3
Chan 3 Selected
(Relays m ake co ntact)
Ad vance to Chan 4
(Relays m akes contact)
Note: if th e B m od e is aborted,
th en this event w ou ld select
Mux Chan 1
FIGURE 4. Diagram Showing Advancement of Channels using Clocking Mode B
4.1.2.3 Datalogger Connection/Instruction
With the 21X and CR7 dataloggers, switched excitation is generally used to
clock the multiplexer (Instruction 22 configured for 5000 mV excitation). If
no switched excitation channel is available, it is possible to clock using control
ports. See Section 5.1 for details.
In the case of the CR5000, CR3000, CR800, CR850, CR1000, CR23X, and
CR10(X), a control port is generally used to clock the multiplexer. Instruction
86 with the pulse port option (command code 71 through 78) generates a 10 ms
pulse which works well.
The CR5000, CR3000, CR800, CR850, and CR1000 uses a control port
controlled by PortSet, Delay, and SubScan/NextSubScan to create the Clock
pulses (see program example in Section 5.3).
If several multiplexers are required, a CR5000, CR3000, CR800, CR850,
CR1000, CR10(X) or CR23X control port can source sufficient current to
drive up to six AM16/32B CLK or RES inputs wired in parallel.
8
AM16/32B Relay Analog Multiplexer
' ***** ' "Jump" AM16/32B directly to Channel 6
Scan (100,mSec,0,1)
PortSet(5,1)
' Raise Reset line
Delay (0,5,mSec)
' Keep reset HI for 5 ms
PortSet(5,0)
' Reset line set LO (enters "B Addressing" mode)
Delay (0,3,mSec)
For i = 1 To 6
' Pulse CLK line 6 times - addresses Channel 6
PortSet(6,1)
' Raise CLK
Delay (0,10,mSec)
PortSet(6,0)
' Drop CLK
Delay (0,10,mSec)
Next i
Delay (0,5,mSec)
PortSet(5,1)
' Raise Reset - selects Channel 6 (relays make contact)
NextScan
4.1.3 Ground
The AM16/32B has a ground lug that should be connected to earth ground via
an 8 AWG wire. This connection should be as short as possible. The ground
lug provides a path to dissipate surges that might propagate on a sensor’s
shield line. An 8-V, bi-polar transzorb connects shield ground to the ground
lug.
The AM16/32B “GND” terminal is connected to datalogger power ground.
The AM16/32B “GND” terminal is also connected to the CABLE4CBL or
MUXPOWER cable’s SHIELD and, via that, to datalogger power ground (see
Figure 3). If a separate power supply is used, the AM16/32B ground should
also connect to the separate supply’s ground (Figure 5). An AM16/32B
“COM ” terminal should connect to a datalogger ground terminal (“ ” or
“G”) via the cable that connects the COM terminals (see Section 4.2.1 and
Figure 6). The datalogger itself must connect to earth ground by one of the
methods described in the Installation and Maintenance Section of your
datalogger operator’s manual.
4.1.4 Power Supply
The AM16/32B requires a continuous 12 VDC power supply for operation.
The multiplexer's current drain is less than 210 microamps in the quiescent
state and is typically 6 to 11 milliamps at 12 VDC when active (see current
drain spec). The power supply is connected to the multiplexer terminals
labeled “12V” (+) and “GND”. Connect the “GND” wire first for safety.
In many applications it is convenient to power the AM16/32B from a
datalogger battery. For more power-intensive applications, an external,
rechargeable, 12 VDC, 60 Amp Hr source may be advisable. Lead-acid
supplies are recommended where solar or AC charging sources are available
because they handle well being “topped off” by constant charging. The
BPALK alkaline supply (12 Amp Hr) can be used to power the AM16/32B in
applications where the average system current is low, or where it is convenient
to frequently replace batteries. It is advisable to calculate the total power
requirements of a system and the expected longevity of the power supply based
9
AM16/32B Relay Analog Multiplexer
on average system current drains (e.g. logger, multiplexer, other peripherals
and sensors) at the expected ambient temperatures.
The average power required to operate an AM16/32B depends on the
percentage of time it is active per time period. For example, if a CR10X
makes differential measurements on 32 thermocouples every minute, the
average current drain due to the AM16/32B would be about ((.030 Sec/chan x
32 chan)/60 Sec) x 6 mA = 0.1 mA. Under the same conditions, a 2 second
execution interval rate increases the average system current drain to about
((.030 Sec/chan x 32 chan)/2 Sec) x 6 mA = 2.9 mA. At a minimum, the
power supply must be able to sustain the system between site visits anticipating
the worst environmental extremes.
If a 21X power supply is used to power the AM16/32B, all low-level analog
measurements (thermocouples, pyranometers, thermopiles, etc.) must be made
differentially. Differential measurements are required because slight ground
potentials are created along the 21X analog terminal strip when the 12V supply
is used to power peripherals. This limitation reduces the number of available
analog input channels and may mandate the use of an external supply for the
AM16/32B (Figure 5).
AM16/32B
FIGURE 5. Power and Ground Connections for External Power Supply
Low supply voltage and high ambient temperatures affect the actuation time of
the multiplexer relays (Figure 2). If your program does not allow the relay
contacts sufficient time to close before a measurement is started, the result will
be inaccurate or overranged values.
4.2 Measurement Terminals
Most of the terminals on the AM16/32B are dedicated to the connection of
sensors to the multiplexer (Figure 1). Depending on the panel switch selection
(“4x16” or “2x32” mode), the sensor input terminals are organized into 16
groups (blue letters) of 4 sensor inputs or 32 groups (white letters) of 2 sensor
inputs. The terminals accept solid or tinned, stripped sensor leads. The four
“COM” terminals marked “ODD H, L” and “EVEN H, L” located by the mode
switch provide for attachment of the common signal leads that carry
multiplexed sensor signals to the datalogger.
10
AM16/32B Relay Analog Multiplexer
4.2.1 COM Terminals
A CABLE3CBL, CABLE4CBL, MUXSIGNAL, or CABLE5CBL cable is
used to connect the datalogger to the COM terminals. The CABLE3CBL is
recommended when the AM16/32B is used in the 4x16 mode. Either the
CABLE4CBL or MUXSIGNAL is typically used for the 4x16 mode. The
CABLE5CBL is recommended for the 4x16 mode when it is desirable to
connect both shields.
The four terminals dedicated to multiplexer-datalogger connection are located
under the blue “COM” next to the mode switch. The terminals are labeled:
ODD H, ODD L, EVEN H, and EVEN L. In “4x16” mode the AM16/32B
maintains the four “COM” terminals electrically isolated from one another. In
“2x32” mode the AM16/32B maintains an internal connection between ODD
H and EVEN H and between ODD L and EVEN L.
Common “ ” terminals are provided next to the COM ODD and COM EVEN
terminals. They bus internally to the other thirty-two “ ” terminals on the
AM16/32B and are connected at all times (i.e., not switched). Their function is
to provide a path to ground for sensor cable shields. A “COM ” terminal
should be wired to datalogger ground via the cable’s shield according to the
following table.
CABLE
MUXSIGNAL
SHIELD
COM
4X16
ODD
EVEN
H L
H L
CR3000,
CR5000
21X
CR7
CR800,
CR850
VX1-VX4
EXCITATION
SE3
EX1-EX3 or
VX1-VX3
SE3
SE3
2H
SWITCHED
ANALOG OUT
2H
EX1-EX2 or
VX1-VX2
SE3
SE2
SE2
SE2
1L
1L
SE2
SE1
SE1
SE1
1H
1H
SE1
CR10X
CR23X
CR1000
G
E1-E3
EX1-EX4
SE3
SE2
SE1
N
O
FIGURE 6. Typical AM16/32B to Datalogger Signal Hookup (4x16 Mode)
using CABLE4CBL or MUXSIGNAL Cable
4.2.2 Sensor Input Terminals
The terminals for sensor attachment are divided into 16 groups (panel switch
set to “4x16”) or into 32 groups (panel switch set to “2x32”). The groups
consist of four or two Simultaneously Enabled Terminals (SETs). With panel
switch set to “4x16” mode the blue channel numbers apply. The SETs are
numbered starting at 1 (1H, 1L, 2H, 2L) and continuing until SET 16 (31H,
31L, 32H, 32L).
In “4x16” mode the odd numbered terminals (example: 5H, 5L) are relay
switched to the COM ODD terminals while the even terminals (6H, 6L) are
switched to the COM EVEN terminals. When activated by the RES line being
high, as the AM16/32B receives clock pulses from the datalogger, each SET of
11
AM16/32B Relay Analog Multiplexer
four in turn is switched into contact with the four COM terminals. For
example, when the first clock pulse is received from the datalogger, SET 1
(1H, 1L, 2H, 2L) are connected with COM (ODD H, ODD L, EVEN H, EVEN
L) terminals respectively. When the second clock pulse is received, the first
SET is switched out (channel 1 sensor inputs become open circuits) and SET 2
(3H, 3L, 4H, 4L) are connected to the four COM terminals. A given SET will
typically be connected to the common terminals for 20 ms.
With panel switch set to “2x32” mode the white channel numbers apply. The
SETs are labeled beginning with 1H, 1L and ending with 32H, 32L. In “2x32”
mode when the AM16/32B selects a given channel the “H” sensor terminal is
relay connected to both COM “H” terminals and the “L” sensor terminal is
connected to both COM “L” terminals (COM ODD H connects to COM
EVEN H and COM ODD L connects to COM EVEN L when panel switch is
in “2x32” mode).
5. Datalogger Programming
A good way for the beginner or veteran datalogger programmer to create an
AM16/32B program is to obtain a copy of SCWIN (Short Cut Program Builder
for Windows). It can be downloaded free of charge from the Campbell
Scientific web site (http://www.campbellsci.com). SCWIN can build many
program configurations for various supported sensors providing a quick way to
generate an application program.
12
AM16/32B Relay Analog Multiplexer
FIGURE 7. SCWIN (Short Cut for Windows Program Builder)
5.1 CRBasic Programming
The CR5000, CR800, CR850, CR3000, and CR1000 are programmed with
CRBasic; for details see the datalogger manual. While the instructions look
different than those used to program the older CR10X, CR23X, etc., they
perform similar functions. One difference that needs to be pointed out is that
with CRBasic measurement results are stored in a variable array, not numbered
input locations. In the older loggers the destination location is “indexed” so
that each pass through the measurement loop the result is stored in a higher
numbered location. In CRBasic the program must specifically increment an
index variable and use that variable to determine where each measurement is
stored.
GENERALIZED CRBASIC PROGRAMMING SEQUENCE:
ACTIVATE MULTIPLEXER/RESET INDEX
Portset (1 ,1)
'Set C1 high to Enable Multiplexer
I=0
BEGIN MEASUREMENT LOOP
SubScan(0,sec,16)
CLOCK PULSE AND DELAY
Portset (2,1 ) ‘Set port 2 high
13
AM16/32B Relay Analog Multiplexer
Delay (0,20,mSec)
Portset (2,0) ‘Set port 2 low
INCREMENT INDEX AND MEASURE
I=I+1
'User specified measurement instruction
‘Storing results in Variable(I)
END MEASUREMENT LOOP
NextSubScan
DEACTIVATE MULTIPLEXER
Portset (1 ,0)
'Set C1 Low to disable Multiplexer
In addition to precision voltage excitation, the CR5000 and CR3000 have
programmable current excitation. Current excitation allows a resistance
measurement on a four-wire sensor (e.g., a PRT) such as shown in Figure 15
using only a single differential channel and no fixed resistor; the excitation
return goes directly to ground. With the current excitation the resistance of the
relays and lead wire do not affect the measurement.
5.1.1 CR1000, CR800, and CR850 Programming
Although the following example is a CR1000 program, a similar program can
be used for the CR800 or CR850. This CR1000 program uses the AM16/32B
to measure 48 CS616 probes connected in the 4x16 configuration. The
program also measures datalogger battery voltage and temperature.
14
AM16/32B Relay Analog Multiplexer
Wiring for CR1000 Program Example
AM16/32B (4x16)
CS616*
Control/Common
Sensor
Terminals
C4
RES
Odd H
CS616#1_Green
C5
CLK
Odd L
CS616#2_Green
12 V
12 V
Gnd
#1,2,3_Blk & Clear
Gnd
Gnd
Even H
CS616#3_Green
1H
COM Odd H
Even L
#1,2,3_Orange
1L
COM Odd L
Gnd
Gnd
2H
COM Even H
C6
COM Even L
*Three sensors to each set of AM16/32B terminals.
CR1000
CR1000 Program Example
‘Declare Public & Dim Variables
Public batt_volt
Public Panel_temp
Public Period(48)
Public VWC(48)
Public Flag(1)
Dim I
‘Declare Constants
‘CS616 Default Calibration Constants
const a0= -0.0663
const a1= -0.0063
const a2= 0.0007
‘Flag logic constants
const high = true
const low = false
‘Define Data Tables
DataTable (Dat30min,1,-1)
DataInterval (0,30,Min,10)
Minimum (1,batt_volt,FP2,0,False)
Average (1,Panel_temp,FP2,0)
Sample (48,Period(),FP2)
Sample (48,VWC(),FP2)
EndTable
15
AM16/32B Relay Analog Multiplexer
‘Main Program
BeginProg
Scan (5,Sec,0,0)
‘scan instructions every 5 sec
Battery (Batt_volt)
PanelTemp (Panel_temp,250)
‘
‘Set flag 1 High every 30 min (Note: User can manually set flag 1 high/low)
If IfTime (0,30,min)Then flag (1)=high ‘++++++++++++++++++++++++
If Flag(1)=high Then
‘measure 48ea CS616 probes on AM16/32B in (4x16) mode
PortSet (4,1) ‘Set Mux Reset line High
‘
I=1
‘set sub scan loop counter
SubScan (0,mSec,16)
PulsePort (5,10000)
‘Clock Mux
CS616 (Period(I),3,1,6,3,1.0,0)‘measure 3ea CS616 probes
I=I+3
NextSubScan
‘
For I=1 to 48
‘convert CS616 period to Volumetric Water Content
VWC(I)=a0 + a1*Period(I) + a2*Period(I)^2
Next
‘
PortSet (4,0)
‘Set Mux Reset line Low
flag(1)= low
EndIf
‘+++++++++++++++++++++++++++
‘
CallTable Dat30min
‘Call Output Tables
NextScan
EndProg
5.1.2 CR5000 and CR3000 Programming
Although the following example is a CR5000 program, a similar program can
be used for the CR3000. This CR5000 program uses the AM16/32B to
measure 16 100 ohm Platinum Resistance Thermometers connected in the
4x16 configuration. The program also measures 6 copper constantan
thermocouples.
CR5000
C1
C2
IX1
IXR
7H
7L
16
AM16/32B
Control/Common Sensor Terminals
Reset
Odd H
Clock
Odd L
COM Odd H
Even H
COM Odd L
Even L
COM Even H
COM Even L
PRT(4 Wires)
Excitation
Excitation Return
Sense wire excitation side
Sense wire return side
AM16/32B Relay Analog Multiplexer
'CR5000 Example Program to measure 16 100 ohm Platinum Resistance Thermometers ‘connected to an
AM16/32B multiplexer used in the 4x16 configuration. The program also ‘measures 6 copper constantan
'thermocouples.
'The Thermocouples are connected to differential channels 1-6.
'Declare Variables:
Public TRef, TCTemp(6), PRTResist(16), PRTTemp(16)
Dim I
'Counter for setting Array element to correct value for mux measurement
'Declare Output Table for 15 minute averages:
DataTable (Avg15Min,1,-1)
DataInterval (0,5,Min,10)
Average (1,TRef,IEEE4,0)
Average (6,TCTemp(),IEEE4,0)
Average (16,PRTTemp(),IEEE4,0)
EndTable
BeginProg
Scan (60,Sec,3,0)
PanelTemp (TRef,250)
TCDiff (TCTemp(),6,mV20C ,1,TypeT,TRef,True ,0,250,1.0,0)
Portset (1 ,1)
'Set C1 high to Enable Multiplexer
I=0
SubScan(0,sec,16)
'Pulse C2 (Set High, Delay, Set Low) to clock multiplexer
Portset (2,1 )
Delay (0,20,mSec)
Portset (2,0)
I=I+1
'The Resistance measurement measures the PRT resistance:
Resistance (PRTResist(I),1,mV50,7,Ix1,1,500,True ,True ,0,250,0.01,0)
'With a multiplier of 0.01 (1/100) the value returned is R/Ro (Resist/Resist @ 0 deg)
'the required input for the PRT temperature calculation instruction.
NextSubScan
Portset (1 ,0)
'Set C1 Low to disable Multiplexer
‘Calculate the Temperature from R/Ro:
PRT (PRTTemp(1),16,PRTResist(1),1.0,0)
CallTable Avg15Min
‘Call the DataTable
NextScan
EndProg
5.2 Edlog Programming
Edlog is used to program our CR10(X), 21X, CR23X, and CR7.
5.2.1 Single Loop Instruction Sequence
When a number of similar sensors are multiplexed and measured, the
Instructions to clock the AM16/32B and to measure the sensors are placed
within a program loop. For the CR23X, CR10(X), 21X, and CR7, the
generalized structure of a program loop is as follows:
17
AM16/32B Relay Analog Multiplexer
TABLE 1. Single Loop Instruction Sequence
#
INSTRUCTION FUNCTION
1
Set port high to activate AM16/32B
2
Begin loop
3
Clock AM16/32B & delay
4
Step loop index
(required in some configurations)
5
Measure sensor
6
Additional processing
7
End loop
8
Additional program loops
9
Set port low to deactivate AM16/32B
#1, #9 Activate/deactivate the AM16/32B −The control port connected to reset
(RES) is set high to activate the AM16/32B prior to the advance and measure
sequence and set low following the measurement loop(s). For the CR10X,
CR23X, and CR10, 21X, CR7 dataloggers with OS series PROMs, use
instruction 86 to set and reset the port (for CR10, 21X, and CR7 with earlier
PROMs, use Instruction 20).
#2, #7 Begin and End a Loop − For the CR23X, CR10(X), 21X, and CR7
dataloggers, a loop is defined by Instruction 87 (Begin Loop), and by
Instruction 95 (End). Within Instruction 87, the 2nd parameter (iteration
count) defines the number of times the instructions within the loop are
executed before the program exits the loop.
# 3 Clock and Delay − With the CR23X and CR10(X) the clock line is
connected to a control port. Instruction 86 with the pulse port command (7178) pulses the clock line high for 10 ms. Instruction 22 can be added
following the P86 to delay an additional 10 ms.
When using a 21X or CR7, the clock line may be connected to either an
excitation or control port. Connection to an excitation port is preferred
because only one instruction (22) is required to send the clock pulse.
Instruction 22 should be configured to provide a 10ms delay with 5000 mV of
excitation. A control port can be used to clock the AM16/32B if an excitation
port is not available. The 21X and CR7 instruction sequence required to clock
with a control port is: Instruction 20 (set port high), Instruction 22 (delay 20
ms without excitation), followed by Instruction 20 (set port low).
# 4 Step Loop Index – With the CR23X, CR10(X), 21X or CR7, the Step Loop
Index instruction “90” is used when a measurement instruction within a loop
has more than one repetition. This instruction allows 2 - 4 sensors per SET to
be measured by 2 – 4 analog input channels. The Step Loop Index instruction
sends each measurement value to a sequentially assigned input location
without overwriting any other current iteration value. Without this instruction,
the input location within the loop will advance by only one location per loop
iteration even though the measurement instruction’s Input Location is indexed.
18
AM16/32B Relay Analog Multiplexer
Example: 2 sensors per SET, 6 sensors total; two reps specified in
measurement instruction; two measurement values assigned to indexed input
locations (--); P90 step of 2. Loop count of three.
First pass:
Second pass:
Third pass:
Input locations
1 2 3 4
1 2
3 4
5
6
5
6
sensor
numbers
Removing the step loop instruction from the program, the following situation
results:
First pass:
Second pass:
Third pass:
Input Locations
1 2 3 4 5
1 2
3 4
5 6
6
sensor
numbers
Without P90 the measurement values for the 2nd and 4th sensors will be
overwritten in their input locations. The 1st, 3rd, 5th, and 6th measurement
values will reside in the first 4 input locations.
Step Loop Instruction “90” is available in the CR23X, CR10(X), CR7, and
21X (with 3rd PROM). For 21X dataloggers without 3rd PROM (i.e., no
Instruction 90), a separate measurement instruction (with one rep) is required
for each sensor measured within the loop. The input location parameter within
both measurement instructions is indexed.
For example: 2 sensors per SET; one rep in each of two measurement
instructions; two measurement values assigned to indexed input locations (--),
one begins with input location 1, the other with input location 4; no P90. A
total of six sensors to be measured; loop count is three.
First pass:
Second pass:
Third pass:
Input locations
1 2 3 4
1
2
3
5
5
6
4
6
sensor
numbers
A potential drawback of this technique is that sequential sensors (i.e., those
input to the same SET) will not have sequential input locations.
#5 Measure - Enter the instruction needed to measure the sensor(s) (see
Section 6, Sensor Hook-Up & Measurement Examples). The input location
parameter of a measurement instruction is indexed if a (--) appears to the right
of the input location. Index an input location by pressing "C" after keying the
location or by pressing F4 in Edlog while cursor is on the input location
parameter. Indexing causes the input location to be incremented by 1 with
each pass through the loop. This allows the measurement value to be stored in
sequential input locations. Instruction 90, as explained above, allows the
indexed input location to be incremented in integer steps greater than 1.
19
AM16/32B Relay Analog Multiplexer
NOTE
If more than the datalogger’s default number of input locations
are required, then additional input locations must be assigned
using the datalogger *A mode. Consult your datalogger manual
for details.
#6 Optional Processing - Additional processing is sometimes required to
convert the reading to the desired units. It may be more efficient if this
processing is done outside the measurement loop. A second loop can be used
for processing, if necessary.
20
AM16/32B Relay Analog Multiplexer
GENERALIZED “4x16” MODE PROGRAM LOOPS FOR THE CR23X, CR10(X), 21X, and CR7
21X SAMPLE PROGRAM
CR7 SAMPLE PROGRAM
CR10X, CR23X SAMPLE PGM
*
*
*
1
01:
60
Table 1
Programs
Sec.
Execution
Interval
1
01:
60
Table 1
Programs
Sec.
Execution
Interval
:ACTIVATE MULTIPLEXER
1: Set Port (P20)
1:
1
Set high
2:
1
Port
Number
;ACTIVATE MULTIPLEXER
1: Set Port (P20)
1:
1
Set high
2:
1
EX Card
3:
1
Port No.
:BEGIN MEASUREMENT
;LOOP
2: Beginning of Loop (P87)
1:
0
Delay
2:
16
Loop Count
;BEGIN MEASUREMENT
;LOOP
2: Beginning of Loop (P87)
1:
0
Delay
2:
16
Loop Count
;CLOCK PULSE AND DELAY
3: Excitation with Delay (P22)
1:
1
EX Chan
2:
1
Delay w/EX
(units=.01
sec)
3:
1
Delay after
EX (units=
.01 sec)
4: 5000
mV
Excitation
;CLOCK PULSE AND DELAY
3: Excitation with Delay (P22)
1:
1
EX Card
2:
2
EX Chan
3:
1
Delay w/EX
(units=.01
sec)
4:
1
Delay after
EX (units =
.01 sec)
5: 5000
mV
Excitation
4: User Specified Measurement
Instruction
;END MEASUREMENT
;LOOP
5: End (P95)
;DEACTIVATE
;MULTIPLEXER
6: Set Port (P20)
1:
0
Set low
2:
1
Port
Number
4: User Specified Measurement
Instruction
;END MEASUREMENT
;LOOP
5: End (P95)
;DEACTIVATE
;MULTIPLEXER
6: Set Port (P20)
1:
0
Set low
2:
1
EX Card
3:
1
Port No.
1
01:
60
Table 1
Programs
Sec.
Execution
Interval
;ACTIVATE MULTIPLEXER
1: Do (P86)
1:
41
Set high
Port 1
;BEGIN MEASUREMENT
;LOOP
2: Beginning of Loop (P87)
1:
0
Delay
2:
16
Loop Count
;CLOCK PULSE
3: Do (P86)
1:
72
Pulse Port
2
;DELAY
4: Excitation with Delay (P22)
1:
1
EX Chan
2:
0
Delay w/EX
3:
1
Delay after EX
4:
0
mV
Excitation
5: User Specified Measurement
Instruction
;END MEASUREMENT
;LOOP
6: End (P95)
;DEACTIVATE
;MULTIPLEXER
7: Do (P86)
01: 51
Set low
Port 1
FIGURE 8. Example “4x16” Mode Program Loops for CR23X, CR10(X), 21X and CR7 Loggers
21
AM16/32B Relay Analog Multiplexer
EXAMPLE “2x32” MODE PROGRAMS - GENERALIZED PROGRAM LOOPS FOR THE
CR23X, 21X, CR10(X), AND CR7.
21X SAMPLE PROGRAM
*
1
Table 1
Programs
01:
60
Sec.
Execution
Interval
CR7 SAMPLE PROGRAM
*
1
Table 1
Programs
01:
60
Sec.
Execution
Interval
;ACTIVATE MULTIPLEXER
1: Set Port (P20)
1:
1
Set high
2:
1
Port
Number
;ACTIVATE MULTIPLEXER
1: Set Port (P20)
1:
1
Set high
2:
1
EX Card
3:
1
Port No.
;BEGIN MEASUREMENT
;LOOP
2: Beginning of Loop (P87)
1:
0
Delay
2:
32
Loop Count
;BEGIN MEASUREMENT
;LOOP
2: Beginning of Loop (P87)
1:
0
Delay
2:
32
Loop Count
;BEGIN MEASUREMENT
;LOOP
2: Beginning of Loop (P87)
1:
0
Delay
2:
32
Loop Count
CLOCK PULSE/DELAY
3: Excitation with delay (P22)
1:
1
EX Chan
2:
1
Delay w/EX
(units=
.01 sec)
3:
1
Delay after
EX (units=
.01 sec)
4: 5000
mV
Excitation
;CLOCK PULSE/DELAY
3: Excitation with delay (P22)
1:
1
EX Chan
2:
2
EX Chan
3:
1
Delay w/EX
(units=
.01 sec)
4:
1
Delay after
EX (units =
.01 sec)
5: 5000
mV
Excitation
;CLOCK PULSE
3: Do (P86)
1:
72
Pulse Port 2
4: User Specified Measurement
Instruction
5: User Specified Measurement
Instruction
;END MEASUREMENT
;LOOP
5: End (P95)
;END MEASUREMENT
;LOOP
6: End (P95)
;DEACTIVATE
;MULTIPLEXER
6: Set PortP20
1:
0
Set low
2:
1
EX Card
3:
1
Port No.
;DEACTIVATE
;MULTIPLEXER
7: Do (P86)
1:
51
Set low
Port 1
4: User Specified Measurement
Instruction
;END MEASUREMENT
;LOOP
5: End (P95)
;DEACTIVATE
;MULTIPLEXER
6: Set Port (P20)
1:
0
Set low
2:
1
Port
Number
CR10(X), CR23X SAMPLE
PROGRAM
*
1
Table 1
Programs
01:
60
Sec.
Execution
Interval
;ACTIVATE MULTIPLEXER
1: Do (P86)
1:
41
Set high
Port 1
;DELAY
4: Excitation with Delay (P22)
1:
1
EX Chan
2:
0
Delay w/EX
(units=.01 sec)
3:
1
Delay after EX
(units=.01 sec)
0:
0
mV Excitation
FIGURE 9. Example “2x32” Mode Program Loops for CR23X, CR10(X), 21X and CR7 Loggers
22
AM16/32B Relay Analog Multiplexer
AM16/32B
MODE
AM16/32IN
IN "4X16"
"4X16" MODE
CR23X
MUX POWER SHIELD
GND
SETS 1-10
12V
H1
G
GND
L1
C1
RES
H2
C2
CLK
L2
12V
SETS 11-16
EX 1
COM H1
H1
SE 1
COM L1
L1
SE 2
COM H2
H2
COM L2
L2
MUXSIGNAL
SHIELD
COM
COM
FIGURE 10. Wiring Diagram for Strain Gages and Potentiometers
(CABLE4CBL can be used instead of the MUXPOWER and/or MUXSIGNAL)
#8 Additional Loops - Additional loops may be used if sensors that
require different measurement instructions are connected to the same
multiplexer. In this instance, like sensors are assigned to sequential
input SETS. Each group of sensors is measured in a separate loop
(steps 2 through 7, Table 1). Each loop contains clock and
measurement instructions, and all loops must reside between the
instructions that activate and deactivate the AM16/32B (Steps 1 and 9).
The instruction sequence for control of an AM16/32B is given on the
following page.
5.2.2 Multiple Loop Instruction Sequence
As shown above, the programs for operation of the AM16/32B are
essentially the same for all CSI dataloggers. To measure sensors of
different types, different measurement instructions may be used
within successive program loops. In the following example, each
loop is terminated with Instruction 95, and the multiplexer is not reset
between loops. The example demonstrates the measurement of two
dissimilar sensor types (i.e. strain gages and potentiometers).
The program and accompanying wiring diagram are intended as
examples only; users will find it necessary to modify both for specific
applications.
23
AM16/32B Relay Analog Multiplexer
*1 Table 1 Programs
1: 60
Sec. Execution Interval
;ACTIVATES MULTIPLEXER
1: Do (P86)
1: 41
Set high Port 1
;BEGINS STRAIN GAGE MEASUREMENT LOOP
2: Beginning of Loop (P87)
1: 0
Delay
2: 10
Loop Count
;CLOCK PULSE
3: Do (P86)
1: 72
Pulse Port 2
;DELAY
4: Excitation with Delay (P22)
1: 1
EX Chan
2: 0
Delay w/EX (units=.01sec)
3: 1
Delay after EX (units=.01sec)
4: 0
mV Excitation
;FULL BRIDGE MEASUREMENT INSTRUCTION
5: Full Bridge (P6)
1: 1
Rep
2: 3
50 mV slow Range
3: 1
IN Chan
4: 1
Excite all reps w/Enchain 1
5: 5000
mV Excitation
6: 1-Loc [:STRAIN #1]
7: 1
Mult
8: 0
Offset
;END OF STRAIN GAGE MEASUREMENT LOOP
6: End (P95)
;BEGINNING OF POTENTIOMETER MEASUREMENT LOOP
7: Beginning of Loop (P87)
1: 0
Delay
2: 6
Loop Count
8: Step Loop Index (Extended) (P90)
1: 2
Step
;CLOCK PULSE
9: Do (P86)
1: 72
Pulse Port 2
;DELAY
10: Excitation with Delay (P22)
1: 1
EX Chan
2: 0
Delay w/EX (units=.01sec)
3: 1
Delay after EX (units=.01sec)
4: 0
mV Excitation
24
AM16/32B Relay Analog Multiplexer
;POT. MEASUREMENT INSTRUCTION
11: Excite,Delay,Volt(SE) (P4)
1: 2
Reps
2: 5
5000 mV slow Range
3: 1
IN Chan
4: 2
Excite all reps w/EXchan 2
5: 1
Delay (units .01sec)
6: 5000
mV Excitation
7: 11-Loc [:POT #1 ]
8: 1
Mult
9: 0
Offset
;END POT. MEASUREMENT LOOP
12: End (P95)
;DISABLES MULTIPLEXER
13: Do (P86)
1: 40
Reset Low Port 1
14: End Table 1 (P95)
INPUT LOCATION LABELS:
1:STRAIN #1 13:POT #3
2:STRAIN #2 14:POT #4
3:STRAIN #3 15:POT #5
4:STRAIN #4 16:POT #6
5:STRAIN #5 17:POT #7
6:STRAIN #6 18:POT #8
7:STRAIN #7 19:POT #9
8:STRAIN #8 20:POT #10
9:STRAIN #9 21:POT #11
10:STRAIN#1022:POT #12
11:POT #1
23:_________
12:POT #2
24:_________
5.3 General Programming Considerations
The excitation voltage, integration time, and delay time associated
with measuring the signal, and the speed at which the channels are
advanced can be varied within the datalogger program. In general,
longer delay times are necessary when sensors and datalogger are
separated by longer lead lengths. Consult your datalogger manual for
additional information on these topics.
6. Sensor Hook-up and Measurement Examples
This section covers sensor-to-AM16/32B connections as well as
AM16/32B-to-datalogger connections. The following are examples
only, and should not be construed as the only way to make a
particular measurement. See the Measurement Section of your
datalogger manual for more information on basic bridge
measurements. Most of the following examples do not depict
datalogger-to-AM16/32B control connections (Section 4.1), but their
presence is implied and required. Campbell Scientific recommends
25
AM16/32B Relay Analog Multiplexer
that only sensor shield (drain) wires be connected to AM16/32B
shield terminals labeled (“ ”).
6.1 Single-Ended Analog Measurement without Sensor
Excitation
Sensor to AM16/32B wiring - one single-ended sensor not requiring
excitation can be connected to an input SET with panel mode switch
set to “2x32”.
Multiplexer to Datalogger wiring - The COM signal line is input to a
single-ended analog input channel. The COM signal-ground line is
tied to “ ” at the CR23X, 21X, or CR7, and to “AG” at the
CR10(X). Up to 32 single-ended sensors can be measured by one
single-ended datalogger channel in this manner.
NOTE
Low level single-ended measurements are not
recommended in 21X applications where the 21X's
internal 12VDC supply is used to power the multiplexer
or other peripherals (see Section 4.1.4).
21X/
CR7
CR10(X)
CR23X/CR3000/
CR800/CR850/
5000
CR1000/CR5000
H
H
H
AG
CABLE3CBL
MUXSIGNAL
G
SHIELD
"2 X 32" Mode
COM ODD H
ODD H
(+) SENSOR
COM ODD L
ODD L
(-)
SENSOR SHIELD
COM
AM16/32B
AM16/32
FIGURE 11. Single-ended Measurement without Excitation
21X/
CR7
CR10(X)
CR23X/CR3000/
CR800/CR850/
5000
CR1000/CR5000
H
H
H
L
L
L
G
"4 X 16" Mode
CABLE3CBL
MUXSIGNAL
SHIELD
COM ODD H
ODD H
(+) SENSOR
COM ODD L
ODD L
(-)
SENSOR SHIELD
COM
AM16/32B
AM16/32
FIGURE 12. Differential Measurement without Excitation
26
AM16/32B Relay Analog Multiplexer
6.2 Differential Analog Measurement without Sensor
Excitation
Sensor to Multiplexer wiring - Up to two differential sensors that
don't require excitation may be connected to one input SET with panel
switch set to “4x16” mode. Sensor shields are connected to the input
“ ” terminals.
Multiplexer to Datalogger wiring - The two pairs of COM terminals
(ODD H, ODD L and EVEN H, EVEN L) are connected to two pairs
of differential analog inputs at the datalogger. Observe H to H and L
to L from sensor to multiplexer to analog input. In “4x16” mode up to
32 differential sensors can be measured by two differential datalogger
channels in this way.
With panel switch set to “2x32” mode, one differential input can
measure up to 32 differential sensors in SETs of two with appropriate
programming.
6.3 Half Bridge Measurements
Measurements of this type may be subdivided into three categories
based on completion resistance and the presence or absence of
measured excitation. If the sensor's completion resistor(s) are
installed at the datalogger panel (example: a CSI 107 probe modified
for multiplexer use), then three probes per SET may be excited and
measured in “4x16” mode (Figure 13). However, if the circuit is
completed within the sensor (e.g. potentiometers), then excitation,
wiper signal, and ground must be multiplexed. Because excitation
and ground may be multiplexed in common, up to two sensors per
SET may be measured (Figure 14). If measured excitation is required
(i.e. four wire half-bridge), then only one sensor per SET of four may
be measured (Figure 15).
6.3.1 Half Bridge Measurement with Completion Resistor at
Datalogger
Sensor to Multiplexer wiring - up to three half bridges may be
connected to one input SET in “4x16” mode, provided that the
sensors’ three completion resistors are located at the datalogger
(Figure 13).
Multiplexer to Datalogger wiring - Signal lines from the multiplexer
COM terminals tie to three consecutive single-ended analog input
channels. Three precision completion resistors connect from analog
input channels to analog ground in CR10(X) or to “ ” in the other
dataloggers.
27
AM16/32B Relay Analog Multiplexer
CR23X/
CR800/
CR850/
CR1000
21X/
CR7
CR10(X)
CR3000/
CR5000/
EX
E
E
VX
H
H
H
L
L
H
H
"4 X 16" Mode
0
COM H (ODD)
ODD H
H
COM L
ODD L
L
L
COM H (EVEN)
EVEN H
H
H
COM L
EVEN L
AG
CABLE5CBL
MUXSIGNAL
G
SHIELD
COM
SHIELD
SENSOR SHIELDS
FIGURE 13. Half Bridge (Modified 107 Temperature Probe) Hook-up and Measurement
CR23X/
CR800/
CR850/
CR1000
21X/
CR7
CR10(X)
CR3000/
/
CR5000
EX
E
E
VX
H
H
H
L
L
L
"4 X 16" Mode
0
COM H (ODD)
ODD H
H
COM L
ODD L
L
COM H (EVEN)
EVEN H
COM L
EVEN L
AG
G
CABLE
MUXSIGNAL
SHIELD
COM
SHIELD
SENSOR SHIELDS
FIGURE 14. Potentiometer Hook-up and Measurement
(using CABLE4CBL or MUXSIGNAL cable)
6.3.2 Potentiometer Measurement
Sensor to Multiplexer wiring – if panel switch is set to “4x16” mode,
up to two potentiometers may be connected to one input SET.
Excitation and ground leads may be common; signal leads must be
routed separately (Figure 14).
28
AM16/32B Relay Analog Multiplexer
Multiplexer to Datalogger wiring - Signal lines from two COM
terminals are connected to two consecutive single-ended analog input
channels. One COM terminal is connected to a datalogger switched
excitation channel, and the remaining COM line connects to
datalogger ground. Up to 32 potentiometers may be measured by two
single-ended datalogger channels.
6.3.3 Four Wire Half Bridge (Measured Excitation Current)
Sensor to Multiplexer Wiring - one sensor per input SET. The panel
switch is set to “4x16” mode.
Multiplexer to Datalogger Wiring - One COM line is tied to a
datalogger excitation channel, and two COM lines to a differential
analog input. The remaining COM line is connected to the H side of a
datalogger differential channel along with a fixed resistor. The other
side of the resistor connects to the L side of the differential channel
and to ground (Figure 15). Up to 16 four wire half-bridges may be
measured by two differential datalogger channels in this manner.
CR23X/
CR800/
CR850/
CR1000
21X/
CR7
CR10(X)
CR3000/
/
CR5000
EX
E
E
VX
H
H
H
L
L
L
COM H (ODD)
ODD H
H
COM L
ODD L
L
COM H (EVEN)
EVEN H
COM L
EVEN L
AG
H
H
H
H
L
L
L
L
G
"4 X 16" Mode
0
COM
SHIELD
SENSOR SHIELDS
FIGURE 15. Four Wire Half Bridge Hook-up and Measurement
The CR5000 and CR3000 also have current excitation channels which
allow a resistance measurement. Because the excitation current is
known, it is not necessary to measure the voltage across a fixed
resistor to determine the current as in Figure 15. See Section 5.3 for
an example.
29
AM16/32B Relay Analog Multiplexer
CR23X/
CR800/
CR850/
CR1000
21X/
CR7
CR10(X)
CR3000/
/
CR5000
0
EX
E
E
VX
AG
"4 X 16" Mode
COM H (ODD)
ODD H
COM L
ODD L
H
H
H
H
COM H (EVEN)
EVEN H
L
L
L
L
COM L
EVEN L
G
COM
SHIELD
SENSOR SHIELDS
FIGURE 16. Full Bridge Measurement
6.4 Full Bridge Measurements
Sensor to Multiplexer wiring – With panel switch set to “4x16” mode,
excitation, ground, and the two signal leads may be connected to one
input SET (Figure 16).
Multiplexer to Datalogger wiring - COM terminals are connected to a
datalogger excitation channel, a differential analog input channel, and
an analog ground. Up to sixteen full bridges may be multiplexed
through the AM16/32B.
A problem with making full bridge measurements with this
configuration is that the resistance of the lead wire and multiplexer
relays can cause a voltage drop, reducing the excitation at the bridge.
The following section describes a configuration that compensates for
this by measuring the excitation at the bridge.
6.5 Full Bridges with Excitation Compensation
Sensor to Multiplexer wiring – With panel switch set to ”4x16” mode
you are 2 lines short for a six wire measurement. One solution is to
multiplex the four signal wires through the AM16/32B, but bypass the
AM16/32B with excitation and ground wires. This means that the
sensors will be excited in parallel which causes a higher current drain,
possibly enough to exceed the current available from the datalogger's
excitation channel. Alternatively, the excitation and ground leads can
be multiplexed through an additional AM16/32B allowing the sensors
to be excited one at a time (Figure 17). In this case the 12V, GND,
CLK, and RES lines of the second multiplexer are wired in parallel
with those of the first, effectively widening the multiplexer to “8x16”.
Multiplexer to Datalogger wiring - Four leads from the COM ODD,
EVEN terminals connect to two sequential differential analog
channels in the datalogger. Excitation and ground are multiplexed by
the second AM16/32B. Both multiplexers can be reset and clocked
by the same control ports and/or excitation channels to simplify
programming.
30
AM16/32B Relay Analog Multiplexer
CR23X/
CR800/
CR850/
CR1000
21X/
CR7
CR10(X)
CR3000/
/
CR5000
0
AG
EX
E
E
VX
"4 X 16" Mode
COM H (ODD)
ODD H
COM L
ODD L
"4 X 16" Mode
H
H
H
H
COM H (ODD)
ODD H
L
L
L
L
COM L
ODD L
H
H
H
H
COM H (EVEN)
EVEN H
L
L
L
L
COM L
EVEN L
G
COM
SENSOR SHIELDS
FIGURE 17. Full Bridge Measurement with Excitation Compensation
6.6 Thermocouple Measurement
The datalogger manuals contain thorough discussions of
thermocouple measurement and error analysis. These topics will not
be covered here.
6.6.1 Measurement Considerations
Reference Junction - As shown in Figure 18 and 18, two reference
junction configurations are possible: 1) reference located at the
datalogger or 2) reference at the AM16/32B.
Datalogger Reference - The CR1000, CR800, CR850, CR3000,
CR23X, 21X and the CR7 723-T Analog Input card with RTD have
built-in temperature references. The CR10XTCR Thermocouple
Reference (not standard with CR10X purchase), is installed on the
wiring panel between the two analog input terminal strips.
When the reference junction is located at the datalogger, the signal
wires between the data-logger and the AM16/32B must be of the
same wire type as the thermocouple (Figure 18). The "polarity" of the
thermocouple wires must be maintained on each side of the
multiplexer (e.g. if constantan wire is input to an L terminal, then a
constantan wire should run between the multiplexer's COM ODD L
terminal and the datalogger measurement terminal). Figures 17 and
18 depict type T thermocouple applications, but other thermocouple
types (e.g. E, J, and K) may also be measured and linearized by the
dataloggers.
If thermocouples are measured with respect to the datalogger
reference (i.e. the signal wires between datalogger and AM16/32B are
made of thermocouple wire), then it is not recommended that one
make measurements of any other sensor type through the AM16/32B.
31
AM16/32B Relay Analog Multiplexer
Two problems would arise due to the properties of thermocouple
wire:
An extraneous thermocouple voltage would be added to the nonthermocouple signal at the junction of dissimilar metals (e.g. the
multiplexer COM terminals). The magnitude of this signal would
vary with the temperature difference between the datalogger and the
AM16/32B.
Some thermocouple wires have a greater resistance than copper,
which adds resistance to the non-thermocouple sensor circuit. For
example, constantan is approximately 26 times more resistive than
copper.
21X/
CR7
CR10(X)
CR3000/
CR800/CR850/
/
CR23X/CR1000/
0
CR5000
H
H
H
L
L
L
H
H
H
L
L
L
"4 X 16" Mode
CU
CO
CU
CO
G
COM ODD H
ODD H
COM ODD L
ODD L
COM EVEN H
EVEN H
COM EVEN L
EVEN L
CU
CO
CU
CO
SENSOR SHIELDS
COM
FIGURE 18. Differential Thermocouple Measurement with Reference Junction
at the Datalogger
CR23X/
CR800/
CR850/
CR1000
21X/
CR7
CR10(X)
/
CR3000/
0
CR5000
H
H
H
H
L
L
L
L
EX
H
E
H
E
H
AG
VX
H
H
H
H
H
L
L
L
L
G
"4 X 16" Mode
CU
CU
COM ODD H
ODD H
COM ODD L
ODD L
CO
107
CU
CU
COM EVEN H
EVEN H
COM EVEN L
EVEN L
COM
FIGURE 19. Differential Thermocouple Measurement with Reference Junction
at the AM16/32B
32
CU
CU
CO
SENSOR SHIELDS
AM16/32B Relay Analog Multiplexer
If a mix of TCs and other sensor types are multiplexed through the
AM16/32B, it is generally best to locate the reference junction on the
AM16/32B, as shown in Figure 19.
AM16/32B Reference - An external reference, usually a thermistor,
can be located at the AM16/32B, as shown in Figure 19. This
approach requires an additional single-ended datalogger input to
measure the reference. Position the reference next to the COM
terminals and, when practical, measure the thermocouples on SETs
that are in close proximity to the COM terminals in order to minimize
thermal gradients.
Thermal Gradients - Thermal gradients between the AM16/32B's
sensor input terminals and COM terminals can cause errors in
thermocouple readings. For example, with type T thermocouples, a
one degree gradient between the input terminals and the COM
terminals will result in an approximate one degree measurement error.
Installing the aluminum cover plate (included with AM16/32B) helps
to minimize gradients. For best results the AM16/32B should be
shielded and insulated from all radiant and conducted thermal sources.
When an enclosure is used, gradients resulting from heat conducted
along the thermocouple wire can be minimized by coiling some wire
inside the enclosure. This technique allows heat to largely dissipate
before it reaches the terminals. If the AM16/32B is housed in a field
enclosure, the enclosure should be shielded from solar radiation.
FIGURE 20. AM16/32B Aluminum Cover Plate
6.6.2 Single-ended Thermocouple Measurement
In single-ended thermocouple measurements, the following
precautions must be taken to ensure accurate measurement:
Only shielded thermocouple wire should be used; the sensor shields
should be tied to multiplexer input shield (“ ”) terminals.
33
AM16/32B Relay Analog Multiplexer
Exposed ends of thermocouples measuring soil temperature should be
electrically insulated to prevent differences in ground potential among
the thermocouples from causing errors in the measured temperatures.
AM16/32B panel switch set to “4x16” mode.
Sensor to Multiplexer wiring - up to three thermocouples per SET; the
high side of each thermocouple is input into terminals ODD H,
ODD L, and EVEN H. The low sides of each thermocouple are
multiplexed in common through terminal EVEN L.
Multiplexer to Datalogger wiring - If the reference junction is at the
datalogger, then the wire that connects the COM ODD H, COM ODD
L, and COM EVEN H terminals to the datalogger should be of the
same composition as the high side of the thermocouples. Also, the
wire that connects COM EVEN L to datalogger ground should be of
the same composition as the low side of the thermocouples.
If the reference junction is at the AM16/32B (CSI 107 thermistor,
RTD, etc.), then copper wire should be used to connect COM
terminals to the datalogger.
6.6.3 Differential Thermocouple Measurement
AM16/32B panel switch set to “2x32” mode.
Multiplexer to Datalogger wiring - The wire types here can be
handled in one of two ways. If a reference junction (107 thermistor,
or RTD, etc.) is at the AM16/32B, then one copper wire may be run
between the COM terminals of the multiplexer and the datalogger
input channel.
If the reference junction is at the datalogger, then matching
thermocouple wire should be run between the COM terminals of the
multiplexer and the differential input channel on the datalogger
(observe TC wire polarity).
6.7 Mixed Sensor Types
In applications where sensor types are mixed, multiple hook-up
configurations and programming sequences are possible. Please
consult CSI for application assistance if you need to multiplex
markedly different sensor types in your application.
6.7.1 Mixed Sensor Example: Soil Moisture Blocks and
Thermocouples
AM16/32B panel switch set to “4x16” mode.
In this example, 16 thermocouples and 16 soil moisture blocks will be
multiplexed through the AM16/32B. One thermocouple and one soil
moisture block are input into each SET.
34
AM16/32B Relay Analog Multiplexer
CR10X Example Program – Thermocouple and Soil Block
Measurement
AM16/32B
AM16/32
CR10(X)
G
MUXPOWER
SHIELD
GND
12V
12V
G
GND
C1
RES
C2
CLK
1H
COM
COM
1L
SETS 1-16
ODD H
ODD L
ODD H
ODD L
EX 1
107
2L
SETS 1-16
AG
1K 0.1%
EX 2
COM
EVEN H
EVEN H
COM
EVEN L
EVEN L
2H
AG
G
MUXSIGNAL
SHIELD
COM
FIGURE 21. Thermocouple and Soil Block Measurement for CR10X Example
33 LOCATIONS ALLOCATED TO INPUT STORAGE)
*1
1:
60
Table 1 Programs
Sec. Execution Interval
REFERENCE TEMPERATURE FOR THERMOCOUPLES
1: Temp 107 Probe (P11)
1: 1
Rep
2: 4
IN Chan
3: 1
Excite all reps w/EXchan 1
4: 1
Loc [:REFTEMP ]
5: 1
Mult
6: 0
Offset
ENABLES MULTIPLEXER
2: Do (P86)
1: 41
Set high Port 1
BEGINS MEASUREMENT LOOP
3: Beginning of Loop (P87)
1: 0
Delay
2: 16
Loop Count
35
AM16/32B Relay Analog Multiplexer
CLOCK PULSE
4: Do (P86)
1: 72
Pulse Port 2
5: Excitation with Delay (P22)
1: 1
EX Chan
2: 2
Delay w/EX (units=.01 sec)
3: 0
Delay after EX (units=.01 sec)
4: 1
mV Excitation
5: 0
MEASURES 1 THERMOCOUPLE PER LOOP
6: Thermocouple Temp (DIFF) (P14)
1: 1
Rep
2: 1
2.5 mV slow Range
3: 1
IN Chan
4: 1
Type T (Copper-Constantan)
5: 1
Ref Temp Loc REFTEMP
6: 2-Loc [:TC #1 ]
7: 1
Mult
8: 0
Offset
MEASURES 1 SOIL MOISTURE BLOCK PER LOOP
7: AC Half Bridge (P5)
1: 1
Rep
2: 14
250 mV fast Range
3: 3
IN Chan
4: 2
Excite all reps w/EXchan 2
5: 250
mV Excitation
6: 18-Loc [:SOIL M #1]
7: 1
Mult
8: 0
Offset
ENDS MEASUREMENT LOOP
8: End (P95)
DISABLES MULTIPLEXER
9: Do (P86)
1: 51
Set low Port 1
CALCULATES BRIDGE TRANSFORM ON SOIL MOISTURE BLOCKS
10: BR Transform Rf[X/(1-X)] (P59)
1: 16
Reps
2: 18
Loc [:SOIL M #1]
3: 1
Multiplier (Rf)
11: End Table 1 (P)
INPUT LOCATION LABELS:
1:REFTEMP
2:TC #1
3:TC #2
4:TC #3
5:TC #4
6:TC #5
7:TC #6
8:TC #7
36
19:SOIL M #2
20:SOIL M #3
21:SOIL M #4
22:SOIL M #5
23:SOIL M #6
24:SOIL M #7
25:SOIL M #8
26:SOIL M #9
AM16/32B Relay Analog Multiplexer
9:TC #8
27:SOIL M#10
10:TC #9
28:SOIL M#11
11:TC #10
29:SOIL M#12
12:TC #11
30:SOIL M#13
13:TC #12
31:SOIL M#14
14:TC #13
32:SOIL M#15
15:TC #14
33:SOIL M#16
16:TC #15
34:_________
17:TC #16
35:_________
18:SOIL M #1 36:_________
CR1000 Example Program – Thermocouple and Soil Block
Measurement
'CR1000 Series Datalogger
'Declare Public Variables
Public PTemp, batt_volt, TCTemp(16), Soil(16)
Dim I
'Counter for setting Array element
'Define Data Tables
DataTable (Avg15Min,1,-1)
DataInterval (0,5,Min,10)
Minimum (1,batt_volt,FP2,0,False)
Average (1,PTemp,IEEE4,False)
Average (16,TCTemp(),IEEE4,False)
Average (16,Soil(),IEEE4,False)
EndTable
'Main Program
BeginProg
Scan (1,Sec,0,0)
PanelTemp (PTemp,250)
Battery (Batt_volt)
'Activate Multiplexer Index
PortSet (1 ,1 )
I=0
'Begin Measurement Loop
SubScan (0,Sec,16)
'Clock Pulse and Delay
PortSet (2 ,1 )
'Set port 2 high
Delay (0,20,mSec)
PortSet (2 ,0)
'Increment Index and Measure
I=I+1
TCDiff (TCTemp(I),1,mV2_5C,1,TypeT,PTemp,True ,0,250,1.0,0)
BrHalf (Soil(I),1,mV2500,3,Vx2,1,2500,True ,0,250,1.0,0)
'End Measurement Loop
NextSubScan
37
AM16/32B Relay Analog Multiplexer
'Deactivate Multiplexer
PortSet (1 ,0)
'Call Data Table
CallTable Avg15Min
Next Scan
EndProg
7. General Measurement Considerations
Long lead lengths – Longer sensor-to-AM16/32B leads result in
greater induced and capacitively coupled voltages (cross-talk)
between cable wires. To minimize capacitive effects CSI
recommends the use of cabling having Teflon, polyethylene, or
polypropylene insulation around individual conductors. You should
not use cables with PVC insulation around individual conductors
(PVC cable jacket is acceptable). It may also be necessary to program
a delay within the measurement instruction allowing time for lead
wire capacitances to discharge after advancing a channel, before the
measurement is made. Please consult the theory of operation section
of your datalogger manual for more information.
Earth Ground – The AM16/32B’s ground lug should be connected to
earth ground via an 8 AWG wire. This connection should be as short
as possible. The AM16/32B also connects to earth ground via the
datalogger. The lead wire that connects the datalogger power ground
to the AM16/32B power ground (“GND”) establishes this connection.
The Installation/Maintenance Section of your datalogger manual
contains more information on grounding procedures.
Completion resistors - In some applications it is advantageous to place
completion resistors at the datalogger terminal strips. Certain sensors
specific to the use of multiplexers are available from CSI. Examples
include soil moisture probes and thermistor probes. Please consult
CSI for ordering and pricing information.
Contact degradation - Once excitation in excess of 30 mA has been
multiplexed, that channel’s relay contacts have been rendered
unsuitable for further low voltage measurement. To prevent undue
degradation, it is advisable to reserve certain channels for sensor
excitation and employ other channels for sensor signals.
8. Installation
The standard AM16/32B may be operated in an indoor, noncondensing environment. If condensing humidity is present or if the
possibility exists that the multiplexer might be exposed to liquids, a
water-resistant enclosure is required.
Several enclosures are available for purchase through CSI (models
ENC10/12, ENC12/14, ENC14/16, and ENC16/18). They offer a
degree of protection against dust, spraying water, oil, falling dirt, or
dripping, noncorrosive liquids. These enclosures contain a mounting
38
AM16/32B Relay Analog Multiplexer
plate with 1-inch hole grid suitable for mounting the AM16/32B. The
enclosures have a cable bushing to accommodate the sensor lines.
These standard enclosures are rain-tight, but not water-proof.
The enclosure lids are gasketed. The screws on the outside of the
enclosure should be tightened to form a restrictive seal. In high
humidity environments, user supplied foam, putty, or similar material
helps to reduce the passage of moisture into the enclosure via cable
conduits.
8.1 Mounting Tabs
The AM16/32B has mounting tabs allowing attachment by four
screws. See Figure 22 dimensions.
AM16/32
AM16/32B
11in
in
2.54
2.54cm
cm
3 in
7.62 cm
9 inin
9.4
22.9 cm
23.9
FIGURE 22. Mounting Tab Hole Pattern
U-bolts are provided with enclosure to attach to a 1.25 inch (32 mm)
diameter pipe. An enclosure may also be lag-bolted to a wall or other
flat surface.
8.2 Controlling Humidity
The multiplexer is susceptible to corrosion in high relative humidity.
Desiccant packs are available from CSI and should be used inside the
enclosure to remove water vapor.
CAUTION
Air movement should not be restricted through an
enclosure containing batteries that may produce
explosive or noxious gases (e.g., lead-acid
batteries).
39
AM16/32B Relay Analog Multiplexer
40
Appendix A. AM16/32B Improvements
The AM16/32B replaced the AM16/32A in January 2008. A clocking mode
was added that uses a relay address to go directly to a specific channel. This
reduces power consumption and wear on the relay switches.
The AM16/32A replaced the AM16/32 in October 2006. The AM16/32A’s
improvements over the AM16/32 are better ESD and surge protection, a main
ground lug, and a newer processor.
A-1
This is a blank page.
This is a blank page.
Campbell Scientific Companies
Campbell Scientific, Inc. (CSI)
815 West 1800 North
Logan, Utah 84321
UNITED STATES
www.campbellsci.com
[email protected]
Campbell Scientific Africa Pty. Ltd. (CSAf)
PO Box 2450
Somerset West 7129
SOUTH AFRICA
www.csafrica.co.za
[email protected]
Campbell Scientific Australia Pty. Ltd. (CSA)
PO Box 444
Thuringowa Central
QLD 4812 AUSTRALIA
www.campbellsci.com.au
[email protected]
Campbell Scientific do Brazil Ltda. (CSB)
Rua Luisa Crapsi Orsi, 15 Butantã
CEP: 005543-000 São Paulo SP BRAZIL
www.campbellsci.com.br
[email protected]
Campbell Scientific Canada Corp. (CSC)
11564 - 149th Street NW
Edmonton, Alberta T5M 1W7
CANADA
www.campbellsci.ca
[email protected]
Campbell Scientific Ltd. (CSL)
Campbell Park
80 Hathern Road
Shepshed, Loughborough LE12 9GX
UNITED KINGDOM
www.campbellsci.co.uk
[email protected]
Campbell Scientific Ltd. (France)
Miniparc du Verger - Bat. H
1, rue de Terre Neuve - Les Ulis
91967 COURTABOEUF CEDEX
FRANCE
www.campbellsci.fr
[email protected]
Campbell Scientific Spain, S. L.
Psg. Font 14, local 8
08013 Barcelona
SPAIN
www.campbellsci.es
[email protected]
Please visit www.campbellsci.com to obtain contact information for your local US or International representative.