1
Autofeed
CORDLESS PAINTING SYSTEM
PR9
OPERATING INSTRUCTIONS
Thank you for purchasing the Earlex PR9 Autofeed Paint Roller.
BEFORE USE - PLEASE READ THE SAFETY & OPERATING
INSTRUCTIONS.
Please retain for future reference
SAFETY OPERATING INSTRUCTIONS
l
PLEASE READ BEFORE USE
l
l
l
l
l
l
l
l
l
l
l
Do not operate when paint container is
empty.
l During breaks in painting never allow
the roller to be placed on a surface
lower than the paint level in the
container as this could cause the paint
to siphon out.
l Always wear protective clothing and as
with all decorating, cover furnishings,
carpets etc.
ALWAYS CHECK PAINT
MANUFACTURERS THINNING
INSTRUCTIONS BEFORE
PROCEEDING.
ALWAYS CHECK PAINT
MANUFACTURER’S INSTRUCTIONS
FOR SURFACE PREPARATION.
ENSURE PAINT IS STIRRED
THOROUGHLY BEFORE USE.
Never use corroded or damaged
batteries, do not mix old and new
batteries.
Do not overfill the paint reservoir.
NEVER use any liquids other than those
specified.
Always ensure motor housing is firmly
clipped to container before
commencingwork.
Ensure strap is secure before
commencing work.
NEVER strain, kink or block the delivery
tube in anyway - even when stored.
Keep upright at all times.
Do not remove the lid containing the
motor and pump when in operation.
HAVING FINISHED...
l Ensure all parts are thoroughly cleaned
as instructed in the cleaning guide, and
when replacing roller cover use only the
PRA2 supplied by Earlex.
l Do not allow the motor housing to
become immersed in water as this can
seriously damage the electrical
components. This will VOID your
guarantee.
l Always remove the batteries if the unit
is to be stored or not used for a while.
l Always use genuine Earlex replacement
parts.
PLEASE NOTE
We have done all we can to ensure that used
correctly and according to these instructions,
the Earlex PR9 Autofeed Paint Roller will give
long trouble free service. We accept no
responsibility for damage caused by the use of
incorrect or unsuitable substances, paint or
fluids which have not been thinned correctly or
are unsuitable for the surfaces to which they
are applied, health hazards arising from lack of
ventilation when working in confined spaces,
or failure of the equipment due to inadequate
cleaning of components after use.
If in doubt, always test a small inconspicuous
area
first. Always
read
the
paint
manufacturer’s instructions first.
Neither our guarantee nor the above statement
affect your statutory rights.
ABOUT THE PR9
The PR9 Autofeed Paint Roller is designed to
paint emulsions and water based paints by
providing a continuous feed of paint to the
roller head from the paint container. It is easy
to use and will save you time when painting. It
has a two speed motor to allow you to control
the amount of paint being fed to the roller. The
battery operated system means complete
portability when painting your walls or ceilings.
The kit includes the following:
Motor housing with 3 litre container, 2.4m
delivery tube, paint roller and handle, resting
tray for roller, spares pack, shoulder strap and
tap connector.
The container holds enough paint to cover four
walls of an average size room 3.7m (12’) x
2.7m (9’), without requiring to be refilled.
The PR9 requires four (4) x 1.5 volt (D size)
ordinary or alkaline batteries. Ordinary
batteries will provide you with up to
approximately 12 hours use and alkaline
batteries will provide you with up to
approximately 60 hours use.
IMPORTANT
It is essential to clean the PR9 thoroughly
when you have finished using it. Failure to do
so will result in blockages occurring and void
the guarantee. Also remove the batteries when
not using for long periods of time.
2
OPERATING INSTRUCTIONS
PAINT
Most water based paints and emulsions are
able to be used direct from the can. However
check the paint manufacturers instructions
regarding thinning first. If the paint requires
thinning, dilute with water (usually around
10%) and stir well. Paints will need to be stirred
thoroughly before use in the PR9. However
check the paint manufacturer’s instructions on
stirring first. The paint needs to be stirred
thoroughly to mix the thicker paint which can
settle to the bottom of the can (during transport
and storage) and ensure an even consistency
for the entire contents of the can. A couple of
turns with a screwdriver is not enough to fully
mix the paint, a paint stirrer long enough to
reach the bottom of the paint can, must be
used. The paint should be stirred thoroughly
before any is used for cutting in corners or
edges of the area to be painted. If the paint
cannot be poured from the can immediately
when the can is tipped then the paint will
require thinning. SOLID “GEL” TYPE PAINTS
CANNOT BE USED IN THE PR9. If you have
tried to operate the unit with paint that is too
thick, in addition to thinning the paint, you will
need to remove the filter and clean this
thoroughly before the pump will operate
correctly.
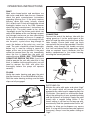
3 ltr
MAX
CONNECTING
Connect the end of the delivery tube with the
spring guard on it to the outlet spout of the
paint unit and the other end to the base of the
roller handle. Ensure both ends are firmly
secured with the hose clips provided. Feed the
shoulder strap through the handle ensuring
that it will not release itself in operation, adjust
strap as required. Insert 4 batteries into the
battery compartment in the motor housing,
ensuring the correct polarities.
Slow
FILLING
Unclip top motor housing and pour the paint
into the container, fill to a MAXIMUM of 3 litres.
Refit the motor housing making sure that both
clips are fully engaged.
HI
OFF
LOW
Fast
SWITCHING ON
Moisten the roller with water and select “high”
on the switch which will ensure the paint is
pumped to the roller head in approximately five
(5) minutes. Once paint has reached the head,
adjust the setting to suit your speed of painting
and the thickness of the paint. Apply the paint
evenly with a smooth rolling action. If the
lowest setting is still too fast to keep up with,
occasionally slide the speed control to the “off”
position, to allow you to disperse any excess
paint. If using with the extension pole (optional
accessory) always have the power setting on
“high”.
3
TAKING A BREAK
If you wish to take a short break, switch to the
“off” position and place the roller into the
resting tray supplied. Ensure the roller is not
lower than the level of the paint in the paint
container to avoid siphoning.
For breaks of up to 24 hours, slide the switch
to the OFF position, place a plastic bag over
the roller head, tying around the bag to ensure
this is airtight. The roller must be kept above
the level of the paint container.
sink or drain and turn the unit on to high speed,
the water pumping through will rinse out the
pump mechanism.
Whilst the water is being pumped through the
motor unit, re-connect the hose to the roller
head, remove the tap connector from the tap
and add some washing up liquid into the water
in the hose. Re-connect the tap connector to
the tap and gently turn on the tap gradually
increasing the pressure to flush the washing up
liquid through the roller head. Allow the tap to
CLEANING
To consistently obtain the best results from
your paint roller, it is essential that all the
components are cleaned thoroughly once
painting is completed. When cleaning the PR9
care must be taken to ensure that the tap
adaptor is held in position to prevent spillage.
As tap designs and water pressure may vary
considerably, it is advisable to turn on the tap
gently and gradually build up the pressure
when using the tap connector to prevent it
being forced off of the tap. Using warm water,
washing up liquid and a brush will speed up the
cleaning of the roller head, paint container and
pump parts by breaking down the paint.
Unclip the top motor housing from the paint
container and empty any remaining paint from
the container back into the paint can. To
recover the unused paint in the hose remove
the hose from the top motor housing and the
roller head. Connect the tap connector to one
end of the hose, ensuring that it is firmly held in
place with one of the hose clips. Hang the
other end of the hose over the paint can, and
push the tap connector onto a tap. Turn on the
tap gently and gradually increase the water
pressure to flush the paint from the hose. Do
not turn the tap to full pressure immediately as
this could force the tap connector off of the tap.
Immediately turn off the tap when the hose is
clear of paint. Once the hose is clean it can be
used to rinse out the paint connector and the
outside of the filter. The end of the hose can be
pinched or partly blocked with a finger or
thumb to create a jet of water which will speed
up cleaning of the interior of the paint
container.
When the paint container is clean, fill it with 3
litres of water and clip the top motor housing
on. Position the unit so that the outlet is over a
run for a few minutes to clear as much paint as
possible from the roller head.
Turn off the tap, remove the roller head from
the hose and dismantle by undoing the screw
in the end of the roller. Remove the roller from
the handle and then remove the end plugs
from the roller cover and remove the roller
core. Wash any remaining paint from the roller
parts in warm soapy water.
Finally when all the water has been pumped
through the motor unit, unclip the top motor
housing from the paint container.
4
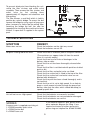
To prevent dried paint from blocking the unit,
unclip the filter strainer and outlet valve
assembly. Then remove the filter strainer and
outlet valve by first rotating them
approximately 45 degrees anti-clockwise and
then pulling.
The filter houses a small ball which is held in
position by a plastic bridge. To access the ball
remove the bridge by using a pair of long nose
pliers, tweezers or similar tool for pulling. After
removing the bridge the ball can now be
tapped out for cleaning. Be careful not to loose
the ball. A spare ball is supplied in the spares
pack.
TROUBLE SHOOTING
SYMPTOM
REMEDY
Motor does not run:
Check the batteries are the right way round.
Check the batteries are not flat.
No paint is being fed to the roller:
Check that there is sufficient paint in the paint container.
(The container can appear to be full from the outsid
when it is actually empty)
Check that there are no kinks or blockages in the
delivery tube or roller.
Check that the unit has been thoroughly cleaned after
last use.
Check that the filter is not blocked with particles of dried
paint or dirt.
Check that the filter and outlet valve are fitted.
Check that the suction ball is fitted in the top of the filter.
Check that the suction ball and outlet valve are not
blocked with dried paint.
Check that the paint has been stirred thoroughly and is
not too thick.
Check that the unit is set to high speed. It can help to
pump a small amount of water through the pump and
delivery tube (not the roller, which should be damp) to
speed up paint flow.
Unit will not run on High speed:
Check that the batteries are correctly installed.
Check that the batteries are not corroded or damaged.
Check that the batteries are not flat.
If you need to replace a part, please refer to
parts explosion diagram for fitting. If you
require assistance or further spare parts
please ring our helpline No. 01483 454666
SPARES
A spares pack is supplied consisting of:
1 x PR28 Assembly outlet valve
1 x PR33 Suction ball
2 x PR40 Foam seal
5
6
7
EC Declaration of Conformity
We declare that the unit: PR9 conform to: 89/336/EEC, EN50082-1
Tim Hopper - Technical Director
OPTIONAL ACCESSORIES
SS100 - 2300W 4.5 ltr steam wallpaper
stripper
PRA1 - A 1.4mtr extension pole which is ideal
for painting hard to reach areas and ceilings.
SS50 - 2000W 4.5 ltr steam wallpaper
stripper
PRA2 - Spare roller cover.
Alternatively the Steama-Plus combines the
versatility of the steam wallpaper stripper with
a selected range of the accessories providing
you with a complete steam cleaning kit and
wallpaper stripper.
A range of steam cleaning accessories are
also available to be used in conjunction with
the steam wallpaper strippers. The
accessories can be used to clean and
rejuvenate carpets, floor tiles, unblock sinks or
waste outlets, clean work surfaces, defrost
fridges and freezers, clean windows and tiles,
remove soiling from upholstery and curtains.
SC165 - 1500W 4.5 ltr steam cleaning kit,
incl. floor cleaner, window/tile cleaner, jet
nozzle cleaner, upholstery cleaner/small
steamplate, large wallpaper stripping plate.
OTHER PRODUCTS FROM
EARLEX
ASG55 - The Super Sprayer electric spray
gun is ideal for spraying wood preservatives,
varnishes, water and oil based paints, enamels
and wood stains.
Earlex also manufacture a wide range of steam
wallpaper strippers. Designed to remove all
types of wallpaper, multi-layered painted
papers and artex.
GUARANTEE
This product is guarantee for a period of 24 months against faulty manufacture or materials. It
is not guaranteed for industrial or hire purposes. This guarantee does not affect your statutory
rights. In the event of any problem occuring please contact us on our Helpline
no.01483 454666
HELPLINE NUMBER: 01483 454666
Earlex Limited ,
Moorfield Road, Slyfield Industrial Estate,
Guildford, Surrey, GU1 1RU, UK
Tel: +44 (0) 1483 454666.
Fax: +44 (0) 1483 454548
website: www.earlex.co.uk email: [email protected]
© Earlex Limited 2004
PR46 04/02
8