1
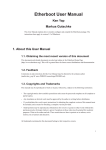
Remote Booting Linux on Intel Processors (CERN Variant)
Concurrent Technologies Plc.
Application Engineering Technical Reference
Remote Booting Linux on Intel Processors
(CERN Variant)
Subject:
Remote booting a Concurrent Technologies Intel based processor board from another
Concurrent Technologies Intel based processor board with Red Hat Linux.
Date:
March 3rd, 2005
Products
Discussed:
VME and CPCI Intel based processor boards with mass storage module (DS MSS/IFP24) or external drives.
Contact Points:
Please contact [email protected] at CERN with any queries regarding this
application note. Please contact [email protected] for any technical queries regarding
the Concurrent Technologies processor boards.
Overview
The Concurrent Technologies VME and CPCI processor boards are designed using standard architecture
based on the Intel Pentium, Pentium II, and Pentium III processors. Our processor boards support many
standard operating systems designed to run on the Intel platforms, including Linux.
This application note outlines a procedure for remote booting a diskless Client with Linux from a Linux
disk based Server over a network. Two network boot methods are described along with several methods of
providing a root file system to the diskless Client.
The procedure discussed in this application note has been performed on the following systems and
combination there of:
1.
Two PP CP2/P3x Pentium III processor boards, one with an external EIDE Hard Drive and
CDROM attached.
2.
Two VP 101/01x Pentium III processor boards, one with an external EIDE Hard Drive and
CDROM attached.
3.
Two VP 110/01x Pentium III processor boards, one with an external EIDE Hard Drive and
CDROM attached.
4.
Two VP 315/02x Pentium M processor board.
And, can be applied to all variants of the product families in the above list.
Materials Used
The installation of a Linux Boot server and Client requires the following materials:
•
•
•
•
One Concurrent Technologies processor board, to be the Server
One or more Concurrent Technologies processor boards, to be the Clients
Concurrent Technologies mass storage module or external drive
IDE CD-ROM (if using external drive)
Concurrent Technologies
Page 1 of 30
Remote Booting Linux on Intel Processors (CERN Variant)
•
•
•
•
Floppy drive
Either Red Hat Linux 7.1, 7.2, 7.3, 8.0, 9.0, RHE3
Network connection between the Client and Server boards
Keyboard, mouse and monitor
Hardware Set-up
Hardware set-up is quite simple. Just plug the Concurrent Technologies processor boards into a chassis. If
using external drives, connect the P2 breakout (if using a VME board) or the transition module (if using a
CPCI board) to the slot corresponding to the Server processor board at the back of the chassis and plug in
the hard drive, CD-ROM, and floppy drive using a ribbon cable.
If using a mass storage module on VME, just slide the mass storage module in next to the Server processor
board and plug a ribbon cable into the back of the chassis connecting the two boards.
Plug in the mouse, keyboard, and monitor and connect both boards to the local network.
Discussion
This application note assumes the client system is self-contained and does not have any external drives
attached. The examples below assume the Server has an IP address of 192.67.84.170, as depicted in the
figure below.
Client
(Remote Boots From Server)
Server
IP=192.67.84.170
Network
Hard Drive
+
Red Hat
Linux
VP 110 01x
VP 315 02x
Figure 1. Schematic overview of system set up.
Installing and Configuring the Linux Server Tools on the Server
1.
If Linux is not already installed on the workstation then install Red Hat Linux; see the
Concurrent Technologies application note entitled “Red Hat Linux 7.1, 7.2, 7.3 and 8.0
Installation” for instructions on how to do this.
2.
Login to the Server as root.
3.
The standard installation of Red Hat Linux will not include the server tools required to
perform a network boot. A few additional tools need to be installed, a DHCP server, a TFTP
server and some Etherboot utilities. At CERN all the rpm packages are available from
“/afs/cern.ch/project/linux/redhat/cern/7.3.1/i386/RedHat/RPMS/”. Type the following in a
shell to set the RPMSHOME environment variable,
•
4.
“declare RPMSHOME=
/afs/cern.ch/project/linux/redhat/cern/7.3.2/i386/RedHat/RPMS/”
To install the TFTP server Type the following commands,
Concurrent Technologies
Page 2 of 30
Remote Booting Linux on Intel Processors (CERN Variant)
•
•
5.
Install the TFTP server,
“rpm -ivh $RPMSHOME/tftp-server-0.28-*.i386.rpm”
While we are here, install some nice utilities that convert files from DOS to Unix format1,
“rpm -ivh $RPMSHOME/dos2unix*.i386.rpm”
To install the DHCP server download the latest server from ftp://ftp.isc.org/isc/dhcp/ and then
download the software to the Red Hat machine and type the following,
•
•
•
•
•
•
“gzip -d dhcp-latest.tar.gz”
“tar -xf dhcp-latest.tar”
“cd dhcp-3.0pl1”
“./configure”
“make”
“make install”
#Uncompress the DHCP server file
#Untar server file, which creates a DHCP directory
#Change into this directory
#Run the configurations script
#Make the server
#Install the server
NOTE: Should the DHCP server report either that CONFIG_PACKET or CONFIG_FILTER
have not been included in the kernel you will need to include these options in the server
kernel and recompile. Select “Network Options” and include “Packet Socket” and “Socket
Filtering” from the kernel configuration menu.
6.
When the Client attempts to perform a network boot it will first call for an IP address. This
request will either be formatted as a BOOTP request in the case of an Etherboot boot or a
DHCP request in the case of a PXE boot. The DHCP server may answer both these requests.
To configure the DHCP server type the following,
•
Create a required empty file,
“echo > /var/state/dhcp/dhcpd.leases”
•
And create the file “/etc/dhcpd.conf” containing the following,
default-lease-time 600;
max-lease-time 7200;
ddns-update-style ad-hoc;
subnet 192.67.84.0 netmask 255.255.255.0
{
host client1
{
hardware ethernet 00:40:9E:00:FF:F0;
fixed-address
192.67.84.171;
server-name
"192.67.84.170";
option host-name "Client1"
option dhcp-message
"192.67.84.170:/home/ClientLocalRootFs/client1/home";
#Checks vendor class for a PXE Client.
if substring (option vendor-class-identifier,
0, 9) = "PXEClient"
{
filename "pxelinux.0";
}
else
{
filename "LinuxBootImage.nbi";
1
This utility will already be installed on a CERN workstation.
Concurrent Technologies
Page 3 of 30
Remote Booting Linux on Intel Processors (CERN Variant)
}
}
host client2
{
hardware ethernet 00:40:9E:00:FF:F1;
fixed-address
192.67.84.172;
server-name
"192.67.84.170";
option host-name "Client2"
option dhcp-message
"192.67.84.170:/home/ClientLocalRootFs/client2/home";
#Checks vendor class for a PXE Client.
if substring (option vendor-class-identifier,
0, 9) = "PXEClient"
{
filename "pxelinux.0";
}
else
{
filename "LinuxBootImage.nbi";
}
}
}
•
To have the DHCP server start automatically next time the system boots edit the
“/etc/rc.d/rc.local” file and include “dhcpd” in the last line of the file.
The “dhcpd.conf” file above assigns a unique IP address to each client based on the clients
Ethernet, or MAC address. In this case the Client1 will be served an IP address of
192.67.84.171 for network boot purposes and told that the server serving its boot image is
192.67.84.170 and its boot image name is “LinuxBootImage.nbi”. The option statements
provide additional information to a DHCP client, and will be explained and used later.
7.
By default the Red Hat firewall is configured to deny DHCP packets. However, the firewall
may be configured to allow DHCP packets and NFS packets, see the “ipchains” and or the
“iptables” manual for how to configure the firewall. For the purposes of this application note
we assume the firewall is correctly configured or disabled. To disable the firewall type the
following,
•
•
“chkconfig ipchains off”
“chkconfig iptables off”
To enable the firewall at boot time again type, “chkconfig ipchains on” and or “chkconfig
iptables on”
2
8.
In addition to the IP address returned to the Client by the DHCP server, the DHCP server will
also inform the Client the name and location of its boot image. The boot process on the Client
uses this information to request its boot file via TFTP; a TFTP server answers this request.
To enable the TFTP server edit the “/etc/xinetd.d/tftp” file so that the “disable = yes” option
reads “disable = no”. Create the default TFTP working directory “mkdir /tftpboot”
9.
An NFS server will be required for the NFS examples later in the application note. To install
follow these commands2,
The NFS server will already be installed on a CERN workstation
Concurrent Technologies
Page 4 of 30
Remote Booting Linux on Intel Processors (CERN Variant)
•
•
10.
Install the NFS utilities,
“rpm –ivh $RPMSHOME/nfs-utils-0.3.3-*.i386.rpm”
To have the NFS start on boot type “chkconfig nfs on”.
Create the NFS exports file “/etc/exports” with the following lines,
/tftpboot/192.67.84.171
/home
/usr
*(rw,no_root_squash)
*(rw,no_root_squash)
*(ro,no_root_squash)
NOTE1: This informs the NFS server the directories that maybe accessed using NFS, the *
option informs the NFS server that anyone may access these directories. For security reasons,
this should never be done in practice. Please read the Linux NFS manuals for more details
about the NFS server.
NOTE2: It has been noticed that the NFS server supplied with Red Hat may not behave as
expected when first run. If you experience problems with NFS, i.e. unable to mount exported
NFS directories it maybe that the NFS server has stopped responding, in which case the server
needs to be restarted, to do this type,
“service nfs restart”
11.
Installing
the
Etherboot
utilities.
Download
the
“mknbi”
utility
from
http://sourceforge.net/projects/etherboot Choose to download the RPM version. Download
the RPM to the Red Hat Server machine and type,
•
12.
If any [FAILED] response is given, then NFS was broken!
“rpm -ivh mknbi-1.4.4-1.noarch.rpm”
#Installs the MKNBI utilities
Installing the PXE utilities. In this application note we have chosen to use the SysLinux PXE
boot
loader.
Download
the
latest
SysLinux
source
code
from
http://www.kernel.org/pub/linux/utils/boot/syslinux/ and copy it to the root directory on the
Red Hat Server machine. The “nasm” compiler is required to compile SysLinux, the latest
RPM binary version can by obtained from http://sourceforge.net/projects/nasm Copy this to
the root directory on the Red Hat Server machine. Type the following:
•
•
•
•
•
•
“ cd /root”
“rpm -ivh nasm-0.98.38-1.i386.rpm”
# Install the NASM compiler
“gzip -d syslinux-2.11.tar.gz”
“tar -xf syslinux-2.11.tar”
“cd syslinux-2.11”
Edit the file “pxelinux.asm” and search for the following lines,
;
; Initialize screen (if we're using one)
;
•
And add the following two lines immediately after semicolon, and save the file,
mov ax,0003h
int 10h
13.
; Set video mode to text 80x25 16 colours
; And clear the screen
•
“make clean”
•
“make pxelinux.0”
# Make the patched PXE boot loader
Copy the PXE boot loader from the syslinux directory to /tftpboot,
Concurrent Technologies
Page 5 of 30
Remote Booting Linux on Intel Processors (CERN Variant)
•
14.
“cp /root/syslinux-2.11/pxelinux.0 /tftpboot”
The Syslinux boot loader will look for a client’s configuration file in the
“/tftpboot/pxelinux.cfg” directory. The LILO style configuration file tells the boot loader,
among other things, where the client’s kernel, and root file system file, if any, is located. A
client’s configuration file name is derived from the client’s IP address, by converting the dot
decimal IP address to its hex equivalent, in this case 192.67.84.171 is the dot decimal address
that converts to 192=C0h, 67=43h, 84=54h and 171=ABh giving the file name C04354AB.
The file name for 192.67.84.172 will be C04354AC. Please read the Syslinux documentation
in “/usr/doc/syslinux-1.72” for further information.
NOTE: As a convenience the following script file will perform the above conversion
automatically, cut and past the following into the file “/usr/bin/dotIP2hex” and “chmod 755
/usr/bin/dotIP2hex”
#!/bin/sh
if [ $# != 1 ]
then
echo Usage: $0 '< IP number in dotted decimal notation i.e. 192.168.0.1'>'
exit 1
fi
echo $1 | awk -F "." '{printf("HexIP=0x%02X%02X%02X%02X\n", $1, $2, $3, $4)}'
15.
Create a PXE configuration directory and client configuration file,
•
•
“mkdir /tftpboot/pxelinux.cfg”
Cut And Paste the following and save to the files “/tftpboot/pxelinux.cfg/C04354AB” and
“/tftpboot/pxelinux.cfg/C04354AC”
PROMPT 1
TIMEOUT 100
DEFAULT linux
LABEL linux
KERNEL bzImage
APPEND initrd=rootfs.gz root=/dev/ram rw
16.
All the server tools and boot image utilities have now been installed and are ready for use.
Reboot. The DHCP, TFTP, and NFS servers will start automatically.
Configuring the Client Kernel
This section outlines the kernel options that are required to make the Client kernel suitable for network
booting.
1.
The source for the kernel in not installed as standard, type the following commands to install the
kernel,
•
Install the kernel source,
“rpm -ivh $RPMSHOME/kernel-source-2.4.*.i386.rpm”
Concurrent Technologies
Page 6 of 30
Remote Booting Linux on Intel Processors (CERN Variant)
2.
Next we configure a basic kernel for the client based on the default settings,
•
•
•
•
•
Change in to the Linux source directory,
“cd /usr/src/linux-2.4”
Ensure the source tree is clean,
“make mrproper”
Edit
the
Makefile
and
change
the
EXTRAVERSION
=
<xx>
to
“EXTRAVERSION=<xx>Client”, where the <xx> is the original content, if any.
Cut and Paste the client kernel configuration file at the end of this document and save it to the
file “/usr/src/kernel-2.4/.config”, ensure that the file is in Unix format by typing “dos2unix
/usr/src/kernel-2.4/.config”
The kernel configuration file you have just copied and will use to compile the Client kernel
has some features enabled to allow the kernel to be used on a diskless client. These features
are described below.
• Module support has been removed from the kernel. Select “Loadable module
support” and exclude the “Enable loadable module support” option.
• IP autoconfiguration options have been enabled, allowing the kernel to auto
configure the network adapters IP address. Select “Networking options” and include
the “IP: Kernel level autoconfiguration” option into the kernel and also the “IP:
DHCP support” option into the kernel.
• Root file system NFS options have been enabled. Select “File systems” and then
“Network file systems” and include the “NFS file system support” option and the
“Root file system on NFS” option that appears below the “NFS file system support”
option. If the “NFS file system support” option is already included and you do not
see the “Root file system on NFS” option below then exclude and then include the
“NFS file system support” option and it should appear.
• RamDisk support has been configured. For the purposes of this application note a
64MB RamDisk is used. Select “Block Devices” and include the “RAM disk
support” option and the “Initial RAM disk (initrd) support” option into the kernel.
Type 65536 under the “RAM disk support” option to create support for a RAM disk
of 64MB.
• Network device support has been configured. Select “Network device support” and
include “Network device support”. Select the “Ethernet (10 or 100Mbit)” and
include the “Ethernet (10 or 100Mbit” option scroll down the list and include the
“EISA, VLB, PCI and on board controllers” option and below this the “DECchip
Tulip (dc21x4x) PCI support” and the “EtherExpressPro/100 support” options.
There are many options in the “Network device support” section included by default,
exclude all other options in this section not mentioned here, remembering to follow
and exclude all the options found under the “--->” headers as well.
• Serial console support has been configured. Select “Character Devices” and include
the “Standard/generic serial support” and then the “Support for console on serial
port”. This option provides support for boards that do not have a graphics device.
With this option set console output maybe received by a terminal through the serial
port.
• The Client kernel may also be optimised as a diskless system by turning off things
that the diskless client doesn’t need, IDE, SCSI, and support for various file systems,
for example.
3.
Compiling the client kernel. Update the configuration file by typing “make oldconfig”, if
prompted simply press return to except the default option. Make the dependencies by typing
“make dep”. When the operation has finished we are ready to make the client kernel, type “make
bzImage” to do this. Now we make any modules that have been included, type “make modules”,
and when the operation has finished install them, type “make modules_install”.
4.
When compilation has finished copy the client kernel bzImage to the netboot directory,
Concurrent Technologies
Page 7 of 30
Remote Booting Linux on Intel Processors (CERN Variant)
“mkdir /root/netboot”
“cp /usr/src/linux/arch/i386/boot/bzImage /root/netboot”
Configuring the root File System and Performing the Network Boot
As well as a kernel, the Client also needs a root file system. There are several ways of serving up a root file
system to the Client, we discuss three possibilities below and show how the kernel and root file system are
put together to perform a network boot using Etherboot.
NFS Only
1.
Perhaps the most flexible method for serving a root file system to a diskless client is with
NFS. To create a root file system on the Server that NFS will serve up to the Client, Cut and
Paste the script below, save it to “/usr/bin/mknfsfs”, and type,
•
•
•
“dos2unix /bin/mknfsfs”
“chmod 755 /bin/mknfsfs”
“mknfsfs 192.67.84.171”
#Ensure the file is in Unix format
#Make the file executable
#Creates a root file system in the /tftpboot directory
#!/bin/sh
if [ $# != 1 ]
then
echo Usage: $0 client-IP-addr
exit 1
fi
cd /
umask 022
echo -n Making Root File System template for $1.
mkdir -p /tftpboot/$1
# Just make these ones
for d in home mnt proc tmp usr root boot
do
mkdir /tftpboot/$1/$d
echo -n .
done
chmod 1777 /tftpboot/$1/tmp
touch /tftpboot/$1/fastboot
chattr +i /tftpboot/$1/fastboot
# Copy these ones
for d in bin lib sbin dev etc var usr/sbin
do
cp -a $d /tftpboot/$1/$d
echo -n .
done
Concurrent Technologies
Page 8 of 30
Remote Booting Linux on Intel Processors (CERN Variant)
# Remove any modules in /tftpboot/$1/lib/modules
# We don't need them in our example
rm -rf /tftpboot/$1/lib/modules/*
echo -n .
# Next two steps are necessary to make the rfs fit into
# the 64MB RamDisk, as used in the NFS+RamDisk rfs example
# later.
# Empty out all the files in var
for d in `find /tftpboot/$1/var/`
do
if [ -f $d ]
then
rm -f $d
fi
done
# Strip down the libraries
for f in `find /tftpboot/$1/lib/ -type f`; do
strip $f -o $f
chmod 755 $f
done
echo -n .
# Make a basic /tftpboot/$1/usr/lib directory
mkdir /tftpboot/$1/usr/lib
cp -a /usr/lib/libglib* /tftpboot/$1/usr/lib
cp -a /usr/lib/libtermcap.so /tftpboot/$1/usr/lib
cp -a /usr/lib/libuuid.so /tftpboot/$1/usr/lib
cp -a /usr/lib/libext2fs.so /tftpboot/$1/usr/lib
cp -a /usr/lib/libpopt* /tftpboot/$1/usr/lib
cp -a /usr/lib/libnewt* /tftpboot/$1/usr/lib
cp -a /usr/lib/libslang* /tftpboot/$1/usr/lib
cp -a /usr/lib/libz* /tftpboot/$1/usr/lib
cp -a /lib/libacl* /tftpboot/$1/lib
cp -a /lib/libattr* /tftpboot/$1/lib
echo -n .
# Make a basic /tftpboot/$1/usr/bin directory
mkdir /tftpboot/$1/usr/bin
cp -a /usr/bin/id /tftpboot/$1/usr/bin
cp -a /usr/bin/dircolors /tftpboot/$1/usr/bin
# Copy the kernel.h file
cp /boot/kernel.h /tftpboot/$1/boot
echo -n .
# Remove these services from rc3.d
for d in 80 60 54 28
do
if [ -e /tftpboot/$1/etc/rc.d/rc3.d/S$d* ]
then
rm /tftpboot/$1/etc/rc.d/rc3.d/S$d*
fi
echo -n .
Concurrent Technologies
Page 9 of 30
Remote Booting Linux on Intel Processors (CERN Variant)
done
echo Done.
2.
Now modify the lines in the following files,
Edit “/tftpboot/192.67.84.171/etc/sysconfig/network”
NETWORKING=yes
HOSTNAME=”LinuxClient”
Edit “/tftpboot/192.67.84.171/etc/sysconfig/network-scripts/ifcfg-eth0”
…
IPADDR=192.67.84.171
…
Edit “/tftpboot/192.67.84.171/etc/fstab” to look like this,
192.67.84.170:/tftpboot/192.67.84.171
192.67.84.170:/home
none
none
/
/home
/proc
/dev/pts
nfs
nfs
proc
devpts
defaults
defaults
defaults
gid=5,mode=620
11
00
00
00
Edit the “initdefault” line in “/tftpboot/192.67.84.171/etc/inittab” to read,
id:3:initdefault:
3.
The “/tftpboot/192.67.84.171” directory now contains the file system for the Client. The next
step is to create an Etherboot boot image to boot the Client.
How to create an Etherboot Image
•
•
•
•
“cd /root/netboot”
Type either “mknbi-linux --rootdir=/tftpboot/192.67.84.171 --ip=rom bzImage >
LinuxBootImage.nbi”
Or if you are using a board without a VGA adapter, or simply wish to use a serial console
then type this command instead, “mknbi-linux --rootdir=/tftpboot/192.67.84.171 -append=”console=ttyS0,9600” --ip=rom bzImage > LinuxBootImage.nbi”
Copy the image to the TFTP directorty “cp LinuxBootImage.nbi /tftpboot”
How to create a PXE Image
•
•
•
•
•
Change the APPEND line in the files “/tftpboot/pxelinux.cfg/C04354AB”,
“/tftpboot/pxelinux.cfg/C04354AC” to read “APPEND ip=rom or if you are using a
board without a VGA adapter, or simply wish to use a serial console then use “APPEND
console=ttyS0,9600 ip=rom”
“cp /root/netboot/bzImage /tftpboot”
“echo > /tftpboot/rootfs.gz”
“mknod /dev/boot255 c 0 255”
“rdev /tftpboot/bzImage /dev/boot255”
NOTE: If using a VP 31x/02x replace ttys0 with ttys2 in the above to specify the serial port
located on the processor board’s front panel.
Concurrent Technologies
Page 10 of 30
Remote Booting Linux on Intel Processors (CERN Variant)
4.
Reboot the client machine. It should execute a BOOTP or DHCP request, TFTP the boot
image, and start the Linux kernel mounting its root file system from the Server with NFS.
RamDisk Only (For Embedded Systems)
1.
If the client needs to be run independently of the network then Linux maybe run entirely from
RAM. In the previous example we saw how the root file system maybe served to the client
via NFS in this section we explain how to serve the root file system from RamDisk. For the
purposes of this application note we will consider the client as an embedded system,
configuring a Linux boot image with a reasonably small footprint to maximise client
resources for our application, whatever that maybe.
2.
To create a root file system template on the Server for the Client RamDisk, Cut and Paste the
script below, save it to “/bin/mkramfs”, and type,
•
•
•
“dos2unix /bin/mkramfs”
“chmod 755 /bin/mkramfs”
“mkramfs RamDiskFs”
#Ensure the file is in Unix format
#Make the file executable
#Creates the file system in the /tftpboot directory
#!/bin/sh
if [ $# != 1 ]
then
echo Usage: $0 client-name
exit 1
fi
cd /
umask 022
echo -n Making Root File System template for $1.
mkdir -p /tftpboot/$1
# Just make these ones
for d in home mnt proc tmp var usr root boot lib etc dev
do
mkdir /tftpboot/$1/$d
echo -n .
done
# And a var
for d in `find /var -type d`
do
d=`echo $d | cut -c2-`
mkdir /tftpboot/$1/$d
done
echo -n .
chmod 1777 /tftpboot/$1/tmp
# Stop kernel reporting fsck mount errors
touch /tftpboot/$1/fastboot
chattr +i /tftpboot/$1/fastboot
# Copy some important libraries
Concurrent Technologies
Page 11 of 30
Remote Booting Linux on Intel Processors (CERN Variant)
cp -a /lib/ld* /tftpboot/$1/lib
cp -a /lib/libc-2* /tftpboot/$1/lib
cp -a /lib/libc.so* /tftpboot/$1/lib
echo -n .
# Strip down the libraries
for f in `find /tftpboot/$1/lib/ -type f`; do
strip $f -o $f
chmod 755 $f
done
echo -n .
# Make the library .conf files
ldconfig -r /tftpboot/$1 >& /dev/null
# Copy the kernel.h file
cp /boot/kernel.h /tftpboot/$1/boot
echo -n .
cd /tftpboot/$1/dev
# Make some devices
# Single devs
mknod console c 5 1
mknod full c 1 7
mknod kmem c 1 2
mknod mem c 1 1
mknod null c 1 3
mknod port c 1 4
mknod random c 1 8
mknod urandom c 1 9
mknod zero c 1 5
mknod psaux c 10 1
ln -s psaux mouse
ln -s /proc/kcore core
echo -n .
# Ram devs
for i in `seq 0 9`; do
mknod ram$i b 1 $i
done
ln -s ram1 ram
echo -n .
# tty's
mknod tty c 5 0
for i in `seq 0 9`; do
mknod tty$i c 4 $i
done
echo -n .
# Serial tty
mknod ttyS0 c 4 64
mknod ttyS1 c 4 65
mknod ttyS2 c 4 66
mknod ttyS3 c 4 67
Concurrent Technologies
Page 12 of 30
Remote Booting Linux on Intel Processors (CERN Variant)
mknod ttyS4 c 4 68
echo Done.
3.
Creating the binary directories. Instead of the using the standard binary files in our RamDisk,
as we did for the NFS example above, we will use a set of binaries that have been optimised
for embedded systems. The standard set of binaries will occupy a good few megabytes of
disk space. However, the optimised versions will occupy a mere few hundred kilobytes.
•
•
Download the latest version of BusyBox from http://www.busybox.net The BusyBox
program contains the BusyBox binary that implements many of the standard binaries,
optimised on space and functionality, but still providing a very useful system.
Copy the BusyBox file to the BusyBox directory and unpack it,
“mkdir /root/BusyBox”
“cd /root/BusyBox”
“cp <path to busybox-0.60.5.tar.gz>/busybox-0.60.5.tar.gz .”
“gzip -d busybox-0.60.5.tar.gz”
#Uncompress the tar file
“tar -xf busybox-0.60.5.tar”
#Un-tar the file
4.
Compile and install the BusyBox functions into the RamDisk directory. The BusyBox
program is configured with a simple “Config.h” file in its root directory. The default setting
provide most of the routine functionality of a Linux system, although the “ifconfig” function
is not included by default and so needs to be included, and also the “Ping” function is not
included by default, which might be useful,
•
•
•
5.
cd “/root/BusyBox/busybox-0.60.5”
In “Config.h”, edit and modify the “//#define BB_IFCONFIG” line to “#define
BB_IFCONFIG”. This will include the ifconfig command into BusyBox. Edit and
modify the “//#define BB_FEATURE_IFCONFIG_STATUS” line to “//#define
BB_FEATURE_IFCONFIG_STATUS”. This will include the ifconfig status features
into BusyBox. . Edit and modify the “//#define BB_FEATURE_MTAB_SUPPORT”
line to “#define BB_FEATURE_MTAB_SUPPORT”. This will include support for
“/etc/mtab”.
Edit and modify the “//#define BB_ROUTE” line to “//#define
BB_ROUTE”. Edit and modify the “//#define BB_PING” line to “#define BB_PING”.
This will include the ping command into BusyBox. Have a look around the “Config.h”
file and customise as necessary.
Make and install the BusyBox files into the RamDisk directory,
“make PREFIX=/tftpboot/RamDiskFs install”
Instead of hard-coding the Ethernet configuration in our RamDisk, as we did for the NFS
example above, we will use DHCP client to obtain the details from the DHCP server. This
configuration will allow the same RamDisk to be served to multiple clients. We will use an
optimised DHCP client from BusyBox.
•
•
Download the latest version of BusyBox UDHCP software from http://udhcp.busybox.net
Copy the UDHCP software file to the BusyBox directory and unpack it,
“cd /root/BusyBox”
“cp <path to udhcp-0.9.8.tar.gz>/udhcpd-0.9.8.tar.gz .”
“gzip -d udhcp-0.9.8.tar.gz”
#Uncompress the tar file
“tar -xf udhcp-0.9.8.tar”
#Un-tar the file
6.
Compile and install the UDHCP functions into the RamDisk directory.
Concurrent Technologies
Page 13 of 30
Remote Booting Linux on Intel Processors (CERN Variant)
•
•
•
•
•
•
“cd /root/BusyBox/udhcp-0.9.8”
“make”
#Make the client and server
“cp udhcpc /tftpboot/RamDiskFs/sbin”
#Install the client
“mkdir /tftpboot/RamDiskFs/etc/udhcpc”
#Make client script directory
“cp -a samples/* /tftpboot/RamDiskFs/etc/udhcpc” #Install client scripts
Edit the “exec” line in the file “/tftpboot/RamDiskFs/etc/udhcpc/sample.script” to read,
“exec /etc/udhcpc/sample.$1”
•
7.
“chmod 755 /tftpboot/RamDiskFs/etc/udhcpc/sample.script”
The first program the Linux kernel calls is “/sbin/init”. The standard “/sbin/init” function
will look for the “/etc/inittab” script to tell it what actions to perform. This is where the Linux
system configuration files are usually run from, and could readily contain a call to a script that
runs your application, for example. There is a basic “inittab” file in the BusyBox directory
that sets up some terminals after the kernel has booted. Copy the script to the RamDiskFs
directory, “cp /root/BusyBox/busybox-0.60.5/scripts/inittab /tftpboot/RamDiskFs/etc/”. Now
modify the following lines in the “/tftpboot/RamDiskFs/etc/inittab” file,
Add the following lines under the existing :sysinit: line,
::sysinit:/etc/init.d/rcN
::sysinit:/etc/init.d/rcL
Comment out the following two lines,
# tty4::respawn:/sbin/getty 38400 tty5
# tty5::respawn:/sbin/getty 38400 tty6
8.
Three resource files are called from “/tftpboot/RamDiskFs/etc/inittab”. The “rcS” script
mounts the file systems the “rcN” script initialises the network device(s) and the “rcL” script
executes local user command. Creating these files by,
•
•
•
“cd /tftpboot/RamDiskFs/etc/”
“mkdir init.d”
Cut and Paste the following and save it to “/tftpboot/RamDiskFs/etc/init.d/rcS”
#!/bin/sh
# Create the mtab file, and remount file systems
echo -n > /etc/mtab
mount -o remount –t ext2 /dev/ram /
mount -t proc proc /proc
# Start system loggers
klogd
syslogd
# Put any other system initialisation stuff here
•
•
•
“dos2unix /tftpboot/RamDiskFs/etc/init.d/rcS”
“chmod 755 /tftpboot/RamDiskFs/etc/init.d/rcS”
Cut and Paste the following and save it to “/tftpboot/RamDiskFs/etc/init.d/rcN”
#!/bin/sh
ifconfig lo
udhcpc -i eth0 -s /etc/udhcpc/sample.script
Concurrent Technologies
Page 14 of 30
Remote Booting Linux on Intel Processors (CERN Variant)
•
•
•
“dos2unix /tftpboot/RamDiskFs/etc/init.d/rcN”
“chmod 755 /tftpboot/RamDiskFs/etc/init.d/rcN”
Cut and Paste the following and save it to “/tftpboot/RamDiskFs/etc/init.d/rcL”
#!/bin/sh
# This script will be executed after all the other initialisation scripts. You can
put your own initialisation stuff here
•
•
9.
“dos2unix /tftpboot/RamDiskFs/etc/init.d/rcL”
“chmod 755 /tftpboot/RamDiskFs/etc/init.d/rcL”
Edit the “/tftpboot/RamDiskFs/etc/fstab” file to look like this,
/dev/ram
none
none
/
ext2
defaults
11
/proc
proc
defaults
00
/dev/pts devpts gid=5,mode=620 0 0
10. The following few steps converts the file structure created in “/tftpboot/RamDiskFs” into a
RamDisk file for booting. Create an empty file system file,
•
•
•
•
•
•
“cd /root/netboot”
“dd if=/dev/zero of=rootfs bs=1k count=65536”
“losetup /dev/loop0 rootfs”
“mkfs.ext2 -F -i 2000 rootfs”
“mkdir /mnt/loop”
“mount –o loop rootfs /mnt/loop”
#Initialises the file system to zero
#Attach rootfs to the loop device
#Create an EXT2 file system
#Make a mount directory
#Mount the rootfs file system file
11. Transfer the root file system created above into the mounted “rootfs” file system file,
•
“cp -a /tftpboot/RamDiskFs/* /mnt/loop”
12. Detach the root file system file,
•
•
“umount /mnt/loop”
“losetup -d /dev/loop0“
13. Compress the root file system file,
•
•
“cd /root/netboot”
“gzip –9 rootfs“
14. The “rootfs.gz” file now contains a compressed root file system for the Client. The next step
is to create an Etherboot boot image to boot the Client.
How to create an Etherboot Image
•
•
•
Type either “mknbi-linux --rootdir=/dev/ram bzImage rootfs.gz > LinuxBootImage.nbi”
Or if you are using a board without a VGA adapter, or simply wish to use a serial console
then type this command instead, “mknbi-linux --rootdir=/dev/ram -append=”console=ttyS0,9600” bzImage rootfs.gz > LinuxBootImage.nbi”
Copy the image to the TFTP directorty “cp LinuxBootImage.nbi /tftpboot”
Concurrent Technologies
Page 15 of 30
Remote Booting Linux on Intel Processors (CERN Variant)
How to create a PXE Image
•
•
•
Ensure the PXELINUX configuration files “/tftpboot/pxelinux.cfg/C04354AB” and
“/tftpboot/pxelinux.cfg/C04354AB” have the correct “APPEND initrd=rootfs.gz
root=/dev/ram rw” statement, or if you are using a board without a VGA adapter, or
simply wish to use a serial console then use “APPEND console=ttyS0,9600
initrd=rootfs.gz root=/dev/ram rw”
“cp /root/netboot/bzImage /tftpboot/”
“cp /root/netboot/rootfs.gz /tftpboot/”
NOTE: If using a VP 31x/02x replace ttys0 with ttys2 in the above to specify the serial port
located on the processor board’s front panel.
15. Reboot the Client machine. It should execute a BOOTP or DHCP request, TFTP the boot
image, and start the Linux kernel mounting its root file system from RamDisk. When the
client has finished booting you may remove the network connection and work independently.
16. If you are using a Concurrent Technologies board that has on board flash then you may also
boot the Linux image made in this section from flash. Making the Client board entirely selfcontained. See the “Concurrent Technologies Etherboot Extensions Package” section below.
Ramdisk and NFS
1.
If a network connection will always be present the best system performance will be given by
having the root file system that is divided between both RamDisk and NFS. By having a
small RamDisk contain the most commonly accessed files network traffic is kept to a
minimum, optimising both Client and network response times.
2.
Create a RamDisk file system following steps 2 - 8 in the “RamDisk Only (For Embedded
Systems)” section above. In addition to the BusyBox “Config.h” edits described in step 4,
edit and modify the “//#define BB_FEATURE_NFSMOUNT” line to “#define
BB_FEATURE_NFSMOUNT”. This will include the NFS mount code into BusyBox.
3.
Empty the “/tftpboot/RamDiskFs/usr” directory,
•
•
4.
“cd “/tftpboot/RamDiskFs/usr”
“rm –rf *”
Edit the “/tftpboot/RamDiskFs/etc/fstab” file to look like this,
/dev/ram
192.67.84.170:/usr
192.67.84.170:/home
none
none
/
/usr
/home
/proc
/dev/pts
ext2
defaults
nfs
nfs
proc
defaults
devpts gid=5,mode=620
11
00
00
00
00
The simplified RamDisk file system we have created for this example does not include a port
mapper daemon, and so we need specify “nolock” as an NFS mount option. Moreover, the
BusyBox mount operation only understands type two NFS mounts, and so we need to specify
“nfsvers=2” as an NFS mount option.
5.
Create an empty file system file,
•
“cd /root/netboot”
Concurrent Technologies
Page 16 of 30
Remote Booting Linux on Intel Processors (CERN Variant)
•
•
•
•
•
6.
“umount /mnt/loop”
“losetup -d /dev/loop0“
Compress the root file system file,
•
•
9.
“cp -a /tftpboot/RamDiskFs/* /mnt/loop”
Detach the root file system file,
•
•
8.
Initialises the file system to zero
Attach rootfs to loop device
Create an EXT2 file system
Make a mount directory
Mount the root file system file
Transfer the root file system created in the NFS section above into the mounted root file
system file,
•
7.
“dd if=/dev/zero of=rootfs bs=1k count=65536”
“losetup /dev/loop0 rootfs”
“mkfs.ext2 -F -i 2000 rootfs”
“mkdir /mnt/loop”
“mount –o loop rootfs /mnt/loop”
“cd /root/netboot”
“gzip –9 rootfs“
The “rootfs.gz” file now contains a compressed image of part of the root file system for the
Client and the “fstabs” file informs Linux to mount the other directories via NFS, “/usr” in
this case. The next step is to create an Etherboot boot image to boot the Client.
How to create an Etherboot Image
•
•
•
Type either “mknbi-linux --rootdir=/dev/ram bzImage rootfs.gz > LinuxBootImage.nbi”
Or if you are using a board without a VGA adapter, or simply wish to use a serial console
then
type
this
command
instead,
“mknbi-linux
--rootdir=/dev/ram
-append=”console=ttyS0,9600” bzImage rootfs.gz > LinuxBootImage.nbi”
Copy the image to the TFTP directorty “cp LinuxBootImage.nbi /tftpboot”
How to create a PXE Image
•
•
•
Ensure the PXELINUX configuration files “/tftpboot/pxelinux.cfg/C04354AB” and
“/tftpboot/pxelinux.cfg/C04354AB” have the correct “APPEND initrd=rootfs.gz
root=/dev/ram rw” statement.
“cp /root/netboot/bzImage /tftpboot/”
“cp /root/netboot/rootfs.gz /tftpboot/”
10. Reboot the client machine. It should execute a BOOTP or DHCPD request, TFTP the boot
image, and start the Linux kernel mounting its root file system from RamDisk and mount /usr
and /home from the Server with NFS.
Ramdisk and NFS example for multiple configurable servers and clients
1.
In this example we take the concepts introduced in the above sections and extend them further
into a practical example. Below we describe a system that has one or more Server boards
serving an Etherboot image to one or more Client boards. We describe how a single
Etherboot image can be served to multiple clients, with each client sharing a common NFS
root file system together with its own local root file system, and each client being fully
configurable with its own unique NFS home file system and command scripts. For the
purpose of this example we will consider only one Server in the system, with two Client
boards. The client systems are based entirely on the Red Hat server system and so will share
Concurrent Technologies
Page 17 of 30
Remote Booting Linux on Intel Processors (CERN Variant)
its functionality. First we must prepare the Server by adding and modifying a few files and
directories on the Server.
2.
Replace the NFS exports file “/etc/exports” with the following,
# Exports Global Root and Diskless Clients
# Global file system
/home/ClientCommonRootFs/
*(ro,no_root_squash)
#Diskless Clients
/home/ClientLocalRootFs/client1 *(rw,no_root_squash)
/home/ClientLocalRootFs/client2 *(rw,no_root_squash)
3.
Create the directories on the server where it will serve up the common root file system and the
unique home directories from.
•
•
•
•
•
•
4.
“mkdir /home/ClientCommonRootFs”
#Common root directory for all clients
“mkdir /home/ClientLocalRootFs”
#Root directory for client local roots
“mkdir /home/ClientLocalRootFs/client1/”
#Local root directory for client1
“mkdir /home/ClientLocalRootFs/client2/”
#Local root directory for client2
“mkdir /home/ClientLocalRootFs/client1/home”
#Local home directory for client1
“mkdir /home/ClientLocalRootFs/client2/home”
#Local home directory for client2
When the client boots it will make a DHCP request to configure the network devices and will
use the information in the option fields to configure its root file system. The directory
specified in the “dhcp-message” option will be mounted via NFS as the client’s home
directory. The client will then look in the home directory for various control files, in this
example we use three files to control the client’s configuration.
•
“.custom.rc” This file is an executable shell script file used to run client specific
commands.
Create the file “/home/ClientLocalRootFs/client1/home/.custom.rc”
containing the following,
#!/bin/sh
echo Hello World from `hostname`
•
“chmod 755 /home/ClientLocalRootFs/client1/home/.custom.rc”
•
The “.fstab.global” file has the same syntax as the standard fstab file and contains the
common root directory mounts and where the client should mount them. Create the file
“/home/ClientLocalRootFs/client1/home/.fstab.global” containing the following,
192.67.84.170:/home/ClientCommonRootFs/bin
192.67.84.170:/home/ClientCommonRootFs/lib
192.67.84.170:/home/ClientCommonRootFs/usr
192.67.84.170:/home/ClientCommonRootFs/sbin
•
/bin
/lib
/usr
/sbin
nfs ro,nolock 0 0
nfs ro,nolock 0 0
nfs ro,nolock 0 0
nfs ro,nolock 0 0
The “.fstab.local” file has the same syntax as the standard fstab file and contains the local
root directory mounts and where the client should locally mount them. Create the file
“/home/ClientLocalRootFs/client1/home/.fstab.local” containing the following,
192.67.84.170:/home/ClientLocalRootFs/client1/etc
/etc
nfs rw,lock 0 0
And also the file “/home/ClientLocalRootFs/client2/home/.fstab.local” containing the
following,
Concurrent Technologies
Page 18 of 30
Remote Booting Linux on Intel Processors (CERN Variant)
192.67.84.170:/home/ClientLocalRootFs/client2/etc
5.
/etc
nfs rw,lock 0 0
Upon boot the client will mount the directories specified in the “.fstab.global” and
“.fstab.local” fstab files. The mount points must exist in the RamDisk and any directory in
the existing root file system RamDisk bearing the same name as a mount point will be
mounted over forming the client’s final root file system.
•
Make a basic root file system for the first client
“cp -a /etc/ /home/ClientLocalRootFs/client1/”
NOTE: The /etc directory contains many host specific configurations files, and the local
client copies may need editing to suit the individual client needs.
NOTE: Edit the “initdefault” line in “/home/ClientLocalRootFs/client1/etc/inittab” to
read suite the target, is should read either one of the following
id:3:initdefault: # The client will boot into runlevel 3, giving a text login prompt
OR
Id:5:initdefault: # The client will boot into runlevel 5, giving an X login prompt
NOTE: Once the client has booted runlevel services can be configured using the
“chkconfig” administration utility
•
Make a common root file system for all clients
“cp -a /usr /home/ClientCommonRootFs”
“cp -a /bin /home/ClientCommonRootFs”
“cp -a /lib /home/ClientCommonRootFs”
“cp -a /sbin /home/ClientCommonRootFs”
•
Once the Client is up and running the Client should run the commands in the
“/home/.custom.rc”
script.
Append
the
following
line
to
the
“/home/ClientLocalRootFs/client1/etc/rc.d/rc.local” file
/home/.custom.rc
•
Update the “home/ClientLocalRootFs/client1/etc/sysconfig/network-scripts/ifcfg-eth0”
file to look like,
DEVICE=eth0
BOOTPROTO=
ONBOOT=no
And update the “home/ClientLocalRootFs/client1/etc/sysconfig/network-scripts/ifcfgeth1” file to look like,
DEVICE=eth1
BOOTPROTO=
ONBOOT=no
Concurrent Technologies
Page 19 of 30
Remote Booting Linux on Intel Processors (CERN Variant)
NOTE: The Ram disk built later in this section will configure all network devices. The
above disables the Linux network-script from reconfiguring the network devices and
avoids the possibility of the NFS root file system mount being lost.
•
Edit the CTRL-ALT-DELETE line in “home/ClientLocalRootFs/client1/etc/inittab” to
read,
# Trap CTRL-ALT-DELETE
ca::ctrlaltdel:/sbin/reboot
•
Copy the first client’s “etc” directory to the second,
“cp -a /home/ClientLocalRootFs/client1/etc/ /home/ClientLocalRootFs/client2/”
6.
Cut and Paste the script below, save it to “/home/ClientCommonRootFs/sbin/reboot”
replacing the existing file, and type,
•
•
•
•
“cd /home/ClientCommonRootFs/sbin”
“dos2unix reboot”
#Ensure the file is in Unix format
“chmod 755 reboot”
#Make the file executable
“ln -s halt /home/ClientCommonRootFs/usr/sbin/reboot” #Link to halt ../usr/sbin/reboot
#!/bin/bash
# Sync the file systems
sync
# Then reboot
if [ $# == 0 ]
then
/usr/sbin/reboot -f
else
/usr/sbin/reboot $@
fi
7.
For this example we have chosen not to use BusyBox to build the RamDisk and have used
instead a small set of standard functions. To create a root file system template on the Server
for the Client RamDisk, Cut and Paste the script below, save it to “/bin/mkramfs”, and type,
•
•
•
“dos2unix /bin/mkramfs”
“chmod 755 /bin/mkramfs”
“mkramfs ClientRamDisk”
#Ensure the file is in Unix format
#Make the file executable
#Creates the file system in the /tftpboot directory
#!/bin/sh
if [ $# != 1 ]
then
echo Usage: $0 client-name
exit 1
fi
cd /
umask 022
Concurrent Technologies
Page 20 of 30
Remote Booting Linux on Intel Processors (CERN Variant)
echo -n Making Root File System template for $1.
mkdir -p /tftpboot/$1
# Just make these ones
for d in home mnt proc tmp usr root boot lib etc dev rootfs bin sbin
do
mkdir /tftpboot/$1/$d
echo -n .
done
# And a var
for d in `find /var -type d`
do
d=`echo $d | cut -c2-`
mkdir /tftpboot/$1/$d
done
echo -n .
chmod 1777 /tftpboot/$1/tmp
# Stop kernel reporting fsck mount errors
touch /tftpboot/$1/fastboot
chattr +i /tftpboot/$1/fastboot
# Copy some important /bin files
for f in bash cp echo hostname mount sh cat
do
cp -a /bin/$f /tftpboot/$1/bin
done
for f in wc tail
do
cp -a /usr/bin/$f /tftpboot/$1/bin
done
echo -n .
# Copy some important /sbin files
for f in ifconfig init portmap route
do
cp -a /sbin/$f /tftpboot/$1/sbin
done
echo -n .
# Copy some important libraries
cp -a /lib/ld* /tftpboot/$1/lib
cp -a /lib/libc-2* /tftpboot/$1/lib
cp -a /lib/libc.so* /tftpboot/$1/lib
cp -a /lib/libdl* /tftpboot/$1/lib
cp -a /lib/libterm* /tftpboot/$1/lib
cp -a /lib/libnsl* /tftpboot/$1/lib
cp -a /lib/libm* /tftpboot/$1/lib
cp -a /usr/lib/libwrap* /tftpboot/$1/lib
cp -a /lib/libpthread* /tftpboot/$1/lib
cp -a /lib/librt* /tftpboot/$1/lib
cp -a /lib/libresolv* /tftpboot/$1/lib
cp -a /lib/libnss*dns* /tftpboot/$1/lib
cp -a /lib/libacl* /tftpboot/$1/lib
Concurrent Technologies
Page 21 of 30
Remote Booting Linux on Intel Processors (CERN Variant)
cp -a /lib/libattr* /tftpboot/$1/lib
echo -n .
# Copy the /etc/resolv.conf file
cp -a /etc/resolv.conf /tftpboot/$1/etc
echo -n .
# Strip down the libraries
for f in `find /tftpboot/$1/lib/ -type f`; do
strip $f -o $f
chmod 755 $f
done
echo -n .
# Make the library .conf files
ldconfig -r /tftpboot/$1 >& /dev/null
# Copy the kernel.h file
cp /boot/kernel.h /tftpboot/$1/boot
echo -n .
# Make some devices
cd /tftpboot/$1/dev
# /dev/pts mount point
mkdir pts
# Single devs
mknod console c 5 1
mknod ptmx c 5 2
mknod full c 1 7
mknod kmem c 1 2
mknod mem c 1 1
mknod null c 1 3
mknod port c 1 4
mknod random c 1 8
mknod urandom c 1 9
mknod zero c 1 5
ln -s /proc/self/fd/0 stdin
ln -s /proc/self/fd/1 stdout
ln -s /proc/self/fd/2 stderr
ln -s /proc/kcore core
echo -n .
# Ram devs
for i in `seq 0 9`; do
mknod ram$i b 1 $i
done
ln -s ram1 ram
echo -n .
# tty's
mknod tty c 5 0
for i in `seq 0 9`; do
mknod tty$i c 4 $i
done
Concurrent Technologies
Page 22 of 30
Remote Booting Linux on Intel Processors (CERN Variant)
echo -n .
# Serial tty
mknod ttyS0 c 4 64
mknod ttyS1 c 4 65
mknod ttyS2 c 4 66
mknod ttyS3 c 4 67
mknod ttyS4 c 4 68
echo -n .
# Storage
cp -af /dev/hd[abcd]* /dev/fd0* .
# Set chmod's
chmod 666 * 2&> /dev/null
chmod 600 console
echo Done.
8.
Cut and Paste the following and save to files,
•
Save to “/tftpboot/ClientRamDisk/etc/inittab”
# System initialisation.
si::sysinit:/etc/init.d/rcI
•
Save to “/tftpboot/ClientRamDisk/etc/hosts”
# Do not remove the following line, or various
# programs that require network functionality will fail.
127.0.0.1
localhost
9.
Instead of hard-coding the Ethernet configuration in our RamDisk, as we did for the NFS
example above, we will use DHCP client to obtain the details from the DHCP server. This
configuration will allow the same RamDisk to be served to multiple clients. We will use an
optimised DHCP client from BusyBox.
•
•
Download the latest version of BusyBox UDHCP software from http://udhcp.busybox.net
Copy the UDHCP software file to the BusyBox directory and unpack it,
“mkdir /root/BusyBox”
“cd /root/BusyBox”
“cp <path to udhcp-0.9.8.tar.gz>/udhcpd-0.9.8.tar.gz .”
“gzip -d udhcp-0.9.8.tar.gz”
#Uncompress the tar file
“tar -xf udhcp-0.9.8.tar”
#Un-tar the file
10. Compile and install the UDHCP functions into the RamDisk directory.
•
•
•
•
•
“cd /root/BusyBox/udhcp-0.9.8”
“make”
#Make the client and server
“cp udhcpc /tftpboot/ClientRamDisk/sbin”
#Install the client
“mkdir /tftpboot/ClientRamDisk/etc/udhcpc”
#Make client script directory
“cp -a samples/* /tftpboot/ClientRamDisk/etc/udhcpc”#Install client scripts
Concurrent Technologies
Page 23 of 30
Remote Booting Linux on Intel Processors (CERN Variant)
•
•
Edit the “exec” line in the file “/tftpboot/ClientRamDisk/etc/udhcpc/sample.script” to
read, “exec /etc/udhcpc/sample.$1”
“chmod 755 /tftpboot/ClientRamDiskFs/etc/udhcpc/sample.script”
11. In this example the client hostname and the client home directory information supplied by the
DHCP server will be used to set the client’s hostname, update the “/etc/hosts” file, and mount
the client’s home directory on “/home”.
Append the following lines to the
“/tftpboot/ClientRamDisk/etc/udhcpc/sample.bound” file to perform these operations.
# Add client to hosts file and set hostname
if [ -n "$hostname" ]
then
# Set hostname
/bin/hostname ${hostname}
if [ -n "$domain" ]
then
echo $ip $hostname $hostname.$domain >> /etc/hosts
else
echo $ip $hostname >> /etc/hosts
fi
fi
# Mounting Home File System
if [ -n "$message" ]
then
echo Mounting home directory $message
mount -t nfs -o nolock $message /home
fi
12. After the DHCP client has configured the network interface and mounted the home directory,
the common and local root file systems are mounted. Create the following to perform these
operations.
•
•
“mkdir /tftpboot/ClientRamDisk/etc/init.d”
Cut and Paste the following and save to the file “/tftpboot/ClientRamDisk/etc/init.d/rcI”
#!/bin/sh
# Run /etc/init.d/rcN
/etc/init.d/rcN
# Tell init to reload the /etc/initab file
/sbin/init q
•
•
•
“dos2unix /tftpboot/ClientRamDisk/etc/init.d.d/rcI”
“chmod 755 /tftpboot/ClientRamDisk/etc/init.d/rcI”
Cut and Paste the following and save it to “/tftpboot/ClientRamDisk/etc/init.d/rcN”
#!/bin/sh
mount -t proc proc /proc
mount -o remount -t ext2 /dev/ram /
# Bring up loop device
Concurrent Technologies
Page 24 of 30
Remote Booting Linux on Intel Processors (CERN Variant)
ifconfig lo 127.0.0.1
ifconfig lo up
# Start portmap
/sbin/portmap
# Configure Ethernet port and mount home file system through udhcpd and scipts
for p in 0 1
do
echo udhcpc attempting to configure eth$p
udhcpc -n -i eth$p -s /etc/udhcpc/sample.script 2&> /dev/null
done
# Updating /etc/fstab file system
if [ -f /home/.fstab.global ]
then
echo Updating /etc/fstab with /home/.fstab.global
cat /home/.fstab.global >> /etc/fstab
fi
if [ -f /home/.fstab.local ]
then
echo Updating /etc/fstab with /home/.fstab.local
cat /home/.fstab.local >> /etc/fstab
fi
# Save files before overlaying nfs mounts on the ramdisk
cp /etc/hosts /hosts # Save hosts file
cp /etc/fstab /fstab
# Mount remote filesystems
echo Mounting remote file systems
mount -an
# Restore files
cp /hosts /etc/hosts
cp /fstab /etc/fstab
# Restore /etc/mtab
mt=`cat /proc/mounts | wc -l`;let mt-=2;tail -n $mt /proc/mounts > /etc/mtab
•
•
“dos2unix /tftpboot/ClientRamDisk/etc/init.d/rcN”
“chmod 755 tftpboot/ClientRamDisk/etc/init.d/rcN”
13. Edit the “/tftpboot/ClientRamDisk/etc/fstab” file to look like this,
/dev/ram
none
none
/
/proc
/dev/pts
ext2
proc
devpts
defaults
defaults
gid=5,mode=620
11
00
00
14. Create an empty file system file,
•
•
“cd /root/netboot”
“dd if=/dev/zero of=rootfs bs=1k count=65536”
Concurrent Technologies
Initialises the file system to zero
Page 25 of 30
Remote Booting Linux on Intel Processors (CERN Variant)
•
•
•
•
“losetup /dev/loop0 rootfs”
“mkfs.ext2 -F -i 2000 rootfs”
“mkdir /mnt/loop”
“mount –o loop rootfs /mnt/loop”
Attach rootfs to loop device
Create an EXT2 file system
Make a mount directory
Mount the root file system file
15. Transfer the root file system into the mounted root file system file,
•
“cp -a /tftpboot/ClientRamDisk/* /mnt/loop”
16. Detach the root file system file,
•
•
“umount /mnt/loop”
“losetup -d /dev/loop0“
17. Compress the root file system file,
•
•
“cd /root/netboot”
“gzip –9 rootfs“
18. The “rootfs.gz” file now contains a compressed image of part of the root file system for the
Client. The next step is to create an Etherboot boot image to boot the Client.
How to create an Etherboot image
•
•
•
Type either “mknbi-linux --rootdir=/dev/ram bzImage rootfs.gz > LinuxBootImage.nbi”
Or If you are using a board without a VGA adapter, or simply wish to use a serial console
then
type
this
command
instead,
“mknbi-linux
--rootdir=/dev/ram
-append=”console=ttyS0,9600” bzImage rootfs.gz > LinuxBootImage.nbi”
Copy the image to the TFTP directorty “cp LinuxBootImage.nbi /tftpboot”
How to create a PXE Image
•
•
•
Ensure the PXELINUX configuration files “/tftpboot/pxelinux.cfg/C04354AB” and
“/tftpboot/pxelinux.cfg/C04354AB” have the correct “APPEND initrd=rootfs.gz
root=/dev/ram rw” statement, or if you are using a board without a VGA adapter, or
simply wish to use a serial console then use “APPEND console=ttyS0,9600
initrd=rootfs.gz root=/dev/ram rw”
“cp /root/netboot/bzImage /tftpboot/”
“cp /root/netboot/rootfs.gz /tftpboot/”
NOTE: If using a VP 31x/02x replace ttys0 with ttys2 in the above to specify the serial port
located on the processor board’s front panel.
19. Reboot the client machines. Each client should execute a BOOTP request, TFTP the boot
image, and start the Linux kernel mounting its basic root file system from RamDisk and
mounting /home and other directories via NFS from the server, running the normal Red Hat
interactive service start up scripts and finally running the local commands as described in
each clients “.custom.rc” file.
Concurrent Technologies Etherboot Extensions Package
This software extends the normal remote booting capabilities provided by Etherboot. It allows a
Concurrent Technologies board to be configured to boot an operating system from on-board Flash memory.
The package contains three main files,
Concurrent Technologies
Page 26 of 30
Remote Booting Linux on Intel Processors (CERN Variant)
8254x.img
21143.img
82559er.img
flash.exe
boot image for boards fitted with the 8254x Ethernet controller.
boot image for boards fitted with 21143 Ethernet controller.
boot image for boards fitted with 82559er Ethernet controller.
DOS utility used to program the boot image into Flash memory.
The Concurrent Technologies Etherboot extensions package is available upon request, and we describe its
installation and use here with the “RamDisk Only” example above.
Installation
The Etherboot Extentions software is provided as a boot image file which is programmed into the
first sector of the on-board Flash memory. This may be done as follows:
•
•
•
•
Boot the board using DOS.
Insert the Etherboot Extensions disk into the floppy drive.
Select the appropriate boot image for your board; See above. Consult the board’s manual
if you are unsure which Ethernet controller your board has installed.
Run the flash.exe utility program as follows:
flash -W <boot.img> where <boot.img> is the selected boot image file.
Using Etherboot Extensions
Once the boot image has been programmed into Flash memory, the board should be configured to use
the Flash ROM disk as follows:
•
•
•
•
Re-boot the board and enter the BIOS Setup by pressing the 'F2' key.
When the BIOS Setup screen is displayed select Main Options.
Scroll down the screen and change either the “Flash ROM Disk” option from 'None' to 'Flash
Disk' or the “ROM/RAM Disk (A:)” option from ‘None’ to ‘ROM Disk’
Save Changes and Exit the BIOS Setup.
The board will now re-boot and load the boot image from Flash memory.
First the normal Etherboot messages are displayed along with the board type and Flash device
details. Next the following prompt is displayed:
Boot from (N)etwork Network and (S)ave (D)isk Fl(a)sh (F)loppy or from (L)ocal?
This allows you to select one of the six available options by pressing the ‘n’, ‘s’, ‘d’, ‘a’, ‘f’ or ‘l’
key. If an option is not selected within a short period the default Flash boot is performed.
Each option is described below:
(N)etwork : Performs a remote boot of an operating system via the network.
(S)ave : Performs a remote boot of an operating system via the network and saves the
downloaded image to Flash memory.
(D)isk : Performs a boot of an operating system from Disk
Fl(a)sh : Performs a boot of an operating system from the Flash memory
(F)loppy : Performs a boot of an operating system from Floppy
Concurrent Technologies
Page 27 of 30
Remote Booting Linux on Intel Processors (CERN Variant)
(L)ocal : Boots an operation system image from Flash memory.
•
•
Using the “Ramdisk and NFS example for multiple configurable servers and clients” example
above. Press ‘s’ at the prompt perform to remote boot the “LinuxBootImage.nbi” via the
network and save the download the image to Flash memory.
Once the image has booted, reboot the system, and without pressing any keys, the
“LinuxBootImage.nbi” will now boot from the Flash memory.
Useful Further Reading
Available on the Red Hat Documentation CD,
•
•
•
•
Diskless-HOWTO.pdf
Diskless-root-NFS-HOWTO.pdf
Ramdisk.txt
The Loopback Root Filesystem HOWTO.htm
Available on the Web,
•
http://sourceforge.net/projecs/etherboot Has a wealth of very useful and highly accessible
information on remote booting with Etherboot.
For Further Information
Concurrent Technologies is a world leader in the design and development of high performance computer
products based on Intel and Motorola CPU technology. For information on the most current line of VME,
Compact PCI and Multibus II processor boards contact Concurrent Technologies at one of the locations
listed below, or send an email with your request to [email protected]
Concurrent Technologies Inc.
3840 Packard Road, Suite 130
Ann Arbor, MI 48108
U.S.A
Tel: (734) 971 6309
Fax: (734) 971 6350
Concurrent Technologies Plc.
4 Gilberd Court, Newcomen Way
Colchester, Essex CO4 9WN
U.K.
Tel: (+44) 1206 752626
Fax: (+44) 1206 751116
NOTE:
Information furnished by Concurrent Technologies is believed to be accurate and reliable. However,
Concurrent Technologies assumes no responsibility for any errors contained in this document and makes no
commitment to update or to keep current the information contained in this document. Concurrent
Technologies reserves the right to change specifications at any time without notice.
Concurrent Technologies assumes no responsibility either for the use of this document or for any
infringements of the patent or other rights of third parties which may result from its use. In particular, no
license is either granted or implied under any patent or patent rights belonging to Concurrent Technologies.
All companies and product names are trademarks of their respective companies.
Concurrent Technologies
Page 28 of 30
Remote Booting Linux on Intel Processors (CERN Variant)
Appendix A: Client Kernel Configuration File3
CONFIG_X86=y
CONFIG_UID16=y
CONFIG_MODULES=y
CONFIG_MODVERSIONS=y
CONFIG_KMOD=y
CONFIG_MPENTIUMIII=y
CONFIG_X86_WP_WORKS_OK=y
CONFIG_X86_INVLPG=y
CONFIG_X86_CMPXCHG=y
CONFIG_X86_XADD=y
CONFIG_X86_BSWAP=y
CONFIG_X86_POPAD_OK=y
CONFIG_X86_L1_CACHE_SHIFT=5
CONFIG_RWSEM_XCHGADD_ALGORITHM=y
CONFIG_X86_HAS_TSC=y
CONFIG_X86_GOOD_APIC=y
CONFIG_X86_PGE=y
CONFIG_X86_USE_PPRO_CHECKSUM=y
CONFIG_X86_F00F_WORKS_OK=y
CONFIG_NOHIGHMEM=y
CONFIG_SMP=y
CONFIG_X86_TSC=y
CONFIG_HAVE_DEC_LOCK=y
CONFIG_NET=y
CONFIG_X86_IO_APIC=y
CONFIG_X86_LOCAL_APIC=y
CONFIG_PCI=y
CONFIG_PCI_GOANY=y
CONFIG_PCI_BIOS=y
CONFIG_PCI_DIRECT=y
CONFIG_ISA=y
CONFIG_PCI_NAMES=y
CONFIG_HOTPLUG=y
CONFIG_SYSVIPC=y
CONFIG_SYSCTL=y
CONFIG_KCORE_ELF=y
CONFIG_BINFMT_AOUT=y
CONFIG_BINFMT_ELF=y
CONFIG_BINFMT_MISC=y
CONFIG_PM=y
CONFIG_MTD=y
CONFIG_MTD_PARTITIONS=y
CONFIG_MTD_CONCAT=y
CONFIG_MTD_CHAR=y
CONFIG_MTD_BLOCK=y
CONFIG_MTD_CFI=y
CONFIG_MTD_GEN_PROBE=y
CONFIG_MTD_CFI_ADV_OPTIONS=y
CONFIG_MTD_CFI_NOSWAP=y
CONFIG_MTD_NAND=y
CONFIG_MTD_NAND_IDS=y
CONFIG_PNP=y
CONFIG_ISAPNP=y
CONFIG_BLK_DEV_FD=y
CONFIG_BLK_DEV_RAM=y
CONFIG_BLK_DEV_RAM_SIZE=65536
CONFIG_BLK_DEV_INITRD=y
CONFIG_PACKET=y
CONFIG_UNIX=y
CONFIG_INET=y
CONFIG_IP_MULTICAST=y
CONFIG_IP_PNP=y
CONFIG_IP_PNP_DHCP=y
CONFIG_IDE=y
CONFIG_BLK_DEV_IDE=y
CONFIG_BLK_DEV_IDEDISK=y
CONFIG_IDEDISK_MULTI_MODE=y
CONFIG_IDEDISK_STROKE=y
CONFIG_BLK_DEV_IDECD=y
CONFIG_BLK_DEV_IDEFLOPPY=y
CONFIG_BLK_DEV_IDEPCI=y
CONFIG_IDEPCI_SHARE_IRQ=y
CONFIG_BLK_DEV_IDEDMA_PCI=y
CONFIG_IDEDMA_PCI_AUTO=y
CONFIG_BLK_DEV_IDEDMA=y
CONFIG_BLK_DEV_PIIX=y
CONFIG_BLK_DEV_RZ1000=y
CONFIG_BLK_DEV_SVWKS=y
CONFIG_IDEDMA_AUTO=y
CONFIG_BLK_DEV_IDE_MODES=y
CONFIG_NETDEVICES=y
CONFIG_DUMMY=y
CONFIG_NET_ETHERNET=y
CONFIG_NET_PCI=y
CONFIG_TULIP=y
CONFIG_EEPRO100=y
CONFIG_E1000=y
3
NOTE: CONFIG_BIGPHYS_AREA=y option has been included.
Concurrent Technologies
Page 29 of 30
Remote Booting Linux on Intel Processors (CERN Variant)
CONFIG_E1000_NAPI=y
CONFIG_VT=y
CONFIG_VT_CONSOLE=y
CONFIG_SERIAL=y
CONFIG_SERIAL_CONSOLE=y
CONFIG_UNIX98_PTYS=y
CONFIG_UNIX98_PTY_COUNT=256
CONFIG_MOUSE=y
CONFIG_PSMOUSE=y
CONFIG_WATCHDOG=y
CONFIG_AUTOFS4_FS=y
CONFIG_EXT3_FS=y
CONFIG_JBD=y
CONFIG_FAT_FS=y
CONFIG_MSDOS_FS=y
CONFIG_VFAT_FS=y
CONFIG_RAMFS=y
CONFIG_JFS_FS=y
CONFIG_NTFS_FS=y
CONFIG_PROC_FS=y
CONFIG_DEVPTS_FS=y
CONFIG_EXT2_FS=y
CONFIG_NFS_FS=y
CONFIG_NFS_V3=y
CONFIG_ROOT_NFS=y
CONFIG_NFSD=y
CONFIG_NFSD_V3=y
CONFIG_SUNRPC=y
CONFIG_LOCKD=y
CONFIG_LOCKD_V4=y
CONFIG_MSDOS_PARTITION=y
CONFIG_NLS=y
CONFIG_VGA_CONSOLE=y
CONFIG_BIGPHYS_AREA=y
Concurrent Technologies
Page 30 of 30