1
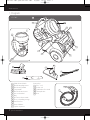
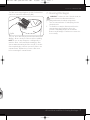
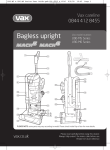
Vax VZL-7061.qxd:Vax VZL-7061
8/4/08
16:55
Page 1
Vax careline
0870 6061248
Vax model number:
VZL-7061
www.vax.co.uk
instruction manual
Bagless cylinder
Please read carefully before using this cleaner.
Always fully extend the mains cable before use.
Retain for future reference.
Vax VZL-7061.qxd:Vax VZL-7061
8/4/08
16:55
Page 2
www.vax.co.uk
1. Diagram
VZL-7061
2
4
3
5
6
1
2
7
8
11
10
9
12
13
15
16
14
1
2
3
4
5
6
7
8
9
10
11
12
Quick release dirtbin
Dirtbin emptying button
Dirt bin carry handle
Carry handle
Dirt bin release button
Auto cord rewind
Plug
Pre-motor release catch
Floor tool parking storage
On/off button
Power indicator
Cyclone separator
2 parts overview
Accessories
13 2-in-1 tool
14 Crevice tool
15 Combination floor head
16 Telescopic tube
17 Hose
17
Vax VZL-7061.qxd:Vax VZL-7061
8/4/08
16:55
Page 3
Vax Careline 0870 606 1248
2. Safety Information
15. Do not vacuum up hard or sharp objects such as
glass, nails, screws, coins, etc.
For Household Use Only
16. Do not use without the filters in place.
When using the vacuum cleaner, basic safety precautions
should always be observed, including the following:
17. Take extra care when vacuuming on stairs.
1.
Only use the vacuum cleaner indoors on dry
surfaces.
19. Store the vacuum cleaner indoors in a cool, dry area.
2.
Turn off the vacuum cleaner controls before
connecting or disconnecting from the mains supply.
3.
Always unplug the vacuum cleaner before
connecting or disconnecting the vacuum hose and
accessories.
4.
Children should be supervised to ensure that they
do not play with the appliance.
5.
This appliance is not intended for use by persons
(including children) with reduced physical, sensory or
mental capabilities, or lack of experience and
knowledge, unless they have been given supervision
or instruction concerning use of the appliance by a
person responsible for their safety.
6.
Use only as described in this manual.
Use only the manufacturer’s recommended
attachments.
7.
Do not use the vacuum cleaner if it has been
dropped, damaged, left outdoors or dropped into
water. Do not use the vacuum cleaner with a
damaged cord or plug. If the supply cord or plug is
damaged, return the vacuum cleaner to a Vax
Authorised Service Agent or suitably qualified
person for examination, repair or adjustment.
8.
Do not pull or carry by the cord. Do not use the cord
as a handle, close a door on the cord or pull the cord
around sharp edges or corners. Do not run the
vacuum cleaner over the cord. Keep the cord away
from heated surfaces.
9.
Do not handle the plug or vacuum cleaner with wet
hands. Do not use outdoors or on wet surfaces.
10. Do not put any objects into openings. Do not use
with any openings blocked and do not restrict air
flow. Keep all openings free of dust, lint, hair or
anything that may reduce airflow.
11. Keep hair, loose clothing, fingers and all parts of the
body away from openings and moving parts.
12. Do not pick up hot coals, cigarette butts, matches or
any hot, smoking or burning objects.
13. Do not pick up flammable or combustible materials
(lighter fluid, petrol, kerosene, etc) or use in the
presence of explosive liquids or vapours.
18. Keep vacuuming area well lit.
20. Turn off the on/off switch before unplugging the
vacuum cleaner.
21. Use only CE-approved 13 amp extension cords. Nonapproved extension cords may overheat. Care should
be taken to arrange the cord so that the cord cannot
be pulled or tripped over.
WARNING: Always switch off and unplug the
vacuum cleaner from the electrical outlet
before assembling, opening or emptying the dirt
container, or before connecting/disconnecting the
attachments.
!
CAUTION: The vacuum cleaner is a very powerful
unit. Before plugging the cord into the electrical
outlet, make sure the switch is in the ‘off’ position. Hold
the vacuum cleaner firmly when starting and in use.
!
IMPORTANT: If the inlet, hose or telescopic tube is
blocked, switch off the vacuum cleaner and
remove the blockage(s) before re-starting the vacuum
cleaner.
!
IMPORTANT: Washing filters improves vacuum
performance. Make sure all the filters are
completely dry before inserting back into the vacuum
cleaner.
!
This vacuum cleaner is intended for household use only
and not for commercial or industrial use.
Motor Thermostat
IMPORTANT: The motor is equipped with a
thermal cut-out. If for any reason, the vacuum
cleaner should over-heat, the thermostat will
automatically turn the unit off. Should this occur,
unplug the vacuum cleaner from the electrical outlet
and turn off the switch. Remove the dirt container
and empty. Clean the filters. Allow the cleaner to cool
for approximately one (1) hour. To re-start, plug into
an electrical outlet and switch back on.
!
14. Do not vacuum up harmful or toxic material (chlorine
bleach, ammonia, drain cleaner, etc).
safety information
3
Vax VZL-7061.qxd:Vax VZL-7061
8/4/08
16:55
Page 4
www.vax.co.uk
3. How to Assemble
4. How to Operate
IMPORTANT: Always unplug the vacuum cleaner
from the electrical outlet before assembling or
removing the accessories.
Cord Release
!
Insert the flexible hose (Fig.3/1) into the inlet on the
main body by pressing the clip on the connector and
releasing until the clip clicks into place.
Fully unwind the power cord. A yellow mark on the power
cord indicates the recommended cord length. Do not
exceed the cord length beyond the red mark.
On/off Button
1.
Insert the plug into the electrical outlet.
2.
Press the on/off switch located on the top of the
vacuum cleaner, to switch on the vacuum cleaner
and press the button again to turn the vacuum
cleaner off.
Carpet Cleaning
For carpet and rug cleaning, press the rocker switch on
the combination floor head to raise the brushes.
Fig.3/1
Push the telescopic extension tube on to the end of the
handle (Fig.3/2).
Hard Floor Cleaning
For hard floor cleaning, press the rocker switch on the
combination floor head to lower the brushes.
Cord Rewind
To rewind the power cord, press the cord rewind button,
located on the top of the vacuum cleaner, and guide the
power cord with one hand. This will prevent the cord from
whipping which could cause damage or injury.
Carry Handle
Fig.3/2
The telescopic tube can be lengthened or shortened by
pushing the button in and sliding the tube apart or
together as required. (Fig.3/3).
Use the small carry handle located on the top of the dirt
bin to move the vacuum cleaner from room to room.
Hose Storage
For convenience there is a parking slot located at the rear
of the vacuum cleaner where the floor tool and hose can
be parked for carrying and storage.
Fig.3/3
Fit the combination floor head by pushing onto the
extension tube. (Fig.3/4).
Fig.3/4
4 assembly / operation
Vax VZL-7061.qxd:Vax VZL-7061
8/4/08
16:55
Page 5
Vax Careline 0870 606 1248
5. Accessories
1.
2.
The accessories can be attached directly to the
handle by removing the telescopic tubes and
pushing in the desired accessory.
The accessories can also be attached to the
telescopic extension tube for extra reach. Remove
the combination floor head and push on the desired
accessory.
2-in1 tool:
Dusting brush: for delicate surfaces
Upholstery tool: for carpet, upholstery and stairs etc.
Crevice tool: for crevices, corners and cracks, etc.
6. Dirt Container & Filters:
Removal & Replacement
!
IMPORTANT : Vax recommends cleaning the filters
every time the dirt container s is emptied for
consistent cleaning performance of your machine.
IMPORTANT: Always unplug the vacuum cleaner
from the electrical outlet before removing the dirt
container.
!
!
IMPORTANT: Do NOT use the vacuum cleaner
without ALL of the filters in place.
NOTE: Do not use any detergents or boiling water to
wash the filters.
Emptying the dirt container
Press the dirt bin release button on the main body of the
unit. The dust container can then be lifted and removed
off the unit. (Fig.6/1)
Fig.6/1
Hold the dirt container over a bin and press the quick
release button as directed (Fig. 6/2).
Fig.6/2
When all the dirt has fallen , close the dirt container flap, a
click will be heard when closed. Then return the dirt
container to the unit which will click into place when
secure.
accessories / dirt container and filters
5
Vax VZL-7061.qxd:Vax VZL-7061
8/4/08
16:55
Page 6
www.vax.co.uk
Cleaning the cyclone separator
1.
Remove the dirt container from the unit as directed
above and dispose of dirt inside the container
before cleaning.
2.
Rotate the lid of the dirt container anti-clockwise to
remove the dirt container off the cyclonic separator
(Fig 6/3).
Fig.6/5
Separate the foam filter from the fabric cassette. Each
filter can be tapped against the side of a dust bin to
remove the excess dirt and dust (Fig 6/6).
Fig.6/3
The separator should be cleaned with a soft brush and
wiped with a damp cloth. The dirt container can be wiped
clean (Fig 6/4).
Fig.6/6
The pre-motor filters may be rinsed in warm water (max
40 deg.). Allow to air dry for 24 hours before replacing.
NOTE: Do not use any detergents or boiling water to
wash the filter. Vax recommends this filter should be
checked and cleaned periodically.
Fig.6/4
!
IMPORTANT: The cyclonic separator should not be
submerged in water.
When the cyclone separator has been cleaned, leave the
separator to dry completely, re-attach the dirt container
to the lid of the separator and return the dirt container to
the unit.
Once completely dry, return the pre-motor filters and case
to the vacuum cleaner. Replace the pre-motor filter cover
before restarting the vacuum cleaner.
Cleaning the Post-motor filter
NOTE:This is located on the base of the vacuum cleaner.
Using a coin, rotate the post-motor filter cover lock
clockwise, and remove the cover as shown. Remove the
filter by pulling the tab towards you (Fig 6/7).
Cleaning the pre-motor filter
NOTE: This is located on the rear of the unit, underneath
the pedals.
Release the pre-motor filter cover by sliding across the
release catch to the right. Lift off the filter cover to gain
access to the filter. Remove the filter by pulling the tab
towards you (Fig 6/5).
Fig.6/7
6 dirt container and filters
Fig.6
Vax VZL-7061.qxd:Vax VZL-7061
8/4/08
16:55
Page 7
Vax Careline 0870 606 1248
The filter can be tapped against the side of a dust bin to
remove the excess dirt and dust (Fig 6/8).
7. Cleaning Blockages
WARNING: To reduce the risk of electric shock, the
power cord must be disconnected before
performing maintenance/troubleshooting checks.
!
Fig.6/8
1.
Turn the vacuum cleaner off and unplug from the
electrical outlet.
2.
The flexible hose may be disconnected from the
vacuum cleaner by pressing the clip on the
connector and pulling away from the machine.
Remove any bloackages found then re-connect the
hose securely.
The post- motor filter may be rinsed in warm water (max
40 deg.). Allow to air dry for 24 hours before replacing.
NOTE: Do not use any detergents or boiling water to
wash the filters. Vax recommends washing the filter.
Vax recommends washing the filter every 9-12 months.
Once completely dry, return the post-motor filter to the
vacuum cleaner. Replace the post-motor filter cover
before restarting the vacuum cleaner.
dirt container and filters/ clearing blockages
7
Vax VZL-7061.qxd:Vax VZL-7061
8/4/08
16:55
Page 8
www.vax.co.uk
8. Storage
9. Troubleshooting
IMPORTANT: Always unplug the vacuum cleaner
from the electrical outlet and rewind the power
cord as directed before storing.
WARNING: To reduce the risk of personal injury,
unplug the vacuum cleaner before performing
maintenance/troubleshooting checks.
!
!
NOTE: Always store the vacuum cleaner base down.
PROBLEM: Vacuum cleaner won't run
Cause:
Not properly plugged into electrical outlet.
Solution: Plug in securely.
Cause:
No electricity in the electrical outlet.
Solution: Check fuse or breaker.
Cause:
On/off switch not turned on.
Solution: Push on/off switch to ‘on’.
Cause:
Motor thermostat has tripped.
Solution: Switch off and unplug the vacuum cleaner.
Leave for one (1) hour before switching the
vacuum cleaner back on.
Cause:
Blown fuse/tripped breaker.
Solution: Reset circuit breaker or replace fuse.
PROBLEM: Cleaner won’t pick up/loss of suction.
Cause:
Dirt container not installed properly.
Solution: Review dirt container replacement.
Cause:
Dirt container full or blocked.
Solution: Empty dirt container.
Cause:
Clogged filters.
Solution: Remove, clean and replace filters.
PROBLEM: Accessories won’t pick up.
Cause:
Accessories are not attached correctly.
Solution: Refer to section 5.
PROBLEM: Dust escaping from the vacuum cleaner.
Cause:
Dirt container full.
Solution: Empty dirt container.
Cause:
Dirt container not installed correctly.
Solution: Review dirt container replacement.
Cause:
Filter not installed completely.
Solution: Remove, clean and replace filters.
8 storage/ trouble shooting
Vax VZL-7061.qxd:Vax VZL-7061
8/4/08
16:55
Page 9
Vax Careline 0870 606 1248
10. UK Service & Help
Vax Care 0870 6061248
11. Technical Specification
Voltage:
220 - 240
Monday-Friday
8.00am to 6.00pm
Saturday-Sunday 9.00am to 5.00pm
Wattage:
1400W
Capacity:
1.5 litres approx
An answerphone will be available out of these hours. Any
queries or concerns about using your Vax, call the Vax
Careline. Calls are charged at the UK national rate.
Filters:
Cyclone separator – wipe clean
Pre-motor filter – washable
HEPA Post-motor filter – washable
Please make a note of the model number and serial
number of your Vax before calling. There are over 400
approved Vax Service Agents in the UK. For the nearest
Vax Service Agent, please call the Vax Careline or visit
www.vax.co.uk
Cord Length:
6m (approx)
Weight:
5.4 Kg (approx)
Subject to technical change without notice
uk service & help/ technical specification
9
Vax VZL-7061.qxd:Vax VZL-7061
8/4/08
16:55
Page 10
www.vax.co.uk
This page has been left intentionally blank.
10
Vax VZL-7061.qxd:Vax VZL-7061
8/4/08
16:55
Page 11
Vax Careline 0870 606 1248
This page has been left intentionally blank.
11
Vax VZL-7061.qxd:Vax VZL-7061
8/4/08
16:55
Page 12
EEC STATEMENT OF COMPLIANCE
Manufacturer/EEC importer: Vax Limited, hereby on our own responsibility, declare that the
VZL-7061 MACH COMPACT is manufactured in compliance with the following Directives:
Safety: 2006/95/EC Low Voltage Directive
EMC: 2004/108/EC Electromagnetic Compatibility Directive
Waste electrical products should not be disposed of with household waste. Please recycle where
facilities exist. Check with your Local Authority or retailer for recycling advice.
Vax Ltd., Kingswood Road, Hampton Lovett, Droitwich, Worcestershire, WR9 OQH, UK
email: [email protected] - website: www.vax.co.uk