1
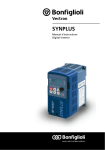
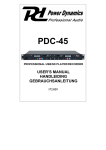
SPL SERIES Stereo Amplifiers Item ref: 178.788, 178.794, 178.797 User Manual / Gebruiksaanwijzing / Mode d’Emploi Gebrauchsanleitung / Manual de instrucciones Thank you for purchasing this QTX SPL amplifier. Please read these instructions prior to use. Safety Instructions • Hearing damage: Loudspeakers can generate high sound pressure levels (SPL) sufficient to cause permanent hearing damage to listeners. Care should be taken to avoid prolonged exposure to SPL in excess of 85 dB. • Make sure that the amplifier is switched off when the speaker cabinet is connected or disconnected. • Do not overload the amplifier or speakers to avoid damage to the components. • Do not plug or unplug the unit with wet hands. • If the plug and/or the mains lead are damaged, they must be replaced by a qualified technician. • Connect the unit to an earthed mains outlet (220-240Vac/50Hz) protected by an approved 10-16A fuse. • If the unit will not be used for a long period of time, unplug from the mains. • If the unit has not been used for a long period of time, condensation may occur. Allow the unit to reach room temperature before you switch it on. Do not use the unit in humid rooms or outdoors. • During operation, the housing may become very hot. Do not touch it during operation or immediately afterwards. • Do not use cleaning sprays to clean the switches. The residues of these sprays can cause deposits of dust and grease. In case of malfunction, always seek advice from a specialist. • Do not force the controls. • Do not place close to open flames • Make sure that the amplifier is placed on a stable, solid surface. • Do not place liquids on the amplifier and protect against humidity. • If the unit is damaged to an extent that internal parts are visible, DO NOT connect the unit and DO NOT switch it on. Contact your dealer. • Never try to repair the unit yourself. There are no user serviceable parts. All repairs must be carried out by a qualified technician. • Set the amplifier to the lowest volume prior to switching it on. • Keep the unit out of the reach of children. • Switch the unit off prior to unplugging it from the mains and/or other equipment. • Unplug all leads and cables prior to moving the unit. • Protect mains lead cannot from damage through people walking on it. Check the mains lead before each use. • Protect your environment. Recycle all materials whenever possible. • Do not attempt to make any repairs yourself. This would invalid your warranty. Do not make any changes to the unit. This would also invalid your warranty. The warranty is not applicable in case of accidents or damages caused by inappropriate usage or disrespect of the warnings contained in this manual. QTX Sound cannot be held responsible for personal injuries caused by disrespect of the safety recommendations and warnings. This is also applicable to all damages. • Do not attempt to make any repairs yourself. This would invalid your warranty. Do not make any changes to the unit. This would also invalid your warranty. The warranty is not applicable in case of accidents or damages caused by inappropriate usage or disrespect of the warnings contained in this manual.QTX Sound cannot be held responsible for personal injuries caused by disrespect of the safety recommendations and warnings. 178.788, 178.794, 178.797 User Manual CONNECTIONS • Firstly, check that the specifications of the amplifier are appropriate to the speaker cabinets being operated. Pay particular attention to the power rating and impedance. Check if the amplifier is switched off before connecting speakers • Please note the wiring polarity (+/-). Wires of the same colour must be connected to the same sign of every side i.e. the + of the amplifier must be connected to the + of the speaker cabinet. If connections are inverted, phase problems will occur. • Only use high quality speaker cables suitable for the power and distance between the amplifier and the speaker. FRONT PANEL 1. INPUT SELECT Allows you to select between CD, TV , PC and the Mp3 inputs. 2. MP3 INPUT 3.5mm JACK input socket for connecting portable audio players 3. LEFT LEVEL Adjusts the level of input signal to the left channel 4. SIGNAL LED Indicates signal present at the input 5. POWER LED Illuminates when power is on 6. RIGHT LEVEL Adjusts the level of input signal to the right channel 7. PEAK LED Indicates when signal is clipping 8. POWER SWITCH On/off switch 9. EQ Adjust high, middle and low frequency content 178.788, 178.794, 178.797 User Manual 1. Mains Inlet IEC mains connector and fuse – connect to 220-250Vac mains, observing correct approved fuse rating • Ensure mains supply has an adequate ground (earth) connection • Ensure good condition of connected mains lead • Keep power switch in the “off” position when connecting or disconnecting mains lead • If unsure of any aspect of the mains supply, consult a qualified electrical technician 2. Inputs RCA left and right connectors for line level input. 3. Speaker Outputs Binding post connectors (minimum impedance 4 Ω). NOTE: to avoid possible damage to the loudspeaker enclosures, only connect enclosures or speaker systems compatible with the power load and impedance limits indicated for the amplifier (regarding this, consult the Technical specifications chapter for reference to your specific amplifier model). Use only loudspeaker cables, not signal or microphone cables 4. Cooling Vents Cooling vents to allow the internal fan to draw air though the amplifier. Do not cover or obstruct these during operation as this could cause the amplifier to overheat. 178.788, 178.794, 178.797 User Manual Setting Up In your sound reinforcement system, always switch on the amplifier after all the other equipment and always switch it off before anything else, if possible with the gain controls set at minimum: this will avoid annoying and sometimes dangerous signal peaks. Your amplifier can dissipate a lot of heat, be sure to install it in locations with ensure correct air circulations. Avoid long exposure to direct sunlight,sources of strong heat, powerful vibrations, very dusty or Particularly damp surroundings or (even worse) rain: this will avoid possible faulty operation, deterioration or even electric shocks and fires. The air for cooling the unit is forced in though the vents in the front panel and out though those on the rear panel, so make certain that there sufficient space round the amplifier to allow adequate air circulation. If racks or flight-cases are used, make sure that airflow is unobstructed: don not install the amplifiers in racks or flight-cases with closed backs. Since part of the heat is dissipated via the metal bottom of the amplifier, it is advisable to install the amplifiers with at least one rack unit space between them. Audio connections Remember to always connect and disconnect other units with the amplifier switched off. Always use good quality cables of the appropriate type. Take care of your connector cables, a very frequent cause of audio problems. Check their condition frequently. Always grip them by the connector, avoid pulling them forcefully and wind them without forming knots or sharp bends, they will last longer this way and be more reliable. Preventing or identifying interference First of all, check that the amplifier is installed in a place free from industrial of RF (radio frequency) Interference. Avoid installing your equipment very near radio or TV sets, mobile phones, etc., as these can cause noisy interference. When connecting the other components of your sound system, watch out for the so-called ground loops, which could cause hum and jeopardize the amplifier excellent signal-to-noise and low distortion characteristics. The best way (even if not always feasible) to avoid ground loops is to connect the electric ground of all the equipment to a single central point (the so-called star system). In this case, the central point in sound systems is the mixer. To help identify the cause of any interference, connect the various sections of the mixer to the rest of the equipment in the following order, listening to the resulting sound as you proceed with connection: Outputs: amplifiers + loudspeaker enclosures (master outputs); Amplifiers + monitors (AUX outputs); Effects (AUX outputs or EFF send/return); Inputs: instruments with line signals (keyboards, samples, recorders, etc.); Microphones ( lastly and one by one). 178.788, 178.794, 178.797 User Manual Specifications SPL400 SPL500 SPL700 SPL1000 Max Output Power @ 4Ω 2 x 200W 2 x 250W 2 x 350W 2 x 500W Minimum Load Impedance 4Ω Inputs RCA Outputs Left + Right 4mm binding posts (+/-) Input Sensitivity (0dB) 775mV Input Impedance 10K (min) Frequency Response 20 Hz - 20 KHz ±3 dB THD + N <0.5% SNR >95dB Cross-talk >82dB @ 1kHz Indicators Clip, Signal, Power Power Supply 220-240Vac, 50Hz Dimensions 482 x 270 x 88mm (2U) Weight 5.5kg 3 x RCA + 3.5mm 5.5kg 6.3kg 7.0kg Operation 1. Connect loudspeaker system (MINIMUM load 4 ohms) with sufficient handling capacity to the output terminals of the amplifier. Connect output from television, dvd player, computer, mixer or any other suitable signal source to the appropriate input sockets of the power amplifier. On the front panel you can connect your MP3 player with a 3.5mm stereo jack connection lead. 2. Connect the power cord to the mains. 3. Select the correct source with the selector on the front. (PC – MP3 – TV – CD) 4. Turn gain controls to minimum and then switch on the amplifier. 5. Adjust the volume controls to required level. NOTE. If the audio input signal is too high, distortion will result and the CLIP indicator will light. If the clip LED is lit permanently or flashes, the level should be reduced 6. Use the equalisers (not SPL400) to make adjustments to the sound. They can compensate for sound quality differences in the source material, or differences in room acoustics. Each EQ has his own boost or cut for low, mid & high frequencies . For reliable and trouble free operation, please observe the following points: • Ensure all input / output connections are correct and secure. • The handling capacity of the loudspeakers is adequate for the output of the amplifier. • Always site the amplifier in a well ventilated location • Protect unit from severe shocks • Do not plug in or unplug the speakers during the operation of the amplifier. This could seriously damage the amplifier. 178.788, 178.794, 178.797 User Manual NL Hartelijk dank voor de aanschaf van deze SPL versterker. Neemt u a.u.b. een moment de tijd om deze handleiding zorgvuldig door te lezen. Veiligheidsinstructies Volg de instructies op anders zou de garantie wel eens kunnen vervallen. Neem ook altijd alle veiligheidsmaatregelen om brand en/of een elektrische schok te voorkomen. Tevens is het ook raadzaam om reparaties / modificaties e.d. over te laten aan gekwalificeerd personeel om een elektrische schok te voorkomen. Bewaar deze handleiding ook voor toekomstig gebruik. Bewaar de verpakking zodat u indien het apparaat defect is, dit in de originele verpakking kunt opsturen om beschadigingen te voorkomen. Voordat het apparaat in werking wordt gesteld, altijd eerst een deskundige raadplegen. Bij het voor de eerste keer inschakelen kan een bepaalde reuk optreden. Dit is normaal en verdwijnt na een poos. In het apparaat bevinden zich onder spanning staande onderdelen; open daarom NOOIT dit apparaat. Bij het verwijderen van de stekker uit het stopcontact nooit aan het netsnoer trekken. Verwijder of plaats een stekker nooit met natte handen resp. uit en in het stopcontact. Indien zowel de stekker en/of netsnoer als snoeringang in het apparaat beschadigd zijn dient dit door een vakman hersteld te worden. Indien het apparaat zo beschadigd is dat inwendige (onder) delen zichtbaar zijn mag de stekker NOOIT in het stopcontact worden geplaatst en het apparaat NOOIT worden ingeschakeld. Neem in dit geval contact op met de dealer. Sluit het apparaat nooit op een dimmer aan. Reparatie aan het apparaat dient te geschieden door een vakman of een deskundige. Sluit het apparaat alleen aan op een 230VAC / 50Hz (geaard) stopcontact, verbonden met een 10-16A meterkastgroep. Gehoor beschadiging : Luidsprekers produceren een hoge luchtdruk, voldoende om permanent gehoor te beschadigen. Zorg er voor dat de 85 dB niet overschreden wordt. Wanneer de versterker aan de muur / aan het plafond bevestigd moet worden, dient eerst zorgvuldig berekend te worden of het plateau en/of (muur)beugels deze wel kunnen dragen. Kunt u het niet berekenen schakel dan vakbekwaam personeel in. Apparaat niet opstellen in de buurt van warmtebronnen zoals radiatoren etc. en niet op een vibrerende ondergrond plaatsen. Dek ventilatieopeningen nooit af. Bij onweer altijd de stekker uit het stopcontact halen, zo ook wanneer het apparaat voor een langere tijd niet gebruikt wordt. Stelregel: Bij geen gebruik stekker verwijderen Als u het apparaat een tijd niet gebruikt heeft en het weer wilt gebruiken kan er condens ontstaan; laat het apparaat eerst op kamertemperatuur komen alvorens het weer in werking te stellen ; apparaat nooit in vochtige ruimten en buiten gebruiken. 178.788, 178.794, 178.797 User Manual Plaats geen vloeistoffen en/of metalen objecten op de versterker, deze kunnen door de openingen vallen en kortsluiting veroorzaken. De behuizing wordt zeer warm, raak deze dan ook niet aan bij gebruik en direct na gebruik.. Om ongevallen in bedrijven te voorkomen moet rekening worden gehouden met de daarvoor geldende richtlijnen en moeten de aanwijzingen/waarschuwingen worden gevolgd. De volumeregelaar dient op minimum te staan bij inschakelen van de versterker. Laat ruimte vrij aan alle zijden voor een deugdelijke ventilatie. Het apparaat buiten bereik van kinderen houden. Bovendien mag het apparaat nooit onbeheerd gelaten worden. Gebruik geen schoonmaakspray om de schakelaars te reinigen. Restanten van deze spray zorgen ervoor dat smeer en stof ophopen. Raadpleeg bij storing te allen tijde een deskundige. Tracht het apparaat niet schoon te maken met chemische oplossingen. Dit kan de lak beschadigen. Gebruik een droge doek om schoon te maken. Zorg dat uw handen schoon zijn tijdens het gebruik. Gebruik geen overmatige kracht bij het bedienen van het apparaat. Blijf uit de buurt van elektronische apparatuur die bromstoringen zouden kunnen veroorzaken. Bij reparatie dienen altijd originele onderdelen te worden gebruikt om onherstelbare beschadigingen en/of ontoelaatbare straling te voorkomen. Schakel eerst het toestel uit voordat u het netsnoer en/of aansluitsnoeren verwijdert. Verwijder netsnoer en aansluitsnoeren voordat u dit product gaat verplaatsen. Zorg ervoor dat het netsnoer niet beschadigd/defect kan raken wanneer mensen erover heen lopen. Het netsnoer vóór ieder gebruik controleren op breuken/defecten! ! In Nederland/België is de netspanning 230Vac/50Hz. Indien u reist (en u neemt het apparaat mee) informeer dan naar de netspanning in het land waar u verblijft. Deze markering wordt weergegeven om u erop attent te maken dat een levensgevaarlijke spanning in het product aanwezig is en dat bij aanraking van deze delen een elektrische schok Dit apparaat is CE-goedgekeurd ; er mogen geen veranderingen/modificaties worden doorgevoerd ; deze kunnen de CE status te niet doen met alle gevolgen van dien. Bescherm het milieu ; laat de verpakking recyclen! Aansluitingen Houdt bij het aansluiten van luidsprekers op deze versterker rekening met de impedantie (min. 4 Ohm) en het maximaal vermogen. Denk aan de polariteit (+/-) en gebruik alleen kwaliteitskabel. Zorg er altijd voor dat er geen overbelasting optreedt en dat de clip indicatoren (5) niet branden. Voorzijde 178.788, 178.794, 178.797 User Manual 1. INGANG KEUZE SCHAKELAAR 6. KANAAL B REGELAAR 2. MP3 INGANG 7. CLIP INDICATOR 3. KANAAL A REGELAAR 8. NETSCHAKELAAR 4. SIGNAAL LED 9. KANAALS EQ 5. AAN/UIT INDICATOR Acherzijde 1. NETENTREE INCL. ZEKERINGHOUDER 3. UITGANGEN (A + B) 2. INGANGEN (RCA) 4. VENTILATOR 178.788, 178.794, 178.797 User Manual 1. Verbindt de luidsprekers (LET OP MINIMALE impedantie 4 Ohm) met de versterker. 2. Sluit de audio uitgang van de TV, Dvd-speler, Cd-speler, computer, mixer of een andere audiobron aan op de RCA –ingangen van deze versterker. Op de voorzijde kan nog een MP3 speler of andere audiobron dmv een 3.5mm jack plug aangesloten worden. 3. Sluit het netsnoer aan. 4. Selecteer met de keuzeschakelaar het gewenste audio signaal. 5. Zet de volumeregelaars op minimum. 6. Zet de netschakelaar aan. LET OP. Als de (in 6) genoemde regelaars niet op minimum staan kan er opeens teveel vermogen uit de versterker komen en kunnen de luidsprekers onherstelbaar beschadigd raken. Tevens kan uw gehoor onherstelbaar beschadigd raken!! . Ook bestaat de mogelijkheid dat alleen de clip indicatoren gaan branden en het geluid vervormt klinkt, draai dan de volumeregelaars terug. 7. Gebruik de equalizer voor het bijregelen van de klankkleur. Voor een betrouwbare en storingsvrije werking geldt het volgende: Alle aansluitingen dienen op een correcte wijze te zijn gemaakt. Gebruik de juiste luidsprekers voor deze versterker qua impedantie en vermogen. Gebruik de versterker op een goed geventileerde plaats. Gebruik de versterker op een stabiele plaats zodat deze niet onderhevig is aan trillingen en stoten. Tijdens gebruik mogen de luidsprekers niet worden verwijderd. De versterker kan defect raken. SPECIFICATIES SPL400 SPL500 SPL700 SPL1000 Max uitgangsvermogen @ 4Ω 2 x 200W 2 x 250W 2 x 350W 2 x 500W Minimum Impedantie 4Ω Ingangen RCA Uitgangen Left + Right 4mm terminal (+/-) Ingangsspanning (0dB) 775mV Ingangs impedantie 10K (min) Frequentiebereik 20 Hz - 20 KHz ±3 dB THD + N <0.5% Signaal/Ruis verhouding >95dB Overspraak >82dB @ 1kHz Indicatoren Clip, Signal, Power Netspanning 220-240Vac, 50Hz Afmetingen 482 x 270 x 88mm (2U) Gewicht 5.5kg 3 x RCA + 3.5mm 5.5kg 6.3kg 7.0kg 178.788, 178.794, 178.797 User Manual F Nous vous remercions pour l’achat de cet amplificateur SPL. Veuillez lire attentivement le mode d’emploi avant la première mise en service. CONSIGNES DE SECURITÉ • Protection de l’ouïe: Des haut-parleurs peuvent générer une pression acoustique très forte qui risque d’endommager l’ouïe des utilisateurs, du personnel et du public. Veillez à ce que la pression sonore ne dépasse jamais 85dB. • Assurez-vous que l’amplificateur est éteint lorsque l’enceinte est branchée ou débranchée. • Ne pas surcharger l’amplificateur ni les haut-parleurs afin d’éviter d’endommager les composants. • Ne pas brancher ni débrancher l’appareil avec les mains mouillées. • Si la fiche et/ou la cordon secteur sont endommagés, il faut les faire remplacer par un technicien qualifié. • Branchez l’appareil sur une prise de terre (220- 240Vac/50Hz) protégé par un fusible de 10-16A. • Pendant un orage ou lorsque l’appareil n’a pas été utilisé pendant une durée prolongée, débranchez-le du secteur. La règle s’applique : Débrancher du secteur lorsque l’appareil n’est pas en service. • Lorsque l’appareil n’a pas été utilisé pendant une durée prolongée, de l’eau de condensation peut se former. Attendez que l’appareil ait atteint la température ambiante avant de le mettre sous tension. Ne jamais utiliser l’appareil dans une pièce humide ou à l’extérieur. • Pendant le fonctionnement, le boîtier peut devenir très chaud. Ne pas toucher pendant le fonctionnement ni immédiatement après l’arrêt. • Ne pas utiliser d’aérosols de nettoyage pour les commutateurs. Les résidus de ces aérosols provoquent des dépôts de poussière et de graisse. En as de dysfonctionnement, demandez l’avis à un spécialiste. • Ne pas forcer les contrôles • Ne pas placer une flamme ouverte (bougies, etc.) sur ou à côté du boîtier – RISQUE D’INCENDIE • Assurez-vous que l’amplificateur est placé sur une surface stable et solide. • Ne pas poser des liquides sur l’amplificateur. • Si l’appareil est endommagé au point que des composants internes sont visibles, NE PAS brancher l’appareil sur le secteur et NE PAS le mettre sous tension. Contactez votre revendeur. • Ne jamais essayer de réparer l’appareil vous-même. Il ne contient aucune pièce remplaçable par l’utilisateur. Toutes les réparations doivent être effectuées par un technicien qualifié. • Réglez le volume au minimum avant de mettre l’amplificateur sous tension. • Eteignez l’appareil avant de le débrancher du secteur et/ou d’un autre équipement. Débranchez tous les câbles et cordons avant de déplacer l’appareil. • Assurez-vous que le cordon secteur ne peut pas être endommagé lorsque des personnes marchent dessus. Vérifiez le cordon secteur avant chaque utilisation. Protection de l’environnement : Recyclez les matériaux d’emballage chaque fois que c’est possible. Ne pas jeter un appareil en fin de vie aux ordures ménagères mais amenez-le à un point de collecte. Une grande partie de ses composants est recyclable. N’effectuez jamais de réparations vous-mêmes sous peine d’invalider la garantie. Ne pas modifier l’appareil. La garantie ne couvre pas les dommages survenus à la suite d’une mauvaise utilisation de l’appareil ou du nonrespect des avertissements et consignes contenus dans ce manuel. 178.788, 178.794, 178.797 User Manual CONNEXIONS Vérifiez tout d’abord les caractéristiques techniques de votre amplificateur afin de savoir s’il convient à votre enceinte, notamment en termes de puissance et d’impédance. Vérifiez si l’amplificateur est éteint avant de brancher l’enceinte. ATTENTION ! Les polarités (+ et –) doivent correspondre. Connectez les fils de la même couleur sur le même signe de chaque côté donc, branchez le + de l’enceinte sur le + de l’amplificateur. Si les connexions sont inversées, la qualité du son en souffre. Utilisez uniquement des câbles de haut-parleurs de bonne qualité qui conviennent à la puissance et à la distance entre l’amplificateur et l’enceinte. FAÇADE 1. SÉLECTEUR D’ENTRÉE 6. CONTRÔLE DE VOLUME CANAL B 2. ENTRÉE MP3 7. INDICATEUR DE CLIPPING 3. CONTRÔLE DE VOLUME CANAL A 8. INTERRUPTEUR M/A 4. LED SIGNAL CANAL A + B 9. EGALISEUR À 3 BANDES 5. VOYANT DE TENSION 178.788, 178.794, 178.797 User Manual ARRIÈRE 1. 2. 3. 4. ALIMENTATION SECTEUR & PORTE-FUSIBLE CANAUX D’ENTRÉE (RCA) SORTIE CANAL A & B VENTILATAUR FONCTIONNEMENT 1. Branchez le système d’enceintes (charge Minimum 4 Ohms) d’une puissance suffisante sur les fiches de sortie de l’amplificateur. 2. Branchez la sortie du téléviseur, lecteur DVD, ordinateur, table de mixage (ou de toute autre source de signal appropriée) sur les fiches d’entrée de l’amplificateur. En façade, vous pouvez brancher votre lecteur MP3 au moyen d’un cordon jack stéréo 3,5mm. 3. Branchez le cordon d’alimentation sur le secteur. 4. Sélectionnez la source appropriée au moyen du sélecteur en façade (PC – MP3 – TV – CD). 5. Baissez les contrôles de gain au minimum et mettez l’amplificateur sous tension. 6. Réglez les contrôles de volume sur le niveau désiré. NOTE: Si le signal d’entrée audio est trop élevé, le son sera déformé et l’indicateur CLIP s’allume. Si la LED Clip est en permanence allumée ou clignote, vous devez réduire le niveau. 7. Réglez le son avec les égaliseurs. Ils peuvent compenser les différences en qualité sonore dans le matériel de source ou les différences dans l’acoustique de la pièce. Chaque égaliseur possède sa propre amplification ou réduction pour les hautes, moyennes et basses fréquences. 178.788, 178.794, 178.797 User Manual CARACTERISTIQUES TECHNIQUES Puissance de sortie max @ 4Ω Impédance de charge minimum SPL400 SPL500 SPL700 SPL1000 2 x 200W 2 x 250W 2 x 350W 2 x 500W 4Ω Entrée RCA 3 x RCA + 3.5mm Sortie Bornier Left + Right 4mm terminal (+/-) Sensibilité d’entrée (0dB) 775mV Impédance d’entrée 10K (min) Bande passante 20 Hz - 20 KHz ±3 dB THD + N <0.5% Rapport S/B >95dB Cross-talk >82dB @ 1kHz Indicateurs Clip, Signal, Power Alimentation secteur 220-240Vac, 50Hz Dimensions 482 x 270 x 88mm (2U) Poids 5.5kg 5.5kg 6.3kg 7.0kg 178.788, 178.794, 178.797 User Manual D Herzlichen Glückwunsch zum Kauf unseres SPL Verstärkers. Vor der ersten Inbetriebnahme bitte sorgfältig diese Anleitung durchlesen. SICHERHEITSHINWEISE Gehörschäden: Lautsprecher können sehr hohe Schallpegel (SPL) erreichen, die bei Publikum, Benutzern und technischem Personal schwere Gehörschäden verursachen können. Achten Sie darauf, dass der Schallpegel nie 85dB übersteigt. Achten Sie darauf, dass der Verstärker ausgeschaltet ist, wenn die Box angeschlossen oder abgekoppelt wird. Verstärker und Lautsprecher nicht überlasten, um Schäden an den Bauteilen zu vermeiden. Das Gerät nicht mit nassen Händen ans Netz anschließen oder vom Netz trennen. Wenn Stecker und/oder Netzkabel beschädigt sind, müssen sie von einem Fachmann ersetzt werden. Schließen Sie das Gerät an eine geerdete 220- 240VAC/50Hz Netzsteckdose an, die von einer 10-16A Sicherung geschützt ist Bei Gewitter oder längerem Nichtgebrauch den Netzstecker abziehen. Im Allgemeinen gilt: Bei Nichtgebrauch Stecker abziehen. Nach längerem Nichtgebrauch kann sich Kondenswasser bilden. Lassen Sie das Gerät erst auf Zimmertemperatur kommen, bevor Sie es einschalten. Niemals in feuchten Räumen oder im Freien benutzen. Während des Betriebs wird das Gehäuse sehr heiß. Nicht während des Betriebs oder sofort danach berühren. Keine Reinigungssprays für die Regler benutzen. Die Rückstände, die diese Produkte hinterlassen, führen zu Staub- und Fettansammlungen. Im Problemfall einen Fachmann um Rat fragen. Niemals die Regler mit Gewalt bedienen. Kein offenes Feuer (Kerze usw.) auf oder neben das Gehäuse stellen – FEUERGEFAHR. Den Verstärker auf eine stabile, feste Fläche stellen Keine Flüssigkeiten auf den Verstärker stellen. Vor Feuchtigkeit schützen, da sie die Lebensdauer des Geräts erheblich verkürzt. Wenn das Gerät so stark beschädigt ist, dass Innenteile sichtbar sind, NICHT das Gerät ans Netz anschließen und NICHT einschalten. Bitte wenden Sie sich an Ihren Fachhändler. Niemals das Gerät selbst reparieren. Alle reparaturen müssen von einem fachmann ausgeführt werden. Den Lautstärkeregler des Verstärkers ganz herunterfahren, bevor Sie ihn einschalten Das Gerät von Kindern fernhalten. Gerät ausschalten, bevor Sie es vom Netz und/oder anderen Geräten trennen. Bevor Sie das Gerät an einen anderen Platz stellen, erst alle Kabel abziehen. Achten Sie darauf, dass das Netzkabel nicht beschädigt werden kann, wenn Menschen darauf treten. Vor jeder Inbetriebnahme das netzkabel auf schäden überprüfen. Umweltschutz: Verpackungsmaterial wann immer möglich recyceln Keine eigenmächtigen Reparaturen oder Veränderungen am Gerät vornehmen, sonst verfällt jeglicher Garantieanspruch. 178.788, 178.794, 178.797 User Manual ANSCHLÜSSE Prüfen Sie zuerst die technischen Daten Ihres Verstärkers, um sicherzugehen, dass er für die Box geeignet ist. Achten sie dabei besonders auf die Leistung und die Impedanz. Prüfen Sie, dass der verstärker ausgeschaltet ist und schließen Sie dann die Box an. ACHTUNG! Achten Sie auf die polarität (+/-). Schließen sie leiter mit derselben Farbe an beiden Seiten gleich an, also + am Verstärker mit dem + an der Box. Bei falschem Anschluss wird die klangqualität beeinträchtigt. Benutzen Sie nur Lautsprecherkabel von guter Qualität, die der Leistung und der Entfernung zwischen Verstärker und box entsprechen. BESCHREIBUNG 1. EINGANGSWAHLSCHALTER 6. LATSTÄRKEREGLER KANAL B 2. MP3 EINGANG 7. CLIP ANZEIGER 3. LATSTÄRKEREGLER KANAL A 8. EIN/AUS SCHALTER 4. SIGNAL LED KANAL A + B 9. 3-BAND EQUALIZER 5. BETRIEBS LED 178.788, 178.794, 178.797 User Manual RÜCKSEITE 1. 2. 3. 4. NETZANSCHLUSS & SICHERUNGSHALTER EINGÄNGE KANAL A & B (RCA) AUSGANG KANAL A & B VENTILATOR BETRIEB 1. Die Lautsprecheranlage (Mindestens 4 Ohms Last) mit ausreichender Leistung an die ausgangsklemmen des verstärkers anschließen 2. Den Ausgang des Fernsehers, DVD Spielers, Computers, Mischpults (oder eine andere geeignete Signalquelle) n die entsprechenden eingangsbuchsen des leistungsverstärkers anschließen. An der frontseite können Sie einen MP3 Spieler über eine 3,5mm stereo-klinkenbuchse anschließen. 3. Das Netzkabel in eine Netzsteckdose stecken. 4. Wählen Sie mit dem Wahlschalter auf der Frontseite eine Eingangsquelle (PC – MP3 – TV – CD) 5. Die Gainregler ganz herunterfahren und den Verstärker einschalten. 6. Stellen Sie die Lautstärkeregler auf den gewünschten Pegel ein. HINWEIS: Wenn das Audio Eingangssignal zu stark ist, klingt der Ton verzerrt und der CLIP Anzeiger leuchtet. Wenn die Clip LED ständig leuchtet oder blinkt, muss der Pegel reduziert werden. 7. Regeln sie den Klang mit den Equalizern. Sie können Unterschiede in der Klangqualität der Quellen oder in der raumakustik ausgleichen. Jeder Equalizer verfügt über seinen eigenen Boost oder Cut für die tiefen, mittleren und hohen Frequenzen. Für einen zuverlässigen und problemlosen Betrieb, bitte folgende Punkte beachten: • Alle Ein- und Ausgangsverbinder müssen gut und sicher angeschlossen sein. • Die Leistung der Lautsprecher muss für die Ausgangsleistung des Verstärkers geeignet sein. 178.788, 178.794, 178.797 User Manual • Den Verstärker immer an einer gut belüfteten Stelle aufstellen. • Vor schweren Erschütterungen schützen. • Niemals während des Betriebs die Lautsprecher anschließen oder abziehen. Das kann den Verstärker schwer beschädigen. TECHNISCHE DATEN SPL400 SPL500 SPL700 SPL1000 Max Ausgangsleistung bei 4Ω 2 x 200W 2 x 250W 2 x 350W 2 x 500W Impedanz (Mindestens) 4Ω Eingang RCA Ausgang Schraubklemmen Left + Right 4mm terminal (+/-) Eingangsspannung (0dB) 775mV Eingangsimpedanz 10K (min) Frequenzbereich 20 Hz - 20 KHz ±3 dB THD + N <0.5% Signal/Rauschabstand >95dB Crosstalk >82dB @ 1kHz Anzeiger Clip, Signal, Power Netzspannung 220-240Vac, 50Hz Abmessungen 482 x 270 x 88mm (2U) Gewicht 5.5kg 3 x RCA + 3.5mm 5.5kg 6.3kg 7.0kg 178.788, 178.794, 178.797 User Manual ES Enhorabuena por la compra de nuestro amplificador SPL. Lea atentamente las instrucciones antes de usar el aparato. INSTUCCIONES DE SEGURIDAD • Daños auditivos: Los altavoces pueden generar fácilmente altos niveles de presión acústica (SPL) suficientes para causar daños auditivos permanentes a los artistas, equipo de producción y a los espectadores. Debería vigilarse de no exponerse prolongadamente a SPL que sobrepasen los 85dB. • Asegúrese de que el amplificador está apagado cuando conecte o desconecte los altavoces. • No sobrecargue el amplificador o los altavoces para evitar dañar los componentes. • No enchufe o desenchufe el aparato con las manos mojadas. • Si la clavija y/o el cable de alimentación están dañados, han de reemplazarse por un técnico cualificado. • Conecte el aparato a una toma de corriente con toma de tierra (220-240Vac) protegida por un fusible de 1016A. • Desenchufe el aparato durante una tormenta o si no va a ser usado durante un largo período de tiempo. La norma es: Desenchúfelo cuando no lo vaya a usar. • Si el aparato no se ha usado por un largo período de tiempo, puede producirse condensación. Deje el aparato a temperatura ambiente antes de encenderlo. Nunca lo utilice en lugares húmedos o en exteriores. • Durante el funcionamiento, la carcasa se calienta mucho. No la toque mientras funciona o inmediatamente después. • No utilice sprays de limpieza para limpiar los interruptores. Los residuos de estos sprays provocan depósitos de polvo y grasa. En caso de un mal funcionamiento, siempre pida consejo a un especialista. • No fuerce los controles. • No coloque nada que tenga llama (velas, etc.) encima o cerca - PELIGRO DE INCENDIO • Asegúrese de que el amplificador está colocado en una superficie sólida y estable. • No coloque líquidos encima del amplificador y protéjalo de la humedad. La humedad puede acortar considerablemente la vida útil del aparato. • Si el aparato está dañado hasta el grado de que se pueden ver sus partes internas, NO conecte el aparato y NOT lo encienda. Contacte con su distribuidor. • Nunca intente reparar el aparto por su cuenta. No contiene partes reemplazables por el usuario. Todas las reparaciones deben llevarse a cabo por técnicos cualificados. • Ajuste el amplificador al mínimo volumen antes de encenderlo. • Mantenga el aparato fuera del alcance de los niños. • Apague el aparato antes de desenchufarlo o desconectarlo de otros equipos. Desconecte todos los cables antes de mover el aparato. • Asegúrese de que el cable no puada dañarse cuando lo pise la gente. Compruebe el cable de alimentación antes de cada uso para ver si hay daños. • Proteja el Medio Ambiente. Recicle el material de embalaje siempre que sea posible. No tire un aparato estropeado a un contenedor normal de basura sino llévelo a un punto especial de recogida. Gran parte puede ser reciclado. No intente hacer reparaciones por su cuenta ni cambios en el aparato. 178.788, 178.794, 178.797 User Manual CONEXIONES Antes de nada, compruebe que las especificaciones del amplificador se ajustan a sus altavoces. Preste especial atención en la potencia y la impedancia. Compruebe que el amplificador esté apagado. Si lo está, puede encender los altavoces. ¡ATENCIÓN! Vigile la polaridad (+/-). Los cables del mismo color han de conectarse a la misma pestaña en ambos lados. P.ej. el + del amplificador debe conectarse al + del altavoz. Si se invierten las conexiones, la calidad del sonido disminuirá. Utilice solo cables de altavoz de alta calidad que sean adecuados para la potencia y la distancia entre el amplificador y los altavoces. PANEL FRONTAL 1. SELECTOR DE ENTRADA 2. ENTRADA MP3 3. CONTROL DE VOLUME CANAL A 4. LED SEÑALIZADOR CANALES A & B 5. INDICATOR DE ENCENDIDO 6. CONTROL DE VOLUME CANAL B 7. INDICADOR DE CLIP 8. INTERRUPTOR 9. ECUALIZADOR 3-BANDAS 178.788, 178.794, 178.797 User Manual PANEL POSTERIOR 1. 2. 3. 4. BASE DE ALIMENTACION & PORTAFUSIBLES ENTRADAS CANALES A & B (BASES RCA) SALIDA CANALES A & B VENTILADOR FUNCIONAMIENTO 1. Conecte el sistema de altavoces (carga MÍNIMA 4 ohms) con suficiente potencia de trabajo a los terminales de salida del amplificador. 2. Conecte la salida de un televisor, reproductor DVD, ordenador, mezclador o cualquier otra fuente de señal a las 3. 4. 5. 6. 7. bases de entrada apropiadas del amplificador. En el panel frontal puede conectar su reproductor MP3 con una conexión jack estéreo 3.5mm. Conecte el cable de alimentación a la toma de corriente. Seleccione la fuente correcta con el selector en el frontal. (PC – MP3 – TV – CD) Gradúe los controles de ganancia al mínimo, encienda el amplificador. Ajuste los controles de volumen al nivel requerido. NOTA. Si la señal de entrada de audio es demasiado elevada, resultará en distorsión y el indicador de CLIP se encenderá. Si el LED de CLIP permanece encendido o si parpadea, debería reducirse el nivel Use los ecualizadores para ajustar el sonido. Pueden compensar las diferencias en la calidad del sonido del material de las fuentes, o las diferencias en la acústica de la sala. Cada ecualizador tiene su propio boost o cut par alas frecuencias bajas, medias & altas Para un funcionamiento fiable y sin problemas, por favor observe los siguientes puntos: Asegúrese de que las conexiones de entrada / salida son correctas y seguras. La potencia de trabajo de los altavoces es la adecuada para la salida del amplificador. Siempre coloque el amplificador en un lugar bien ventilado Proteja el aparato de golpes No enchufe o desenchufe los altavoces mientras funciona el amplificador. Esto dañaría seriamente el amplificador. 178.788, 178.794, 178.797 User Manual SPECIFICATIONS SPL400 SPL500 SPL700 SPL1000 Potencia Max de Salida @ 4Ω Impedancia mínima de carga 2 x 200W 2 x 250W 2 x 350W 2 x 500W Entrada RCA Salida (altavoz) Sensibilidad de entrada (0dB) Left + Right 4mm terminales (+/-) Impedancia de entrada 10K (min) Respuesta de frecuencia 20 Hz - 20 KHz ±3 dB THD + N <0.5% Relación señal/ruido >95dB Crosstalk >82dB @ 1kHz Indicadores Clip, Signal, Power Alimentación 220-240Vac, 50Hz Dimensiones 482 x 270 x 88mm (2U) Peso 5.5kg 4Ω 3 x RCA + 3.5mm 775mV 5.5kg 6.3kg 7.0kg Errors and omissions excepted. Copyright© 2013. AVSL Group Ltd. 178.788, 178.794, 178.797 User Manual