1
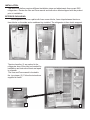
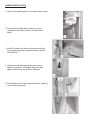
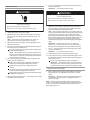
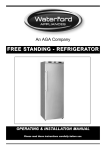
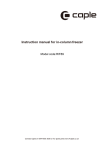
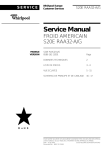
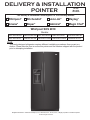
DELIVERY & INSTALLATION POINTER DP-036 May 2010 R8178806 This Delivery & Installation Pointer Applies To The Following Brands: Whirlpool ® Amana® KitchenAid® Jenn-Air® Maytag® Roper® Admiral® Magic Chef® Whirlpool SXS 2010 Models: GSF26C5EXA GSF26C5EXA GSF26C5EXS GSF26C5EXT GSF26C5EXW GSF26C5EXY GSS26C5XXA GSS26C5XXB GSS26C5XXW GSS26C5XXY ISSUE: This newly designed refrigerator requires different installation procedures than current production. Please take the time to review this pointer and the literature shipped with the product prior to attempting installation. ®Registered trademark/™ Trademarks of Whirlpool, U.S.A., KitchenAid, U.S.A., Jenn-Air, U.S.A., or Maytag Corporation or its related companies. © 2010 All rights reserved. INSTALLATION: This new SXS platform requires different installation steps and adjustments than current SXS refrigerators. Review the Use and Care manual and instruction sheets shipped with the product prior to installation. EXTERIOR PACKAGING: The refrigerator is set on a pallet with foam corner blocks, foam strips between the doors , foam blocks on the sides and a cardboard top installed. The refrigerator is then shrink wrapped . Back Front Side The door handles (1) are packed in the refrigerator door. A hex hey tool needed for installation and instruction sheet are taped to a handle. The Use and Care manual is located in the top crisper (2). Follow the instructions supplied to install. Use &Care Handles 2 1 HANDLE INSTALLATION: 1. Remove the handle pack from the door and unwrap. 2. The instruction sheet and a Hex key tool are attached to the handle. Review the instruction sheet. 3. Install the handle on the mounting studs with the hex screws facing the refrigerator/freezer divider wall (Mullion). 4. Hold the handle tight against the door as you tighten the screws. The handle will pull in tight against the door as the screw is tightened. 5. The handle should fit tight against the door panel (5) when installed properly. INSTALLATION: Removing Grille Grille Removal The grille is held in place with 2 screws. 1. Remove screws 2. Open the doors 90 degrees perpendicular to the cabinet to remove the grille. Components Located Behind Grille The refrigerator is equipped with two fixed rear wheels and a fixed center wheel. The adjustable front legs are used for leveling and stabilizing the refrigerator (3) . A ¼” hex head on the top of the leveling leg is used for adjusting (4) Turning clockwise retracts the leg and lowers cabinet, turning counterclockwise extends the leg and raises the cabinet. After leveling the refrigerator, check the alignment of the top of the freezer and refrigerator doors. If adjustment is needed the refrigerator door can be raised or lowered to match the freezer door. A 5/16” adjustment screw is provided under the refrigerator door for making the adjustment (5). Turning clockwise raises the door and turning counterclockwise lowers the door. DOOR REMOVAL, LEVELING AND ALIGNMENT Gather the required tools and parts and read all instructions before starting installation. Save these instructions for future reference. NOTE: Before moving your product into your home, measure the door way of your home to see whether you need to remove the refrigerator and freezer doors. If door remo val is necessary, see the instructions below. IMPORTANT: Before you begin, turn the refrigerator control OFF. Unplug refrigerator or disconnect power. TOOLS NEEDED: Phillips screwdriver, 3⁄16 " hex wrench, 1⁄4 " hex-head socket wrench, 1⁄4 " and 5⁄16 " open-ended wrenches or adjustable wrench WARNING Electrical Shock Hazard Disconnect power before removing doors. Failure to do so can result in death or electrical shock. 4 5 Top Left Hinge 6 Door Removal A Top Right Hinge A A A Do Not Remove Screws A 3 Do Not Remove Screws A Wiring Connection A B C D E Bottom Hinge 8 Leveling F A. P-clamp B. Routing Plate C. Electrical Housing D. Wiring Clip E. Grommets F. Wiring Plugs 2 7 A B Water Dispenser Tubing Connection R a is e L owe r C A. Bottom Hinge B. Leveler Bracket C. Leveling Foot 9 1 A Door Alignment Base Grille Raise A A A. Face of Fitting W10299704A Doors must be open to 90˚ Lower A. Alignment Screw 7. Use a 3⁄16 " hex wrench to remove the top left hinge screws as shown. See Graphic 4. IMPORTANT: Do not remove either screw A. Remove the Doors WARNING WARNING Excessive Weight Hazard Use two or more people to lift the freezer door. Failure to do so can result in back or other injury. Electrical Shock Hazard Disconnect power before removing doors. Failure to do so can result in death or electrical shock. 1. Unplug refrigerator or disconnect power. 2. Open both doors to 90°. Remove the base grille by removing the two screws, then pulling out on the outside corners. See Graphic 1. NOTE: The doors must only be opened to 90°. If they are opened all the way, the base grille will not come off. 3. Remove food, the ice storage bin, and any adjustable door or utility bins from doors. 4. Disconnect the water tubing, located behind the base grille on the freezer door side. See Graphic 2. Press the colored outer ring against the face of fitting and pull the water tubing free. NOTE: Keep the water tubing connector attached to the tube that runs underneath the freezer. The door cannot be removed if the connector is still attached to the tube that runs through the door hinge. 5. Disconnect the wiring, located behind the base grille on the freezer door side. See Graphic 3. Remove the P-clamp using a " hex-head 1⁄4 socket wrench. Remove the small wiring bundle from the P-clamp. Remove the wiring clip using a " hex-head 1⁄4 socket wrench. Pull the electrical housing out from under the refrigerator. Disconnect the wiring plugs from the housing. Gently pull the large wiring bundle (with two white plugs) through the routing plate. 6. Close both doors and keep them lift them free from the cabinet. closed until you are ready to 8. Lift freezer door straight up off bottom hinge. See Graphic 5. The water tubing and wiring remain attached to the freezer door and pull through the bottom left hinge. NOTE: This may require two people - one to lift the door and another to feed the water tubing and wiring through the hinge. Be sure the hole in the hinge is clear of obstructions, then gently pull one water tube through the hinge. (Avoid kinking the tube.) Next, gently pull the other water tube through the hinge, again avoiding kinks. Finally, gently pull the wiring bundle (including the grommet and wiring plugs) through the hinge. IMPORTANT: Rest the door on its side on a soft, clean surface, such as a towel, blanket or piece of cardboard. This will help avoid damaging the door, water tubing and wiring. 9. Use a 3⁄16 " hex wrench to remove the top right hinge screws as shown. See Graphic 6. IMPORTANT: Do not remove either screw A. 10. Lift the refrigerator door straight up off bottom hinge. 11. It may not be necessary to remove the bottom hinges to move the refrigerator through a doorway. Both bottom hinges have similar construction. If necessary, disassemble the hinges. See Graphic 7. IMPORTANT: The leveler brackets are mounted behind the hinges. If you remove the hinges, make sure that the leveler brackets are replaced when reinstalling the hinges. Replace the Doors and Hinges 1. Replace both bottom hinges, if removed. Make sure that the leveler brackets are assembled behind the hinges. Tighten screws. IMPORTANT: When the screws are tightened properly, there should not be any gaps between the refrigerator, leveler bracket and hinge. NOTE: There are two wiring bundles that run underneath the freezer - a large bundle with a large grommet and two white plugs at the end, and a small bundle with a small grommet and one yellow plug at the end. 2 WARNING Excessive Weight Hazard Use two or more people to lift the freezer door. Failure to do so can result in back or other injury. 2. Before replacing the freezer door on the bottom left hinge, feed the small wiring bundle through the hinge. Assistance may be needed. IMPORTANT: Do not feed the large wiring bundle through the hinge. This bundle is intended to run directly from the door to the connections beneath the freezer. Forcing the large bundle through the hinge may damage the door and/or the wiring, and will keep the door from closing properly. 3. Feed both water tubes through the bottom left hinge, then replace the freezer door on the hinge. Assistance may be needed. NOTE: Provide additional support for the doors while the top hinges are being replaced. Do not depend on the door magnets to hold the doors in place while you are working. 4. Align and replace the top left hinge as shown. See Graphic 4. Tighten screws. 5. Reconnect water tubing and wiring. IMPORTANT: Do not intertwine the water tubing and wiring bundles when reconnecting them. Push the larger 5⁄16 " (7.94 mm) water tube into the blue fitting until it stops, then push the smaller 1⁄4 " (6.35 mm) water tube into the green fitting until it stops. See Graphic 2. Reinstall the P-clamp around the small wiring bundle (with one yellow plug), then replace the P-clamp on the top screw hole of the routing plate. See Graphic 3. Gently route the large wiring bundle (with two white plugs) through the hole in the routing plate, so that the wiring runs behind the right side of the routing plate. See Graphic 3. NOTE: The large wiring bundle should always remain below the small wiring bundle. Reconnect the wiring plugs to the electrical housing, then push the housing back under the refrigerator. Align the left hole in the front lip of the housing with the right hole in the refrigerator's base crossbar. See Graphic 3. Reinstall the wiring clip over the grommets. First install the smaller grommet into the top of the clip, then install the larger grommet into the bottom of the clip (closest to the screw hole). See Graphic 3. Align the clip's screw hole with the left hole in the electrical housing and the right hole in the crossbar, and screw in the clip using a single screw. Tighten screw. See Graphic 3. 6. 7. 8. 9. IMPORTANT: Once connected, the wiring bundles should not be taut. Some flexibility is needed to allow the freezer door to open properly. Replace the refrigerator door by lifting the door onto the bottom right hinge. Align and replace the top right hinge as shown. See Graphic 6. Tighten screws. Replace the ice storage bin and any adjustable door or utility bins. Plug refrigerator into a grounded 3 prong outlet. Leveling and Door Closing Your refrigerator has two adjustable front feet — one on the right and one on the left. In most cases, the refrigerator should be steady when both feet are touching the floor. If your refrigerator seems unsteady or if you want the doors to close more easily, adjust the refrigerator's tilt using the instructions below: 1. Move the refrigerator into its final location. If necessary, open both doors to 90° and remove the base grille. See Graphic 1. 2. The two leveling feet are located on the brackets on each side of the product. See Graphic 8. NOTE: Having someone push against the top of the refrigerator takes some weight off the leveling feet. This makes it easier to make adjustments. 3. Use a 1⁄4 " open-ended or adjustable wrench to adjust the leveling feet. Turn the leveling foot to the left to raise that side of the product, or turn it to the right to lower that side of the product. 4. Open both doors again and check that they close as easily as you like. If not, tilt the refrigerat or slightly more to the rear by turning the leveling feet to the left. It may take several more turns, and you should turn both leveling feet the same amount. NOTE: Whenever you need to move the refrigerator, turn the leveling feet to the right until they are no longer touching the ground. This will allow the refrigerator to roll more easily. Door Alignment A refrigerator that is not level from side-to-side may appear to have doors that are not properly aligned. If the doors appear this way, use the instructions in the previous section to check the leveling. The doors are designed to be slightly different heights when the refrigerator is empty, in order to account for the weight of food that will be placed on the doors. If the doors are still not aligned after checking the leveling and loading the refrigerator with food, follow the steps below to adjust the door alignment. 1. If necessary, open both doors to 90° and remove the base grille. See Graphic 1. 2. Locate the alignment screw on the bottom hinge of the refrigerator door. See Graphic 9. 3. Use a 5⁄16 " open-ended or adjustable wrench to turn the screw. To raise the refrigerator door, turn the screw to the right. To lower the door, turn the screw to the left. 4. Check that the doors are even at the top. If necessary, continue to turn the alignment screw until the doors are aligned. 5. Open both doors to 90°. Replace the base grille. See Graphic 1.