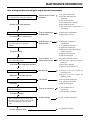
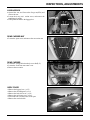
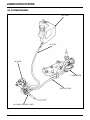
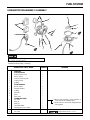
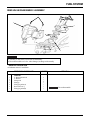
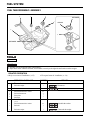
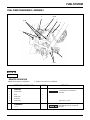
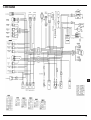
1
SERVICE MANUAL
INTRODUCTION
The lst chapter includes general maintenance information
of this manual.
The 2nd chapter is involved with the explanation of
inspection and maintenance of the parts particular to this
vehicle for the maintaining of safety and optimal function
of each of the parts.
● It is possible for certain of this service manual to
be erroneous as a result of changes and improvements
made in the vehicle. We ask that you understand if
discrepancies are found in this manual.
● This manual is intended to be used by those
having basic technical knowledge of Delfino
maintenance. It is asked for the persons lacking in the
knowledge and experience to utilize this manual when
performing maintenance and to ensure any questions
you might have to these authorized maintenance
centers.
ELECTRICAL
FRAME
Starting with the 3rd chapter, this service manual groups
its chapters into that of the engine, frame, and electrical
parts, giving a detailed explanation of the maintenance of
parts concerned under these groupings.
GENERAL
This manual was made with the goal of being easy to use
and includes drawing with reference numbers and a
detailed explanation of the relative area or part of concern
for this purpose.
ENGINE
This manual describe effective maintenance procedure
for Delfino manufactured by DAELIM Motor co., Ltd.
CONTENTS
MAINTENANCE INFORMATION
1
INSPECTIONS, ADJUSTMENTS
2
LUBRICATION SYSTEM
3
FUEL SYSTEM
4
ENGINE REMOVAL / INSTALLATION
5
CYLINDER HEAD, CYLINDER, PISTON
6
KICK STARTER, BELT-TYPE C.V.T
7
TRANS MISSION
8
CRANK CASE, CRANK SHAFT
9
FRONT WHEEL, STEERING
10
REAR WHEEL, BRAKE, SUSPENSION 11
BRAKE SYSTEM(FRONT DISK BRAKE) 12
ELECTRICAL SYSTEM
13
WIRING DIAGRAM
14
HOW TO USE THIS MANUAL
Finding correct location in manual
● This manual is divided into chapters of the inspection
and maintenance of different areas of the vehicle. When
you want to find a certain chapter, first go to the
Contents section on the first page and after finding the
desired chapter, simply flip through the pages until
reaching the desired marker corresponding with that on
the Contents page. Also, found on the first page of each
chapter is a list of what is included in that chapter; and
cautionary notes and a malfunction diagnosis are added
in the beginning of each chapter. Please read these
carefully before starting any maintenance work.
Unders tanding information and explantions given in manual
● Exploded diagrams of the main parts are offered in their respective chapters for the easy assembling and
disassembling of parts.
● Numbers or letters are found in the drawings indicating the order of disassembly.
● Symbol marks are included in the drawings to allow for the easy recognition of precautions and necessary steps to be
taken when working on the vehicle. Please refer to the following page for a complete explanation of the symbol
marks.
● A maintenance summary chart is also provided. This chart lists all the parts that appear in the graph and their
numbers, as well as cautions.
● Supplementary explanations are provided when extra information, not provided for in the drawings, is needed or
when a more detailed explanation is required.
Drawing(Exploded view)
Symbol Mark
Disassembly
order(unmbers
and letters)
Maintenance
summary chart
Part name Number of each
part(in the drawing)
Supplementary
explanation or
cautionary
suggestionss
Detailed pre / post
maintenance information
SYMBOLS
The following symbols appear in this manual and offer cautionary suggestions which need to be heeded when performing
maintenance work on the vehicle.
Symbol
Caution
Symbol
Caution
Indicates an important step or operation.
Possibility of resulting in minor
malfunctioning or damage to part if
ignored.
Indicates special caution needed.
Possibility of resulting in serious
malfunctioning of vehicle if ignored.
Indicates general caution. Caution
needed to be taken when performing the
maintenance operation or in the handling
of part.
The following symbols indicate needed lubrication, the changing of parts, and required specialized tools, etc. When
performing maintenance.
Symbol
Caution
Symbol
Caution
Indicates needed application of oil. When
a designated brand is not listed, use the
designated or suggested engine oil when
this symbol appears.
Indicates needed application of a
sealant.
Indicates needed application of a
molybdenum solution. The molybdenum
solution is made by mixing molybdenum
grease with engine oil at a 1:1 ratio.
Indicates new part needed every time
when disassembled.
Indicates needed application of a multi
purpose grease.
(NLG 1#2 using a lithium soap base)
Example brand: Shell Albania EP-2
(Fire-Proof Shell Oil)
Indicates brake fluid needed.
Use recommended DOT3 or DOT4
brake fluid.
Indicates needed application of
molybdenum grease.(containing over
3% of emulsified molybdenum, NCG
1#2)
Cushion
Oil
Use recommended cushion oil.
Indicates needed application of
molybdenum paste.
(containing over 40% of emulsified
molybdenum, NLG 1#2)
Use Specialized Tool.
Indicates needed application of silicon
grease.
Use Option Tool. These tools are needed
for the part, see part list for tool number.
Indicates needed application of an antilock substance. When a designated
brand is not listed, use a medium- (⇨ 3 - 1 )
strength brand.
Indicates reference page. This particular
symbol indicates chapter 3 page 1.
Special greases, etc. that do not correspond to the above are indicated without using symbols.
MEMO
1. MAINTENANCE INFORMATION
SERIAL NUMBER LOCATION
1-1
SPECIFICATIONS
1-2
MAINTENANCE DATA
1-2
MAINTENANCE SPECIFICATIONS
1-4
TWIST TORQUE
1-9
SPECIAL TOOLS
1-11
LUBRICATION OIL
1-12
WIRING DIAGRAM
1-14
TROUBLESHOOTING
1-16
1
SE R I A L NUM B E R L O CA TI O N
FRAME SERIAL NUMBER
ENGINE SERIAL NUMBER
ENGINE
ENGINE
ENGINE SERIAL
SERIAL
SERIAL NUMBER
NUMBER
NUMBER
FRAME
FRAME
FRAME SERIAL
SERIAL
SERIAL NUMBER
NUMBER
NUMBER
1-1
MAINTENANCE INFORMATION
SPECIFICATIONS
VEHICLE TYPE
Delfino
TRAIL
86mm
LENGTH
1,810mm
FRAME TYPE
Under bone
WIDTH
720mm
MIN REVOLUTION RADIUS
1.9m
HEIGHT
1,130mm
COOLING TYPE
Air cooling
WHEEL BASE
1,290mm
STARTING SYSTEM
Kick & Starter motor
DISPLACEMENT
99.7cc
MOTOR TYPE
2Cycle
FUEL TYPE
Unleaded gasoline
No. OF CYLINDER / MOUNTING
34kgf
VALVE APPARATUS
56kgf
BORE × STROKE
1Cylinder / Transverse
Read Valve, Piston Valve
Combination
50.6×49.6mm
90kgf
COMPRESSION RATIO
6.7
2person
9.2N·m /4,500rpm
FRONT
DRY WEIGHT REAR
TOTAL
SEATING CAPACITY
FRONT
67kgf
REAR
153kgf
TOTAL
220kgf
MAX. TORQUE
PRIMARYSPEED
REDUCTION RATIO
SECONDARY SPEED
REDUCTION RATIO
TRANSMISSION
GROUND CLEARANCE
110mm
TRANSMISSION RATIO 1ST GEAR
2.300~0.800
CASTER
28°
FUEL CONSUMPTION
41km(60km/h)
GROSS
WEIGHT
3.000
3.142
V-belt auto matic
MAINTENANCE SPECIFICATIONS
ITEM
STANDARD
Lubrication
Engine oil capacity
1.2ℓ
2cycle oil, DMC ultra 2 super oil
Recommended engine oil
Transmission oil
1-2
Full capacity
After oil change
0.12ℓ
0.11ℓ
Recommended transmission oil
API service classification : SE,
SF,SH grade
Viscosity : SAE 80W/90
Lubrication type
Oil pump type
Separate oil system
Current filtration
Plunger type
Cooling system
Cooling type
Air-cooled
SERVICE LIMITS
MAINTENANCE INFORMATION
ITEM
Fuel system
Fuel capacity
Air cleaner type
Carburetor type
Identification mark
Venturi Diameter
Air screw opening
Float level
Idle speed
No. of jet needles
Main jet
Slow jet
Throttle grip free play
STANDARD
SERVICE LIMITS
7.2ℓ (Reserve capacity 1.9ℓ)
Wet sump
PB110
PB110 1
16.0mm
1 1/8
8.00mm
1,800 ±100rpm
2nd
#88
#38
2 - 6mm
Cylinder, Cylinder, piston
Cylinder head
Cylinder
Compression pressure
bending
Inside diameter ID mark(B)
Inside diameter ID mark(A)
Inside diameter ID mark(No)
Cylindrical degree
Out of roundness
10.5kg/㎠-600rpm
Top of Cylinder
-50.600-50.605mm
50.605-50.610mm
50.610-50.615mm
---
0.10mm
50.65mm
50.65mm
50.65mm
0.10mm
0.10mm
50.565-50.569mm
50.570-50.574mm
50.575-50.579mm
0.035-0.045mm
14.002-14.008mm
13.994-14.000mm
0.002-0.012mm
0.10mm
14.03mm
13.98mm
0.03mm
ID mark location
Piston
Outside diameter
measurement location
outside
dia meter
Outside diameter ID mark(B)
Outside diameter ID mark(A)
Outside diameter ID mark(No)
Cylinder and piston spacing
Piston pin hole inside diameter
Piston pin outside diameter
Piston and Piston pin spacing
Piston ring seam spacing
Top
Second
Carving in ring
Connecting rod small and portion diameter
0.15-0.35mm
0.15-0.35mm
Turning up
18.005-18.017
0.60mm
0.40mm
18.03mm
1-3
MAINTENANCE INFORMATION
ITEM
Port timing
IN.
Open
Close
Ex
Open
Close
Scavenging Open
Close
Clutch
Clutch
Automatic
Type
Clutch outer diameter
Clutch lining thickness
Drive belt
Width
Moveable drive face
Bush inside diameter
Boss outside diameter
Weight roller outside diameter
Driven pulley Face spring free extension
Face outside diameter
Moveable face inside diameter
Crankshaft, Transmission
Crankshaft
Big end side clearance
Connecting rod Radial clearance
Crank shaft runout
A
B
1-4
STANDARD
SERVICE LIMITS
Auto Control
Auto Control
82.5。BBDC
82.5。ABDC
58。BBDC
58。ABDC
Automatic Centrifugal
Gearless shifting
112.0-112.2mm
3.5mm
17.5mm
112.5mm
2.0mm
16.5mm
24.011-24.052mm
23.960-23.974mm
15.92-16.08mm
145.5mm
33.965-33.985mm
34.000-34.025mm
24.60mm
23.94mm
15.40mm
137.5mm
33.94mm
34.060mm
---
0.80mm
0.04mm
---
0.15mm(A)
0.10mm(B)
MAINTENANCE INFORMATION
ITEM
Front, Rear Wheel
Wheel
Rim runout
Tire
Axle runout
Tire pressure
STANDARD
Radial
Axial
Front
Rear(2 Person)
(1 Person)
Tire size
Suspension
Front cushion free length
Rear cushion free length
Brake
Front brake
Rear brake
Brake fluid
Brake pad thickness
Disk thickness
Disk runout
Master cylinder inside diameter
Master piston outside diameter
Caliper cylinder inside diameter
Caliper piston outside diameter
Free play
Brake drum inside diameter
Brake lining thickness
SERVICE LIMITS
---1.50kgf/㎠
2.25kgf/㎠
1.75kgf/㎠
100/90-10 56J
2.0mm
2.0mm
0.2mm
273.1mm
249.7mm
--
DOT3 or DOT4
4.8mm
3.5mm
-11.000-11.043mm
10.957-10.984mm
30.230-30.280mm
30.148-30.198mm
10-20mm
110mm
4.0mm
To wear line
3.0mm
0.3mm
11.055mm
10.945mm
30.29mm
30.14mm
-111mm
2.0mm
1-5
MAINTENANCE INFORMATION
ITEM
Ignition System
Ignition type
Spark plug
Standard
Plug gap
Ignition timing“F”mark
STANDARD
CDI
BR8HS
0.6-0.7mm
BTDC 17°
/1,800rpm
Ignition coil
Resistance values(20℃)
Initial coil
Secondary coil(plug cap sticking)
Secondary coil(No plug cap)
0.1-0.3Ω
7.5-8.6Ω
2.7-3.5Ω
Pulse generator Resistance values(20℃)
50-200Ω
Charging System, AC generator
AC generator type
Out put
Charging coil resistance value(20℃)
Lamp coil resistance value(20℃)
Regulator / Rectifier
Type
Control pressure Lamp
Charging
Resistor value Resistor (6.7Ω 5W)
Resistor (5.9Ω 30W)
Light, Switch, meter
Light, Bulb
Head light
Stop light
Winker light
Speedometer Lamp
Winker pilot Lamp
High beam pilot Lamp
Position Lamp
Fuse
AC
12V-5.5A
0.3-1.2Ω
0.1-1.0Ω
Single phase halfwave SCR
charging
12.0-14.0V/5,000rpm
13.0-15.0V/5,000rpm
6.3-7.1Ω
5.6-6.2Ω
12V-35/35W×1
12V-21W
12V-10W×4
12V-1.7W×2
12V-3W×2
12V-3W
12V-5W×2
7A
Battery
Capacity
Terminal voltage
Charging current/standard
Charging time/Rapid
1-6
12V-3Ah(MF Battery)
13.0-13.2(20℃)
0.4A/5h
4A/0.5h
SERVICE LIMITS
MAINTENANCE INFORMATION
TWIST TORQUE
STANDARD TWIST TORQUE
TYPE
TWIST TORQUE
6mm Bolt, Nut
6mm Bolt, Nut
8mm Bolt, Nut
10mm Bolt, Nut
12mm Bolt, Nut
0.5kg-m
1.0kg-m
2.2kg-m
3.5kg-m
5.5kg-m
TYPE
5mm Screw
6mm Screw, SH Bolt
6mm Flange Bolt, Nut
8mm Flange Bolt, Nut
10mm Flange Bolt, Nut
TWIST TORQUE
0.4kg-m
0.9kg-m
1.2kg-m
2.7kg-m
4.0kg-m
* Bolts not appearing in the following table are tightened using standard torque.
ENGINE PARTS
TWIST PART
Fly wheel nut
Drive face nut
Cylinder head bolt
Spark plug
Moveable drive face bolt
Driven face nut
Clutch outer nut
Oil level check bolt
Carburetor mount bolt
Inlet pipe bolt
Mission cover special bolt
Cooling fan bolt
NUMBER SCREW
TWIST TORQUE
DIAMETER(mm)
1
1
4
1
3
1
1
1
2
4
8
2
10
10
6
14
4
28
10
10
6
8
10
6
REMARK
4.0kg-m
4.0kg-m
1.0kg-m
1.4kg-m
0.45kg-m
5.5kg-m
4.0kg-m
1.8kg-m
1.0kg-m
1.0kg-m
1.4kg-m
1.0kg-m
1-7
MAINTENANCE INFORMATION
FRAME PARTS
TWIST PART
Handle twist bolt
Steering stem lock nut
Top cone race
Front axle nut
Rear axle nut
Brake disk bolt
Caliper bleeder valve
Caliper mount bolt
Caliper pad pin
Caliper slide pin bolt
Brake hose bolt
Rear brake arm bolt
Steering stem bolt(FR. Fork)
Rear cushion upper bolt
Rear cushion lower bolt
Rear damper lock nut
Engine hanger bracket nut
Oil pump cable Stay bolt
Engine mount
Muffler joint nut
1-8
NUMBER
1
1
1
1
1
3
1
2
2
1
2
1
4
1
1
1
1
2
1
2
SCREW
TWIST TORQUE
DIAMETER(mm)
10
24.4
25.4
12
16
8
8
8
8
10
10
6
10
10
8
8
10
5
10
8
4.4kgf-m
6.9kgf-m
7.4kgf-m
5.9kgf-m
11.9kgf-m
3.9kgf-m
0.6kgf-m
2.8kgf-m
1.8kgf-m
2.3kgf-m
3.4kgf-m
0.6kgf-m
3.0~4.0kgf-m
4.0kgf-m
2.5kgf-m
2.0kgf-m
7.1kgf-m
0.8kgf-m
4.0kgf-m
3.2kgf-m
REMARK
Tighten lightly and
rotate about ⅛ back
wards
MAINTENANCE INFORMATION
SPECIAL TOOLS
TOOL NAME
OUTER HANDLE A
SOCKET WRENCH 39×41mm
CLUTCH SPRING COMPRESSOR
BEARING DRIVER
CASE PULLER
UNIVERSAL HOLDER
OUTER DRIVER 24×26mm
OUTER HANDLE A
OUTER DRIVER 32×35mm
OUTER DRIVER 37×40mm
DRIVER PILOT 17mm
USAGE
Assembly bearing
Disassembly/Assembly of clutch/
driven pulley
Insert driven face ball bearing
Disassembly starter driven gear
Disassembly clutch outer lock nut
Disassembly drive face lock nut
Insert driven face needle bearing
Assembly bearing
Change drive shaft(case)
/ final shaft(cover) bearing
Change drive shaft(cover)
/ final shaft(case) bearing
Change drive shaft(cover) bearing
Assembly driven face needle bearing
DRIVER PILOT 15mm
Change final shaft(case) bearing
DRIVER PILOT 12mm
Change drive shaft(case) bearing
CRANK ASSEMBLY SHAFT
CRANK ASSEMBLY COLLAR
Assembly drive shaft
CASE PULLER
CASE PULLER
UNIVERSAL BEARING PULLER
SHAFT PROTECTOR
OUTER DRIVER 52×55mm
DRIVER PILOT 20mm
ASSEMBLY COLLAR
CRANK ASSEMBLY SHAFT
CRANK ASSEMBLY SHAFT
CRANK ASSEMBLY COLLAR
OUTER HANDLE A
Remove crank shaft
Disassembly crank case
Remove crank shaft bearing
LOCK NUT WRENCH A
LOCK NUT WRENCH B
BALL RACE REMOVER
CUSHION COMPRESSOR ATTACHMENT
Disassembly top come race
Disassembly top come race
Remove upper ball race
Disassembly front cushion
CUSHION COMPRESSOR
Disassembly rear cushion
CHAPTER
7
8
Change crank shaft bearing
9
Assembly L. crank shaft oil seal
Assembly crank shaft / R. crank shaft oil seal,
Assembly crank case
Change crank shaft bearing
10
11
-COMPRESSOR SCREW ASS’Y
CUSHION COMPRESSOR ATTACHMENT
UNIVERSAL HOLDER
FLY WHEEL PULLER
Disassembly fly wheel
Remove fly wheel
13
1-9
MAINTENANCE INFORMATION
LUBRICATION OIL
ENGINE PARTS
APPLICATION AREAS
Connecting rod big end, rotatory part of crank
Case, operation part, connecting rod small end
Part needle bearing, rotatory part of cylinder,
Operation part, rotatory piston pin, piston pin hole
operation part
Transmission(Final drive gear)
OIL TYPE
CAUTIONARY SUGGESTIONS
2cycle oil,
DMC ultra 2 super oil
API service classification : SE,SF,SH grade
Viscosity : SAE 80W-90
Crank shaft bearing operation part
Crank shaft oil seal edges
Mission oil seal edges
Starter drive gear operation part oil pump O-ring
Drive shaft bearing operation part
Kick driven gear, friction spring operation part
Bearing, Kick spindle bearing part
Capacity : 0.5g
Capacity : 10-15g
※ Do not apply to drive belt
operation face.
Engine hanger bush operation part
Moveable drive face, Weight roller operation part
Driven face inside diameter part
Oil pump drive gear
Molybdenum grease
FRAME PARTS
APPLICATION AREAS
OIL TYPE
CAUTIONARY SUGGESTIONS
Front wheel dust seal edges
Front pivot arm bush contact part
Front pivot arm seal edges
Rear brake, cam shaft, cam part,
Brake anchor pin shaft part
Caliper piston seal edges
Master cylinder inside and operation part
Throttle cable stay bolt
Oil pump cable stay bolt
Caliper pin bolt screw part
Rear damper lock nut screw part
Rear brake cam dust seal
Rear brake cable
1-10
0.1cc
0.5cc
MAINTENANCE INFORMATION
FRAME PARTS
APPLICATION AREAS
OIL TYPE
CAUTIONARY SUGGESTIONS
Top cone race operation part
Bottom cone race operation part
Upper ball race operation part
Lower ball race operation part
Speedometer, gear, screw, Inside diameter
Speedometer pinion axle, screw part
Speedometer gear box seal, edges
Speedometer cable, inner cable face
Main stand axle part
Seat lock axle part
FR. brake lever master cylinder assembly part
FR. brake lever bolt, lever operation part
L. handle grip lever, grip inner diameter
R. handle grip lever, grip inner diameter
Bond
Air cleaner connecting tube
Case assembly part
Bond
Air cleaner element
4cycle oil
Oil tank, tank inside
2cycle oil
1-11
MAINTENANCE INFORMATION
WIRING DIAGRAM
LIGHTING SWITCH
METER
DIMMER SWITCH
HORN
FRONT WINKER
FRONT WINKER
FRONT BRAKE
MASTER CYLINDER
WINKER RELAY
REAR BRAKE CABLE
SPEEDOMETER CABLE
FRONT BRAKE HOSE
RESISTOR
1-12
MAINTENANCE INFORMATION
IGNITION COIL
THROTTLE CABLE
REGULATOR RECTIFIER
FUEL PUMP
BATTERY
IGNITION COIL
OIL TUBE
FUEL UNIT
AUTO-BY STARTER
1-13
MAINTENANCE INFORMATION
TROUBLESHOOTING
The following is an explanation of diagnosis of the principal malfunctions that can occur in the engine.
Not starting or difficulty starting
Remove the spark plug, and inspect the
electrode.
Mixture too rich.
bad starting method.
Plug of electrode
is wet.
●
Weak or
no spark.
●
Faulty ignition system.
(ignition system)
No Gasoline.
●
Faulty Fuel system.
Compression
weak or non-existent.
●
Sign of explosion
or no starting.
●
Plug is wet.
●
●
Correct.
Check spark plugs.
Good spark.
Remove the drain screw, and look
to see if gasoline is visible.
Gasoline visible.
Measure compression pressure.
There is compression pressure.
Try to start engine.
No sign of explosion.
Remove spark plug again and inspect.
Compression leakage
of cylinder gasket part.
● Piston ring is sticking or wear.
Faulty Auto by starter.
Mixture is too lean.
● Inlet pipe contact part receiving
secondary air suction.
● Faulty Fuel.
● Air cleaner is blocked.
●
●
Ignition timing damage.
Overflow of carburetor.
●
Auto by starter damage.
Plug is dry.
Let vehicle sit for 30 minute.
After disassembling carburetor, blow
through a plastic tube or straw into
the fuel in crease circuit.
Air blow through.
Carburetor is blocked.
1-14
Air does not
blow through.
MAINTENANCE INFORMATION
After starting and after becoming wet, engine does not run smoothly.
Remove the drain screw and check to
see if gasoline is reaching the carburetor.
●
There is contamination
or discoloration.
●
Spark is weak or no
spark is visible.
●
There is weak or no
compression pressure.
●
Mis-adjusted.
●
It is incorrect.
●
Gasoline does reach carburetor.
Remove spark plug and examine.
No gasoline in fuel tank.
Fuel tube is blocked to the
carburetor.
● Float valve is blocked.
● Fuel tank cap hole is blocked.
● Fuel strainer is blocked.
● Auto cock negative pressure tube is
off damaged.
Gasoline does not reach
carburetor.
●
●
Spark plug is contaminated.
Spark plug is incorrect.
No contamination or discoloration
After removing the spark plug, replace
cap, ground and see if any spark is
emitted.
The spark is strong.
Measure compression pressure.
(Use
compression
gauge.)
There
is sufficient
compression pressure.
There is sufficient compression pressure
Inspect the carburetor air screw.
Adjustment compression pressure
Inspect ignition timing.
Spark plug is damaged or
contaminated.
● AC generator is damaged.
● Ignition coil is damaged.
● High tension cord is disconnected
or short-circulated.
● Main switch is damaged.
● CDI unit is damaged.
Cylinder, piston ring is worn.
● Compression leakage of cylinder
gasket part.
● Reed valve is damaged.
● Faulty the crank shaft ail seal.
Mixture is too rich. (adjust by
loosening screw)
● Mixture is too lean. (adjust by
tightening screw)
●
It is correct.
The auto-by starter wire and see of
there is a connection.
●
Air does not blow through.
Auto-by Starter wire is
disconnected.
● Auto-by starter is damaged.
There is no connection.
●
Air blows through.
●
Auto-by Starter is damaged.
●
Carburetor is blocked.
There is a connection.
After contacting the auto-by starter wire to
the battery for five minutes, blow into fuel
increase circuit using a straw or plastic
tube.
Pulse generator is damaged.
AC generator is damaged.
CDI unit is damaged.
1-15
MAINTENANCE INFORMATION
Insufficient power or reduction in speed when travelling at high speeds.
Slowly increase speed. (on a flat, paved road)
●
Incorrect.
●
Good increase of speed.
Inspect ignition timing.
Air cleaner is blocked.
Fuel tube, filter is blocked.
● Fuel tank cap hole is blocked.
● Muffler is blocked.
Insufficiently increases
speed.
●
●
CDI unit is damaged.
AC generator is damaged.
Correct.
Measure compression pressure.
(Use compression gauge)
There is weak or no
compression pressure.
●
●
Sufficient compression pressure.
Inspect for blocked carburetor.
●
●
Carburetor is blocked
●
●
Cylinder, piston is worn.
Compression leakage of cylinder
head gasket in area.
Reed valve is damaged.
Faulty the crank shaft oil seal.
Lines in carburetor are blocked.
Air cleaner case is damaged.
Unblocked.
Remove spark plug and examine.
There is contamination or
discoloration.
●
Engine overheating.
●
●
Spark plug is contaminated.
Heat of spark plug is incorrect.
No contamination or discoloration.
Check to see if engine is overheating.
Mixture is lean.
Quality of gasoline is bad.
● Accumulation of carbon in
combustion chamber.
● Ignition timing is too fast.
●
No overheating.
Continue driving test and increase speed
and drive at high speeds.
Engine does not knock.
1-16
Engine knocks.
Accumulation of carbon in
combustion chamber.
● Quality of gasoline is bad.
● Clutch slipping.
● Mixture is lean.
●
MAINTENANCE INFORMATION
Idling rpms slow.
Check ignition timing.
Incorrect.
● AC
generator is damaged.
unit is damaged.
● CDI
Correct.
Inspect carburetor air screw.
Incorrect adjustment.
● Mixture
There is secondary
suction.
● Carburetor,
Spark is weak or there
is no spark at times.
● Spark
No connection.
● Auto
Correct adjustment.
Examine the inlet pipe contact area to see
if there is secondary air suction.
is rich. (adjust by loosening
screw)
● Mixture is lean. (adjust by tightening
screw)
inlet pipe is tightened
incorrectly.
● Carburetor insulator O-ring is
damaged.
No secondary suction.
Remove spark plug. replace cap and
ground to check the spark.
Spark is strong.
Remove Auto by-starter line covering
and inspect connection.
plug is contaminated or
damaged, cap is damaged.
● AC generator is damaged.
● Ignition coil is damaged.
● High tension cord is damaged.
● Main switch is damaged.
● CDI unit is damaged.
● Auto
by-Starter wire is disconnected.
by-Starter is damaged.
● Auto
by-Starter is damaged.
There is connection.
After contacting the Auto by-starter wire to
the battery for five minutes, blow into fuel
increase circuit using a straw or plastic tube.
Air blows through.
Air does not blow through.
1-17
MAINTENANCE INFORMATION
Engine problems at medium and high speeds.
Check ignition timing.
Incorrect.
●
●
A.C generator is damaged.
C.D.I unit is damaged.
Correct.
Examine how well fuel comes out of
fuel cock.
Does not flow well.
●
Flows well.
Check to see if carburetor jet is blocked.
Lack of gasoline in fuel tank.
Fuel tube or strainer is blocked.
● Fuel tank cap hole is blocked.
● Fuel auto cock negative pressure
tube is off. damaged.
● Fuel pump is damaged.
●
Blocked.
●
●
Air cleaner is damaged.
Connecting tube is separated.
Not blocked.
Remove outer cover of starter line and check
if there is a connection.
No Connection.
●
Auto by-Starter wire is cut.
Auto by-Starter is damaged.
●
Auto by-Starter is damaged.
●
There is a connection.
After contacting the starter wire to the
battery for five minutes, blow into
fuel increase circuit using a straw or
plastic tube.
Air does not blow through.
1-18
Air blows through.
MAINTENANCE INFORMATION
No spark at spark plugs
Replace with known good spark
plugs, conduct the spark plug test.
Spark
●
Faulty plug.
Spark
●
Loose wires.
Spark
●
Poorly connected.
CDI unit connector.
Spark is weak or not visible.
Check for poorly connected of loose
spark plug wires.
No spark.
Check for loose or poorly connected CDI unit.
●
Normal
Disconnect CDI unit connector and
check related circuit at the connector
Abnormal
●
●
●
●
●
Normal
Check the CDI unit.
●
Main switch is damaged.
Exciting coil is damaged.
Pulse coil is damaged.
Ignition coil is damaged.
Wire harness is short.
Disconnected the coupler,
Connector.
Abnormal
●
Faulty the CDI unit.
No spark.
●
Faulty ignition coil.
Normal
Measure resistance of the coil.
1-19
MAINTENANCE INFORMATION
Faulty Charging(Battery overcharging)
Measure the battery current leakage.
Over
Charged
Correct
●
Faulty regulator rectifier.
●
Battery is failing.
Abnormal
●
Open circuit in wire harness.
Correct
●
Faulty Regulator rectifier.
Abnormal
●
Not charging
Check the voltage between the red cord
and green cord of regulator rectifier.
Normal
Remove the coupler of regulator rectifier
check the system.
In correct
Check the charging coil of the AC generator.
Faulty stator.
Open circuit in wire harness
yellow cord.
● Faulty coupler.
●
Normal
Check the regulator rectifier.
Normal
Faulty battery.
1-20
Abnormal
●
Faulty Regulator rectifier.
2. INSPECTIONS / ADJUSTMENTS
REGULAR INSPECTION SCHEDULE
2-1 LOCATION OF MAINTENANCE PARTS
2-8
EXTERNAL PARTS REMOVAL
2-2 AIR CLEANER ASSEMBLY / DISASSEMBLY
2-10
2
REGULAR INSPECTION SCHEDULE
Carry out pre-operation check at each scheduled maintenance period based on the information described in the owners
manual.
I : Inspect, and clean, adjust, lubricate or replace, if necessary
R : Replace L : Lubricate C: Clean
FREQUENCY
ITEM
✽
✽
✽✽
✽✽
✽
✽
✽
✽✽
✽
✽
✽✽
✽✽
1,000km
FUEL LINE
THROTTLE GRIP OPERATION
OIL PUMP, OIL LINE
AIR CLEANER
SPARK PLUG
REMOVE THE CARBON
CARBURETOR IDLE SPEED
TRANSMISSION OIL
BRAKE FLUID
BRAKE SHOE / PAD
BRAKE SYSTEM
BRAKE LIGHT SWITCH
HEAD LIGHT BEAM DISTANCE
CLUTCH SHOE
SUSPENSION
BOLT AND NUT TIGHTNESS
WHEEL / TIRE
STEERING HEAD BEARING
ODOMETER READING(NOTE 1)
4,000km
8,000km
12,000km
I
I
I
I
I
I
I
I
I
I
I
C
C
C
I
R
I
REMARKS
NOTE 2
C
I
I
I
I
I
R
I
I
I
I
I
I
I
I
I
I
I
I
NOTE 3
I for each 1,000km
I
I
I
I
I
I
I
R
I
I
I
I
I
I
I
I
I
I
I
✽ Should
be received by an authorized DAELIM dealer, unless the owner has proper tools and service data and not
mechanically qualified.
✽✽ In the interest of safety, we recommended these items be served only by an authorized DAELIM dealer.
NOTE
1. After the odometer reading exceeds 12,000km, repeat maintenance service at intervals indicated in the table.
2. After riding in areas with high humidity or pollution, carry out maintenance.
3. Replace every 2years proper technology is required for this job.
2-1
INSPECTIONS, ADJUSTMENTS
EXTERNAL PARTS REMOVAL
Order of cover disassembly
1. HORN COVER
4. TAIL COMBINA
-TION LIGHT
7. LUGGAGE BOX
16. WIND SCREEN
2. FRONT COVER
5. REAR MUDGUARD
8.REAR CARRIER MAT
17.FRONT HANDLE COVER
3. FRONT UNDER
COVER
6. BODY SIDE COVER
9. REAR CARRIER
18.REAR HANDLE COVER
10. BODY COVER
19. FRONT FENDER
11. REAR CENTER COVER
12. CENTER COVER
13. FLOOR SIDE COVER
14. FLOOR PANEL
15. INNER BOX
2-2
INSPECTIONS, ADJUSTMENTS
HORN COVER
● Opened
the front cover, and loosen the tapping
screw(IEA).
● Remove the horn cover.
TAPPING
TAPPING
FRONT COVER
● Opened
the front cover, and loosen the 4(R, L each 2)
tapping screw of front cover arm.
●Remove the front cover.
TAPPING
SCREW
TAPPING
TAPPING SCREW
SCREW
INNER BOX
● Remove
the horn cover.
● Loosen the 6 tapping screw of front under cover and the 2
pan screw of front under cover.
● Loosen the 2pan screw of back holder, and remove the
back holder.
● Remove the floor site cover. (⇨2-6)
● Remove the floor panel. (⇨2-6)
● Remove the inner box.
● Install in the reverse order of removal.
PAN
PAN SCREW
SCREW
TAPPING
TAPPING
TAPPING SCREW
SCREW
SCREW
FRONT UNDER COVER
● Remove
the front fender. (⇨2-7)
the front wheel.
● Remove the horn cover, and loosen the 2 tapping screw.
● Loosen the 6 tapping screw of inner box.
● Loosen the washer screw(R, L. each 1) of floor side cover.
● Remove the front under cover.
● Install in the reverse order of removal.
● Remove
TAPPING SCREW
SCREW
TAPPING
2-3
INSPECTIONS, ADJUSTMENTS
TAIL COMBINATION LIGHT
●
●
Loosen the 2 pan screw, and remove the tail combination
light and coupler.
PAN
PAN
PAN SCREW
SCREW
SCREW
In case the buble needs replacing, loosen screw of each
bulb, press hook on the back of reflector, then remove the
lens.
● Replace
● Install
the bulb.
in the reverse order of removal.
REFLECTOR
REFLECTOR
SCREW
SCREW
SCREW SCREW
SCREW
SCREW
SCREW
SCREW
SCREW
SCREW
SCREW
When replacing bulb of tail combilight, take caution not
to damage the lens near the hook.
REAR MUDGUARD
● Remove
the tail combination light.
the washer screw.
● Loosen the 2(R. L) cover clip.
● Remove the mudguard.
● Loosen
WASHER SCREW
SCREW
WASHER
COVER
CLIP
BODY
BODY
BODY COVER
COVER CLIP
CLIP
BODY
BODY COVER
COVER CLIP
CLIP
BODY SIDE COVER
●Remove
the tail combination light.
the Rear mudguard.
●Loosen the body cover clip, and remove the body side
cover.
●Remove
COVER
CLIP
BODY
BODY
BODY COVER
COVER CLIP
CLIP
MOVEMENT
MOVEMENT
MOVEMENT
2-4
INSPECTIONS, ADJUSTMENTS
LUGGAGE BOX
● Opened
the seat, and Loosen the flange nut(2EA) and
remove the seat.
● Loosen the 4 stay nut, 1 washer screw, and remove the
trunk lamp of coupler.
● Pull upward and remove the luggage box.
FLANGE
FLANGE
FLANGE NUT
NUT
NUT
WASHER
WASHER
WASHER SCREW
SCREW
SCREW
STAY
NUT
STAY
STAY NUT
NUT
REAR CARRIER MAT
● Loosen
the 4 pan screw, and remove the rear carrier mat.
PAN
SCREW
PAN
PAN SCREW
SCREW
REAR CARRIER
● Loosen
the 2 flange bolt from body cover side(R, L).
the 2 bolt from rear center cover.
● Remove the rear carrier.
● Loosen
FLANGE
FLANGE BOLT
BOLT
FLANGE
BOLT
BODY COVER
● Remove
the luggage box. (⇨2-5)
the rear mudguard. (⇨2-4)
● Remove the body side cover. (⇨2-4)
● Remove the rear center cover. (⇨2-6)
● Loosen the each 2 washer screw of R/L part.
● Remove the seat lock cable.
● Remove
SCREW
SCREW
2-5
INSPECTIONS, ADJUSTMENTS
REAR CENTER COVER
● Loosen
the 4 tapping screw, and remove the rear center
cover.
* Repair the body cover disassembly.
Assembly at the same time.
TAPPING
SCREW
TAPPING
TAPPING SCREW
SCREW
TAPPING
CENTER COVER
● Remove
● Loosen
the luggage box. (⇨2-5)
the 5 special screw, and remove the center cover.
SCREW
SPECIAL
SPECIAL
SPECIAL SCREW
SCREW
SPECIAL
SCREW
SPECIAL
SPECIAL SCREW
SCREW
SPECIAL
SCREW
SCREW
SPECIAL
SPECIAL
SPECIAL SCREW
SCREW
FLOOR SIDE COVER
● Remove
the tail combination light. (⇨2-4)
the rear mudguard. (⇨2-4)
● Remove the body side cover. (⇨2-4)
● Loosen the washer screw (R/L each 1), and loosen the
tapping of R. Lower part.
● Remove the body cover clip(R/L 6EA), washer
screw(2EA).
● Remove
WASHER
SCREW
BODY COVER CLIP
FLOOR PANEL
● Loosen
the washer bolt(4EA).
back part of the floor panel slightly.
● Remove front inner cover and
connections from
groove.
● Move floor panel left and right, while pulling back it back
wards, and then removeit.
● Raise
WASHER
SCREW
WASHER
WASHER SCREW
SCREW
WASHER
2-6
WASHER
SCREW
INSPECTIONS, ADJUSTMENTS
WIND SCREEN
● Loosen
the 3 tapping screw, and remove the wind screen.
TAPPING
SCREW
TAPPING
TAPPING SCREW
SCREW
TAPPING
FRONT HANDLE COVER(FRONT, REAR)
the back mirror.
● Loosen the 1 washer screw of front part, 1 tapping screw,
and loosen the tapping screw of rear handle cover.
● Extract the front handle cover from R/L lever part.
● Remove the headlight and winker cord.
● Remove the front handle cover.
● Disconnect the speedometer cable.
● Disconnect the meter harness coupler.
● Remove the Rear handle cover.
SCREW
TAPPING
TAPPING
TAPPING SCREW
SCREW
● Remove
WASHER
WASHER SCREW
SCREW
● Inspect
● The
the switch of operation after assembly.
wire, cables must be connected accurately.
TAPPING
TAPPING
TAPPING SCREW
SCREW
SCREW
FRONT FENDER
● Loosen
the 4 special screw of fender, and remove the front
fender.
SPECIAL
SPECIAL
SPECIAL
SCREW
SCREW
SPECIAL
SPECIAL
SPECIAL
SPECIAL
SCREW
SCREW
SCREW
SCREW
2-7
INSPECTIONS, ADJUSTMENTS
LOCATION OF MAINTENANCE PARTS
The following shows the location of parts for maintenance, inspections and adjustments.
THROTTLE GRIP
(Operation, Clearance)
MASTER CYLINDER
(Brake fluid level)
SPARK PLUG
(Damage, Contamination)
FRONT CUSHION
(Damage, Looseness)
REAR WHEEL
(Damage, Vibration)
2-8
REAR TIRE
(Wear, Damage, Air pressure)
FRONT WHEEL
(Damage, Vibration)
FRONT TIRE
(Wear, Damage, Air pressure)
INSPECTIONS, ADJUSTMENTS
REAR BRAKE LEVER
(Free play)
REAR BRAKE
(Drum wear and
damage)
Shoe operational
(Area and lining wear)
REAR CUSHION
(Damage, Looseness)
HEAD LIGHT
FRONT BRAKE CALIPER
(pad wear)
FRONT BRAKE DISK
(Damage, Wear)
AIR CLEANER
(Contamination,
blockage, exchange)
TRANSMISSION
(Oil leakage and Oil level)
2-9
INSPECTIONS, ADJUSTMENTS
AIR CLEANER DISASSEMBLY / ASSEMBLY
AIR CLEANER ELEMENT REMOVAL / INSTALLATION
● Remove
● Remove
● Remove
the L. body side cover. (⇨2-4)
the 5 air cleaner screw and cover.
the air cleaner.
in the reverse order of the disassembly.
● Assembly
AIR CLEANER CASE COVER / DUCT REMOVAL / INSTALLATION
● Remove
the L. body side cover. (⇨2-4)
the luggage. (⇨2-5)
● Loosen the air cleaner case tube band.
● Loosen the 5 air cleaner case cover, and remove the cover 1 duct.
● Remove
2-10
SCREW
SCREW
SCREW
SCREW
3. LUBRICATION SYSTEM
SERVICE INFORMATION
TROUBLESHOOTING
OIL SYSTEM DRAWING
ENGINE OIL LEVEL CHECK
TRANSMISSION OIL
OIL PUMP DISASSEMBLY / ASSEMBLY
OIL PUMP ADJUSTMENT
OIL TANK DISASSEMBLY / ASSEMBLY
3-1
3-1
3-2
3-3
3-3
3-4
3-5
3-6
3
SERVICE INFORMATION
● Be
sure to remove all air from oil line after performing maintenance work. Air in the oil line hinders lubrication and
leads to clogging of the engine.
● Remove air from oil tube and oil pump if the oil tube is taken off of if air enters the oil tube.
● Maintenance
on the oil pump is done without the engine being removed from the vehicle.
disassembling the oil pump, do not allow foreign substances from entering the engine or oil pump.
● Do not disassemble the oil pump assembly.
● If the oil tube is disassembled, place a tube clip or band on the oil tube to prevent oil from leaking out.
● When
TROUBLESHOOTING
Overheating or engine clogging
● Faulty
adjustment of oil pump(insufficient amount pumped).
quality of engine oil.
● Engine oil not being injected or blocked, bent strainer screen or oil tube.
● Entering of air in oil tube system.
● Faulty oil pump.
● Engine oil not being supplied from oil tank.
- blocked oil tank cap air hole.
- blocked oil strainer screen.
● Bad
Excess exhaust smoke, accumulation of carbon on sparkplug
● Faulty
● Bad
adjustment of oil pump(over-pumped amount).
quality of engine oil.
3-1
LUBRICATION SYSTEM
OIL SYSTEM DRAWING
OIL TANK
OIL TUBE
OIL PUMP
CARBURETOR
OIL PASS TUBE
OIL PUMP CONTROL CABLE
3-2
LUBRICATION SYSTEM
ENGINE OIL LEVEL CHECK
● If
pilot lamp turns on when main switch is on, check
engine oil level.
Oil level during oil lighting : 0.2ℓ
PILOT
PILOT
PILOT LAMP
LAMP
LAMP
● Remove
oil tank cap, and pour oil up to the projected
part as shown infigure.
● After assembling oil cap tightly turn on main swich,
then check if pilot lamp is turned off.
TRANSMISSION OIL
● Check
● Check
OIL TANK
OIL LEVELCHECK BOLT
if oil leaks from rear wheel gear box.
if oil flows out from the hole of oil level check
bolt.
case the oil level is low, slowly pour oil through oil
injection hole with the recommended transmission oil.
● Tighten the oil level check bolt.
Torque : 1.8kg-m
● Check if oil leaks out after the engine starts.
● Fill in oil after loosening drain bolt.
● Tighten drain bolt and oil check bolt securely after
replace ment.
● In
OIL DRAIN BOLT
HOLE OF CHECK BOLT
3-3
LUBRICATION SYSTEM
OIL PUMP DISASSEMBLY / ASSEMBLY
1
2
8
6
0.8kg·m
7
10
9
4
3
5
Be sure to remove all air from oil line after performing maintenance work.
Air in the oil line hinders lubrication and leads to clogging of the engine.
● Install
in the reverse order of removal.
case air is inserted into oil tube caused by oil tube removal or thorough consumption of oil remove air from oil
pump, then remove air fram oil pass tube.
● In
RELATED OPERATIONS
● Disassembly
the starter motor(⇨13-10)
OPERATION / PART NAME
NUMBER
1
Disassembly
Oil tube
1
2
3
4
5
6
7
8
9
10
Oil pass tube
Oil pump bolt
Bolt
Bracket
Oil pump cable stay bolt
Stay
Oil pump control cable
Oil pump
O-ring
1
1
1
1
2
1
1
1
1
3-4
REMARK
Place tube clip or valve on oil tube to
prevent oil leaking.
Inspect the oil pump. (⇨3-5)
LUBRICATION SYSTEM
OIL PUMP ADJUSTMENT
CONTROL LEVER
OIL PUMP BODY
Perform after inspection and adjustment of throttle cable.
● Check
to see if the matching mark of the oil pump body
and control lever are aligned in a state where the throttle
grip is completely rotated.
● Adjustment is performed by loosening the oil pump cable
stay nut and turning the control nut.
● While the engine is running, slightly open the throttle and
check to see if the control lever operates together with the
increase in engine rpms.
LOCK NUT
MATCHING MARK
OIL PUMP CABLE STAY BOLT
Do not adjust the control lever matching mark to the
closed side of the oil pump body matching mark. If this
is done, the amount of pumped oil is reduced, negatively
affecting the engine. Make sure that the open axis stays
within a 1 mm sphere.
The following occurs when the oil pump is adjusted
incorrectly.
● When the oil pump control lever is excessively opened:
emitting of white exhaust gas or starting problems.
● When the oil pump control lever is insufficiently opened:
clogging of engine.
OIL PUMP STAY
● In
case of removing stay bolt of oil pump cable, coat
bolt screw with screw lock agent.
3-5
LUBRICATION SYSTEM
OIL TANK DISASSEMBLY / ASSEMBLY
8
4
2
7
HOLE
5
6
8
1
3
BOSS
OIL LEVEL SWITCH
Assembly is done in the reverse order of disassembly.
RELATED OPERATION
● Remove
the body cover.
OPERATION / PART NAME
1
2
3
4
5
6
7
8
3-6
Removal
Oil tank mount bolt
bolt
Rear fender
Crip
Joint
Rubber
Oil strainer
Oil tank
NUMBER
1
2
1
3
1
1
1
1
REMARK
Remove the oil tank from rear fender.
Remove the oil tube.
Remove from the oil tank.
Disconnect of oil level switch.
4. FUEL SYSTEM
CAUTION WHEN PERFORMING MAINTENANCE
TROUBLESHOOTING
CARBURETOR REMOVAL / INSTALLATION
CARBURETOR DISASSEMBLY / ASSEMBLY
AIR CLEANER DISASSEMBLY / ASSEMBLY
REED VALUE DISASSEMBLY / ASSEMBLY
FUEL TANK DISASSEMBLY / ASSEMBLY
FUEL PUMP DISASSEMBLY / ASSEMBLY
FUEL PUMP INSPECTION
4-1
4-1
4-2
4-3
4-4
4-5
4-6
4-7
4-8
4
CAUTION WHEN PERFORMING MAINTENANCE
● Do
not overly tighten or bend cables. Cables that are bent or damaged do not operate correctly.
caution when working in the area of O-ring and replace before re-assembling.
● Before disassembling the carburetor, unscrew the float chamber drain screw and receive the draining gasoline in a
container.
● After disassembling the carburetor, cover the port section with tape to prevent the entering of foreign substances into the
engine.
● Remove gasoline from carburetor float chamber when storing the vehicle for more than one month.
● Take
TROUBLESHOOTING
The vehicle does not start
● No
Fuel in Fuel tank.
● Fuel is not coming out of carburetor.
● Too much fuel is flowing into cylinder.
Idle is unstable and engine turns off
after starting
● Auto-by
starter is damaged.
● Ignition system is damaged.
● Using low quality gasoline.
● Suction system is experiencing secondary in take of air.
● Idle is adjusted improperly.
● Air screw is adjusted improperly.
● Compression pressure is low.
● Air/Fuel mixture is either too lean or rich.
● Carburetor is blocked.
Mis-firing occurs when driving at
highspeeds
● Ignition
● Mixture
system is damaged.
is too lean.
Bock firing
● Ignition
● Mixture
system is damaged.
is too lean.
Insufficient power and high fuel
consumption
● Air
cleaner is blocked.
system is damaged.
● Mixture is too rich.
● Ignition
Air / Fuel mixture is extremely lean
● Fuel
jet is blocked.
valve is damaged.
● Oil level is low.
● Bad ventilation of air in tank cap.
● Fuel strainer screen is blocked.
● Fuel tube is bent, creased or blocked.
● Suction system is receiving secondary suction of air.
● Insufficient amount pumped.
● Float
Air / Fuel mixture is extremely rich
● Air
jet is blocked.
valve is damaged.
● Oil level is too high.
● Auto-by starter is damaged.
● Air cleaner is blocked.
● Float
4-1
FUEL SYSTEM
CARBURETOR REMOVAL / INSTALLATION
2
3
1
9
8
CUTAWAY
THROTTLE
STOP SCREW
DRAIN SCREW
5
4
7
6
Flammable
● Assembly
is done in the opposite order as disassembly.
● Remove drain screw to abolish the gasoline of carburetor chamber.
RELATED OPERATION
● Air
cleaner removal / installation
● Luggage
OPERATION / PART NAME
1
2
3
4
5
6
7
8
9
Removal
Auto-by starter coupler
Cap top
Throttle valve
Oil tube
Fuel tube
Carburetor bolt
Insulator
O-ring
Carburetor
box removal / installation
NUMBER
1
1
1
1
1
2
1
2
1
Installation
Throttle valve
2
cap top
4-2
Disconnect
● When
8⇨1
3
REMARK
1
1
assembling, make sure to match
the throttle valve cutaway with the
stop screw.
● When assembling, securely tighten
cap top, ensuring that it is not loosen.
FUEL SYSTEM
CARBURETOR DISASSEMBLY / ASSEMBLY
2
11
3
1
10
9
16
8
4
7
15
5
13
14
12
6
Assembly is done in the opposite order as disassembly.
RELATED OPERATION
● Carburetor
disassembly / assembly
OPERATION / PART NAME
1
2
3
4
5
6
7
8
9
10
11
12
13
14
15
16
12
Removal
Auto-by starter
Auto-by starter cover
Screw washer
Auto-by starter set plate
Auto-by starter
O-Ring
Float chamber
Screw washer
Throttle chamber
O-Ring
Float pin
Float
Float valve
Carburetor body
Air screw
Slow jet
Main jet
Jet needle holder
Throttle stop screw / spring
Installation(15⇨1)
Air screw
NUMBER
REMARK
2
2
1
1
1
2
1
1
1
1
1
1
1
1
1
1/1
● Before
disassembling, check number of
screw rotations in assembled state.
● As the seat face can become damaged do not
overly tighten.
Inspect the air screw. (⇨1-5)
4-3
FUEL SYSTEM
AIR CLEANER DISASSEMBLY / ASSEMBLY
BREATHER TUBE
a
2
b
5
7
4
3
6
1
Assembly is done in opposite order as disassembly.
RELATED OPERATION
● Luggage
removal / installation (⇨ 2-5)
OPERATION / PART NAME
NUMBER
REMARK
1
2
3
4
Air cleaner cover screw
Air cleaner connecting tube band
Air cleaner case cover
Air cleaner element
5
1
1
1
a
b
Air cleaner chamber
Chamber mount nut
Air cleaner chamber
2
1
Assemble with the luggage.
5
6
7
Air cleaner connecting tube bend screw
Air cleaner case mount bolt
Air cleaner case
1
2
1
Assemble transmission
the breather tube.
4-4
FUEL SYSTEM
REED VALVE DISASSEMBLY / ASSEMBLY
1
3
2
4
5
6
7
● Assembly
● Do
is done in the reverse order of disassembly.
not disassemble reed valve. when damaged, exchange with assembly.
RELATED OPERATION
● Carburetor
removal / installation
OPERATION / PART NAME
1
2
3
4
5
6
7
Removal
L. Shroud mount bolt
L. Shroud
Flange bolt
Inlet pip
Inlet pipe gasket(A)
Reed valve Ass’y
Inlet pipe gasket(B)
NUMBER
2
1
4
1
1
1
1
REMARK
Do not disassemble
4-5
FUEL SYSTEM
FUEL TANK DISSEMBLY / ASSEMBLY
4
2
3
RETAINER
1
ARROW
5
a
RETAINER
Flammable
● Assembly
● Adjust
is done in opposite order as disassembly.
arrow mark of retainer and tank, and assemble it securely to the right side until retainer reaches stopper.
RELATED OPERATION
● Body
cover removal / Installation (⇨2-5)
OPERATION / PART NAME
● Floor
panel removal / installation (⇨ 2-6)
NUMBER
REMARK
1
Removal
Fuel unit coupler
1
Disconnect
a
Fuel unit
1
Remove the retainer
2
3
4
5
Fuel tank mount bolt / washer
Fuel tank mount nut
Floor plate
Fuel tank
2/2
2
1
1
Installation
(5⇨2)
2
a
Fuel tank mount bolt / washer
Fuel unit
1
Fuel unit coupler
4-6
2/2
1
Assemble the washer
1
Connected the coupler
FUEL SYSTEM
FUEL PUMP DISASSEMBLY / ASSEMBLY
CLIP
5
3
CLIP
4
2
1
CLIP
Flammable
RELATED OPERATION
● Body
cover removal / installation
OPERATION / PART NAME
●
Center cover removal / installation
NUMBER
1
Removal
Fuel strainer
1
2
3
4
5
Bolt
Pulse tube
Fuel tube
Fuel pump
2
1
1
1
Installation
(5⇨1)
REMARK
Loosen the clip, and remove
the tube.
inspection (⇨4-8)
Assembly is done in opposite order as disassembly.
If the damaged of clip, replace the
new part.
4-7
FUEL SYSTEM
FUEL PUMP INSPECTION
Adjust idling rrevolution to specified range by starting
engine before checking discharge quantity.
● Engine
starting, idling.
pump is in good condition if discharge quantity is over
28cc for 10seconds after dis charging fuel for 5seconds or
more since fuel tube is removed from carburetor.
● If specified discharge quantity is not obtained, check fuel tube,
oil pressure tube, and fuel strainer if there is no problem with
them, replace fuel pump with new one.
● Fuel
4-8
5. ENGINE REMOVAL / INSTALLATION
CAUTION WHEN PERFORMING MAINTENANCE
5-1
ENGINE REMOVAL / INSTALLATION
5-2
CAUTION WHEN PERFORMING MAINTENANCE
● When
dismounting the engine, make sure to support the vehicle body and be careful not to damage the frame,
engine, cables and harness.
● When dismounting the engine, tape the frame to protect.
● The following parts can be without dismounting of the engine from the vehicle body.
- Transmission(Chapter 8)
- AC Generator(Chapter 13)
- Kick starter, belt-type gearless transmission(Chapter 7)
- Cylinder head, Cylinder, Piston(Chapter 6)
- Carburetor(Chapter 4)
- Oil pump(Chapter 3)
5
● The
following parts must be disassembled after the engine is dismounted.
- Crank shaft, Crank shaft bearing, Crank case bearing(Chapter 9)
5-1
ENGINE REMOVAL / INSTALLATION
ENGINE REMOVAL / INSTALLATION
3
8
7
9
2
10
2.5kg·m
14
1
12
6
5
15
7.0kg·m
4
11
4.0kg·m
13
RELATED OPERATION
●Bady cover removal / installation (⇨2 - 5 ), Auto by starter cord disassembly (⇨4 - 3 ),
Air cleaner removal / installation (⇨4 - 4 )
OPERATION / PART NAME
1
2
3
4
5
6
7
8
9
10
11
12
13
14
15
Removal
AC Generator cord / Starter motor cord
Throttle valve
Spark plug cap
Rear brake adjust nut
Brake arm pin
Rear brake cable
Oil pump and oil tank of oil tube
Fuel pump and crank case of tube
Fuel tube
Rear cushion lower bolt
Engine mount nut
Engine mount bolt
Engine
Engine hanger
Engine hanger link
Engine hanger nut
NUMBER
1
1
1
1
1
1
1
REMARK
Remove the L cover of clamp.
Remove the side of oil pump.
Oil does not spill out.
Remove the side of oil pump.
1
1
1
1
1
1
Securely support the frame so that the vehicle
body does not fall over.
1
2
Engine assemble, loosen the firmness.
Installation
(15⇨1)
5-2
Follow the inspection, adjusting.
·Electric of inspection, Rear brake cable throttle cable.
·Oil pump cable (⇨ 3-5)
MEMO
6. CYLINDER HEAD, CYLINDER, PISTON
CAUTION WHEN PERFORMING MAINTENANCE
6-1
TROUBLESHOOTING
6-2
CYLINDER HEAD, CYLINDER, PISTON REMOVAL / INSTALLATION
6-3
CAUTION WHEN PERFORMING MAINTENANCE
● After
disassembling parts, they must be cleaned and air-dried before inspecting and measuring.
disassembling the cylinder, be careful not to scratch the matching face with tools or damage the cooling pins
by bumping or dropping the cylinder head.
● Take special care not to scratch the inside surface of the cylinder or the outside of the piston.
● When
6
TROUBLESHOOTING
Compression pressure is too Low
● Cylinder
head
- The head gasket is cracked.
- The head of bent or broken.
●The cylinder piston is worn
Compression pressure is too high
● Carbon
accumulation on piston and in combustion chamber.
Engine noise
●The
cylinder, piston, piston ring are worn.
pin hole and piston pin wear bending or crack of head.
●The connecting rod of small and bearing worn.
●Piston
6-1
CYLINDER HEAD, CYLINDER, PISTON
CYLINDER HEAD, CYLINDER, PISTON REMOVAL / INSTALLATION
1
1.0kg·m
1.4kg·m
2
3
9
TOP
SECOND
4
10
STOPPER PIN
5
6
7
8
11
6-2
CYLINDER HEAD, CYLINDER, PISTON
When disassembling cylinder, do not scratch the matching face with tools, etc.
Assembly is done in reverse order of disassembly.
RELATED OPERATIONS
● Shroud
removal / installation
OPERATION / PART NAME
NUMBER
REMARK
1
2
3
Removal
Cylinder head
Cylinder bolt
Cylinder head
Cylinder head gasket
4
1
1
Bolts are loosened by rotating 2-3 times
and alternating to diagonal bolt.
4
5
Cylinder
Cylinder
Cylinder gasket
1
1
Be careful not to bend pins.
Be careful not to damage the cylinder and
crank case gasket face when cleaning.
Piston
Piston pin clip
Piston pin
Piston
Piston ring
Expander
Connecting rod small and bearing
2
1
1
2
1
1
Assemble in the inner side of the second
piston ring.
6
7
8
9
10
11
6-3
7. KICK STARTER, BELT-TYPE C.V.T
CAUTION WHEN PERFORMING MAINTENANCE
7-1
TROUBLESHOOTING
7-1
L. CRANK CASE COVER REMOVAL / INSTALLATION
7-2
KICK STARTER REMOVAL / INSTALLATION
7-3
BELT-TYPE C.V.T REMOVAL / INSTALLATION
7-4
STARTER DRIVEN GEAR REMOVAL / INSTALLATION
7-5
MOVABLE DRIVE FACE DISASSEMBLY
7-6
CLUTCH / DRIVEN PULLEY DISASSEMBLY
7-7
7
CAUTION WHEN PERFORMING MAINTENANCE
● Do
not allow oil to contact the drive belt or the pully face. The transmission rate of driving force is reduced with oil
contact.
● Do not operate starter motor while the L. crank case front cover is removed.
TROUBLESHOOTING
Engine does not start or vehicle does not work
● Drive
belt is worn.
plate is damaged.
● Clutch shoe is worn or damaged.
● The movable driven face spring has been cut.
● Lamp
When starting to drive, the engine stops or causes the vehicle to
jump forward
● Clutch
shoe spring has been cut.
Can not reach top speeds and engine power is low
● Drive
belt is worn.
driven face spring is damaged.
● Weight roller is worn.
● Contamination on pulley face.
● Movable
7-1
KICK STARTER, BELT-TYPE C.V.T
L. CRANK CASE COVER REMOVAL / INSTALLATION
5
6
7
4
3
2
1
Assembly is done in reverse order of disassembly.
RELATED OPERATION
● Air
cleaner case removal / installation (⇨ 4 - 4 )
body cover (⇨2 - 5)
● Frame
OPERATION / PART NAME
1
2
3
4
5
6
7
7-2
6mm Special bolts
Bolt
Clamp
L. Crank case cover
Knock pin
Gasket
8mm Special bolt
NUMBER
7
1
1
1
2
1
1
REMARK
Assemble the bolts of length to same.
Remove the rear. brake cable clamp.
Remove the cooling hose from cover.
KICK STARTER, BELT-TYPE C.V.T
KICK STARTER REMOVAL / INSTALLATION
3
4
9
5
6
8
10
7
2
1
RELATED OPERATION
● L.
crank case cover removal / installation (⇨7 - 2 )
OPERATION / PART NAME
NUMBER
1
2
3
4
5
6
7
8
9
10
Removal
Kick driven gear
Trust washer
Bolt
Kick starter pedal
Snap ring
Trust washer
Kick starter spindle
Kick starter return spring
Gear box collar
Spindle bush
1
1
1
1
1
1
1
1
1
1
10
9
8
Installation
Spindle bush
Gear box collar
Kick starter return collar
1
1
1
Kick starter spindle
Trust washer
Snap ring
Trust washer
Kick driven gear
Kick starter pedal
bolt
1
1
1
1
1
1
1
7
6
5
2
1
4
3
REMARK
Disassemble the kick starter in assembly with
rotating its pedal.
Push and assemble spindle by dividing it into
internal and external spring with“ ⊖ ”driver.
Insert the spring at“
”
part.
7-3
KICK STARTER, BELT-TYPE C.V.T
BELT-TYPE C.V.T REMOVAL / INSTALLATION
2
1
13
11
7
12
5
4
10
6
9
3
4.0kg·m
8
4.0kg·m
Assembly is done in reverse order as disassembly.
RELATED OPERATION
● L.
crank case cover removal / installation (⇨ 7 - 2 )
fan removal / installation (⇨ 13 - 6)
● Cooling
OPERATION / PART NAME
1
2
3
4
5
6
7
8
9
10
11
12
13
7-4
Removal
Pinion holder
Starter pinion
nut
washer
starter ratchet
Drive face
Drive belt
Clutch outer nut
Clutch outer
Clutch / driven pulley
Drive face boss
Movable drive face
Starter driven gear
NUMBER
1
1
1
1
1
1
1
1
1
1
1
1
1
REMARK
Use a universal holder.
Use a universal holder, fix the clutch outer
and remove.
Removal (⇨ 7-7)
Removal (⇨ 7-6)
Removal / Installation (⇨ 7-5)
KICK STARTER, BELT-TYPE C.V.T
STARTER DRIVEN GEAR REMOVAL / INSTALLATION
STARTER DRIVEN GEAR
REMOVAL
Secure a case puller on the crank case and remove the starter
driven gear.
CASE PULLER
CASE PULLER
7-5
KICK STARTER, BELT-TYPE C.V.T
MOVABLE DRIVE FACE DISASSEMBLY
3
1
2
5
4
Assembly is done in reverse order as disassembly.
OPERATION / PART NAME
1
2
3
4
5
7-6
Ramp plate
Slide piece
O-ring
Weight Roller
Movable drive face
NUMBER
1
3
1
6
1
REMARK
KICK STARTER, BELT-TYPE C.V.T
CLUTCH / DRIVEN PULLEY DISASSEMBLY
19
5
18
4
17
2
14
3
11
7
15
20
16
6
1
13
5.5kg·m
12
10
9
OPERATION / PART NAME
1
2
3
4
5
6
7
8
9
10
11
12
13
14
15
16
17
18
19
20
Disassembly
Clutch
Driven face nut
Snap ring
Washer
Clutch shoe
Clutch spring
Damper rubber
Clutch drive plate
Driven pully
Spring collar
Driven face spring
Seal collar
Guide pin
Roller guide pin
Roller guide
Movable driven face
O-ring
Oil seal
Inner bearing
Snap ring
Outer bearing
Driven face
NUMBER
1
3
3
3
3
3
1
1
1
1
3
3
3
1
2
2
1
1
1
1
8
REMARK
28mm special nut.
Exchange if damaged, worn or deformed.
Ball bearing 6901U
Needle bearing 17×25×18
7-7
8. TRANSMISSION
CAUTION WHEN PERFORMING MAINTENANCE
TROUBLESHOOTING
DRIVE SHAFT / TRANSMISSION DISASSEMBLY / ASSEMBLY
DRIVE SHAFT EXCHANGE
8-1
8-1
8-2
8-3
CAUTION WHEN PERFORMING MAINTENANCE
This chapter explains maintenance to the final reduction. It is possible to perform this maintenance without
dismounting the engine. However, the exchange of the L. crank case side bearing is performed after the engine and
the rear brake are disassembled to prevent damage to the case.
● This exchange of the drive shaft must be done with the use of special tools, and the shaft is assembled with the inner
bearing and inner race securely fixed.
●
TROUBLESHOOTING
The engine starts ; is not possible to drive
●
●
The transmission is damaged.
The transmission is clogged.
A noise when driving
Gear is worn, clogged or damaged.
● Bearing wear, clearance.
●
Oil leakage
●
●
Too much oil.
Oil seal wear, damage.
8-1
8
TRANSMISSION
DRIVE SHAFT / TRANSMISSION DISASSEMBLY / ASSEMBLY
5
4
2
6
9
8
7
1
10
8
1.8kg·m
3
Assembly is done in reverse order as disassembly.
RELATED OPERATION
● Rear
wheel removal / installation (⇨11-2 )
/ driven pully disassembly / assembly (⇨ 7-7 )
● Clutch
OPERATION / PART NAME
1
2
3
4
5
6
7
8
9
10
8-2
Disassembly
Bolt
Trans mission cover
Gasket
Knock pin
Final gear comp
Counter shaft
Counter shaft gear
Thrust washer - Drive shaft
Side washer
Drive shaft
NUMBER
4
1
1
2
1
1
1
2
1
1
REMARK
remove the oil.
Check for clogging, damage.
Disassemble gear from counter shaft.
TRANSMISSION
DRIVE SHAFT EXCHANGE
DRIVE SHAFT
● Use
a hydraulic press to disassemble the drive shaft from
the transmission cover.
Be careful not to scratch the cover assembly face.
TRANSMISSION COVER
● Disassemble
● Disassemble
● Install
the drive shaft oil seal.
the bearing.
BEARING
OIL SEAL
a new bearing on transmission cover.
OUTER HANDLE
Make sure the mark faces outside when assembling.
DRIVER PILOT 17mm
OUTER DRIVER
37×40mm
OUTER HANDLE A
OUTER DRIVER 37×40mm
DRIVER PILOT 17mm
Assemble the drive shaft to the transmission cover.
ASSEMBLY COLLAR
CRANK ASSEMBLY SHAFT
CRANK ASSEMBLY COLLAR
● Use
a new drive shaft oil seal when assembling.
ASSEMBLY SHAFT
8-3
MEMO
9. CRANKCASE, CRANKSHAFT
CAUTION WHEN PERFORMING MAINTENANCE
9-1
TROUBLESHOOTING
9-1
CRANKCASE DISASSEMBLY / ASSEMBLY
9-2
CRANKSHAFT REMOVAL
9-4
CRANKSHAFT INSTALLATION
9-4
CRANKCASE ASSEMBLY
9-6
CAUTION WHEN PERFORMING MAINTENANCE
● This
chapter explains the crankcase disassembly operation for maintenance related to the crankshaft.
disassembling the crankcase, the following parts must be disassembled first. Refer to the listed chapters
when disassembling.
- Oil pump(⇒ chapter 3)
- Carburetor(⇒ chapter 4)
- Reed Valve(⇒ chapter 4)
- Engine(⇒ chapter 5)
- Cylinder Head, Cylinder, piston(⇒ chapter 6)
- AC Generator(⇒ chapter 13)
- Drive face(⇒ chapter 7)
- Clutch/Driven Pulley(⇒ chapter 7)
● When replacing the L. Crankcase, the following disassembly operation must be performed first. Refer to the listed
chapters when disassembling.
- Transmission(⇒ chapter 8)
- Rear Brake(⇒ chapter 11)
● When assembling the crankcase and crank shaft, use a specialized tool which matches with the crankshaft bearing
inner race to pull the crankshaft. When disassembling, make sure to remove the bearing in the crankshaft and place
a new bearing in the case side, and after assembly, replace a new oil seal.
● Before
9
TROUBLESHOOTING
Engine noise
● Clearance
● Clearance
in the connecting rod large end portion/ small end portion bearing.
in the crankshaft bearing.
9-1
CRANKCASE, CRANKSHAFT
CRANKCASE DISASSEMBLY / ASSEMBLY
9(L)
12
3
8
10
2
4
11
1
7
6
5
14
9-2
13
CRANKCASE, CRANKSHAFT
RELATED OPERATION
● Engine
removal/installation(⇒chapter 5)
pully removal/installation(⇒ chapter 7)
● Drive face removal(⇒ chapter 7)
● AC generator removal/installation(⇒ chapter 13)
● Clutch/driven
OPERATION/PART NAME
1
2
3
4
5
6
7
8
9
10
11
12
13
14
12
11
8
9
14
13
7
6
5
4
3
2
10
1
Disassembly
Crankcase connecting bolt
R. crankcase
Gasket
Knock pin
Flange bolt
Silent plate
Silent rubber
Crankshaft
L. oil seal
R. oil seal
R. bearing
L. bearing
Flange bolt
Case cover comp
Assembly
L. bearing
R. bearing
Crankshaft
L. oil seal
Case cover comp
Flange bolt
Silent Rubber
Silent plate
Flange bolt
Knock pin
Gasket
R. crankcase
R. oil seal
Crankcase connection Bolt
NUMBER
6
1
1
2
3
1
1
1
1
1
1
1
1
1
1
1
1
1
1
1
1
1
3
2
1
1
1
6
REMARK
disassembly(⇨ 9-4)
disassembly(⇨ 9-4)
disassembly(⇨ 9-4)
Assembly(⇨ 9-4)
Assembly(⇨ 9-4)
Assembly(⇨ 9-4)
Assembly(⇨ 9-5)
Assembly(⇨ 9-5)
9-3
CRANKCASE, CRANKSHAFT
CRANKSHAFT REMOVAL
CASE DRIVEN
GEAR PULLER
Secure a case puller on the R. crankcase and remove the R.
crankcase from the L. crankcase.
R. CRANKCASE
CASE PULLER
Secure a case puller on the L. crankcase and remove the
crankshaft the L. crankcase.
CASE PULLER
CRANKSHAFT
Do not force to disassemble by pounding on the
crankshaft.
L. CRANKCASE
CASE PULLER
Use a bearing puller to remove bearing from the crank shaft.
Remove the oil seal from the R. and L. crankcase.
SHAFT PROTECTOR
Replace with a new oil seal when disassembling the
crankcase.
UNIVERSAL BEARING PULLER
SHAFT PROTECTOR
CRANKSHAFT INSTALLATION
Clean the crankcase using cleansing oil, check for crack and
damage to each area.
● Apply
oil to the radial ball bearings and the connecting
rod large end portion.
● After thoroughly removing the liquid gasket from the
joining face, mend the scratched areas using an oil
stone.
9-4
UNIVERSAL BEARING PULLER
CRANKCASE, CRANKSHAFT
Place new bearings in R. crankcase.
OUTER HANDLE A
OUTER HANDLE A
OUTER DRIVER 52×55mm
DRIVER PILOT 20mm
OUTER DRIVE A
Place new bearings in L. crank case.
OUTER HANDLE A
OUTER HANDLE A
OUTER DRIVER 52×55mm
DRIVER PILOT 20mm
Assemble the crankcase to the L. crankcase.
OUTER DRIVE
CONNECTING ROD
ASSEMBLY COLLAR
● Apply
2cycle oil to the redial ball bearings and the
connecting rod large end portion.
● Assemble not to interfere with the case with being
careful of connecting rod location.
CRANK ASSEMBLY COLLAR
CRANK ASSEMBLY SHAFT
Place a new oil seal in the crankcase end portion at a 2.5 ~
3.5mm depth.
ASSEMBLY SHAFT
ASSEMBLY COLLAR
2.5-3.5mm
CRANK ASSEMBLY COLLAR
CRANK ASSEMBLY SHAFT
OIL SEAL
ASSEMBLY SHAFT
9-5
CRANKCASE, CRANKSHAFT
CRANKCASE ASSEMBLY
Apply a liquid gasket to the L.
crankcase joining face, assemble knock pins.
Assemble the R. crankcase.
ASSEMBLY SHAFT
ASSEMBLY
COLLAR
CRANK ASSEMBLY COLLAR
CRANK ASSEMBLY SHAFT
Place a new L. oil seal in the crankcase end portion at
12.5~13.5mm depth.
CRANK ASSEMBLY COLLAR
CRANK ASSEMBLY SHAFT
12.5-13.5mm
ASSEMBLY
SHAFT
OIL SEAL
ASSEMBLY
COLLAR
9-6
MEMO
10. FRONT WHEEL, STEERING
CAUTION WHEN PERFORMING MAINTENANCE
10-1
TROUBLESHOOTING
10-1
FRONT WHEEL REMOVAL/INSTALLATION
10-2
FRONT WHEEL DISASSEMBLY / ASSEMBLY
10-3
STEERING HANDLE REMOVAL / INSTALLATION
10-4
STEERING STEM DISASSEMBLY / ASSEMBLY
10-6
CAUTION WHEN PERFORMING MAINTENANCE
●
See chapter13 for maintenance and inspection of lights, meter, and switches.
TROUBLESHOOTING
Heavy steering handle
Wheel rotation not smooth
● Steering
● Wheel
top cone lace is tightened too tightly.
● Steering step ball is damaged.
● Damage to steering ball race, cone race.
● Low tire pressure.
● Tire wear.
Weak front suspension
●
Weak spring.
Steering handle turns to one side
Noise from front cushion
● Fork
●
● Front
●
is bent.
axle is bent.
● Frame is bent.
● Uneven tire wear and bending.
● Wheel bearing wear.
10
bearing damage.
● Brake is sticking.
Catching on cushion case.
Cushion connecting portion is loose.
10-1
FRONT WHEEL, STEERING
FRONT WHEEL REMOVAL / INSTALLATION
3
4
7
5
2
6
1
Do not allow oil to contact brake disk or not to reduce braking capability. If oil does come into contact with these
parts, replace the pad and clean the disk.
● Assembly
● Make
is done in reverse order of disassembly.
sure that the vehicle body is well supported when removing the front wheel.
OPERATION / PART NAME
1
2
3
4
5
6
7
10-2
Disassembly
Speedometer gear box screw
Speedometer cable
Front axle nut
Front axle
Front brake collar
Speedometer gear box
Front wheel ass’y
NUMBER
1
1
1
1
1
1
1
REMARK
FRONT WHEEL, STEERING
FRONT WHEEL DISASSEMBLY / ASSEMBLY
6
1
4
3
5
2
8
b
a
4.0kg·m
7
Assembly is done in reverse order of disassembly.
RELATED OPERATION
● Front
wheel disassembly / assembly
OPERATION / PART NAME
1
2
3
4
5
6
7
8
a
b
Disassembly
Speedo meter gear seal / gear
Dust seal
L. wheel bearing
Distance collar
R. wheel bearing
Tire
Cast wheel
Rim valve
Disk bolt
Brake disk
Assembly
(8 ⇨ 1)
(b ⇨ a)
NUMBER
REMARK
1/1
1
1
1
1
1
1
1
3
1
Replace wheel bearing by set place L.
bearing at frist.
Face the mark side toward outside when
assembling.
10-3
FRONT WHEEL, STEERING
STEERING HANDLE REMOVAL / INSTALLATION
11
9
8
PIPE
5
1
6
HOLE
2
4
HOLE
10
PART
7
16
14
4.0kg·m
13
15
12
PART 3
RELATED OPERATION
● Handle cover removal
OPERATION / PART NAME
1
2
3
4
5
6
7
8
9
10
11
12
13
14
15
16
10-4
Rear brake lever
Bolt
Rear brake lever holder
Rear brake lever
L. grip
Front master cylinder / brake lever
Bolt
Master cylinder holder
Master cylinder
Throttle housing
Screw
Upper throttle housing
Throttle cable
R. throttle grip
Steering handle
Nut
Washer
Handle join bolt
Washer
Steering handle
NUMBER
1
1
1
REMARK
Remove the rear brake cable from lever,
insepct the rear brake.
2
1
1
1
1
1
1
1
1
1
1
1
Remove the throttle from throttle grip pipe part.
do not a bent or damage for the throttle cable.
FRONT WHEEL, STEERING
● Handle
cover assembly
OPERATION / PART NAME
NUMBER
16
(16⇨1)
Steering handle
1
10
9
Throttle cable
Upper throttle housing
1
1
2
Rear brake lever holder
1
REMARK
Match the handle ‘ ’part with the step pipe
groove assembling.
Inspect the throttle grip of free play.
Match the housing ‘ ’part with the upper throttle
housing groove, and loosen the washer screw .
Match the holder groove with the lever ‘ ’ part,
and loosen the bolt.
10-5
FRONT WHEEL, STEERING
STEERING STEM DISASSEMBLY / ASSEMBLY
1
7.0kg·m
2
3
4
7
7
5
6
RELATED OPERATION
fender removal / installation(⇨ 2-7)
wheel removal / installation(⇨ 10-2)
● Steering handle removal / installation(⇨ 10-4)
● Front brake caliper removal / installation(⇨ 12-3)
● Front
● Front
OPERATION / PART NAME
1
2
3
4
5
6
7
5
3
2
10-6
Removal
Front fork
Stem lock nut
Top cone race
Upper steel ball
Steering stem comp
Lower steel ball
Bottom cone race
Ball race
Installation
(7 ⇨ 1)
Lower steel ball
Upper steel ball
Top cone race
NUMBER
REMARK
1
1
26
1
29
1
2
29
26
1
Do not lose a attention.
Do not lose a attention.
Tighten lightly and ratate about ⅛ backwards.
MEMO
11. REAR WHEEL, BRAKE, SUSPENSION
CAUTION WHEN PERFORMING MAINTENANCE
11-1
TROUBLESHOOTING
11-1
REAR WHEEL REMOVAL/INSTALLATION
11-2
REAR WHEEL DISASSEMBLY / ASSEMBLY
11-3
REAR BRAKE DISASSEMBLY / ASSEMBLY
11-4
REAR CUSHION REMOVAL / INSTALLATION
11-5
REAR CUSHION DISASSEMBLY / ASSEMBLY
11-6
CAUTION WHEN PERFORMING MAINTENANCE
●
So that brake capability is not reduced, make sure that oil dose not come into contact with the brake drum or
lining face. If oil dose contact these parts wipe off the drum and replace.
11
TROUBLESHOOTING
Shaking of rear wheel shakes
Rear cushion noise
● Wheel
● Caught
● Tire
● Assembly
rim is bent.
is damaged.
● Axle is tightened improperly.
● Improper tire pressure.
● Wheel is not balanced.
Weak rear cushion
in cushion case.
portion has become loose.
Rear cushion hard
● Damper
rod is bent.
tire air pressure.
● Improper
● Damaged
● Rear
spring.
damper is damaged, leaking oil.
11-1
REAR WHEEL, BRAKE, SUSPENSION
REAR WHEEL REMOVAL / INSTALLATION
6
5
4
12.0kg-m
7
1
3
2
Assembly is done in order of disassembly.
RELATED OPERATIONS
● Luggage
box removal / installation (⇨2-5)
OPERATION / PART NAME
1
2
3
4
5
6
7
11-2
Joint nut
Flange bolt
Exhaust muffler
Rear axle nut
Washer
Rear wheel
Gasket
NUMBER
2
2
1
1
1
1
1
REMARK
REAR WHEEL, BRAKE, SUSPENSION
REAR WHEEL DISASSEMBLY / ASSEMBLY
1
2
3
● Assembly
is done in reverse order of disassembly.
●Rear brake disassembly/assembly. (⇨11-4)
Related operations
● Rear
wheel disassembly
OPERATION / PART NAME
1
2
3
Disassembly
Rear tire
Casting wheel
Rim valve
NUMBER
REMARK
1
1
1
11-3
REAR WHEEL, BRAKE, SUSPENSION
REAR WHEEL DISASSEMBLY / ASSEMBLY
2
1
5
1.0kg·m
7
6
8
9
ANCHER PIN
11
10
4
3
Assemble is done in reverse order of disassemble.
RELATED OPERATION
● Rear
wheel Removal / Installation
OPERATION / PART NAME
1
2
3
Disassembly
Rear brake axle nut
Brake arm joint
Rear brake cable
4
5
6
7
8
9
10
11
Brake shoe/ Shoe spring
Flange blot
Brake arm
Return spring
Wear indicator
Cam dust seal
Brake cam
Shoe stopper rubber
11-4
NUMBER
1
1
1
2/2
1
1
1
1
1
1
2
REMARK
Check if booth of rear brake cable is
securely assembled during assembly.
REAR WHEEL, BRAKE, SUSPENSION
REAR CUSHION REMOVAL / INSTALLATION
2
4.0kg·m
3
1
2.5kg·m
HEX BOLT
● Assemble
is done in reverse order of disassemble.
● mark sure that frame is securely supported.
RELATED OPERATION
● Luggage
box removal / installation
OPERATION / PART NAME
1
2
3
Disassembly
Hex bolt
Flange bolt
Rear cushion Ass’y
REMARK
NUMBER
1
1
1
Disassembly (⇨11-6)
11-5
REAR WHEEL, BRAKE, SUSPENSION
REAR CUSHION DISASSEMBLY / ASSEMBLY
Assembly is done in reverse order of disassembly.
RELATED OPERATION
● Rear
Cushion Removal / Installation (⇨11-5)
OPERATION / INSTALLATION
1
2
3
4
5
6
7
11-6
Disassembly
Bottom metal
Lock nut
Spring
Stopper
Spring guide
Damper comp
Rubber bush
NUMBER
1
1
1
1
1
1
1
REMARK
Disassembly (⇨ 11-7) loosen the lock nut
Assemble it so that the narrow side of
pith may be orented upward during
assembly.
REAR WHEEL, BRAKE, SUSPENSION
DISASSEMBLY / ASSEMBLY
CUSHION COMPRESSOR
Install the compressor attachment.
Install the cushion for cushion compressor, compress spring.
REAR CUSHION COMPRESSOR ATTACHMENT
REAR COMPRESSOR
COMPRESSOR SCREW ASS’Y
COMPRESSOR ATTACHMENT
● Fix
the bottom metal, and loosen the lock nut.
the bottom metal.
● Disassemble the lock nut, bottom metal, stopper rubber
spring, spring guide from damper comp.
● Remove the bottom metal.
● Assembly is done in reverse order of disassembly.
● Remove
LOCK NUT
BOTTOM METAL
11-7
12. BRAKE SYSTEM (FRONT DISK BRAKE)
CAUTION WHEN PERFORMING MAINTENANCE
12-1
TROUBLESHOOTING
12-1
BRAKE PAD REPLACING
12-2
BRAKE CALIPER REMOVAL / INSTALLATION
12-3
MASTER CYLINDER REMOVAL/ INSTALLATION
12-4
MASTER CYLINDER DISASSEMBLY / ASSEMBLY
12-5
CAUTION WHEN PERFORMING MAINTENANCE
● Do
not allow foreign materials or water to enter brake master cylinder when filling with brake fluid.
● Use only recommended brake fluid.
● Do not re-use contaminated oil.
● Brake fluid damages paint, plastic and rubber. Do not allow brake fluid to contact these materials.
● Do not re-use sealing washer.
● Cleanse the disassembled parts with brake fluid, and using compressed air, check to see if any of the passageways
are blocked.
● When disconnecting or connecting the brake hose connection part, if air is found mixed in this part, remove the
air by using a hydraulic system.
TROUBLESHOOTING
Breaking power is bad
● Air
has entered the brake system.
● Deteriorated brake fluid by mositure.
● Contamination on brake pad and disk.
● Caliper piston seal wear.
● Master cylinder piston seal wear.
● Brake pad wear.
● Contamination on inside of caliper.
● Uneven brake pad, disk wear.
● Insufficient brake fluid.
● Blocked brake fluid passageway.
● Bent and deformed disk.
● Caliper piston sticking, wear.
● Master cylinder piston sticking, wear.
● Disk wear.
● Contamination in master cylinder.
● Bent lever.
● Caliper side damaged.
12
Brake lever feels heavy or does not spring
back well
Brake hydraulic system blocked.
Caliper piston sticking.
● Blocked brake fluid passageway.
● Caliper piston seal wear.
● Master cylinder piston sticking, wear.
● Bent lever.
● Caliper side damaged.
●
●
Brake sticking (The brake pad is wearing unevenly)
● Contamination
on brake pad, disk.
● Incorrect wheel alignment.
● Uneven wear of brake pad, disk.
● Bent and deformed disk.
● Blocked hydraulic line in caliper.
12-1
BRAKE SYSTEM(FRONT DISK BRAKE)
BRAKE PAD REPLACING
2.7kg·m
1
2
1.8kg·m
4
3
● Do
not allow oil to make contact with the disk or panel as this reduces braking capability. If this happens,
replace the pad and clean brake disk.
● After replacing the brake pad and disassembling the caliper, operate the lever remove the piston to the out.
● When
● Do
replacing brake pads, replace whole set.
not operate the brake lever when replacing brake pads.
OPERATION / PART NAME
1
2
3
4
12-2
Assembly
Flange bolt 8×20
Hanger pin
Brake pad
Pad seam
NUMBER
2
2
2
1
REMARK
Assembly is done in reverse order of disassembly.
Do not allow clliper to hang from the hose
during disassembly.
Before assembling, check to see the spring is securely fixed.
Assemble to brake tightly.
BRAKE SYSTEM(FRONT DISK BRAKE)
BRAKE CALIPER REMOVAL / INSTALLATION
3
1
2
4
Do not allow oil make contact with the disk or panel as this reduces braking capability.
If this happens, replace the pad and clean brake disk.
Assembly is done in revers order of disassembly.
RELATED OPERATION
●
Front wheel removal / installation (⇨10-2)
OPERATION / PART NAME
1
2
3
4
Disassembly
Brake hose bolt
Sealing washer
Brake calliper Ass’y
Flange bolt 8×20
NUMBER
REMARK
1
2
1
2
12-3
BRAKE SYSTEM(FRONT DISK BRAKE)
MASTER CYLINDER REMOVAL / INSTALLATION
PUNCH MARK
6
4
5
3
2
3.0kg·m
1
Assembly is done in reverse order of disassembly.
RELATED OPERATION
●
Handle cover removal/ installation (⇨2-7)
OPERATION / PART NAME
NUMBER
1
2
3
4
5
Assembly
Brake switch connector
Brake hose bolt
Sealing washer
Master cylinder bolt
Master cylinder holder
2
1
2
2
1
6
Master cylinder
1
12-4
REMARK
Wind cloth around hose in order to prevent
liquid from leaking.
Tighten the above bolt first during assembly.
Tighten it so that“UP”mark may be oriented up
ward during assembly.
Adjust the adjusting surface of master cylinder
and holder at punch mark above handle bar.
BRAKE SYSTEM(FRONT DISK BRAKE)
MASTER CYLINDER DISASSEMBLY / ASSEMBLY
10
11
5
12
13
14
6
7
8
9
3
2
4
1
Assembly is done in reverse order of disassembly.
RELATED OPERATION
●
Master cylinder removal/ installation (⇨12-4)
OPERATION / PART NAME
1
2
3
4
5
6
7
8
9
10
11
12
13
14
Disassembly
Washer screw
Stop switch
6mm nut/pivot bolt
Brake lever
Plat screw
Cap
Diaphragm plate
Diaphragm
Protector
Dust boot
Circlip
Stopper plate
Master piston
Spring
NUMBER
1
1
1/1
1
2
1
1
1
1
1
1
1
1
1
REMARK
disassembly, replace the set.
12-5
13. ELECTRICAL SYSTEM
CAUTION WHEN PERFORMING
MAINTENANCE
TROUBLESHOOTING
BATTERY REMOVAL/INSTALLATION
CHARGE LEVEL(OPEN-CIRCUIT VOLTAGE)
INSPECTION
CHARGING SYSTEM INSPECTION
LIGHTING SYSTEM CONTROL VOLTAGE
INSPECTION
REGULATOR RECTIFIER INSPECTION
AC GENERATOR REMOVAL/INSTALLATION
AC GENERATOR(CHARGING COIL)
INSPECTION
13-1
13-1
13-3
13-4
13-4
13-5
13-5
13-6
13-7
RESISTER INSPECTION
CDI UNIT INSPECTION SYSTEM
EXCITE COIL, PULSE COIL GENERATOR
INSPECTION
IGNITION TIMING INSPECTION
STARTERMOTOR REMOVAL / INSTALLATION
STARTER MOTOR DISASSEMBLY /
ASSEMBLY
FUEL UNIT INSPECTION
MAIN SWITCH INSPECTION
HANDLE SWITCH INSPECTION
BLUB REPLACING
TRUNK LAMP
13-7
13-7
13-8
13-8
13-9
13-10
13-11
13-11
13-11
13-12
13-13
CAUTION WHEN PERFORMING MAINTENANCE
● The
maintenance-free (MF) battery does not require battery acid level inspection. Do not replenish distilled water.
● To charge the battery, remove the battery from the frame, and charge it with its seal-cap closed.
● Unless required in an emergency, do not carry out battery quick-charging.
● Always charge battery based on the current and time specified on top of the battery.
● Use a tester to check the charging status(open voltage).
● Do not replace the battery with a general-type battery.
● There is no need to adjust ignition period because of CDI ignition device, In case ignition period is not suitable,
check CDI unit and AC generator, and if it is defective, replace it.
● It is possible to separate starter motor with engine not lowered.
13
TROUBLESHOOTING
Low power - key turned on
Charging system failure
1. Weak battery
- Low fluid level
- Low specific gravity
- Charging system failure
2. Loose battery connection
1. Loose, broken, or shorted wire or connection
2. Faulty voltage regulator
3. Faulty rectifier
4. Faulty alternator
No power - key turned on
● Poorly
1. Dead battery
- Low fluid level
- Low specific gravity
- Charging system failure
2. Disconnected battery cable
3. Main fuse burned out
4. Faulty ignition switch
No spark at plug
connected, broken or shorted wires
- Between the AC generator and CDI unit
- Between the CDI unit and ignition coil
- Between the CDI unit and main switch
- Between the ignition coil and plug
● Faulty main switch
● Faulty ignition coil
● Faulty CDI unit
● Faulty AC generator
● Faulty pulse generator
13-1
ELECTRICAL SYSTEM
Starter motor does not rotate
● Fuse
is out
is in sufficiently
● Damaged main switch
● Damaged front or rear stop switch
● Damaged starter relay
● Connector is connected in correctly or out
● Damage starter motor
● Damage starter switch
● Battery
Weak rotational power in starter
motor
(Does not turn over engone)
Battery is insufficiently charged.
Incorrect connection of battery terminal cord.
● Damaged starter motor.
● Ground wire is connected incorrectly.
● Brush is not worn.
Engine problems
●
●
●
●
Ignition /circuit
- Ignition coil damaged
- wire or connector damaged
- main switch damaged
Ignition 2 circuit
- Ignition coil damaged
- Spark plug damaged
- High tension cord damaged
- Plug cap leak
Ignition timing
- AC generator damaged
- Stator damaged
- CDI unit damaged
●
oil indicator light not operating (when there is oil)
●
●
●
Burned out fuse
Battery insufficiently charged
Main switch damaged
Meter damaged
Oil level switch damaged
Starter motor is normal but does
not turn engine over
●
● Engine
Oil indicator does not turn off (when oil is out)
is malfunctioning so the crank shaft
is not rotating.
● Incorrect meshing of gears in starer pinion.
Dim headlight
● Battery
● wiring
discharged
and switch resistance high
Headlight HI-LO not operating
● Bulb
malfunction
● Dimmer switch damaged
●
● Coupler
loose
disconnected
● Oil level switch damaged
● Green/red wire joined
● Harness
Fuel meter indicator malfunctioning
●
●
●
●
●
Coupler separated
Harness disconnected
Float operation malfunction
Fuel unit damaged
Meter damaged
Fuel meter needle unstable
● Coupler
loose
unit damaged
● Meter damaged
● Fuel
13-2
ELECTRICAL SYSTEM
BATTERY REMOVAL / INSTALLATION
7
6
4
2
Fuse
5
3
1
Assembly is done in reverse order of disassembly.
RELATED OPERATION
● loosen
the seat lock and open seat.
OPERATION / PART NAME
1
2
3
4
5
6
7
6
Assembly
Washer screw
Battery cover
Battery holder bolt
Battery holder
Battery ⊖ terminal
Battery ⊕ terminal
Battery
Assembly
7 ⇨1
Battery ⊕terminal
NUMBER
1
1
1
1
1
1
1
1
REMARK
Remove the charger ⊖ cable to the battery ⊖
terminal first, then Remove the charger ⊕ cable
to the battery ⊕ terminal.
connect the charge ⊕ cable to the battery ⊕
terminal first, then connect the charger ⊖ cable
to the battery ⊖terminal.
13-3
ELECTRICAL SYSTEM
CHARGE LEVEL (OPEN-CIRCUIT VOLTAGE)
INSPECTION
● loosen
the seat lock and remove the seat.
● Remove the battery holder.
● Remove the battery terminal from the battery.
● Measure the voltage between the battery terminals
- Fully charged : 13.0~13.2v
- Insufficiently charged : under 12.3v
use a digital volt meter when measuring charge level.
CHARGING SYSTEM INSPECTION
LEAKAGE TEST
After turing the main switch off and take off the earth-cable
from the battery, connect the amperemeter between the
battery terminals with earth-cables. Measure the current
voltage when main switch off.
● Amperage
should be measured with the amperemeter
alternating from a large sphere to a small sphere. When
a current larger then the upper limit sphere is
measured, it is possible to burn out the fuse in the
amperemeter.
● Do not turn the main switch ON when measuring
current.
VOLTMETER
AMPEREMETER
Leakage : Under 1mA
INSPECTION OF CHARGE LEVEL
the size of the current changes according to the
charged state of the battery in this inspection, make sure
that the battery is fully charged 13.0-13.2V when
inspecting.
● When staring the engine using the starter motor, much
current flows as battery power is consumed in the
staring of the vehicle.
MAIN FUSE
TERMINAL
● As
Assemble the battery to the vehicle after the engine is
heated.
Connect a voltmeter to the battery terminals.
DIGITAL MULTIMETER
Connect an amperemeter to the main fuse.
Start the engine, slowly increase engine rpms and measure
charge voltage and current.
● Leakage
current : 0-0.14A / 5.000rpm
Control voltage(charge) : 13.5-15.0V / 5.000rpm
(Lamp) : 12.0-14.0V / 5.000rpm
13-4
MAIN FUSE
ELECTRICAL SYSTEM
LIGHTING SYSTEM CONTROL VOLTAGE
INSPECTION
● Remove
the handle cover. (⇨2-7)
Leave the headlight coupler connected.
● After
staring the engine, place the dimmer switch to Hi and
check the voltage between the blue(+) and green(-)wires on
the headlight coupler.
Measurement is performed in AC area.
Analogue type : 12.0~14.0/5,000rpm
Digital type : 10.0~13.0/5,000rpm
HARNESS OF
COUPLER
REGULATOR RECTIFIER INSPECTION
●
Remove the 4p coupler of the regulator rectifier and
inspect the wiring circuit in the main harness side terminal.
REGULATOR
RECTIFIER
ITEM
MEASUREMENT LOCATION
LEVEL
There must be
battery voltage
BATTERY WIRE Voltage between red ⊕ green ⊖
✽Resistance between white wire
and earth wires.
Disconnect the bystarter
✽Resistance between yellow
wire and earth wires,
Disconnect dimmer switch
connection
CHARGING
COIL
LIGHTING
COIL
0.1-2Ω
AREAS OF INSPECTION IF IN CORRECT
Damaged, disconnected main fuse/ harness
AC generator(charging, lighting coil, coupler
connection damage) register(6.7Ω 5W),
(5.9Ω 30W) headlight lighting circuit
0.1-2Ω
✽ Inspect ※ Part after at least 10minutes later.
Resistance value
A
unit : ㏀
L
○○
A
L
○○
B
○○
○○
E
○○
5-100
B
E
3-50
○○
○○
5-100
B
L
○○
○○
A
E
13-5
ELECTRICAL SYSTEM
AC GENERATOR REMOVAL / INSTALLATION
6
4
2
5
4.0kg·m
7
12
13
11
3
1.0kg·m
8
10
1
9
Assembly is done in reverse order of disassembly.
RELATED OPERATION
● Rear
frame body cover removal/installation.
removal/installation.
● Muffler
OPERATION / PART NAME
1
2
3
4
5
6
7
8
9
10
11
12
13
13-6
Assembly
Pan cover bolt
Pan cover
Bolt
Cooling pan
Fly wheel nut
Fly wheel
Woodruffkey
Couplers
Pulse generator assembly bolt
Pulse generator
Stator assembly bolt
Stator
Grommet
NUMBER
2
1
2
1
1
1
1
1
2
1
2
1
1
REMARK
Remove the connector.
ELECTRICAL SYSTEM
AC GENERATOR(CHARGING COIL) INSPECTION
AC GENERATOR
COUPLER(3P)
This test is done with the stator mounted to the engine.
the body cover. (⇨ 2-5)
the AC generator coupler.
● Measure the resistance of the charging coil. (between the
white wire and ground)and the lighting coil. (between the
yellow wire and ground)
● Remove
● Remove
Standard value(20。
C)
Between white wire and ground : 0.3~1.2Ω
Between yellow wire and ground : 0.1~1.0Ω
RESISTER INSPECTION
● Remove
RESISTER
RESISTER
the front under cover.
● Measure
the resistance between the resistance lead
wire and ground.
Standard value(20。
C)
Resister(6.7Ω 5W) Green Black-body ground : 6.3~7.1Ω
Resister(5.9Ω 30W) Pink-body ground : 5.6~6.2Ω
Problems with the resister are caused by operation
problems of Auto bystarter.
CDI UNIT INSPECTION SYSTEM
Remove the Luggage box.
Remove the body cover.
● Remove the 6p coupler from CDI unit.
●
●
ITEM
Pulse
generator
Ignition coil
(1)
(2)
MEASUREMENT
LOCATION
Blue/Yellow-Green
STANDARD
50 - 200Ω
Black / Yellow-Green 0.1 - 0.3Ω(20℃)
Green-Hight tension
cord
(Connection plug cap) 7.5 - 8.6KΩ(20℃)
(No plug cap)
2.7 - 3.5KΩ(20℃)
13-7
ELECTRICAL SYSTEM
EXCITE COIL, PULSE GENERATOR
INSPECTION
AC GENERATOR
COUPLER(3P)
This test should be performed with stator assembled to
engine.
● Remove
the Luggage box.
● Remove
the 3P coupler of AC generator.
● Measure the pulse generator of coil from between
Blue/Yellow and Ground.
Standard resistance(20。
C ) : 50~200Ω
● AC
generator removal/installation (⇨13-6)
IGNITION TIMING INSPECTION
As a CDI device is used in this vehicle, there is no need
for adjusting ignition timing. If ignition timing problems
occur, inspect the CDI unit and the AC generator and
replace if any malfunctions are found in the devices.
●After warming up the engine rpms are at 3,200, Ignition
timing is correct if the “ F ” mark and cooling pan bolt of
center between ±3。
IGNITION TIMING : BTDC 17°
/1,800 rpm
13-8
ELECTRICAL SYSTEM
STARTER MOTOR REMOVAL / INSTALLATION
5
4
6
3
7
1
2
Assembly is dome in reverse order of disassembly.
1
2
3
4
5
6
7
OPERATION / PART NAME
NUMBER
REMARK
Disassembly
Cable clamp assembly bolt
Clamp
Starter motor assembly bolt
Earth cable
Starter motor
Gasket
Starter cable connect
1
1
1
1
1
1
1
A combined starter motor bolt.
Tighten with the ground wire
disassembly. (⇨13-10)
13-9
ELECTRICAL SYSTEM
STARTER MOTOR DISSEMBLY / ASSEMBLY
1
3
4
2
5
6
7
RELATED OPERATIONS
●
Starter motor removal(⇨13-9)
OPERATION / PART NAME
1
2
3
4
5
6
7
2
13-10
Disassembly
Screw
Case
Armature
Spring
Packing
Front bracket
Gasket
Assemble
Case
NUMBER
REMARK
3
1
1
2
1
1
1
1
Be careful no to allow screws or foreign
substance enter the case.
ELECTRICAL SYSTEM
FUEL UNIT INSPECTION
the fuel unit. (⇨ 4-6)
the float to the farthest extreme up and measure
the resistance values at each terminal.
● Remove
● Move
UP
WIRE TERMINAL FLOAT UPPER LINE FLOAT LOWER LINE
Green and Yellow/White
25 - 41Ω
500 - 800Ω
Green and Blue/White
400 - 700Ω
100 - 200Ω
White and Blue/White
450 - 750Ω
450 - 750Ω
MAIN SWITCH INSPECTION
DOWN
FLOAT
DIMMER SWITCH
Hi
the front cover. (⇨ 2-7)
● Remove the main switch wear and inspect continuity of
each terminal while referring to the wire diagram.
Lo
HL
● Remove
REPLACE MENT
the front handle cover. (⇨2-7)
the main switch coupler.
● Remove the two screws and remove the main switch.
● Assembly is done in the reverse order of disassembly.
L o
R
W
WINKER
SWITCH
● Remove
● Disconnect
HORN
SWITCH
B A T
HANDLE SWITCH INSPECTION
CI
HL
Ho
RE
LIGHTING SWITCH
● Remove
the handle cover. (⇨2-7)
● Remove the handle switch of coupler, connect
inspect between the terminal of an electric current.
T L
CI
ST
E
STATER
SWITCH
13-11
ELECTRICAL SYSTEM
BULBS REPLACING
HEAD LIGHT BULB
● Remove
the headlight maintenance Lid.
down on the bulb socket and turn on the left.
Replace with new blub.
● Push
METER BULB
● Remove
the bulb socket. replace with New bulb.
TAIL LIGHT BULB
● Loosen
the two pan screw and remove the taillight lens.
(⇨ 2-4)
● Loosen the two screw and, remove the rear taillight cover
R. L. and rear winker lens.
● Remove the tail stoplight bulb, rear winker bulb. Replace
with new bulb.
Remove the taillight lens, pay attention to the
taillight lens and winker lens of broken.
13-12
ELECTRICAL SYSTEM
TRUNK LAMP
●Replace
the bulb.
the luggage box. (⇨2-5)
●Replace the trunk lamp bulb socket of luggage.
●Remove
COLOR
TERMINAL
GREEN
RED
G
R
PUSH
PRO JECTION
13-13
14. WIRE DIAGRAM
14
14-1
• HEAD OFFICE
(FACTORY) : #58, Sungsan-dong, Changwon, Kyungnam, Korea
Tel : (82-55)279-7000 / Fax : (82-55)239-7524
• OVERSEAS SALES OFFICE
: #16-6 Pil-dong 2Ka, Chung-ku, Seoul, Korea
Tel : (82-2)2274-3171 / Fax : (82-2)2269-7997
SM39-0102-01E