1
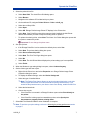
Rimage PrismPlus!TM User Guide Corporate Headquarters: Rimage Corporation 7725 Washington Avenue South Minneapolis, MN 55439 USA 800 553 8312 (toll free US) Service: +1 952 946 0004 (International) Fax: +1 952 944 6956 European Headquarters: Rimage Europe GmbH Hans-Böckler-Straße 7 63128 Dietzenbach, Germany Tel: +49-(0) 6074-8521-0 Fax: +49-(0) 6074-8521-21 DISC and DVD Recording Software Disclaimer This Product, Software, or Documentation may be designed to assist you in reproducing material in which you own the copyright or have obtained permission to copy from the copyright owner. Unless you own the copyright or have permission to copy from the copyright owner, you may be violating copyright law and be subject to payment of damages and other remedies. If you are uncertain about your rights, you should contact your legal advisor. If you are neither in possession of the copyright nor have authorization from the owner of the copyright, unauthorized copying of DISCs violates national and international legislation and can result in severe penalties. Rimage Corporation reserves the right to make improvements to the equipment and software described in this document at any time without any prior notice. Rimage Corporation reserves the right to revise this publication and to make changes from time to time in the content hereof without obligation of Rimage Corporation to notify any person or organization of such revisions or changes. This document may contain links to web sites that were current at the time of publication, but may have moved or become inactive since. This document may contain links to sites on the Internet that are owned and operated by third parties. Rimage Corporation is not responsible for the content of any such third-party site. ©2005, Rimage Corporation Rimage™ is a trademark of the Rimage Corporation. PrismPlus!™ is a trademark of the Rimage ® Corporation. Dell is registered trademark of Dell ® Computer Corporation. FireWire is a registered trademark of Apple Computer, Inc. All other trademarks and registered trademarks are the property of their respective owners. Rimage PrismPlus! Support information US, Asia/Pacific, Mexico/Latin America Europe Rimage Corporation 7725 Washington Avenue South Minneapolis, MN 55439 USA Attn: Rimage Services Rimage Europe GmbH Hans-Böckler-Straße 7 63128 Dietzenbach, Germany Tel: +49-(0) 6074-8521-0 FAX: +49-(0) 6074-8521-21 Service: North America: 800-553-8312 Asia/Pacific, Mexico/ Latin America: 952-946-0004 FAX: 952-946-6956 Rimage Europe Technical Website Rimage Support Website http://www.rimage.de/support.html Select the appropriate Support link to learn more. If you cannot find a solution on our website, email Rimage Services, Europe at [email protected]. http://www.rimage.com/support.html select the appropriate Product Family and then select your product. If you cannot find a solution on our website, email Rimage Services at [email protected]. When you contact Rimage Services, please provide: • Unit serial number and software version. • Functional and technical description of the problem. • Exact error message received. Contents Contents Introduction ...................................................................................... 1 Operating system requirements ............................................................................ 1 Media requirements............................................................................................... 1 Ribbon requirements ............................................................................................. 1 Label design requirements .................................................................................... 1 Identify the parts of the PrismPlus ................................................. 2 Front view.............................................................................................................. 2 Rear view .............................................................................................................. 4 Operate the PrismPlus ..................................................................... 5 Setting up a standalone PrismPlus..................................................................5 Connecting the cables........................................................................................... 5 Installing the software............................................................................................ 6 Installing the printer driver ..................................................................................... 6 Powering on the printer ......................................................................................... 8 Loading the discs.............................................................................................9 Selecting the printing preferences ...................................................................9 Navigating to printing properties............................................................................ 9 Setting ribbon type, media type, and print strobe................................................ 10 Setting color options............................................................................................ 10 Setting the print quality........................................................................................ 11 Centering the image on the disc.......................................................................... 12 Printing discs with serialized labels ..................................................................... 12 Maintain the PrismPlus .................................................................. 13 General cleaning ................................................................................................. 13 Replace consumables ......................................................................................... 15 Learn more ...................................................................................... 18 PrismPlus printer specifications .......................................................................... 18 Technical support and product updates .............................................................. 18 Safety information ............................................................................................... 19 Safety testing....................................................................................................... 20 Rimage PrismPlus!TM Limited 6 Month Warranty. ............................................... 21 110635_G i Rimage PrismPlus! . ii Introduction Introduction This manual provides the information needed to set up, install, and operate the PrismPlus printer and to identify the parts. Operating system requirements The Rimage PrismPlus is compatible only with Windows 2000, Windows XP, and Windows 2003 Server. It requires one USB port. Media requirements You must use discs that are coated with a surface designed for thermal printing. Silver lacquer discs without an additional thermal protective layer are not designed for thermal printing. The heat of the thermal printing process may damage the dye layer in a CD-R. The media in Rimage Media Kits™ is designed for optimum use in the PrismPlus. For information about Rimage Media Kits™ – convenient packages of discs and ribbons, all guaranteed by Rimage – contact Rimage at 800-445-8288. Ribbon requirements The PrismPlus requires ribbons designed specifically for use with the printer. The table below lists the type of ribbon to use with your printer. Ribbon Color Part Number Number of Discs Printed Black 201737-006 2100 Red 202082-002 2100 Midnight Blue 203217-001 2100 Multicolor 202506-001 500 Store the ribbons at -5°C (23°F) to 40°C (104°F) and at 30-80% relative humidity, noncondensing. Avoid direct sunlight. Label design requirements Properties Image Size Resolution 300x300 DPI Width 5.12” (1536 pixels) Height 4.52” (1356 pixels) 110635_G 1 Rimage PrismPlus! Identify the parts of the PrismPlus Front view Ribbon Guides Clamping Pins Drawer and Centering Pin Take-up Roller Supply Roller Control panel There are four LEDs and an Operator Button on the operator panel located on the front of the printer. Disc Not Present LED Active LED Power LED 2 110635_G Identify the parts of the PrismPlus Operator button This button opens and closes the printer tray. There is a yellow LED in the center of this button. LED indicators The LED conditions described below reflect conditions on a Standalone PrismPlus. PrismPlus printers that are mounted in automated equipment have different conditions. For conditions of automated printers, refer to the automated equipment user guides. Image Name Functionality • The yellow LED located in the Operator button illuminates when an error occurs while printing. Error • The Error LED and the Disc Not Present LED flash when the printer is in cleaning mode. • The error LED illuminates and the Disc Not Present LED flashes at a slow rate when the ribbon is out. • The yellow Disc Not Present LED illuminates when the tray is empty or when the disc is not properly clamped. When a disc is placed on the tray, the Disc Not Present LED turns off. • In Multiple Copy mode, the Disc Not Present LED illuminates until the disc is removed from the pad. Disc Not Present • The Disc Not Present LED flashes a fault code when an error occurs. After the error is resolved, press the Operator button to turn off the LED. • The Disc Not Present LED flashes continuously at a slow rate when the ribbon is low (less than 100 prints remain). This applies only to monocolor ribbons and only if you have not changed or switched ribbons since loading the current ribbon. • The Disc Not Present LED flashes at a slow rate while the error LED illuminates when the ribbon is out. • The Disc Not Present LED and the Error LED flash when the printer is in cleaning mode. • The yellow Active LED flashes when the printer is operating. Active • The Active LED flashes continuously at a slow rate when the printer is in AutoPrinter mode. • The green Power LED illuminates when the PrismPlus is powered on. • The Power LED flashes when the system board requires reprogramming. Power 110635_G • The Power LED turns off when the printer detects a bad pixel element in the printhead. You can continue to print discs (the Power LED turns back on when a disc is placed on the tray); however small lines may occur in printing. This is an indication that the printhead will require replacement. 3 Rimage PrismPlus! Rear view 4 110635_G Operate the PrismPlus Operate the PrismPlus Setting up a standalone PrismPlus Use these procedures to step up a standalone PrismPlus printer. Connecting the cables 1. Connect the parallel cable to the parallel cable connection at the back of the printer. 2. Connect the other end of the parallel cable to a parallel port on the back of the PC. 3. Connect the power cord to the printer. 4. Plug the power cord into a suitable electrical outlet. Parallel Cable 110635_G Power Cord 5 Rimage PrismPlus! Installing the software To install CD Designer, place the CD Designer disc in your PC disc tray and follow the prompts. Installing the printer driver You must install the driver for the PrismPlus before you can use the printer with any label editing software. This procedure describes how to install the printer driver for Windows 2000 and Windows XP. Before you begin If CD Designer is open, exit it. - Important! If the Windows Logo testing dialog box opens, select Continue Anyway. 1. Navigate to the print area settings. • In Windows 2000, navigate: Start > Settings > Printers. The Printers dialog box opens. • In Windows XP, navigate: Start > Printers and Faxes. The Printers and Faxes dialog box opens. - Important! If you have an earlier version of the Rimage PrismPlus printer driver, delete it before continuing. 2. Add the printer driver. a. Select Add Printer. The Add Printer Wizard dialog opens. b. Select Next. Note: If the computer is connected to a network, a Local or Network Printer dialog box opens. c. Select Local Printer. d. Clear the Automatically detect and install my Plug and Play printer checkbox. e. Select Next. The Select the Printer Port dialog displays. f. Select the Use the following port radio button. g. From the list of available ports, select the desired printer port. • If the PrismPlus is being used as a standalone printer, select LPT1. • If the PrismPlus is mounted on a Rimage Producer system, select USB. h. Select Next. The Select manufacturer and model dialog displays. 6 110635_G Operate the PrismPlus 3. Select the printer driver file. a. Select Have Disk. The Install From Disk dialog opens. b. Select Browse. c. Navigate to the software CD included with your printer. d. On the software CD, navigate: Printer Drivers > Prism > win2k_xp. e. Select the ccd2kxp.inf file. f. Select Open. g. Select OK. Rimage Perfect Image Printer PF displays in the Printers box h. Select Next. If the PrismPlus printer driver was previously installed, the Add Printer Wizard asks whether you wish to keep the existing driver or replace it. i. To replace the existing driver, select Next. The Name Your Printer dialog box opens with the option to rename the printer. - Important: Do not change the printer name. 4. Set up the printer. a. If the Rimage PrismPlus is to be used as the default printer, select Yes. b. Select Next. The printer sharing dialog box opens. c. Select Do not share this printer. d. Select Next. The Print Test Page dialog box opens. e. Select No. f. Select Next. The Add Printer Wizard displays the printer settings you have specified. g. Select Finish. 5. When the Windows Logo testing dialog box opens, select Continue Anyway. 6. Set the ribbon type and how to print. a. Right-click the Printer icon and select Properties. The Rimage Perfect Image Printer Properties dialog box opens. b. To display the default settings, select the Device Settings tab. c. Select the type of installed ribbon. Note: The Double Print feature allows you to print the same label twice on the disc. Different types and brands of media have different printing characteristics. If you would like the printed areas on your discs to have more density, enable Double Print. d. Select the Advanced tab. e. Choose how to print. • If the PrismPlus is mounted in a Rimage Producer system select Print directly to the printer. • If the PrismPlus is being used as a standalone printer, select Spool print documents so program finishes printing faster. 7. Select OK. The Windows 2000/XP driver installation is complete. Note: To optimize your print settings, refer to the Selecting the printing preferences section on page 9. 110635_G 7 Rimage PrismPlus! Powering on the printer 1. To power on the printer press the power switch on the rear of the printer. The printer initializes. 2. To power off the printer press the power switch again. 8 110635_G Operate the PrismPlus Loading the discs 1. To open the printer tray, press the Operator button. 2. Place one disc on the rubber pad between the two clamping pins and the centering pin. - Important! Place the disc with the recording side facing down. The recording side has a stacking ring close to the hub that you can feel with your fingers. If you insert a disc with the stacking ring facing up, you will damage the print head. Note: If the disc is resting on the clamping pins, the printer tray will not close. The print pad and plate vary between the standalone and the automated models. The automated models have a hole through the center of the plate; the standalone model does not. All models have a centering pin. 3. To close the printer tray, press the Operator button. Centering Pin Clamping Pins Selecting the printing preferences Navigating to printing properties 1. Navigate to the printers. • In Windows 2000, navigate: Start > Settings > Printers. The Printers dialog box displays. • In Windows XP, navigate: Start > Printers and Faxes. The Printers and Faxes dialog box displays. 2. Right-click on Rimage Perfect Imager Printer PF and select Properties from the drop-down list. The Rimage Perfect Image Printer PF Properties dialog box displays. 110635_G 9 Rimage PrismPlus! Setting ribbon type, media type, and print strobe 1. Navigate to printing properties. 2. Select the Device Settings tab. 3. Select the type of Installed Ribbon. Note: Double Print is a feature that allows you to print the same label twice on the disc. Different types and brands of media have different printing characteristics. If you would like the printed areas on your discs to have more density, try enabling Double Print. 4. Select the Media Type. 5. Set the Master Print Strobe: • To achieve the best print results for monocolor printing, set the Master Print Strobe to 350 ms. • To achieve the best print results for color printing, set the Master Print Strobe to 400 ms. • To increase the printhead life, set the Master Print Strobe to the lowest setting that provides satisfactory printing. 6. To Enable Color Sub-Strobes, select Enabled. Setting color options Printing in monocolor 1. Install a monocolor ribbon in the printer. 2. Navigate to printing properties. 3. Select the Device Settings tab. 4. Select the Installed Ribbon setting and select Monocolor. 5. Select the Master Print Strobe setting and set the value from the table below. Media Surface Print strobe setting for black ribbon Print strobe setting for red ribbon Print strobe setting for blue ribbon DVD or Regular 325-400 375-425 350-400 Thermal white overcoat 350-400 375-425 350-400 6. Select the Detect Media Change option. • If you are using a Rimage autoloader, select No. • If you are making multiple copies on a standalone PrismPlus, select Yes. Note: When the Detect Media Change option is enabled, you must press the Operator button after you remove the printed disc and place a new disc on the tray. 7. Disable the Perfect Print option. This option is only used for the Rimage AutoPrinter. 8. Select the Media Type. 9. To save the changes, select OK. 10 110635_G Operate the PrismPlus Printing in color 1. Install a multicolor ribbon in the printer. 2. Navigate to printing properties. 3. Select the Device Settings tab. 4. Select the Installed Ribbon setting. 5. Select Color, Three Panel CMY from the drop-down list. Note: The Double Print selection is disabled when a color ribbon is selected because double print is not available during the color printing process. 6. Select the Media Type. 7. Select the Print Strobe setting and set the value from the table below. Media Surface Print strobe setting for multicolor ribbon DVD or Regular 375-425 Thermal white overcoat 375-425 Note: This may require multiple test printings on discs to fine-tune the color hue. Set Enable Color Sub-Strobes to Enabled to lower an individual color’s print strobe. For example, this setting can be used to lower the Yellow Print Strobe setting when trying to eliminate a halo effect on a printed disc. 8. Select the Detect Media Change option: • If you are using a Rimage Producer system, select No. • If you are making multiple copies on a standalone printer, select Yes. Note: When the Detect Media Change option is enabled, you must press the Operator button after you remove the printed disc and place a new disc on the tray. 9. Disable Perfect Print option. This option is only used for the Rimage AutoPrinter. 10. To make changes that affect color intensity, color balance, or pattern settings, select Halftone Setup Properties. 11. To save the changes, select OK. Setting the print quality 1. Navigate to the printers. • In Windows 2000, navigate: Start > Settings > Printers. The Printers dialog box displays. • In Windows XP, navigate: Start > Printers and Faxes. The Printers and Faxes dialog box displays. 2. Right-click on Rimage Perfect Imager Printer PF and select Printing Preferences from the drop-down list. The Rimage Perfect Image Printer PF Printing Preferences dialog box opens. 3. Select Advanced. The Rimage Perfect Image Printer PF Advanced Options dialog box opens. 4. Select the desired resolution. 5. Select OK. The Rimage Perfect Image Printer PF Advanced Options dialog box closes. 6. Select OK. The Rimage Perfect Image Printer PF Printing Preferences dialog box closes. 110635_G 11 Rimage PrismPlus! Centering the image on the disc There are two ways to center the label. If the printer has a microparallel cable connection, and you have the Rimage serial cable, you can program the offsets. If you do not have the serial cable, you can adjust the print position by changing the top and bottom margins. 1. In the CD Designer application, select Page Setup. 2. Select the Margins tab. 3. Change the left and top margins. Increase the top margin to bring the printed label downward. Increase the left margin to move the label toward the right. 4. Select OK to save the changes to the label. 5. Print another label to verify the proper print position. Printing discs with serialized labels When printing multiple discs with serialized labels, the Detect Media Change option in the Printer Driver Properties must be enabled manually. This is required for standalone printing. Note: If the printer is being used with a Rimage Producer system, this option must be disabled. 1. Navigate to printing preferences. 2. Select the Device Settings tab. 3. Set the Detect Media Change option: • If the PrismPlus is a standalone printer, set to Yes. • If the PrismPlus is attached to an autoloader, set to No. 4. Select OK. 12 110635_G Maintain the PrismPlus Maintain the PrismPlus General cleaning Cleaning the exterior Wipe the exterior of the printer with a lint free cloth. Cleaning the printhead Clean the printhead at every ribbon change, or more often if streaks start appearing or the ribbon has torn. This procedure requires the PrismPlus cleaning kit (PN 210555-001). This kit includes the necessary cleaning pads and solution. Contact your local Value Added Reseller for the cleaning kit. 1. Prepare the PrismPlus. a. Power down the PrismPlus. b. Remove the top cover. c. Remove the ribbon. Refer to Changing the print ribbon on page 15. d. While pressing the Operator button, power on the PrismPlus. e. When the Disc Not Present LED flashes, release the Operator button. 2. Prepare the cleaning pad. a. Remove the adhesive backing from the cleaning pad. b. Adhere the cleaning pad to a disc. 3. Clean the printhead. a. Place the cleaning pad with attached disc on the tray. b. Press the pad down over the sensor. Press Down Press Pad pad down ver the Thesensor Sensor Oover leaning Pad with CCleaning pad with ttached CD Aattached disc c. Place 5 drops of cleaning solution on the cleaning pad. Front Ribbon Guides Cleaning Pad Cleaning Solution 110635_G 13 Rimage PrismPlus! d. To close the tray and start the cleaning cycle, press the Operator button. When the cleaning cycle is complete, the tray opens. e. If necessary, repeat step d. f. Remove the cleaning pad with attached disc. g. Using a cotton swab soaked in the cleaning solution, clean the front two ribbon guides. 4. Prepare the PrismPlus for use. a. Power off the PrismPlus. b. Reinstall the ribbon. c. Replace the top cover. Note: If the printing pad on the tray becomes wet, allow the printing pad to completely dry before using the PrismPlus. d. Power on the PrismPlus. Cleaning the printhead – alternate method If a cleaning pad is not available, use the following cleaning procedure. 1. Prepare the PrismPlus. a. Power on the PrismPlus. b. To open the printer tray, press the Operator button. c. Power down the PrismPlus. d. Remove the top cover. e. Remove the ribbon. Refer to Changing the print ribbon on page 15. 2. Clean the printhead. - Important! Do not remove the printhead. a. Lightly soak a cotton swab in isopropyl alcohol. b. Insert the cotton swab in the drawer opening and lift the swab upward as you run the swab against the printhead elements. 3. After the alcohol on the printhead dries, prepare the PrismPlus for use. a. Replace the ribbon. b. Replace the top cover. c. Power on the PrismPlus. 14 110635_G Maintain the PrismPlus Replace consumables Changing the print ribbon # Tip: If ribbons are stored in an environment much different from that of the printer, allow plenty of time for them to become acclimated to the new environment. Allow more time for greater temperature and/or humidity differences. Store the ribbons at -5°C (23°F) to 40°C (104°F) and at 30-80% relative humidity, noncondensing. Avoid direct sunlight. Note: If you are replacing the ribbon, now is a good time to clean the printhead. Refer to Cleaning the printhead on page 13. 1. Access the ribbon area. a. Power on the PrismPlus. b. Remove the top cover of the printer. c. To remove the take-up roller, pull up on it so the end with the gear comes up first, and lift the take-up roller out of the printer. d. To remove the supply roller, lift it up. 2. Load the print ribbon. a. Slide the print ribbon onto the supply roller. b. Align the two notches of the cardboard core to the metal pins on the supply roller. c. Peel the ribbon leader from the supply ribbon. d. Slide the ribbon leader under the ribbon guide. e. Tape the ribbon leader to the back of the printer tray as shown. 110635_G 15 Rimage PrismPlus! f. Install the supply roller as shown. Leave some slack in the ribbon leader. g. Press the operator button until the printer tray comes out. The ribbon is threaded to the front of the PrismPlus. h. Remove the tape from the printer tray. i. Remove the adhesive strip from the ribbon leader. 3. Load the take-up roller. a. Place the new empty cardboard core on the take-up roller. It is notched to fit only one way. b. Place the take-up roller on top of the ribbon leader as shown. The gear must be on the correct side. c. Pull the ribbon leader up over the cardboard core and attach the adhesive strip to the cardboard core so that the edges on the ribbon leader are aligned to the edges of the cardboard core. The arrow illustrates the wrap direction. d. Roll the ribbon leader so that it is wrapped only once around the roller. - Important! Do not roll past the marking on the leader that states STOP - Wind Leader Onto Takeup Core Stopping here. e. Install the cardboard take-up roller in the printer as shown. The ribbon should be tight and there should be no creases in the ribbon. 16 110635_G Maintain the PrismPlus f. Install the take-up roller in the PrismPlus and press down firmly until the take-up roller snaps into place. - Important! Do not roll the STOP - Wind Leader Onto Take-up Core Stopping here marking on the Ribbon Leader onto the take-up roller. The marking should not be past the point shown in the picture on page 16. If the marking is on the roller, pull the take-up roller out and roll back the ribbon. To take up the slack, roll the supply roller back. 4. To close the tray, press the operator button. Note: During the ribbon validation process, the ribbon cycles past the ribbon leader. After the ribbon validation process, ensure that the ribbon is tight. 5. Install the top cover. The PrismPlus is ready for use. 110635_G 17 Rimage PrismPlus! Learn more PrismPlus printer specifications Item Description Printing Speed 0.65 inches/second @ 300 x 300 dpi, typical 0.45 inches/second @ 300 x 600 dpi, typical Printing Direction Images are printed from a top to bottom orientation as the media is moving out of the machine. Printing Modes Single-pass (standard) and double-pass (monocolor ribbon only) for improved print quality on some media types. Print Quality 300x300 or 300x600 dpi (11.8 dots per mm) Media Types 120mm CD and DVD media with thermal protective layers Standard Ribbon Color Black, Red, and Blue monocolor ribbons Multi-Color Ribbon 3-color (CYM) panel ribbon Ribbon Capacity Monochrome black = 2100 discs Monochrome red = 2100 discs Monochrome blue = 2100 discs 3-color panel = 500 discs Physical Properties 6.0" H x 8.5" W x 14.0" D (15.24 cm x 21.59 cm x 35.56 cm) 18 pounds (8.2 kg) Interface USB 1.0, Centronics Parallel, Serial (USB supported with Windows 2000 & XP) Power 100-240 VAC, 50-60 Hz, 1.10–0.55 Amps auto ranging Operating Temperature 60° F to 90° F (15.5° C to 35° C) Relative Humidity 30% to 80% non-condensing System Requirements Pentium or Greater with min 64MB RAM Windows XP requires 128 MB Technical support and product updates Support for the PrismPlus is available through your authorized reseller. - Important! Register your PrismPlus online or complete and return the registration card so Rimage can notify you of upgrades as they become available. 18 110635_G Learn more Safety information This manual and the indications on the product allow proper and safe operation. The indication marks below help protect you and other persons from injury, and equipment from damage. n Warning! According to ANSI (American National Standards Institute) standards, a warning is used to indicate situations that could result in bodily injury to personnel operating or maintaining the equipment. p Caution: Indicates that failure to observe this guideline could result in loss or damage to the equipment, product, software, or data. Safety precautions n Warning! Do not disassemble or use tools on the printer. All service procedures should be performed by an authorized field technician, or sent in for repair. Do not service the printer with the power cord plugged into the AC outlet. n Warning! This printer has a voltage slide switch on the back of the unit. Before you use the printer, check that the switch is set to the correct voltage. Do not use voltage other than 110VAC or 220VAC. This could result in a fire and an electric shock. p Caution! All equipment with AC line voltage, or low DC voltages, such as switches, power supplies, fuses, fans, non-stepper motors, must be replaced with Rimage–approved components to maintain the safety approval issued by UL. p Caution! Do not reach inside the printer unless absolutely necessary. There may be sharp edges on some metal parts. p Caution! Do not use the printer if it is overheating or an abnormal smell is detected. This may result in a fire and an electric shock. In case of heating or abnormal smell, immediately disconnect the cable from the outlet. Contact your dealer for repairs. p Caution! Do not place or store the printer in a location where children may reach it. Severe injuries and equipment damage may occur if the printer is turned over or falls down. p Caution! Allow sufficient free space for opening the printer tray. Do not touch the printer tray while it is moving. 110635_G 19 Rimage PrismPlus! Safety testing Product name: PrismPlus Printer Model: cdprs Notice for USA Tested to Comply with FCC Standards FOR HOME OR OFFICE USE. NOTE: This equipment has been tested and found to comply with the limits for a Class B digital device, pursuant to Part 15 of the FCC Rules. These limits are designed to provide reasonable protection against harmful interference in a residential installation. This equipment generates, uses and can radiate radio frequency energy and, if not installed and used in accordance with the instructions, may cause harmful interference to radio communications. However, there is no guarantee that interference will not occur in a particular installation. If this equipment does cause harmful interference to radio or television reception, which can be determined by turning the equipment off and on, the user is encouraged to try to correct the interference by one or more of the following measures: • Reorient or relocate the receiving antenna. • Increase the separation between the equipment and receiver. • Connect the equipment into an outlet on a circuit different from that to which the receiver is connected. • Consult the dealer or an experienced radio/TV technician for help. rd This product complies with UL 60950 3 Edition. Notice for Canada C Canadian Department of Communications (DOC) Statement This digital apparatus does not exceed the Class B limits for radio noise for digital apparatus specified in the Radio Interference Regulations of the Canadian Department of Communications. Product Safety Statement This product is in compliance with CSA C22.2 No.60950. Notice for Europe This product is in conformity with the EMC Directive (89/336/EEC) and the Low-Voltage Directive (73/23/EEC) through compliance with the following European standards: EN 60950, EN 55022, EN 55024, EN 61000-3-2, EN 61000-3-3. The CE mark has been affixed in accordance with the CE Marking Directive 93/68/EEC. 20 110635_G Learn more Rimage PrismPlus!TM Limited 6 Month Warranty. Rimage warrants, to the original end user only, most parts of the PrismPlus!TM DISC Printer for 6 months, according to the following terms: • Rimage will replace or repair, at Rimage's discretion, any non-consumable parts found defective within the Warranty period. • Valid from the date Rimage ships the product to you. • Factory depot repair: To Rimage’s location in Minnesota from a location within the US or Canada with a typical response of 15 business days. To Rimage’s location in Germany from a location in Europe with a typical response of 15 business days. To Rimage Minnesota from a location that is not in the US or Canada with a typical response of up to 25 business days. • Advanced Replacement or faster response Maintenance Contracts are available for an additional fee. • Rimage will pay ground service freight charges for components shipped to you. The use of non-Rimage certified parts may void this warranty. This Warranty does not include the following: • Work done at the customer's location, or customer's loss of data. • Shipment costs of equipment or components returned to the Rimage factory. • Software and/or firmware enhancements released after purchase of the product • Equipment malfunctions as a result of repairs made by technicians who are not authorized or certified by Rimage. • Equipment or parts that were tampered with, misused, neglected, or that were modified in any respect without the written consent of Rimage. • Equipment or parts that have been damaged due to shipping or accidents, or damaged by lightning, storms, water, or power surges. • Printer consumables including the print head and ribbon. You may not assign this Warranty without Rimage's written consent. Rimage is the intended beneficiary of this Warranty; if there is any inconsistency between this Warranty and any other agreement included with or relating to Rimage products, this Warranty shall govern. If any term of this Warranty is illegal or unenforceable, the legality and enforceability of the remaining provisions are not affected or impaired. This Warranty is to be interpreted under the laws of the State of Minnesota, without giving effect to conflict of law rules. Rimage must receive written notice of any claimed failure to perform or defect within five (5) days after such failure or defect is first observed. For warranty service, call Rimage at (952) 946-0004. The limited warranty set forth above is Rimage’s only warranty in connection with the Perfect Image printer. All other warranties, whether written or oral, express or implied, contractual or statutory, including but not limited to any warranties of merchantability or fitness for any particular purpose are specifically excluded and disclaimed. In no event shall Rimage’s liability under this warranty exceed the obligation to repair or replace a covered product, and, without limiting the foregoing, Rimage’s liability under this warranty shall not exceed the cost of the covered product. 110635_G 21