1
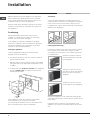
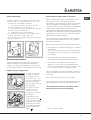
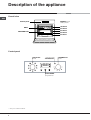
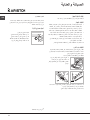
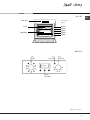
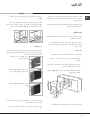
Operating Instructions OVEN Contents AUS AR English,1 Installation, 2-3 Positioning Electrical connections Description of the appliance, 4 Overall view Control panel Start-up and use, 5 Starting the oven Using the cooking timer Data plate The electronic cooking programmer, 6 FH 837 C AUS FH 837 C IX AUS Cooking modes, 7-9 Cooking modes Practical cooking advice Cooking advice table Precautions and tips, 10 General safety Disposal Respecting and conserving the environment Maintenance and care, 11 Switching the appliance off Cleaning the appliance Cleaning the oven door Replacing the light bulb Assistance, 12 AUS Installation Before placing your new appliance into operation please read these operating instructions carefully. They contain important information for safe use, for installation and for care of the appliance. Please keep these operating instructions for future reference. Pass them on to possible new owners of the appliance. Ventilation To ensure good ventilation, the back panel of the cabinet must be removed. It is advisable to install the oven so that it rests on two strips of wood, or on a completely flat surface with an opening of at least 45 x 560 mm (see diagrams). Positioning 560 Keep packaging material out of the reach of children.It can become a choking or suffocation hazard. see Precautions and tips). ! The appliance must be installed by a qualified person in compliance with the instructions provided. Incorrect installation may cause harm to persons, animals or may damage property. Fitting the appliance Use the appropriate cabinet to ensure that the appliance functions properly. The panels adjacent to the oven must be made of heat-resistant material. mm . 45 m m. Centring and fastening Position the 4 tabs on the side of the oven according to the 4 holes of the outer frame. Adjust the tabs according to the thickness of the cabinet side panel, as shown below: thickness of 20 mm: take off the removable part of the tab (see diagram) Cabinets with a veneer exterior must be assembled with glues which can withstand temperatures of up to 100°C. To install the oven under the counter (see diagram) and in a kitchen unit, the cabinet must have the following dimensions: thickness of 18 mm: use the first groove, which has already been set in the factory (see diagram) 45 m m. thickness of 16 mm: use the second groove (see diagram) 5 mm. 567 mm. 558 mm . 593 mm. 23 mm. . . min mm 547 595 mm. AUS 595 mm 24 545 . mm . mm . ! The appliance must not come into contact with electrical parts once it has been installed. The consumption indications on the data plate have been calculated for this type of installation. 2 Secure the appliance to the cabinet by opening the oven door and putting 4 screws into the 4 holes of the outer frame. ! All parts which ensure the safe operation of the appliance must not be removable without the aid of a tool. Centring and fixing* Connecting the supply cable to the mains 1. Position brackets A against oven support B. 2. Position tabs C against brackets A. If the thickness of the cabinet side panel: is 16 mm thick: place the tab so that the number 16 written on it is facing you; is 18 mm thick: place the tab so that the part without any text is facing you; is 20 mm thick: do not fit the tab. 3. Fix the brackets and tabs onto the edge of the cabinet side panel using screws D. 4. Fix the oven to the cabinet using the screws and plastic washers E. Install a standardised plug corresponding to the load indicated on the data plate (see side). The appliance must be directly connected to the mains using an omnipolar circuit-breaker with a minimum contact opening of 3 mm installed between the appliance and the mains, suitable for the load indicated and complying with current electrical regulations (the earthing wire must not be interrupted by the circuit-breaker). The supply cable must not come into contact with surfaces with temperatures higher than 50°C. D C 16 ! The installer must ensure that the correct electrical connection has been made and that it is compliant with safety regulations. 16 Before connecting to the power supply, make sure that: A D C E 16 16 D E C B The appliance is earthed and the plug is compliant with the law. The socket can withstand the maximum power of the appliance, which is indicated on the data plate (see below). Electrical connections The voltage must be in the range between the values indicated on the data plate (see below). ! Ovens equipped with a three-pole power supply cable are designed to operate with alternating current at the voltage and frequency indicated on the data plate located on the appliance (see below). The socket is compatible with the plug of the appliance. If the socket is incompatible with the plug, ask an authorised technician to replace it. Do not use extension cords or multiple sockets. Fitting the power supply cable 1. Open the terminal board by inserting a screwdriver into the side tabs of the cover. Use the screwdriver as a lever by pushing it down to open the cover (see diagram). 2. Loosen the cable clamp screw and remove it, using a screwdriver as a lever (see figure). 3. Remove the wire contact screws L-N, then fasten the wires under the screw heads, respecting the colour code: Blue (N), Brown (L) and Yellow-Green Verde ( ). ! Once the appliance has been installed, the power supply cable and the electrical socket must be easily accessible. ! The cable must not be bent or compressed. ! The cable must be checked regularly and replaced by authorised technicians only (see Assistance). ! The manufacturer declines any liability should these safety measures not be observed. * Only on certain models. 3 AUS Description of the appliance AUS Overall view GUIDES for the sliding racks Control panel position 5 position 4 position 3 position 2 position 1 GRILL DRIPPING PAN Control panel SELECTOR Knob Indicator light THERMOSTAT •• •• ELECTRONIC Programmer* * Only on certain models. 4 THERMOSTAT Knob Start-up and use ! The first time you use your appliance, heat the empty oven with its door closed at its maximum temperature for at least half an hour. Ensure that the room is well ventilated before switching the oven off and opening the oven door. The appliance may produce a slightly unpleasant odour caused by the burning away of protective substances used during the manufacturing process. AUS Starting the oven 1. Select the desired cooking mode by turning the SELECTOR knob. 2. Select the desired temperature with the THERMOSTAT knob. See the Cooking advice table for cooking modes and the suggested cooking temperatures (see Cooking Modes). 3. When lit, the THERMOSTAT indicator light indicates that the oven is heating up to the temperature set. 4. You may do the following during cooking: - change the cooking mode by turning the SELECTOR knob. - change the temperature by turning the THERMOSTAT knob. - stop cooking by turning the SELECTOR knob to the 0 position. ! Never put objects directly on the oven bottom to avoid damaging the enamel coating. ! Always place cookware on the rack(s) provided. Cooling ventilation In order to cool down the external temperature of the oven, some models are fitted with a cooling fan that blows out air between the control panel and the oven door. ! Once the cooking has been completed, the cooling fan remains on until the oven has cooled down sufficiently. Oven light It goes on when selecting with the SELECTOR knob. It stays on when a cooking mode is selected. DATA PLATE Dimensions width 43.5 cm height 32 cm depth 41,5 cm Volume lt. 58 Electrical connections voltage: 220-240V ~ 50Hz maximum power absorbed 2800W Directive 2002/40/EC on the label of electric ovens. Standard EN 50304 ENERGY LABEL Energy consumption for Natural convection – heating mode: / Convection mode. Declared energy consumption for Forced convection Class – heating mode: / Baking. This appliance conforms to the following European Economic Community directives: - 2006/95/EEC of 12/12/06 (Low Voltage) and subsequent amendments; - 2004/108/EEC of 15/12/04 (Electromagnetic Compatibility) and subsequent amendments; - 93/68/EEC of 22/07/93 and subsequent amendments. - 2002/96/EC and subsequent amendments. 5 The electronic cooking programmer Programming cooking AUS A cooking mode must be selected before programming can take place. DISPLAY END OF COOKING icon DURATION icon •• •• DECREASE TIME button CLOCK icon Programming the cooking duration TIMER icon 1. Press the button several times until the icon and the three digits on the DISPLAY begin to flash. 2. Use the + and - buttons to set the desired duration; if you press and hold either button, the display will scroll through the values more quickly, making it quicker and easier to set the value. INCREASE TIME button SET TIME button Setting the clock The clock may be set when the oven is switched off or when it is switched on, provided that a the end time of a cooking cycle has not been programmed previously. After the appliance has been connected to the mains, or after a blackout, the icon and the four numerical digits on the DISPLAY will begin to flash. button several times until the 1. Press the icon and the four digits on the display begin to flash. 2. Use the + and - buttons to adjust the time; if you press and hold either button, the display will scroll through the values more quickly, making it quicker and easier to set the desired value. 3. Wait for 10 seconds or press the to finalise the setting. button again Setting the timer This function does not interrupt cooking and does not affect the oven; it is simply used to activate the buzzer when the set amount of time has elapsed. 1. Press the button several times until the icon and the three digits on the display begin to flash. 2. Use the + and - buttons to set the desired time; if you press and hold either button, the display will scroll through the values more quickly, making it quicker and easier to set the value. 3. Wait for 10 seconds or press the button again to finalise the setting. The display will then show the time as it counts down. When this period of time has elapsed the buzzer will be activated. 6 3. Wait for 10 seconds or press the button again to finalise the setting. 4. When the set time has elapsed, the text END appears on the DISPLAY, the oven will stop cooking and a buzzer sounds. For example: it is 9:00 a.m. and a time of 1 hour and 15 minutes is programmed. The programme will stop automatically at 10:15 a.m. Setting the end time for a cooking mode A cooking duration must be set before the cooking end time can be scheduled. 1. Follow steps 1 to 3 to set the duration as detailed above. 2. Next, press the button until the icon and the four digits on the DISPLAY begin to flash. 3. use the + and - buttons to adjust the cooking end time; if you press and hold either button, the display will scroll through the values more quickly, making it quicker and easier to set the desired value. 4. Wait for 10 seconds or press the button again to finalise the setting. 5. When the set time has elapsed, the text END appears on the DISPLAY, the oven will stop cooking and a buzzer sounds. Programming has been set when the and buttons are illuminated. The DISPLAY shows the cooking end time and the cooking duration alternately. Cancelling a programme To cancel a programme: press the button until the icon corresponding to the setting you wish to cancel and the digits on the display are no longer flashing. Press the - button until the digits 00:00 appear on the display. Press and hold the + and - buttons; this will cancel all the settings selected previously, including timer settings. Cooking modes Cooking modes ! A temperature value can be set for all cooking modes between 60°C and Max, except for BARBECUE (recommended: set only to MAX power level); GRATIN (recommended: do not exceed 200°C). LEAVENING mode The oven reaches and maintains a temperature of 40°C irrespective of the position of the THERMOSTAT knob. This mode is ideal for leavening dough made with yeast. TRADITIONAL OVEN mode Both the top and bottom heating elements will come on. With this traditional cooking mode, it is best to use one cooking rack only: if more than one rack is used, the heat distribution will be uneven. BAKING mode The rear heating element and the fan come on, guaranteeing the distribution of heat delicately and uniformly throughout the oven. This mode is ideal for baking and cooking temperature sensitive foods such as cakes that need to rise and to prepare certain tartlets on 3 shelves simultaneously. PIZZA mode AUS The heating elements (bottom and circular) and the fan come on. This combination heats the oven rapidly by producing a considerable amount of heat, particularly from the bottom element. If you use more than one rack simultaneously, switch the position of the dishes halfway through the cooking process. BARBECUE mode The top heating element and the rotisserie (where present) come on. The high and direct temperature of the grill is recommended for food that requires high surface temperature. Always cook in this mode with the oven door closed. GRATIN mode The top heating element as well as the fan and the rotisserie (where present) come on. This combination of features increases the effectiveness of the unidirectional thermal radiation of the heating elements through forced circulation of the air throughout the oven. This helps prevent food from burning on the surface, allowing the heat to penetrate right into the food. Always cook in this mode with the oven door closed. FAST COOKING mode The heating elements and the fan come on, guaranteeing the distribution of heat consistently and uniformly throughout the oven. Pre-heating is not necessary for this cooking mode. This mode is especially recommended for cooking pre-packed food quickly (frozen or pre-cooked). The best results are obtained if you use one cooking rack only. MULTI-COOKING mode All the heating elements (top, bottom and circular), as well as the fan, will come on. Since the heat remains constant throughout the oven, the air cooks and browns food uniformly. A maximum of two racks may be used at the same time. 7 AUS Practical cooking advice ! Do not place racks in position 1 and 5 during fanassisted cooking. Excessive direct heat can burn temperature sensitive foods. ! In the BARBECUE and GRATIN cooking modes, particularly when using the rotisserie, place the dripping pan in position 1 to collect cooking residues (fat and/or grease). MULTI-COOKING Use position 2 and 4, placing the food that requires more heat on 2. Place the dripping pan on the bottom and the rack on top. BARBECUE Insert the rack in position 3 or 4. Place the food in the centre of the rack. We recommend that you set the maximum power level. The top heating element is regulated by a thermostat and may not always be on. PIZZA MODE Use a light aluminium pizza pan. Place it on the rack provided. For a crispy crust, do not use the dripping pan (prevents crust from forming by extending cooking time). If the pizza has a lot of toppings, we recommend adding the mozzarella cheese on top of the pizza halfway through the cooking process. 8 Cooking advice table Cooking modes Foods Leavening process of dough made with yeast or baking powder (brioches, bread, sugar pie, croissants, etc.) Duck Traditional Roast veal or beef Pork roast Oven Biscuits (short pastry) Tarts Tarts Fruit cakes Plum cake Sponge cake Baking Stuffed pancakes (on 2 racks) Small cakes (on 2 racks) Mode Cheese puffs (on 2 racks) Cream puffs (on 3 racks) Biscuits (on 3 racks) Meringues (on 3 racks) Frozen food Pizza Courgette and prawn pie Country style spinach pie Turnovers Lasagne Golden Rolls Fast Chicken morsels cooking Pre-cooked food Golden chicken wings Fresh Food Biscuits (short pastry) Plum cake Cheese puffs Pizza (on 2 racks) Lasagne Lamb Roast chicken + potatoes Mackerel MultiPlum cake cooking Cream puffs (on 2 racks) Biscuits (on 2 racks) Sponge cake (on 1 rack) Sponge cake (on 2 racks) Savoury pies Pizza Pizza Mode Roast veal or beef Chicken Soles and cuttlefish Squid and prawn kebabs Cuttlefish Cod filet Grilled vegetables Barbecue Veal steak Sausages Hamburgers Mackerels Toasted sandwiches (or toast) Grilled chicken Gratin Cuttlefish AUS Weight (in kg) Rack Position Pre-heating time (minutes) Recommended temperature Cooking time (minutes) 1 1 1 1 0.5 1 0.7 0.5 1.2 0.6 0.4 0.7 0.7 0.5 3 3 3 3 3 3 2 or 3 3 3 2 and 4 2 and 4 2 and 4 1 and 3 and 5 1 and 3 and 5 1 and 3 and 5 15 15 15 15 15 15 15 15 15 15 15 15 15 15 15 200 200 200 180 180 180 180 180 160 200 190 210 180 180 90 65-75 70-75 70-80 15-20 30-35 20-30 40-45 40-50 25-30 30-35 20-25 15-20 20-25 20-25 180 0.3 0.4 0.5 0.3 0.5 0.4 0.4 2 2 2 2 2 2 2 - 250 200 220 200 200 180 220 12 20 30-35 25 35 25-30 15-20 0.4 2 - 200 20-25 0.3 0.6 0.2 1 1 1 1+1 1 1 0.5 0.5 0.5 1 1.5 0.5 1 1 0.7 0.6 0.6 0.8 0.4 0.8 0.6 0.6 1 4 and 6 1.5 1.5 2 2 2 2 and 4 3 2 2 and 4 2 2 2 and 4 2 and 4 2 2 and 4 3 3 2 2 or 3 4 4 4 4 3 or 4 4 4 4 4 4 2 2 15 10 10 15 10 10 10 10 10 10 15 15 10 10 10 10 200 180 210 230 180 180 200 180 170 190 180 170 170 200 220 220 180 Max Max Max Max Max Max Max Max Max Max 200 200 15-18 45 10-12 15-20 30-35 40-45 60-70 30-35 40-50 20-25 10-15 15-20 20-25 25-30 15-20 25-30 60-70 10-12 8-10 10-15 10-15 15-20 15-20 15-20 10-12 15-20 3-5 55-60 30-35 Leavening 9 Precautions and tips AUS ! The appliance was designed and manufactured in compliance with international safety standards. The following warnings are provided for safety reasons and must be read carefully. General safety The appliance was designed for domestic use inside the home and is not intended for commercial or industrial use. The appliance must not be installed outdoors, even in covered areas. It is extremely dangerous to leave the appliance exposed to rain and storms. When handling the appliance, always use the handles provided on the sides of the oven. Do not touch the appliance with bare feet or with wet or moist hands and feet. The appliance must be used by adults only for the preparation of food, in accordance with the instructions outlined in this booklet. Any other use of the appliance (e.g. for heating the room) constitutes improper use and is dangerous. The manufacturer may not be held liable for any damage resulting from improper, incorrect and unreasonable use of the appliance. When the appliance is in use, the heating elements and some parts of the oven door become extremely hot. Make sure you don't touch them and keep children well away. Ensure that the power supply cable of other electrical appliances does not come into contact with the hot parts of the oven. The openings used for ventilation and dispersion of heat must never be covered. Always grip the oven door handle in the centre: the ends may be hot. Always use oven gloves to place cookware in the oven or when removing it. Do not use aluminium foil to line the bottom of the oven. Do not place flammable materials in the oven: if the appliance is switched on by mistake, it could catch fire. Always make sure the knobs are in the l/¡ position when the appliance is not in use. When unplugging the appliance always pull the plug from the mains socket, do not pull on the cable. Never carry out any cleaning or maintenance work without having unplugged the plug from the mains. In the case of a malfunction, under no circumstances should you attempt to repair the appliance yourself. Repairs carried out by inexperienced persons may cause injury or further 10 malfunctioning of the appliance. Contact a Service Centre (see Assistance). Do not rest heavy objects on the open oven door. Do not let children play with the appliance. The appliance should not be operated by people (including children) with reduced physical, sensory or mental capacities, by inexperienced individuals or by anyone who is not familiar with the product. These individuals should, at the very least, be supervised by someone who assumes responsibility for their safety or receive preliminary instructions relating to the operation of the appliance. Disposal Observe local environmental standards when disposing packaging material for recycling purposes. Observe existing legislation when disposing of the old appliance. The European Directive 2002/96/EC on Waste Electrical and Electronic Equipment (WEEE), requires that old household electrical appliances must not be disposed of in the normal unsorted municipal waste stream. Old appliances must be collected separately in order to optimise the recovery and recycling of the materials they contain and reduce the impact on human health and the environment. The crossed out wheeled bin symbol on the product reminds you of your obligation, that when you dispose of the appliance it must be separately collected. Consumers should contact their local authority or retailer for information concerning the correct disposal of their old appliance. Respecting and conserving the environment By using the appliance in the hours between late afternoon and early morning, you can help reduce the work load placed on electrical companies. Always keep the oven door closed when using the BARBECUE and GRATIN modes: to attain best results and to save energy (approximately 10%). Regularly check the door seals and wipe clean to ensure they are free of debris so that they stick properly to the door and do not allow heat to disperse. Maintenance and care Switching the appliance off Inspecting the seals Cleaning the appliance Check the door seals around the oven periodically. If the seals are damaged, please contact your nearest After-sales Service Centre (see Assistance). We recommend not using the oven until the seals have been replaced. Disconnect your appliance from the electricity supply before carrying out any work on it. The stainless-steel or enamel-coated external parts as well as the rubber seals may be cleaned using a sponge that has been soaked in lukewarm water and neutral soap. If these stains are difficult to remove, use only specialised products. After cleaning, rinse and dry thoroughly. Do not use abrasive powders or corrosive substances. Ideally, the inside of the oven should be cleaned after each use, when it is still lukewarm. Use hot water and detergent, rinse and dry with a soft cloth. Do not use abrasive products. All accessories can be washed like everyday crockery, and are even dishwasher safe. Never use steam cleaners or pressure cleaners on the appliance. AUS Replacing the light bulb To replace the oven light bulb: 1. Remove the glass cover of the lamp-holder. 2. Remove the light bulb and replace it with a similar one: Wattage 25 W, cap E 14. 3. Replace the glass cover (see diagram). Cleaning the oven door Clean the glass part of the oven door using a sponge and a non-abrasive cleaning product, then dry thoroughly with a soft cloth. Do not use rough abrasive material or sharp metal scrapers as these could scratch the surface and cause the glass to crack. To clean more thoroughly, you can remove the oven door. 1. Open the oven door fully (see diagram). 2. Use a screwdriver to lift up and turn the small levers . located on the two hinges (see diagram). F 3. Grip the door on the two outer sides and close it approximately half way. Pull the door towards you lifting it out of its seat (see diagram).* To replace the door, reverse this sequence. * Only on certain models 11 Assistance AUS Communicating: appliance model (Mod.) serial number (S/N) This information is found on the data plate located on the appliance and/or on the packaging. ARISTON PRIORITY SERVICE If you are not completely satisfied with your appliance or require service call: Australia Phone: 1300 815 589 New Zealand Phone: (09) 306 1020 GENUINE ACCESSORIES & SPARE PARTS A wide range of genuine accessories are available for your appliance call: Australia Phone: 03 9768 0888 New Zealand Phone: (09) 306 1020 AUSTRALIA ARISIT PTY LIMITED 40-44 Mark Anthony Drive, Dandenong South, VIC 3175, Australia Fax: Service & Sales (03) 9768 0838 NEW ZEALAND ARISIT PTY LIMITED PO Box 68-140 Newton, Auckland 1145, New Zealand Fax: (09) 302 0077 Email: [email protected] Email: [email protected] 12 المساعدة :االتصال .).Mod( • طراز الجهاز .)S/N( • الرقم التسلسلي .أو على العبوة/هذه المعلومات يمكن أن تجدها على لوحة البيانات الموجودة على الجهاز و ARISTON PRIORITY SERVICE If you are not completely satisfied with your appliance or require service call: Australia Phone: 1300 815 589 New Zealand Phone: (09) 306 1020 GENUINE ACCESSORIES & SPARE PARTS A wide range of genuine accessories are available for your appliance call: Australia Phone: 03 9768 0888 New Zealand Phone: (09) 306 1020 AUSTRALIA ARISIT PTY LIMITED 40-44 Mark Anthony Drive, Dandenong South, VIC 3175, Australia Fax: Service & Sales (03) 9768 0838 NEW ZEALAND ARISIT PTY LIMITED PO Box 68-140 Newton, Auckland 1145, New Zealand Fax: (09) 302 0077 Email: [email protected] Email: [email protected] 12 AR الصيانة والعناية إيقاف تشغيل الجهاز قم بفصل جهازك عن تزويد الطاقة قبل إنجاز أي عمل عليه. تنظيف الجهاز • الفوالذ المقاوم للصدأ أو طالء المينا الذي يغطي األجزاء الخارجية والمطاط يمكن تنظيفهما باستخدام إسفنجة مبللة بالماء الفاتر والصابون غير المتفاعل. إذا كان من الصعب إزالة هذه البقع ،استخدم المنتجات المخصصة فقط .بعد التنظيف ،اشطفه وجففه جيدا .ال تستخدم المساحيق الكاشطة أو المواد اآلكلة. • يجب تنظيف الجزء الداخلي من الفرن بشكل كامل بعد كل استعمال ،بينما يكون ما زال دافئا .استخدم الماء الساخن ومادة تنظيف ،ثم اشطفه وجففه جيدا بواسطة خرقة ناعمة .ال تستخدم المنتجات الكاشطة. • يمكن غسل كل األدوات الملحقة مثل األواني العادية ،وهي قابلة للغسل في ماكينة غسل األطباق بأمان. ! ال تستخدم أبدا المنظفات بالبخار أو المنظفات بالضغط مع الجهاز. فحص مطاط الفرن AR افحص مطاط الباب حول الفرن بشكل منتظم .إذا تلف المطاط ،الرجاء اتصل بأقرب مركز خدمة ما بعد البيع (أنظر المساعدة) .نوصي بعدم استخدام الفرن إلى أن يتم استبدال المطاط. تبديل مصباح اإلنارة لتبديل مصباح إنارة الفرن: .1أزل الغطاء الزجاجي لحامل المصباح. .2أزل مصباح اإلنارة واستبدله بمصباح مماثل :الفولطية 25واط ،الكبسولة .E 14 .3أعد الغطاء الزجاجي (انظر الرسم). تنظيف باب الفرن نظف زجاج باب الفرن باستخدام منتجات غير كاشطة وإسفنجة وجففه بخرقة ناعمة .ال تستخدم المواد الكاشطة الخشنة أو كاشطة معدنية حادة ،فهذه يمكن أن تخدش السطح وتسبب تص ّدع الزجاج. لتنظيف الفرن تنظيفا كامال ،يمكنك إزالة بابه. .1افتح باب الفرن بأكمله (أنظر الرسم). .2استخدم مفك لرفع وإدارة الرافعات الصغيرة Fالموجودة على المفصلتين (أنظر الرسم). F .3أمسك بالباب من جانبيه الخارجيين واغلقه إلى نصفه تقريبا .اسحب الباب باتجاهك واخرجه من مفصلتيه (انظر الرسم)*. عكسي. إلعادة الباب إلى مكانه نفذ التعليمات بترتيب ّ * في طرازات معينة فقط 11 وسائل حذر ونصائح AR ! تم تصميم الجهاز وتصنيعه طبقا لمواصفات األمان العالمية .يتم تزويد التحذيرات التالية ألسباب وقائية ويجب قراءتها بعناية. الوقاية العامة • • • • • • • • • • • • • • • • 10 تم تصميم الجهاز لالستعمال البيتي داخل المنزل وهو غير مع ّد لالستعمال التجاري أو الصناعي. يجب عدم تركيب الجهاز خارج المنزل ،حتى وإن كان ذلك في مناطق مغطاة .من الخطر جدا إبقاء الجهاز عرضة للشتاء والعواصف. عند إزالة أو تغيير موضع الجهاز ،استخدم دائما المسكات المزودة على جانبي الفرن. ال تلمس الجهاز وأنت حافي القدمين أو بيدين ورجلين مبللتين أو رطبتين. يجب استخدام الجهاز من قبل البالغين فقط لتحضير الطعام ،بموجب التعليمات المزودة في هذه الكراسة .أي استخدام آخر (مثل تدفئة الغرف) من شأنه أن يكون غير صحيح ولذلك أن يلحق الخطر .لن يتحمل المصنع أية مسؤولية عن خطر ينتج عن االستخدام ،غير المالئم ،غير الصحيح وغير الالئق للجهاز. عندما يكون الجهاز قيد االستخدام ،تصبح عناصر التسخين وبعض أجزاء باب الفرن ساخنة جدا .تأكد من عدم مالمستها وابعد األطفال عنها. تأكد من أن كبالت تزويد الطاقة الخاصة باألجهزة الكهربائية األخرى ال تالمس األجزاء الساخنة من الفرن. يمنع تغطية الفتحات المعدة للتهوئة ولعزل الحرارة منعا باتا. أمسك مقبض باب الفرن من الوسط دائما :األطراف يمكن أن تكون ساخنة. استخدم قفازات الفرن دائما عند إدخال إناء الطهي إلى الفرن أو عند إخراجه منه. ال تستخدم رقائق األلومنيوم لتغطية أرضية الفرن. ال تضع المواد القابلة لالشتعال في الفرن :إذا تم تشغيل الجهاز عن غير قصد ،فمن الممكن أن يسبب الحريق. تأكد دائما من أن المفاتيح موجودة بوضع " "¡"/"lعندما ال يكون الجهاز قيد االستخدام. عند فصل الجهاز عن الكهرباء ،اسحب دائما القابس من مقبس الشبكة الرئيسية ،ال تسحب الكبل. ال تقم بأي عملية تنظيف أو صيانة دون فصل الجهاز عن شبكة الكهرباء الرئيسية. في حال حدوث خلل في عمل الجهاز ،ال تحاول ،بأي شكل من األشكال، تصليح الجهاز بنفسك .يمكن إلجراء التصليحات من قبل أشخاص قليلي الخبرة أن يلحق األذى أو حتى إلى تعطيل الجهاز .اتصل بمركز الخدمة (انظر المساعدة). • ال تضع أغراضا ثقيلة على باب الفرن وهو مفتوح. • ال تدع األطفال يعبثون بالجهاز. • يجب عدم تشغيل الجهاز من قبل أشخاص (بمن فيهم األوالد) ذوي القدرات الجسدية ،الشعورية أو العقلية المحدودة ،من قبل أشخاص تنقصهم التجربة أو أي شخص ليست له دراية بالمنتج .يمكن توفير النصح لهؤالء األشخاص ،على األقل ،من قبل شخص يتحمل المسؤولية عن أمانهم أو الحصول على تعليمات أولية متعلقة باستخدام الجهاز. التخلص • تقيّد بالمعايير البيئية المحلية عند التخلص من مواد التعبئة بهدف إعادة تدويرها .تقيد بالقوانين القائمة عند التخلص من الجهاز القديم. • تقضي التوجيهات األوروبية EC/2002/96المتعلقة باألجهزة الكهربائية التالفة ( )WEEEبعدم التخلص من األجهزة الكهربائية البيتية القديمة بواسطة دورة جمع النفايات البلدية غير المصنفة .يجب جمع األجهزة القديمة على انفراد بهدف إنجاع عملية استرداد وإعادة تدوير المواد التي تحتوي عليها وتقليل تأثيرها على صحة اإلنسان والبيئة .إشارة "السلة الدائرية" المشطوبة على المنتج تذكرك بالتزامك بأنه عند تخلصك من الجهاز ،يجب تجميعه على حدة. يتوجب على المستهلكين االتصال بسلطتهم المحلية أو بتاجر التجزءة فيما يتعلق بالمعلومات المتعلقة بالطريقة الصحيحة للتخلص من جهازهم القديم. احترام البيئة والحفاظ عليها • عند استخدام الجهاز بين الساعات المتأخرة ما بعد الظهر وبين ساعات الصباح الباكر ،فبإمكانك أن تساعد على تقليل العبء الملقى على شركات الكهرباء. • ابق باب الفرن مغلقا دائما عند استخدام أنماط الباربكيو و والجبن :للحصول على أفضل النتائج ولتوفير الطاقة (ما يقارب .)10% • افحص مطاط الباب بشكل منتظم وامسحه ونظفه لضمان خلوه من البقايا بحيث يحكم التصاقه بالباب كما ينبغي ،هذا سيمنع تسرب الحرارة. جدول نصائح الطهي أنماط الطهي األطعمة عمليات تخير العجين تتم بواسطة خميرة أو مسحوق خبز (خبز محلى ،خبز ،كعكات السكر ،كروسون ،وما التخمير شابه) بط لحم العجل أو البقر المشوي لحم الخنزير المشوي فرن تقليدي البسكوت (معجنات ذو قشرة دقيقة) التورتة التورتة كعكات الفواكه كعكة خوخ كعكة إسفنجية الفطائر المحشوة (على صينيتين) النمط - كعكات صغيرة (على صينيتين) فطائر الجبنة (على صينيتين) فطائر الكريما (على 3صواني) بسكوت (على 3صواني) المنيرج (على 3صواني) أطعمة مجمدة بيتزا فطائر الكوسا والقريدس فطائر السبانخ القروية مخبوزات محشوة الزانيا لفائف ذهبية طهي سريع فتات دجاج أطعمة قبل الطهي أجنحة دجاج ذهبية أطعمة طازجة البسكوت (معجنات ذو قشرة دقيقة) كعكة خوخ فطائر الجبن بيتزا (على صينيتين) الزانيا لحم الخروف لحم الدجاج المشوي +بطاطا سمك المكاريل الطهي المتعددد كعكة خوخ فطائر الكريما (على 2صواني) بسكوت (على 2صواني) كعكة إسفنجية (على صينية واحدة) كعكة إسفنجية (على صينيتين) الفطائر اللذيذة بيتزا نمط PIZZAلحم العجل أو البقر المشوي لحم الدجاج سمك موسى والصبيدج كباب السبيدج والقريدس ‑{}‑سمك السبيدج فيليه سمك القد خضروات مشوية شرائح العجل نقانق Barbecueهامبرغر سمك المكاريل ساندويشات محمصة (أو خبز محمص) مع مشواة (إن وجدت) عجل على السيخ دجاج على السيخ خروف على السيخ لحم الدجاج المحمر سمك السبيدج مع مشواة (إن وجدت) الجبن المبروش عجل على السيخ خروف على السيخ دجاج على السيخ شواء (متوسط) AR وضع الحامل وقت اإلحماء المسبق (دقيقة) درجة الحرارة الموصى بها وقت الطهي (دقائق) الوزن (كغم) 1 1 1 1 0.5 1 0.7 0.5 1.2 0.6 0.4 0.7 0.7 0.5 3 3 3 3 3 3 2أو 3 3 3 2و4 2و4 2و4 1و 5/3 1و 5/3 1و 5/3 15 15 15 15 15 15 15 15 15 15 15 15 15 15 15 200 200 200 180 180 180 180 180 160 200 190 210 180 180 90 65-75 70-75 70-80 15-20 30-35 20-30 40-45 40-50 25-30 30-35 20-25 15-20 20-25 20-25 180 0.3 0.4 0.5 0.3 0.5 0.4 0.4 2 2 2 2 2 2 2 - 250 200 220 200 200 180 220 12 20 30-35 25 35 25-30 15-20 0.4 2 - 200 20-25 0.3 0.6 0.2 1 1 1 1+1 1 1 0.5 0.5 0.5 1 1.5 0.5 1 1 0.7 0.6 0.6 0.8 0.4 0.8 0.6 0.6 1 4و6 2 2 2 2و4 3 2 2و4 2 2 2و4 2و4 2 2و4 3 3 2 2أو 3 4 4 4 4 3أو 4 4 4 4 4 4 15 10 10 15 10 10 10 10 10 10 15 15 10 10 - 200 180 210 230 180 180 200 180 170 190 180 170 170 200 220 220 180 الحد األقصى الحد األقصى الحد األقصى الحد األقصى الحد األقصى الحد األقصى الحد األقصى الحد األقصى الحد األقصى الحد األقصى 15-18 45 10-12 15-20 30-35 40-45 60-70 30-35 40-50 20-25 10-15 15-20 20-25 25-30 15-20 25-30 60-70 10-12 8-10 10-15 10-15 15-20 15-20 15-20 10-12 15-20 3-5 1.0 1.5 1.0 1.5 1.5 2 2 10 10 الحد األقصى الحد األقصى الحد األقصى 200 200 80-90 70-80 70-80 55-60 30-35 1.5 1.5 1.5 - 2 10 10 10 10 200 200 200 200 70-80 70-80 70-75 70-75 9 AR نصائح طهي عملية ! ال تضع الصينيات بالوضعين 1و 5خالل الطهي بمساعدة المروحة. الحرارة المباشرة المبالغ بها يمكن أن تحرق األطعمة الحساسة للحرارة المرتفعة. ! في نمطي الطهي BARBECUEو GRATINوخاصة عند استخدام سيخ المشواة ،ضع صينية التنقيط في الوضع 1لجمع فضالت الطهي (الدهون و/ أو الشحوم). الطهي المتعددد • استخدم األوضاع 2و ،4بوضع الطعام الذي يحتاج إلى المزيد من التسخين على .2 • ضع صينية التنقيط في األسفل والصينية في الجهة العليا. BARBECUE • أدخل الحامل بالوضع 3أو .4ضع الطعام في مركز الحامل. • نحن نوصي بضبط مستوى الطاقة إلى الحد األقصى .تتم معايرة عنصر التسخين العلوي بواسطة ثرموستات ومن الممكن أال يتم تشغيله بشكل متواصل. نمط PIZZA • استخدم صينية بيتزا من األلومنيوم الخفيف .ضعها على الحامل المزود. للحصول على قشرة هشة ،ال تستخدم صينية التنقيط (تمنع القشرة من التكوّن بسبب إطالة وقت الطهي). • إذا كانت البيتزا تحتوي على الكثير من اإلضافات العلوية ،نحن نوصي بإضافة جبنة الموزاريال في وسط وجه البيتزا خالل عملية الطهي. 8 أنماط الطهي أنماط الطهي ! يمكن ضبط مستوى درجة الحرارة لكل أساليب الطهي ما بين 60درجة مئوية وحتى الحد األقصى ،فيما عدا أساليب الطهي التالية • ( BARBECUEيُستحسن :ضبط الحد األقصى من مستوى الطاقة فقط)؛ • الجبن المبشور (يُستحسن :أال يتعدى 200درجة مئوية). GRILLنمط يصل الفرن إلى درجة حرارة 40°Cويحافظ عليها بغض النظر عن وضع مفتاح الثرموستات .هذا النمط أمثل لتخمير العجين بواسطة الخميرة. فرن تقليدي نمط سيتم تشغيل كل من عناصر التسخين العليا والسفلى .بنمط الطهي التقليدي هذا، من األفضل استخدام صينية طهي واحدة فقط :إذا تم استخدام أكثر من صينية واحدة ،فسيكون توزيع الحرارة غير موحد. الخبز نمط PIZZAنمط AR سيتم تشغيل عناصر التسخين (السفلي والدائري) والمروحة .هذا الدمج يسخن الفرن بسرعة بواسطة إنتاج كمية كبيرة من الحرارة ،وخاصة من قبل عنصر التسخين السفلي .إذا استخدمت أكثر من صينية واحدة في نفس الوقت ،قم بتبديل مواضع األطباق في منتصف عملية الطهي. BARBECUEنمط سيتم تشغيل عنصر التسخين العلوي وسيخ المشواة (إن وجدت) .يوصى بدرجة حرارة الشواء المرتفعة والمباشرة لألطعمة التي يحتاج وجهها إلى درجة حرارة عالية .قم بالطهي بهذا النمط دائما بينما يكون باب الفرن مغلقا. GRATINنمط سيتم تشغيل عنصر التسخين العلوي و وكذلك المشواة (إن وجدت) .هذا الدمج بين المزايا يزيد من فعالية اإلشعاع الحراري أحادي االتجاه لعناصر التسخين عن طريق دفع تدوير الهواء داخل الفرن. هذا يساعد على تحاشي حرق وجه الطعام ويتيح للحرارة اختراق الطعام بشكل صحيح .قم بالطهي بهذا النمط دائما بينما يكون باب الفرن مغلقا. عنصر التسخين الخلفي والمروحة يبدأن بالعمل ،ليضمنا توزيع الحارة بشكل دقيق وموحد داخل الفرن .هذا النمط أمثل للخبز وطهي األطعمة الحساسة للحرارة مثل الكعكات التي تحتاج إلى االنتفاخ ولتحضير كعكات فواكه معينة على ثالثة رفوف في نفس الوقت. الطهي السريع نمط عناصر التسخين والمروحة يبدأن بالعمل ،ليضمنا توزيع الحارة بشكل دقيق وموحد داخل الفرن. اإلحماء المسبق غير ضروري لنمط الطهي هذا .هذه النمط موصى به بشكل خاص لطهي األطمة ما قبل خبزها بسرعة (المجمدة أو ما قبل المطهية) .يتم التوصل إلى أفضل النتائج إذا استخدمت صينية طهي واحدة فقط. الطهي المتعدد نمط سيتم تشغيل كل عناصر التسخين (العلوي ،السفلي والدائري) وستبدأ المروحة بالعمل أيضا .بما أن الحرارة ستكون ثابتة في الفرن كله ،سيطبخ الهواء الطعام موحد .من الممكن استخدام صينيتين على األكثر في نفس وسيحمّره بشكل ّ الوقت. 7 مبرمج الطهي اإللكتروني برمجة الطهي AR ﺍﻟﺸﺎﺷﺔ ! يجب اختيار نمط طهي قبل إنجاز البرمجة. •• •• ﺃﻳﻘﻮﻧﺔ ﺍﻟﺴﺎﻋﺔ ﺃﻳﻘﻮﻧﺔ ﻋﺪﺍﺩ ﺍﻟﻮﻗﺖ ﺃﻳﻘﻮﻧﺔ ﺍﻧﺘﻬﺎء ﺍﻟﻄﻬﻲ ﺃﻳﻘﻮﻧﺔ ﺍﻟﻤﺪﺓ ﺗﻘﻠﻴﻞ ﺍﻟﻮﻗﺖ ﺯﺭ ﺯﻳﺎﺩﺓ ﺍﻟﻮﻗﺖ ﺯﺭ ﺇﻋﺪﺍﺩ ﺍﻟﻮﻗﺖ ﺯﺭ ضبط الساعة ! يمكن ضبط الساعة بينما ال يكون الفرن مشغال أو عندما يكون مشغال ،شريطة أنه لم تتم برمجة وقت انتهاء دورة طهي مسبقا. بعد أن يكون قد تم توصيل الجهاز بالشبكة الكهربائية الرئيسية ،أو بعد انقطاع فإن األيقونة المؤلفة من أربعة منازل رقمية على الشاشة ستبدأ التيار، بالوميض. واألرقام األربعة على الشاشة حتى يبدأ الرمز .1اضغط الزر بالوميض. .2استخدم األزرار " "+و " "-لضبط الوقت؛ إذا ضغطا ضغطا متواصال على واحد منهما ،فستبدأ الشاشة بالتمرير عبر القيم بسرعة أكبر ،لتجعل ضبط القيمة المرغوب بها أسرع. مرة أخرى إلنهاء اإلعداد. .3انتظر لمدة 10ثوان أو اضغط على الزر ضبط ساعة التوقيت ! ال تعترض هذه الوظيفة الطهي وال تؤثر على الفرن؛ إنها تستخدم ببساطة لتنشيط الجرس عند انتهاء مدة الوقت المحددة. حتى يبدأ الرمز .1اضغط الزر بالوميض. .2استخدم األزرار " "+و " "-لضبط الوقت المرغوب به؛ إذا ضغطا ضغطا متواصال على واحد منهما ،فستبدأ الشاشة بالتمرير عبر القيم بسرعة أكبر، لتجعل ضبط القيمة أسرع وأسهل. مرة أخرى إلنهاء اإلعداد. .3انتظر لمدة 10ثوان أو اضغط على الزر عندها ستعرض الشاشة الوقت بعد تنازلي .عند انتهاء هذه المدة ،سيقوم جرس التنيبه بإسماع صوت. 6 واألرقام الثالثة على الشاشة برمجة مدة الطهي واألرقام الثالثة على عدة مرات حتى يومض الرمز .1اضغط الزر شاشة العرض. .2استخدم األزرار " "+و " "-لضبط المدة المرغوب به؛ إذا ضغطا ضغطا متواصال على واحد منهما ،فستبدأ الشاشة بالتمرير عبر القيم بسرعة أكبر، لتجعل ضبط القيمة أسرع وأسهل. مرة أخرى إلنهاء اإلعداد. .3انتظر لمدة 10ثوان أو اضغط على الزر .4بعد انتهاء الوقت المحدد ،وظهور النص ENDعلى الشاشة ،سيُسمع الفرن صوت جرس وسيتوقف الفرن عن العمل. • على سبيل المثال :اآلن الساعة 9:00صباحا ،وتمت برمجة ساعة واحدة و 15دقيقة .سيتوقف البرنامج أوتوماتيكيا الساعة 10:15صباحا. إعداد وقت االنتهاء لنمط الطهي ! يجب إعداد مدة الطهي قبل تحديد وقت انتهاء الطهي. .1اتبع الخطوات من 1إلى 3لضبط المدة كما هو مفصل أعاله. الرمز واألرقام األربعة على الشاشة حتى يبدأ .2من ثم اضغط الزر بالوميض. .3استخدم األزرار " "+و " "-وقت انتهاء الطهي؛ إذا ضغطا ضغطا متواصال على واحد منهما ،فستبدأ الشاشة بالتمرير عبر القيم بسرعة أكبر ،لتجعل ضبط القيمة المرغوب بها أسرع. مرة أخرى إلنهاء اإلعداد. .4انتظر لمدة 10ثوان أو اضغط على الزر .5بعد انتهاء الوقت المحدد ،وظهور النص ENDعلى الشاشة ،سيُسمع الفرن صوت جرس وسيتوقف الفرن عن العمل. مضاءان .ستبين شاشة و تم إعداد البرمجة عندما يكون الزران عرض الوقت وقت النهاية ومدة الطهي بالتناوب. إلغاء برنامج إللغاء برنامج: حتى يتوقف الرمز المالئم لإلعداد الذي ترغب بإلغائه • اضغط الزر واألرقام الشاشة عن الوميض .اضغط زر " "-حتى تظهر األرقام 00:00 على الشاشة. • اضغط ضغطا متواصال على الزرين " "+و ""-؛ هذا سيلغي كل اإلعدادات المختارة مسبقا ،بما فيها إعدادات عداد الوقت. بدء التشغيل واالستخدام ! عند استخدامك لجهازك ألول مرة ،قم بإحماء الفرن الفارغ بينما يكون بابه مغلقا ،بدرجة الحرارة القصوى ولنصف ساعة على األقل .تأكد من أن الغرفة مهوئة جيدا قبل إطفاء الفرن وفتح باب الفرن .يمكن للجهاز أن يطلق رائحة كريهة قليال بسبب المواد الواقية المستخدمة خالل عملية التصنيع بسبب الحرق. AR تشغيل الفرن .1اختر أسلوب الطهي المرغوب فيه بواسطة إدارة مفتاح االختيار. .2اختر ضبط درجة الحرارة المرغوب بها بواسطة مفتاح االختيار .انظر جدول نصائح الطهي حول أساليب الطهي ودرجة الحرارة المقترحة للطهي (انظر أساليب الطهي). .3عندما يكون مؤشر الثرموستات مضاء ،فهذا يشير إلى أن الفرن يقوم بالتسخين إلى درحة الحرارة المحددة. .4يمكنك القيام بما يلي أثناء الطهي: تغيير أسلوب الطهي بواسطة إدارة مفتاح االختيار. تغيير درجة الحرارة بواسطة إدارة مفتاح الثرموستات. وقف الطهي بواسطة إدارة مفتاح االختيار إلى الوضع "."0! ال تضع أبدا أغراضا في الجهة السفلية من الفرن؛ وذلك لتحاشي إتالف طالء المينا. ! ضع إناء طهي دائما على الحامل(ات) المزود/ة. لوحة البيانات األبعاد العرض 43.5سم االرتفاع 32سم العمق 41.5سم السعة 58لتر تهوئة التبريد بهدف خفض درجة حرارة الفرن الخارجية هناك بعض الطرازات المزودة مروحة تبريد لتوليد تيار من الهواء يجري بين لوحة التحكم في الفرن وباب الفرن. ! عند اكتمال الطهي ،ستواصل مروحة التبريد عملها حتى يبرد الفرن بما فيه الكفاية. إضاءة الفرن إنها تعمل عند اختيار اختيار أسلوب الطهي. التوصيالت الكهربائية توجيهات 2002/40/ECعلى لوحة بيانات األفران الكهربائية. مواصفات 50304 EN لوحة الطاقة بواسطة مفتاح االختيار .إنها تبقى مشغلة بيما يتم الفولطية220-240V ~ 50Hz: الطاقة القصوى المستهلكة 2800W المصرح به لمستوى الحمل استهالك الطاقة ّ الحراري الطبيعي -أسلوب التسخين: أسلوب النقل الحراري. المصرح به لمستوى الحمل استهالك الطاقة ّ الحراري االضطراري-أسلوب التسخين: خبز. / / يذعن هذا الجهاز إلرشادات السوق األوروبية المشتركة التالية: 2006/95/EECمن تاريخ 12/12/06(الفولطية المنخفضة) والتعديالت الالحقة؛ 2004/108/EECمن تاريخ 15/12/04(تطابق المغناطيسية الكهربائية) والتعديالت الالحقة؛ 93/68/EECمن تاريخ22/07/93والتعديالت الالحقة. 2002/96/EC -والتعديالت الملحقة. 5 وصف الجهاز AR نظرة عامة ﻣﻮﺟﻬﺎﺕ ﺭﻓﻮﻑ ﺍﻻﻧﺰﻻﻕ ﻟﻮﺣﺔ ﺍﻟﺘﺤﻜﻢ ﺍﻟﻮﺿﻊ 5 ﺍﻟﻮﺿﻊ 4 ﺍﻟﻮﺿﻊ 3 ﺍﻟﻮﺿﻊ 2 ﺍﻟﻮﺿﻊ 1 ﺍﻟﻤﺸﻮﺍﺓ ﺻﻴﻨﻴﺔ ﺍﻟﺘﻨﻘﻴﻂ لوحة التحكم ﻣﻔﺘﺎﺡ ﺍﻟﺜﺮﻣﻮﺳﺘﺎﺕ ﻣﺆﺷﺮ ﺍﻟﺜﺮﻣﻮﺳﺘﺎﺕ ﻣﻔﺘﺎﺡ ﺍﻻﺧﺘﻴﺎﺭ •• •• ﺍﻟﻤﺒﺮﻣﺞ ﺍﻹﻟﻜﺘﺮﻭﻧﻲ* * في طرازات معينة فقط 4 المركزة والتثبيت* .1 .2 .3 .4 توصيل كبل تزويد الكهرباء بالشبكة الكهربائية الرئيسية ضع الخطافات " "Aمقابل داعم الفرن "."B ضع األلسنة " "Cمقابل الخطافات " ."Aخاصة إذا كانت المقصورة: بسمك 16ملم :قم بتعليق اللسان بحيث يكون الرقم 16مكتوبا • باتجاهك؛ بسمك 19ملم :قم بتعليق اللسان بحيث تكون الجهة التي ال تحتوي • على أي نص باتجاهك؛ بسمك 20ملم :ال تقم بتثبيت اللسان. • قم بتثبيت الخطافات واأللسنة على اللوحة الجانبية من الفرن .3 باستخدام البراغي "."D قم بتثبيت الفرن بالمقصورة بواسطة البراغي والحلقات البالستيكية .4 "."E D C 16 D C C D قبل التوصيل بتزويد الطاقة ،تأكد من أن: E 16 16 ! على من يقوم بالتركيب أن يتأكد من أن التوصيالت الكهربائية الصحيحة قد تم إنجازها وأنها تتوافق تماما مع قواعد الوقاية. • الجهاز مؤرض وشمعة االشتعال تذعن للقانون. • المقبس يصمد أمام الطاقة القصوى في الجهاز ،المشار إليها في لوحة البيانات( .أنظر أدناه). 16 A ّ ركب شمعة إشعال قياسية تتالءم مع الجهد المشار إليه على لوحة البيانات (أنظر في الجانب). يجب توصيل الجهاز بالشبكة الكهربائية الرئيسية مباشرة باستخدام قاطع دائرة أحادي القطب مع فتحة تماس من 3ملم على األقل بين الجهاز والشبكة الكهربائية الرئيسية، بما يتوافق مع الجهد المشار إليه ومع المعايير الكهربائية الحالية (يجب عدم اعتراض سلك األرضي بواسطة قاطع الدورة) .على كبل التزويد أال يالمس األسطح ذات درجة الحرارة التي تتعدى 50درجة مئوية. E • الجهد الكهربائي في نطاق يتراوح بين القيم المشار إليها في لوحة البيانات (انظر أدناه). • المقبس متوافق مع قابس الجهاز .إذا لم يكن المقبس متوافقا مع القابس، فني مؤهل أن يقوم بتغييره .ال تستخدم كبالت اإلطالة أو المقابس أطلب من ّ المتعددة. B التوصيالت الكهربائية ! األفران المزودة بكبل تغذية طاقة ثالثي األقطاب ،مصممة لتعمل مع تغيير فولطية الدائرة الكهربائية والتردد المشار إليهما على لوحة بيانات الجهاز (انظر أدناه). ! بعد أن تم تركيب الجهاز ،يجب أن يكون كبل تزويد الطاقة والمقبس الكهربائي قابلين للوصول السهل. ! على الكبل أال يكون معوجا أو مضغوطا. مالءمة كبل تزويد الطاقة .1افتح اللوحة النهائية بواسطة إدخال مفك في األلسنة الجانبية الموجودة على الغطاء .استخدم المفك كرافعة بضغطه إلى األسفل لفتح الغطاء (انظر الرسم). ! يجب فحص الكبل بانتظام وتبديله من قبل فنّي مؤهل فقط (أنظر المساعدة). ! ال يتحمل المصنع أية مسؤولية في حال عدم التقيد بتدابير الوقاية هذه. .2حرر برغي كبشة الكبل وأزله، باستخدام مفك براغي كرافعة (أنظر الرسم). .3حرر براغي نقاط التماس في ثم ثبت األسالك السلك -L-N تحت رؤوس البراغي ،مع التقيد بكود اللون :األزرق ( ،)Nالبني ( )Lواألصفر-األخضر ( ). * في طرازات معينة فقط 3 AR التركيب AR ! قبل وضع جهازك الجديد في المكان الذي سيعمل فيه ،الرجاء إقرأ تعليمات التشغيل هذه بعناية .إنها تحتوي على معلومات هامة لالستخدام اآلمن ،لتركيب الجهاز والعناية به. ! الرجاء االحتفاظ بمعلومات التشغيل هذه لمراجعتها في المستقبل .قم بتحويلها إلى مالكي الجهاز الجدد الممكنين. تم حساب األرقام المشار إليها على لوحة البيانات لهذا النوع من التركيب. التهوئة للتأكد من تزويد تهوئة كافية ،يجب إزالة اللوحة الخلفية من الخزانة .يجب تركيب الفرن بحيث يكون موضوعا على شريحتين من الخشب ،أو على مسطح 4ملم (انظر الرسومات). مستو تماما بفتحة تكون على األقل 5 x 560 تحديد الموضع 45 m m. . mm 560 ! أبعد مواد التعبئة عن متناول يد األوالد .يمكنها أن تلحق خطر االختناق (انظر وسائل الحذر والنصائح). ! يجب تركيب الجهاز من قبل شخص مؤهل بموجب التعليمات المزودة التركيب غير الصحيح يمكن أن يلحق األذى بالناس وبالحيوانات أو أن يلحق الضرر باألمالك. مالءمة الجهاز المركزة والتثبيت قم بموضعة األلسنة األربعة الموجودة على جانب الفرن بحيث تدخل في الشقوق األربعة الموجودة على اإلطار الخارجي .قم بضبط األلسنة بما يتوافق مع سمك لوحة الخزانة الجانبية ،كما هو مبين أدناه: سمك من 20ملم :انزع جزء اللسان القابل لإلزالة (انظر الرسم). استخدم المقصورة المالئمة للتأكد من أن الجهاز يعمل بشكل صحيح. • الحوافي القريبة من الفرن يجب أن تكون مصنوعة من مواد مقاومة للحرارة. • على الخزائن المغطاة بقشرة خشبية أن تكون ملصقة بغراء مقاوم لدرجات الحرارة التي تتعدى 100درجة مئوية. • لتركيب الفرن تحت رف (أنظر الرسم) أو في وحدة مطبخ ،على مقاييس الخزانة أن تكون كالتالي: . 45 m 567 mm. . mm 558 595 mm. 593 mm. m. 23 mm. . min mm 547 سمك من 18ملم :استخدم الثلم األول الذي تم إعداده مسبقا في المصنع( ،انظر الرسم). سمك من 16ملم :استخدم الثلم الثاني (انظر الرسم). 5 mm. . mm mm 545 . . mm 595 24 قم بتثبيت الجهاز بالخزانة عن طريق فتح باب الفرن وإدخال 4براغي داخل 4 ثقوب موجودة على اإلطار الخارجي. ! على الجهاز أال يالمس األجزاء الكهربائية ابتداء من لحظة تركيبه. ! على جميع األجزاء التي تضمن أمان الجهاز أال تتم إزالتها من دون مساعدة أداة. 2 تعليمات التشغيل فرن 11/2009 - 195078179.00 XEROX FABRIANO الفهرس AUS AR English,1 التركيب2-3 ، تحديد الموضع التوصيالت الكهربائية وصف الجهاز4 ، نظرة عامة لوحة التحكم التشغيل واالستخدام5 ، تشغيل الفرن استخدام ساعة توقيت الطهي لوحة البيانات مبرمج الطهي اإللكتروني6 ، FH 837 C AUS FH 837 C IX AUS أنماط الطهي7-9 ، أنماط الطهي نصائح طهي عملية جدول نصائح الطهي وسائل حذر ونصائح10 ، الوقاية العامة التخلص احترام البيئة والحفاظ عليها الصيانة والعناية11 ، إيقاف تشغيل الجهاز تنظيف الجهاز تنظيف باب الفرن تبديل مصباح اإلنارة المساعدة12 ، AR