1
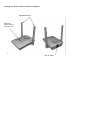
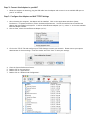
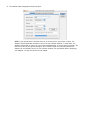
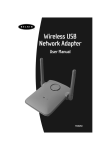
Belkin Wireless USB Network Adapter
User Manual
Macintosh OS 10.1.5 and 10.2 Version
P73851-B
F5D6050 ver. 2
Introduction
Thank You for purchasing the Belkin Wireless USB Network Adapter (the Adapter). Now you can take advantage of this
great new technology and gain the freedom you need around the home or office without using cables. The Wireless USB
Network Adapter works like a conventional network Adapter, but without the wires. The easy installation and setup will
have you networking wirelessly in minutes. Please be sure to read through this manual completely to be sure that you are
getting the most out of your Wireless USB Network Adapter.
Features
The Adapter complies with the IEEE 802.11b standard in order to communicate with other 802.11b compliant wireless
devices.
??
??
??
??
??
??
??
2.4GHz ISM (Industrial, Science, and Medial) band operation
Wireless interface compliance with the IEEE 802.11b standard
USB Interface, for plug-and-play installation and convenience
64 or 128-bit Wireless (WEP) Encryption
Wireless access to networked resources
Support for both Infrastructure and Ad-Hoc (peer to peer) networking modes
Data rate of up to 11Mbps
o Supports 11, 5.5, 2 or 1Mbps rates (Auto Rollback)
?? Easy installation and use
?? External antennas
?? LED link Indicator
Applications and Advantages
?? Wireless roaming with a laptop around the home or office
Offers the freedom of networking? without cables.
?? Difficult-to-wire environments
Enables networking in buildings with solid or finished walls, or open areas where wiring is difficult to install.
?? Frequently changing environments
Adapts easily in offices or environments that frequently rearrange or change locations.
?? Temporary LANs for special projects or peak time
Sets up temporary networks such as at trade shows, exhibitions and constructions sites, which need networks on a
short-term basis? Also companies who need additional workstations for a peak activity period.
?? SOHO (Small Office/Home Office) networking needs
Provides the easy and quick small network installation SOHO users need.
Product Specifications
Host Interface:
Power Consumption:
Certification:
Operating Temperature:
Storage Temperature:
Typical Operating Range:
USB 1.1
300mA (Max)
FCC Class B, CE Mark, C-Tick
32 – 131 degrees F (0 – 55 degrees C)
-13 – 158 degrees F (-25 – 70 degrees C)
Indoor: 160’ (50m) @ 11Mbps, 260’ (80m) @ 5.5 Mbps or lower
Outdoor: 490’ (150m) @ 11Mbps, up 1800’ (550m) @ 5.5 Mbps or lower
System Requirements
?? Power Mac G3 or G4 with one available USB Port
?? Mac OS 9.x, 10.1.5, 10.2
Package Contents
?? Belkin Wireless USB Network Adapter
?? USB Cable
?? Quick Installation Guide
?? Installation Software CD
?? User Manual
Knowing your Belkin Wireless USB Network Adapter
Adjustable Antennas
Status Light
Indicates network
activity and power
1.
USB “B” socket
Placing the Belkin Wireless USB Network Adapter
A six-foot USB cable is provided with the Adapter to allow you to place it as high as possible. The best location is on top of
your computer’s monitor. Placing the Adapter on your desktop is acceptable, however, avoid placing the adapter near
metal objects such as a computer case or speakers. Any object that is metal has the ability to block the radio signals from
the Adapter.
Installing and setting up the Adapter
Installing your Adapter is done in three easy steps.
1. Install the software FIRST. If you connect your adapter to your PC before you install the software, it will not work
until you install the software.
2. Connect the Adapter to your MAC.
3. Configure the Adapter and MAC TCPIP Settings
NOTE: INSTALL THE SOFTWARE FIRST BEFORE YOU CONNECT THE ADAPTER TO YOUR COMPUTER
Step 1: Software and Driver Installation (Mac OS 10.1.5 and higher including 10.2.x)
1.
2.
3.
4.
5.
6.
7.
8.
9.
10.
11.
12.
13.
14.
15.
16.
17.
18.
Insert the CD into your CD-ROM drive.
Double-Click on the CD-ROM disk located on your desktop.
Drag the icon with the file named “Belkin_F5D6050X10********.dmg.gz” to your desktop.
Double-Click on the file named “Belkin_F5D6050X10********.dmg.gz”.
Double-Click on the file named “Belkin_F5D6050X10********.dmg”.
Double-Click on the newly mounted disk image “Belkin 11Mbps Wireless USB Adapter”.
Double-Click on the Package “F5D6050”.
If administrator rights are required, please click the lock icon to make changes.
Type your user name and password, then click “OK”.
Click on “Continue” to begin installation.
Click on “Continue” to proceed with installation.
Click on “Continue” after reading the Software License Agreement.
Click on “Agree” to accept the Software License Agreement.
Select a destination volume to install the software by double-clicking on the listed icon.
Click on “Continue” to proceed with installation.
Click on “Install” to proceed with installation.
Click on “Continue Installation” to install files.
Click on “Restart” to reboot you machine. While the computer is rebooting, plug the USB cable into the adapter
and connect it to an available USB port on your PC or USB hub.
Step 2: Connect the Adapter to you MAC
1. While the computer is rebooting, plug the USB cable into the adapter and connect it to an available USB port on
your PC or USB hub.
Step 3: Configure the Adapter and MAC TCPIP Settings
1. After rebooting the computer, the adapter will be installed. Click on the Apple Menu and select System
Preferences. In System Preferences, select the Network Preferences. You will be notified that a new Ethernet
adapter has been added to the system. It will be called Ethernet Adapter (en”x”), where “x” is the next available
Ethernet adapter number.
2. Next to Show, select the new Ethernet Adapter (en”x”).
3. Click on the TCP/IP Tab and configure your TCPIP Settings to match your network. Please contact your system
administrator for these settings. Close the window and click “Save” to save your settings.
4.
5.
6.
7.
Close the System Preferences Screen.
Double-click on the hard drive.
Double-click on “Applications”.
Double-click on “Wireless LAN Configuration”
8. The Wireless LAN Configuration Utility will open.
NOTE: If you already have a wireless router or an access point in your home or office, the
Adapter will automatically attempt to connect to your wireless network. In most cases, the
Adapter will be able to connect to your network automatically. If you are using encryption, you
will have to set the encryption settings on your wireless router or access point before the
adapter can successfully connect to your wireless network. For information about configuring
your Adapter, see the next section in this manual.
Connecting to your wireless network
If you already have a wireless router or an access point in your home or office, the Adapter will automatically attempt to
connect to your wireless network. In most cases, the Adapter will be able to connect to your network automatically. If
your wireless network is using encryption, you will need to set the encryption settings of your Adapter to match that of
your wireless network. For information about configuring your Adapter, see the next section in this manual.
Using the Belkin Wireless LAN Monitor Utility
To run the Belkin Wireless LAN Monitor Utility, click on the Hard Drive. Click on the Applications Folder and select
Wireless LAN Configuration. When you launch the Belkin Wireless NIC Configuration Utilty (the Utility), you will be
presented with the screen below.
a
b
c
d
e
h
f
g
The General Tab
(a) Network Name
The Network Name is the wireless network name. This field shows the current SSID with which the Adapter is associated.
The default (factory) setting is “ANY” which will cause the Adapter to automatically look for any wireless network in the
area. To connect to a specific wireless network, you can manually enter the SSID of the known wireless network. Note
that the SSID is case-sensitive, so, capital letters do make a difference. To change the SSID, click in the Network SSID
field, type the SSID you want, then click “Apply”.
(b) Operating Mode
Shows the current wireless mode the Adapter is operating in. There are two operating modes: Infrastructure and Peer-toPeer. Infrastructure is the most common mode to operate in and is the factory default setting. Use Infrastructure mode
when connecting your PC to a Wireless Access Point or to a Wireless Router. Peer-to-Peer mode is used to connect two or
more computers together without the use of an Access Point or Wireless Router. To change the mode, click the up/down
arrow next to the network mode field. Select the mode you wish to use, then click “Apply”.
(c) Channel
Shows the current channel the Adapter is operating on. When operating in Infrastructure mode, the channel is set
automatically by the Access Point or Wireless Router that the Adapter is connected to. You cannot change the channels in
Access Point mode. In Peer-to-Peer mode, the channel can be set manually. For more information about operating in
Peer-to-Peer mode, see Operating in Peer-to-Peer mode.
(d) Preamble Mode
The preamble is a signal used to synchronize the timing between the wireless network Adapter and the Access Point. Some
older wireless equipment may not be able to work if this setting is too short. Leaving this setting to “Auto” is the most
effective way to ensure the Adapter will connect to any wireless network available.
(e) Transmit Rate
Displays the current rate of data transmission. There are four Transmit rates possible:
Fixed 11Mbps – Always transmit and receive at 11Mbps data rate regardless of signal quality
Fixed 5.5Mbps - Always transmit and receive at 5.5Mbps data rate regardless of signal quality
Auto 1Mbps or 2Mbps - Auto transmit and receive at 1Mbps or 2Mbps data rate regardless of signal quality
Auto – Adjust speed according to signal strength. This mode is the recommended setting. It will decrease the amount of
transmit and receive errors by reducing the speed of transmission in favor of receiving error free data. Note that data
being sent at Fixed 11Mbps with low signal quality will not necessarily get the data to the computer faster. This is because
when errors occur, the data must be re-sent. When the signal quality is low, the chances for errors to occur at high speeds
are greatly increased. Sending the data at lower speeds when the signal quality is poor, will reduce the chances of errors,
and thus data will get to the computer in the shortest possible time.
(f) Status
Displays the BSSID (in hexadecimal) of the access point with which the Adapter is associated. If you are connected to a
network, the word “Associated” followed by a series of number (the MAC address of the Access Point) will be displayed.
(g) Signal Strength
Displays the strength of the wireless signal from 0 to 100%. The closer to 100% the better the signal strength is. The closer
you are to a wireless Router or Access Point the stronger the signal should be.
(h) Defaults
Clicking this button will set all values back to default.
The Site Survey Tab
Clicking on the Site Survey Tab will display a list of all available access points in your area. The following information
about each is displayed:
h
a
d
b
e
c
f
g
(a) BSSID – The MAC address of the access point
(b) SSID – The Service Set Identifier (wireless network name) of the access point.
(c) Signal Strength – The signal strength of the related access point. This is a “snap-shot” of the signal strength at the
time of the site survey. Pressing the “Rescan” (g) button may get a different result.
(d) BSS – Displays the mode that the access point is operating in: Infrastructure or AD-Hoc
(e) Encryption – Will display “No” when encryption is disabled, 64-bit when 64-bit encryption is enabled and 128-bit
when 128-bit encryption is enabled.
(f) Channel number – The current operating channel of the access point
(g) Rescan – Rescans for available wireless access point and wireless routers.
(h) Apply – Double click on a BSSID (a) and click Apply (h) to select an available wireless access point or wireless
router.
TIP-> Double-clicking on the BSSID and clicking Apply (h) of an access point will make the Adapter join that particular
network. To check the area for more access points, click “ReScan”.
The Encryption Tab
The encryption tab is used to set up the wireless encryption settings.
a
There are two ways to set up the encryption settings of your Adapter. Create with Passphrase or Manual Entry.
Select 64-bit from the drop-down menu. You will notice when using 64-bit encryption there are four keys labeled “Key
1” through “Key 4”. Only one key can be used at a time. For ease of use, the software can generate keys using a
“Passphrase” that you enter. This passphrase can be easily distributed to other wireless equipped computer users in
your network. For instance, creating a key using the passphrase “Passphrase” generates four keys in 64-bit encryption
mode and one key in 128-bit encryption mode. In this scenario, a user of a laptop needs only to enter the passphrase
and the key number into their computer’s wireless management software to be able to communicate while using
encryption. All computers on the network must use the same encryption rate, passphrase and key. The passphrase can
be changed as often as desired.
Setting 64-Bit or 128-bit Encryption using a Passphrase (Easiest)
1. Select 64-bit or 128-bit from the drop-down menu (a).
a
2. Select “Create with Passphrase” (b).
b
[passphrase.tif]
3. Enter a Passphrase and click “Apply”. Clicking “Apply” will generate four keys if you choose 64-bit or 1 key if
you choose 128-bit.
4. You can now select which 64-bit key you want to use from the ”Use WEP Key” (c) drop-down menu. Leave this
set to “1” unless you have a specific reason to use another key. Click “Apply” for the changes to be saved.
c
Encryption is now enabled. Each wireless equipped computer (client) that needs to communicate on the wireless
network must be set to the same encryption settings (rate, passphrase and key).
Setting 64-Bit or 128-bit Manually using a Hexidecimal key (Advanced)
1. Select 64-bit or 128-bit from the drop-down menu.
2. Select “Create Keys Manually” then enter one to four 10 digit hexadecimal keys for 64-bit encryption or one 26
digit hexadecimal key for 128-bit encryption. Hexadecimal values consist of number 0-9 and letter a-f.
3. If using 64-bit Encryption, select the key you want to use.
4. Click “Apply”
Encryption is now enabled. Each wireless equipped computer (client) that needs to communicate on the wireless network
must be set to the same encryption settings (rate, passphrase and key).
Operating in Ad-Hoc/Peer-to-Peer Mode
Ad-Hoc mode is a peer-to-peer mode (computer-to-computer). To set two or more computers to communicate directly
with each other, follow these steps.
1. `Select “Peer-to-Peer” from the Mode box. (a)
c
a
b
2. Enter the channel you want to use in the “Channel” box. (b) You can choose any one of the available channels you
wish.
3. In the Network SSID field (c), type in the name you want to use to identify the Peer-to-Peer network. You can
name this anything you want.
4. Click “Apply” to save the changes. When the Adapter is in Peer-to-Peer mode, the “Status” box (d) will say
“Ready”. NOTE: The Status and Signal Strength indicator does not work in Peer-to-Peer mode.
5. Using these same settings, set the rest of the computers on your Peer-to-Peer network to the same settings. When
you have completed setup of the Peer-to-Peer network, computers will network together normally as if wired
together through a hub or switch.
Technical Support
You can find technical support information at www.networking.belkin.com or www.belkin.com through the tech support
area. If you want to contact technical support by phone, please call 800-223-5546. Technical support is available 24 hours
a day, 7 days a week.