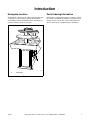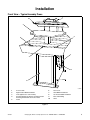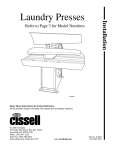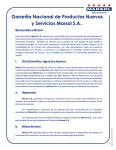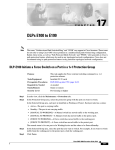
1
Installation
Mighty Mite and
Super Laundry
Presses
Refer to Page 3 for Model Numbers
SCR1529C
SCR1529C
Keep These Instructions for Future Reference.
(If this machine changes ownership, this manual must accompany machine.)
An LSG Company
831 South First Street, P.O. Box 32270
Louisville, KY 40232-2270
Phone: (502) 587-1292
Sales Fax: (502) 585-3625
Service/Parts Fax: (502) 681-1275
www.cissellmfg.com
Part No. AJ1031
February 2005
Table of
Contents
Model Identification ...........................................................................
3
Safety Information..............................................................................
Explanation of Safety Messages...........................................................
Important Safety Instructions ...............................................................
5
5
5
Introduction.........................................................................................
Nameplate Location..............................................................................
Parts Ordering Information...................................................................
7
7
7
Installation...........................................................................................
Front View – Typical Laundry Press....................................................
Front View – Typical Laundry Collar and Cuff Press..........................
Rear View – Typical Laundry Press.....................................................
Dimensions and Specifications.............................................................
Electrical Requirements........................................................................
Electrical Data..................................................................................
Overall Dimensions and Connecting Data ...........................................
Dimensions of Bucks Without Padding................................................
Required Materials................................................................................
Receiving Inspection ............................................................................
Location Requirements.........................................................................
Foundation Requirements.....................................................................
Uncrating ..............................................................................................
Installing Anchor Bolts and Levelling Press ........................................
Connecting Steam Supply and Returns ................................................
Connecting Air Service.........................................................................
Connecting Electrical Service...............................................................
Final Preparation for Use......................................................................
Final Check-Out Procedure ..................................................................
Mechanical and Air System Check-Outs .........................................
Steam Check-Out .............................................................................
Electrical Check-Out........................................................................
9
9
10
11
12
12
12
13
15
16
16
17
17
17
17
17
18
19
19
19
19
20
20
© Copyright 2005, Alliance Laundry Systems LLC
All rights reserved. No part of the contents of this book may be reproduced or transmitted in any form or by any
means without the expressed written consent of the publisher.
AJ1031
© Copyright, Alliance Laundry Systems LLC – DO NOT COPY or TRANSMIT
1
Notes
2
© Copyright, Alliance Laundry Systems LLC – DO NOT COPY or TRANSMIT
AJ1031
Model Identification
Information in this manual is applicable to the
following models:
LDBB (CMMBB)
LDCC (CMMCCY)
AJ1031
© Copyright, Alliance Laundry Systems LLC – DO NOT COPY or TRANSMIT
3
Notes
4
© Copyright, Alliance Laundry Systems LLC – DO NOT COPY or TRANSMIT
AJ1031
Safety Information
Explanation of Safety Messages
Important Safety Instructions
Precautionary statements (“DANGER,” “WARNING,”
and “CAUTION”), followed by specific instructions,
are found in this manual and on machine decals. These
precautions are intended for the personal safety of the
operator, user, servicer, and those maintaining the
machine.
Save These Instructions
DANGER
Indicates an imminently hazardous
situation that, if not avoided, will cause
severe personal injury or death.
WARNING
WARNING indicates the presence of a
hazard that can cause severe personal
injury, death, or substantial property
damage if the warning is ignored.
WARNING
To reduce the risk of fire, electric shock,
serious injury or death to persons when
using your press, follow these basic
precautions:
W372
1. Read all instructions before using the press.
2. Refer to the GROUNDING INSTRUCTIONS in
the INSTALLATION manual for the proper
grounding of the press.
3. Do not allow children to play on or around the
press.
4. Do not reach into the press while the press is in
operation.
5. Do not install or store the press where it will be
exposed to water and/or weather.
6. Do not tamper with the controls.
CAUTION
CAUTION indicates the presence of a
hazard that will or can cause minor
personal injury or property damage if the
caution is ignored.
Additional precautionary statements (“IMPORTANT”
and “NOTE”) are followed by specific instructions.
IMPORTANT: The word “IMPORTANT” is used
to inform the reader of specific procedures where
minor machine damage will occur if the procedure
is not followed.
NOTE: The word “NOTE” is used to communicate
installation, operation, maintenance or servicing
information that is important but not hazard
related.
AJ1031
7. Do not repair or replace any part of the press, or
attempt any servicing unless specifically
recommended in the user-maintenance
instructions or in published user-repair
instructions that the user understands and has the
skills to carry out.
8. To reduce the risk of an electric shock or fire, DO
NOT use an extension cord or an adapter to
connect the press to the electrical power source.
9. Use press only for its intended purpose, finishing
garments.
10. ALWAYS disconnect the press from electrical
supply before attempting any service. Disconnect
the power cord by grasping the plug, not the cord.
11. Install the press according to the
INSTALLATION INSTRUCTIONS. All
connections for steam, electrical power and
grounding must comply with local codes and be
made by licensed personnel when required.
© Copyright, Alliance Laundry Systems LLC – DO NOT COPY or TRANSMIT
5
Safety Information
Safety signs and labels are also placed on the press.
Those signs and labels are limited messages. Where
needed, further explanations are provided in the
manual. These signs are to be inspected for readability
and replaced when missing, damaged or unreadable.
Refer to Operation/Maintenance Manual for
inspections process. Refer to parts manual for ordering
information.
12. Replace worn power cords and/or loose plugs.
13. Never operate the press with any guards
and/or panels removed.
14. DO NOT operate the press with missing or
broken parts.
15. DO NOT bypass any safety devices.
16. Failure to install, maintain, and/or operate this
press according to the manufacturer’s
instructions may result in conditions which can
produce bodily injury and/or property damage.
NOTE: The WARNINGS and IMPORTANT
SAFETY INSTRUCTIONS appearing in this
manual are not meant to cover all possible
conditions and situations that may occur. Common
sense, caution and care must be exercised when
installing, maintaining, or operating the press.
DANGER
To avoid possible serious injury, ensure
that air and steam supply systems have
adequate RELIEF VALVE PROTECTION or
have the pressures sufficiently limited at
the sources for safe operating pressures
as specified for this equipment.
W333
Any problems or conditions not understood should be
reported to the dealer, distributor, service agent or the
manufacturer.
When using your press (garment finishing appliance),
basic precautions should always be followed,
including the following:
1. Read all instructions.
2. Use appliance only for its intended use.
3. Close supervision is necessary for any appliances
being used by or near children. Do not leave
appliance unattended while connected.
WARNING
To AVOID possible serious injury, BEFORE
performing maintenance or repair tasks:
• Shut off and lock out ALL electric power
to the press.
• Shut off and lock out ALL air service to
the press.
• Shut off and lock out ALL steam service
to the press.
• Allow heated surfaces to cool.
4. To reduce the likelihood of circuit overload, do
not operate another high wattage appliance on the
same circuit.
W358
WARNING
• Failure to install, maintain, and/or operate this machine according to the manufacturer’s
instructions may result in conditions which can produce serious injury, death, and/or
property damage.
• Do not repair or replace any part of the machine or attempt any servicing unless specifically
recommended or published in the service manual and that you understand and have the
skills to carry out.
• Whenever ground wires are removed during servicing, these ground wires must be
reconnected to ensure that the machine is properly grounded and to reduce the risk of fire,
electric shock, serious injury, or death.
W335
6
© Copyright, Alliance Laundry Systems LLC – DO NOT COPY or TRANSMIT
AJ1031
Introduction
Nameplate Location
Parts Ordering Information
A nameplate is located at the right side of the unit and
on the pressure arm. Always provide the machine’s
serial number and model number when ordering parts
or when seeking technical assistance.
If literature or replacement parts are required, contact
the source from which the machine was purchased or
contact Cissell at (502) 587-1292 for the name and
address of the nearest authorized parts distributor.
1
SCR1529C
1
Nameplate
Figure 1
AJ1031
© Copyright, Alliance Laundry Systems LLC – DO NOT COPY or TRANSMIT
7
Notes
8
© Copyright, Alliance Laundry Systems LLC – DO NOT COPY or TRANSMIT
AJ1031
Installation
Front View – Typical Laundry Press
1
10
9
2
8
3
7
4
5
6
SCR95N
1
2
3
4
5
Pressure Arm
Right Head CLOSE Pushbutton
Timer (Optional on some models)
Air Filter/Regulator/Lubricator and Downstream
Relieving Air Shut-Off and Lockout Valve
Frame
6
7
8
9
10
Front Cover
Head OPEN Pushbutton
Left Head CLOSE Pushbutton
Buck and Padding
Head
Figure 2
AJ1031
© Copyright, Alliance Laundry Systems LLC – DO NOT COPY or TRANSMIT
9
Installation
Front View – Typical Laundry Collar
and Cuff Press
1
9
10
2
2
3
3
8
7
4
6
5
SCR548N
SCR548N
1
2
3
4
5
Pressure Arm
Cuff Buck
Close Pushbutton
Timer Control Box
Air Filter/Regulator/Lubricator and Downstream
Relieving Air Shut-Off and Lockout Valve
6
7
8
9
10
Cover
Open Pushbutton
Yoke Rest
Head
Collar Buck
Figure 3
10
© Copyright, Alliance Laundry Systems LLC – DO NOT COPY or TRANSMIT
AJ1031
Installation
Rear View – Typical Laundry Press
8
1
7
2
6
3
5
B0158
4
SCR96N
1
2
3
4
Head Steam Outlet
Buck Steam Outlet
Rear Cover
Anchor Bolt Holes
5
6
7
8
Air Inlet
Electrical Hook-Up (With optional timer)
Steam Inlet
Pressure Arm
Figure 4
AJ1031
© Copyright, Alliance Laundry Systems LLC – DO NOT COPY or TRANSMIT
11
Installation
Dimensions and Specifications
Laundry Press
Net Weights
Supply Requirements
Weight
Steam (Max. Pressure
115 psig [7.9 bar])
Air
lbs.
kg
cu. ft. (cu. m)
free air/cycle
@ 80 psig
(5.5 bar)
LDCC
370
168
1 (.03)
.75 (7.35)
26 (12)
LDBB
370
168
1 (.03)
.75 (7.35)
26 (12)
Model
BHP (kw)
@ 115 psig
(7.9 bar)
lbs. (kg)
conds/hr
Table 1
Electrical Requirements
(Presses With Timers Only)
NOTE: Presses without timers do not require
electric hook-up.
115 Volt, 230 Volt/60 Hertz/1 Phase, (0.50, 0.25) full
load amps
110 Volt, 220 Volt/50 Hertz/1 Phase, (0.50, 0.25) full
load amps
Electrical Data
Nominal Voltage*
115
230
110
220
Frequency/Phase
60/1
60/1
50/1
50/1
Rated Amperes**
0.50
0.25
0.50
0.25
Average Running Amperes
0.31
0.16
0.31
0.16
2 + grd
2 + grd
2 + grd
2 + grd
Quantity Electrical Connections
* The voltages listed are rated machine voltages. The currents listed are rated for system voltage ranges of 110 – 220 and 220 – 240.
** Rated Amperes are to be used to determine incoming conductor size and short-circuit protection. Rated amperes are figured in
accordance with the 1981 NATIONAL ELECTRIC CODE, Sections 430-22 and 430-24.
Table 2
12
© Copyright, Alliance Laundry Systems LLC – DO NOT COPY or TRANSMIT
AJ1031
Installation
Overall Dimensions and Connecting
Data
36-7/8 in.
(93.7 cm)
HEAD OPEN
CLOSE
OPEN
38 in.
(96.5 cm)
CLOSE
1-1/2 in. TYP
(3.8 cm)
16 in.
(40.6 cm)
53 in.
(134.6 cm)
HEAD OPEN
HEIGHT
STEAM INLET
34 in.
(86.4 cm)
1 in. TYP
(2.5 cm)
23 in.
(58.5 cm)
2 in.
(5.1 cm)
20 in.
(50.8 cm)
SCR97N
Figure 5
AJ1031
© Copyright, Alliance Laundry Systems LLC – DO NOT COPY or TRANSMIT
13
Installation
4-3/4 in.
(12 cm)
4, 5
1-1/2 in.
(3.8 cm)
1-1/2 in.
(3.8 cm)
1-1/2 in.
(3.8 cm)
3
3-3/4 in.
(9.5 cm)
1
5-1/2 in.
(14 cm)
1-1/8 in.
(2.9 cm)
2
18-1/4 in.
(46.4 cm)
B0167B
SCR98N
Figure 6
Item
Above Flat Floor
Description
inches
cm
Connection
1
Electrical Connection (for presses with timer ONLY)
12
30.5
Refer to Table 2
2
Air Inlet
11
28
1/4 NPT-F
3
Steam Inlet
21.63
55.0
1/2 NPT-F
4
Buck Steam Outlet
21.25
54.0
1/2 NPT-F
5
Head Steam Outlet
23.25
59.0
1/2 NPT-F
Table 3
14
© Copyright, Alliance Laundry Systems LLC – DO NOT COPY or TRANSMIT
AJ1031
Installation
Dimensions of Bucks Without
Padding
8-1/4 in.
(21 cm)
6-1/2 in.
(16.5 cm)
13 in.
(33 cm)
20-1/2 in.
(52 cm)
90°
LDCC COLLAR, CUFF & YOKE PRESS
30-1/2 in.
(77.4 cm)
10-3/4 in.
(27.3 cm)
13-3/4 in.
(34.9 cm)
SCR558N
LDBB BOSOM & BODY PRESS
SCR558N
Figure 7
AJ1031
© Copyright, Alliance Laundry Systems LLC – DO NOT COPY or TRANSMIT
15
Installation
Required Materials
NOTE: Applicable codes, ordinances, specifications
and/or other governing data related to installation
must be complied with. The materials listed in
Table 4 MAY or MAY NOT conform to these
requirements.
Quantity
Description
Source
1
Models with timer ONLY. Lockout type fused disconnect switch suitable for
electric service connected to press (refer to wiring schematic in control box). Not
required if circuit breaker is used.
Local
As required
Models with timer ONLY. Wire of suitable size, type and length to connect
electric service to press (refer to wiring schematic in control box).
Local
As required
Models with timer ONLY. Flexible conduit and connections to encase wires and
make connections (refer to wiring schematic in control box).
Local
2
Steam trap and check valve, or combination steam trap/check valve sized for buck
and head steam return lines and steam consumption.
Local
3
Ball shut-off valves sized for steam supply and return lines.
Local
1
Ball shut-off valve sized for air supply line.
Local
4
Anchor bolts.
Local
Pipe, couplings, unions, flanges, etc., to connect steam supply and return lines and
air supply line to press. Wall thickness of pipe and tubing must be in compliance
with recommendations by compressor and boiler manufacturers and local code
(refer to sections on Connecting Steam Supply and Returns and Connecting Air
Supply).
Local
As required
Table 4
Receiving Inspection
Press is shipped assembled and enclosed in a wood slat
crate. Upon delivery, inspect crate and contents for
shipping damage. If crate or cover is damaged, or
signs of possible damage are evident, have carrier note
condition on shipping papers BEFORE shipping
receipt is signed, or advise carrier of condition when
discovered.
Remove protective cover and check items received
against items listed on packing list. If any item is
damaged or missing, a written claim should be filed
with carrier as soon as possible.
16
© Copyright, Alliance Laundry Systems LLC – DO NOT COPY or TRANSMIT
AJ1031
Installation
Location Requirements
NOTE: If a forklift is used to move press, exercise
care that forklift arms are inserted under frame
and DO NOT CONTACT ANY OPERATING
MECHANISM.
Moving press to installation location while still
attached to skid is recommended. However, press can
be removed from skid before moving.
Removing Press from Skid
Unscrew four shipping screws from attaching holes.
Using a forklift, lift press and remove skid.
Press should be located in an area that provides a
minimum of 24 inches (61 cm) between press and any
structure.
NOTE: Above dimensions are considered
MINIMUM working and maintenance dimensions
and SHOULD BE INCREASED if possible.
Space between front of table and closest structure
should be determined by work requirements, but in no
case should be less than 30 inches (76.2 cm).
Foundation Requirements
Install press on a solid, level floor such as concrete.
NOTE: Installation on a wooden floor can cause
machine to shift, which WILL result in
MISALIGNMENT of heads and bucks and
DAMAGE to both press and garments.
Floor should be capable of supporting 125 pounds per
square foot (56.7 kg). Remove all floor covering
material (tile, wood, carpeting, etc.) from press
mounting area.
Uncrating
Installing Anchor Bolts and
Levelling Press
After press is in position, attach and level it to floor
with four anchor bolts (obtain locally). Using the
frame base anchor bolt holes as a template, drill four
holes in floor. Holes must be drilled deep enough to
properly install bolts in accordance with
manufacturer’s instructions. Securely tighten anchor
bolts.
Ensure press is level front and back, as well as left and
right. Place a spirit level on top of frame. If press is not
level, raise and lower corners as required. Place
sufficient shims between press frame and floor. Shims
should be sized to make maximum contact with floor
and frame to distribute weight evenly. Use industrial
grout if necessary.
NOTE: Prior to bolting to floor, shim press frame
to eliminate rocking.
Connecting Steam Supply and
Returns
(Refer to Figure 8)
NOTE: Clean out ALL pipe lines BEFORE
connecting them to press. Failure to properly install
suitable traps and check valves AND supply correct
steam pressure WILL REDUCE operating
efficiency.
Steam supply connected to press must have a constant
pressure of 115 psig (7.9 bar).
The following steps outline the procedure for
connecting steam supply and return lines to press:
1. Run a 1/2 NPT steam supply to steam supply
connection with suitable black iron pipe, elbows,
strainer, ball valve and union.
NOTE: A MINIMUM 3 inch (7.62 cm) riser should
be installed off supply header to minimize water in
steam supply to press.
WARNING
To avoid possible serious injury:
• ALWAYS be careful to AVOID springloaded components when working
inside press.
• Installation MUST be performed ONLY by
qualified service personnel.
NOTE: It is recommended that a steam strainer be
installed between steam supply and press.
2. Install two suitable 1/2 NPT unions, steam traps,
check valves and one ball valve between steam
return connections and steam return lines.
W336
Remove front cover from press and use a hammer to
knock out shipping brace.
AJ1031
NOTE: Cast iron inverted bucket traps are
recommended. Size traps according to steam
pressure and consumption found in Specifications
in Table 1.
© Copyright, Alliance Laundry Systems LLC – DO NOT COPY or TRANSMIT
17
Installation
Connecting Air Service
NOTE: Failure to provide clean, dry air to press
WILL cause premature valve FAILURE and
UNNECESSARY DOWNTIME.
(Refer to Figure 8)
Air service connected to press must have a
MINIMUM constant pressure of 80 psig (5.52 bar)
and be of ample volume to meet requirements listed in
data table (refer to Table 1). Air pressure should be
reduced to 75 to 80 psig (5.17 to 5.52 bar) at air inlet
regulator. It is customer’s responsibility to connect air
line with galvanized pipe, brass, aluminum or stainless
steel pipe, copper tubing, fittings, shut-off valve,
union, air filter and air dryer suitable for delivery of
clean, dry air to inlet.
A shut-off valve and union placed at each unit is
recommended.
13
3" MIN.
12
1
11
2
10
4
3
7
5
14
4
16
4
15
6
9
8
SCR100N
SCR100N
1
Steam Return*
2
Steam Trap
3
Check Valve
4
Union
5
Steam Return Shut-Off Valve
6
To Steam Return
7
Steam Strainer
8
Air Supply
*Parts installed on press by manufacturer
9
10
11
12
13
14
15
16
Filter Regulator Lubricator*
Steam Inlet*
Steam Supply Line
Header
Riser
Downstream Relieving Shut-Off Valve
Steam Supply Shut-Off Valve
Air Supply Line Shut-Off Valve
Figure 8
18
© Copyright, Alliance Laundry Systems LLC – DO NOT COPY or TRANSMIT
AJ1031
Installation
Connecting Electrical Service
• Check all bolts, nuts, screws, tru-arc rings,
terminals and fittings for security and tighten as
required.
(Presses With Timers Only)
The following steps outline the procedure for
connecting electric service:
1. Install a suitably sized fused disconnect switch or
circuit breaker as close to press as practical.
2. Remove one knockout plug from electrical
connection box.
3. Connect proper size conduit encased wires to
wires inside box.
• Check oil level in air line oiler. It should be
3/4 full (approximately 1/2 inch [12.7 mm] from
top).
• Check air tubing. It should be clear of steam lines
and moving parts.
• Check that foot pedals can be fully depressed (no
carpet, rubber pads, etc., under pedals to restrict
movement).
Final Check-Out Procedure
4. Connect conduit to box.
The following paragraphs outline check-out
procedures for properly operating mechanical, air,
electrical and steam systems.
NOTE: Refer to wiring schematic enclosed in
control panel.
Final Preparation for Use
NOTE: Press passed a thorough inspection before it
was shipped; however, due to vibration
encountered during shipment, some cap screws,
nuts, screws or fittings may have loosened.
After press is installed, all covers and guards should be
removed and the following performed:
FAILURE to perform requested checks and make
corrective actions as required could result in damage
to the press.
NOTE: Refer to Operation/Maintenance Manual
to identify controls before performing the following
check-outs.
Mechanical and Air System Check-Outs
1. Open air supply shut-off valves.
WARNING
To avoid possible serious injury, BEFORE
making final check-out:
• ALWAYS shut off services to press
BEFORE removing guards and covers to
do ANY maintenance, service, setup,
adjustments or repair tasks.
• Shut off AND lock out ALL electric power
to press.
• Shut off AND lock out ALL air service to
press.
• Shut off AND lock out ALL steam service
to press.
• Let heated surfaces cool.
W337
2. Simultaneously push and hold both CLOSE
pushbuttons until head is against buck. Head
should continue downward until padding is
squeezed. Pressing pressure is now applied.
3. Push OPEN button. Head return springs should
pull head open.
4. Simultaneously push both CLOSE buttons. As
head travels downward, release left button. Head
should return open.
5. Simultaneously push both CLOSE buttons. As
head travels downward, release right button.
Head should return open.
6. Simultaneously push both CLOSE buttons. Have
a second person press the OPEN button as you
continue pressing the CLOSE buttons. Head
should return open.
7. If buttons do NOT perform as described above,
DO NOT operate the press. Call a qualified
service technician.
AJ1031
© Copyright, Alliance Laundry Systems LLC – DO NOT COPY or TRANSMIT
19
Installation
Steam Check-Out
Electrical Check-Out
Slowly open shut-off valves in steam SUPPLY and
RETURN lines to prevent water hammer in steam
pipes.
(Presses With Timers Only)
1. Check all steam lines for leaks.
2. Allow press to heat for 15 minutes.
3. Check head surface temperature with a
pyrometer or temperature stick measuring device.
Temperature should be 300°F to 340°F (150°C to
172°C).
20
Close electrical disconnect switch or circuit breakers.
1. Place timer switch to ON position.
2. Set timer for 25 seconds.
3. Close press head.
4. Head closes against buck for approximately
25 seconds, then opens automatically.
© Copyright, Alliance Laundry Systems LLC – DO NOT COPY or TRANSMIT
AJ1031