1
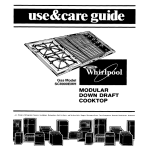
(Shown with
OWional Coil
Element Module)
MODULAR
DOWN
DRAFT
COOKTOP
”
s, Freezers.
Refrigerator-Freezers.
Ice Makers.
Olshaashers.
Built-In
Ovens
and Surface
Units.
Ranges,
Mlcrowave
Ovens,
_i+
Trash Compactors.
C%.
,. Ll’rm
Room Air Condllloners,
rs, &w&i’“&+
Dehumldlfl
Contents
BEFORE YOU USE YOUR COOKTOP
IMPORTANT SAFETY INSTRUCTIONS
PARTS AND FEATURES
USING
1
2
3
4
5
b
kaqe
- 2
2
YOUR COOKTOP.
Usit :g the Control Knobs
Usil g the Coil Element Module
Usvg the Vent System
Usir 1g the Grrll Module
USI,
,a the Solid Element Module
Us~r.g
the Optronal Griddle
,.
MC jule
J USI~I~ the Optional Rotisserie
H Usr: 13 the Opttonal Smoothtop
,.
Mc’Jule
V Cookware
CHANGING COOKTOd iODULES
:
Coil Element, Solid Element
and Smoothtop Modules
2
7
7
7
2
9
IO
10
11
?1
Accessory Canning Kit
Grill Module
Optional Griddle Module
Optional Rotisserie
CLEANING AND CARING FOR’iOiJii
COOKTOP.....
,.....
Control Panel and Knobs
Coil Elements and Reflector Bowls
Solid Elements
Smoothtop Module
Cleaning
Cooktop Chart,
Cleaning
Vent System
11.
IF YOU NEED SERVICE OR ASSISTANCE.
1. Before Calling for Assistance
2. If You Need Assistance
3. If you Need Service
4. If You Have a Problem
11
14
14
15
16
16
17
18
19
19
19
19
19
J
L
01986 Whirlpool
12
12
13
?3
Corporation
Before you use your cooktop
Read this”Use and Care Guide”carefully
for important
use and safety
information.
You are personally
rerponrlble
for maklng sure that your cook-top...
l is installed
by a qualified
installer.
l is properly
installed
and leveled
in a countertop
and cabinet
that can
support the weight.
l is installed
in an area protected
from the weather.
l is properly
connected
to the correct electric supply and properly grounded.
(See “Installation
Instructions.“)
l is vented
according
to manufacturer’s
instructions, with no restrictions.
l is properly
maintained.
l is used only for jobs expected
of home cooktops.
l is not used by children
or anyone unable to operate
it properly.
l See the “Installation
Instructions” for complete
information.
Parts and features
Model
RC8920XRH
GRILL
CONTROL
KNOBS
CONTROL KNOB
VENT SYSTEM
A
\
CONTROL
PANEL
COIL ELEMENTS
IT
‘EM
SYSTW..
CHRO ME
REFLECTOR
BOWL
This model comes with a removable
grill module on the left side and a nonremovable
coil element module on the right side. Other modules can be purchased
and used In place of the grill module.
Copy your Model and Serial Numbers
If you need service or call with a question, have
this information
ready:
1. Complete
Model and Serial number [under
the right module on the back wall.)
2. Purchase date from sales slip.
Copy this information in these spaces. Keep this
book, your warranty and sales slip together in a
handy place.
Please complete
and mail the Owner Registration Card furnished with this product.
4
here.. .
Model
Serial
Number
Number
Purchase
Service
Date
Company
Phone Number
Model
RC8950XRH
VENT GRILL
REAR
SURFACE
UNIT
_-
-DEAD
1
FRONT
SURFACE
UNIT
OPTIONAI
COIL
ELEMENT
MODULE
I
I
GRILLS
HEATING-k
ELEMENT
&.$gJ$g
\
w
REFLECTOR
GRILL
A ‘A-
CONTROL
CONTROL KNOB
VENT SYSTEM
SYSTEM
v
\COOKTOP
lhls model comes with a grill module that can be used on elther slde. Several
moduies can be purchased
and used In the other module openlng,
or In place
of the grill module.
Using your cooktop
‘1 Surtace
Unlt
lndlcators
-
Left
Rear
Surface
Unlt
Control
1. Usingthe control
2
4
-
Surface
Grill
, Control or
LeR Front
Surtace
Unlt
Control
Surface
or module
unit indicators:
unit indicators
show the surface
operated
by that control knob.
l
l
l
Right
Rear
Surface
Unlt
Control
, Slgnal
Light
Vent
’ System
Control
unit
The solid dot shows the surface unit that is controlled
by
that knob.
The solid box shows that a
module, such as a grill, can
be controlled
by that knob.
The solid dot inside the box
shows the surface
unit controlled if a surface unit module is installed.
Rlght
Flont
Surface
Unlt
Control
or Grill
Control
-
knobs
PUSH IN
Turn to
settlng.
Control knobs must be pushed
in before
turning them to a setting. There is a click at HI.
LO and OFF, but they can be set anywhere
between
HI and OFF.
The signal light will glow when any surface
unit or module is ON. Be sure the light is OFF
when you are not cooking.
NOTE: The grill and griddle
ated with the front control
being used.
modules are operknob In the section
2. Using the coil element module
Use only flat-bottomed
utensils for best results and to prevent damage
Specialty
items with rounded or ridged bottoms [woks, ridged bottom
kettles) are not recommended.
Until You get used to the settlngs,
Use HI to start
foods cooking
or
to bring liquids to
a boil.
Surtace
unlts will not turn
red It good contact Is made with
bottom of pan.
3.
use the followlng
Use MED-HI
to
hold a rapid boll
or to fry chicken
or pancakes.
Using the vent system
to the cooktop.
canners or tea
as a gulde.
Use MED for gravy,
puddings,
and ICings or to cook
large amounts
of
vegetables.
Use MED-LO to
keep food cooking after starting
it on a higher
setting
Use LO to keep
food
warm
until
ready toserve. Set
the heat higher or
lower
within
the
LO band to keep
food at the temperoture
YOU
want.
FILTERS MUST BE IN PLACE FOR PROPER SAFE
OPERATION.
THE EXHAUST FAN SHOULD BE ON FOR MOST
COOKING OPERATIONS.
The built-in
fan removes
cooking
vapors,
odors and smoke from foods prepared
on the
cooktop.
The fan should
always
be ON when
using
the grill module.
Turn the exhaust
fan
control
knob clockwise
to turn the fan ON.Turn
counterclockwise
to turn the fan OFF.
DO NOT PUT HANDS IN VENT BOX WHEN FAN
OR CONTROLS
ARE ON. INJURY
COULD
RESULT.
NOTE: The vent
system
may come
on au-
4. Using the grill module
Before
A.
using
the grill
Wash, rinse and dry grill.
Use warm sudsy water.
l
DO NOT use metal scouring
pads or
abrasive
cleaners.
They will damage
the non-stick coating on the grill.
Lightly wipe with cooking
oil to prevent
l
B.
for the first time:
meats
from
sticking.
Approximate
Prohoat
grill cooklng
the grill tor 10 mlnutor
PCCD
Steak (%“-%“)
ROW
Medium
Well-done
Steak (1Wi”)
Rare
Medium
Well-done
times
on HI.
Control
Sottlng
HI
HI
HI
5 Mln.
6 Mln.
8 Mln.
4 Mln.
6 Min.
8 Min.
HI
HI
HI
5-7 Mln.
9-l 1 Min.
12-l 5 Mln.
5 Min.
10 Mln.
12 Mln.
Other:
These toods must be turned and rearranged
cooklng
to provide
even cooklng
results.
HI
Hamburgers
HI
Hot Dogs
HI
Pork Chops
HI
Spare Ribs. Barbecued*
MED.HI
Lamb Chops
HI
Chlcken
Pieces
MED.HI
Ham Slice
HI
Lobster Tails
HI
Garlic Bread
‘Baste
wlth barbecue
CAUTION:
Hlnts
and
sauce
as necessary
20-25
12-l 5
25-30
50-60
25-35
45-60
20.25
20-25
2-J
Mln.
Min.
Min.
Mln.
Mln.
Mln.
Min.
Mln.
Mln.
last 15-20 minutes.
The use of metal forks and tongs
can scratch
the non-stick
coatIng. Use with care.
tlpr:
vent excessive
smoke and flare-up. Mkats
which normally
have a high fat content
will produce
more smoke and flare-up. Fat
meats cook faster than lean meats.
If meat begins to cook too quickly, turn the
grill control knob to a lower setting.
8
Approxlmate
Cooklng
Time
Side 1
Side 2
during
Total
Total
Total
Total
Total
Total
Total
Total
Total
5. Using the solid element module
Use only flat-bottomed utensils for best results
and to prevent damage to the cooktop. Specialty items with rounded or rtdged bottoms
(woks, ridged bottom canners or tea keffles) are
not recommended. Solid elements are made of
heavy cast-iron to provide even cooking. These
elements hold heat longer than conventional type surface units. For best cooking results,
use a HIGH setting for a very short period; then use a LOW setting to complete the cooking.
Turn the element OFF a few minutes before you are finished cooklng.
CAUTION: Elements stay hot for a long time. Do not leave pans on hot elements when
cooking is done. Burned food and damage to the cookware could result.
NOTE: A protective limiter is built into each solid element. If pan bottoms are not flat, it will
sense uneven cooking temperatures and automatically reduce the heat setting. This will
result in longer cooking times. See Cookware on page 11.
Until you get used to me refflngs,
Use HI
to start
cooking or to bring
liquids to a boil.
When cooking
foods, turn to Q
LC or MED-LO setttng when slzzte
starts.
6.
Use MED-HI to
hold a rapid boil
or to start frying
chicken or pancakes. Turn to Q
LO or MED-LO setllng when sizzle
starts.
3.
4.
5.
Use MED for gravy,
puddings and
Icings or to cook
large amounts of
vegetables. Turn
to 0 LO setting
tlnlsh cooklng.
Use MID-l.0 to
continue cooking
after starting at
a hlgher settlng.
to
Use LO to continue cooktng after
startlng at a higher setting, to keep
food warm or to
melt chocolate or
shortenlng.
for the first time:
Wash, rinse and dry griddle.
Use warm sudsy water.
l
DO NOT use metal scouring
pads or abrasive
cleaners.
They will damage
the nonstick coating on the griddle.
Lightly wipe with cooking
oil to
season. You don’t have to grease
the griddle every time you use it.
l
DCt NOT use shortening or butter
Preheat on HI. then switch to desired setting.
l
2.
as a gulde.
Using the optional griddle module
Before using the griddle
1.
use me followlng
Add food. Use only nylon
or
plastic
utensils.
Metal
can
scratch the non-stick coating.
Turn off the element when cooking is finished. Leaving it ON can
damage the griddle.
Approximate
Proheat the griddle
Food
Sausage Pattles
Bacon
Ham Slice
Hornburger
Fish Sticks
Hot Dogs
Buns
French Toast
Grtlled
Sandwlchea
Pancakes
Eggs
griddle
cooklng
times
for 10 minutes on HI.
COfltd
Setting
Approximate
Cooklno Ilme
SW. 1 - Sld.2
/IMED.HI
8 Min.
4 Mln.
3 Min.
l-2 Mln.
6 Mln.
HI
MED
MED.HI
MED
6 Mln.
5 Mln.
5 Mln.
3 Mln.
3 Mln.
5.6 Min.
5 Mln.
3-4 Mln.
5 Mln.
Total
2-3 Mln.
MED.HI
MED.HI
MED-LO
3 Mln.
1%2 Mln.
3 Mln.
3 Mln.
l-2 Mln.
1 Mln.
MED.HI
7. Using the optional rotisserie
1.
2.
3.
Put fork on the spit pointing away from the
handle.
Push spit through meat so the weight is balanced around the center.
~;t%?t~ec;;~t,fork
on the spit pointing
5.
6.
Push the pointed end of the spit all the way
into the motor socket.
Put the handle.end
of the spit into the rack
slot.
7. Plug in and turn on the rotisserie motor. Turn
4.
Push both forks into the meat
the thumbscrews.
Approximate
and tighten
minimum
on the Grill Module. See chart below for suggested cooking times.
rotlsserie
cooklng
times
No prohoat roqulrod.
Food
Setting
Mhutesl
Pound *
Intern01
Temperature
Beef Roost* * Well-done
Pork Loln Roast* *
Leg of Lomb
Chlcken,
med.
Cornlsh Game Hen
HI
MED.HI
HI
HI
MED.HI
45 Tolal
65 Total
45 Total
120 Total
60 Total
170°F
185" F
180" F
190" F
190" F
Control
*Be sure grllls ore removed
durlng rotlsslng.
**Roosts
of approximately
3-J’/, pounds ore the most sultable
roosts wilt greatly
Increase
cooklng
tlmes.
for rotisslng.
Larger
8. Using the optional smoothtop module
Cooking
on the optional
most the same as cooking
There are three differences
a bout:
1. The cookware
you use.
2. What to expect.
3. Thecareandcleaning.
smoothtop
on surface
you should
is alunits
know
Cooking...
The glass will take longer to heat up than a
regular surface unit. It will also take longer to
cool down. Turn off the unit a few minutes before you are finished cooking.
l
Do not use the smoothtop
module
for
canning.
l Bottoms
must be perfectly flat, with NO ridges,
rims, patterns, dents, roughness or scratches.
-Pans
with uneven
bottoms
cause poor
cooking
results and may damage
the
smoothtop.
-Nicks
and scratches
on a pan can damage the smoothtop.
l
Bottoms must be clean. Heating a soiled pan
can leave a stain on the smoothtop.
l
Sliding aluminum
pans or foil, and copper
pans, on the smoothtop
can leave marks.
Aluminum marks can be removed It they are
not heated.
See page 16 for cleaning
and
caring suggestions.
10
Pans should be the same size or larger than the elements to prevent boilovers and hot handles.
Flat bottoms allow maximum contact between the pans and
the elements for fast, even cooking. Pans with uneven bottoms or raised patterns on the bottom
are not suitable. Flatness of a pan can be checked by placing an edge of a ruler across it. There
should not be space between the ruler edge and the bottom of the pan. DO NOT USE trlvefs,
Only use pans wllh fluI bottoms.
woks wtlh skirts, or canners
wlfh concave
bottoms.
See lllustmflons
below.
Changing cooktop modules
The cooktop modules will work on either side of the cooktop. NOTE: The toll element
module
on the rlghf ride of the RC8920XRH
cooktop
Is not removable.
Coil element, solid element and smoothtop modules
NOTE: On the RC8920XRH
1.
cooktop,
these opflonal
modules
will only fli In the lefl side.
To remove,
lift slightly
by the handle.
2.
With both hands, pull
module
toward vou to
3.
Lift out and set aside.
To replace,
terminal
receptacle.
2.
Push terminal into place
until it’s plugged
in.
3.
Lower the front with the
handle.
line up the
with
the
Accessory
canning
kit [Par? no. 242905)
Tobeusedwlthoollelementmodulesonly.
The large diameter of most water-bath or
pressure canners combined
with high heat
settlngs for long periods of time can shorten
the life of regular surface units and cause
damage to the cooktop.
1
Grill
module
NOTE: On the RC8920XRH
cooktop,
the grill module
will only flt In the left olde.
1.
To remove,
lift off grills.
2.
Lift heating
element
slightly
and
pull toward
you.
3.
Lift out splatter shield.
4.
Lift and remove
the
grease well,
being careful not to spill
fat
drip-
1.
To replace,
lower
the
grease
well
into opening.
2.
Put in splatter shield.
3.
Plug heating element
terminal into
receptacle.
4.
Place grills
over
heating element.
All grill parts must be cleaned
after each
fat spollage
and odors. See page 17.
12
If you plan to use the cooktop for canning. we recommend the installation of a
Canning Kit. The kit includes one heavy
duty 8” surface
unit and necessary
switches. Order the klt from your Whirlpool
Dealer or Tech-Care Service Company.
use to avold
exceulve
smoke,
flare-ups,
Optional griddle module
The griddle
1.
To Install,
the grills
module
is used with the grill module.
remove
2.
1.
Slide the griddle
tnto place
with
drain slot at rear
To remove,
lift
front slightly
by
both front corners
and set aside.
Note: Make sure
griddle
is cool
before removing.
2.
Replacethegrills
Optional rotisserie
The optional rotisserie has 5 parts.
It is used with the grill module.
Motor
1.
2.
To install, remove
the grills.
Lift and pull out
the heating element.
3.
Set in rotisserie
rack.
4.
Plug in the heatIng element.
5.
6.
Lift grease well
slightly and slide
side baffles into
place.
Install rotisserie
motor as shown.
1.
To remove, slide
out the side
baffles.
2.
Litt and pull out
the heating element. Note: Make
sure element is
completely
cool
before removing.
3. Remove
motor
and rotisserie rack
and set aside.
4.
5.
Plug in the heating element.
Replace grills over
heating element.
Cleaning and caring for your cooktop
Control
Dane1 and knobs
1.
First make sure knobs
pull knob straight off.
3.
Wash knobs in worm
well and dry
14
are set on OFF then
soapy
water.
Rinse
2.
Use warm soapy water and a soft cloth to
wrpe the panel. Rinse and wipe dry.
4.
Push the knobs straight
they point to OFF.
back on. Make sure
Coil elements and reflector bowls
Replaclng
Removlng
1.
1.
Be sure controls
COOL.
are OFF and elements
are
Be sure toll
elements
are OFF.
2. Line up opening in the reflector bowl with the
coil element receptacle.
3. Hold the coil element as level as possible
with the terminal
just started into the
receptacle.
2. Lift the edge of the coil element opposite the
receptacle just enough to clear the reflector
bowl.
4. While pushing the coil element terminal into
the receptacle, lift a little on the edge of the
unit nearest the receptacle.
5. When the terminal is pushed into the receptacle as far as it will go, the coil element will flt
into the reflector bowl.
3. Pull the coil element straight away from the
receptacle.
4. Lift out the reflector bowl
Reflector bowls reflect heat back to
the utensils on the coil elements. They
also help catch spills. When they are
kept clean, they reflect heat better and
look new longer.
If a reflector bowl gets discolored,
some of the utensils used may not be flat
enough. Or some may be too large for
the coil element. In either case, some of
the heat that is meant to go into or
around a utensil goes down and heats
the reflector bowl. This extra heat can
discolor it.
Solid elements
Solld elements are not removable.
After
each use, wipe off the elements with a damp,
soft cloth and soapy water. Burned-on food
may be removed with a soapy scouring pad.
The red spot in the center of the elements
will gradually wash off. This is normal and
will not affect the operation of the elements.
IMPORTANT: AFTER EACH CLEANING,
HEAT ELEMENTS UNTIL DRY.
To darken elements or to remove rust spots caused by improper drying, apply a thin
coat of salt-free oil to the CCCL elements, then heat for 3-5 minutes. If elements have
dark spots, the oil treatment will improve their appearance but will not eliminate
the spots.
The stainless steel spillrings will gradually yellow from the heat of the elements
and pans. This is normal. The yellowing can be removed by using stainless steel
cleaner on the spillrings.
Smoothtop module
Always
l
clean
l
l
l
atter
or cloth. A llttle lettover
staln the smoothtop
use.
soap
when
Use only clean cookware.
Avoid spillovers. Use pans with tall sides.
Do not let covers
drlp on the smoothtop.
Wipe up any spills with a wet paper towel,
when the unit is cool enough not to steam. The
longer you cook with a splllover
the harder It will be to remove.
l
each
Wipe the smoothtop surface with a clean,
damp paper towel before each use. Do not
use a sponge
or soll can
heated.
l
the smoothtop
on the unlt,
Clean off metal marks (from copper or aluminum) right away. If heated they may never
come off.
16
Avold damage
l Do
not use the
board.
smoothtop
as a cutting
0 Sugary spills can cause pitting on the surface.
l Spilling
cold water on a hot surface may
crack it. Do not use a cracked
smoothtop.
l Dropping
heavy or hard objects on the
smoothtop can crack it. Be careful with heavy
skillets. Do not store Jars or cans above the
smoothtop.
See the special
gestlons on page
smoothtop
18.
cleaning
sug-
:op chart
Cleaning cooktop
..*.s***w
-e
PART
WHAT TO USE
l-,w&%*+>,nch?*- w--,.-+e%x7”*,
Heating Element
Coil Element
Module
Do not clean.
HOW TO CLEAN
l
l
. ..>L s*e.
Grill Module
.,...
Reflector Bowls
Warm soapy water and
plastic scouring pad or
dishwasher.
.%.CL~e,kxT~i-~~~~*
wpw
Grill
Warm soapy water and
plastic scouring pad.
Wash, rinse and dry well.
Do not use metal scouring pads or
harsh cleansers.
yyelhw>
-mss-ITY(,
l
l
l
l
l
.5*“R-.*I- rnlL&
Solld Element
Module
water
and
l
l
l
l
l
,-mmRotlsserle
Wash, rinse and dry well.
Do not use metal scouring
harsh cleansers.
pads
or
Soil burns off.
Do not put In water.
Wash, rinse and dry well,
Use plastic scouring pads for stubborn
areas.
Grease Well and Frame
9 Wash, rinse and dry well.
Warm soapy water and
l Clean
after each use.
plastic scouring pad.
l Dishwasher
safe.
.
.^I
. -aWe,,*... ..T?Y-Ir*LI,. L.:s+~u A”&weBa&.%
“t*~^~eer.‘%ds& ^im
Heat Element
l Clean
after each use.
Warm soapy water and
l Scrub
off burned on food. After each
a soft cloth.
cleaning,
heat elements until dry.
Soapy scouring pad.
Damp, soft cloth and
salt-free oil.
.-P---CI
Griddle
Soil burns off.
Do not put In water.
l
Heating Element
Do not clean.
Splatter Shield
Warm soapy
a soft cloth.
h--v~
Spillrings
Damp, soft cloth and
stainless steel cleaner.
Warm soapy
cloth; plastic
Module
w#ss+-w
water and a soft
scouring pad.
uwE**
Rack and Spit
Warm soapy water and
plastic scouring pad.
Motor
Warm soapy
a soft cloth.
lrt~91i~.~~-7.-~a&p;~ 3,r LP .FII%, ,c,>^
water
and
il <La,,
l,. Atia%*->: ?-*--
l
Aa.!
To darken elements or to remove rust
spots, apply thin coat of oil to the
COOL elements.
Heat for 3-5 minutes.
Oil treatment will improve appearance
or dark spots, but not eliminate
them.
Scrub stainless steel spillrings
cleaner to remove yellowing.
with
Clean after each use.
Wash, rinse and dry well.
l Do not use metal
scouring pads or
harsh cleansers.
l Use plastic
scouring pads if needed.
a..L-F
l
l
l
l
Wash, rinse and dry well.
Clean after each use.
. Do not put In water.
Unplug before cleaning.
l Wipe
clean after each use.
l
continued
on next page
HOW TO CLEAN
PART
WHAT TO USE
Smoothtop
Module
Stain cleaning
Vinegar
and clean
towel.
paper
l
l
l
l
Single-edge
razor blade in
a holder for a very thick soil.
Area Under
Modules
Warm soapy
cloth.
water
and a soft
l
Do not soak in water.
Soak paper towel with vinegar.
Rub
soiled area. For stubborn
soils, keep
vinegar
soaked paper towel on stain
for1015 minutes. Rub off soil.
Rinse and dry well.
Do not use vinegar
on metal parts.
Carefully
scrape off the coiled area,
then use the above cleaning
method.
l
l
l
Control
Control
Cleaning
Panel
Knobs
Warm soapy water
glass cleaner.
or spray
Warm soapy water
bristle brush.
and a soft
1.
To clean,
clean
with
l
the vent system
Before
cleaning
the vent system,
fan and all controls
to OFF.
turn the
remove
the vent grill and wipe
a damp
cloth or wash in warm
soapy water. Do not use metal scouring
pads or harsh cleansers.
Do not place in
dishwasher.
2. Lift filters and turn slightly to remove. The filters
can be cleaned
in warm soapy water or in
18
l
l
l
Wash, rinse and dry well.
Do not pour water into the area.
Do not drip water into receptacles.
Wash, rinse ond dry well.
Follow directions
provided
with cleaner.
Wash, rinse and dry well.
Do not soak
If you need service or assistance, we suggest you
follow these four steps:
1. Before calling for assistance...
Performance
problems
often result from little
things you can find and fix yourself without tools
of any kind.
If nothing operates:
Is the cooktop wired correctly to a live circuit
with the proper voltage?
(See Installation
Instructions.)
l Have
you checked
your home’s main fuses or
circuit breaker box?
If surface units will not operate:
l Have
you checked
your home’s main fuses or
circuit breaker box?
l Are surface
units plugged
in all the way?
l Do the control
knobs turn?
u surface unlt control knob or knobs
will not turn:
l Dld you push
in before trying to turn?
If cooking results aren’t what you expected:
Surface Units
l Is the cooktop
level?
l Are you using
pans recommended
on page
7?
l Are the pans
the size called for in the recipe?
l Do the
cooking
utensils fit the surface unit
being used?
Grill
l Did you leave
space between the food items?
l Was the grill preheated
for the proper amount
of time?
l Was food
partially
frozen or very cold before
grilling? Cooking time will be longer.
l
Solid Elements
Did you use the HIGH setting for a short time,
then use a LOW setting to complete
cooking?
l Are you using
heavy metal pans?
l Are you using
pans with flat bottoms?
If dark spots or rust appear
on elements:
l Apply
a thin coating
or salt-free oil to the
COOL elements, then heat for 3-5 minutes. If
elements have dark spots, the treatment will
improve their appearance,
but not eliminate
the spots.
If stainless steel spillrings
are yellowing:
l Use
stainless
steel
cleaner
to remove
yellowing.
If venting results aren’t what you expected:
l Is the exhaust
fan turned on?
l Are
the cooktop
surface units and module
parts clean?
They must be cleaned
after
each use.
l Are the vent
filters clean and in place? Replacement
filters (Part No. 786220) can be ordered from Whirlpool Dealers or TECH-CARE”
Service Companies.
l
Is the vent duct or outside opening
blocked?
Is there a draft in the room where the cooktop
is installed?
Has the meat fat been well trimmed?
l
l
l
2. If you need assistance?..
Call Whirlpool
COOL-LINEa
service
assistance telephone
number. Dial free from:
Continental
U.S. . , . . . . . . . . (800) 253-1301
Michigan
. . . . . . . . . . . . . . . . . (800) 632-2243
. . . . . . . . . (800) 253-1121
Alaska 81 Hawaii
and talk with one of our trained Consultants. The
Consultant can instruct you on how to obtain
satisfactory operation from your appliance
or, if
service is necessary,
recommend
a qualified
service company
in your area.
3.
If you need setice?..
Whirlpool
has a nationwide
network of franchised TECH-CARE” Service Companies.
TECHCARE service technicians
are trained to fulfill
the product warranty
and provide
after-warranty service, anywhere
in the United States. To
locate TECH-CARE service in your area, call out
COOL-LINE
service
assistance
telephone
number (see Step 2) or look in your telephone
directory Yellow Pages under:
ELECTRKAL
APPLIANCESMAJOR-REPAIRING
(L PARTS
APPLIANCES-HOUSEHOLOMAJOR -SERVICE
&REPAIR
OR
'WHIRLPOOL APPL!ANCtS
FRANCHISEDTECH-CARF
.Sb..H\ if%
XYZSERVICE CO
123 MAD?6
WHlHLPOOLRPPLlANCES
FRANCHISEDTECH
CARESERVICE
SERVICE
S6HI
XYZSERVICECO
123 MAPLE
c i~.MII\VlEY
9% 9999
l(‘E
u~1,PA.v,6s
999 9999
OR
WASHING
MACHINES.
DRYERS
8 IRONERS
- SERVICING
WHIHLPO~LAPPLIANCES
~RANCHISEOTECH
\b..oi,c
XYL SERVIIX CO
123MAPLE
CARESERViCt
t c'o,,,'n.Yi.h
\
999 9999
4. If you have a problem?..
Call our COOL-LINE service assistance
telephone number (see Step 2) and talk with one of
our Consultants, or if you prefer, write to:
Mr. Robert Stanley
Division Vice President
Whirlpool Corporation
2000 US-33, North
Benton Harbor, Ml 49022
‘If you must call or write, please provide: model
number, serial number, date of purchase, and a
COmplete
description
of the problem. This information is needed in order to better respond to
your request for assistance.
19
Home
Making
your world
.% Appliances
a little easier.
Part No. 75647-001706696
Rev. B
01986 Whirlpool
Corporation
ce Makers,
Dishwashers,
Bu~ll-In
Ovens
and Surface
Units,
Ranges,
Printed
MIcrowave
Ovens.
Trash Compactors,
Room Air Condltloners.
Oehumldiflers.
Automatic
in U.S.A.
Washers,
Clothes
Or