1
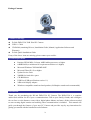
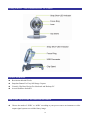
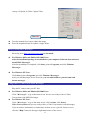
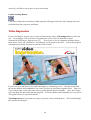
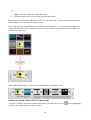
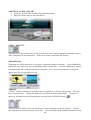
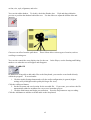
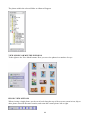
D-Link VisualStream™ 330K Pixel PC Camera Manual Ver. 2.00 1 Contents Package Contents--------------------------------------------------------------------------- 3 Introduction --------------------------------------------------------------------------------- 3 Getting To Know Your VisualStreamTM PC Camera ---------------------------------- 4 Features and Benefits------------------------------------------------------------------------ 4 How to Use Your D-Link VisualStreamTM Camera ------------------------------- 4 How to Install MSN Messenger ---------------------------------------------------- ----- 5 Using Your PC Camera with MSN Messenger------------------------------------------- 5 How to Install and use Arcsoft Software----------------------------------------------- 6 2 Package Contents Contents of Package z z z D-Link DSB-C320 330K Pixel PC Camera USB 1.1 Cable CD-ROM (containing Drivers, Installation Guide, Manual, Application Software and Warranty) z D-Link Quick Installation Guide If any of the above items are missing, please contact your reseller. System Requirements z z z z z z z z z z Pentium III 500 MHz, Celeron, AMD Athlon processor, or higher 64MB RAM (or minimum OS requirement whichever is higher) Microsoft Windows XP/2000/ME/98SE Microsoft DirectX 8.1b or higher Update Service Pack 200MB free hard drive space CD-ROM drive USB Port (USB specification version 1.1) 24Bit color display adapter Windows compatible sound card and speakers (full duplex sound card recommended) Introduction Thank you for purchasing the D-Link DSB-C320 PC Camera. The DSB-C320 is a complete audiovisual solution for all of your e-communications. Talk to your family, friends, and colleagues face-to-face over the Internet, create videos, digital photo albums, and more, all the software needed to start creating digital content and enabling video communication is included. This manual will guide you through the features of your new PC Camera and provides step by step instructions for getting you started with the bundled Arcsoft Software. 3 Getting To Know Your VisualStreamTM PC Camera Features and Benefits z z z z Resolution 648x480 Pixels Snapshot Button For Easy Still Image Capture Versatile Clip Base Design For Notebook and Desktop PC Arcsoft Software Included How to Use Your D-Link VisualStreamTM Camera z Choose the mode of “50Hz” or “60Hz” according to your power source environment or video output signal system to avoid the blurry image. 4 Amcap Æ Option Æ Video Capture Filter Click OK z z Turn the manual focus ring to adjust the image. Press the snapshot button to capture a single frame. How to Install MSN Messenger Please log on to http://messenger.msn.com to download. z For Windows 98Second Edition/Me/2000 Users After the installation package is downloaded to your computer, follow the instructions to install MSN Messenger. After the installation is completed, click Start, point to Programs, and click Windows Messenger. z For Windows XP Users Click Start, point to Programs, and click Windows Messenger. After you run Messenger for the first time, you can add friends to your list and send instant messages. Using Your PC Camera with MSN Messenger Plug the PC camera into your PC first. z For Windows 98Second Edition/Me/2000 Users Click “Messenger” to go to the main screen. You are now ready to have a Video Conversation with MSN Messenger. z For Windows XP Users Click “Messenger” to go to the main screen, click Actions, click Start a Video Conversation and you are ready to have a Video Conversation with Messenger. If you need more information or instructions on how to use a specific feature or tool, click the “Help” button in the upper right-hand corner of the screen. 5 How to Install Arcsoft Software Simply put the provided software CD into your CD drive. The set-up software will automatically start, prompting you through the steps to install the video and photo software. You may enter the selection for the destination folder, the Start menu, Programs group and other set-up options. The set-up process will copy the applications to the destination folder. Note if Windows auto-run feature has been turned off on your computer, you will need to start the Setup.exe application on the software CD. Click Install Arcsoft Software How to use Arcsoft Software Getting Started All applications can be started from the Application Panel. The Application Panel can be started by clicking on the Web cam Companion icon. Welcome. Click anywhere on the image below for details: 6 The program is divided into two main sections: My Captures, and the camera preview area. You can adjust which section is larger by simply clicking and dragging the area in between the two sections. Application Menu FILE Refresh Contents - Refreshes the screen to update any changes to your captured thumbnails. Page Setup - View and modify your printer settings. Print - Prints selected images. Stop Web Camera - Turns off your cam. Quit - Closes the application. EDIT Cut - Removes the selected files from their current location and stores them in memory for pasting in another location. Copy - Copies the selected files and stores them in memory for pasting in another location. Paste - Places the contents of the clipboard memory into the current location. Select All - Selects all thumbnails in the current location. PREFERENCES Web Camera Settings - View and modify the camera options (brightness, contrast, etc.; dependent on the device). Capture Settings - View and modify your capture settings (snapshot and video resolution). Media Folder - Change the directory that stores newly captured files. Upgrade Software - Search for updates to the program. HELP This menu contains links to various help resources, including this Help file. . Slide Show Button Click this button to run a slide show of the selected images. A slide show dialog will appear. Choose the amount of time that each slide will be displayed before changing to the next slide. Check the "Loop Slide Show" button to have your presentation continually loop over and over. Press ESC to exit your slide show at any time. 7 Rotate Button Click this button to rotate the selected files 90 degrees. Email Button Click this button to attach the selected files to an email. Print Button Click this button to print the selected images. Each image will print on a separate page. New Folder Button Click this button to create a new folder in the "Folders" section of My Captures. Delete Button Click this button to delete the selected files or folder. My Captures This section sorts your captures so you can view them in a variety of ways. View all captures, images only, videos only, or by folder. The contents of the section you select will be displayed in the thumbnails area. Double-click a thumbnail to view it. Arrows on either side let you browse the various files (no arrow will appear on the left side when the first file is displayed; no arrow will appear on the right side when the last file is displayed). Playback controls will appear beneath videos. 8 Full Screen Button Click this button to display your camera over the entire screen. Press ESC to exit full screen mode. Disconnect Button Click this button to disconnect your camera. Camera Preview This area shows you a live stream from your camera Capture Image Click this button to capture a still image from your cam. Capture Video Click this button to begin capturing video from your cam. Click it again to stop. Chat Tab This tab offers shortcuts and/or links for a variety of video and instant messaging programs. Web Camera Settings Click this button to view and modify your camera settings/properties. The options here will vary depending on your device. Show/Hide My Captures These buttons hide and display the My Captures section, respectively. Hide the My Captures 9 section if you'd like to focus more on your cam stream. Capture Settings Button Click here to adjust the resolution for both captured still images and video clips. Simply select the resolution from the respective pull-down. Video Impression If you’re looking for an easy way to create and share home videos, VideoImpression is perfect for you. By creating a VCD, your movie is burned onto a CD, ready for playback on most commercial DVD players, right on your TV! Even if you’re new to computers and don’t know much about “files” and “hard drives” and whatnot, you’ll scrape by just fine. In fact, this program is designed specifically for general consumers like yourself. If you’re the type that likes to dive right into things, by all means go for it! Playing around with the various buttons and commands is one of the best ways to learn how programs work. However, if you want to take it slow, take some time to go through this quick start guide. Also, don’t forget to use the Help file that’s built into the program. It closely defines each command on every screen. This guide is more of a practical tutorial. VideoImpression lets you create two types of projects: video and slide show. the creation of both types. 10 We’ll walk through - CREATING A VIDEO - OVERVIEW Videos are constructed by combining still images and/or existing movie clips. All components are arranged onto what’s called the “Storyboard.” When you make your final video, all of the components on the Storyboard are combined together and saved as a single video file. In addition to still images and videos, you can also add transitions between each component as well as sound clips on two separate audio tracks. Video Clips & Still Transitions The Storyboard Confused? Don’t worry. We’ll talk more about the Storyboard later. It’ll all come together. GETTING STARTED When you first run the program, a window will appear that lets you choose the type of project you want to make (you can also open previously saved projects). Choose “Create a New Video.” A new window will appear. It will contain multiple options for gathering your video content. For this walk-though, choose “Get From Album.” Even if you choose one of the other options, you’ll end up at your albums soon or later. Albums contain shortcuts to files stored on your system. You’ll grab most of your “media” for movie construction from your albums. STEP 1 – MEDIA 11 This first step is where you select the “media” (still images, videos, and sound clips) that you want to use to create your movie. All you need to do is choose the components you want and add them to the Storyboard. When you save—or “produce”—your movie, all the components on the Storyboard will be combined together into a single video file. Let’s look at the Storyboard again: Video Clips & Still Transitions The Storyboard The large squares are reserved for still images and video clips. The two horizontal bars beneath are reserved for audio tracks. The smaller squares between the still image/video clip components are for “transitions.” You’ll learn more about transitions later. The top-left area of the program contains your albums. Use the pull-down to choose the one you want. To create a new album, choose “<New Album>” from the pull-down. Click the Add button ( ) to browse your system for files to add to it. You can create multiple albums to keep track of different types of photos (i.e., keep all your vacation photos in one album, separate from your miscellaneous family photos, etc.). You can differentiate the types of files within an album by the way they look. Images simply appear as thumbnails. Video files appear as filmstrips. Audio files have a default speaker icon. ADDING MEDIA TO THE STORYBOARD To add media to the Storyboard: 1. Double-click the component within the album. 12 Or: 1. Single-click the component within the album. 2. Click the Apply button (it’s the arrow beneath the album). Don’t worry too much about adding your files in a particular order. on the Storyboard at any time to swap positions. You can click and drag them Don’t forget that you can add audio to two different audio tracks! You can overlap simultaneous sound clips and adjust their volumes to create the perfect blend. If you need to record audio, you can do so at a later step. After adding your media, your Storyboard should look something like this: REMOVING MEDIA FROM THE STORYBOARD To remove a media component from the Storyboard, click the trash can icon ( (clicking) the component you want to remove. 13 ) after highlighting THE PLAYER Now’s a good time to talk about the Player. The Player is the video screen on the right side of the display. It lets you preview each component on the Storyboard, as well as your entire movie. The Player has standard playback controls. The slider beneath the preview window shows you the progress of the video. There are two times listed; the first lists the total time of the clip, while the second lists the time at the current position. If you want to preview your entire movie (all of the components on the Storyboard played together), click the Entire Movie button ( ). If you want to preview only a specific component on the Storyboard, click the Active Clip button ( ). If you choose the latter, single-click the component you want to preview on the Storyboard, then press the Play button. STEP 2 – EDIT You’re now ready to touch up and modify your movie components. available depending on the component type. Different editing options are MODIFYING IMAGE AND VIDEO BRIGHTNESS/CONTRAST 1. Single-click the desired still image or video clip on the Storyboard. 2. Click and drag the sliders to your liking. You can preview the effect within the Player. 14 SETTING STILL IMAGE DISPLAY TIME 1. Single-click the desired image on the Storyboard. 2. Use the pull-down to select the duration (in seconds) of the selected still image. During your final movie, the still image will display for the set amount of time before proceeding to the next component. TRIMMING VIDEOS AND AUDIO 1. Select the desired video or audio clip on the Storyboard. 2. Drag the Starting Mark to the spot where you would like the clip to begin playback. 3. Drag the Ending Mark to the spot where you would like the clip to end. 15 ADJUSTING AUDIO VOLUME 1. Select the desired video or audio clip on the Storyboard. 2. Drag the volume slider to the desired level. STEP 3 – EFFECTS The third step in the creation process lets you add cool scene transitions between each still image or video component on the Storyboard. There are two tabs: Transitions and Themes. TRANSITIONS Transitions are effects that occur as one movie component changes to another. You can add/delete transitions in the same way that you add/delete media components. Click the “Randomize” button to automatically add a random transition to each spot. You can go back to Step 2 to modify the display time for your transitions as well. THEMES “Themes” consist of transitions and effects that are applied over the entire Storyboard. They all have a specific motif. Choose the theme you want, then click the Apply button. To remove a theme (or all transitions on the Storyboard), click the Delete All Effects button ( ). STEP 4 – TEXT This step lets you add text over any still image or video component on the Storyboard. Click on the component you want, then type in your text. You can modify all the standard parameters, such 16 as font, size, style, alignment, and color. You can also add a shadow. To do this, check the Shadow box. Click and drag within the preview to position the shadow behind the text. Use the sliders to adjust the shadow blur and intensity. Choose a text effect from the pull-down. scrolling or rotating text. These effects allow various types of motion, such as You can also control the exact display time for the text. In the Player, use the Starting and Ending marks to set when the text will appear and disappear. STEP 5 – NARRATE In addition to being able to add audio files to the Storyboard, you can also record audio directly within the program. To record audio: 1. Click the Audio Settings button and verify the audio configuration (in general, higher settings will yield higher audio quality but larger file sizes). Click the red Record button. 2. Set the file name and save location for the recorded file. If you want, you can have the file automatically added to an album for easy access in another project. 3. Click the Start button and begin your narration. Press the Stop button to stop recording. Click the Add button to add the recorded audio to the Storyboard. 17 STEP 6 – PRODUCE The final step lets you save your movie in a variety of ways. Consult the Help file for details on the specifics of each case. For this guide, we’ll save a movie as a VCD. When you do this, you can pop the CD into most commercial DVD players to see your movie on your TV! 1. Click on the CD tab. 2. Select the device/drive to which the movie will be written or “burned.” 3. Choose the burn speed. 4. Choose the file type. (Remember, we’re creating a VCD, so choose “Video CD File.”) Click Start when you’re ready! Congratulations, you’re done! Pop your VCD into your DVD player and enjoy your movie! 18 -CREATING A SLIDE SHOW OVERVIEW Creating a slide show is similar to creating a video, only there are fewer steps involved. Many of the video creation concepts are applied here, so we won’t go into as much detail as a result. If you have to, go back through the previous section again. GETTING STARTED The only difference here from starting a video project is the first option. Whereas you’re able to capture video for a video project, you can instead acquire an image from a connected TWAIN device for your slide show: STEP 1 – MEDIA This step is basically the same as the first step when creating a video. Choose the media that you want to include in your slide show and add it to the Storyboard. The components on the Storyboard will look nearly identical to the way they look for a video project. 19 The main difference that you’ll notice is the display time for each still image is noted on the thumbnail. Change the display time by double-clicking it and entering a new time (in seconds). You can apply the new display time exclusively to the image you’ve selected, or all of the images in the slide show. STEP 2 – EFFECTS Effects (transitions) are added exactly the same as they are when creating a video. Double-click the transition you want and it will automatically appear in the next available spot on the Storyboard. Themes are not available for slide shows. STEP 3 – AUDIO Unlike the Narrate step (Step 5) when creating a video, the Audio step when creating a slide show offers you two different tabs: Soundtrack and Narration. The latter works exactly the same as the Narrate step. to an album, and apply them to the Storyboard. The Soundtrack option is a bit different. of any added audio: You can record new audio clips, save them It offers you the ability to fit your slide show to the time Check the “Fit Slide Show to Soundtrack” box if you would like the current audio tracks to establish the length of your slide show. The display time for still images will automatically be set so that the slide show will end at the same time as the audio tracks. You can also set the display time for the current still image (or all still images) in this window. STEP 4 – PRODUCE Saving—or “producing”—your slide show works just the same as producing a video. The exception here is that you only have two choices: saving to your hard drive and burning a CD. Slide shows are saved in the EXE file format, and cannot playback on DVD players. 20 TIPS & TRICKS Here are a few pointers to help you out: 1. Experiment. Click on every button. Choose every different option. You’ll learn the most and have the most enjoyable experience if you just play around with the software. 2. Familiarize yourself with “albums.” The core of project construction stems from understanding how albums work. We’ll tell you again here: albums are simply collections of shortcuts to files stored on your system. You can “add” files to an album for fast and easy access. If you delete an album thumbnail, the actual file is still on your system (unless you actually choose to delete it). 3. Use the sample content. The program comes bundled with a few sets of still images, video clips, and sounds. Use these to create a sample movie. Get comfortable with the various controls and commands. All programs are intimidating at first, but trust us, with just a little practice you’ll be making movies and slide shows in no time! 4. Preview your project. Click the “Entire Movie” button when previewing your project within the Player. Always know how your work is coming along so you can make changes as you go along each step. 5. Use this guide along with the Help file. It’s a tad lengthy for a quick start guide, but these pages walk you right through the gist of the program. Consult the built-in Help file for specific details on any aspect of the application. 6. Check your audio levels. Remember, some of your videos may have sound on them. Use the volume slider to mute a video’s sound if it ends up competing with any of the clips you’ve added to the audio tracks. 7. Save often. This usually goes without saying. 8. Use the “Fill & Crop” option. Before adding still images to your Storyboard, click on the Options menu, then highlight the Photo Sizing group. Choose “Fill & Crop.” This will automatically make your still images display in a consistent size. 9. You can grab screenshots from your videos. Right-click within the Player while displaying a video to see options for saving and printing the current frame. 10. Have fun! Photo Impression Welcome to ArcSoft Photo Impression 5! This tutorial will walk you through the six program “modules.” Each module offers you commands to perform various imaging tasks. The six modules are: 21 Get Photo - Locate photos on your computer within various folders or ArcSoft albums. Enhance - Quickly touch-up and modify your photos. Create - Add text, frames, special effects, and more to any picture. Project - Make your own calendars or “PhotoBooks.” Print - Print out single or multiple photos in a variety of ways. Send - Share your photos with friends and family. Don’t forget about the built-in Help file. You can access it from the Help menu along the top of the program screen. It will explain each button and option. This tutorial will show you how to perform the most common operations and may not cover every individual command. Use the tutorial and Help files together and you’ll be fine. GETTING STARTED When the program initially starts, you’re prompted with a window that offers you various ways to acquire photos. This window will appear each time you start the program or go to the Get Photo module. Note: Graphics and procedures may vary slightly between Windows and Macintosh versions. VIEWING PHOTOS To view photos stored anywhere on your system, go to the Get Photo module. Here you can also acquire photos from cameras, scanners, or other photo-centric devices. THE MINI BROWSER Navigation is fairly simple. Use the Mini Browser on the left side to choose a folder or album (use the pull-down at the top to choose; you can also choose to acquire a photo from a camera/scanner). 22 The photos within the selected folder or album will appear. VIEW SINGLE OR MULTIPLE PHOTOS To the right are the View Mode buttons. Here you can view photos in a number of ways. PHOTO VIEW OPTIONS When viewing a single photo, use the set of tools along the top of the screen to zoom in/out, skip to other photos stored in the same location, and rotate the current picture left or right. 23 - ENHANCING PHOTOS When you’re ready to edit a photo, bring it up on the screen and then proceed to the Enhance module. From there, you can perform various types of modifications. ADJUSTING PHOTO ORIENTATION Use the tools along the top of the screen to rotate and flip a photo in a variety of ways. You can also save and delete a photo by clicking on the respective icon. CROPPING A PHOTO (FREEHAND CROP) To crop a photo: 1. Click the Crop button in the upper-right corner. 2. Click and drag on the photo to draw a crop box that encloses the area you want to keep. If you make a mistake, simply single-click anywhere outside the crop box and start over. 3. Keep the “Apply to all layers” box checked. When you’re ready, click Crop. Everything outside the crop box will be removed. If you’re not satisfied with the crop, click the Undo button. MAKING PHOTOS BRIGHTER Use the Brightness/Contrast option under the Fix button for total control over photo vibrancy. Drag the sliders until your photo looks vivid and crisp. You may also want to fiddle with the Hue/Saturation and Sharpen/Blur options to further touch-up your picture. 24 REMOVING RED EYE You can choose between “Auto Detect” and “Manual.” When using “Auto Detect,” simply move the mouse over the red part of the eye and click. The manual option lets you define the size of the affected area by moving a slider. RESIZING A PHOTO To resize a photo, simply enter in the pixel values that you want. It may be easier to change by percentage instead of pixels. For example, if you enter in “50%,” the photo will be resized to half the original size. Leave the “Keep Aspect Ratio” box checked to prevent distorted photos. When you’re ready, click Apply. 25 -CREATIVE OPTIONS A variety of tools can be found in the Create module that let you touch-up and liven photos with the addition of various frames, borders, edges, and effects. The Help file describes each tool in detail, but we’ll walk you through some of the more engaging procedures here. CLONING Cloning lets you effectively paint over damaged areas of a photo by copying--or “cloning”--another part of the photo over the damaged section. You can also duplicate objects. To clone: 1. Choose the Clone tool from the Paint section. 2. Move your mouse over the area you want to clone. Hold the Shift key and then single-click. This sets the “clone source.” 3. Move your mouse to the area that you want to paint over. Click and drag (don’t let go of the mouse button!). As you paint, you will see the paint from the clone source appear. 26 ADDING CLIP ART An entire library of clip art is included, allowing you to add fun and humorous images over any photo. You can move, resize, and rotate any clip art image. • • • Click and drag a piece of clip art to move it. Click and drag a corner to adjust the size. Click and drag the top anchor to rotate. ADDING TEXT Freely add titles, captions, quotes, or catchphrases to your pictures. All of the text editing options are consistent with most word processors. You can change the font, size, style, alignment, and color. You can even add multiple text layers (click “New Text”). Text can be modified just like clip art (you can resize, move, and rotate). PHOTO PROJECTS In addition to simply editing photos and including various creative templates and effects, you can also create calendars and “PhotoBooks.” 27 CREATING A CALENDAR With just a few clicks you can create a yearly, monthly, or 12-month calendar. 1. First, choose the type of calendar you want to create. 2. Set the month (if applicable) and year. 3. Choose your calendar template/design. You can click/drag your photo to move, resize, and rotate it within the calendar. CREATING PHOTOBOOKS A “wizard” walks you through the setup of a PhotoBook. Simply follow the instructions and you’ll be fine. Once the design and template have been set, all you need to do is click and drag photos to the empty spots on each page. You can add and edit clip art, too. - PRINTING PHOTOS ArcSoft PhotoImpression lets you print photos in a variety of ways. You can print single photos or multiple images across multiple pages. • • From the Page Layout tab, choose “Standard Printing” to print photos at standard sizes, such as 5” x 7” and 8” x 10”. Choose “Custom Printing” to alter the number of photos printed per page, as well as the 28 • • spacing between the various photos. Keep the “Auto Crop Photos” box checked to have the program automatically crop and size your photos so that they fit optimally within the print template. Some of your photos may have a low resolution, and may not print very clearly. When applicable, check the “Resize All Photos for Best Print Quality” box. ArcSoft PhotoImpression will resize your image to a size that yields a higher quality. - SHARING PHOTOS You never again need to worry about your friends and family receiving photos that are too big and take forever to download. ArcSoft PhotoImpression makes it easy to send your pictures to any email address. 1. Choose your email application from the pull-down. 2. Select the photo size. If you’re sending a photo that’s only going to be seen on a computer, choose “Small.” 29 Today, megapixel cameras are common and almost everyone can take high-quality pictures. However, these pictures are often very large, and only need to be so when you’re printing them. So if you’re sending pictures through email, you’ll probably want to always use the “Small” option unless you’d like the recipient to print the photo as well. Funhouse ArcSoft Funhouse allows you to create unique, fun images by combining two or more photos together — put your face on famous monuments, magazine covers, celebrity bodies, animation cells, or any other type of picture. Swap heads with family members, or put a friend’s face on the family dog. The program comes with several ready-to-use templates. These templates are organized into unique categories. Each template has one or more “masks”—areas that are cut out so that you can insert your own images. Typically, if there is a person involved, the mask will cover the face of that person so that it can be replaced with a face from one of your pictures. In addition to having these 30 built-in templates, you can also create your own using your personal collection of digital images. Creating a Funhouse Image The creation procedure is extremely simple. There are five easy steps. Each step is listed vertically along the left side of the program desktop: In this step, you will select the template for your project. A “template” is the primary image in which other images will be inserted. You can think of a template as the background, or scene, of your Funhouse image. Within this scene, you’ll insert your own images to make it unique. Click the Get Template icon on the left side of the screen. You’ll be taken to the Template Screen, where you can preview, create, and select your Funhouse template. The left side of this screen will contain a pull-down that contains several template categories. Use this pull-down to select a desired category. Once you select one, you’ll be able to preview each template within the category. Choose the “My Templates” category to view, edit, and create your own templates (see the “Creating Your Own Templates” section). When you click a template thumbnail, it will appear in the main preview window. Notice that on the template there will be one or more colored areas, usually over the face of any figure that may be present. These are “masks”, which are areas that will end up being replaced by images that you insert. Click Okay when you’re ready to proceed. You’ll be taken back to the Main Screen and your selected template will be displayed. Step 2: Get Photo Now that your template is selected, you can insert other photos into the masked areas. This is done through the second step along the left side of the screen. Click the Get Photo icon. You’ll be taken to the Get Photo Screen. >From this screen, you can choose one or more (depending on your template) images for insertion into your selected scene. Choosing photos works similarly to choosing a template, but there are additional options. 31 Photo Mask – Click on the respective button to insert an image into the associated mask. All three of these buttons may not be available. If your selected template only has one mask, only the first button will be available. Use the pull-down to select an album. Select “New” to create a new one. Albums contain thumbnail links to images stored on your system. Click Open to add photos to an album. Click Acquire to capture images from external devices. Click Delete to remove a thumbnail from an album (you can also choose to delete the source file). Once you select a photo, it will appear within the appropriate mask on the screen. Click the other Photo Mask buttons and select other photos. Remember, you can only select as many photos as there are masks on your template. Step 3: Fine-Tune – Even though your selected photos are inserted into the template, they likely need to be altered in a few ways so that they look like they’re naturally part of the scene. You can make these adjustments on the Fine-Tune Screen. Click the Fine-Tune icon to get to this screen. From this screen, you can apply various edits and enhancements to each included image. – Select an image from the Photo Mask buttons. Once you’ve selected an image, any changes you make will be applied to that image only. – This command flips the selected image so that it looks like a mirror image. – These buttons make the selected image larger or smaller within the template. 32 – These buttons slightly rotate the selected image in the indicated direction. – Use these buttons to move the selected image within the template. Alternately, you can click and drag the image directly on the preview. – By enabling color matching, the program will apply a series of enhancements to make the tone of the inserted image match the tone of the template. The three sliders allow you to adjust the image brightness, contrast, and saturation (color intensity), respectively. – You can zoom in and out on the selected inserted image by clicking the “+” and “–”buttons. – Use these buttons to capture an image from an attached video device directly into the template. Click the first button to capture. Click the middle button to toggle your video device on/off. The third button lets you adjust the settings specific to your selected device. Step 4: Add Text Add text to your scene to make it even more unique and personal. Click on the Add Text button to open the Text Window. Standard text options are available here. Type in your text in the text box, and choose your formatting options. You can even add a shadow to the text. If you do so, you can click and drag the shadow within the preview box to place it any way you like. When you’ve finished, you can click and drag the text to position it anywhere on the image. 33 Step 5: Print Preview Once you’ve completed your Funhouse image, you’re ready to print it. Click the Print Preview button on the Main Screen to go to the Print Screen. From this screen, you have complete control over how your image prints. Click and drag the image to move it about the page. Click and drag the corners of the image to resize it. You can set the number of copies you’d like printed (Copies), view and edit your printer settings (Printer Setup), center the image on the screen (Center), and change the paper orientation (Orientation) between portrait and landscape. If your image is taller than it is wide, you’ll want to stay in the portrait format. If your image is wider than it is tall, you might want to consider printing in the landscape format (you’ll be able to make a bigger print). Saving Images To save your image, click Save as on the Main Screen. A window will appear. From the “Save in” pull-down, choose the directory to which the file will be saved. In the “File name” field, type in a unique name for the file. From the “Save as type” pull-down, choose the file format. If you only plan on displaying the image on a computer, or emailing it to others, you’ll want to use the JPG file format. 34 Creating Your Own Templates >From the “My Templates” category on the Get Template Screen, click New.You’ll be taken to the Create Mask Screen. From here, you can open images and create up to three masks. You’ll then be able to insert other photos into each mask to create your Funhouse image. The tools described below can be used to create and modify your masks. – These tools are used to manually add or remove a masked area. Select the appropriate tool, then click and drag on your image to set the mask area (or remove the mask area). Alternately, you can add or remove a mask by clicking at various points — the mask border will be drawn from point to point. Double-click to close the masked area. – Several brush sizes are available for you to use. Select a brush when you use the Paint, Eraser, or Blur tools to create a mask. – Use the Paint tool to draw a mask on the image. Using your mouse, click and drag to create a mask. To erase any masked area, use the Eraser tool. It works the same way as the Paint tool, except it removes masked areas instead of creating them. The Blur tool is excellent for creating a soft edge around masked areas. By blending a mask around the edges, it will look much nicer when a photo is inserted into the mask. When using any of these tools, you can select various brush sizes. – Use these sliders to adjust the brightness, contrast, and saturation of the template. Emailing Images Once your Funhouse image is complete, you can email it by clicking the Send button on the Main Screen. You will be asked to choose either AOL or another MAPI-compliant program. Make the appropriate choice, then click OK. You’ll see that the image file size is listed, along with the time it will take to email the image at different Internet connection speeds. 35