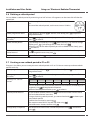
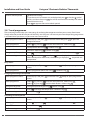
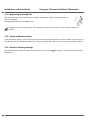
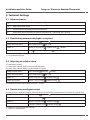
1
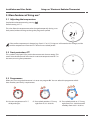
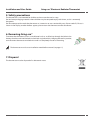
Installation and User Guide
living eco®
Electronic Radiator Thermostat
Danfoss Heating Solutions
VIIDB102
01/2013
1
Installation and User Guide
living eco® Electronic Radiator Thermostat
Congratulations on the purchase of your living eco® radiator thermostat
living eco® is an electronic radiator thermostat with programmes to automatically lower the room temperature
for selected periods. This allows you to save heating expenses and benefits the environment by using less
energy.
For further information, please see
www.danfoss.com/living
2
01/2013
VIIDB102
Danfoss Heating Solutions
Installation and User Guide
living eco® Electronic Radiator Thermostat
Table of Contents
1.Installation
1.1In the package . . . . . . . . . . . . . . . . . . . . . . . . . . . . . . . . . . . . . . . . . . . . . . . . . . . . . . . . . . . . . . . . . . . . . . . . . . . . . . . . 4
1.2
Inserting the batteries . . . . . . . . . . . . . . . . . . . . . . . . . . . . . . . . . . . . . . . . . . . . . . . . . . . . . . . . . . . . . . . . . . . . . . . . . 4
1.3Setting the time and date when you start using living eco® . . . . . . . . . . . . . . . . . . . . . . . . . . . . . . . . . . . . . . 4
1.4Installing living eco® . . . . . . . . . . . . . . . . . . . . . . . . . . . . . . . . . . . . . . . . . . . . . . . . . . . . . . . . . . . . . . . . . . . . . . . . . . . 4
2.
Getting started with living eco®
2.1
Thermostat display . . . . . . . . . . . . . . . . . . . . . . . . . . . . . . . . . . . . . . . . . . . . . . . . . . . . . . . . . . . . . . . . . . . . . . . . . . . . 5
2.2
Thermostat buttons . . . . . . . . . . . . . . . . . . . . . . . . . . . . . . . . . . . . . . . . . . . . . . . . . . . . . . . . . . . . . . . . . . . . . . . . . . . 5
2.3
Display symbols . . . . . . . . . . . . . . . . . . . . . . . . . . . . . . . . . . . . . . . . . . . . . . . . . . . . . . . . . . . . . . . . . . . . . . . . . . . . . . . 5
3. More features of living eco®
3.1
Adjusting the temperature . . . . . . . . . . . . . . . . . . . . . . . . . . . . . . . . . . . . . . . . . . . . . . . . . . . . . . . . . . . . . . . . . . . . 7
3.2
Frost protection, 6°C . . . . . . . . . . . . . . . . . . . . . . . . . . . . . . . . . . . . . . . . . . . . . . . . . . . . . . . . . . . . . . . . . . . . . . . . . . . 7
3.3Programmes . . . . . . . . . . . . . . . . . . . . . . . . . . . . . . . . . . . . . . . . . . . . . . . . . . . . . . . . . . . . . . . . . . . . . . . . . . . . . . . . . . 7
3.4
Selecting the programme . . . . . . . . . . . . . . . . . . . . . . . . . . . . . . . . . . . . . . . . . . . . . . . . . . . . . . . . . . . . . . . . . . . . . 8
3.5
Adjusting the setback period in programme P1 or P2 . . . . . . . . . . . . . . . . . . . . . . . . . . . . . . . . . . . . . . . . . . . 8
3.6
Deleting a setback period . . . . . . . . . . . . . . . . . . . . . . . . . . . . . . . . . . . . . . . . . . . . . . . . . . . . . . . . . . . . . . . . . . . . . 9
3.7
Creating a new setback period in P1 or P2 . . . . . . . . . . . . . . . . . . . . . . . . . . . . . . . . . . . . . . . . . . . . . . . . . . . . . . 9
3.8
Travel programme . . . . . . . . . . . . . . . . . . . . . . . . . . . . . . . . . . . . . . . . . . . . . . . . . . . . . . . . . . . . . . . . . . . . . . . . . . . . 10
3.9
Function menu . . . . . . . . . . . . . . . . . . . . . . . . . . . . . . . . . . . . . . . . . . . . . . . . . . . . . . . . . . . . . . . . . . . . . . . . . . . . . . 11
3.10 Installation mode . . . . . . . . . . . . . . . . . . . . . . . . . . . . . . . . . . . . . . . . . . . . . . . . . . . . . . . . . . . . . . . . . . . . . . . . . . . . 11
3.11 Temperature limit . . . . . . . . . . . . . . . . . . . . . . . . . . . . . . . . . . . . . . . . . . . . . . . . . . . . . . . . . . . . . . . . . . . . . . . . . . . . 11
3.12 Setting the time . . . . . . . . . . . . . . . . . . . . . . . . . . . . . . . . . . . . . . . . . . . . . . . . . . . . . . . . . . . . . . . . . . . . . . . . . . . . . . 11
3.13 Child lock . . . . . . . . . . . . . . . . . . . . . . . . . . . . . . . . . . . . . . . . . . . . . . . . . . . . . . . . . . . . . . . . . . . . . . . . . . . . . . . . . . . . 11
3.14 Replacing the batteries . . . . . . . . . . . . . . . . . . . . . . . . . . . . . . . . . . . . . . . . . . . . . . . . . . . . . . . . . . . . . . . . . . . . . . . 12 3.15 Open window function . . . . . . . . . . . . . . . . . . . . . . . . . . . . . . . . . . . . . . . . . . . . . . . . . . . . . . . . . . . . . . . . . . . . . . . 12
3.16 Reset to factory settings . . . . . . . . . . . . . . . . . . . . . . . . . . . . . . . . . . . . . . . . . . . . . . . . . . . . . . . . . . . . . . . . . . . . . . 12
4.
Technical settings
4.1
Advanced menu . . . . . . . . . . . . . . . . . . . . . . . . . . . . . . . . . . . . . . . . . . . . . . . . . . . . . . . . . . . . . . . . . . . . . . . . . . . . . .13
4.2
Deactivating automatic daylight saving time . . . . . . . . . . . . . . . . . . . . . . . . . . . . . . . . . . . . . . . . . . . . . . . . . . 13
4.3
Adjusting to radiator/room . . . . . . . . . . . . . . . . . . . . . . . . . . . . . . . . . . . . . . . . . . . . . . . . . . . . . . . . . . . . . . . . . . . 13
4.4
Deactivating intelligent control . . . . . . . . . . . . . . . . . . . . . . . . . . . . . . . . . . . . . . . . . . . . . . . . . . . . . . . . . . . . . . . 13
4.5
Technical specifications . . . . . . . . . . . . . . . . . . . . . . . . . . . . . . . . . . . . . . . . . . . . . . . . . . . . . . . . . . . . . . . . . . . . . . . 14
5. Safety precautions . . . . . . . . . . . . . . . . . . . . . . . . . . . . . . . . . . . . . . . . . . . . . . . . . . . . . . . . . . . . . . . . . . . . . . . . . . . . . . . . . . 15
6. Removing living eco® . . . . . . . . . . . . . . . . . . . . . . . . . . . . . . . . . . . . . . . . . . . . . . . . . . . . . . . . . . . . . . . . . . . . . . . . . . . . . . . 15
7. Disposal . . . . . . . . . . . . . . . . . . . . . . . . . . . . . . . . . . . . . . . . . . . . . . . . . . . . . . . . . . . . . . . . . . . . . . . . . . . . . . . . . . . . . . . . . . . . 15
Danfoss Heating Solutions
VIIDB102
01/2013
3
Installation and User Guide
living eco® Electronic Radiator Thermostat
1. Installation
1.1 In the package
living eco® is supplied with adapters for Danfoss RA valves and valves with M30 x 1.5 (K) connections, two alkaline AA batteries and a 2 mm Allen key.
1.2 Inserting the batteries
Remove the battery cover and insert the two batteries. Make sure the batteries are correctly
oriented.
1.3 Setting the time and date when you start using living eco®
Once the batteries are installed
The time will flash on the display - 23:59.
Set the time
Set hours using
Set min. using
Set date
Set date using
and press .
Format: day/month/year (DD/MM/YYYY)
Confirm setting
When
and press .
and press .
flashes, press
to confirm.
1.4 Installing living eco®
M must be flashing on the display prior to installing. If not, see Installation mode on page 11.
1. Start by mounting the adapter.
RA
K
2. Tighten RA adapter using the 2 mm Allen key.
Hand-tighten K adapter (max. 5 Nm).
3. Screw the thermostat onto the adapter and tighten by hand
(max. 5 Nm).
4. Press
for approx. 3 seconds to enter the function menu.
5. A small M flashes, press
4
01/2013
to fix the thermostat.
VIIDB102
Danfoss Heating Solutions
Installation and User Guide
living eco® Electronic Radiator Thermostat
2. Getting started with living eco®
2.1 Thermostat display
The black dashed circle on the display shows a 24-hour dial. The black segments represent periods of comfort
temperature, 21°C (default setting), and the ‘empty’ segments represent setback periods, where the temperature is 17°C (default setting). The display also shows the set temperature and current program.
24
P1
24-hour dial
Half hour segments
Shows the program the thermostat
is running (e.g. P1).
Setback period
22:30 - 06:00 hrs, 17°C
Fr
18
6
Weekday
Programmed temperature
Battery symbol
12
Flashes at the current time
2.2 Thermostat buttons
The thermostat has two arrow buttons
which allow you
to navigate the display, menus and set the temperature.
Use
to select and confirm.
2.3 Display symbols
Symbols flash when they can be activated.
Programme Menu
P0
Programme with no automatic temperature reduction – maintains a constant temperature all day and
night. You select the temperature.
P1
Saving programme which lowers the temperature to 17°C at night (22:30 - 06:00 hrs).
Saving programme is configurable.
P2
Extended saving programme which lowers the temperature to 17°C at night (22:30 - 06:00 hrs), and
during the day on weekdays (08:00 - 16:00 hrs).
Saving programme is configurable.
Travel programme which lowers the temperature when you are away.
You select the period and the temperature.
Danfoss Heating Solutions
VIIDB102
01/2013
5
Installation and User Guide
living eco® Electronic Radiator Thermostat
Function Menu
M
Installation mode (see page 11).
Child lock.
MAX
MIN
Set the max and min temperature range.
Set time and date.
Other Symbols
Back.
Confirm selection.
Battery symbol (indicates low battery).
Period setting for the travel programme.
6
01/2013
VIIDB102
Danfoss Heating Solutions
Installation and User Guide
living eco® Electronic Radiator Thermostat
3. More features of living eco®
3.1 Adjusting the temperature
Set the desired temperature by pressing
Default setting is 21°C.
.
This also allows the temperature to be changed temporarily during a setback period, without having to change the program or period.
24
P1
Fr
18
6
12
If the comfort temperature is changed, e.g. from 21°C to 22°C, living eco® will remember this change, and the
comfort temperature will remain 22°C after the next setback period.
3.2 Frost protection, 6⁰C
This symbol is displayed if you set the thermostat to its lowest setting. This
means that the thermostat will maintain a constant temperature of 6 °C in
the room, ensuring frost protection.
24
6
18
12
3.3 Programmes
When you start using the thermostat it is set to use program P1. You can select the programme which
best matches your family’s requirements.
P0: Constant temperature of 21°C
all day and night.
Danfoss Heating Solutions
P1: One setback period at 17°C every
night from 22:30 - 06:00 hrs.
VIIDB102
P2: Two setback periods at 17°C every
night from 22:30 - 06:00 hrs and all
weekdays from 08:00 - 16:00 hrs.
01/2013
7
Installation and User Guide
living eco® Electronic Radiator Thermostat
3.4 Selecting the programme
Select programme menu
If the display is off, press .
Then press
briefly to open the programme menu.
Selecting the programme
(P0, P1 or P2)
Switch between programmes using
Select using .
Confirm setting
When
flashes, press
.
to confirm.
3.5 Adjusting the setback period in programme P1 or P2
The thermostat default setting is one setback period for P1 and two setback periods for P2. You can adjust the
setback periods so they match your family’s requirements.
When living eco® is set to change from 17°C to 21°C, e.g. at 06.00 hrs, the thermostat will learn when to start
heating in order for the temperature to reach 21°C at 06.00 hrs.
Select programme menu
If the display is off, press
programme menu.
Select programme
(P1 or P2)
Press
press
Weekdays for setback
period
to activate. Then press
briefly to open the
to highlight the desired programme. When the programme flashes,
to select it.
Mo
Tu
We
Th
Fr
Sa
Su
Monday
Tuesday
Wednesday
Thursday
Friday
Saturday
Sunday
You can select to adjust the setback period for the weekend, all weekdays, or
a single day.
Use
to select the desired period.
When the desired period flashes, press
to select it.
Setback period interval
You are using
to move around the 24-hour dial. For example when moving from one setback period to the next setback period.
Use
to move between the start and stop times. The time flashes slowly
when it can be selected. Select time using .
Once the time has been selected it flashes faster to indicate it can now be
adjusted.
Set the start and stop time using
. Once the time is chosen, confirm using
.
Change temp. if required
The temperature now flashes. Set the temperature using
. Once the desired temperature is chosen, confirm using .
now flashes.
(If you do not wish to change the setback period, press so that the symbol
flashes, and then select using . You will be returned to the weekdays for setback
period selection menu).
Press
to approve the entire setback period.
Confirm setback period
8
01/2013
flashes. Press
to run the selected programme.
VIIDB102
Danfoss Heating Solutions
Installation and User Guide
living eco® Electronic Radiator Thermostat
3.6 Deleting a setback period
You can delete a setback period by minimising it to half an hour. All segments on the timer dial will then become black.
Example
In this example the setback period is Monday, 08.30-16.00
hrs.
To cancel the setback period, set the start time to 15.30 hrs.
Select programme menu
If the display is off, press
programme menu.
Select programme
(P1 or P2)
Press
press
Select setback period
Cycle through the weekdays using
. When the day(s) you wish to change
flashes, press
. Cycle through the 24-hour dial using
.
When the start of the setback period you wish to delete flashes slowly, press
to select it.
Clear setback
period interval
Use to set the start time so the setback period is half an hour. Once you
have changed the start time, press .
Confirm deletion
to activate. Then briefly press
to open the
to highlight the desired programme. When the programme flashes,
to select it.
now flashes. Press
to approve. You have now deleted the setback period.
3.7 Creating a new setback period in P1 or P2
living eco® also allows you to create your own setback periods in P1 or P2. You can create up to three setback
periods each day.
Select programme menu
If the display is off, press
programme menu.
Select programme
(P1 or P2)
Press
press
Weekdays for setback
period
to activate. Then briefly press
to open the
to highlight the desired programme. When the programme flashes,
to select it.
Mo
Tu
We
Th
Fr
Sa
Su
Monday
Tuesday
Wednesday
Thursday
Friday
Saturday
Sunday
You can select to adjust the setback period for the weekend, all weekdays, or a
single day. Use
to find the desired period.
When the desired period flashes, press
to select it.
Setback period interval
To add another setback period, use
to move around the 24-hour dial to
find and select the new start time.
Disregard existing setback periods, just move ahead with
to choose your
new setback period.
Confirm the start time by pressing .
The stop time now flashes. Set the stop time using
.
Once the time is chosen, confirm using .
Change temp. if required
The temperature now flashes. Set the temperature using
using .
Danfoss Heating Solutions
VIIDB102
, and confirm
01/2013
9
Installation and User Guide
Confirm setback period
living eco® Electronic Radiator Thermostat
continues flashing.
(If you do not wish to create a new setback period, press so that the symbol
flashes, and then select using . You will be returned to the weekdays for setback
period selection menu).
Press
to approve the entire setback period.
3.8 Travel programme
The travel programme helps you save energy by reducing the temperature when you are away from home.
Simply enter the period of time you will be away, and living eco® will ensure your normal operating programme
is resumed when you return, so you arrive into a warm house.
Select programme menu
If the display is off, press
programme menu.
Select programme
Select
Set departure date
Set departure date using
Set return date
Set return date using
Change temp. if required
Press
Confirm setting
When flashes, press
to confirm is now displayed.
When the departure date arrives, the following is displayed:
temperature.
by pressing
to activate. Then briefly press
to open the
until the suitcase flashes. Select using
. Confirm using
. Confirm using
.
.
.
to change the temperature (default is 17°C). Confirm using
.
, set period and
Early return
Select programme menu
If the display is off, press
menu.
to activate. Press
Select programme
Select programme (P0/P1/P2) using
briefly to open programme
. Confirm using
.
Changing an existing travel period
Select programme menu
If the display is off, press
menu.
Select programme
Select
Select
Change travel period
Change the period by pressing
Change temp. if required
Press
Confirm setting
Confirm using
by pressing
by pressing
to activate. Press
briefly to open programme
until the suitcase flashes. Select using
until the clock flashes. Select using .
. Select using
.
.
to change the temperature. Confirm using
.
.
Cancelling set travel period
10
Select programme menu
If the display is off, press
menu.
Select programme
Select
Select off
Select OFF using
Confirm setting
Confirm using
01/2013
by pressing
to activate. Press
briefly to open programme
until the suitcase flashes. Select using
.
.
.
VIIDB102
Danfoss Heating Solutions
Installation and User Guide
living eco® Electronic Radiator Thermostat
3.9 Function menu
M
Installation mode. Always activate installation mode when installing/removing the thermostat.
The thermostat may be irreparably damaged if not in the correct position during installation.
Child lock - allows the buttons to be locked so your settings cannot be changed.
MAX
MIN
Temperature limit - allows you to change the thermostat’s temperature range, so you decide what
the max and min temperature should be. This is useful, for example, in rooms with public access.
Set time and date - allows the time and date to be changed after the thermostat is in use.
3.10 Installation mode
Select function menu
Press and hold
for 3 sec.
Activate installation mode
Select M using
. M flashes, press . Now a large M is flashing in the display. The mode is activated and living eco® can be mounted.
Deactivate installation mode
Press and hold
for 3 sec. M flashes, press
Select function menu
Press and hold
for 3 sec.
Select max/min
Select max/min using
. Press
. Press
to approve.
to deactivate.
3.11 Temperature limit
. Set the max and min temperature using
3.12 Setting the time
The thermostat automatically changes to/from daylight saving time.
Select function menu
Press and hold
for 3 sec.
Select clock
Select
using
. Press
using
.
. Set time and date using
. Select and confirm
3.13 Child lock
Select function menu
Press and hold
for 3 sec.
Activate child lock
Select
. Press
Deactivate child lock
Deactivate the child lock by pressing all three buttons
ously for at least 5 sec.
Danfoss Heating Solutions
using
VIIDB102
to activate the child lock.
simultane-
01/2013
11
Installation and User Guide
living eco® Electronic Radiator Thermostat
3.14 Replacing the batteries
Remove the battery cover and insert two alkaline AA batteries. Make sure the batteries are
correctly oriented.
Rechargeable batteries may not be used.
Programme settings are preserved. Time and date settings are reset after 2 minutes and must then be reentered.
3.15 Open window function
If the thermostat detects a dramatic drop in temperature, for example due to an open window, it reacts by shutting off the heat. The thermostat returns to its original setting after half an hour, or when the window is closed.
3.16 Reset to factory settings
Remove the battery cover and take out one battery. Press and hold
the battery.
12
01/2013
VIIDB102
for approx. 5 seconds, while reinserting
Danfoss Heating Solutions
Installation and User Guide
living eco® Electronic Radiator Thermostat
4. Technical Settings
4.1 Advanced menu
dS
Deactivate/activate automatic daylight saving time.
Pb
Adjust to radiator/room
Fo
Deactivate/activate intelligent control (forecast)
Or
Information about horizontal or vertical orientation (0 = horizontal, 90 = vertical)
4.2 Deactivating automatic daylight saving time
Select function menu
Press and hold
Select advanced menu
Press both buttons
Select dS
Select dS by pressing . Confirm using
Deactivate feature
Press , 0 flashes. Confirm using
for 3 sec.
flashes.
for 3 sec.
. 1 flashes.
.
1 = automatic daylight saving time (default setting).
0 = no automatic change.
4.3 Adjusting to radiator/room
2 is the factory setting.
1 is used if the radiator appears oversized for the room.
3 is used if the radiator appears undersized for the room.
Select function menu
Press and hold
Select advanced menu
Press both buttons
Select Pb
Select Pb by pressing . Confirm using
Select adjustment
Select 1, 2 or 3 using
for 3 sec.
flashes.
for 3 sec.
.
. Confirm using
.
The frequency of heat adjustment varies for 1, 2 and 3.
4.4 Deactivating intelligent control
The thermostat’s intelligent control (forecast) ensures that the desired temperature is reached by a given time.
Select function menu
Press and hold
Select advanced menu
Press both buttons
Select Fo
Select Fo by pressing . Confirm using
Deactivate forecast
1 flashes. Select 0 using . Confirm using
for 3 sec.
flashes.
for 3 sec.
.
.
1 = forecast is activated (default setting).
0 = forecast is deactivated.
Danfoss Heating Solutions
VIIDB102
01/2013
13
Installation and User Guide
living eco® Electronic Radiator Thermostat
4.5 Technical specifications
Actuator type
Electromechanical
Software classification
A
Automatic action
Type 1
Recommended use
Residential (pollution degree 2)
Open window function
Yes
Mechanical strength
70 N (max. force from valve)
Maximum water temperature
90°C
Movement type
Linear
Battery life
2 years
Spindle movement
2-3 mm on the valve
Maximum extension
4.5 mm
Frequency
Measures temp. every minute
Speed of adjustment
1 mm/s
Power supply
2 x 1.5V AA alkaline, class III (SELV)
Power consumption
3 μW in standby, 1.2 W in active state
Operating temperature
0 to 40°C
Transportation temp. range
-20 to 65°C
Temperature setting range
6 to 28°C
Time keeping accuracy
+/- 10 min/year
Clock setting accuracy
+/- 1 min
Size (mm)
L: 91 Ø: 51 (RA)
Ball pressure test
75°C
Weight
177 g (RA)
IP class*
20
* The thermostat should not be used in hazardous installations or in places where it may be exposed to water.
14
01/2013
VIIDB102
Danfoss Heating Solutions
Installation and User Guide
living eco® Electronic Radiator Thermostat
5. Safety precautions
The thermostat is not intended for children and must not be used as a toy.
Do not leave packaging materials where children may be tempted to play with them, as this is extremely
dangerous.
Do not attempt to dismantle the thermostat as it contains no user-serviceable parts. If error code E1, E2 etc. is
shown in the display or other defects appear, please return the thermostat to the distributor.
6. Removing living eco®
To remove the thermostat, insert a suitable tool such as an Allen key through the hole in the
battery chamber and into the hole in the black ring behind this. Keeping the tool in position,
turn the entire thermostat anticlockwise until it is completely free of its mounting.
The thermostat must be set to installation mode before removal (see page 11).
7. Disposal
The thermostat must be disposed of as electronic waste.
Danfoss Heating Solutions
VIIDB102
01/2013
15
Installation and User Guide
living eco® Electronic Radiator Thermostat
Danfoss A/S
Haarupvaenget 11
DK-8600 Silkeborg
Denmark
Phone: +45 7488 8000
Fax: +45 7488 8100
Homepage: www.danfoss.com
VIIDB102
Produced by Danfoss A/S © 01/2013