1
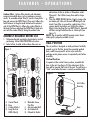
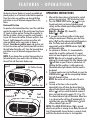
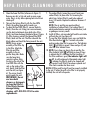
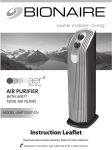
pure indoor living
AIR CLEANER
with
™
filter series
série de filtres
MC
MODELS: BAP529/531 Series
Instruction Leaflet
Read instructions before operating. Retain for future reference.
Questions? Comments? Call 1-800-253-2764 in North America
or visit our website at www.bionairecanada.com.
IMPORTANT SAFEGUARDS
When using electrical appliances, basic safety precautions
should always be followed to reduce the risk of fire,
electric shock, and injury to persons. These precautions
include:
1. Read all instructions before using the appliance.
2. To avoid fire or shock hazard, plug the appliance
directly into a 120V AC electrical outlet.
3. If the filter is covered by a bag when shipped,
remove plastic bag before use.
4. Keep the cord out of heavy traffic areas. To avoid
fire hazard, NEVER put the cord under rugs, near
heat registers, radiators, stoves, or heaters.
5. To protect against electrical hazards, DO NOT
immerse the appliance in water or other liquids. Do
not use near water.
6. Close supervision is necessary when any appliance is
used by or near children, or disabled persons.
7. Always unplug the air purifier before moving or
cleaning the unit, opening the grill, changing the
filters and whenever the unit is not in use. To
disconnect the unit, be sure to pull the plug and not
the cord.
8. NEVER drop or insert any objects into the openings of
the unit.
9. DO NOT operate any appliance with a damaged cord
or plug.
10. If the motor fan fails to operate or the unit has been
dropped or damaged in any manner, return
appliance to manufacturer for examination.
11. Use appliance only for intended household use as
described in this manual. Any other use not
recommended by the manufacturer may cause fire,
electric shock, or injury to persons. The use of
attachments may cause hazards and is not
recommended or sold by Jarden Consumer Solutions.
12. DO NOT use outdoors.
13. NEVER place on a soft surface such as a bed or sofa
as this could cause the unit to tip over and block the
air inlet or outlet grills.
14. Keep unit away from heated surfaces and open
flames.
15. DO NOT attempt to repair or adjust any electrical or
mechanical functions on this unit. Doing so will void
your warranty.
16. DO NOT place anything on top of unit.
17. NEVER use detergents, gasoline, glass purifier,
furniture polish, paint thinner, or other household
solvents to clean any part of the appliance.
18. Always turn the appliance off before unplugging it.
19. The ionizer in this appliance produces less ozone than
the UL established limits of 50ppb (parts per billion).
However, in high concentrations, ozone can be
harmful to birds and small pets. To prevent ozone
buildup, we suggest using the ionizer in well
ventilated areas with the fan on.
20. This appliance should only be used in a room with
temperatures between 40° F and 110° F.
21. WARNING: To reduce the risk of fire or electric
shock, DO NOT use this appliance with any solid-state
speed control device.
PLEASE READ AND SAVE
THESE IMPORTANT
SAFETY INSTRUCTIONS
THIS APPLIANCE HAS A POLARIZED PLUG (one blade is wider than the
other). To reduce the risk of electric shock, this plug is intended to fit in a
polarized outlet only one way. If the plug does not fit fully in the outlet,
reverse the plug. If it still does not fit, contact a qualified electrician to
install the proper outlet.
DO NOT ATTEMPT TO MODIFY THIS PLUG OR DEFEAT THIS
SAFETY FEATURE IN ANY WAY.
FEATURES
CORD SAFETY
• The length of cord used on this appliance was
selected to reduce tangling or tripping hazards.
• If a longer cord is necessary, an approved extension
cord may be used. The electrical rating of the
extension cord must be equal to or greater than the
electrical rating of the air purifier (see rating label
marked on bottom of the product).
• Care must be taken to arrange the extension cord so
that it will not drape over the countertop or tabletop
where it can be pulled on by children or accidentally
tripped over.
IONIZER
This appliance has an optional ionizer feature which,
when turned on, releases negative ions into outgoing
filtered air to help the air purification process.
What Are Ions?
Ions are tiny particles that carry a positive or negative
charge. They exist naturally around us: in the air, water,
and ground. Both positive and negative ions are
colourless, odour, and harmless.
How Does The Ionizer Work?
Negative ions help air purification by attaching
themselves to very small airborne particles in the room.
These particles take on a negative charge and may join
with positively charged particles such as dust, pollen,
smoke, and pet dander to form larger particles. These
larger particles are then more easily captured by the
filter system.
Important Notes:
Your ionizer may produce an occasional popping or
cracking sound. This is normal and occurs when a small
buildup of ions is discharged.
After extended use, you may notice dust around the grills
or rear panel. This is caused by negative ions exiting the
air outlet, evidence of the ionizer’s air cleaning
effectiveness. Follow the cleaning and maintenance
instructions for appropriate cleaning method.
Larger particles may be attracted to positively charged
surfaces throughout the home, like walls or floors.
This may occur more frequently when the filter has
captured excessive amounts of particulates and needs to
be cleaned.
To help prevent particles from attracting to surfaces
throughout your home:
• You may want to run the ionizer less often.
• Check the condition of the filter more frequently.
CAUTION: The ionizer in this appliance produces less
ozone than the UL established limits of 50ppb. However,
in high concentrations, ozone can be harmful to birds and
small pets. To prevent ozone buildup, we suggest using
the ionizer in well ventilated areas with the air purifier
fan on.
TURBO, HIGH, MEDIUM, LOW AND
QUIET SETTINGS
For optimum air filtration, operate your air purifier
continuously on the MEDIUM (2) setting. For quieter
operation (such as in a bedroom), select the QUIET ( )
setting. When high levels of air pollution are present,
select the HIGH (3) or TURBO ( ) setting to quickly
circulate and filter the air in the room.
4-STAGE AIR PURIFICATION SYSTEM
Your air purifier uses a four-stage air purification system
to help purify the air that passes through the filters (see
Figure 1):
Anti-microbial Grill - The plastic infused with
antimicrobial additive to create a protective barrier
against odour causing bacteria.
Washable Foam Pre-filter – The pre-filter captures
larger particles, thus extending the period between
cleaning of the HEPA filter.
Long life True HEPA filter - Long life True HEPA filter
removes up to 99.97% of smaller visible and non-visible
particles, as small as 0.3 microns in size, from the air
passing through it. The long life filter allows for easy
maintenance and eliminates the hassle of filter
replacement.
FEATURES - OPERATIONS
Carbon Filter - Carbon filter absorbs and eliminates
common household odour, such as garbage or nursery
smells. To assemble carbon filter(s), remove from plastic
bag and remove the HEPA filter(s) from unit. Adhere the
hook fastener to the glue bead located on the exhaust
side of the HEPA filter(s). Adhere the carbon filter(s) to
the hook fastener and place the HEPA filter(s) back into
unit with the carbon filter(s) facing the exhaust side.
ASSEMBLY REQUIRED BEFORE USE
1. Determine desired orientation: horizontal or vertical
positioning. Follow DUAL POSITION instructions.
2. Select a firm, leveled surface where there are no
A
H
A
DUAL POSITION
This air purifier is designed as multi-positional. Carefully
unpack your Air Purifier, locate the separately packed
base, small base cap and 4 suction cups inside the
package carton, please ensure to unpack all parts before
assembly.
Vertical Position
To operate in the vertical tower position, assemble the
base to the unit (see Figure 2). The widest part of the
base will be towards the front of the unit. You will hear a
“click” sound when the base is securely assembled with
Figure 1
B
obstructions to the air intake or filtered air outlet.
Place unit 1 foot (30cm) away from wall or large
objects.
3. Press the DOOR RELEASE button ( ) to remove the
air intake grill, take out the anti-microbial grill and
check if any filter is covered by a plastic bag. If it is,
remove plastic bag before use. Attach the carbon
filter(s) onto the long life true HEPA filter(s). Reinstall
all filters and grill and then the air intake grill (see
Figure 1).
NOTE: The air purifier will NOT operate unless the air
intake grill is properly installed on unit.
C
D
E
F
G
Figure 2
Vertical
H
Air Purifier
Housing
B
A.
B.
C.
D.
Control Panel
Base
Carbon Filter(s)
Long life True
HEPA Filter(s)
E. Washable Foam
Pre-filter
F. Anti-microbial Grill
G. Air Intake Grill
H. Filtered Air Outlet
Base
FEATURES - OPERATIONS
the housing. Ensure the base is securely assembled and
placed properly on a firm level surface before operation.
Store the suction cups and base cap along with these
instructions in case of alternate usage position in the
future.
Horizontal Position
To operate in the horizontal position, insert the small base
cap into the opposite side of the control panel (see Figure
3). Locate 4 suction cup feet. Position the air purifier so
that the air intake is facing you and the control panel is
to your left. Ensure the surface of the air purifier is free
from oil. Lightly dampen the suction cup surface with
water and attach suction cups evenly as shown in
Figure 4. Turn the air purifier over, and position unit
to sit on the suction cup feet (control panel will now be to
the right when facing the unit). Store the base and these
instructions in case of alternate usage position in the
future.
NOTE: If you change from a vertical tower position to a
horizontal position, you need to take out the base from
the unit first and then insert the base cap.
Figure 3
Horizontal
Small Base Cap
Air Intake Grill
Figure 4
Air Intake Grill
Air Purifier Housing
Suction
Cups
Small
Base Cap
OPERATING INSTRUCTIONS
1. After unit has been setup in a horizontal or vertical
position, plug unit into a 120V AC electrical outlet.
) to cycle
2. Press the POWER/SPEED button (
through and select your desired operating speed
setting, and the selected speed setting indicator light
will illuminate in blue:
High (3) - Medium (2) - Low (1) Quiet ( ) - Off
3. If you want to run the air purifier at turbo speed
setting for maximum air filtration, press the Turbo
button ( ) and the indicator light will illuminate in
blue. The Turbo mode will activate the IONIZER
automatically, and the IONIZER indicator light ( )
will illuminate in blue.
4. For optimum air filtration, it is recommended to
operate the air purifier continuously. Its rugged
motor has been designed to give many years of use.
NOTE: When the unit is plugged in and the air
intake grill is closed properly, the Filter Indicator light
( ) will blink in green 3 times to indicate that it is
checking the filter condition. A solid continuously
illuminated amber light indicates the filter needs to
be cleaned.
5. To release negative ions into the filtered air, press the
IONIZER button ( ) and the corresponding indicator
light will illuminate in blue.
NOTE: The ionizer will not work unless the unit is
running.
6. You may set the timer so the air purifier
automatically turns off when the desired time has
elapsed. Select desired speed, then press the TIMER
button ( ) until you reach the desired number of
hours you want the unit to operate (2, 4, 8 or 12).
The selected indicator light will illuminate. When time
is up, the air purifier will turn off automatically. To
cancel the timer, press the TIMER button ( ) until
all hour indicator lights are off.
NOTE: If the DOOR RELEASE button ( ) is pressed
when the air purifier is running at any mode, the unit will
shut off automatically. Ensure the door is properly closed,
and follow the above instructions to start operation.
CLEANING/MAINTENANCE
HEPA FILTER CLEANING INSTRUCTIONS
CLEANING/MAINTENANCE
INSTRUCTIONS
HEPA FILTER CLEANING INSTRUCTIONS
The Long Life True HEPA filter(s) are designed to last for
up to 2 years. For Allergy sufferers we recommend
IMPORTANT:
replacing the filter after 6-8 cleanings for maximum
• DO NOT attempt to wash and re-use the Carbon
effectiveness. Every few months, check the condition of
filter(s). The Carbon filter(s) (AOR31) can last
the filter. Filter life may vary, depending on air quality
between 3-4 months. and can be purchased by calling and usage. After approximately 3 months of operation, a
1 800 253-2764. Using the hook fastener to
Filter Indicator Light ( ) will alert you to clean the
assemble carbon filter to the exhaust side of the
filter(s). Use vacuum cleaner to clean the filter(s) before
HEPA filter (see figure 1).
further use. Every 6 months, vacuum clean and rinse the
1. Turn the air purifier off and unplug it before
filter(s) under water. Air dry the filter(s) for
cleaning.
approximately 24 hours before re-installing back to the
2. The outside of the air purifier can be cleaned with a
air purifier. Ensure the filters are completely dry before
soft, clean damp cloth.
operation.
3. The air intake grill, the anti-microbial grill (not
To clean your filter(s):
dishwasher safe) and the Washable Foam Pre-filter
1. Turn off and unplug the air purifier before replacing
(reference Fig. 1) can be removed and washed in
the filters.
warm soapy water. Dry before replacing in the unit.
2. Press the DOOR RELEASE button ( ) and remove
4. The filtered air outlet can be cleaned of dust with a
the air intake grill.
small, soft brush.
3. Detach the centre grill (Figure 1 Part F) from the
5. If you wish to clean the inside of the air purifier,
door frame by pulling it away at the fasteners.
please only use a dry, soft cloth to wipe it down.
Remove the foam pre filter from the door assembly.
6. NEVER use detergents, gasoline, glass cleaner,
Rinse the air intake grill with water. Dry and reinstall
furniture polish, paint thinner or other household
onto door frame by aligning fasteners and snap into
solvents to clean any part of the air purifier.
place.
WARNING: Do not allow moisture to come in contact
with the main housing of the air purifier.
Filters can be purchased at a retailer near you, by calling 1 800 253-2764.
Air Purifier
Filter Quantity
Model Number
Needed
BAP529
BAP531
Compatible with all
filter models below
Filter Description
1
BAPF300AL-CN
Long Life Allergen Filter
1
AOR31
Carbon Filter
1
166790
Washable Foam Pre-filter
2
BAPF300AL-CN
Long Life Allergen Filter
2
AOR31
Carbon Filter
1
166789
Washable Foam Pre-filter
HEPA FILTER CLEANING INSTRUCTIONS
4. Clean the Foam Pre-filter (reference to Figure 1).
Remove any dust or lint and wash in warm soapy
water. Rinse, air dry before placing back into the air
intake grill.
5. Take out the Carbon filter(s) with the True HEPA
filter(s) by pulling them gently towards you.
6. To clean the True HEPA filter(s), remove the dirty
filter(s) from the unit. Using your vacuum cleaner,
run the brush attachment along both sides of the
filter(s) and clean between the pleated layers (Figure
5). After cleaning, reinstall the cleaned True HEPA
filter(s) back into the unit. The filter side with the
black rubber seal should be facing towards the unit.
NOTE: Ensure proper
Figure 5
assembly of the filter clip
to the filter. Attach the
filter clip and filter
assembly to the air
purifier hang tabs. Make
sure the hang tab is
securely in place. Align
the clip on the side of the
true HEPA filter with the
rails on the inside of the
unit. Gently slide the filter
onto the rail (see Figure
6). The arrows should
point towards the unit.
IMPORTANT: Do not
use household
cleaners or detergents
to clean the filter(s).
Figure 6
If the filter(s) become
damaged during
cleaning, call 1-800-253-2764 to order
replacements.
7. The carbon filter(s) cannot be re-used. Insert new
carbon filter(s) in place after first removing the
plastic bag. Carbon filter(s) need to be replaced
every 3-4 months. Replace the adhesive fasteners if
needed.
NOTE: The air purifier can operate without
installation of carbon filter(s), but carbon filter(s)
absorb and eliminate common household odour, such
as garbage or nursery smells.
8. Install all filters, anti-microbial grill and the air intake
grill onto the unit (see Figure 3).
9. To reset the Filter Indicator timer, press and hold the
Filter Reset button ( ) for 3 seconds only under
working mode when unit is powered on. The Indicator
light ( ) will blink in green 3 times and go off, and
reset the Filter Indicator timer.
10. NOTE: Every time you plug in the air purifier, the
Filter Indicator light ( ) will blink in green 3 times
to indicate that it is checking the filter condition. If
the filter condition is good, the indicator light will
go off. A solid continuously illuminated amber light
( ) indicates the filter(s) need to be cleaned and
will remain lit until filter(s) have been replaced and
filter check reminder has been reset.
NOTE: All filters and front grill must be properly installed
to the unit. If either the grill or the filter is not properly
installed, the unit will not operate.
TROUBLESHOOTING
TROUBLESHOOTING
Problem
Solution
• Unit will not operate.
4 Check if unit is properly plugged in and outlet is energized.
4 Make sure unit is turned ON.
4 Make sure filters are properly installed using the correct orientation of the
filter clip(s).
4 Make sure the front air intake grill is assembled and closed completely.
• Decreased air flow.
4 Make sure nothing is blocking air inlet and filtered air outlets.
4 Check condition of the filters and replace if necessary.
4 Check Filter(s) to remove any plastic wrapping/packaging.
• Excessive Noise.
4 Make sure parts are firmly positioned in place.
4 Open the air intake grill, and make sure that any plastic packaging was
removed from the filters, if applicable.
4 Make sure air cleaner is placed at least 1 foot (30cm) away from wall or
large objects.
• The filter check indicator
will not reset.
4 Check condition of the filters and replace if necessary.
4 Press and hold the Filter Reset Button for 3 seconds under power on condition
(with fan running). The indicator light will blink 3 times and turn off.
Long Life Allergen Filter
Congratulations! Your new air cleaner is equipped with the Long Life Allergen Remover.
Filter Type
Technology
Consumer Benefit
99.97% True HEPA technology.
Helps remove up to 99.99% of particles
passing though the filter such as pollen,
dust, mold and dander.
Ideal for allergy sufferers.
Replaceable Total Air
99% HEPA-Type technology.
Infused with Arm & Hammer® baking soda.
Ideal for dust reduction.
Delivers 30% better air quality.
Replaceable Odour Eliminator
10 times the odour fighting power.
Contains Arm & Hammer® baking soda,
carbon and zeolite for odour control.
Ideal for eliminating odours from
pets, tobacco smoke and cooking
fumes.
Replaceable Allergen Remover
99.97% True HEPA technology.
Removes up to 99.97% of particales
passing through the filter such as pollen,
dust, mold and dander.
Ideal for allergy sufferers.
Replaceable Germ Fighter with
Allergen Remover
99.97% True HEPA technology.
Infused with silver technology.
Helps reduce viruses and bacteria as
well as ideal for allergy sufferers.
THIS UNIT
COMES
WITH
Long Life
Allergen Filter
LEARN MORE
For a wealth of information about your air cleaner and other Bionaire® products, visit our website at
www.bionairecanada.com or call 1-800-253-2764.
© 2014 Sunbeam Products, Inc. doing business as Jarden Consumer Solutions. All rights reserved. Imported and
distributed by Sunbeam Corporation (Canada) Limited doing business as Jarden Consumer Solutions, 20B Hereford
Street, Brampton, Ontario L6Y 0M1.
174108
BAP531BCXL-CN_14EFM1
Printed In China
GCDS-BIO33534-SL
WARRANTY INFORMATION
3 YEAR LIMITED WARRANTY
Sunbeam Products, Inc. doing business as Jarden Consumer Solutions or if in Canada, Sunbeam Corporation (Canada)
Limited doing business as Jarden Consumer Solutions (collectively “JCS”) warrants that for a period of three years
from the date of purchase, this product will be free from defects in material and workmanship. JCS, at its option, will
repair or replace this product or any component of the product found to be defective during the warranty period.
Replacement will be made with a new or remanufactured product or component. If the product is no longer available,
replacement may be made with a similar product of equal or greater value. This is your exclusive warranty. Do NOT
attempt to repair or adjust any electrical or mechanical functions on this product. Doing so will void this warranty.
This warranty is valid for the original retail purchaser from the date of initial retail purchase and is not transferable.
Keep the original sales receipt. Proof of purchase is required to obtain warranty performance. JCS dealers, service
centers, or retail stores selling JCS products do not have the right to alter, modify or any way change the terms and
conditions of this warranty.
This warranty does not cover normal wear of parts or damage resulting from any of the following: negligent use or
misuse of the product, use on improper voltage or current, use contrary to the operating instructions, disassembly,
repair or alteration by anyone other than JCS or an authorized JCS service center. Further, the warranty does not
cover: Acts of God, such as fire, flood, hurricanes and tornadoes.
What are the limits on JCS’s Liability?
JCS shall not be liable for any incidental or consequential damages caused by the breach of any express, implied or
statutory warranty or condition.
Except to the extent prohibited by applicable law, any implied warranty or condition of merchantability or fitness for
a particular purpose is limited in duration to the duration of the above warranty.
JCS disclaims all other warranties, conditions or representations, express, implied, statutory or otherwise.
JCS shall not be liable for any damages of any kind resulting from the purchase, use or misuse of, or inability to use
the product including incidental, special, consequential or similar damages or loss of profits, or for any breach of
contract, fundamental or otherwise, or for any claim brought against purchaser by any other party.
Some provinces, states or jurisdictions do not allow the exclusion or limitation of incidental or consequential damages
or limitations on how long an implied warranty lasts, so the above limitations or exclusion may not apply to you.
This warranty gives you specific legal rights, and you may also have other rights that vary from province to province,
state to state or jurisdiction to jurisdiction.
How to Obtain Warranty Service
In the U.S.A.
If you have any question regarding this warranty or would like to obtain warranty service, please call
1-800-253-2764 and a convenient service centre address will be provided to you.
In Canada
If you have any question regarding this warranty or would like to obtain warranty service, please call
1-800-253-2764 and a convenient service centre address will be provided to you.
In the U.S.A., this warranty is offered by Sunbeam Products, Inc. doing business as Jarden Consumer Solutions located
in Boca Raton, Florida 33431. In Canada, this warranty is offered by Sunbeam Corporation (Canada) Limited doing
business as Jarden Consumer Solutions, located at 20 B Hereford Street, Brampton, Ontario L6Y 0M1. If you have any
other problem or claim in connection with this product, please write our Consumer Service Department. PLEASE DO
NOT RETURN THIS PRODUCT TO ANY OF THESE ADDRESSES OR TO THE PLACE OF PURCHASE.