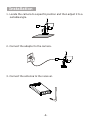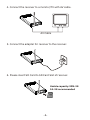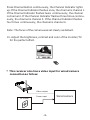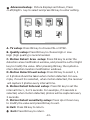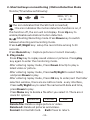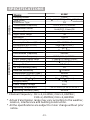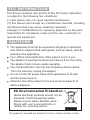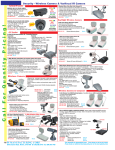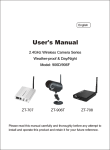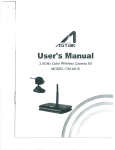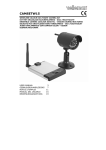
1
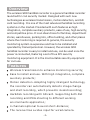
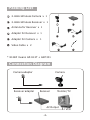
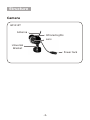
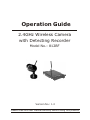
Operation Guide
2.4GHz Wireless Camera
with Detecting Recorder
Model No.: 812BF
Version No.: 1.0
Please read this user Manual carefully before using this product!
CONTENTS
1. Overview
1
2. Features
1
3. Packing List
2
4. Connection Diagram
3
5. Structure
4
6. Installation
5
7. Receiver Operation
9
8. Specifications
9. FCC & EU
12
Back Cover
Overview
The wireless SDR harddisk recorder is a general harddisk recorder
launched for civil security market. Designed with such new
technologies as wireless transmission, motion detection, and SD
card recording. It is one of the most advanced harddisk recording
systems on the market.Provided with such features as high
integration, complete auxiliary products, ease of use, high security,
and competitive price. It is an ideal choice for families, department
stores, warehouses, parking lots, office building, and other places
where the monitoring is required.In general, the security
monitoring system is expensive and has to be installed and
operated by trained personnel. However, the wireless SDR
harddisk recorder is easy to install and use, can be used once the
power is connected, featuring a set of true DIY security
monitoring equipment. It is the most suitable security equipment
for civil use.
Features
Wireless transmission to enhance monitoring security;
Ease to install and use. With high integration, complete
auxiliary products;
Motion detection. Adopting highly inteligent technology,
the recorder can automatically detects image change
and start recording, which prevents invalid recording;
Harddisk recording with SD card. Supporting both AVI
recording and JPEG shooting to different working
environments application;
4 channels optional to avoid short-distance;
The receiver has a video input for wired camera.
-1-
Packing List
2.4GHz Wireless Camera x 1
2.4GHz Wireless Receiver x 1
Antenna for Receiver x 1
Adapter for Receiver x 1
Adapter for Camera x 1
Video Cable x 2
* 812BF means GP-812T + GB7301
Connection Diagram
Camera adapter
Receiver adapter
Camera
Receiver
Monitor/TV
AV Output
-2-
VCR
Structure
Camera
GP-812T
Antenna
Infrared Lights
Lens
Universal
Bracket
Power Jack
-3-
Receiver
Antenna
Up Button
OK Button
Down Button
Right Button
Left Button
Menu Button
Channel Switch
Record Button
Channel Indicator
Automatic Detection
/Recording Indicator
Play Button
Power Indicator
Video In
Power Socket
Power ON/Off
SD Card Slot
Video Out
-4-
Installation
1. Locate the camera to a specific position and then adjust it to a
suitable angle.
2. Connect the adapter to the camera.
3. Connect the antenna to the receiver.
-5-
4. Connect the receiver to a monitor/TV with AV cable.
AV Cable
5. Connect the adapter for receiver to the receiver.
6. Please insert SD Card to SD Card Slot of receiver.
Usable capacity:32M-2G
1G-2G recommended
-6-
If the SD Card is inserted incorrectly or is not inserted, the
monitor/TV will display SD Card not plug in , and only real-time
monitoring is available at this time.
Notes :
* Make sure the protection switch on SD Card is turned on.
* Never touch the metal part of the SD Card with bare hands for
static electricity of human body may cause permanent damage
to the SD Card.
* Insert or pull out the SD Card only when the equipment is
turned off.
7. Push the power switch to ON position and the power indicator
lights up.
8. Power on the monitor/TV and select AV mode.
9. Set the channel of receiver same as that of camera by pressing
the channel button continuously, and image will be displayed
on the monitor/TV.
-7-
Press Channel Button continuously, the Channel Indicator lights
up.If the Channel Indicator flashes once, the channel is channel 1.
If the Channel Indicator flashes twice continuously, the channel
is channel 2. If the Channel Indicator flashes three times continuously, the channel is channel 3. If the Channel Indicator flashes
four times continuously, the channel is channel 4.
Note: The focus of the camera was set clearly as default.
10. Adjust the brightness, contrast and color of the monitor/TV
for the perfect effect.
* This receiver also has a video input for wired camera
connection as follow:
Video output
DC Power
Power input
-8-
Wired camera
Receiver Operation
1. Menu Key Operation
You are recommended to press menu key to set before its
first use.
Monitor/AV displays picture as follows, Press <Left/Right>
key to select and press OK key to enter setting.
Date/Time set up: Press the <Left/Right> and
<Up/Down> keys to set the date and time of the equipment.
Motion Detect ON/OFF set up: Press OK key to change
the setting. If you choose ON , the receiver can automatically
record or capture photos when motion detected. If you choose
OFF, the receiver is only in real-time monitoring status.
Capture Format AV/Photo set up: Press the OK key to
change the setting. If you choose capture format AV, when
motion detected, the receiver will automatically record videos.
If you choose capture format Photo, when motion detected,
the receiver will automatically capture photos.
-9-
Advanced setup: Picture displays as follows, Press
<Left/Right> key to select and press OK key to enter setting.
A
B
E
F
C
D
G
A. TV setup: Press OK key to choose PAL or NTSC.
B. Quality setup: Press OK key to choose High or Low.
High (high quality) is recommended.
C. Motion Detect Area setup: Press OK key to enter the
detection area modification window, and press the Left or Right
key to modify the value. After pressing OK key, the system enters detection location modification windows.
D. Motion Detect Count setup: Press OK key to select 1, 3
or 5 photos should be taken when motion detected. For example, if count 3 is selected, when motion detected, the receiver
will capture 3 photos every interval time.
E. Motion Detect Interval setup: Press OK key to set the
interval time 1, 3 or 5 seconds. For example, if 3 seconds is
selected, when motion detected, photos will be captured every
3 seconds.
F. Motion Detect sensitivity setup: Press Up or Down key
to modify the value and press OK key to exit.
G: Exit: Press OK key to return.
Exit: Press OK key to return.
-10-
2. Shortcut keys on monitoring /Motion Detection Mode
Monitor/TV window as following:
20s
2008 / 07 / 24
16 : 08 : 26
:the icon indicates that the SD Card is inserted;
: the icon indicates the motion detection function is on, if
this function off, the icon will not display. Press Up key to
enable/disable automatical motion detection.
/ :Shooting/Recording mode.Press Down key to switch
between shooting and recording mode.
Press Left/Right key: setup the record time among 5-30
seconds.
Press Record key : Capture pictures or record manually.
3. Play mode
Press Play key to replay saved videos or pictures. Press play
key again to enter the monitoring mode.
After entering replay mode, Press Down directly to play a
latest video or picture.
After entering replay mode, Press Left/Right to select folder,
and press Down to play.
After entering replay mode, Press OK key to enter/exit the folder
selection window, there are six-lattice mode every interface,
Press Left/Right key to select file named with date and time,
press Down to play.
Press Menu key to delete a file after you select it. There are 4
icons for options.
Exit
Delete file
Format
Delete all
Delete file: Delete a single picture or video.
Delete all: Delete all pictures and videos.
Format: Format SD Card.
Exit: Press to return.
-11-
SPECIFICATIONS
Items
812BF
CMOS
720 480 (NTSC); 720 576(PAL)
FM
CAMERA
Imaging Sensor
Total Pixels
Modulation Type
Transmission Frequency
ISM 2,400~2,483MHz
Transmission Power
2mW/FCC,10wm/CE
0 Lux
Minimum Illumination
Night Vision range
Bandwidth
Power Supply
Consumption Current(Max.)
7m
18MHz
8VDC
160mA&250mA
45 78 83 (mm)
217 g
50 ohm SMA
Dimensions(W x D x H)
Weight(about)
Antenna
RECEIVER
Intermediate Frequency
480MHz
ISM 2,400~2,483MHz
1.1Vpp 0.1Vpp@75 ohm,
1.1Vpp 0.1Vpp@50 ohm,
Transmission Frequency
Video Output Signal Level
Video Input Signal Level
Storage Media
SD Card
2G
SD Card memory(max.)
Received Sensitivity
Consumption Current (Max.)
Unobstructed Effective Range
Dimensions(W D H)
Weight(About)
Power Supply Voltage
Operating Temperature
Operating Humidity(Max.)
80
-85dBm
590mA
100m
127 18(mm)
178g
5VDC
O
O
O
O
-10 C~+50 C/+14 C~+122 C
85%RH
* Channel Frequency: CH1=2,414MHz; CH2=2,432MHz;
CH3=2,450MHz; CH4=2,468MHz
* Actual transmission range may vary according to the weather,
location, interference and building construction.
* All the specifications are subject to minor change without prior
notice.
-13-
FCC INFORMATION
This device complies with part15 of the FCC Rules. Operation
is subject to the following two conditions:
(1) this device may not cause harmful interference,
(2) this device must accept any interference received, including
interference that may cause undesired operation.
Changes or modifications not expressly approved by the party
responsible for compliance could void the user s authority to
operate the equipment.
CAUTIONS
The apparatus shall not be exposed to dripping or splashing
and that no objects filled with liquids, such as vases, shall be
placed on the apparatus.
Turn off the Camera/Monitor if the system is not in use.
The adapter is used as the disconnect device from the mains.
The adapter shall remain readily operable.
The Camera/Monitor can only be completely disconnected
from the mains by unplug the adapter.
Do not cut the DC power cable of the apparatus to fit with
another power source.
Attention should be drawn to the environment aspects of
battery disposal.
EU Environmental Protection
Waste electrical products should not be
disposed of with household waste.
Please recycle where facilities exist.
Check with your Local Authority or
retailer for recycling advice.
The graphics included are subject to minor change without notice.