1
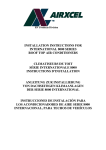
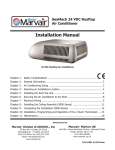
RV Products Division
INSTALLATION INSTRUCTIONS
FOR
48000 SERIES
AIR CONDITIONERS
CLIMATISEURS
SÉRIE 48000
INSTRUCTIONS D’INSTALLATION
TABLE OF CONTENTS
I.
II.
III.
IV.
V.
VI.
VII.
VIII.
IX.
X.
General Information . . . . . . . . . . . . . . . . . . . . . . . . . . . . . . . . . . . . . . . . . . . . . . . . . . . . . . . . . .
Air Conditioning Sizing . . . . . . . . . . . . . . . . . . . . . . . . . . . . . . . . . . . . . . . . . . . . . . . . . . . . . . . .
Selecting an Installation Location . . . . . . . . . . . . . . . . . . . . . . . . . . . . . . . . . . . . . . . . . . . . . . . .
Installing the Roof Top Unit . . . . . . . . . . . . . . . . . . . . . . . . . . . . . . . . . . . . . . . . . . . . . . . . . . . .
Securing the Air Conditioner to the Roof . . . . . . . . . . . . . . . . . . . . . . . . . . . . . . . . . . . . . . . . .
Electrical Wiring . . . . . . . . . . . . . . . . . . . . . . . . . . . . . . . . . . . . . . . . . . . . . . . . . . . . . . . . . . . . .
Installing the Optional Heater Accessory . . . . . . . . . . . . . . . . . . . . . . . . . . . . . . . . . . . . . . . . .
Installing the Ceiling Assembly (9300 Series) . . . . . . . . . . . . . . . . . . . . . . . . . . . . . . . . . . . . . .
Installing the Ceiling Assembly (9400 Series) . . . . . . . . . . . . . . . . . . . . . . . . . . . . . . . . . . . . . .
System Checkout . . . . . . . . . . . . . . . . . . . . . . . . . . . . . . . . . . . . . . . . . . . . . . . . . . . . . . . . . . . . . .
2
3
3
3
6
7
8
8
10
12
These instructions are a general guide for installing the 48000 Series Coleman-Mach roof top air conditioners. For specific air
conditioner details, it will be necessary to refer to the printed Customer Envelope Package supplied with each air conditioner.
WARNING – SHOCK HAZARD
IMPORTANT NOTICE
To prevent the possibility of severe personal injury or
equipment damage due to electrical shock, always be sure
the electrical power source to the appliance is
disconnected.
These instructions are for the use of qualified individuals
specially trained and experienced in installation of this type
equipment and related system components.
Installation and service personnel are required by some states
to be licensed. PERSONS NOT QUALIFIED SHALL NOT
INSTALL NOR SERVICE THIS EQUIPMENT.
CAREFULLY FOLLOW ALL INSTRUCTIONS AND
WARNINGS IN THIS BOOKLET TO AVOID DAMAGE
TO THE EQUIPMENT, PERSONAL INJURY OR FIRE.
NOTE
WARNING
The words “Shall” or “Must” indicate a
requirement which is essential to satisfactory
and safe product performance.
Improper installation may damage equipment, can create
a hazard and will void the warranty.
The words “Should” or “May” indicate a
recommendation or advice which is not
essential and not required but which may be
useful or helpful.
The use of components not tested in accordance with these
units will void the warranty, may make the equipment in
violation of state codes, may create a hazard and may ruin
the equipment.
I. GENERAL INFORMATION
INQUIRIES ABOUT THE A/C UNIT – Inquiries to your
Airxcel, Inc. representative or to Airxcel, Inc. pertaining to
product installation should contain both the model and serial
numbers of the roof top air conditioner. All roof top air
conditioning units have model and serial number identification
in two locations; (1) rating plate sticker may be viewed by
looking through the shroud louvers on the compressor side of
the roof top air conditioning unit. The rating plate sticker can
be seen without removing the outer plastic shroud, (2)
model/serial number sticker (silver color) is located on the
bottom of the basepan of the roof top air conditioner. If the air
conditioner is installed, the sticker may be viewed by lowering
the ceiling assembly shroud.
OEM – Please make sure the Customer Envelope Package
accompanies the air conditioner.
INSTALLER AND/OR DEALER – Please make sure the
Customer Envelope Package is presented to the product
consumer. The product consumer should also be afforded the
opportunity to purchase the optional three (3) year parts
replacement contract available from Airxcel, Inc.
For more information about the contract, please review the
sample contract located in the Operation and Maintenance
Instructions Booklet (Customer Envelope Package). Use the
card attached to the Customer Envelope Package to apply for
the extended parts contract.
2
II. AIR CONDITIONING SIZING
The ability of an air conditioner to provide a comfortable
environment for the consumer is dependent upon the
following conditions.
As a general rule, air supplied (discharge air) from the air
conditioner will be 15 to 20 degrees cooler than the air
entering (return air) the ceiling assemblies bottom air grilles.
Air conditioners are rated primarily by their ability to remove
heat. The thermal measurement used for detecting a gain or
loss of heat is the British Thermal Unit (BTU). One (1) BTU
is the amount of heat required to raise the temperature of one
pound of water by one degree Fahrenheit. An air conditioner
rated at 13,500 BTUH can remove 13,500 BTU’s of heat in
one hour.
For example, if the air entering the air conditioner is 80
degrees F. (return air), the supply air (discharge air) into the
vehicle will be 60 to 65 degrees F. As long as this
temperature difference (15 to 20 degrees) is being maintained
at the air conditioner, the air conditioner is operating properly.
Again, give careful consideration to the vehicle heat gain
variables. During extreme outdoor temperatures, the heat gain
of the vehicle may be reduced by:
The ability of an air conditioner to cool down a vehicle or
maintain a consumer desired temperature is dependent upon
the heat gain of the vehicle. The physical size, the amount of
window area, the quality and amount of insulation, the
position exposure to sunlight, the number of people using the
vehicle and the outside temperature may increase the heat gain
to such an extent that the capacity of the air conditioner is
exceeded.
Parking the vehicle in a shaded area
Keeping windows and doors closed
Avoiding the use of heat producing appliances
Using window shades (blinds and/or curtains)
For a more permanent solution to high heat gain situations,
additional vehicle insulation, window awnings and/or window
glass tinting should be considered.
III. SELECTING AN INSTALLATION LOCATION
Your Airxcel, Inc. air conditioner has been designed for use
primarily in recreational vehicles.
Motor Homes – a single unit or the forward of two units
should be mounted within 9 feet of the drivers compartment.
Is the roof of the vehicle capable of supporting both the roof
top unit and ceiling assembly without additional support
structures? Inspect the interior ceiling mounting area to avoid
interference with existing structural members such as: bunks,
curtains, tracks or room dividers. The depth of the ceiling
assembly shroud is 3”. Be sure to check clearance for doors
which must be swung open (refrigerator, closets, cabinets).
Travel Trailers or Mini-Homes – a location should be selected
that is near the door slightly forward of the vehicle center
length.
Vans – location should be in the center of the roof (side to side
– front to back).
Truck with Camper – location should be between 4 or 5 feet
from the rear of the camper to achieve maximum cooling
effect.
Most of the time, roof mount air conditioners are installed at
existing roof vent locations. If there are no roof vents
(existing mounting hole), the following placement locations
are recommended.
IV. INSTALLING THE ROOF TOP UNIT
DANGER
SHOCK HAZARD
IMPORTANT
TO PREVENT DAMAGE TO THE WIRING AND
BATTERY, DISCONNECT THE BATTERY CABLE
FROM THE POSITIVE BATTERY TERMINAL
BEFORE PERMORMING ANY CUTTING TO THE
VEHICLE.
DISCONNECT ALL POWER TO THE VEHICLE
BEFORE PERFORMING ANY CUTTING TO THE
VEHICLE. CONTACT WITH HIGH VOLTAGE CAN
RESULT IN EQUIPMENT DAMAGE, PERSONAL
INJURY OR DEATH.
If the air conditioner is being installed on a low friction roof
surface such as aluminum, steel or gelcoat fiberglass, it is
advisable to order a spring pad kit, part number 8333-3871 to
add “spring pads” to maintain bolt tension and retard lateral
motion of the air conditioner which could shear the mounting
bolts.
3
If the air conditioner is being installed subject to heavy lateral
loads, it is advisable to order a “Roughneck” gasket/bolt
package, part number 48207-3301 to maintain bolt tension,
prevent lateral movement of the air conditioner and guard
against bolt shear.
Airxcel’s 48000 series requires that the spacing from
the vehicle roof top to the interior ceiling be no less
than 1”. A typical support frame is shown in
Figure 1.
The frame must provide an opening to allow passage
for the power supply wiring. Route the supply wiring
through the frame at the same time the support frame
is being installed.
Once the location for your air conditioner has been determined
(See Section III), a reinforced and framed roof hole opening
must be provided (may use existing vent hole). Before cutting
into the vehicle roof, verify that the cutting action will clear all
structural members and crossbeams. Additionally, the
location of any inner roof plumbing and electrical supplies
must be considered.
A.
After the support frame is installed, seal off all gaps
between the frame and both the roof exterior and the
interior ceiling of the vehicle (cavity walls).
Additionally, seal the gap around the electrical
supply wiring.
If a roof vent is already present in the desired
mounting location for the air conditioner, the
following steps must be taken.
1.
B.
IMPORTANT – Allow 24” of supply wiring
through the support frame (working length).
Remove all screws which secure the roof
vent to the vehicle. Remove the vent and
any additional trim materials. Carefully
remove all caulking from around the roof
vent opening to obtain clean exterior roof
surface.
2.
It may be necessary to seal some of the old
roof vent mounting screw holes which may
fall outside of the air conditioner basepan
gasket.
3.
Examine the roof opening. If the opening is
smaller than 14” x 14”, the opening must be
enlarged. If the opening exceeds 15” x 15”,
a mounting frame must be field fabricated
to reduce the opening size (See Figure 1).
Capable of supporting both the weight of
the roof top air conditioner and the interior
ceiling assembly.
2.
Capable of holding or supporting the roof
outer surface and interior ceiling apart, so
that when the roof top air conditioner and
ceiling assembly are bolted together, no
collapsing occurs.
This air conditioner is to be installed in accordance
with NFPA Standard 501C.
D.
The roof top air conditioner must be mounted as
near level from front to rear and side to side as is
possible when the vehicle is parked on a level plane.
Figure 2 shows maximum allowable degree
deviations (mounting degrees from total surface
flat plane).
Holes For
Wires
14"
If a roof vent opening is not used, a new opening
(See Figure 1) will have to be cut into the vehicle
roof. A matching opening will also have to be cut
into the interior vehicle ceiling. Be careful when
cutting the ceiling opening. If the ceiling opening
is carpeted, snagging could occur. After the opening
in the roof and interior ceiling are the correct size, a
framed support structure must be provided between
exterior roof top and interior ceiling. The reinforced
framed structure must provide the following
guidelines:
1.
C.
2 ½"
Minimum
Typical Wood Frame
1"
Minimum
Thickness
FIGURE 1
4
ɨɬʸŜſƀ
ɨɬʸŜ
FIGURE 2
Height Varies To
Make Unit Level
FIGURE 4
FIGURE 3
E.
If the roof of the vehicle is sloped (not level) such
that the roof top air conditioner cannot be mounted
within the maximum allowable degree deviations, an
exterior leveling shim will need to be added to make
the roof top air conditioner level. A typical leveling
shim is shown in Figure 3.
5
After the mounting hole area is properly
prepared, remove the carton and shipping pads
from the roof top air conditioner. Carefully
lift the unit to the top of the vehicle. Do not use
the outer plastic shroud for lifting. Place the
roof top air conditioner over the prepared mounting
hole. The pointed end (nose) of the shroud must
face towards the front of the vehicle. Pull the
electrical conduit down from the roof air
conditioner through the mounting opening and
let hang.
V. SECURING THE AIR CONDITIONER TO THE ROOF
A mounting frame is supplied with the ceiling assembly.
Follow the steps below to secure the air conditioner to the
roof. Refer to Figure 4.
A.
Locate the air conditioner mount gasket over the
14” to 15” square opening in the roof.
B.
Install the ceiling assembly mount frame using the
four bolts found with the ceiling assembly.
C.
FIGURE 4
6
Proper tension has been achieved for each bolt
when any portion of each gasket indicating tab has
been pulled down even with the roof. See Figure 4.
The upper unit has now been properly installed with
optimum gasket compression.
VI. ELECTRICAL WIRING
ROUTING 115 VAC WIRING
TH
STRIP THE INDIVIDUAL WIRE LEAD
ENDS FOR WIRE CONNECTION
(ABOUT 3/4” BARE WIRE). INSERT
THE SUPPLY WIRES INTO THE
ELECTRICAL CONNECTOR CLAMP.
SHEATH MUST PROTRUDE PAST
THE CLAMP BUSHING INSIDE THE
BOX AS ILLUSTRATED. MAKE SURE
SHEATH CABLE IS CENTERED IN
CLAMP BEFORE TIGHTENING UP
ON IT. DO NOT OVERTIGHTEN!!
Following Airxcel’s high voltage wiring specifications and
all local and national electrical codes, route the roof top unit
115 VAC supply wiring from its power source to the wirebox.
High Voltage Wiring Specifications based on Minimum
Overcurrent Protection Device Amperage – (see upper unit
nameplate)
1.
2.
U.L. requires copper conductors only with minimum
#12 AWG when using the minimum recommended
overcurrent protection device. Higher rated devices or
longer wiring runs will require #10 AWG or greater
copper conductors.
THIS COULD RESULT IN PINCHING
THROUGH THE PLASTIC WIRE
INSULATION AND CAUSE SHORTING
OR “HOT” WIRES TO GROUND
(SHOCK HAZARD). THE CLAMP IS
INTENDED FOR STRAIN RELIEF OF
THE WIRES. SLIGHT PRESSURE IS
USUALLY SUFFICIENT TO
ACCOMPLISH THIS.
To prevent voltage drops greater than 10% during
starting loads, adhere to the following guideline:
For lengths greater than 50’, use #10 AWG or larger
copper conductors. Match to the overcurrent protection
device provided.
Circuit Protection – Refer to upper unit nameplate.
IF OTHER THAN NON-METALLIC
CABLES ARE USED FOR SUPPLY
CONDUCTORS, APPROPRIATE
STRAIN RELIEF CONNECTORS OR
CLAMPS SHOULD BE USED.
High Voltage Wiring Specifications based on Overcurrent
Protection Device rated higher than the minimum required
(see upper unit nameplate)
Follow all local and NEC (National Electrical Code) for proper
sizing of wire AWG based on Overcurrent Protection Device
selected and the length of the wiring run to the air conditioner.
IN NO CASE SHOULD CLAMPING
OR PINCHING ACTION BE APPLIED
TO THE INDIVIDUAL SUPPLY LEADS
(NEUTRAL AND “HOT” WIRES).
DANGER – SHOCK HAZARD
DANGER
SHOCK HAZARD
MAKE SURE THAT ALL POWER SUPPLY TO THE
UNIT IS DISCONNECTED BEFORE PERFORMING
ANY WORK ON THE UNIT TO AVOID THE
POSSIBILITY OF SHOCK INJURY OR DAMAGE TO
THE EQUIPMENT.
TO PREVENT THE POSSIBILITY OF
SHOCK INJURY, THE WHITE WIRE
MUST BE CONNECTED TO NEUTRAL
IN THE SERVICE BOX ENTRANCE
AND THE MECHANICAL GROUND
MUST BE CONNECTED TO A
GROUNDING LUG EITHER IN THE
SERVICE BOX OR THE MOTOR
GENERATOR COMPARTMENT.
DANGER
WHEN USING NON-METALLIC
SHEATH CABLES (ROMEX, ETC.),
STRIP SHEATH BACK TO EXPOSE
4-6 INCHES OF THE SUPPLY LEADS.
7
VII. INSTALLING THE OPTIONAL HEATER ACCESSORY
NOTE
If the heater option is being installed, position the
heater assembly in the air conditioner return air
opening as shown in Figure 5. The heater bracket
must be installed over the metal basepan extrusion
and positioned between the basepan and the plastic
drain pan (See Figure 6). Tighten set screw to
secure the assembly so as to prevent movement.
Replace the selector switch control knob on the
ceiling assembly with that provided with the
optional heater.
The optional Heater Accessory is intended to take
the chill out of the indoor air when the air is a few
degrees too cool for comfort. The Heater
Accessory is an effective “chill chaser”. It is not
a substitute for a furnace.
FIGURE 5
FIGURE 6
VIII. INSTALLING THE CEILING ASSEMBLY (9300 SERIES)
TIE ALL WIRING TO INSURE NO CONTACT
WITH THE HEATER OR ANY SHARP EDGES.
KEEP IN MIND THAT HIGH VELOCITY AIR
WILL BE ENCOUNTERED IN THIS AREA.
Make sure that you have properly matched the roof top air
conditioner and interior ceiling assembly. The following step
by step instructions must be performed in the following
sequence to insure proper installation.
A.
B.
C.
Carefully uncarton the ceiling assembly. Controls
are factory installed in the ceiling assembly (except
D.
Fasten the duct collar to the basepan of the air
conditioner with three (3) screws (See Figure 9).
ceiling assemblies for applications with remote
control box/thermostat).
E.
Plug the roof top air conditioner electrical conduit
into the 9 position receptacle located in the
thermostat side of the ceiling assembly (See Figure 7).
F.
Insert the supply wiring through the cable clamp and
into the field wiring box so that 4 - 6” of supply
conductor is inside the box. Secure the cable clamp
over the supply wire sheath so that no movement is
possible (See Figure 8).
G.
Connect the supply power conductors to the black
and white pigtail wires and the supply ground wire to
the green pigtail wire found in the field wiring box
using the 3 provided wire nuts. IMPORTANT –
Connect the black supply to the black pigtail and the
Remove the grille and filters from the ceiling
assembly.
STEP “C” CAN BE SKIPPED IF THE OPTIONAL
9233(X)4551 HEATER ACCESSORY PACKAGE
IS NOT INSTALLED AT THIS TIME.
Plug the heater cord into the 2 position receptacle
(See Figure 7).
8
J.
Place the metal control box shield over the thermostat,
switch and field wiring boxes. Make certain that all
wires are pushed into the control boxes or laying in
the wireway between the thermostat and switch
boxes and will not be pinched by the control box
shield. Control box shield is properly installed when
the two holes in the shield are aligned with the two
screw holes in the ceiling assembly chute (See Figure
7).
The ceiling assembly shroud is curved to contour to a
crowned ceiling. If installation is to a flat ceiling and
gaps are present on the sides of the shroud, insert the
four optional 3/4 inch screws (provided) through the
mounting posts and secure them to the mounting
frame above (See Figure 7, 8 & 9 for screw
locations).
K.
Raise the ceiling assembly and secure to the mounting
frame with 4 provided shoulder screw/spring
assemblies. The front two screws should pass
through the clearance holes in the metal control box
shield (See Figure 9).
Pull the fabric duct material through ceiling assembly
discharge opening. Peel the release liner from the
adhesive strip around the discharge opening. Press
the fabric duct material firmly in place around
opening. Cut off excess fabric on inside of ceiling
assembly chute with a box knife taking care not to
tear the fabric beyond the adhesive strip.
L.
Make sure the non-allergenic filters are properly
positioned in the ceiling grille.
M.
Install the ceiling grille by positioning on the bottom
of the shroud and engaging the two 1/4 turn fasteners.
N.
Turn the selector switch to OFF position.
O.
Turn ON the power supply to the roof top air
conditioner.
white supply to the white pigtail. Using a U.L.
approved electrical tape, secure the wire nuts to wires
in a workmanlike manner (See Figure 8).
H.
I.
FIGURE 7
FIGURE 8
9
FIGURE 9
IX. INSTALLING THE CEILING ASSEMBLY (9400 SERIES)
Make sure that you have properly matched the roof top
air conditioner and interior ceiling assembly. The
following step-by-step instructions must be performed
in the following sequence to insure proper installation.
A.
Remove ceiling assembly from carton, separate
individual items and remove the two grilles and
filters from the ceiling shroud.
B.
Fasten the duct collar to the air conditioner
basepan with 3 provided screws (See Figure 12).
C.
Raise the ceiling assembly chute and insert the
the supply wiring through the cable clamp and
into the wiring box so that 4-6” of supply
conductor is inside the box. Secure the cable
clamp over the supply wire sheath so that no
movement is possible (See Figure 10).
10
D.
Connect the supply power black conductor to the
black pigtail wire, the white conductor to the white
pigtail wire and the supply ground conductor to the
green pigtail wire found in the wiring box using the
3 provided wire nuts. Using a U.L. approved
electrical tape, secure the wire nuts to wires in a
workmanlike manner (See Figure 11).
E.
Press supply conductors and wire nuts into wiring
box and making sure no wires are pinched, secure
the wire box cover with 2 provided screws (See
Figure 11).
F.
Plug the air conditioner electrical conduit into the
9 position receptacle as shown in Figure 10.
G.
If the optional heater accessory package is being
installed, remove the cover from the 2 position
receptacle and plug the heater cord into receptacle
as shown in Figure 10.
H.
Raise the ceiling assembly chute to the unit
mounting frame and secure the chute with 4
provided screws (See Figure 12).
I.
TIE ALL WIRING TO INSURE NO CONTACT
WITH ANY SHARP EDGES OR WITH
OPTIONAL HEATER IF POSSIBLE. KEEP
IN MIND THAT HIGH VELOCITY AIR WILL
BE ENCOUNTERED IN THIS AREA.
J.
Pull the fabric duct material through the ceiling
chute discharge opening. Peel the release liner
from the adhesive strip around the opening. Press
the fabric duct material firmly in place around
opening. Cut off excess fabric on inside of
ceiling chute with a box knife taking care not to
tear the fabric beyond the adhesive strip.
K.
Raise the ceiling shroud and while insuring it
meshes with the chute, secure to mounting frame
with 4 provided screws (See Figure 12).
L.
Install the control knobs over the switch and
thermostat shafts. The thermostat (temperature)
control knob installs nearest the “Coleman-Mach”
logo. If the optional heater accessory is installed,
use the selector switch knob that was included in
the heater package.
M.
Re-install the filters and grilles into the ceiling
assembly shroud.
N.
Turn the selector switch to OFF position.
O.
Turn ON the power supply to the roof top air
conditioner.
FIGURE 10
FIGURE 11
11
FIGURE 12
X. SYSTEM CHECKOUT
Airxcel, Inc. manufactures a wide range of roof top
air conditioners which incorporate different product
operation features. To properly evaluate the
performance of a newly installed air conditioner,
it is necessary to review the specific unit operation
characteristics (features) described in the product
operation and maintenance instructions (Customer
Envelope Package).
12
TABLE DES MATIÈRES
I.
II.
III.
IV.
V.
VI.
VII.
VIII.
IX.
X.
Informations générales . . . . . . . . . . . . . . . . . . . . . . . . . . . . . . . . . . . . . . . . . . . . . . . . . . . . . . . .
Sélection d’un climatiseur approprié . . . . . . . . . . . . . . . . . . . . . . . . . . . . . . . . . . . . . . . . . . . . .
Sélection de l’emplacement d’installation . . . . . . . . . . . . . . . . . . . . . . . . . . . . . . . . . . . . . . . . .
Installation de l’unité de toit . . . . . . . . . . . . . . . . . . . . . . . . . . . . . . . . . . . . . . . . . . . . . . . . . . . .
Fixation du climatiseur au toit . . . . . . . . . . . . . . . . . . . . . . . . . . . . . . . . . . . . . . . . . . . . . . . . . . .
Câblage électrique . . . . . . . . . . . . . . . . . . . . . . . . . . . . . . . . . . . . . . . . . . . . . . . . . . . . . . . . . . . .
Installation de l’accessoire de chauffage facultatif . . . . . . . . . . . . . . . . . . . . . . . . . . . . . . . . . .
Installation de l’ensemble de plafond (Série 9300) . . . . . . . . . . . . . . . . . . . . . . . . . . . . . . . . . .
Installation de l’ensemble de plafond (Série 9400) . . . . . . . . . . . . . . . . . . . . . . . . . . . . . . . . . .
Vérification fonctionnelle du système . . . . . . . . . . . . . . . . . . . . . . . . . . . . . . . . . . . . . . . . . . . . .
13
14
14
14
16
16
17
17
18
19
Les présentes instructions sont un guide général pour l’installation des climatiseurs de toit Coleman-Mach Série 48000. Pour plus de
précisions sur le climatiseur, veuillez vous reporter à l’ensemble d’enveloppe client livré avec chaque pompe à chaleur.
AVIS IMPORTANT
AVERTISSEMENT : RISQUE DE
CHOC ÉLECTRIQUE
Ces instructions sont conçues pour être utilisées par un
installateur qualifié spécialement formé et expérimenté dans
l’installation de ce type d’équipement et des éléments s’y
rattachant.
Afin de prévenir la possibilité de graves blessures
corporelles ou des dommages à l’équipement dus à un
choc électrique, assurez-vous de toujours débrancher le
câble d’alimentation de l’appareil.
Dans certains États, on exige que le personnel d’installation
et d’entretien détienne une licence. AUCUNE PERSONNE
NON QUALIFIÉE NE DOIT INSTALLER OU
ENTRETENIR CET ÉQUIPEMENT.
SUIVEZ ATTENTIVEMENT TOUTES LES
INSTRUCTIONS ET LES MISES EN GARDE DE CE
FASCICULE AFIN D’ÉVITER LES RISQUES DE
DOMMAGES À L’ÉQUIPEMENT, DE BLESSURES
CORPORELLES OU D’INCENDIE.
REMARQUE
MISE EN GARDE
Les mots « doivent » ou « doit », ou d’autres
formes de ceux-ci, identifient une
exigence qui est essentielle à la performance
satisfaisante et sécuritaire du produit.
L’installation inappropriée peut endommager
l’équipement et créer un danger, et annule la garantie.
Les mots « devrait/devraient » ou « peut/
peuvent » identifient une recommandation ou
un conseil qui n’est pas essentiel(le) ou exigé(e),
mais qui peut être pratique ou utile.
L’utilisation de composants non testés en conformité avec
ces appareils annulera la garantie, peut contrevenir aux
codes d’État ou provinciaux, peut créer un danger et peut
abîmer l’équipement.
I. INFORMATIONS GÉNÉRALES
OEM : Veuillez assurer que l’ensemble d’enveloppe client est
livré avec le climatiseur.
DEMANDES D’INFORMATIONS SUR LE
CLIMATISEUR : Les demandes d’informations sur
l’installation du produit présentées à votre représentant
Airxcel ou à Airxcel devraient contenir le nom et le numéro
de série du modèle du climatiseur. Le nom et le numéro de
série se situent à deux endroits sur tous les modèles de
climatiseur de toit : (1) vous pouvez visualiser l’autocollant de
puissance nominale en regardant par les fentes de ventilation
du côté compresseur du climatiseur de toit. Vous pouvez
visualiser l’autocollant de puissance nominale sans retirer le
carénage externe en plastique, (2) l’autocollant de modèle/no.
de série (couleur argent) est apposé sur le dessous du bac de
condensation du climatiseur de toit. Si le climatiseur est
installé, vous pouvez visualiser l’autocollant en abaissant le
carénage de l’ensemble de plafond.
INSTALLATEUR ET/OU MARCHAND : Veuillez vous
assurer de remettre l’ensemble d’enveloppe client à l’acheteur
du produit. L’opportunité d’acheter le contrat de
remplacement de pièces facultatif de trois (3) ans offert par
Airxcel, Inc. doit également être proposée à l’acheteur du
produit.
Pour plus d’informations sur le contrat, veuillez examiner
l’exemple de contrat qui figure dans le livret d’instructions
d’utilisation et d’entretien (ensemble d’enveloppe client).
Présentez une demande de contrat de remplacement de pièces
prolongé au moyen de la carte jointe à l’ensemble d’enveloppe
client.
13
II. SÉLECTION D’UN CLIMATISEUR APPROPRIÉ
La capacité d’un climatiseur à créer un milieu confortable
pour le consommateur dépend des conditions ci-dessous.
Par exemple, si la température de l’air entrant (air repris) dans
le climatiseur est 80 degrés Fahrenheit (27 degrés Celsius),
l’air soufflé (air de décharge) dans le véhicule sera de 60 à
65 degrés Fahrenheit (16 à 18 degrés Celsius). Tant et aussi
longtemps que le climatiseur maintient cet écart de
températures (15 à 20 degrés Fahrenheit/9 à 11 degrés
Celsius), il fonctionne correctement.
Les climatiseurs sont surtout évalués selon leur capacité à
éliminer la chaleur. L’unité thermique britannique (BTU) est
la mesure thermique employée pour détecter un apport ou une
perte de chaleur. Un (1) BTU est la quantité de chaleur requise
pour augmenter d’un degré Fahrenheit la température d’une
livre (0,45 kg) d’eau. Un climatiseur à rendement nominal de
13 500 BTUH peut retirer 13 500 BTU de chaleur en une
heure.
N’oubliez pas, songez soigneusement aux variables d’apport
de chaleur du véhicule. En périodes de températures ambiantes
extrêmes, vous pouvez réduire l’apport de chaleur du véhicule
en :
La capacité d’un climatiseur à refroidir un véhicule ou à
maintenir une température voulue dépend de l’apport de
chaleur du véhicule. La taille physique, la surface des fenêtres,
la quantité et la qualité de l’isolation, l’ensoleillement direct,
le nombre de personnes dans le véhicule et la température
extérieure peuvent augmenter l’apport de chaleur dans une
mesure qui dépasse la capacité du climatiseur.
stationnant le véhicule à l’ombre;
gardant les fenêtres et les portes fermées;
évitant d’utiliser des appareils producteurs de
chaleur;
en utilisant des stores et/ou des rideaux.
Pour une solution plus durable aux situations d’apport de
chaleur élevé, songez à une meilleure isolation du véhicule, à
installer des auvents au-dessus des fenêtres ou à les faire
teinter.
En règle générale, l’air produit par le climatiseur (air de
décharge) sera de 15 à 20 degrés plus frais que l’air entrant
(air repris) dans les grilles à air inférieures de l’ensemble de
plafond.
III. SÉLECTION DE L’EMPLACEMENT D’INSTALLATION
Votre climatiseur Airxcel, Inc. est principalement conçu à
l’intention de véhicules récréatifs.
Autocaravanes : une unité unique ou l’unité avant de deux
devrait être installée à moins de 2,7 mètres (9 pi) du siège du
conducteur.
Le toit du véhicule peut-il accueillir l’unité de toit et
l’ensemble de plafond sans être renforcé? Inspectez la zone de
montage du plafond afin d’éviter d’interférer avec des
éléments structuraux tels que lits superposés, rideaux, tringles
à rideaux ou séparations. Le carénage de l’ensemble de
plafond a une épaisseur de 7,6 cm (3 po). Assurez-vous de
confirmer la suffisance de dégagement pour les portes
(réfrigérateur, garde-robes, armoires).
Caravanes classiques ou maisons mobiles : l’emplacement
sélectionné devrait se situer près de la porte, légèrement en
avant de la ligne centrale de longueur du véhicule.
Fourgonnettes de camping : l’appareil devrait être installé en
plein centre du toit (gauche à droite et d’avant à arrière).
Camion avec boîte campeur : afin d’obtenir le refroidissement
maximum, l’emplacement devrait se situer de 1,2 à 1,5 mètre
(4 à 5 pi) de l’arrière de la boîte.
Généralement, les climatiseurs de toit sont installés à
l’emplacement des évents de toit existants. En absence d’un
évent de toit (ouverture d’installation existante), nous
recommandons les endroits ci-dessous.
IV. INSTALLATION DE L’UNITÉ DE TOIT
DANGER
RISQUE DE CHOC ÉLECTRIQUE
IMPORTANT
AFIN D’ÉVITER D’ENDOMMAGER LE CÂBLAGE ET
LA BATTERIE, DÉBRANCHEZ LE CÂBLE DE LA
BORNE POSITIVE DE LA BATTERIE AVANT
D’EXÉCUTER TOUT DÉCOUPAGE DU VÉHICULE.
DÉBRANCHEZ TOUTE ALIMENTATION
ÉLECTRIQUE DU VÉHICULE AVANT D’EXÉCUTER
DU DÉCOUPAGE. TOUT CONTACT AVEC UNE
SOURCE DE HAUTE TENSION PEUT PROVOQUER
DES BLESSURES CORPORELLES OU LA MORT, ET
DES DOMMAGES À L’ÉQUIPEMENT.
14
Si vous installez le climatiseur sur un toit à coefficient de
frottement réduit tel que d’aluminium, d’acier ou de fibre de
verre plastifiée, nous vous recommandons de vous procurer et
d’installer un ensemble de ressorts tampons, pièce n°
8333-3871, afin de maintenir la tension sur les boulons et
retarder le mouvement latéral du climatiseur, qui pourrait
rompre les boulons de fixation.
S'il est prévu que le climatiseur en cours d’installation soit
assujetti à d’importantes charges latérales, nous vous
conseillons de commander un ensemble joints/boulons
« Roughneck », pièce n° 48207-3301, afin de maintenir la
tension sur les boulons, interdire le mouvement latéral du
climatiseur et protéger contre la rupture des boulons.
B.
Vous pourriez devoir sceller certains des
vieux trous de vis de fixation d’évent situés
à l’extérieur du joint du bac à condensation
du climatiseur.
3.
Examinez l’ouverture du toit. Si
l’ouverture est plus petite que 35,56 cm x
35,56 cm (14 po x 14 po), vous devrez
l’agrandir. Si l’ouverture est plus grande
que 38 x 38 cm (15 x 15 po), vous devrez
fabriquer un cadre de montage sur place
pour réduire la taille de l’ouverture (voir
Figure 1).
Capacité de maintenir la surface portante
extérieure du toit et la plafond intérieur
séparés, de façon à ce qu’aucun
affaissement ne se produise lors du
boulonnage du climatiseur de toit et de
l’ensemble de plafond.
IMPORTANT : Prévoyez 61 cm (24 po) de câblage
d’alimentation à travers le cadre de soutien (longueur
utile).
Suivant l’installation du cadre de soutien, scellez
tous les écarts qui existent entre le cadre, le toit et
l’emplacement plafond du véhicule (parois de
l’ouverture). Scellez également l’espace vide autour
du câblage d’alimentation électrique.
Déposez toutes les vis qui fixent l’évent de
toit au véhicule. Retirez l’évent ainsi que
toute garnissage supplémentaire. Retirez
soigneusement tout le calfeutrage d’autour
de l’ouverture de l’évent afin d’obtenir une
surface extérieure de toit propre.
2.
2.
L’ouverture du cadre doit permettre le passage du
câblage d’alimentation. Acheminez le câblage
d’alimentation dans le cadre au moment de son
installation.
Si un évent se situe à l’emplacement d’installation
prévu d’installation prévu pour le climatiseur, les
mesures suivantes doivent être prises :
1.
Capacité de supporter à la fois le poids
du climatiseur de toit et le l’ensemble de
plafond.
La série 48000 d’Airxcel exige un écart minimum de
2,54 cm (1 po) entre le toit du véhicule et son plafond
(intérieur). Un cadre de soutien type est illustré dans
la Figure 1.
Une fois l’emplacement de votre climatiseur identifié (voir
section III), vous devez préparer une ouverture de toit
renforcée et encadrée (une ouverture d’évent existante peut
convenir). Avant de commencer le découpage du toit du
véhicule, confirmez qu’aucun élément de structure ou
entretoise ne sera touché. De plus, songez à l’emplacement de
toute plomberie et alimentation électrique à l’intérieur du toit.
A.
1.
C.
Ce climatiseur doit être installé en conformité avec
la norme NFPA 501C.
D.
Le climatiseur de toit doit être installé le plus à
niveau gauche-droit et avant-arrière que possible
avec le véhicule est stationné sur une surface
plate. La Figure 2 illustre les degrés de déviation
maximum permis (degrés de montage relativement
à la surface plane totale).
Si le toit du véhicule est incliné (non plat) de telle
façon à empêcher que le climatiseur ne soit installé
à l’intérieur des degrés de déviation permis, une cale
de nivellement extérieure devra être rajoutée afin de
niveler le climatiseur de toit. Une cale de
nivellement type est illustrée dans la Figure 3.
E.
Si vous n’employez pas une ouverture d’évent, vous
devrez découper une nouvelle ouverture (voir Figure 1)
dans le toit du véhicule. Une ouverture correspondante
devra aussi être découpée dans le plafond à l’intérieur du
véhicule. Découpez l’ouverture du plafond
soigneusement. Si le plafond est recouvert de tapis,
vous pourriez l’effilocher. Une fois les ouvertures dans
le toit et le plafond découpées à la taille appropiée, vous
devez installer un élément de soutien encadré entre le
toit (extérieur) et le plafond (intérieur). L’élément de
renforcement encadré doit respecter les lignes
directrices suivantes :
15
Suivant la préparation appropriée de l’ouverture
de montage, retirez l’emballage et les tampons
d’expédition du climatiseur de toit. Retirez
soigneusement l’appareil sur le toit du véhicule.
Ne le soulevez pas à l’aide du carénage externe en
plastique. Positionnez le climatiseur de toit sur
l’ouverture de montage préparée. L’extrémité
pointue (nez) du carénage doit être orientée vers
l’avant du véhicule. Tirez la conduite électrique
du climatiseur de toit à travers l’ouverture de
montage et laissez-la pendre.
V. FIXATION DU CLIMATISEUR AU TOIT
L’ensemble de plafond comprend un cadre de montage.
Fixez le climatiseur au toit à l’aide des étapes véhicule.
Reportez-vouz à la Figure 4.
A.
Positionnez le joint de montage de climatiseur
sur l’ouverture carrée de 35,56 cm à 38,1 cm
(14 po à 15 po) dans le toit.
B.
Installez le cadre de montage de l’ensemble de
plafond à l’aide de quatre boulons inclus dans
l’ensemble de plafond.
C.
La tension appropriée de chaque boulon est
atteinte quand toute partie de chaque languette
indicatrice du joint vient en contact avec le toit.
Voir Figure 4. L’unité supérieure est maintenant
correctement installée avecla compression
optimale du joint.
VI. CÂBLAGE ÉLECTRIQUE
DANGER : RISQUE DE CHOC ÉLECTRIQUE
ACHEMINEMENT DU CÂBLAGE 115 V CC
AFIN D’ÉVITER TOUTE BLESSURE PAR CHOC
ÉLECTRIQUE ET TOUT DOMMAGE À
L’ÉQUIPEMENT, CONFIRMEZ QUE TOUTES LES
SOURCES D’ALIMENTATION DE L’UNITÉ
SONT DÉBRANCHÉES AVANT D’ENTREPRENDRE
QUELQUE TRAVAIL QUE CE SOIT SUR
L’APPAREIL.
En respectant les spécifications d’Airxcel, Inc. pour le câblage
haute tension et l’ensemble des codes de l’électricité locaux et
nationaux, acheminez le câblage d’alimentation 115 V CC de
l’unité de toit de sa source à la boîte de raccordement.
Spécifications de câblage haute tension pour un dispositif de
protection contre les surtensions possédant l’intensité
minimale requise – (voir la plaque d’identification sur la
partie supérieure de l’appareil)
1.
2.
DANGER
LORSQUE VOUS EMPLOYEZ DES
CÂBLES À GAINE NON MÉTALLIQUE
(ROMEX, ETC.), DÉNUDEZ LES
CÂBLES D’ALIMENTATION SUR UNE
LONGUEUR DE 10 À 15 CM (4 À 6 PO).
DÉNUDEZ ENSUITE LES EXTRÉMITÉS
DES FILS INDIVIDUELS AUX FINS DE
RACCORDEMENT (ENVIRON 19 MM
[3/4 PO] DE FIL NU). INSÉREZ LES FILS
D’ALIMENTATION DANS LE SERRECÂBLE DU CONNECTEUR
ÉLECTRIQUE. LA GAINE DOIT
PÉNÉTRER AU-DELÀ DE LA DOUILLE
DU SERRE-CÂBLE À L’INTÉRIEUR DE
LA BOÎTE, TEL QU’ILLUSTRÉ.
ASSUREZ-VOUS QUE LE CÂBLE GAINÉ
EST CENTRÉ DANS LE SERRE-CÂBLE
AVANT DE LE SERRER. NE SERREZ PAS
TROP!!
U.L. exige l’utilisation exclusive de conducteurs en
cuivre 12 AWG minimum lors de l’utilisation du
dispositif minimal recommandé de protection contre
les surtensions. Les appareils plus puissants ou
les installations de câblage plus longues exigeront
des conducteurs en cuivre 10 AWG ou plus.
Afin d’éviter des chutes de tension supérieures à
10 % lors de charges de démarrage, respectez la
ligne directrice suivante :
Pour des longueurs de plus de 15 mètres (50 pi),
utilisez des conducteurs en cuivre 10 AWG
ou plus. Appariez-les au dispositif de protection
contre les surtensions fourni.
Protection du circuit : reportez-vous à la plaque
d’identification sur la partie supérieure de
l’appareil.
CECI POURRAIT ENTRAÎNER UN
PINCEMENT À L’INTÉRIEUR DE LA
GAINE ISOLANTE EN PLASTIQUE
ET PROVOQUER LA PRÉSENCE
D’UN COURT-CIRCUIT OU DE FILS
CHARGÉS À LA MASSE (DANGER
DE CHOC ÉLECTRIQUE). LE
SERRE-CÂBLE SERT À RÉDUIRE
LA TENSION SUR LES FILS. UNE
LÉGÈRE PRESSION SUFFIT
GÉNÉRALEMENT À CETTE FIN.
Spécifications de câblage haute tension pour un dispositif
de protection contre les surtensions dépassant l’intensité
minimale requise (voir la plaque d’identification sur la
partie supérieure de l’appareil)
Le diamètre de câblage du dispositif de protection contre
les surtensions et la longueur des câbles du climatiseur
doivent être conformes aux réglementations locales et aux
normes NEC (National Electrical Code).
16
SI VOUS UTILISEZ DES CÂBLES
AUTRES QU’À GAINE NON
MÉTALLIQUE EN TANT QUE
CONDUCTEURS D’ALIMENTATION,
VOUS DEVEZ UTILISER DES
CONNECTEURS OU DES SERRECÂBLE RÉDUCTEURS DE TENSION
APPROPRIÉS.
DANGER
RISQUE DE CHOC ÉLECTRIQUE
AFIN DE PRÉVENIR LA POSSIBILITÉ DE
BLESSURE PAR CHOC ÉLECTRIQUE, LE
FIL BLANC DOIT ÊTRE RACCORDÉ AU
CONDUCTEUR NEUTRE DANS L’ENTRÉE
DE LA BOÎTE DE RACCORDEMENT, ET LA
MISE À LA MASSE MÉCANIQUE DOIT ÊTRE
RACCORDÉE À UNE COSSE DE MASSE DANS
LA BOÎTE DE RACCORDEMENT OU DANS LE
COMPARTIMENT DU GROUPE
ÉLECTROGÈNE.
LES FILS D’ALIMENTATION
INDIVIDUELS NE DOIVENT JAMAIS
ÊTRE SERRÉS OU PINCÉS (FILS
NEUTRES ET FILS CHARGÉS).
VII. INSTALLATION DE L’ACCESSOIRE DE CHAUFFAGE FACULTATIF
REMARQUE
L’accessoire de chauffage facultatif sert à
éliminer la fraîcheur de l’air intérieur quand celui-ci
est quelques degrés trop frais pour être confortable.
L’accessoire de chauffage est un « éliminateur de
fraîcheur » efficace. Il ne remplace pas une fournaise.
Si vous installez un réchauffeur facultatif, positionnez le
réchauffeur dans l’ouverture de reprise d’air du climatiseur,
tel qu’illustré dans la Figure 5. Le support de réchauffeur
doit être installé par-dessus le bac à condensation métallique
extrudé et positionné entre le bac à condensation et le
bac de récupération en plastique (voir Figure 6). Serrez la vis
de fixation afin de fixer fermement l’ensemble et éviter qu’il
ne se déplace. Remplacez le bouton de commande du sélecteur
sur l’ensemble de plafond par celui fourni avec le réchauffeur
facultatif.
VIII. INSTALLATION DE L’ENSEMBLE DE PLAFOND (SÉRIE 9300)
Confirmez que vous avez correctement apparié le climatiseur
de toit et l’ensemble de plafond. Vous devez exécuter les
instructions pas à pas suivantes dans l’ordre qui suit afin
d’assurer une installation appropriée.
A.
Déballez soigneusement l’ensemble de plafond. Les
commandes de l’ensemble de plafond sont installées
en usine (sauf pour les ensembles de plafond pour
les installations avec module de
commande/thermostat télécommandé).
B.
Retirez la grille et les filtres de l’ensemble de
chauffage et mettez-les de côté.
C.
VOUS POUVEZ SAUTER L’ÉTAPE C SI VOUS
N’INSTALLEZ PAS L’ENSEMBLE
D’ACCESSOIRE DE CHAUFFAGE
FACULTATIF 9233(X)4551 IMMÉDIATEMENT.
D.
Fixez le collet de gaine au bac à condensation du
climatiseur avec trois (3) vis (voir Figure 9).
E.
Branchez la conduite électrique du climatiseur dans
la prise à 9 positions située du côté thermostat de
l’ensemble de plafond (voir Figure 7).
F.
Insérez le câblage d’alimentation à travers le serrecâble et dans la boîte de raccordement de façon à ce
que 10 à 15 cm (4 à 6 po) de câblage d’alimentation
se situe dans la boîte. Serrez le serre-câble sur la
gaine du câble d’alimentation afin d’en interdire
tout mouvement (voir Figure 8).
G.
Raccordez les fils d’alimentation aux queues de
cochon noire et blanche, et le fil de mise à la masse
à la queue de cochon verte située dans la boîte de
raccordement à l’aide des 3 marettes fournies.
IMPORTANT : Raccordez le fil d’alimentation noir
à la queue de cochon noire et le fil d’alimentation
blanc à la queue de cochon blanche. Fixez les
marettes de façon professionnelle avec du ruban
isolant homologué U.L. (voir Figure 8).
H.
Positionnez le bouclier métallique du boîtier de
commande au-dessus du thermostat, de l’interrupteur
et des boîtes de raccordement. Assurez-vous que
tous les fils sont enfoncés dans les boîtiers de
commande ou reposent dans la goulotte guide-fils
Branchez le cordon d’alimentation du réchauffeur
dans la prise à 2 positions (voir Figure 7).
RATTACHEZ TOUT LE CÂBLAGE AFIN
D’ÉVITER TOUT CONTACT AVEC LE
RÉCHAUFFEUR OU DES ARÊTES VIVES.
N’OUBLIEZ PAS QUE CETTE ZONE SERA
ASSUJETTIE À DE L’AIR CIRCULANT À
GRANDE VITESSE.
17
entre le thermostat et les boîtiers d’interrupteur et
que le bouclier du boîtier de commande ne les
pinceront pas. Le bouclier du boîtier de commande
est correctement installé lorsque les deux trous dans
le bouclier sont alignés avec les deux trous de vis de
la chute de l’ensemble de plafond (voir Figure 7).
I.
J.
Soulevez l’ensemble de plafond et fixez-le au
cadre de montage avec les 4 ensembles vis à
épaulement/ressort fournis. Les deux vis avant
doivent traverser les trous de dégagement dans le
bouclier de la boîte de commande métallique (voir
Figure 9).
Le carénage de l’ensemble de plafond est courbé de
façon à s’ajuster à un plafond bombé. Si l’ensemble
est installé sur un plafond plat et que les côtés de
carénage présentent des écarts, insérez les quatre vis
de 1,9 mm (3/4 po) optionnelles (fournies) à
travers les tiges de montage et fixez-les au cadre de
montage au-dessus (voir Figures 7, 8 et 9 pour
l’emplacement des vis).
K.
Tirez le tissu de gaine à travers l’ouverture de
décharge de l’ensemble de plafond. Pelez la
pellicule de protection de la bande adhésive installée
autour de l’ouverture de décharge. Pressez le tissu
de gaine fermement en position autour de l’ouverture.
Découpez l’excédent de tissu à l’intérieur de la
chute de l’ensemble de plafond avec un couteau
universel en prenant soin de ne pas déchirer le tissu
au-delà de la bande adhésive.
L.
Assurez-vous que les filtres anti-allergie sont
correctement positionnés dans la grille de plafond.
M.
Installez la grille de plafond en la positionnant sur
le dessous du carénage et en tournant les deux
attaches sur un quart de tour.
N.
Tournez le sélecteur à la position OFF (arrêt).
O.
Allumez le climatiseur de toit.
IX. INSTALLATION DE L’ENSEMBLE DE PLAFOND (SÉRIE 9400)
Confirmez que vous avez correctement apparié la pompe à
chaleur de toit et l’ensemble de plafond. L’unité les
instructions pas à pas suivantes dans l’ordre qui suit afin
d’assurer une installation appropriée.
A.
Déballez l’ensemble de plafond, séparez les
éléments individuels et retirez les deux grilles et
filtres du carénage de plafond.
B.
Fixez le collet de gaine au bac à condensation du
climatiseur avec les 3 vis fournies (voir Figure 12).
C.
Soulevez la chute de l’ensemble de plafond et insérez
le câblage d’alimentation à travers le serre-câble et
dans la boîte de raccordement de façon à ce que
10 à 15 cm (4 à 6 po) de câblage d’alimentation se
situe dans la boîte. Serrez le serre-câble sur la gaine
du câble d’alimentation afin d’en interdire le
mouvement (voir Figure 10).
D.
J.
Raccordez le fil d’alimentation noir à la queue de
cochon noire, le fil d’alimentation blanc à la queue
de cochon blanche et le fil de mise à la masse
d’alimentation à la queue de cochon verte située dans
la boîte de raccordement avec les 3 marettes fournies.
Fixez les marettes aux fils de façon professionnelle
avec du ruban isolant homologué U.L. (voir Figure
11).
E.
Enfoncez les fils d’alimentation et les marettes dans la
boîte de raccordement en évitant de pincer les fils,
fixez la boîte de raccordement avec les deux vis
fournies (voir Figure 11).
F.
Branchez la conduite électrique du climatiseur dans la
prise à 9 positions de la façon illustrée dans la Figure
10.
G.
Si vous installez l’ensemble d’accessoire de chauffage
facultatif, retirez le couvercle de la prise à 2 positions
et branchez le cordon d’alimentation du réchauffeur de
la façon illustrée dans la Figure 10.
H.
Soulevez la chute de l’ensemble de plafond jusqu’au
cadre de montage et fixez-la avec les 4 vis fournies
(voir Figure 12).
I.
RATTACHEZ TOUT LE CÂBLAGE AFIN
D’ÉVITER TOUTE POSSIBILITÉ DE
CONTACT AVEC DES ARÊTES VIVES OU
AVEC LE RÉCHAUFFEUR. N’OUBLIEZ PAS
QUE CETTE ZONE SERA ASSUJETTIE À DE
L’AIR CIRCULANT À GRANDE VITESSE.
Tirez le tissu de gaine à travers l’ouverture de
décharge de la chute de plafond. Pelez la pellicule de
protection de la bande adhésive installée autour de
l’ouverture. Pressez le tissu de gaine fermement en
position autour de l’ouverture. Découpez l’excédent
de tissu à l’intérieur de la chute de l’ensemble de
plafond avec un couteau universel en prenant soin de
ne pas déchirer le tissu au-delà de la bande adhésive.
K.
18
Soulevez le carénage de plafond, et en vous assurant
qu’il s’engage correctement dans la chute, fixez-le au
cadre de montage avec les 4 vis fournies (voir Figure
12).
L.
Installez les boutons de commande sur les tiges de
commutateur et de thermostat. Le bouton de
commande de thermostat (température) s’installe
immédiatement à côté du logo « Coleman-Mach ».
Si vous installez l’ensemble d’accessoire de chauffage
facultatif, employez le bouton de commande de
sélecteur compris dans l’ensemble.
M.
Réinstallez les filtres et les grilles dans le carénage de
l’ensemble de plafond.
N.
Tournez le sélecteur à la position OFF (arrêt).
O.
Allumez le climatiseur de toit.
X. VÉRIFICATION FONCTIONNELLE DU SYSTÈME
Airxcel, Inc. fabrique une gamme étendue de climatiseurs de
toit qui incorporent différentes caractéristiques de
fonctionnement de produit. Afin de correctement évaluer la
performance d’une pompe à chaleur nouvellement installée,
vous devez examiner les caractéristiques de fonctionnement
propres à l’unité décrites dans les instructions d’utilisation et
d’entretien du produit (ensemble d’enveloppe client).
19
RV Products Division
Airxcel, Inc.
RV Products Division
P.O. Box 4020
Wichita, KS 67204
Coleman is a registered trademark of The Coleman Company, Inc. used under license. Mach is a registered trademark.
1976C520 (1-14) PP
20