1
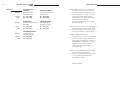
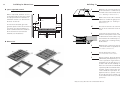
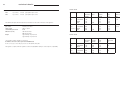
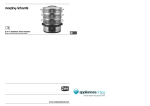
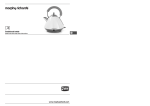
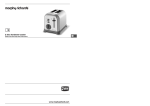
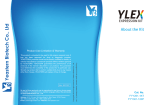
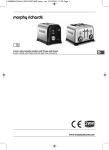
USE AND CARE GUIDE
Guide d'utilisation et d'entretien
Bruksanvisning
art. nr. 700001505000
Guía de uso y cuidados
Brugs- og vedligeholdelsesvejledning
Bruks- og vedlikeholdsveiledning
Guia de Utilização e Manutenção
Guida per l'uso e la manutenzione
Käyttö- ja hoito-opas
Bedienungsanleitung
Gebruikers- en Onderhoudshandleiding
HOB T120
HOB T130
english
AU
page 1 - 19
hob T130
large burner
normal burner
pan support
2-zone wok burner
normal burner
simmer burner
control knob burner
hob T120
large burner
simmer burner
pan support
normal burner
control knob burner
normal burner
hob T130
AU
wok burner
left front burner
right front burner
left rear burner
right rear burner
contents
hob T120
2|
|3
left rear burner
left front burner
right rear burner
where you can find ASKO
introduction
4|5
for your safety
4|5
things to watch out for
6|7
lighting and adjusting
8|9
cooking in comfort
8|9
saving energy
right front burner
10 | 11
keeping your appliance looking good
10 | 11
solving problems yourself
12 | 13
building-in – preliminary notes
14 |
building-in dimensions
| 15
building-in
16 |
technical details
18 | 19
disposal of packaging and appliance
18 | 19
ASKO’s guarantee
english
}
where you can find
ASKO
2
Australia
Adress:
Phone:
Fax:
Adress:
Phone:
Fax:
Adress:
Phone:
Fax:
introduction
ASKO Appliances
VICTORIA
35 Sunmore Close
Moorabbin 3189
03 - 8551 2200
03 - 8551 2220
NEW SOUTH WALES
F3 / 3-9 Birnie Avenue
Lidcombe 2141
02 - 8748 2900
02 - 8748 2920
QUEENSLAND
2/112 Fison Ave Eagle Farm,
QLD. 4009
07 - 3868 2989
07 - 3868 2991
SOUTH AUSTRALIA
45 Hampton Road
Keswick, S.A. 5035
08 - 8293 1833
08 - 8293 8399
WESTERN AUSTRALIA
15 Walters Drive
Osborne Park 6017
08 - 9244 4366
08 - 9244 4175
}
You have chosen to cook with gas.
You have therefore also chosen a
hob which offers optimum ease of
use. The gas hob is easy to operate,
heats up quickly and is reliable.
Furthermore, the gas flame can be
adjusted very accurately.
Professional chefs don't cook with
gas for nothing!
}
Thanks to the spacious positioning of
the wok burner, a wok can be used
and leave minimal two burners free
for the preparation of other dishes.
}
By reading through these
instructions you can find out quickly
and simply about the possibilities
offered by your appliance. Advice on
safety and the maintenance of your
appliance is included, as well as
environmental tips and ways of
saving energy.
}
Do not throw away the instructions
for use and the installation
instructions. Another user who takes
on the appliance will find this
information useful.
Happy cooking.
3
4
for your safety
5
±
ventilation
do
]
}
don’t
When a gas cooking appliance is being
used heat and moisture is produced in
the area where the appliance is situated.
Make sure that the area is sufficiently
ventilated; open natural ventilation
openings or fit a mechanical ventilator
(extractor).
When the hob is used for longer periods
extra ventilation may be needed, such as
an open window or a higher setting on
the ventilator (extractor).
}
Never cover ventilation openings in the
kitchen.
}
Do not block the combustion air
openings at the rear of the hotplate.
}
Do not spray aerosols in the vicinity of
the appliance while in operation.
}
Where the appliance may be installed in
marine craft or caravans it shall not be
used as a space heater.
use
]
}
This cooking appliance is designed for
household use. It should only be used
for preparing meals.
}
Do not use the appliance to heat the
kitchen. This will produce a damp
atmosphere.
pans
]
}
Use pans with a diameter of between
12 and 28 cm.
}
Smaller pans will be unstable, and
larger pans may cause walls or knobs
to overheat.
Using pans which are too big may
deform the control knobs or discolour
the walls. This is not covered by the
guarantee.
flambéeing under extractor hood
]
}
}
Never flambe under an extractor. The
high flames can cause fire. Even if the
ventilator is switched off.
]
}
Only appliances equipped with an
electronic igniter have a flex.
check: the distance between pan and
knob and the distance between pan and
wall.
}
The distance from a knob or a non heat
resistant wall is always greater than
2 cm.
}
If the pan is nearer, the knobs or the
wall may become discoloured or
deformed.
check: that the pan supports are
positioned correctly on the drip tray.
}
When the flame reaches the ends of the
pan support, the flame could damage
the enamel.
}
Discoloration of or damage to the
enamel of the pan supports is not
covered by the guarantee.
things to watch out for
1 open the mains tap
2 plug the appliance in
6
lighting and adjusting
7
lighting
]
}
Push the control in and turn it to the full
on position. The burner lights
automatically.
adjusting
]
}
You may set the knob at any position
between full-on and simmer.
flame protection
]
}
These appliances are fitted with a
thermocouple. This is a thermoelectric
protection system. It ensures that the
gas tap is closed if the flame goes out.
A symbol below the control knob
indicates which burner is being operated.
}
If a burner refuses to light, always
check:
- that the cover is properly aligned on
the burner;
- that the burner is clean and dry.
}
It is important that you check regularly
whether or not this protection system is
working properly.
testing
1. Blow out the flame and wait for one
minute. The gas tap now closes, and
no more gas should come out of the
burner.
2. Hold a lighted match next to the
burner. The burner should not ignite
now. If it does, you should contact
the service department immediately.
cooking in comfort
8
9
sauteing and frying
deep-frying and blanchin, boiling large
quantities stir-frying
]
}
are best done on the rapid burner. This
gives the greatest heat.
}
Choose the right sized pan. The best is
between 16 and 28 cm in diameter,
although a 10 cm pan will also fit on the
burner.
stewing and steaming
cooking standard portions
making a roux
]
}
The vario burner is ideal for preparing
portions for about 4 people.
}
Choose the right sized pan. The best is
between 16 and 28 cm in diameter,
although a 10 cm pan will also fit on the
burner.
making sauces
keeping food hot
cooking through/simmering
]
}
are best done on the simmer burner.
}
At full heat, this burner is large enough
to cook food through.
stir-frying
]
}
is best done on the 2 zone wok burner.
}
This burner is particularly suitable for
stir-frying in a wok. In addition to using
the wok burner for stir-frying, you can
also use it for stewing, steaming and
deep-frying small quantities in the wok.
pan supports
]
}
The pan supports should have their
narrow edges next to each other. When
removing and fitting the grids, take care
that you remove them by lifting them
straight up and fit them by lowering
them straight down, so that you avoid
scratching the drip tray.
}
Be careful: always fit the wok support
(hob T130) on the auxillary support at
an angle of 45 degrees. A wrongly fitted
wok support will become too hot,
resulting in possible damage.
saving energy
wrong
wrong
do not use too small a pan
]
}
The points of the flames are hottest. If
flames escape around the sides of the
pan much heat is lost.
cook with the lid on the pan
]
}
This can save on energy by up to 50%.
use heavy pans
]
}
Thin and light pans will cause food to
burn on the pan more easily. They will
also lose their shape more easily and
therefore become less stable.
right
}
To use the gas as efficiently as possible
it is best to use a pan with a large
diameter.
}
If the base of the pan is thick it will take
a little more time for the heat to reach
the food, but the base will have a more
uniform temperature.
right
10
keep your appliance looking
good
◆Regular wiping down directly after use
prevents dirt from burning on and
resulting in stains which are difficult to
remove.
11
do
don’t
daily
]
}
Clean the appliance with water and a
detergent or all purpose cleaner.
}
Avoid using too much water to prevent
it entering the burner or ventilation
openings.
stubborn stains on enamel
]
}
Remove with a non-abrasive cream or a
soft sponge.
}
Never use scouring powders,
aggressive cleaning agents, green
scours.
stubborn stains on stainless steel
]
}
Remove with 3M cleaner for stainless
steel or a non-scouring sponge. These
sponges can be recognised by their
white surface e.g. Scotch Brite no. 373.
}
Green scours contain scouring agents
which can scratch stainless steel. The
structure of the stainless surface is
such that (shiny) spots may appear
after polishing or scouring.
}
If stains cannot be removed, clean the
hob with the proprietary HG barbecue
grill & oven cleaner. Always treat the
whole drip-tray, to prevent "colour
differences". Always treat with a
stainless steel polish/care product
afterwards.
Any spillage should be removed
immediately, particularly red cabbage,
apple sauce and rhubarb. These can
leave permanent spots on the enamel or
on stainless steel.
This damage is not covered by the
guarantee.
note
]
}
burner does not burn well
]
}
Burner dirty or moist.
}
Clean and/or dry the burner.
burner does not ignite
]
}
Hob not suitable for type of gas.
}
Check identification plate and if
necessary have the appliance adapted.
}
Burner dirty or moist.
}
Clean and/or dry the burner.
}
One burner not working.
}
Turn all burners off.
}
Do not use the defective burner. Call
the Service Department.
}
Do not drop hot burner caps in cold
water. Because of the strong cooling
they might get damaged.
solving problems yourself
◆If your appliance does not operate as
required, check first if you can solve the
problem yourself by using the table below.
The cause of the problem is often a simple
one.
cause
remedy
building-in
preliminary notes
12
building-in
preliminary notes
The fitting of the appliance should only be
carried out by registered Corgi gas fitter.
warning: Ensure that the hose assembly is restrained
from accidental contact with the flue or flue
outlet of an underbench oven. The hose
should not be subjected to abrasion,
kinking or permanent deformation and
should be able to be inspected along its
entire length. Unions compatible with the
hose fittings must be used and connections
tested for gas leaks. The supply connection
point shall be accessible with the appliance
installed.
please note: The type of gas in the country for which the
appliance is equipped is stated on the data
plate.
This appliance must be installed by an
authorized person.
This appliance shall be installed in
accordance with the manufacturers
installation instructions, local gas fitting
regulations, municipal building codes,
electrical wiring regulations, AS5601 /
AG601 - Gas installations and relevant
statutory regulations.'
please note: Before operating the appliance, check the
gas connections with a soap/water mix for
any leaks.
electrical connection
The appliance is not suitable for connection
with a flexible hose.
}
gas connection RC 1/2"
240 V a.c., 50 Hz - 0.6 Watt
This hotplate is supplied with a plug &
cord. Simply plug into a 3 pin household
socket outlet which is properly earthed.
There are two ways to carry out the
(ISO 7/1-RC 1/2)
connection to the main gas line:
A nipple 1/2” (ISO 228-1-G 1/2A) is
supplied for those countries where it is A. The hotplate can be connected with rigid
required.
pipe as specified in AS5601 table 3.1.
B. The hotplate can be connected with a
Flexible Hose, which complies with
AS/NZS 1869 (AGA Approved), 10 mm
ID, class B or D, no more than 1.2 m long
and in accordance with AS5601. Ensure
that the Hose does not contact the hot
surfaces of the hotplate, oven,
dishwasher or other appliance that may
be installed underneath or next to the
hotplate.
warning: In order to avoid hazard, any electrical work
performed on this equipment or its
associated wiring, should only be done by
persons authorised by the supplier or
similarly qualified persons.
}
If the supply cord is damaged, it shall be
replaced by the manufacturer or its service
agent or similarly qualified person in order
to avoid a hazard.
The socket outlet for this hotplate shall be
installed near the hotplate and shall be
easily accessible.
13
building-in dimensions
14
}
building-in
50
space required around
Where cupboards, drawers etc. are
located beneath the hob, there must
be a physical barrier installed at a
minimum clearance of 10 mm from
the base of the hob.
In view of the fact that gas hobs
generate quite an amount of heat it is
necessary, for safe installation, to
allow a sufficient distance between
the hob and non heat-resistant
material (see illustration).
}
min. 600 mm for hob T120
min. 750 mm for hob T130
15
1
Make the cut-out in the work surface.
Ensure that there is sufficient space
allowed at the sides and at the back
(see ”building-in dimensions”).
2*
Make a hole in the side of the kitchen
cabinet to enable the gas pipe to be
passed through (see ”building-in
dimensions”).
3*
Place the hob in the cut-out. Check that
the air inlets at the back of the hob are
clear.
4
Secure the hob in position. The
brackets clamp either at the sides or
underneath the work surface. Tighten
the bracket bolts sufficiently to ensure
the under seal is seating evenly on the
work surface.
5
Make the gas connection. Check the gas
connections with a soap/water mix
(see "Gas Connection").
6
Put the plug in the socket
(see "Electrical Connection").
7
Before Leaving - Ignite all burners both
individually and separately to ensure
correct operation of gas valves, burners
and ignition. Turn gas taps to low flame
position and observe stability of the
flame for each burner individually and
separately. When satisfied with the
hotplate, please instruct the user on the
correct method of operation. In case the
appliance fails to operate correctly after
all checks have been carried out, refer
to the authorised service provider in
your area.
min. 650 mm
min. 450 mm
min. 100 mm
min. 100 mm
min. 10 mm
dimensions
* Only necessary when an oven is fitted under the hob
technical details
16
17
ASKO T130
model number
version
T130
top controls
5 flame
spark ignition part control
T120
top controls
4 flame
spark ignition part control
GAS
BURNER
SIMMER
N.G.
The identification plate with the model and serial number can be found on the base of the appliance.
INJECTOR
INJECTOR
ADJ.
BURN
GAS
BURNER
WOK
SCREW
RATE
PRESSURE
IN MM
IN MM
MJ/h
kPa
0.90
0.45
3.60
2 x NORMAL
1.20
0.60
6.70
LARGE
1.35
0.65
8.50
WOK
1.80
1.16
14.90
SIMMER
0.48
0.30
2.90
2 x NORMAL
0.66
0.36
5.10
0.77
0.40
7.30
0.65
11.70
gas source
natural gas or LPG*
LPG
energy source
240 V a.c.,50 Hz
(propane) LARGE
overall wattage electrical
0.6 W
dimensions (w x d)
750 x 526 hob T130
WOK
0.93
3.00
2.30
600 x 526 hob T120
weight
approximately 18 kg hob T130
ASKO T120
approximately 11 kg hob T120
GAS
BURNER
* The appliance will be suitable for natural gas.
For LPG Gas conversion contact your nearest ASKO Branch.
SIMMER
For the correct gas source and gas pressure see the identification plate.
N.G.
This appliance complies with the regulations of directive 89/336/EEC relating to electromagnetic compatibility.
LPG
INJECTOR
ADJ.
BURN
GAS
BURNER
SCREW
RATE
PRESSURE
kPa
IN MM
IN MM
MJ/h
0.90
0.45
3.60
2 x NORMAL
1.20
0.60
6.70
LARGE
1.35
0.65
8.50
SIMMER
0.48
0.30
2.90
2 x NORMAL
0.66
0.36
5.10
0.77
0.40
7.30
(propane) LARGE
1.0
2.75
1.0
2.75
18
disposal of packaging
and appliance
19
The packaging of the appliance is
recyclable. It is made up of:
- cardboard;
- polyethylene film (PE);
- CFC free polystyrene (PS rigid foam).
]
}
Please dispose of these materials in a
responsible way in accordance with the
regulations of your local authority.
A household appliance should always offer
ASKO quality is equally high worldwide,
Troublefree performance. It cannot just
but the guarantees vary from country to
suddenly stop working, it should not be noisy or
country depending on legislation and
vibrate, nor should it be dirty or ugly, waste
other factors. Guarantees and terms of
water and electricity, or blink obstinately while
sale are presented on a separate page
refusing to allow itself to be programmed. The
that accompanies your machine.
whole point of household appliances is to make
your life troublefree - not be the cause of your
◆ excluded from the guarantee
troubles!
When we created ASKO, we did all we could to
prevent problems by incorporating high quality,
transport damages
]
reliability, timeless design, and efficient
features into a few, carefully selected models.
However, no matter how hard you try, at some
installation errors
]
point someone may require service on an
appliance. Since neither we, nor any other
manufacturer can guarantee 100% reliability,
we created a unique service concept for our
ASKO customers which guarantees that we will
take care of any problem that might arise improper use
]
before it starts to trouble you.
and incorrect or insufficient maintenance
}
Check your new appliance before using it. } Contact your supplier if you discover
any damages.
}
Defects or damages resulting from
} Insufficient ventilation or faulty
installation errors, are excluded from the
electrical connections, for example.
guarantee.
Complaints resulting from changes to
the appliance are also excluded from
the guarantee.
}
Examples include broken glass or
damages to the enamel finishing caused
by bumps or by dropping objects on or
against the appliance.
]
}
Examples include broken light bulbs,
discolouration of synthetic or enamelled
parts, and scratches.
]
}
In countries with an ASKO establishment, } In all other countries, please contact
please contact the ASKO Service
your supplier or your ASKO importer.
Department.
}
Your local authority will also be able to
give you information about disposing
disused household appliances in a
responsible way.
ASKO’s guarantee
troublefree housekeeping
◆ scope of the terms of guarantee
We call it 'troublefree housekeeping'. For us
this is a way to stay in touch with our
customers, to make sure that you are still
satisfied after 2 years, as well as after 13. In
wear due to use
practice, the Troublefree housekeeping concept
or ageing
gives you the best service possible.You can call
on the Troublefree line at any time to ask
◆ whom to contact
questions or request service.
We will still stay in touch with you and
your appliance for as long as you use it - and
we expect that to be a long time!
}
Insufficient or improper maintenance
may also result in discolouration of
surfaces or rapid ageing of rubber and
plastic parts. These complaints are also
excluded from the guarantee.