1
AMI StorTrends® iTX
Installation and Login
Intel® Storage System SSR212MC2
Recipe ID: 27AMIX46INTC000000-01
StorTrends® iTX Installation and Login
Intel® Server System SSR212MC2
WWW.intel.com/go/esaa
The information contained in this document is provided for informational purposes only and represents the current view of Intel Corporation
(“Intel”) and its contributors ("Contributors") on, as of the date of publication. Intel and the Contributors make no commitment to update the
information contained in this document, and Intel reserves the right to make changes at any time, without notice.
DISCLAIMER. THIS DOCUMENT, IS PROVIDED “AS IS.” NEITHER INTEL, NOR THE CONTRIBUTORS MAKE ANY REPRESENTATIONS OF
ANY KIND WITH RESPECT TO PRODUCTS REFERENCED HEREIN, WHETHER SUCH PRODUCTS ARE THOSE OF INTEL, THE
CONTRIBUTORS, OR THIRD PARTIES. INTEL, AND ITS CONTRIBUTORS EXPRESSLY DISCLAIM ANY AND ALL WARRANTIES, IMPLIED
OR EXPRESS, INCLUDING WITHOUT LIMITATION, ANY WARRANTIES OF MERCHANTABILITY, FITNESS FOR ANY PARTICULAR
PURPOSE, NON-INFRINGEMENT, AND ANY WARRANTY ARISING OUT OF THE INFORMATION CONTAINED HEREIN, INCLUDING
WITHOUT LIMITATION, ANY PRODUCTS, SPECIFICATIONS, OR OTHER MATERIALS REFERENCED HEREIN. INTEL, AND ITS
CONTRIBUTORS DO NOT WARRANT THAT THIS DOCUMENT IS FREE FROM ERRORS, OR THAT ANY PRODUCTS OR OTHER
TECHNOLOGY DEVPSLOPED IN CONFORMANCE WITH THIS DOCUMENT WILL PERFORM IN THE INTENDED MANNER, OR WILL BE
FREE FROM INFRINGEMENT OF THIRD PARTY PROPRIETARY RIGHTS, AND INTEL, AND ITS CONTRIBUTORS DISCLAIM ALL LIABILITY
THEREFOR.
INTEL, AND ITS CONTRIBUTORS DO NOT WARRANT THAT ANY PRODUCT REFERENCED HEREIN OR ANY PRODUCT OR TECHNOLOGY
DEVPSLOPED IN RELIANCE UPON THIS DOCUMENT, IN WHOLE OR IN PART, WILL BE SUFFICIENT, ACCURATE, RELIABLE, COMPLETE,
FREE FROM DEFECTS OR SAFE FOR ITS INTENDED PURPOSE, AND HEREBY DISCLAIM ALL LIABILITIES THEREFOR. ANY PERSON
MAKING, USING OR SELLING SUCH PRODUCT OR TECHNOLOGY DOES SO AT HIS OR HER OWN RISK.
Licenses may be required. Intel, its contributors and others may have patents or pending patent applications, trademarks, copyrights or other
intellectual proprietary rights covering subject matter contained or described in this document. No license, express, implied, by estoppel or
otherwise, to any intellectual property rights of Intel or any other party is granted herein. It is your responsibility to seek licenses for such
intellectual property rights from Intel and others where appropriate.
Limited License Grant. Intel hereby grants you a limited copyright license to copy this document for your use and internal distribution only.
You may not distribute this document externally, in whole or in part, to any other person or entity.
LIMITED LIABILITY. IN NO EVPSNT SHALL INTEL, OR ITS CONTRIBUTORS HAVPS ANY LIABILITY TO YOU OR TO ANY OTHER THIRD
PARTY, FOR ANY LOST PROFITS, LOST DATA, LOSS OF USE OR COSTS OF PROCUREMENT OF SUBSTITUTE GOODS OR SERVICES,
OR FOR ANY DIRECT, INDIRECT, SPECIAL OR CONSEQUENTIAL DAMAGES ARISING OUT OF YOUR USE OF THIS DOCUMENT OR
RELIANCE UPON THE INFORMATION CONTAINED HEREIN, UNDER ANY CAUSE OF ACTION OR THEORY OF LIABILITY, AND
IRRESPECTIVPS OF WHETHER INTEL, OR ANY CONTRIBUTOR HAS ADVANCE NOTICE OF THE POSSIBILITY OF SUCH DAMAGES.
THESE LIMITATIONS SHALL APPLY NOTWITHSTANDING THE FAILURE OF THE ESSENTIAL PURPOSE OF ANY LIMITED REMEDY.
Intel, the Intel logo, and Intel Xeon are trademarks or registered trademarks of Intel Corporation or its subsidiaries in the United States and
other countries.
*Other names and brands may be claimed as the property of others.
Copyright © 2007, Intel Corporation. All Rights Reserved.
4
StorTrends® iTX Installation and Login
Intel® Server System SSR212MC2
Contents
CONTENTS ............................................................................................................ 5
HARDWARE COMPONENTS ................................................................................ 7
SOFTWARE USED IN THE INSTALLATION......................................................... 7
HARDWARE USED IN THE INSTALLATION ........................................................ 7
ABOUT STORTRENDS® ITX ................................................................................ 7
Obtaining Software ........................................................................................................................... 8
Software Environment ...................................................................................................................... 8
STORTRENDS® ITX INSTALLATION................................................................... 9
Overview ............................................................................................................................................ 9
Remove Any PCI NIC Add-on Cards ............................................................................................. 11
Attach a Keyboard, Monitor and External USB CD-ROM Drive.................................................. 11
Installation Procedure .................................................................................................................... 11
Get the IP address........................................................................................................................... 15
Connecting to the StorTrends® iTX Storage Appliance from another system ........................ 17
Logging on to the StorTrends® iTX Storage Appliance ............................................................. 17
USING THE QUICK START SETUP WIZARD ..................................................... 19
Step One: Quick Start Setup Wizard ............................................................................................. 20
Step Two: RAID Level ..................................................................................................................... 20
Step Three: SAN or NAS or Both................................................................................................... 21
Step Four: Allocating Space .......................................................................................................... 22
Step Five: Summary View .............................................................................................................. 23
Step Six: All Done No Errors.......................................................................................................... 26
USING THE ADVANCED SETUP WIZARD ......................................................... 27
5
StorTrends® iTX Installation and Login
Intel® Server System SSR212MC2
Step One: Advanced Wizard .......................................................................................................... 27
Step Two: Create a New Storage Pool .......................................................................................... 28
Step Three: Select Pool .................................................................................................................. 28
Set the RAID Levels ........................................................................................................................ 29
Type in the Storage Pool’s Name .................................................................................................. 30
Step Four: Configure SAN Volume................................................................................................30
Enter Volume Name ........................................................................................................................ 31
Enter Volume Size ........................................................................................................................... 31
Select Thin or Exact Provisioning ................................................................................................. 32
Select SAN as the Dialect Type ..................................................................................................... 32
Create Target and Target Name..................................................................................................... 32
Step Five: Configure NAS Volume ................................................................................................ 32
Enter Volume Name ........................................................................................................................ 33
Enter Volume Size ........................................................................................................................... 33
Select Thin or Exact Provisioning ................................................................................................. 33
Create Share and Share Name....................................................................................................... 34
Step Six: Summary View and Status............................................................................................. 34
Step Seven: All Done No Errors .................................................................................................... 35
APPENDIX A: STORAGE APPLIANCE CONFIGURATION................................ 36
APPENDIX B: UPDATING AN EVALUATION LICENSE .................................... 37
ADDITIONAL DOCUMENTATION ....................................................................... 40
6
StorTrends® iTX Installation and Login
Intel® Server System SSR212MC2
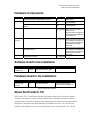
Hardware Components
Quantity
1
Item
Intel® Storage System SSR212MC2– (Server)
Manufacturer Model
Intel
SSR212MC2
1 (Select one) Intel® HDD Backplane – SR1500 1U SAS active
Intel
ASR1500SASBP
Intel® HDD Backplane – SR1500 1U SATA/SAS
passive
Intel
ASR1500PASBP
4 GB minimum Memory
Any supported Please refer to the Tested
Memory List at
http://www.intel.com/support/m
otherboards/server/s5000pal/s
b/CS-022919.htm
1 – 12 (250GB SAS or SATA 3.5-inch hard drives
minimum)
Any supported Please refer to the Server Hard
Drive Validation Test Report at
http://www.intel.com/support/m
otherboards/server/sb/CS025416.htm
1
SAS or SATA 2.5-inch hard drive (to be used as
internal boot drive)
1
Gigabit Ethernet Switch
Any supported Please refer to the Server Hard
Drive Validation Test Report at
http://www.intel.com/support/m
otherboards/server/sb/CS025416.htm
Any Supported
Table 1 – Intel® Storage System SSR212MC2R Configuration Hardware
Software Used in the Installation
Item
StorTrends® iTX
Installation CD
Version
Manufacturer
2.7.1019
American Megatrends (AMI)
Comment
Table 2 - Software Bill of Materials
Hardware Used in the Installation
Item
External CD-ROM
Drive with USB
connector
Version
Manufacturer
Comment
N/A
(none recommended)
To be used when loading
StorTrends iTX Installation CD
Table 3 -Hardware Bill of Materials
About StorTrends® iTX
StorTrends® iTX 2.7 Dual Dialect Storage Software provides both file and block-based
storage functionality in a single, intuitive software stack, enabling businesses to utilize
existing Ethernet networks to simplify data management and reduce storage expenditures.
Designed for enterprise-level high availability and disaster recovery, it is cost-effective,
scalable, and suitable for both novice and advanced users. StorTrends® iTX 2.7 allows
7
StorTrends® iTX Installation and Login
Intel® Server System SSR212MC2
customers to enjoy the advantages of the storage centralization and scalability of IP-based
Storage Area Networks, and the ease of use and file-sharing of Network Attached Storage,
on a single platform at an attractive price.
For more information on StorTrends® iTX, please visit the StorTrends web site at
http://www.StorTrends.com.
Obtaining Software
To request a copy of the 45-day StorTrends iTX Evaluation Kit, or to purchase a copy of
StorTrends iTX, please contact the AMI Storage Sales Department toll-free at 1-800-U-BUYAMI (1-800-828-9264). Alternatively, to place a request for an Evaluation Kit, you may
complete the Evaluation Kit Request Form at www.stortrends.com with your complete
mailing address and contact information. Please allow 5-7 days for mail delivery of
Evaluation Kits, depending on your location.
For interested overseas customers, please contact AMI’s US Headquarters at the phone
number and email listed above, so that we may connect you with your regional AMI overseas
office.
Additional product documentation, including copies of the StorTrends iTX/ManageTrends Set
up Guide, User Guide, Product Data Sheets, Whitepapers and much more are available
online at www.ami.com.
Finally, please refer to the documentation included in the StorTrends iTX Evaluation Kit CD or
contact an AMI Storage Sales Representative at 1-800-U-BUY-AMI for more information and
assistance with the recommended evaluation procedures for StorTrends iTX.
Software Environment
StorTrends iTX is based on a Linux kernel and operates through the intuitive
ManageTrends® web-based user interface, as well as through a versatile command-line
interface (CLI) environment.
The ManageTrends GUI is customizable and features several different “themes”, familiar
icons and an organizational layout that is amenable to both novice and advanced users
alike.
8
StorTrends® iTX Installation and Login
Intel® Server System SSR212MC2
StorTrends® iTX Installation
Overview
Use the StorTrends iTX Installation CD from AMI to install the StorTrends iTX software on to
your Intel® Storage Server SSR212MC2. An external USB CD-ROM drive (not included) must
be attached to one of the USB ports on the Intel® Storage Server SSR212MC2 (located in
the rear of the device and front left handle) to do so. Once the StorTrends iTX Installation CD
is loaded into the CD-ROM drive and the Intel® Storage Server SSR212MC2 is set to boot
from the CD, the Install Wizard will automatically begin. Follow the instructions listed during
the installation to complete the installation procedure. The StorTrends iTX software
installation is a relatively fast process that should not take more than 30 minutes.
Once StorTrends iTX software installation is complete, StorTrends iTX will display a prompt to
log in (using the default user name and password). At that time, the initial storage
configuration of the Intel® Storage Server SSR212MC2 can begin.
This document outlines the StorTrends iTX software installation and the initial storage
configuration process (through the use of either the Quick Start Setup Wizard or the
Advanced Setup Wizard) of the Intel® Storage Server SSR212MC2 in greater detail.
STOP!
READ THE INTEL® STORAGE SERVER SSR212MC2 / SSR212MCR QUICK START USER’S
GUIDE PRIOR TO BEGINNING THE STORTRENDS ITX INSTALLATION. IT IS A PRINTED
PIECE OF PAPER THAT SHOULD HAVE BEEN SHIPPED WITH THE INTEL® STORAGE
SERVER SSR212MC2.
THIS GUIDE DESCRIBES HOW TO INSTALL THE STORTRENDS ITX SOFTWARE ON THE
INTEL® STORAGE SERVER SSR212MC2 ONLY.
THIS GUIDE DOES NOT DESCRIBE HOW TO INSTALL CPU, MEMORY, HARD DISK
DRIVES OR OTHER HARDWARE COMPONENTS. SEE THE INTEL® STORAGE SERVER
SSR212MC2 / SSR212MCR QUICK START USER’S GUIDE FOR MORE INFORMATION.
AT LEAST ONE (1) NOTEBOOK HARD DISK DRIVE MUST BE INSTALLED IN YOUR
INTEL® SERVER SYSTEM SSR212MC2 IN ORDER TO INSTALL STORTRENDS ITX.
STORTRENDS ITX WILL ATTEMPT TO INSTALL ITSELF ONTO THE INTERNAL
NOTEBOOK HARD DISK DRIVE (S) IN THE INTEL® STORAGE SERVER. THE INTEL®
SERVER SYSTEM SSR212MC2 SUPPORTS UP TO TWO NOTEBOOK HARD DISK
DRIVES. STORTRENDS ITX WILL AUTOMATICALLY DETECT WHETHER ONE OR TWO
NOTEBOOK HARD DISK DRIVES ARE PHYSICALLY INSTALLED.
9
StorTrends® iTX Installation and Login
Intel® Server System SSR212MC2
IF THERE IS ONLY ONE NOTEBOOK HARD DISK DRIVE INSTALLED, A MESSAGE
STATING, “WARNING!!! DETECTED A SINGLE OS DISK FOR THE STORTRENDS ITX
INSTALLATION. ANY OS DISK FAILURE WILL RESULT IN THE SYSTEM BECOMING
UNUSABLE. CHOOSE “YES” TO CONTINUE, “NO” TO EXIT FROM THE INSTALLATION”
WILL BE DISPLAYED
IF TWO NOTEBOOK HARD DISK DRIVES ARE INSTALLED, STORTRENDS ITX WILL
AUTOMATICALLY DETECT THEM AND WILL MIRROR THE INSTALLATION OF ITSELF
OVER BOTH HARD DISK DRIVES. PRIOR TO BEGINNING THE INSTALLATION, THE
FOLLOWING MESSAGE, “DETECTED MULTIPLE DISKS. THE OS WILL BE INSTALLED ON
A RAID 1 ARRAY” WILL BE DISPLAYED
IT IS RECOMMENDED THAT TWO HARD DISK DRIVES BE PRESENT IN THE SYSTEM
FOR INSTALLATION OF STORTRENDS ITX.
IN ORDER TO INSTALL STORTRENDS ITX, AN EXTERNAL USB CD-ROM DRIVE
MUST BE ATTACHED TO THE SYSTEM. THE APTIO SETUP UTILITY (AMIBIOS)
MUST BE CONFIGURED TO BOOT FROM THIS USB CD-ROM DRIVE.
10
StorTrends® iTX Installation and Login
Intel® Server System SSR212MC2
Remove Any PCI NIC Add-on Cards
STOP!
IF ADDITIONAL NIC CARDS ARE PRESENT IN THE SYSTEM, THEY MUST BE REMOVED
BEFORE PROCEEDING WITH THE INSTALLATION.
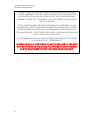
Attach a Keyboard, Monitor and External USB CD-ROM Drive
Attach a keyboard, monitor and external USB CD-ROM drive to the Intel® Server System
SSR212MC2 (See the Intel® Storage Server SSR212MC2 / SSR212MCR Quick Start User’s
Guide folded sheet for more information). Power on the Intel® Server System SSR212MC2
and insert the StorTrends iTX Installation CD into the external USB CD-ROM drive.
Installation Procedure
Step
Description
1
11
StorTrends® iTX Installation and Login
Intel® Server System SSR212MC2
Step
Description
Once the keyboard, monitor and external USB CD-ROM Drive have been attached,
power on the Intel® Server System SSR212MC2.
2
Enter the Aptio® Setup Utility (AMIBIOS) to configure the system to boot from the
StorTrends iTX Installation CD. The Intel® Server System SSR212MC2 takes
approximately one and a half minutes to get to the screen that prompts to enter
SETUP.
When prompted with, “Press <F2> to enter setup, <F12> Network boot,”
press the <F2> key on the keyboard.
Version X.XX.XXX. Copyright (C) 2005-2XXX American Megatrends, Inc.
Press <F2> to enter setup, <F12> Network Boot
Step
Description
3
If performed successfully, the Aptio Setup Utility screen should display. If not, reset the
power on the Intel® Server System SSR212MC2 and start over.
Aptio Setup Utility - Copyright (C) 2005-2007 American Megatrends, Inc.
Main Advanced
Security
Server Management
Boot Options
Logged in as Administrator
Platform ID
XXXXXXXX
System BIOS
Version
Build Date
XXXXXXX.XXX.XX.XX.XXXX
MM/DD/YEAR
Processor
Intel (R) Xeon (R) CPU
Core Frequency
Count
XXXX @ X.XX GHz
X.XX GHz
X
Memory
Size
X GB
Quiet Boot
POST Error Pause
[Disabled]
[Disabled]
System Date
System Time
[Mon MM/DD/YEAR]
[HH:MM:SS]
Boot Manager
[Enabled] - Display the logo
screen during POST.
[Disabled] - Display the
diagnostic screen during POST.
+/Enter
F1
F9
F10
ESC
Select Screen
Select Item
Change Value
Select Field
General Help
Optimized Defaults
Save and Exit
Exit
Version X.XX.XXXX, Copyright (C) 2005-2007 American Megatrends, Inc.
12
StorTrends® iTX Installation and Login
Intel® Server System SSR212MC2
Step
Description
4
Using the <RIGHT ARROW> key, select Boot Manager. Using the <UP ARROW> and
<DOWN ARROW> keys, select the USB CD-ROM Drive. Press the <ENTER> key to
boot from the StorTrends iTX Installation CD.
Aptio Setup Utility - Copyright (C) 2005-2007 American Megatrends, Inc.
Main
Advanced
Security
Server Management
Boot Options
BRANDNAME CD-ROM USBDRIVE
#0400 ID02 LUN0 ATA NOTEBOOKHDD
IBA GE Slot 0501 vXXXX
[EFI Shell]
Boot Manager
Select this option to boot
now.
Note: This list is not the
system boot option order. Use
the Boot Options menu to view
and configure the system boot
option order.
+/Enter
F1
F9
F10
ESC
Select Screen
Select Item
Change Value
Select Field
General Help
Optimized Defaults
Save and Exit
Exit
Version X.XX.XXXX, Copyright (C) 2005-2007 American Megatrends, Inc.
Note: Make sure that the proper menu is selected. A common error is to select the
Boot Options menu instead of the Boot Manager menu.
Step
Description
5
If performed successfully, the Welcome to AMI StorTrends iTX screen should display.
If not, reset the power on the Intel® Server System SSR212MC2 and start over.
Press the <ENTER> key to continue.
American Megatrends Inc
---------------------------------Welcome to AMI Stortrends ITX.
To install on 3200i/1100i/Intel SSR212MC2, press the <ENTER> key.
To install on Intel Helena Island(SS4200-E), type helena and press the <ENTER> key.
boot: _
Step
Description
13
StorTrends® iTX Installation and Login
Intel® Server System SSR212MC2
Step
Description
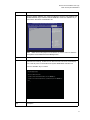
6
The StorTrends iTX installation begins, but before it proceeds, it will prompt with a
message depending on how many notebook hard disk drives are installed. The Intel®
Server System SSR212MC2 has a dedicated bay for up to two notebook hard disk
drives used to hold the operating system.
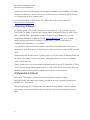
If there is only one notebook hard disk drive installed, the system will prompt with a
message stating, “Warning!!! Detected a single OS disk for the
StorTrends iTX installation. Any OS disk failure will result in
the system becoming unusable. Choose “YES” to continue, “NO” to
exit from the installation.”
Welcome to StorTrends iTX 2.7
OS Array Configuration
Warning!!! Detected a single OS disk for the
StorTrends iTX installation. Any OS disk failure
will result in the system becoming unusable.
Choose YES to continue,
NO to exit from the installation.
YES
NO
<Enter> to reboot
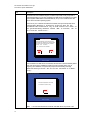
If two notebook hard disk drives are installed, StorTrends iTX will automatically detect
them and will mirror the installation of itself over both hard disk drives. Prior to
beginning the installation, the system will prompt with the following message,
“Detected multiple disks. The OS will be installed on a RAID 1
array.”
Welcome to StorTrends iTX 2.7
OS Array Configuration
Detected multiple disks. The OS will
be installed on a RAID 1 array.
OK
<Enter> to reboot
Note:
14
It is recommended that two notebook hard disk drives are present in the
StorTrends® iTX Installation and Login
Intel® Server System SSR212MC2
Step
Description
system for installation of StorTrends iTX.
Note: In StorTrends iTX 2.7.10.19 and older versions, if StorTrends iTX discovers
two notebook hard disk drives, it will not prompt at all.
Step
Description
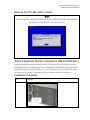
7
The StorTrends iTX installation takes approximately 30 minutes. Various screens
throughout the installation, and at certain times there will be a long period where only
a blank screen will appear. However, do not try to do anything; leave the system alone
until the StorTrends iTX Installation CD ejects, and a message is displayed that the
installation is complete.
Press the <ENTER> key to reboot.
StorTrends iTX 2.7
Complete
Congratulations, your AMI StorTrends installation is complete.
Remove any media used during the installation process and press
<Enter> to reboot your system.
Reboot
<Enter> to reboot
8
Congratulations! StorTrends iTX has been successfully installed on your Intel® Server
System SSR212MC2. At this point, the external USB CD-ROM drive can be physically
disconnected.
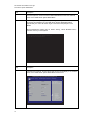
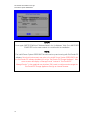
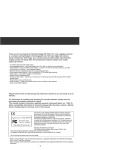
Get the IP address
Once the Intel® Server System SSR212MC2 has fully booted into StorTrends iTX, the
following screen (shown below) will be displayed. Write down the IP Address listed in the “Ip
Address” field. If both internal NICs are connected to your network, two IP Addresses will be
displayed.
15
StorTrends® iTX Installation and Login
Intel® Server System SSR212MC2
STOP!
Once again, WRITE DOWN the IP Address listed in the “Ip Address” field. Go to ANOTHER
COMPUTER on the same network to continue with the installation.
NOTE:
The Intel® Server System SSR212MC2 should now be up and running with StorTrends iTX
software. Note that this document may refer to the Intel® Server System SSR212MC2 with
the StorTrends iTX software installed on it as the “StorTrends iTX Storage Appliance”. Also,
some screens will display a “ManageTrends” instead of “StorTrends iTX”.
ManageTrends™ is the graphical user interface (GUI) used to configure and manage the
StorTrends iTX Storage Appliance through an Internet browser.
16
StorTrends® iTX Installation and Login
Intel® Server System SSR212MC2
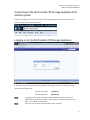
Connecting to the StorTrends® iTX Storage Appliance from
another system
Type the IP Address of the StorTrends® iTX Storage Appliance that was recorded in a
previous step into an Internet Browser.
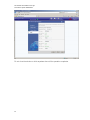
Logging on to the StorTrends® iTX Storage Appliance
A prompt to provide a username and password will appear. Enter the following default
username and password.
Note:
Note:
Default user name:
itxadmin
Default password:
password
Logging into the system using the default itxadmin password gives full
administrative powers and rights on the system. It is advised that once you
login, you change the password.
Both the user name and password are case sensitive.
17
StorTrends® iTX Installation and Login
Intel® Server System SSR212MC2
Note:
18
StorTrends® iTX has a built in feature that logs the user out in the event that it
detects no activity for 20 minutes and will display a message that states, “Your
session has expired.”
StorTrends® iTX Installation and Login
Intel® Server System SSR212MC2
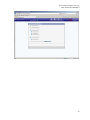
Using the Quick Start Setup Wizard
After login, the system will prompt to run the Storage Wizard. The Quick Start Setup Wizard
will get the Intel® Server System SSR212MC2 storage appliance up and running in less than
five minutes.
STOP!
If more detailed control of these settings is desired, enter the Advanced Setup
Wizard instead of the Quick Start Setup Wizard. Jump to the next section for
more information on the Advanced Setup Wizard.
Use the following instructions as a basis.
Note:
The Quick Start Setup Wizard will select all the physical hard disk drives
present in the StorTrends® iTX Storage Appliance to create the RAID array.
SAN and NAS volume names are automatically generated. A default NAS
Share is also automatically created. In the Quick Start Setup Wizard the SAN
and NAS Volumes are configured to use Exact Provisioning. Twenty percent of
the physically available hard disk space should be reserved ifsnapshot storage
will be utilized on this system.
19
StorTrends® iTX Installation and Login
Intel® Server System SSR212MC2
Step One: Quick Start Setup Wizard
To configure the storage on the Storage Appliance, the system will prompt to run the Wizard.
Click the Quick Start Setup option, and then click Next.
Step Two: RAID Level
Once the Quick Start Setup Wizard begins, the following options for RAID level selection
appear:
RAID 0
RAID 1
RAID 5
This step will create a Logical Disk and a storage pool from all the physical hard disk drives
available in the system/controller using the selected RAID type. Once Next has been
selected, this step can not be repeated / overridden.
20
StorTrends® iTX Installation and Login
Intel® Server System SSR212MC2
The system will prompt the user to wait while it configures the box. Do not close the window
or click anywhere else during this configuration step.
Step Three: SAN or NAS or Both
Once an array has been created in the box, select how the Storage Appliance will be utilized,
according to the following options:
Only SAN
Only NAS
Both SAN and NAS
If the Storage Appliance is to be used for block-level storage only, select Only SAN. If the
Storage Appliance is to be used for file-level storage only, select Only NAS. Select Both SAN
and NAS to enable the Storage Appliance to support both block-level and file-level storage.
21
StorTrends® iTX Installation and Login
Intel® Server System SSR212MC2
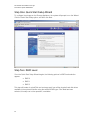
Step Four: Allocating Space
Enter the size of the desired Volume. The default volumes cannot exceed the available
physical space, due to the fact that they are both using Exact Provisioning by default. Click
Next.
Note:
22
Use the slider bar to adjust the size of each Volume type. If Only NAS or Only
SAN have been selected, then only the slider for that type of Volume will be
available.
StorTrends® iTX Installation and Login
Intel® Server System SSR212MC2
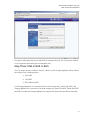
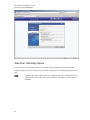
Step Five: Summary View
A summary will appear; click the Finish button after reviewing that this information is correct.
The Storage Appliance will be automatically configured based on the values that have been
entered.
Note:
The default names for volumes and containers can be modified at this point.
Also note that uppercase characters are not allowed in target names.
Additionally, if the snap-assisted replication feature will be used, uppercase characters
should be avoided in both the container and volume names. Because of this restriction, the
default names must be modified at this time.
23
StorTrends® iTX Installation and Login
Intel® Server System SSR212MC2
Do not close the window or click anywhere else until the operation completes.
24
StorTrends® iTX Installation and Login
Intel® Server System SSR212MC2
25
StorTrends® iTX Installation and Login
Intel® Server System SSR212MC2
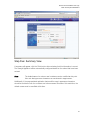
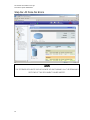
Step Six: All Done No Errors
STOP!
THE STORAGE APPLIANCE SHOULD NOW BE UP AND RUNNING. ALL THE REMAINING
SECTIONS OF THIS DOCUMENT CAN BE SKIPPED.
26
StorTrends® iTX Installation and Login
Intel® Server System SSR212MC2
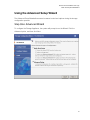
Using the Advanced Setup Wizard
The Advanced Setup Wizard allows users increased control and options during the storage
configuration process.
Step One: Advanced Wizard
To configure the Storage Appliance, the system will prompt to run the Wizard. Click the
Advanced option, and then click Next.
27
StorTrends® iTX Installation and Login
Intel® Server System SSR212MC2
Step Two: Create a New Storage Pool
Select Create new storage pool and then click Next.
Step Three: Select Pool
Select the Disks
Select the Disks that designated for use in the Storage Pool.
28
StorTrends® iTX Installation and Login
Intel® Server System SSR212MC2
Set the RAID Levels
Select the RAID Level, Capacity, Cache Option type, Stripe Size and Spare type (if
applicable).
NOTE:
Not all RAID levels mentioned in this document are supported by the Intel® Server System
SSR212MC2. See the Intel® RAID Software User’s Guide that shipped with the Intel®
Server System SSR212MC2 for more information on the supported hardware RAID levels.
The Intel® Server System SSR212MC2 should have a RAID controller that supports RAID
0, RAID 1, RAID 5, RAID 10 and RAID 50. Depending on the configuration of your Intel®
Server System SSR212MC2, its RAID controller MAY also support RAID 6 and RAID 60.
29
StorTrends® iTX Installation and Login
Intel® Server System SSR212MC2
Type in the Storage Pool’s Name
Insert a Storage Pool Name in the field provided, according to the guidelines listed in the
notes below.
Note:
The Storage Pool Name must be alphanumeric, not have any spaces and be
between one and 63 characters in length.
Note:
If the snap-assisted replication feature will be utilized, uppercase characters
should be avoided in container and volume names as well.
Click the Next button to continue.
The system will prompt the user to wait while it configures the box. Do not close the window
or click anywhere else.
Step Four: Configure SAN Volume
STOP!
This section provides instruction for configuring a SAN Volume and a SAN Target on the
Storage Appliance. If this storage appliance has been configured as a NAS Only unit, SKIP
THIS STEP and go to Step Five: Configure NAS Volume.
The next page provides instructions on creating a SAN Volume and Target.
30
StorTrends® iTX Installation and Login
Intel® Server System SSR212MC2
Enter Volume Name
In the Enter Volume Name field, enter a name for the SAN Volume. The SAN Volume Name
must be alphanumeric, not have any spaces and be between one and 63 characters in
length.
Enter Volume Size
In the Enter Volume Size field, enter the size desired for the SAN Volume. The field is
measured in Gigabytes (GB).
31
StorTrends® iTX Installation and Login
Intel® Server System SSR212MC2
Select Thin or Exact Provisioning
Select the desired type of provisioning.
If Thin Provisioning is selected, the volume can be assigned a size greater than the actual
physical size of the storage device. For example, if the storage device has an actual physical
size of 500 GB, the user can assign a size of up to 256 TB per box. Based on the
consumption of the storage device’s physical capacity, more physical drive capacity can be
added later as desired.
If Exact Provisioning is selected, the volume size cannot exceed the actual physical space
available in the storage device.
Note:
It is recommended to leave 20% of the physical space free for snapshots.
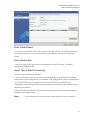
Select SAN as the Dialect Type
Select SAN as the Dialect Type.
Create Target and Target Name
Place a check next to the Create New Target field. Enter a name for the Target. The Target
Name must be alphanumeric, not have any spaces and be between one and 63 characters
in length. Uppercase characters are not allowed in target names.
Note:
If snap-assisted replication feature will be used, uppercase characters should
be avoided in both the Container and Volume names as well.
Click the Add button to continue.
Step Five: Configure NAS Volume
STOP!
This provides instruction on the configuration a NAS Volume and a NAS Share on to the
Storage Appliance. If this storage appliance will be configured as a SAN Only unit, SKIP
THIS STEP by clicking the Finish button and go to Step Six: Summary View and Status.
The next page allows the creation of the NAS Volume and Share.
32
StorTrends® iTX Installation and Login
Intel® Server System SSR212MC2
Enter Volume Name
In the Enter Volume Name field, enter a name for the NAS Volume. The NAS Volume Name
must be alphanumeric, not have any spaces and be between one and 63 characters in
length.
Enter Volume Size
In the Enter Volume Size field, enter the size desired for the NAS Volume. The field is
measured in Gigabytes (GB).
Select Thin or Exact Provisioning
Select the type of provisioning desired.
If Thin Provisioning is selected, the volume can be assigned a size greater than the actual
physical size of the storage device. For example, if the storage device has an actual physical
size of 500 GB, the user can assign a size of up to 256 TB per box. Based on the
consumption of the storage device’s physical capacity, more physical drive capacity can be
added later as desired.
If Exact Provisioning is selected, the volume size cannot exceed the actual physical space
available in the storage device.
Note:
It is recommended to leave 20% of the physical space free for snapshots.
33
StorTrends® iTX Installation and Login
Intel® Server System SSR212MC2
Select NAS as the Dialect Type
Select NAS as the Dialect Type.
Create Share and Share Name
Place a check next to Create New Share if a NAS Share is needed at this time, otherwise click
the Add button and continue on to the next step. To create a NAS Share, in the Share Name
field, enter a unique name for the NAS Share. The NAS Share Name must be alphanumeric
and be between one and 63 characters in length. To use spaces in the NAS Share Name, be
sure to use quotation marks around the entire name that is typed in.
Click the Add button to continue.
Step Six: Summary View and Status
When all Volumes have been added, click the Finish button.
A summary will appear. The Storage Appliance will be automatically configured based on the
values that were entered.
Do not close the window or click anywhere else until the operation completes.
34
StorTrends® iTX Installation and Login
Intel® Server System SSR212MC2
Step Seven: All Done No Errors
STOP!
THE STORAGE APPLIANCE SHOULD NOW BE UP AND RUNNING.
35
StorTrends® iTX Installation and Login
Intel® Server System SSR212MC2
Appendix A
: Storage Appliance
Configuration
For instructions on the configuration and storage provisioning of the Intel® Storage Server
SSR212MC2, please see the user manual titled “StorTrends/ManageTrends® (Version 2.7)
Web Interface User’s Guide”.
This document may be downloaded from the AMI StorTrends web site at
http://www.ami.com/support/doc/MAN-MT-27.pdf and will provide specific walk-through
instructions on configuration of the Intel® Storage Server SSR212MC2.
36
StorTrends® iTX Installation and Login
Intel® Server System SSR212MC2
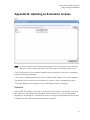
Appendix B: Updating an Evaluation License
Note: All screen captures are for representative purposes only. The actual screen may look
different. A newer version and build of the StorTrends® iTX Software may be in use
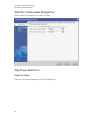
In the event that the 45-day evaluation expires before entering the License key, a message
stating the following will appear:
“The license is unavailable/expired for both the SAN and NAS features. You need to upgrade
to a valid license for at least one of the features in order to continue managing this server.”
This page displays when logging into the Intel® Storage Server to manage it.
Overview
StorTrends® iTX software comes with a License Key that is valid for a trial period of 45 days
and nearly all of the features will be enabled. At the conclusion of the 45-day trial period,
upgrading to an unlimited or customized license by entering the appropriate license key that
is obtained from an AMI Support Representative is possible.
37
StorTrends® iTX Installation and Login
Intel® Server System SSR212MC2
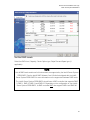
The license can be updated via the Update License button. The Update License screen
provides a StorTrends® iTX Service Key that will be required any time any changes or
upgrades to the licensing of product is attempted.
Note: The Service Key is required in order for the License Key to be generated. Each iTX
Service Key is generated from hardware that is specific to a single iTX unit; thus it
cannot be used to license or upgrade any other iTX devices. Please note that you can
email yourself a copy of the Service Key simply by clicking on the Email Service Key
button. This email can later be forwarded to an AMI Support Representatives when
you’re ready to make changes.
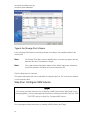
After an AMI Support Representative has processed these changes, you’ll receive a new
license key in the form of a text document. After you save the new key to a location on the
hard drive, use the Browse button to navigate to the location of that file, and then simply
select the Update License button to complete the process.
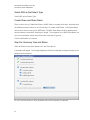
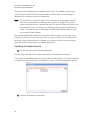
Updating an Expired License
1) Log into the StorTrends iTX Storage Appliance.
The first thing visible will be the License Information screen stating the following:
“The license is unavailable/expired for both the SAN and NAS features. You need to upgrade
to a valid license for at least one of the features in order to continue managing this server.”
2) Left-click the Update License button.
38
StorTrends® iTX Installation and Login
Intel® Server System SSR212MC2
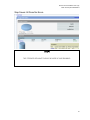
3) The Update License page will open containing the Service Key and a License Key
File Path field in order to enter path of the License key. If the License key was
obtained previously, type the path or browse to the License key file. If the License key
has not yet been obtained, contact an AMI Support Representative to obtain one.
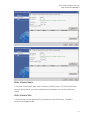
4) After an AMI Support Representative has processed the license, a License key will be
forwarded in the form of a text document. After saving the new key to a location on
the hard drive, use the Browse button to navigate to the location of that file, and then
simply select the Update License button to complete the process.
The options that were licensed will be marked “Enabled”.
39
StorTrends® iTX Installation and Login
Intel® Server System SSR212MC2
Additional Documentation
StorTrends/ManageTrends® (Version 2.7) Web Interface User’s Guide
(Downloadable from the AMI StorTrends web site at:
http://www.ami.com/support/doc/MAN-MT-27.pdf)
StorTrends iTX Installation Kit Guidebook (included in the StorTrends iTX
Installation Kit CD; conversely contact an AMI Storage Sales
Representative at 1-800-U-BUY-AMI or [email protected] to request a
copy)
StorTrends iTX 2.7 Data Sheet (Downloadable from the AMI StorTrends
web site: www.stortrends.com)
StorTrends iTX Whitepapers (Downloadable from the AMI StorTrends web
site: www.stortrends.com)
40