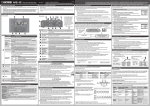
1
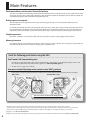
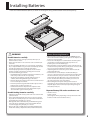
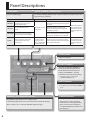
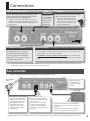
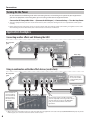
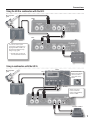
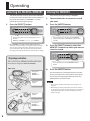
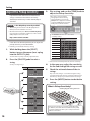
Owner’s Manual
* With the factory settings, this device will enter Sleep mode (power conservation mode) when ten hours have elapsed since the last
operation, or since the last audio input while in Stop mode.
If you want to prevent the device from entering Sleep mode, hold down the left pedal while you turn on the power, and continue holding down it
down for five seconds (p. 9).
* Before using this unit, carefully read the sections entitled: “USING THE UNIT SAFELY” and “IMPORTANT NOTES” (supplied on a separate sheet). These
sections provide important information concerning the proper operation of the unit.
Additionally, in order to feel assured that you have gained a good grasp of every feature provided by your new unit, Owner’s manual should be
read in its entirety. The manual should be saved and kept on hand as a convenient reference.
Main Features
Dedicated effects unit for the V-Guitar/GK pickup
The GR-D is an effects unit specifically designed for the GK pickup, which individually extracts the signal of each string.
Since each string’s signal is processed individually, you’ll be able to experience completely new sounds that could not
be produced by guitars with conventional pickups of the past.
Richly expressive sounds
The GR-D processes the signal from each string individually, generating rich and unprecedentedly expressive
distortion sounds.
In addition to distortion that does not get muddy when you play a chord, you also get analog-synth-type lead sounds
that go well beyond the boundaries of conventional effects units. All the distinctive features of a guitar performance
will be fully expressed, without any sense of latency (the timing discrepancy between your playing and the sound).
Simple operation
Operation is effortless. Just twist the knobs and press the pedals to obtain cutting-edge V-Guitar sounds.
Memory function
Four effects settings can be stored (in memory) in the unit. You can switch memory slots using the [S1] [S2] buttons of
the GK pickup for instant sound selection during your live performances.
Check the following points before using the GR-D
You’ll need a GK-compatible guitar
In order to use the GR-D, you’ll need a guitar equipped with a GK pickup or a GK-compatible guitar such as the
GC-1 V-Guitar. (Hereafter, we’ll refer to such a guitar as a “GK-compatible guitar.”)
* The GR-D does not support basses (GK-3B).
You must set the GK pickup select switch to the “MIX” position!
If the switch is set to any position other than MIX, the unit won’t operate correctly (there will be no sound).
GK-3 users
V-Guitar GC-1 users
You must set this to the center (MIX) position!
• Roland is either registered trademark or trademark of Roland Corporation in the United States and/or other countries.
• Company names and product names appearing in this document are registered trademarks or trademarks of their respective owners.
• This product contains eCROS integrated software platform of eSOL Co.,Ltd. eCROS is a trademark of eSOL Co., Ltd. in Japan.
Copyright © 2013 ROLAND CORPORATION
All rights reserved. No part of this publication may be reproduced in any form without the written permission of ROLAND CORPORATION.
2
Installing Batteries
Insert the included batteries (AA x 6) as shown in the diagram, being careful to observe the correct polarity.
WARNING
Handle batteries carefully
• Batteries must never be recharged, heated, taken apart, or
thrown into fire or water.
• Never expose batteries to excessive heat such as sunshine, fire
or the like.
• Incorrect handling of batteries can cause leakage, overheating,
fire, or explosion. Before use, you must read and strictly observe
all of the precautions that accompany the batteries.
• If used improperly, batteries may explode or leak and cause
damage or injury. In the interest of safety, please read and
observe the following precautions.
• Carefully follow the installation instructions for batteries, and
make sure you observe the correct polarity.
• Avoid using new batteries together with used ones. In
addition, avoid mixing different types of batteries.
• Remove the batteries whenever the unit is to remain unused
for an extended period of time.
• Never keep batteries together with metallic objects such as
ballpoint pens, necklaces, hairpins, etc.
• Used batteries must be disposed of in compliance with
whatever regulations for their safe disposal that may be
observed in the region in which you live.
Handle leaking batteries carefully
• If fluid has leaked from a battery, make sure not to touch it with
your bare hands.
• If any of the leaking fluid gets into your eyes, the loss of vision
may result. Do not rub your eyes; use clean water to flush them
thoroughly. Then, promptly see a doctor.
• Burning of the skin or dermatitis may result if fluid has gotten
onto your skin or clothing. Use clean water to flush affected
areas thoroughly; then, promptly see a doctor.
• Using a soft cloth, carefully wipe any remaining fluid from the
inside of the battery compartment. Then, install new batteries.
Notes Concerning Batteries
• When operating on battery power only, the POWER indicator
will become dim when battery power gets too low. Replace the
battery as soon as possible.
• The use of an AC adaptor is recommended as the unit’s power
consumption is relatively high. Should you prefer to use
batteries, please use the alkaline type.
• When installing or replacing batteries, always turn this unit off
and disconnect any other devices you may have connected. This
way, you can prevent malfunction and damage.
• If operating this unit on batteries, please disconnect the AC
adaptor from this unit.
• Even if batteries are installed, the unit will turn off if you
connect or disconnect the power cord from the AC outlet while
the unit is turned on, or if you connect or disconnect the AC
adaptor from the unit. When this occurs, unsaved data may
be lost. You must turn off the power before you connect or
disconnect the power cord or AC adaptor.
• When turning the unit upside down, position stacks of
magazines (or other materials) under the unit in such a way that
they will support its four corners, thus preventing damage to
the buttons, knobs, etc.
Expected battery life under continuous use
• Alkaline: 7 hours
Carbon: 2 hours
(These figures will vary depending on the specifications of the
batteries and the actual conditions of use.)
3
Panel Descriptions
[TYPE] knob
[GAIN], [COLOR], [TONE] knobs
Selects the effect type.
The [GAIN], [COLOR], [TONE] knobs will operate differently depending on the
type you select, as follows.
[TYPE] knob
[GAIN] knob
VG-DIST 1
Expressive distortion made
possible by processing each
string independently
VG-DIST 2
A rich and thick distortion
sound
POLY DIST
Distortion that allows chords to
resonate clearly and beautifully
SYNTH
Analog synth-type sound that
responds to the nuances of
your picking
[COLOR] knob
[TONE] knob
Adjusts the strength of the attack. Turning
the knob toward the right will strengthen
the attack.
Adjusts the amount
of distortion.
Adjusts the thickness of the sound.
Turning the knob toward the right will
strengthen the effect.
Adjusts the amount of separation for
chords. Turning the knob toward the right
will produce chords that are less muddy.
Selects the synth
waveform. Turn to
the left for square
wave, or to the right
for sawtooth wave.
Adjusts the character (resonance) of the
sound. Turning the knob toward the right
will strengthen the effect.
Adjusts the brightness
of the sound. Turning
the knob toward the
right will brighten the
sound.
Adjusts the synth’s
filter (cutoff ). Turning
the knob toward the
right will brighten the
sound.
[LEVEL] knob
Adjusts the volume.
[SELECT] button
Switches you between MANUAL, in
which the current positions of the
knobs determine the sound that’s
output, and MEMORY 1–4, which
provide for use of the stored settings.
* For details, refer to “Selecting the
MANUAL/MEMORY” (p. 8).
[WRITE] button
Press this to store settings in MEMORY.
* For details, refer to “Storing the MEMORY”
(p. 8).
[ON/OFF], [SOLO] pedal/indicator
The [ON/OFF] (left) pedal turns the effect on/off.
If the [SOLO] (right) pedal is on, the sound will be suitable for soloing.
When a pedal is on, its indicator (ON/OFF, SOLO) will light.
4
POWER indicator
This lights up when the power is on.
If this gets dim or fails to light up
when the unit is running on battery
power, it means that the batteries
are depleted. Replace promptly with
fresh batteries.
Connections
MIX/GUITAR INPUT jacks
The sound of other devices can be input here. This
input sound will be mixed with the sound of the
GR-D and output via the OUTPUT jacks.
* If nothing is connected to the GK IN connector, the L/
MONO jack will function as the GUITAR INPUT jack. You
can connect a non-GK-compatible guitar using a 1/4”
phone plug. *1
GK IN
connector
DC IN jack
This jack is for connecting an AC adaptor
(BOSS PSA series; sold separately).
Connect the
GK-compatible
guitar using
dedicated GK
cable (sold
separately).
* Use only the specified AC adaptor
(PSA series), and connect it to an AC
outlet of the correct voltage. Do not
use any other AC adaptor, since this
may cause malfunction.
GUITAR OUTPUT jack
OUTPUT jacks
Normal pickup signals of the
GK-compatible guitar are output.
Connect these jacks to your guitar amp or to another effects unit.
By connecting another effects unit
and returning its signal to the MIX
INPUT jacks, you can use the unit for
send/return applications.
*1
* Use the [SELECT] switch to specify whether these jacks are connected to a guitar
amp (G. AMP) or to a line-level device (LINE).
* The OUTPUT L jack also operates as a power switch. The power will be on if a
plug is inserted in the OUTPUT L jack. Remove the plug when you’re not using the
GR-D.
If you’ve connected your guitar to the GUITAR INPUT jack using a 1/4” phone plug, the signal from each string cannot be processed
individually, so you won’t be able to enjoy the full potential of the GR-D.
Basic Connection
Connect the GR-D to the GK-compatible guitar using dedicated GK cable.
GK-compatible
guitar
When connecting to
the guitar amp, set
the [SELECT] switch to
“G. AMP.”
Guitar Amp
Connect the GK-compatible
guitar only with dedicated GK
cable (supplied with Roland
GK-compatible devices and
optional GK cables sold by
Roland). Use of any other
cable may result in damage
or malfunction.
When connecting the GK cable,
insert the connector completely,
until it is locked.
You can disconnect the cable
simply and easily by holding
down the locking portion with
your thumb and gently pulling on
the plug.
To get the best performance from the GR-D, we
recommend that you set your amp to “Clean” (no
distortion).
Always turn the amp volume down completely
before connecting and disconnecting cords.
* To prevent malfunction and equipment failure, always turn down the volume, and turn off all the units before making any connections.
5
Connections
Turning On the Power
Be sure to observe the following order when connecting devices and switching on the power to your equipment. If
you turn on equipment in the wrong order, you risk causing malfunction or equipment failure.
Connect the GK-Compatible Guitar g (Connect the AC Adaptor) g Connect the Amp g Turn On Amp Power
* This unit is equipped with a protection circuit. A brief interval (a few seconds) after turning the unit on is required before it will operate
normally.
* Before turning the unit on/off, always be sure to turn the volume down. Even with the volume turned down, you might hear some sound
when switching the unit on/off. However, this is normal and does not indicate a malfunction.
Application Examples
Connecting another effects unit following the GR-D
GK-compatible
guitar
Effect Device
Guitar Amp
Using in combination with other effect devices (send/return)
GK-compatible
guitar
When connecting to
the recorder or mixer,
set the [SELECT] switch
to “LINE”
Recorder or Mixer
If the sound of the
connected effects
unit is unnaturally
distorted, reduce
the volume of the
effects unit.
OUTPUT
Effect Device
INPUT
Normal pickup signals of the GK-compatible
guitar are output. By connecting another effects
unit and returning its signal to the MIX INPUT
jacks, you can use the unit for send/return
applications.
* When connection cables with resistors are used, the volume level of equipment connected to the inputs (MIX/GUITAR INPUT jacks) may be low.
If this happens, use connection cables that do not contain resistors.
6
Connections
Using the GR-D in combination with the GR-S
GK-compatible
guitar
GR-D
GK IN
GR-S
US-20
You can use a US-20 (sold
separately) to switch between
playing the GR-D and GR-S, or
playing both simultaneously
using a single guitar.
Guitar Amp
* Two GK cables (1.2 meters)
are included with the US-20.
Using in combination with the GR-55
GR-55
GK-compatible
guitar
GK IN
If the sound of the
GR-55 is unnaturally
distorted, reduce
the volume of the
GR-55.
GK IN
OUTPUT
US-20
When connecting
to the recorder or
mixer, set the [SELECT]
switch to “LINE”
Recorder or Mixer
7
Operating
Selecting the MANUAL/MEMORY
The [SELECT] button switches you between MANUAL,
in which the current positions of the knobs determine
the sound that’s output, and MEMORY 1–4, which
provide for use of the stored settings.
1. Press the [SELECT] button.
Storing the MEMORY
Here’s how to store your settings in MEMORY.
1. Operate the knobs to create the sound
you want.
2. Press the [WRITE] button.
Pressing the button cycles you through the choices
like this:
MANUAL g MEMORY 1 g 2 g 3 g 4 g MANUAL.
* When MEMORY is selected, to avoid sudden inadvertent
changes in sound, the knobs are designed so that the setting
does not change unless the knob is first turned as far as the
stored setting value. Once the position of the knob matches
the setting value stored in memory, the sound starts to change.
The indicator for the currently selected MEMORY
number start to flash, and the GR-D is put into write
standby.
3. Press the SELECT button to select the
MEMORY (number) to which you want to
store the sound.
GK-pickup controllers
You can also use [S1] (DOWN)/[S2] (UP) buttons of the
GK-pickup to change the MANUAL/MEMORY.
GK-3 users
The indicator for the selected MEMORY number
flashes.
4. Press the [WRITE] button.
Changes the
MANUAL/
MEMORY 1–4.
The write operation is completed after the indicator
for the write-destination memory flash more rapidly.
To cancel the write operation before you press the
[WRITE] button, rotate the knob.
Adjusts the
volume.
V-Guitar GC-1 users
Adjusts the
volume.
Changes the
MANUAL/
MEMORY 1–4.
8
NOTE
* Do not switch off the power while a write operation is in
progress.
* Unfortunately, it may be impossible to restore the contents
of data that was stored in the unit’s memory once it has been
lost. Roland Corporation assumes no liability concerning
such loss of data.
Setting
About Sleep Mode
When ten hours have elapsed since the last operation
or audio input, the GR-D will enter sleep mode (power
conservation mode). From sleep mode, you can press
the pedal to return to normal mode.
* Battery power continues to be consumed even in sleep
mode. To prevent battery consumption, turn off the power by
removing the plug from the OUTPUT L jack.
Disabling sleep mode
1. While holding down the left pedal, turn
on the power (insert a plug into the
OUTPUT L jack).
2. Continue holding down the left pedal
for five seconds.
The POWER indicator will blink.
3. Release the left pedal; the GR-D will
resume normal operation.
Enabling sleep mode (default setting)
1. While holding down the left pedal, turn
on the power (insert a plug into the
OUTPUT L jack).
2. Within two seconds after the POWER
indicator lights up, step on the left pedal
two more times.
The POWER indicator will blink.
After two seconds, the GR-D will resume normal operation;
sleep mode will be enabled.
Restoring the Factory Settings
(Factory Reset)
Here’s how to restore the GR-D’s settings to their
factory-set condition.
* When you execute “Factory Reset,” the settings you made will
be lost.
1. While holding down the [WRITE] button,
turn on the power (insert a plug into the
OUTPUT L jack).
All MEMORY indicators (1–4) will blink.
2. Press the [WRITE] button to execute
Factory Reset.
All MEMORY indicators (1–4) will blink rapidly. When Factory
Reset is completed, the GR-D will return to normal operation.
* Never turn off the power while MEMORY indicators are blinking
rapidly.
Turning the FX On/Off
The GR-D includes spatial-type effects (FX) that
provide a pleasant sound even when you’re not using
any other equipment.
Here’s how to turn the FX on/off.
1. While holding down the right pedal,
turn on the power (insert a plug into the
OUTPUT L jack).
The SOLO indicator will blink.
2. Press the [SELECT] button to turn the FX
on/off.
The FX is on when the first indicator is lit,
and off when the indicator is unlit.
3. Press the [WRITE] button to decide the
setting.
9
Setting
Adjust the Pickup Sensitivity
If you feel that the volume balance between the
strings is incorrect or the sound is unnaturally
distorted, check the way in which the GK pickup is
attached.
Check
Is the GK-pickup correctly installed?
3. Play a string, and use the [TONE] knob to
adjust the Pickup Sensitivity.
Play string 1 at the maximum
strength you would use during
actual performance, and use the
[TONE] knob to adjust the sensitivity
so that the MANUAL indicator lights
briefly at the maximum volume.
• After reading the instructions in the GK-pickup Owner’s
Manual, check the installation once more.
• On the Roland website, the “How to install the GK pickup”
page provides an explanation and photos on how to attach
a GK pickup. Be sure to take a look!
http://www.roland.com/GK/
If this does not solve the problem, you can adjust the
pickup sensitivity as described below.
* Normally, you should use the factory settings.
1. While holding down the [SELECT]
button, turn on the power (insert a plug
into the OUTPUT L jack).
The unit will be in pickup sensitivity adjustment mode.
2. Press the [ON/OFF] pedal to select a
string.
Start by selecting string 1.
String Indicator
GR-D
ON/OFF
SOLO
POWER
2
GR-D
ON/OFF
SOLO
POWER
3
Indicator
1 (low)
1
2
3
4
2
1
2
3
4
3
1
2
3
4
4
1
2
3
4
5
1
2
3
4
6
1
2
3
4
7
1
2
3
4
8 (high)
1
2
3
4
* If the sound is unnaturally distorted, lower the sensitivity.
4. In the same way, adjust the sensitivity
for the 2nd through 6th strings as well.
Play each of the strings 6–1 at normal strength; if a string
sounds unusually loud, lower the sensitivity of that string to
minimize any discrepancy in volume between the strings.
6. Press the [WRITE] button to decide the
setting.
What is Pickup Sensitivity?
GR-D
ON/OFF
Sensitivity
5. Check the volume balance of the six
strings.
POWER
1
The MEMORY indicator shows the current
sensitivity setting.
SOLO
Cutaway diagram of the guitar neck
POWER
4
GR-D
ON/OFF
SOLO
POWER
5
GR-D
ON/OFF
SOLO
POWER
6
GR-D
ON/OFF
10
SOLO
GK-pickup
If the distance between each string and the GK pickup
is different, the volume will also be different. The pickup
sensitivity adjustment allows you to compensate for this
difference in volume.
Troubleshooting
Problem
Check
Action
Replace with fresh batteries.
Have the batteries run down?
The power doesn’t come on
Is the external device connected correctly to the
OUTPUT L jack?
Is the specified AC adaptor (PSA series; sold
separately) connected correctly?
No sound/volume is low
Noise is produced
Effect not applied to the MIX/
GUITAR INPUT jacks
* The life of the supplied batteries may be limited, since
its primary purpose was to enable testing.
Check the connections again.
* The unit won’t switch on unless there’s something
plugged into the OUTPUT L jack.
Check the connections again. Never use any AC adaptor
other than the adaptor specified.
Is the other equipment connected correctly?
Check the connections again.
Is the volume turned down on the connected
guitar amp, effects processor, or other device?
Check the settings on the connected equipment.
Is the GK-pickup’s selection switch set to “MIX?”
When set to “GUITAR” or “SYNTH,” the necessary signals
may not be input to the unit, which may prevent sounds
from being produced.
Is the GK-pickup’s GK Volume turned down?
Check to make sure the GK-pickup’s GK Volume is not
lowered.
Is the GK-pickup correctly installed and
connected?
After reading the instructions in the GK-pickup Owner’s
Manual, check the installation once more.
Is the external device connected to the MIX/
GUITAR INPUT jack working properly?
The sound of the external device connected to the MIX/
GUITAR INPUT jacks will be mixed with the sound of the
GR-D and output to the OUTPUT jacks. This means that
noise from the external device may be output.
Is the GK cable securely connected?
When connecting the GK cable, insert the connector
completely, until it is locked.
If a GK-compatible guitar is connected to the GK
IN connector, no effect will be applied to the MIX/
GUITAR INPUT jacks.
If you want to apply an effect to the guitar that’s connected to the GUITAR INPUT jacks, don’t connect anything
to the GK IN connector.
11
Specifications
Roland GR-D: V-Guitar Distortion
Nominal Input Level
Input Impedance
Nominal Output
Level
Output Impedance
MIX INPUT: -10 dBu
173 (W) x 158 (D) x 57 (H) mm
Dimensions
GUITAR INPUT: -20 dBu
MIX INPUT: 1 M Ω
6-13/16 (W) x 6-1/4 (D) x 2-1/4 (H) inches
1.1 kg
Weight
GUITAR INPUT: 1 M Ω
2 lbs 7 oz (including batteries)
OUTPUT: -20 dBu
Owner’s Manual
GUITAR OUTPUT: -20 dBu
Leaflet (USING THE UNIT SAFELY, IMPORTANT
NOTES, and Information)
Accessories
OUTPUT: 2 k Ω
Alkaline Battery (AA, LR6) x 6
GUITAR OUTPUT: 2 k Ω
AC Adaptor: BOSS PSA-series
Recommended Load
10 k Ω or greater
Impedance
Divided Pickup: GK-3 (for guitar)
Options
(sold separately)
ON/OFF pedal
SOLO pedal
V-Guitar: GC-1 GK-Ready Stratocaster®
GK Cable: GKC-10 (10 m), GKC-5 (5 m)
TYPE knob
Unit Selector: US-20
GAIN knob
Controls
* 0 dBu=0.775 Vrms
COLOR knob
* In the interest of product improvement, the specifications and/or
appearance of this unit are subject to change without prior notice.
TONE knob
LEVEL knob
SELECT button
WRITE button
OUTPUT SELECT switch
Indicators
POWER indicator (serves also as battery
check indicator)
ON/OFF indicator
SOLO indicator
MIX/GUITAR INPUT (R, L/MONO) jacks
GK IN connector
Connectors
GUITAR OUTPUT jack
OUTPUT (R, L/MONO) jacks
DC IN jack
Memory
4
Effect Type
VG-DIST 1, VG-DIST 2, POLY DIST, SYNTH
Power Supply
Alkaline battery (AA, LR6) or
Carbon-zinc battery (AA, R6) x 6
AC Adaptor (PSA-series: optional)
Current Draw
200 mA (9 V, when used with GK-3)
Alkaline battery:
Approx. 7 hours
Expected Battery Life
Carbon-zinc battery: Approx. 2 hours
Under Continuous
* These figures will vary depending on the
Use
actual conditions of use.
*
5
1
0
0
0
3
0
8
9
3
-
0
2
*