1
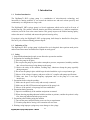
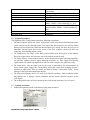
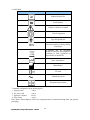
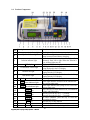
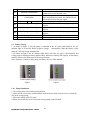
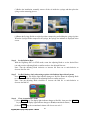
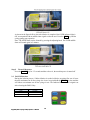
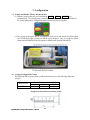
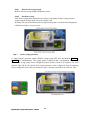
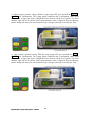
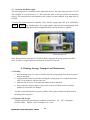
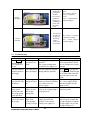
Contents
1. Introduction………………………………………………………………......2
1.1 Product Introduction………………………………………………………2
1.2 Indication of Use……………………………………………………………2
1.3 Safety………………………………………………………………….….....2
1.4 Product Functions and Features……………………………………….….3
1.5 Technical Specifications…………………………………………….……...3
1.6 Product Description………………………………………………….…….4
1.7 Symbols and Labels………………………………………………….……..4
1.8 Product Components………………………………………………….……6
1.9 Battery Charge……………………………………………………….…….7
1.10 Pump Installation…………………………………………………….…….7
2. Syringe Pump Operation.…………………………………………….……...8
2.1 Basic Operations Steps……………………………………………………..8
2.2 Bolus Function…………………………………………………………..….11
3. Configuration……………………………………………………………...….12
3.1 Enable & Disable NEAR Alarm .………………………………………….12
3.2 Syringe Configuration Change…..…………………………………….…..12
3.3 Occlusion Sensibility Adjust…..……………………………………………15
4. Cleaning, Storage, Transport and Maintenance…………………………….15
4.1 Cleaning……………………………………………………………………...15
4.2 Transport and Storage………………………………………………………15
4.3 Preventive Inspection………………………………………………………..16
4.4 Environmental Protection…………………………………………………..16
5. Alarms………………………………………………………………….………17
5.1 Alarms and Actions…………………………………………………….……17
5.2 Troubleshooting……………………………………………………….…..…18
5.3 Service………………………………………………………………………..19
Warranty Terms…………………………………………………………….…..20
Rev 2
1. Introduction
1.1
Product Introduction
The DigiPump™ SR7x syringe pump is a combination of microelectronic technology and
innovation in nursing medicine. It can control the infusion rate and total volume precisely and
continuously over long hours on a large scale.
The DigiPump™ SR7x syringe pump is a hi-tech equipment which can be used in all areas of
modern nursing. The patient’s infusion situation and alarm information (e.g. infusion completion,
occlusion) can all be seen at the central station. This greatly improves the medical nursing quality,
reduces the nurse’s workload, and ensures the patient’s nursing safety.
For patient’s safety, the DigiPump™ SR7x syringe pump, shall always be installed in a firm place,
like an IV pole, when used during patient transport.
1.2 Indication of Use
The DigiPump™ SR7x syringe pump is indicated for use in hospitals where patients need precise
and accurate intravenous microinfusion of liquids at steady speed.
1.3 Safety
1. Unqualified and untrained people are not allowed to operate the machine.
2. Precautions for installing the machine.
① Place the pump in dry place.
② Do not place the pump in places where atmosphere pressure, temperature, humidity, sunshine,
dust, salt and ion air may bring damage to the pump.
③ Observe the safety of the machine, avoiding drop, vibration or bump the pump (specially
during transport).
④ Do not use the pump in place which keeps chemical medicine or gives out poisonous gas.
⑤ Observe if the voltage, frequency and power of the AC, complies with pump specifications.
⑥ Make sure there is no high frequency equipment close to the pump or it can cause
interference.
3. Precautions before using the machine:
① Make sure the power cord is safely and correctly connected.
② Make sure the ON-OFF function and operation of the pump is ok.
④ Observe if the patient’s vein passage has been established.
4. Precautions during operation
① Supervise continuously if the machine and patient are normal.
② When detecting anything abnormal with the machine or patients, consider the patient’s safety
first, then stop infusion and take proper action.
5. Precautions after finishing using the machine
① Turn off the power and pull out the power cord as per requirement.
② Clean the pump before storing it for convenient use next time.
6. Warning: using improper syringe may cause damage to the syringe.
1
DigiPump SR7x Syringe
Syringe Pump Operator’s
Operator s Manual
7. Warning: when using Non standard syringe or setting syringe parameters incorrect, the accuracy
may not be maintained and the discrepancy may reach 5% or above. When changing Syringe
types and syringe calibration settings, it is the user responsibility to ensure that required
accuracy is obtained.
8. Warning: the used syringe shall not be installed on other infusion devices to avoid potential risk.
9. Warning: Keep cell phone or other high frequency power devices away from the syringe pump
within 2’ (0.6m).
10. Warning: There is no air in line detection sensor in the pump. Make sure that there is no air
bubble in the syringe and the infusion set before using.
11. Warning: Stop using the machine when there is alarm.
12. Warning: Do not use the syringe pump in places where flammability and explosion can occur.
1.4 Product functions and features
(1) Precise control of infusion rate.
(2) Precise control of infusion volume.
(3) Smooth flow.
(4) Audible and visual alarms for infusion completion, near completion, occlusion, low battery,
syringe abnormal, control abnormal and no AC power.
(5) Advanced infusion control.
1.5 Technical Specifications
Product name
Maximum flow rate
DigiPump SR7x
500ml/h (Different syringes have different
maximum rate.)
10ml syringe: 0.1 - 100ml/h
20ml syringe: 0.1 - 200ml/h
50ml syringe: 0.1 - 500ml/h
0.1ml/h
10ml syringe: 100ml/h
20ml syringe: 200ml/h
50ml syringe: 500ml/h
0.1 – 999.9ml
+/- 3% (up to +/- 1% with syringe calibration)
AC 100~240V,50/60Hz, 25VA.
Rechargeable lithium battery, 7.4 V, 1650mAh.
25VA, running more than 5 hours after being
fully charged.
When syringe pump is connected to AC power,
the SR7x need to be ON and the battery will
automatically recharge. (about 8~14 hours to
recharge fully.)
Flow rate, accumulated infusion volume, syringe
size, battery capacity, bed No., AC power
indicator.
NEAR completion, OVER, OCCLUSION, low
battery, abnormal 1 (communications failure),
Flow rate range
Infusion increment
Bolus rate
Accumulated infusion volume
Accuracy
Power supply
Battery
Maximum power consumption
Battery charge
Displayed information
Alarm information
2
DigiPump SR7x Syringe
Syringe Pump Operator’s
Operator s Manual
syringe abnormal, control abnormal, no AC
power alarm
288mm×130mm×122m(11.3”×5.1”×4.8”)
<2.4Kg (5.3lb)
Type IIB
ABS plastic
Environment temperature 5℃~40℃, air pressure
80kPa ~106kPa,relative humidity 20 ~ 90%
Environment temperature -15℃~50℃, air
pressure 86kPa~106kPa,relative humidity 20 ~
90%
10 ml、20 ml、50 ml syringes
continuous
Maximum enclosure size
Maximum weight
Classification
Enclosure material
Operating conditions
Storage conditions
Applicable syringes
Operating mode
1.6 Product Description
The DigiPump SR7x syringe pump contains the following components:
1. The microcomputer system: the “brain” of the whole system, that control and manage the whole
system and process the detected signals. Two single-chip Microcontrolers are used for mutual
backup copy and supervision. When one Microcontroler goes wrong, the other one will give an
immediate warning signal and cut the power of the host computer, which will then stop
completely, thus ensuring patient’s safety.
2. The Pump Device: the “heart” of the whole system and the main driving force of the infusion.
Driven by stepper motor, the lead screw moves the infusion piston forward.
3. The Sensor System: various kinds of sensors, such as displacement sensor (detecting liquid flow
rate and flow volume), pressure sensor (detecting occlusion), etc. They supply corresponding
signals which will, after being amplified, be sent over to the computer for signal processing.
4. The alarm device: after the signal given by the sensor is processed by the microcomputer, an
alarm control signal triggers the corresponding audio and visual alarm bringing operator’s
attention for right action. There are mainly two kinds of alarms: Visual alarm (LED) + Alarm
Message in the screen and sound alarm (buzzer).
5. The Keypad and Display device: It is used to set infusion parameters, such as infusion volume
and infusion rate. It displays various parameters and the current operation progress on the
LCD display.
6. The rechargeable battery: provides internal power for the pump when there is no AC power.
1.7 Symbols and Labels
1. Product label pattern (placed on the bottom of the pump enclosure):
3
DigiPump SR7x Syringe
Syringe Pump Operator’s
Operator s Manual
2. Label Mark
Mark
Description
Production batch No.
Serial Number
Caution! Consult user manual
Class II equipment
Type BF applied part
Protection against vertically falling
water drops
IP21
It indicates that the equipment
should be sent to the special agencies
according to local regulation for
disposal after its useful life.
Date of production
Manufacturer
CE mark
~
Alternating current
European Representative
3. Standard configuration in the packaging box
1. Syringe pump
one pc
2. AC power cord
one pc
3. Operator’s manual
one pc
4. Pole Clamp
one pc
Note: Please contact Digicare if there are components above mentioned missing when you open the
packaging.
4
DigiPump SR7x Syringe
Syringe Pump Operator’s
Operator s Manual
1.8
Product Components
No.
1
2
Description
Battery capacity indicator light
AC power indicator light
3
Infusion indicator light
4
LCD display
5
Accumulated Volume light
6
Infusion rate light
7
Bed number light
8
NEAR alarm indicator light
9
OCCL alarm indicator light
10
OVER alarm indicator light
11
SELECT key
12
POWER key
13
CLEAR key
14
15
16
STOP key
START key
BOLUS key
Function
The 3 lights indicate the battery capacity level.
AC indicator light is on when connected to AC,
pump in turned-on and battery charging.
After the infusion starts, the three lights flash
alternately from left to right. When the infusion is
over, all three lights are off.
Digipump SR7x main display.
This light is ON when the accumulated volume is
being displayed in the LCD display.
This light is ON when the infusion rate is being
displayed in the LCD display.
This light is ON when the bed number is being
displayed in the LCD display.
Alarm light indicates the syringe is close to end.
Alarm light indicates occlusion in the infusion line.
The syringe pump stops.
Alarm light indicates the syringe is at it’s end. The
syringe pump stops
Press this key to select infusion rate, accumulated
volume and bed number.
Turn-on: Press the key for 3 – 5 seconds.
Turn-off: Press the key for 3 – 5 seconds.
In STOP condition, press the key to clear the
accumulated volume.
Press the key to stop infusion.
Press the key to start infusion.
Press and hold this key during infusion and the
5
DigiPump SR7x Syringe
Syringe Pump Operator’s
Operator s Manual
17
Adjust & Confirm Knob
18
Clutch button
19
Piston
50 ml syringe indicator light
20
21
22
23
24
20 ml syringe indicator light
10 ml syringe indicator light
Syringe Holder
User-friendly instructions
pump infuses at maximum rate for the syringe.
Rotating the knob adjust value. Pressing the knob
confirm and save the adjusted value.
Keep pressing the button to move the piston freely.
When unfastening the button, the clutch will gear,
and can only be moved by the engine.
Pushes the syringe during infusion.
Light is ON when the 50ml syringe is placed
properly.
Light is ON when the 20ml syringe is placed
properly.
Light is ON when the 10ml syringe is placed
properly.
Hold and detect the syringe.
Operation guide for quick reference.
1.9 Battery Charge
1. As shown in figure 1, after the pump is connected to the AC power and turned on, the AC
indicator light is on and the battery begins to charge
automatically. When the battery is fully
charged, it will stop charge automatically.
2. As shown in figure 2, the AC indicator light will be off if the AC power is disconnected. The
syringe pump is running on battery and the battery indicator is showing full capacity. As the battery
capacity decreases the lights turns-off from top to bottom.
Note: It requires 14 hours to fully charge the battery after it is fully depleted.
Figure 1
Figure 2
1.10 Pump Installation
1. The syringe pump is used in horizontal position.
2. Make sure the screw center with thread hole in the enclosure, then rotate the screw to fasten the
clip on the syringe pump.
3. Check the stability of the IV stand.
4. Rotate the second clip screw to fasten the syringe pump on the IV stand.
6
DigiPump SR7x Syringe
Syringe Pump Operator’s
Operator s Manual
2. Syringe Pump Operation
2.1 Basic Operation Steps
Step 1
Power connection
Insert the power cord into the power supply (AC 100 V~240V, 50/60 Hz).
Connect the power cord as shown.
Step 2
Turn the Power On
Keep pressing Press POWER key for 3 – 5 seconds and then release it. The Digipump SR7x
start a self-test, all indicator lights and enters in operation mode.
Note: When the orange AC light is on, the syringe pump is using AC power and the battery is
being charged automatically.
Press the POWER key (just one touch) to turn-on the LCD back-light to dark vision.
Step 3
Install the syringe
Install the syringe as shown in the figure.
(1) Pull the Syringe Holder and move 90° to the left or right.
(2) Press clutch button, drag piston to fit the desired syringe;
7
DigiPump SR7x Syringe
Syringe Pump Operator’s
Operator s Manual
(3) Before the installation, manually remove all the air inside the syringe and then place the
syringe on the mounting grooves.
(4) Return the Syringe Holder to original position compressing and holding the syringe in place.
When the Syringe Holder compresses the syringe, the syringe size indicator is displayed in the
screen.
Step 4
Set the Infusion Rate
With the DigiPump SR7x in STOP mode, rotate the adjusting Knob to set the desired flow
rate and press the adjusting Knob to confirm and save the adjusted flow rate.
Note: Turn the adjusting Knob clockwise to increase the flow rate or anti-clockwise to
decrease the flow rate.
Step 5
Set Bed Number (Only when using together with Infusion Supervision System)
Press SELECT key. The display light indicator changes to Bed No. Rotate the adjusting Knob
to set the desired Bed No and press the adjusting Knob to confirm and save.
Note: Turn the adjusting Knob clockwise to increase the Bed No or anti-clockwise to
decrease the Bed No.
Step 6
Clear Accumulated Volume
(1) Press SELECT key. The display light indicator changes to Bed No., then press the SELECT
key again and the display light indicator changes to Ʃ ml (accumulated volume).
(2) Press CLEAR key, the accumulated volume will clear to zero ml ‘0’.
8
DigiPump SR7x Syringe
Syringe Pump Operator’s
Operator s Manual
Note: The accumulated volume can be viewed during the infusion pressing the SELECT key,
but to clear the accumulated volume the syringe pump need to be in STOP mode.
Note: accumulated volume can be cleared only in STOP condition.
Step 7
Start infusion
(1) After all values are set and the syringe is properly installed, press START key to start the
infusion, the infusion lights will flash from right to left. The piston shall drive the syringe
from right to left slowly as the infusion begins.
Note: The faster the infusion lights flash, the higher the infusion rate is.
Step 8
Infusion completion
As shown in the figure bellow, when the infusion comes close to near completion, the NEAR
indicator light is ON, accompanied with an audible alarm signal to alert the user.
Note: The NEAR alarm can be silenced by pressing the adjusting knob. The NEAR audible
alarm will sound again in 2 minutes.
9
DigiPump SR7x Syringe
Syringe Pump Operator’s
Operator s Manual
As shown in the figure bellow, when the infusion is completed, the OVER indicator light is
ON, accompanied with an audible alarm signal to alert the user. Press the STOP key and the
syringe pump stops operation.
Note: The OVER alarm can be silenced by pressing the adjusting knob. The OVER audible
alarm will sound again in 2 minutes.
Step 9
Turn off the power
Press the POWER key for 3-5 seconds and then release it, the machine power is turned-off.
2.2
BOLUS Function
During the infusion process, if bolus infusion is needed, while the on-going flow rate is lower
than the maximum rate for the syringe size in use, keep and hold the BOLUS key, the machine
will infuse at maximum rate for the syringe in use. The Infusion Rate returns to original rate
after releasing the BOLUS key.
Syringe Size
10 ml
20 ml
50 ml
Bolus rate
100 ml/h
200 ml/h
500 ml/h
10
DigiPump SR7x Syringe
Syringe Pump Operator’s
Operator s Manual
3. Configuration
3.1
Enable and Disable ‘NEAR’ Alarm Function
(1) With the syringe pump off, press and hold the START + CLEAR + POWER keys
simultaneously. The syringe pump is turned-on and a configuration mode sound indicates
the syringe pump enters configuration mode. Release all the keys together.
(2) The syringe pump enters into the configuration mode to lock and unlock the NEAR alarm.
The NEAR alarm light is turned on and the screen display a value. 01 stands for NEAR
alarm function DISABLED and 02 stands for NEAR alarm function ENABLED.
3.2 Syringe Configuration Change
The DigiPump SR7x syringe pump is calibrated in the factory to the following disposable
syringes:
Manufacturer
BD
Sizes for Reference in (mm)
10ml
20ml
50ml
61.0
70.0
89.5
Length from Size indicator marking to 0ml
e.g.:50ml syringe
11
DigiPump SR7x Syringe
Syringe Pump Operator’s
Operator s Manual
Step 1
Measure the syringe length
Measure the new syringe length in millimeters (mm).
Step 2
Install the syringe
Turn off the syringe pump. Install the new syringe on the pump. Push the syringe piston to
compressing the syringe all the way to the syringe’s end.
Warning: The correct installation of the syringe and the piston is essential when changing the
calibration settings or error may occur.
Step 3
Set the syringe parameter
1)- 50ml syringe’s parameter setting: With the syringe pump OFF, press and hold the CLEAR +
POWER keys simultaneously. The syringe pump is turned-on and a configuration mode sound
indicates the syringe pump enters configuration mode. Release all the keys together. The 50ml
indicator light will be ON and the 50ml current parameter value is displayed. Turn the adjusting
knob to change the value to the one measured in step 1, then press the knob to save the new value.
12
DigiPump SR7x Syringe
Syringe Pump Operator’s
Operator s Manual
2)- 20ml syringe’s parameter setting: With the syringe pump OFF, press and hold the BOLUS +
POWER keys simultaneously. The syringe pump is turned-on and a configuration mode sound
indicates the syringe pump enters configuration mode. Release all the keys together. The 20ml
indicator light will be ON and the 20ml current parameter value is displayed. Turn the adjusting
knob to change the value to the one measured in step 1, then press the knob to save the new value.
3)- 10ml syringe’s parameter setting: With the syringe pump OFF, press and hold the STOP +
POWER keys simultaneously. The syringe pump is turned-on and a configuration mode sound
indicates the syringe pump enters configuration mode. Release all the keys together. The 10ml
indicator light will be ON and the 10ml current parameter value is displayed. Turn the adjusting
knob to change the value to the one measured in step 1, then press the knob to save the new value.
13
DigiPump SR7x Syringe
Syringe Pump Operator’s
Operator s Manual
3.3 Occlusion Sensibility Adjust
The occlusion pressure is sensibility can be adjusted by the user. The value range goes from 12 to 20.
The sensibility is set in the factory to 13. The smaller the value is, the more sensitive the occlusion
alarm is. The actual pressure value depends on the syringes size and conditions in the range from 10
to 25PSI.
To change the occlusion pressure sensibility value, with the syringe pump OFF, press and hold the
START + POWER keys simultaneously. The syringe pump is turned-on and a configuration mode
sound indicates the syringe pump enters configuration mode. Release all the keys together.
Note: During infusion, when the OCCLUSION alarm is triggered the syringe pump enters KVO
mode. It returns to original infusion rate when the occlusion is removed
4. Cleaning, Storage, Transport and Maintenance
4.1 Cleaning
1.Keep the pump clean. Use a piece of cloth to wipe the syringe pump clean when any liquid
drops on the pump.
2. Special attention must be paid when cleaning the syringe pump. Use a tampon moistened
with 75% of alcohol to wipe the outer case.
3.Make sure the AC power is disconnected and the pump is turned off.
4.Do not clean the syringe pump by using xylene, acetone or similar corrosive cleaning
products to avoid outer case damage.
The above mentioned operation is just for guidance. More proper methods should be used for
sanitizing effect inspection.
4.2 Transport and Storage
Transport and Storage environmental conditions: temperature: -15C~50C,atmosphere
pressure: 86kPa~106kPa,relative humidity: 20% ~ 90%.
14
DigiPump SR7x Syringe
Syringe Pump Operator’s
Operator s Manual
4.3 Preventive Inspection
1. Flow Rate accuracy check.
Use one volume calibrated recipient to verify Flow Rate and Volume accuracy every time
new syringes are being used or every six months.
2.Battery Inspection
Batteries have limited life time. Replace the batteries when they are not holding charge.
If replacing batteries are required, please contact Digicare. Model: Lithium Polymer
battery (7.4V,1650mAh).
Use the pump running in its internal battery at least once a month till its depletion and
the power of the pump turns off automatically, for insuring battery performance and
prolonging its life. After battery depletion, recharge 8~14 hours for next use.
The following inspection need to be taken every six months.
(1) Connect to AC power, about 8 hours for recharging.
(2) Turn on the syringe pump and install 50ml syringe.
(3) Set up infusion rate: 25ml/h and start syringe.
(4) Observe operation of the syringe pump till it turns off based on low battery.
If the syringe pump takes 90 minutes or even longer time from starting
infusion to shutdown, the battery is in good condition.
If the syringe pump takes 45-90 minutes from starting infusion to shutdown,
the battery life close to its end.
If the syringe pump takes less than 45 minutes from start infusion to shutdown,
the battery is up to its end and recharge of battery is required.
(5) After battery inspection, recharge the battery again for usage next time.
3.Routine Maintenance
intervening time
According to hospital policy
At least once a year for inspection
4.4
Routine maintenance procedures
Thoroughly cleaning of syringe pump case is
required before or after long period of storage.
1.Inspection of AC power cord and wires.
Environmental Protection
The life time of the products is 3 years. Machines over its life should be discarded, please
contact the manufacturer or distributor for more relevant information.
1. DigiPump SR7x syringe pumps that are no longer in use could be delivered to its
distributors or manufacturer for proper recycling.
2. Used Lithium Polymer batteries could be delivered to its distributors or manufacturers for
handling, or handling it as per applicable laws and regulations.
15
DigiPump SR7x Syringe
Syringe Pump Operator’s
Operator s Manual
5. Alarms
5.1
Alarms and Actions
Reason
Solution
The syringe is
almost empty and
close to end of
infusion
1.press the knob to cancel
the alarm(the alarm will
ring again after two
minutes)
2. Press STOP key to stop
the syringe pump and
cancel the alarm.
The syringe is
empty and
infusion is
finished
1. Press the knob to cancel
the alarm(the alarm will
ring again after two
minutes)
2. Press STOP key to stop
the syringe pump and
cancel the alarm.
Occlusion
alarm
1. Syringe or
infusion set
with occlusion
2. Occlusion
alarm need
sensitivity
adjustment
3. Syringe pump
pressure sensor
has problem
1 : Press STOP key to
stop the syringe pump and
cancel the alarm, eliminate
infusion occlusion, then
press the START key to
start infusion once again.
No.2: Refer to Occlusion
Sensibility Adjust 3.3
No.3 : Contact Digicare
Technical support
Low
battery
1.Battery too low
2.Bad battery
aging or
something
wrong with
the battery
charge circuit
No.1 : Connect to AC
power supply to charge the
battery
No.2 : Contact Digicare
Technical Support
AC
indicator is
OFF
1.No AC power
supply for the
syringe pump.
2.Something
wrong with
the power
supply circuit
of syringe
pump.
No.1:Check if the power
cord is not plugged in or
not properly plugged in.
No.2 : Contact Digicare
Technical Support
Description
Display
NEAR
alarm
OVER
alarm
16
DigiPump SR7x Syringe
Syringe Pump Operator’s
Operator s Manual
1.The syringe is
disengaged or
not properly
installed.
2.The syringe’s
parameter is
wrongly set.
3. Something is
wrong with
the syringe
sensor
Syringe
Disengaged
1. The syringe’s
parameter is
wrongly set
2. the syringe
pump’s
motor can’t
run properly
Control
Abnormal
5.2
No.1:Install the syringe
again
No.2:Refer to item 3.2
Syringe Configuration
Change
No.3:Contact Digicare
Technical Support
No.1:Refer to 3.2 Syringe
Configuration Change
No.2 : Contact Digicare
Technical Support
Troubleshooting
Description
Press START key
but the light for
LED operation is
not on.
Turn the knob but
infusion rate does
not change.
Result
The syringe
pump does not
work.
Cause
The syringe is not properly
installed.
The syringe configuration
parameter is not rightly set.
The infusion rate The rate cannot be changed
does not change. during infusion operation.
The syringe pump
can’t turn-on with
the battery
The syringe
pump can’t turn
on
The occlusion
alarm signal
sounds soon after
the syringe pump
starts operation.
The syringe size
sensor can’t detect
the syringe
The occlusion
light is on and
the syringe
pump stops.
The indicator
light of the
corresponding
syringe is not on
Bad battery. The syringe
pump can not be used before
it is connected to A.C.
electric supply.
The occlusion sensitivity
value of the syringe pump is
not properly set.
The compressed strut is not
tightly pressed on the
syringe. Or the syringe
setting is not rightly set.
17
DigiPump SR7x Syringe
Syringe Pump Operator’s
Operator s Manual
Solutions
Reinstall the syringe. Check
if the right indicator light is
on. Or configure the syringe
settings.
Press STOP key to stop the
syringe pump. Turn the knob
to set the needed value and
press the knob to save the
value.
Connect the syringe pump to
A.C. power supply before
operation (Make sure the
pump is ON).
Reset the occlusion
sensitivity value.
Pull the compressed strut of
the syringe up, reinstall the
syringe and press it onto the
syringe tightly. Or reset the
syringe setting as 3.2
5.3
Service
Attention:
1. If there is any untreatable fault or question, please stop using the Digipump SR7x Syringe Pump
and contact Digicare for Technical Support and Service.
2. Unauthorized person has no right to repair this product; otherwise Digicare will take no
responsibility.
18
DigiPump SR7x Syringe
Syringe Pump Operator’s
Operator s Manual
WARRANTY TERMS & CONDITIONS
DIGICARE BIOMEDICAL TECHNOLOGY, INC. covers all of their infusion pumps with
a 1 year warranty:
Infusion Pump DigiPump SR7x: 1 year parts and labor
Accessories:
90 days on accessories only
DIGICARE BIOMEDICAL TECHNOLOGY, INC. will provide the necessary parts and
labor to maintain the monitor (s) listed on the Warranty Certificate in a usable
condition during the covered period.
DIGICARE BIOMEDICAL TECHNOLOGY, INC. will, at its option, repair or replace any
product which proves to be defective during the warranty period, if returned to the
factory with prior authorization, transportation prepaid.
Not covered by this agreement are repairs necessitated by any of the following
conditions:
1 - Inadequate power or power failure.
2 - Neglect, abuse or misuse of equipment.
3 - Servicing of equipment by person’s other than DIGICARE INC.
4 - Any unit opened or tampered with, without prior authorization.
When returning an infusion pump for warranty repair, you must first contact
DIGICARE BIOMEDICAL TECHNOLOGY, INC. to receive a Returned Goods
Authorization Number (RGA #) that is to be clearly marked on top of the shipping
carton. Please make sure that your company name, shipping address, area code
and telephone number and person to contact is located in and/or on the box. ANY
UNIT THAT IS RETURNED TO THE FACTORY WITHOUT AN RGA# WILL BE REFUSED.
Model # _________________
Serial # _____________________
Dealer Name:_______________________________________________
Date Equip. Purch.: ___/ ___/____ Expiration Date: ___/____/____
DIGICARE BIOMEDICAL TECHNOLOGY INC.
107 Commerce Road
Boynton Beach, FL 33426, USA
Phone: 561-689-0408
Fax: 561-689-0021
Email:[email protected]
www.digi-vet.com
19
DigiPump SR7x Syringe
Syringe Pump Operator’s
Operator s Manual