1
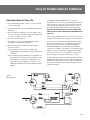
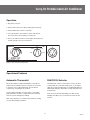
Model No: 12025763
Carry-On
Portable Cabin Air Conditioner
INSTALLATION, OPERATION and WARRANTY
Portable Air Conditioners
For 115V Units
IMPORTANT: MAXIMUM COOLING CAPACITY
This Carry-On air conditioner is designed to cool a space of
approximately 120 square feet. This is “below decks space.”
This means that there are no large windows, typical of powerboats, and the unit will cool a “space/cabin” or a boat with the
above dimensions.
Rev. 20101105 L-2245
Carry-On Portable Cabin Air Conditioner
Table of Contents
• Introduction
Warnings.........................................................................................4
Dimensions & Hatch Size ...............................................................4
Important Information......................................................................4
Power Requirements.......................................................................4
Inverter/Generator Operation..........................................................4
Safe Operation of Carry-On............................................................5
• Installation............................................................................6
• Air Deflector........................................................................8
• Operation/Operational Features
Automatic Thermostat.....................................................................9
FAN/COOL Selector........................................................................9
• Cleaning & Storage
Cleaning Instructions.....................................................................10
Air Filter.........................................................................................10
Cabinet..........................................................................................10
Care of Hatch Bag and Storage Cover*........................................10
Storing Instructions.......................................................................10
• Troubleshooting
Problem/Possible Cause/Action...................................................11
• Parts List..............................................................................12
• Waranty.................................................................................13
• Warning.................................................................................14
3
• English
Introduction
Before installing the unit,
you will need:
You have purchased a marine air conditioner that will add
to your boating enjoyment. Please read the accompanying
instructions to insure proper installation, operation and care.
A power extension cord rated at 15 amps for 115V unit.
(See section, “Safe Operation of Carry-On”.)
Warnings
Optional 3/8 in. (9.5mm) I.D. (Inside Diameter) Flexible drain
tubing. (See section, “Installation Instructions”.)
The use of the Carry-On™ is not recommended while the
boat is under way because of the potential for damage to the
Carry-On or the boat or the potential for personal injury.
Power Requirements
The National Electrical Code recommends the use of a
cord labeled with LCDI or AFCI when connecting a room
air conditioner to power. LCDI stands for Leakage Current
Detection and Interruption; AFCI stands for Arc Fault Circuit
Interruption. Both help prevent fires and electrical shock.
West Marine recommends that you go to your nearest
West Marine store, call: 1-800-BOATING, or go on line to
WESTMARINE.COM and order part LCDI25 (25’ cord) or
purchase a similar cord from another supplier.
For 115 Volt Units (50/60Hz
Operation)
115/60/1 dockside power
Running amps: 6.9 A
Starting amps: 21 A
Minimum Voltage: 104 VAC
Minimum Circuit: 15 A
The Carry-On unit weighs 77 lbs (34.9 kg). Please get
assistance when moving or lifting the Carry-On to prevent
injury.
Inverter/Generator Operation
In order to use the Carry-On safely on inverter or generator
power, you must confirm that the inverter/generator will be
able to meet the power requirements listed in this manual.
West Marine cannot assist in sizing an inverter/generator
as the manufacturer of that item is best suited for that
task. Damage to a unit caused by an inadequate inverter/
generator is not covered under warranty.
Dimensions & Hatch Size
The Carry-On is 19 in. (483mm) high, but only 14-5/8
in. (371mm) above deck when installed. The unit is 33
in. (838mm) long and 16 in. (406mm) wide. For proper
installation, the minimum hatch size is 12 in. (305mm)
square, and the maximum hatch size is 24 in. (610mm)
square. The minimum round hatch diameter is 15-1/2 in.
(394mm).
Important Information
Please make sure you have the following items. If you are
missing any of these items please contact West Marine.
(1) CO-7000 Carry-On Portable Air Conditioning Unit
(1) Hatch Bag
(1) Air Deflector
(2) 23 in. (584mm) Batten Rods
(2) 25-1/2 in. (648mm) Batten Rods
L-2245
4
• English
Carry-On Portable Cabin Air Conditioner
Safe Operation of Carry-On
(c.) DANGER - SHOCK HAZARD! Do not, under any
circumstances, cut or remove the grounding prong from the
end of your power cord. Your Carry-On must be used with
a three-prong grounding power cord and connected to a
properly grounded and polarized three prong receptacle.
DO NOT USE AN ADAPTOR PLUG, OR A TWO BLADE
ADAPTOR PLUG THAT BYPASSES THE GROUNDING IN
ANY WAY!
1. Use cord labeled with LCDI or AFCI to connect to power
source (see warning).
2. Using the Carry-On is not recommended while the boat is
under way.
3. Prevent accidents or damage to Carry-On. Always carry
or move unit using the handles. Unplug at receptacle and
Carry-On control panel prior to moving.
(d.) It is always desirable to have your on-board or shoreside
receptacle protected by a time delay fuse or circuit breaker.
4. Do not disassemble Carry-On.
5. Be certain the Carry-On has been properly installed
according to the Installation Instructions.
(a.) Be sure the electrical service is adequate and
equipped with a circuit breaker (15 amps minimum for
115V units).
7. If the Carry-On operation is interrupted (turned off, plug
pulled out, thunderstorm, etc., accidentally or otherwise)
after operation in the COOL mode, WAIT 3 MINUTES
BEFORE RESTARTING. This allows pressure inside the
compressor to equalize. Consequences of attempted restart
within the 3 minute period may be a tripped circuit breaker
or blown fuse. In this case, turn Carry-On to “OFF”, reset
breaker (or replace fuse), wait 3 minutes, then restart.
(b.) Use a three-prong (grounded) power cord rated at 15
amps minimum for 115V units, with a length no longer
than needed to reach from the installed Carry-On to
a grounded, 3-wire receptacle on your boat, or to a
suitable grounded dockside outlet (order part number
LCDI25).
8. If the Carry-On has been stored in any position other than
upright within 10 degrees of level, then, after installing, wait
30 minutes to allow compressor oil to settle to the bottom of
the compressor. Otherwise permanent damage may occur,
voiding the warranty.
6. Physical and electrical conditions vary greatly from
location to location.
Figure 1:
Wiring Diagram
5
• English
Alternate
Batten Pocket
Batten
Batten Pocket
Figure 2. The Carry-On positioned in the boat hatch with
the Hatch Bag in place. See inset Figure 2b.
Figure 2b. Close-up of Batten and Batten Pockets
Installation
1. Place in open hatch as shown. (See
Figure 5.) Adjust Carry-On so that the
hatch pad protects and insulates the
hatch and the Carry-On unit. Make
sure that movement of Carry-On is
stifled due to wedging action of the
hatch pad as it presses against hatch
edge.
3a. Proper Positioning In Hatch
NOTE: Carry-On may be further secured
using the D-ring type “tie downs”.
2. Place hatch bag over Carry-On in
grooves provided. Do not allow hatch
bag to cover air intake vents
or condensate drain. (See Fig. 2.)
3. Adjust the hatch bag over the hatch
cover and hatch opening. The hatch
bag is designed to keep outside air
from entering the hatch while the
Carry-On is in use. The fit should be
as snug as possible. Use the battens
provided to form the deck frame. Slide
the battens into the pockets provided.
Note that there is an alternative set of
batten pockets for use with a smaller
hatch. Should you decide to use
the alternative batten pockets, you
must cut the battens to size. A more
weather tight seal can be achieved if
you adapt the hatch bag to your boat
using a Velcro® brand fastener, or
snaps. Consult your marine dealer or
canvas shop if you need help.
L-2245
3b. Improper Positioning In Hatch
Figures 3a & 3b. These figures show proper and improper positioning and leveling of
the Carry-On unit in the boat hatch. It is very important that the Carry-On be level.
6
• English
Carry-On Portable Cabin Air Conditioner
Hatch Pad
4. Level unit with adjustable cam and leg. Adjust the leg until
the indicator bubble is away from the side of the level. It is
not necessary to exactly center the bubble. If your hatch
location is such that the Carry-On cannot be leveled with
the leg fully extended, you must provide an additional
means of support to allow the degree of leveling described.
Under no circumstances should the Carry-On be operated
more than 10 degrees off level, since this could cause loss
of proper lubrication to internal parts and void the warranty
(See Figures 3a & 3b).
Air Filter
THERMOSTAT
OFF
HI FAN
LO FAN
FAN
HI COOL
LO COOL
Condensate
Drain
Air Intake
Vents
5. A condensate drain is located under the unit (See Figure
4) in a position such that water removed from the air is
allowed to drain onto the deck. Should you desire to drain
this water to another area, a 3/8 in. I.D. (See Figure 4) hose
fits the condensate drain.
NOTE: The hose must be routed downhill continually with
no “up” loops or air traps.
Optional 3/8’’ (9.5mm)
Flexible
Drain Tube
Leg
(See Installation
Instructions #5)
6. You are now ready to operate the Carry-On. Follow the
operating instructions.
“D” Ring
Foot (Soft)
Cam
Figure 4. Bottom View of Carry-On
Handle
Air Intake Vents
Groove
Level
Exhaust Vents
“D” Ring
Location
Groove
Discharge Air
Return Air
Hatch Pad
HAtch Pad
Leg
Figure 5. The Carry-On positioned in the hatch of a boat without the hatch bag.
7
• English
Air Deflector (Standard for Carry-On)
Air Deflector changes the direction of the air flow from almost vertical to horizontal.
The Air Deflector can be purchased from your dealer; Part No. PL-0018.
Figure 6. Air Deflector
L-2245
8
• English
Carry-On Portable Cabin Air Conditioner
Operation
1. Plug in the Carry-On.
2. Set the thermostat to its coldest setting (fully clockwise).
3. Set the FAN/COOL selector to HI COOL.
4. Close all windows, vents, hatches, doors, and exhaust
fans in the area to be cooled by your Carry-On.
5. Once your cabin or boat has cooled, adjust the thermostat
and fan speed to suit your comfort level.
THERMOSTAT
FAN
OFF
HI FAN
HI COOL
LO FAN
LO COOL
Figure 7. The Carry-On Control Panel
Operational Features
Automatic Thermostat
FAN/COOL Selector
When either HIGH or LOW COOL MODE is selected, the
thermostat automatically turns the compressor on and off
in response to the cabin temperature. The fan will run
continuously, circulating air in your boat.
The FAN/COOL selector control allows a choice of either
cooling cabin air on HI COOL/LOW COOL, or circulating
cabin air at existing temperature on HI FAN/LOW FAN. The
HIGH/LOW settings in either FAN or COOL determines the
air speed only.
You may find it desirable, once the cabin is comfortable,
particularly after sundown, to adjust the thermostat away
from the coolest setting before retiring.
Note: The Carry-On will dehumidify your cabin. As the
humidity level drops, the cool air from the Carry-On will
increase.
After some experience, you will know the optimum setting
for your ideal sleeping conditions.
9
• English
Cleaning Instructions
Storing Instructions
Clean the Carry-On occasionally to keep it looking new and
operating properly. Be sure to unplug the Carry-On before
cleaning.
The Carry-On Hatch Bag and Storage Cover should be
cleaned, allowed to dry and stored in a dry, well-ventilated
area.
Cleaning the Air Filter
When storing the Carry-On unit for long periods of time, it is
advisable to purchase the Storage Cover (accessory), cover
it with plastic or return it to the original carton. STORE IN
OPERATING POSITION in a dry place. These precautions will
prevent the accumulation of dust and airborne particles from
lowering the efficiency of future performance or necessitating
more frequent cleaning.
Remove filter (see Figure 4.) Gently wash by hand in a
solution of mild soap and warm fresh water. Allow water to
drain and reinstall. Extra filters may be ordered from your
dealer.
Cleaning the Cabinet
Wash with mild soap and fresh water. For tougher stains or
scuffs, SOFT SCRUB® may be used. Though Carry-On is
designed for adverse conditions, do not intentionally spray
water directly into air slots.
Care of Hatch Bag and
Storage Cover*
The Hatch Bag and Storage Cover are made out of a fabric
called SUNBRELLA, and should be cleaned regularly before
substances such as dirt, dust, etc. are allowed to accumulate
on it and become embedded in the fabric.
Regular Cleaning: The fabric can be cleaned by simply
brushing it off with a clean brush. It may also be hosed down
and cleaned with a mild solution of a natural soap such as
LUX® or IVORY LIQUID® in lukewarm water (not to exceed
100° F.) Rinse thoroughly to remove soap. Do not use
detergents!
For more stubborn cases: You may soak the Hatch Bag or
the Storage Cover for approximately twenty minutes in a
solution of no more than 1/2 cup (4 oz./118 ml ) CLOROX®
and 1/4 cup (2 oz./59 ml ) IVORY or LUX SOAP per gallon of
warm water. Rinse thoroughly in cold water to remove all of
the soap.
NOTE: Excessive soaking in CLOROX can deteriorate sewing
threads. This method of cleaning may remove part of the
water repellency and the fabric should receive an application
of a marine water repellent treatment such as 10174779 West
Marine Pure Oceans NanoTec Waterproofing Protectant.
*The Storage Cover is an optional accessory which was intended to
cover the entire Carry-On and help protect it from dirt and dust while
being stored away from the boat.
L-2245
10
• English
Carry-On Portable Cabin Air Conditioner
Troubleshooting
Before you call for service, review this list. It may save you
time and expense. This list contains common occurrences
that are not a result of defective workmanship or materials.
Important: Boat must be closed so that outside air is
prevented from access to the inside. Close all hatches and
ventilators.
Problem
Possible Cause
Action
Unit will not operate.
1. Plug disconnected from receptacle or unit.
2. Blown fuse or tripped circuit breaker.
3. Thermostat set incorrectly.
1. Connect firmly.
2. R
eplace fuse with time delay type; or reset
breaker, check for adequate size (minimum 15
amps at 115V)
3. Adjust thermostat to cooler setting.
Air from unit does
not feel cool enough
in cool mode.
1. Selector switch on FAN.
2. Thermostat set incorrectly.
3. Boat temperature below 70°F.
4. Air intakes on heat exchanger blocked or
restricted.
1. Move to COOL.
2. Turn clockwise to cooler setting.
3. C
ooling may not begin until boat is above 70°F.
4. B
e certain all air intake vents (see figure 4) are
clear of hatch bag or other obstructions.
Carry-On operating,
but cabin failing to
cool.
1. Dirty air filter.
2. Thermostat set too cold for nighttime
cooling and the evaporator coil has frozen.
3. Air intakes on heat exchangers blocked or
restricted.
1. Clean filter.
2. T
urn selector switch to FAN position for three
minutes and reset thermostat to a warmer
setting or use hair dryer to thaw out.
3. B
e certain all air intake vents (see fig.4.) are
clear of hatch bag or other obstructions.
Carry-On turns
compressor on and
off rapidly.
1. Dirty air filter.
2. Outside temperature extremely hot.
1. Clean air filter.
2. Turn to HI COOL.
Water dripping inside
cabin through the
hatch.
1. Improper installation.
2. Condensate drain is blocked.
3. Bag over condensate drain.
1. T
ilt Carry-On to accommodate angle of
condensate drain.
2. Clean out condensate drain.
3. Adjust bag to clear drain.
4. C
lear hose; check downhill routing of hose.
You may connect a 3/8-in. I.D. plastic hose
to the condensate drain and send that water
overboard.
4. Blockage in hose.
Water dripping
outside on
weatherdeck.
1. Condensate drain-normal.
2. Compressor area-normal.
1. D
rains are provided to allow rainwater to
drain. Some drainage may occur due to water
condensing in compressor spaces.
11
• English
Parts List
ATTENTION: Owners or Independent
Service Companies: Use the following
guide if replacement parts are
required.
Part No.
Handle
Body
Description
1013............CO-Thermostat Air Temp (Ranco)
1014............CO-Switch 2-SPD Short
1025............CO-Plug 125V 15A Male
1027B.........CO-Fan Motor 115V
4001............CO-Filter
4010............CO-Level Acrylic Rnd
4012............CO-Hatch Bag
4013............CO-Batten 23” X 1/4” LDPE Rod
4014............CO-Batten 25.5” X 1/4” LDPE Rod
4018............CO-Fan Blade Assy - Evaporator (Resil)
4019............CO-Fan Blade Assy - Cond. Alum Hub
5005...........CO-Cam W/Pin
5011............CO-Bulkhead
5012............CO-Pan
5017............CO-Foot
5023...........CO-Shroud Condenser
5024...........CO-Knob Blk Plastic W/White Pointer
7010B..........CO-Evap. Assembly 11.875 x 8 13FPI 3ROW
7011............CO-Condenser Assembly
3014007......CO-Compressor 115V
9510............CO-Body Assembly (PL-0001)
9511............CO-Leg Assembly (PL-0002)
9512............CO-Inlet/Outlet Assembly (PL-0004)
331475........Capacitor Run 35 MFD, Compressor 115VAC
4040110......Capacitor Run 10 MFD, Fan
Bulkhead
Cam with pin
Pan
Inlet/Outlet
Foot
Manufacturer’s Note:
The Carry-on Portable Cabin Air Conditioner
is manufactured for West Marine by Dometic
Corporation.
Description
PL-0018...... Air Deflector
LCDI25........Leakage Current Detection/Interruption Protector
Leg
Hatch Pad
ACCESSORIES
Part No.
Cam Blocks
Air Separator
For technical assistance please call
1-800 BOATING (262-8464).
(25 ft. Electrical Power Extension Cord)
MI-0025...... White Storage Cover
MI-0026...... Blue Storage Cover
L-2245
12
• English
Carry-On Portable Cabin Air Conditioner
Limited Warranty for the Model 12246021 West Marine Carry-On Portable Air Conditioner
What Does This Limited Warranty Cover?
What Must I Do To Keep the Warranty in Effect?
West Marine warrants to the original retail purchaser of the West Marine
product, where the purchase is made in the United States, that for twelve
(12) months from date of original retail purchase said product will be free
from defects in materials and craftsmanship with only the limitations or
exclusions set out below.
• You must keep your receipt or other appropriate documentation as
proof of the date of sale and purchase.
• You must keep your serial number or order number for the product.
This is found on the product itself or on your receipt.
• You must not do any of the things that will make the warranty invalid
as provided for in this warranty statement.
How Long Does This Limited Warranty Last?
• You must use, install, maintain and operate the product in accordance
with published specifications and the user’s manual.
This limited warranty is valid for twelve (12) months from the date of the
original retail purchase from West Marine within the United States (the
“Limited Warranty Term”).
What Do I Do If I Need Warranty Service?
The warranty period is not extended if we repair or replace a warranted
product or any parts. West Marine reserves the right to change the
availability of limited warranties, at its discretion, but any changes will not
be retroactive and will only apply to subsequent purchases.
• Before the warranty expires, please call us at 1-800-262-8464. Please
also have your West Marine serial number or order number available.
• When you contact us, we will issue a Return Material Authorization
Number for you to include with your return. We will also provide you
the address of where to ship the product.
What Does This Limited Warranty Not Cover?
• You must return the product to us in its original or equivalent
packaging, prepay shipping charges, and insure the shipment or
accept the risk if the product is lost or damaged in shipment.
This limited warranty is invalid where and does not cover:
• Software.
• Commercial or industrial use or operation.
What Will West Marine Do?
• Normal maintenance items or normal wear and tear.
During the Limited Warranty Term, if the product you return to us proves to
be defective in materials or workmanship and not for the reasons which
would otherwise disqualify it (as explained here), then we will:
• Problems resulting from fire or submergence in water or other liquids.
• The product was damaged, modified or altered.
• The product was used as part of any conversion kits, subassemblies,
or any configurations not appropriate or contemplated for this product
or its use.
• At West Marine’s option, we will repair the product or, if we are unable
to repair it, we will replace it with a comparable product that is new or
refurbished;
• Damage or loss occurring during return shipment of the product to
West Marine or its authorized service representative.
• Or, as an alternative, at West Marine’s option, we will refund you the
original purchase price;
• The product was subject to improper service, repair, installation,
storage, maintenance, alteration or application.
• If we repair or replace the product, we will return the repaired or
replacement product to you; and
• Problems that result from accident, neglect, abuse, misuse or issues
with electrical power,
• Pay to ship the repaired or replacement product to you if you use
an address in the United States (excluding Puerto Rico and U.S.
possessions and territories). Otherwise, we will ship the product
to you freight collect.
• Problems caused by accessories, parts or components added to the
product that are not appropriate for this product or its use.
If we determine that the problem is not covered under this warranty, we
will notify you of this when we return your product to you to the address
you provide us in the United States (excluding Puerto Rico and U.S.
possessions and territories).
THIS WARRANTY GIVES YOU SPECIFIC LEGAL RIGHTS, AND YOU MAY
ALSO HAVE OTHER RIGHTS WHICH VARY FROM STATE TO STATE (OR
JURISDICTION TO JURISDICTION). WEST MARINE’S RESPONSIBILITY
FOR MALFUNCTIONS AND DEFECTS IN HARDWARE IS LIMITED TO
REPAIR OR REPLACEMENT AS SET FORTH IN THIS WARRANTY
STATEMENT. ALL EXPRESS AND IMPLIED WARRANTIES FOR THE
PRODUCT, INCLUDING BUT NOT LIMITED TO ANY IMPLIED WARRANTIES AND CONDITIONS OF MERCHANTABILITY AND FITNESS FOR A
PARTICULAR PURPOSE, ARE LIMITED IN TIME TO THE TERM OF THIS
LIMITED WARRANTY (AS SPECIFIED ABOVE). NO WARRANTIES,
WHETHER EXPRESS OR IMPLIED, WILL APPLY AFTER THE LIMITED
WARRANTY PERIOD HAS EXPIRED. SOME STATES DO NOT ALLOW
LIMITATIONS ON HOW LONG AN IMPLIED WARRANTY LASTS, SO
THE ABOVE LIMITATIONS MAY NOT APPLY TO YOU.
We use new and refurbished parts made by various manufacturers in
performing warranty repairs and in building replacement parts and
systems. Refurbished parts and systems are parts or systems that have
been returned to West Marine, some of which were never used by a
customer. Replacement parts and systems are covered for the remaining
time left in the Limited Warranty Term for the product you bought
(whatever time remains in the twelve months since purchase). West
Marine owns all parts removed from repaired products.
Maintenance is the Owner’s Responsibility
Cleaning, polishing, lubricating, replacing filters, tuning, replacing worn
parts, using your purchased product according to the user’s manual, and
regularly maintaining your purchased product is your responsibility.
WE DO NOT ACCEPT LIABILITY BEYOND THE REMEDIES PROVIDED
FOR IN THIS LIMITED WARRANTY OR FOR CONSEQUENTIAL OR
INCIDENTAL DAMAGES, INCLUDING, WITHOUT LIMITATION, ANY
LIABILITY FOR THIRD-PARTY CLAIMS AGAINST YOU FOR DAMAGES,
FOR PRODUCTS NOT BEING AVAILABLE FOR USE, OR FOR LOST DATA
OR LOST SOFTWARE. OUR LIABILITY WILL BE NO MORE THAN THE
AMOUNT YOU PAID FOR THE PRODUCT THAT IS THE SUBJECT OF A
CLAIM. THIS IS THE MAXIMUM AMOUNT FOR WHICH WE ARE
RESPONSIBLE. SOME STATES DO NOT ALLOW THE EXCLUSION OR
LIMITATION OF INCIDENTAL OR CONSEQUENTIAL DAMAGES, SO
THE ABOVE LIMITATION OR EXCLUSION MAY NOT APPLY TO YOU.
What if I purchased a Plus Protection Plan?
Service will be provided to you under the terms of the Plus Protection Plan
Contract. Please refer to that contract for details on how to obtain service.
How State Law Relates to the Warranty.
This warranty gives you specific legal rights, and you may also have other
rights which vary from state to state.
13
• English
Warning
West Marine Corporation (West Marine) makes the following
safety warnings concerning the application, installation,
use and care of its products. Although these warnings are
extensive, there may be specific hazards which may arise
out of circumstances which we have not outlined herein.
Use this as a guide for developing an awareness of potential
hazards of all kinds. Such an awareness will be a key factor
in assuring your SAFETY and comfort.
pressure on the other side. Air handling components must
be installed so that the suction-pressure action does not: (1)
pressurize an area to the extent that structural failure occurs
which could cause harm to occupants or bystanders, or (2)
cause a suction or low pressure in an area where hydrogen gas
from batteries, raw fuel vapor from fuel tanks, carbon monoxide
from operating propulsion engines, power generators or
heaters, methane gas from sewage holding tanks, or any other
dangerous gas or vapor could exist. If an air handling unit is
installed in such a manner that allows potentially lethal gases or
vapors to be discharged by the air handling unit into the living
space, this could result in loss of life.
ELECTRICITY - Many West Marine products operate on
115, 230 or 440 volt AC power. Such voltages can be
LETHAL; therefore, the chassis, cabinets, bases, etc., on
all components must be grounded together and connected
to the vessel’s grounding system. Sparks can occur as
switches, thermostats and relays open and close in the
normal operation of the equipment. Since this is the case,
ventilating blowers for the removal of hazardous fumes or
vapors should be operated at least 5 minutes before and
during operation of any West Marine product or group of
West Marine products. All electrical connections must be
covered and protected so accidental contact cannot be
made by persons using the equipment, as such contact
could be LETHAL.
Maximum protection against the introduction of dangerous
gases or vapors into living spaces can be obtained by
providing living spaces which are sealed from all other
spaces by use of airtight bulkheads and decks, etc., and
through the introduction of clean air into the living space.
Bear in mind that the advent of air conditioning, whether it
be for cooling or for heating, naturally leads to the practice
of closing a living space tightly. Never close all windows and
doors unless auxiliary ventilating systems, which introduce
clean outside air into the living space, are used. Always leave
enough window and door openings to provide adequate
ventilation in the event potentially lethal gases or fumes
should escape from any source.
ELECTROLYSIS - Electrical leakage of any component can
cause electrolytic deterioration (electrolysis) of thru-hull
components which could result in leakage serious enough
to sink a vessel which could result in loss of life. All West
Marine’s components must be kept clean and dry and
checked periodically for electrical leakage. If any electrical
leakage is detected, the component should be replaced
or the fault causing the leakage corrected before the
component is put back into service.
CONDENSATE - All cooling units produce water condensate
when operating on the cooling cycle. This water must be
drained from the cooling unit overboard. If condensate is
allowed to drip on a wooden structure, rotting or decay and
structural failure may occur which could result in loss of life.
If condensate is allowed to drip on electrical components,
deterioration of the electrical components could result in
hazardous conditions. When an air conditioning system is in
operation, condensate drains may be subjected to negative
pressure. Always locate condensate drains as far as possible
from points where engine waste and other dangerous gases
are exhausted so no such dangerous gases can be drawn
into the condensate drains.
GAS - This air conditioning component contains R417a
refrigerant, a non-toxic, non-flammable gas. However, this
gas contains no oxygen and will not support life. Refrigerant
gas tends to settle in the lowest areas of the compartment. If
you experience a leak, evacuate all personnel, and ventilate
area. Do not allow open flames in the area of leaks because
refrigerant gas, when burned, decomposes into other
potentially LETHAL gases. Refrigerant components operate
at high pressure and no servicing should be attempted
without gloves, long-sleeved clothing and eye protection.
Liquid refrigerant gas can cause severe frost burns to the
skin and eyes.
Warning
Never sleep in a closed area on a boat when any equipment,
which functions as a result of the combustion of a volatile
fuel, is in operation (such as engines, generators, power
plants, or oil-fired heaters, etc.) At any time, the exhaust
system of such devices could fail, resulting in a build-up of
LETHAL gases within the closed area.
VENTILATION - To cool or heat air, West Marine components
are designed to move air through a heat exchanger by a
blower or propeller fan. This design necessarily produces
a suction on one side of the air handling component and a
L-2245
Warning Revised: 11/10/2010
14
• English
Carry-On Portable Cabin Air Conditioner
Notes
15
• English
The Carry-on Portable Cabin Air Conditioner
is manufactured for West Marine by Dometic
Corporation.
P.O. Box 50070
Watsonville, CA 95077-0070
Phone:1-800 BOATING (262-8464)
Fax:831-761-4421
Email: [email protected]
www.westmarine.com
L-2245
Rev. 20101105