1
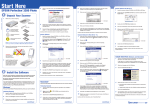
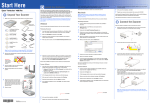
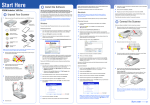
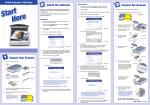
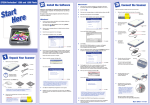
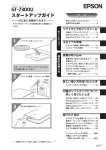
Start Here
4
®
EPSON Perfection 3200 Pro
When you see this screen, click the Adobe Photoshop Elements
button.
1 Unpack Your Scanner
4040929-01
1
5
When you’re asked for a software serial number, enter the number
printed on the sticker attached to the CD-ROM sleeve.
Scanner Software for Mac OS X
1 Insert the scanner software CD-ROM in the CD-ROM or DVD drive.
6
When you see this screen, click the Install button.
2
Double-click the
English folder.
EPSON CD-ROM icon and then double-click the
Click Adobe
Photoshop
Elements
Make sure you have everything:
Click Install
Printed in Singapore
CD-ROM with EPSON
Scan driver, software,
and electronic manuals
XXX
LaserSoft® SilverFast® Ai6
CD-ROM
Continue with the instructions below to install the scanner software.
Adobe® Photoshop® Elements
2.0 CD-ROM
Scanner Software
1 Insert the scanner software CD-ROM in the CD-ROM or DVD drive.
Scanner cover/
transparency unit
Scanner
5
Follow the on-screen instructions. When you’re asked for a software
serial number, enter the number printed on the sticker attached to the
CD-ROM sleeve.
7
Follow the on-screen instructions to install the software.
3
Double-click the EPSON Scan Installer icon.
8
When you’re finished, click Quit.
4
Enter your Administrator name and password and click OK.
9
If you don’t have Acrobat Reader, you can install it from the CD-ROM.
Open the Adobe Acrobat Reader folder. Then double-click the Reader
Installer icon to install it.
5
When you see the EPSON Scan Installer window, click Install,
then follow the on-screen instructions.
®
USB cable
6
Film holders
If you don’t have Acrobat Reader, eject the CD-ROM and repeat
steps 1 – 3. Then select Adobe Acrobat Reader to install it.
The installer starts automatically.
Continue with the following instructions to install the scanner software.
Scanner Software for Mac OS 8.6 – 9.x
1 Insert the scanner software CD-ROM in the CD-ROM or DVD drive.
(If necessary, double-click the
EPSON CD-ROM icon to open it.)
®
ArcSoft Software Suite
CD-ROM
If it doesn’t start, double-click
My Computer (in Windows XP, click
Start > My Computer), double-click
EPSON, then double-click
EPSON.
MonacoEZcolor 2 CD-ROM
2
When you see a message asking you to select a language,
click English.
3
At the Software Installation screen, click Install.
®
Note: If you’ll be connecting your scanner using IEEE 1394 (FireWire,
iLink™), you need to purchase an IEEE 1394 cable (not included).
2
2
Double-click
3
When you see a message asking you to select a language,
click English.
6
Double-click the Reference Guide icon.
When the Software Installation screen appears, click Install.
7
Click Install to install your Scanner Reference Guide.
4
.
Click Install
Install LaserSoft SilverFast, MonacoEZcolor, and the ArcSoft Software
Suite, following the instructions included with each program. Then continue
with the instructions under “Connect the Scanner.”
Remove all the packing tape, but leave the large sticker in place
until instructed to remove it.
IMPORTANT!
Leave the sticker in
place until you are
instructed to remove it.
Click Install
Click Install
3
Insert the hinges on the cover
into the square holes at the
back of the scanner. (Make
sure the cable does not get
caught under the scanner
cover.) Close the cover.
2 Install the Software
Wait! You must install your software before connecting the scanner
to your computer. The install process may take up to 15 minutes.
4
Read the license agreement, then click Agree.
5
Follow the on-screen instructions to install each program. After each
one is installed, click Next or Finish to continue. Note that EPSON
Smart Panel™ installs in several steps. If you have PDA (Palm™ or
Pocket PC) software on your computer, Presto! PixExpress will be
installed.
6
Click Exit. The EPSON Product Registration screen appears.
7
Register your scanner as instructed. At the last screen, click Done or
close your browser.
3 Connect the Scanner
After your software is installed, it’s time to get connected.
5
Read the license agreement, then click Agree.
6
When you see the EPSON Scan Installer, click Install.
1
Remove the sticker from the transportation lock. Use a coin to turn
the lock clockwise one-quarter turn to unlock the scanner carriage.
2
Remove the sticker from the back of the scanner.
When the EPSON Scan installation is complete, click Restart.
Don’t remove your CD-ROM. After your Macintosh restarts,
you can install the rest of your software.
7
When your Macintosh restarts, double-click the
icon to open it, if necessary, then double-click
You see this screen:
EPSON CD-ROM
. Click English.
Install LaserSoft SilverFast, MonacoEZcolor, and the ArcSoft Software
Suite, following the instructions included with each program. Then continue
with the instructions under “Connect the Scanner.”
Be sure to close all open programs and turn off any virus
protection programs.
If you don’t already have Adobe Photoshop or Photoshop Elements on your
computer, install Photoshop Elements from the CD-ROM included with your
scanner. To view the Photoshop user manuals, you’ll need Adobe Acrobat®
Reader® (included on your Photoshop Elements CD).
Windows
®
First you’ll install Adobe Photoshop Elements, then your scanner software.
Photoshop Elements
1 Insert the Adobe Photoshop Elements CD-ROM in the CD-ROM or
Macintosh
®
First you’ll install Adobe Photoshop Elements, then your scanner software.
3
continue
Click Install and follow the on-screen instructions to install each
program. After each one is installed, click Quit to continue. Note
that EPSON Smart Panel installs in several steps. If you have PDA
(Palm) software on your computer, Presto! PixExpress will be installed.
9
Click Exit. The EPSON Product Registration screen appears.
10
Register your scanner as instructed. At the last screen, click Done or
close your browser.
3
Connect the cable for the built-in transparency unit to the round
connector on the back of the scanner. You may need to raise the
scanner cover and twist the cable to insert it.
DVD drive.
2
Double-click the
English folder.
or
CD-ROM icon and double-click the
3
Double-click the Install Photoshop Elements icon.
4
Follow the on-screen instructions to begin installation and accept the
software license conditions. In Mac® OS X, enter your Administrator
name and password, then click OK.
Make sure US English is selected and click Next.
Follow the on-screen instructions to begin installation and accept the
software license conditions.
8
Photoshop Elements
1 Insert the Adobe Photoshop Elements CD-ROM in the CD-ROM or
DVD drive. The installer starts automatically.
2
Remove sticker
Click Install
continue
Install LaserSoft SilverFast, MonacoEZcolor, and the ArcSoft Software
Suite, following the instructions included with each program. Then continue
with the instructions under “Connect the Scanner.”
continue
Make sure the
arrow faces up
continue
Turn over
4
Connect either the USB interface cable that comes with your scanner
or an optional IEEE 1394 (FireWire) cable. Don’t connect both.
4
If you’re using USB...
5
Plug the
square end of the USB cable into the scanner’s
USB port. Then plug the
flat end into any available USB port
on your computer or USB hub.
Note: Your scanner may not work correctly if you use a USB
cable other than the one supplied by EPSON or if you
connect your scanner to a multi-level USB hub system.
If you’re using IEEE 1394 (FireWire)...
Plug one end of the IEEE 1394 cable (not included) into the scanner’s
IEEE 1394 port. Then plug the other end into the IEEE 1394 (FireWire,
iLink) port on your computer.
Click the General tab, then click the Option (or Options) button.
Click the CMS tab.
For the Scanner -> Internal setting,
select Image Color Matching (ICM)
in Windows or ColorSync in Macintosh.
For the Internal -> Monitor setting,
select Automatic. For the Internal
-> Output setting, select RGB.
6
For the Scanner (Reflective) or Scanner
(Transparency) settings, select the
Monaco scanner profile you created.
For the Internal setting, select Adobe
RGB (1998).
7
Click Embed ICC profile to save the
settings in your scan, click Apply,
then click OK.
8
You’ll be prompted to prescan your image.
Click Yes and adjust any scan settings,
then click Scan RGB to scan your image.
9
10
Scan film and slides using Adobe Photoshop and LaserSoft SilverFast.
8
9
Set Transparency for the Original
setting, then choose Positive
or Negative and your film type
(if necessary).
10
For slides, use the color correction
tools to adjust the scan setting. For
negatives, select the type of film you
are scanning to automatically adjust
the color, brightness, and balance
settings.
Plug the scanner’s power cord into a grounded electrical outlet.
6
Press the
power button
on the front of the scanner
to turn it on. The scanner
lamp comes on.
Click File > Print Preview. Click Show Other Options (or Show More
Options) and then select Color Management. Choose your Monaco
printer profile from the Profile menu in the Print Space options.
Click Print, check the settings in your printer software (making sure
that color management is set to No Color Adjustment and that all your
print settings are correct), then click OK or Print to print your image.
To scan film, you’ll need to remove the reflective document mat and place
the film in a holder.
The following sections contain overviews of how to get the most out of your
professional scanner and its software. For detailed instructions, see the
electronic or printed manuals for each software application. The SilverFast
CD-ROM also contains useful QuickTime® tutorials.
1
2
4
To obtain images in the full 48-bit color depth that your scanner offers, you
can scan into ArcSoft PhotoStudio® with EPSON Scan. You can also scan an
image with the stand-alone SilverFast application.
1
Raise the scanner lid and place your photo
face down on the glass. Make sure the
document mat is in place on the
scanner lid.
2
In Windows or Mac OS 9.x,
use Acquire in PhotoStudio
with Epson Perfection 3200
selected as the source.
Make sure the transparency unit cable is connected to the option
interface connector (see step 3 under “Connect the Scanner”).
Lift the scanner lid all the way up
and pull the reflective document
mat up and off of the scanner lid,
as shown.
Slide the film into the film holder,
with the shiny base side
facing down.
Replace the film cover and
press it down until it clicks.
6
Place the film holder in
the upper right corner,
as shown.
First you need to use the Create Printer Profile option in EZcolor
to create profiles for your scanner and printer.
EPSON Technical Support
EPSON provides technical assistance 24 hours a day through the
electronic support services and automated telephone services
described below:
• World Wide Web
From the Internet, you can reach EPSON Support at
http://support.epson.com.
• Automated Telephone Services
To use Automated Telephone Services, you must have a touch tone
telephone and call (800) 922-8911. Your EPSON SoundAdviceSM
Express Code is 70460. Use it to quickly select your scanner in
SoundAdvice.
• To Speak to a Technical Support Representative
Dial (562) 276-4382 (U.S.) or (905) 709-3839 (Canada), 6 AM to 6 PM,
Pacific Time, Monday through Friday. Toll or long distance charges
may apply.
Problems?
First, check the light on the scanner.
More Scanning Options
Flashing green
Warming up or scanning.
Green
Ready to scan.
Flashing red
Make sure the transportation lock is turned
to the right (clockwise) as far as it will go.
Try restarting your computer and turning the
scanner off and then on again. If the red light
is still flashing, contact your dealer or EPSON.
Off
Make sure your scanner is connected to your
computer and plugged into a power source.
Here are more ways to get the most out of your scanner and software:
•
Use the SilverFast Ai Job Manager for
high-capacity batch scanning.
•
Organize all your photos into albums which
you can easily archive to CD or display in
slideshows using ArcSoft PhotoBase.™
If your problem is listed here, try these suggestions. For more information,
see your software Help or your on-screen Scanner Reference Guide.
The New Hardware
Wizard appears on
your screen.
Click Cancel and follow the steps on the
other side of this sheet. Disconnect the
scanner before installing the software.
You see an error message
when you try to scan, or
the scanner doesn’t scan.
Make sure your scanner is connected to your
computer and plugged into a power source.
Uninstall and reinstall EPSON Scan.
Place the film holder
in the top right corner
7
Open Adobe Photoshop Elements and choose Full Color
Management - optimized for Print under the Color Settings.
On-screen Help for Smart Panel and EPSON Scan
Click the Help button or question mark that appears on the screen
when you’re using these programs.
To purchase optional accessories
Call the EPSON StoreSM at (800) 873-7766 or visit our web site at
www.epsonstore.com (U.S. sales only). In Canada, please call
(800) 463-7766 for dealer referral.
Note: If you have the full version
of Photoshop (6.0 or later), you
can scan 48-bit images directly
with SilverFast.
Carefully pop the film cover off of the
film holder. (Don't remove the cover
from the large format film holder,
just lift it.)
5
You must create profiles for each type of print media and settings.
Print an RGB Target with the printer, type of paper, and settings
you will use when printing images.
3
Make sure the
document mat
is in place
In Mac OS X, open the stand-alone
SilverFast application (SF-App) and
scan a 48-bit file. Open the image
in PhotoStudio for editing.
Remove the
document mat
Film cover
2
Questions?
See your Notices booklet for additional software support information.
Managing Color Data
1
Scan documents and save them as files
that you can edit with Word® or other
word processing applications, using
Scan to OCR in EPSON Smart Panel.
Smart Panel also lets you make quick
copies or easily scan and e-mail photos.
On-screen Scanner Reference Guide
Double-click the EPSON Reference Guide icon on your desktop.
Scanning 48-bit Images
Note: To scan slides or medium- or large-format film, follow these steps
but use the correct holder. See your on-screen Scanner Reference Guide
for detailed instructions.
3
You can use MonacoEZcolor and your device software to provide accurate
color data among all your computer input and output devices such as your
scanner, monitor, digital camera, and printer. Here are the basic steps you
need to take to manage color for scans that you will print. See your EZcolor
online guides for detailed instructions.
•
Here’s where to look for answers:
Scanning Film
Getting the Most
From Your Scanner
Create unique artistic creations or effects with your scanned images
using Photoshop Elements or PhotoStudio.
Note for Mac OS X users: EPSON
Smart Panel is available as a Classic
application only.
Note: To correct scratches or dust, click the scratch and dust removal
button
and then click the parameter button
for options.
Note: See your electronic SilverFast manual on the SilverFast CD-ROM for
detailed color space and color management information. To view the manual,
you’ll need Adobe Acrobat Reader, which is included on your CD-ROM.
5
In Photoshop, select SilverFast Epson from the Import options
to open the SilverFast software.
•
•
Stitch individual photos into wide
panoramas or tall views with
ArcSoft PanoramaMaker.™
EPSON is a registered trademark, and EPSON Smart Panel and PRINT Image Matching are trademarks
of SEIKO EPSON CORPORATION. EPSON Perfection is a registered trademark, and EPSON PhotoCenter,
EPSON Store, and SoundAdvice are service marks of Epson America, Inc.
Close the scanner lid.
General Notice: Other product names are for identification purposes only and may be trademarks of
their respective owners. EPSON disclaims any and all rights in those marks.
Note: Make sure the notched area
at the top of the film holder is clear
to ensure an accurate scan.
Copyright © 2003 by Epson America, Inc.
Printed on recycled paper. 1/03
Select File > Import > SilverFast Epson.
continue
continue
continue
CPD-15350R1