1
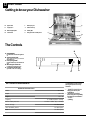
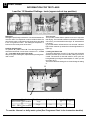
Instructions for Installation and Use Dishwasher Model IDV60 To the Installer: Before installation please make a note of the product details specified on the back cover of this book. The information can be found on the rating plate. To the User: You must read the instructions prior to installing and using the appliance and then retain them for future reference. D ISHWASHER Contents Electrical Connection For Your Safety Installation Getting to know your Dishwasher The Controls How to use your Dishwasher Programme Chart Before Using your Dishwasher Loading your Dishwasher Care and Cleaning Troubleshooting Information for Test Labs Key Contacts 3 4 5 6 6 7 8 9-10 11 12 13 14 Back Cover Retention of this Instruction Book This Instruction Book must be kept handy for reference as it contains important details on the safe and proper use of the appliance. If you sell or pass the appliance to someone else, or move house and leave it behind, make sure this Book is also provided so the new owner can become familiar with the appliance and safety warnings. If the Book is lost or damaged a copy may be obtained from: GDA LTD., Morley Way, Peterborough, PE2 9JB 2 D ISHWASHER ElectricalConnection WARNING: This appliance must be earthed. Fuses SafetyInformation Your appliance comes fitted with a plug and a 13Afuse. If you need to replace the fuse, only those rated at 13AandASTAapproved to BS1362 should be used. If you lose the fuse cover, a replacement may be obtained from your local authorised Service Centre or Electrical company. Correct replacement is identified by colour coding or the marking on base of plug. At the time of delivery... All functions of your dishwasher have been thoroughly tested at the factory. A small number of water marks may have been left as a result, they will disappear when the appliance is used for the first time. WARNING: The dishwasher must not be connected to the electricity supply while installation is being carried out. WARNING: DO NOT use the plug unless the fuse cover is fitted. - Changing the Plug Cut off and dispose of the supplied plug if it does not fit your socket. WARNING: To avoid a shock hazard DO NOT insert the discarded plug into a socket anywhere else. IMPORTANT:WIRESINTHEMAINSLEADARECOLOUREDIN ACCORDANCEWITHTHEFOLLOWINGCODE: Green/Yellow Earth Blue Neutral Brown Live - If your family includes children... - If you change the plug, the colour of the wires in the mains lead may not correspond with the terminal markings in the plug, which if not coloured, could be: EARTH ‘E’ or NEUTRAL ‘N’ LIVE ‘L’ Changing the Mains Lead Alead can be ordered from Creda Service UK: 08709 066 066 or Republic of Ireland: 1850 302 220 If you have damaged the existing lead or require a longer one a charge will be made. It is strongly advised that this work is carried out by a qualified electrician. If the domestic wiring includes a residual current-operated circuit breaker, ensure that it conforms to the latest regulations. This appliance should only be connected to a 230/240VAC source, via a properly installed earthed socket. Use the dishwasher solely in a domestic environment. DO NOT stand or place heavy objects on the door when it is open, this could damage the door or cause the appliance to tip forward. DO NOT allow children to play with the appliance or tamper with its controls. Keep detergents and rinse aids away from children. Keep children away from the open door of a dishwasher, there could still be some detergent left inside. CAUTION: The dishwasher meets the requirements set out by the regulations in force concerning safety and electrical equipment. Any technical checks should be conducted exclusively by a trained and authorised technician: Repairs carried out by unaithorised persons will invalidate the guarantee, as well as posing a potential hazard to the user. The manufacturer declines all responsibility for damage to persons or property resulting from failure to observe the above precautions, from tampering with even a single component or from the use of non-original spare parts. 3 D ISHWASHER ForyourSafety Thismanualformsanintegralpartoftheappliance.Itmustalwaysbekepthandyforreference.Readthroughalltheinstructionscontainedinthismanualbeforeusingthis dishwasher. Installation must be performed by a qualified technician, in compliance with the regulations in force, including the prevention and elimination of radio frequency interference. The dishwasher is designed for washing and drying dishes, any other use shall be considered improper. The manufacturer declines all responsibility for uses other than those described above. 1. 2. 3. 4. 5. 6. 7. Seperate the various packaging materials and dispose of safely DO NOT leave discarded packaging material around the home. After removing the packaging, checktomakesureyourappliance is intact. If in doubt, contact a qualifiedprofessional. DONOTuse extensionleadsand multiple plugs. If the electricity supply wire is not long enough, then have it replaced with one of the correct length and remember that it should be free of bends or dangerouskinks. In the event of any damage to the power cord have it replaced by a qualifiedtechnician. The mains plug must be easily accessible after installation. If the appliance is not operating properly or if maintenance operations are necessary, disconnect the dishwasher from the mains power supply (unplug it!). DONOTinstalloutdoors,noteven if the area is covered by a roof: it is extremely dangerous to leave it exposed to rain and thunderstorms. 8. If installed on a carpeted or covered floor, ensure that the openingsontheundersidearenot obstructed. 9. Donottouchtheheatingelement during or straight after a wash cycle. 10. Iftheappliancemalfunctions, turn off the water inlet tap and disconnect the plug from the wall socket.Thenreadthesection entitled"Troubleshooting".Ifyou cannotresolvetheproblem,then callCredaService(seeKEY CONTACTS,backpage). The rating plate, featuring the technical data, serial number and markings, is visibly positioned on the inner edge of the door. DO NOT remove the rating plate. The dishwasher is intended for use by adults. DO NOT allow children to come near or play with the controls. Keep children away from detergents and clear of the dishwasher door when open. Keep all packaging material away from children. 1. 2. 3. 4. 4 DO NOT use solvents, such as alcohol or turpentine which may cause an explosion. DO NOTload dishes to wash that are soiled with ash, wax or paints. DO NOT lean, sit or stand on any part of the dishwasher - this could cause injuryand/ordamagetheappliance. DONOTdrinkanywaterresiduesfrominsidethedishwasher. D ISHWASHER Installation Choose where you want to install your dishwasher, you can place it so that its sidesorbackpanelaresidebysidewith furniture or up against the wall. The dishwasherisprovidedwithwatersupply anddrainhoses,whichcanbedirected towards the left or right to facilitate appropriate installation. Levelling. Oncetheapplianceispositioned,adjust the feet by screwing them in or out dependingonhowhighyouwantitand to level it so that it is horizontal. Make sure that it is not inclined more than 2 degrees. If the appliance is level, it will help ensure its correct operation. HeightAdjustment Insert the appliance into the cutout and thenadjusttheheightusingthescrews located on the front bottom part of the machine. Use a screwdriver to turn the screwsintheclockwiseoranti-clockwise direction to increase or decrease the heightrespectively. Cold water connection. Connect the cold water supply hose, insertingthesmallfiltersuppliedwiththe dishwasher and making sure that it is fastened tightly in place (see figure 2). If the water hoses are new or have been outofuseforanextendedperiodoftime, let the water run to make sure it is clear andfreeofimpuritiesbeforemakingthe connection.Ifthisprecautionisnottaken, thewaterinletcouldgetblocked,causing damagetoyourdishwasher. Drain hose connection. WARNING:Connectyourdishwasher drainhosetopipeswhichconnecttothe foul drain system and not to surface waterdrains. IMPORTANT:Forthecorrectoperation of your dishwasher, it is essential to complywiththefollowinginformation:Standpipe: Ensure that the hose is not pushed too fardownthestandpipe. Iftheendofyourdrainhoseisfittedwith ‘retainingflaps’,ensuretheyareinserted fullyintothestandpipe. Thiswillprevent the pipe from jumping out during installationanduse. NOTE: Ensure the sink outlet pipe has a minimum diamtere of 32mm. A Fig.2 SinkWasteSystem: Forundersinkdrainage: Before connecting the drain hose, remove any internal restrictions - This will prevent a build up of debris which couldcauseablockage. Removeanyrestrictionsfromthewaste spigotandensurethatthesealingbung isremoved.Thehoseshouldberouted, suchthatitisraisedtoaminimumheight of800mm(31/2”). DONOTpositionthestandpipenearan electrical outlet. ENSURE that the drain hose is not kinked and it is routed as shown in the diagram. Thestandpipeshouldhaveaboreofat least38mm(11/2”).Itshouldbeinstalled as shown, have a trap fitted and must discharge into the same drain system asyourhouseholdsink. ItMUSTNOTbeconnectedtoasurface waterdrain. 1. Untie the end of the GREY drainage hose from the rear of the appliance. 2. Reposition the ‘Hooked End Support’as required along the GREY drainage hose. 3. If fitting an under sink waste disposal unit, cut out the membrane, bung or blanking plug. 4.Attach the GREY drainage hose to the under sink waste disposal unit securely, using the clip and rubber tube supplied. Ensure the drain hose is securely attached, to prevent it coming away while the machine is in use and causing a flood. 5 D ISHWASHER Getting to know your Dishwasher E E. Upperbasket I. F. Topsprayarm J. Saltcontainercap G. Basketheightadjuster K. Washingfilter H. Lowerbasket L. Detergentandrinseaiddispenser Bottomsprayarm F G H J K L I The Controls B A. ON-OFFButton Pressthisbuttontoswitchtheappliance on. B. ON-OFF Indicator light This light informs you that the dishwasherison. C. Door opening handle Usethishandletoopenthedishwasher door. D. WashProgrammeSelector Use this knob to select the cycle. E. Cycle phase indicator light (pre-wash,wash,rinses,drying) E C D TechnicalCharacteristics Thisdishwasherconformstothe followingEuropeanCommunity Directives: Technical characteristics Width cm. 59,5 Depth cm. 57 Height cm. 82 Capacity Mains water pressure 6 A 12 standard place settings 20 KPa÷ 1MPa (0,2 ÷10 bar) Power voltage See data plate Total absorber power See data plate Fuse See data plate • 73/23/EECof19/02/73(Low Voltage)andsubsequent modifications; • 89/336/EECof03/05/89 (ElectromagneticCompatibility) andsubsequentmodifications • 97/17/CE (Labelling) D ISHWASHER How to use your Dishwasher First of all. -Turn on the water supply tap completely. - Add the correct amount of detergent. - Load the baskets correctly. - Check that the spray arms rotate freely. - Close the door securely. - PresstheON-OFFbutton"A":indicatorlight"B"comeson.Yourapplianceis nowonandreadytobeprogrammed. Select the wash cycle. To select the wash cycle, turn knob "D" clockwiseuntiltheindicatorontheknob lines up with the number or symbol for thewashcyclemostsuitableforthetype of dishes to wash (see ‘Programme Chart’). Afterafewseconds,youwillhearashort beep: the wash cycle has started, it is notadvisabletomakeanychangesfrom this point. Indicator lights Your dishwasher is fitted with indicatorlights(E)thatcomeontoshowyou at which point the wash cycle is at. Herearethesymbolscorresponding toeachcyclephase: Starting from the indicator light on the left moving towards the one on the right:pre-wash,wash,rinses,drying. Modifying a wash cycle in progress. Ifyouhavechosenthewrongcycle-You can modify the wash cycle in progress, if it has only just started. Turn knob "D" anti-clockwise and set it to Reset, after a few seconds you will hear 3 short beepsand Indicator light "E" will go out to show all thesettingswillhavebeencancelled.You are now free to re-set the correct wash cycle. You've left out a dish? Interruptthewashcyclebypressingthe ON-OFFbutton,insertthedishyouhad forgottenandpresstheON-OFFbutton again. The cycle will start up from where you interrupted it. Cycle end The end of the wash cycle is indicated by 2 short beeps and a flashing drying phase indicator light . Settheknobtotheresetpositiontoclear all settings. Turn the appliance off by pressing button “A”, cutting off the electricity supply. Turn off the water tap. Waitafewminutesbeforeunloadingthe dishes: they are very hot! If you wait a little while, they dry better due to the steam. Emptythelowerbasketfirst. Atalltimes,yourdishwashertellsyou There's been a power failure or where it is at. you opened the dishwasher door Thewashcyclestopsandthenrestarts when the electricity comes back on or whenyouclosethedoor. 7 D ISHWASHER Programme Chart Select the most suitable programme for the type of dishes and how dirty they are. To select the wash programme see the chart below: 3URJUDPPH :KHQ3URJUDPPH VKRXOGEHXVHG 9HU\GLUW\GLVKHVDQGSDQV QRWWREHXVHGIRUGHOLFDWH LWHPV +HDY\'XW\ 1RUPDOO\GLUW\SDQVDQG GLVKHV6WDQGDUGGDLO\ F\FOH 3URJUDPPH'HVFULSWLRQ 3UHZDVKZLWKFROGZDWHU 3UHZDVKZLWKKRWZDWHUDW& ([WHQGHGZDVKDW& 5LQVHZLWKFROGZDWHU 5LQVHZLWKKRWZDWHUDW& 'U\LQJ SUHZDVKHVZLWKFROGZDWHU ([WHQGHGZDVKDW& 5LQVHZLWKKRWZDWHUDW& 'U\LQJ $PRXQWRI GHWHUJHQWIRU SUHZDVK ZDVK 5LQVH $LG JU JU 'DLO\F\FOH R (FRQRP\DQGIDVWF\FOHWR EHXVHGIRUVOLJKWO\GLUW\ GLVKHV 5XQF\FOHLPPHGLDWHO\ DIWHUXVH1RGU\LQJ 6KRUWZDVKDW& &ROGULQVH JU 5DSLG 6RDN 3UHOLPLQDU\ZDVKF\FOHIRU GLVKHVDQGSDQVDZDLWLQJ 6KRUWFROGZDVKWRSUHYHQWIRRG FRPSOHWLRQRIWKHORDGZLWK IURPGU\LQJRQWRWKHGLVKHV WKHGLVKHVIURPWKHQH[W PHDO To optimise wash performance and save on energy, try to use the dishwasher with a full wash load. If it takes some time to fill your dishwasher, use the soak cycle to avoid caked on food and build up of bad odours. 8 D ISHWASHER Before Using your Dishwasher To prevent rust from forming, load the salt just before beginning a wash cycle. Adjusting the water softener. Yourdishwashercanadjustitssaltconsumption according to the hardness of the water in your home. This way, you can optimise and customise your dishwasher'ssaltconsumption. To adjust salt consumption, do as follows: 1. Unscrew the salt container cap 2.There is an arrow on the neck of the container (see figure): if necessary, turn the arrow anti-clockwise from the "-" setting to the "+" setting. Selectthearrowpositiondependingon thewaterhardness,referringtothetable. Water Hardness Salt consumption (grams/cycle) Autonomy (cycles\2kg) Clarke degrees °fH mmol/l Selector position 0 - 14 0 - 17 0 -1,7 / 0 / 14 - 36 18 - 44 1,8 - 4,4 "-" 20 60 36 - 71 45 - 89 4,5 - 8,9 MED 40 40 "+" 60 25 >71 >89 > 8,9 You don't know how hard the water in your home is? Ask the company that supplies water in your area. Salt Filling the salt container. Low Salt indicator Always use salt which is intended for dishwasheruse. Thesaltcontainerissituatedunderneath the lower basket, fill it up as follows: 1.Pull out the lower basket completely, unscrew and remove the container cap 2. If it is the first time you add the salt, first fill the container up with water (youwon'thavetodothisagainnext time) 3.Putthedishwasherfunnelonthehole and pour in approximately two kilos of salt. It is normal that some water comes out of the container. 4.Screwthecapbackinplacecarefully. This green device is located at the centre of the cap for the decalcification cartridge and it indicates whether the container is full. Whentheindicatorisnotvisibleitmeans that you need to add salt. 9 D ISHWASHER Before Using your Dishwasher B Thedetergent D Addingdetergent To open lidA, press button B. Thedetergentshouldbeputintothetwo containersCandD. If using a tablet, put it in container "D". Nowyoucanclosethelid:pressitdown until you hear it click. C • Use the right amount of detergent (see programmechart). • Store your detergent and rinse aid in a cool, dry place, safely away from children. 5 gr. 25 gr. If it won't close Check whether there is any detergent residue on the edges of the dispenser. Removetheexcess. A We recommend Glist 3 in 1 for use in all Creda dishwashers... Brilliant cleaning is guaranteed with Glist 3 in 1. Creda only recommends Glist 3 in 1 Dishwasher tablets to give outstanding cleaning and care. It is important to use detergent specially designed for domestic dishwashers. (Always follow the manufacturers instructions.) Glist3in1advanceddishwashertabletswithactiveenzymesaretheidealwaytoprotectandcareforyourdishwasher, whilegettingyourdishesandglassessparkingclean. SofterWater: Built in salt action softens water, helping to prevent the build up of limescale in the dishwasher and improve the cleaningresult*. Cleaner Dishes: With unique active enzymes in the cleaning phase Glist 3 in 1 breaks down even the hard to shift foodstuffs and grease,leavingthedishesspotlessandthedishwashercleantoo. Sparkling Results: The built-in Glist rinse agent ensures the dishes and glasses are free from water marks and smears. *If you live in an area particularly prone to very hard water ( 35°f) Glist and Creda recommend that you continue to keep your dishwasher salt toppedup. If you have any questions regarding Glist 3 in 1, please contact the hotline on 0800 216 730. Rinse aid. Rinse aid makes dishes sparkle more asitimprovestheirdrying.Therinseaid containerissituatedontheinsideofthe appliance door, you should refill it when light “D” indicates that it is empty. (If your dishwasher is fitted with a “low rinse aid” indicator light, fill the container up when the indicator light flashes or lights up). Adding rinse aid. To open the dispenser, turn cap C anticlockwise.Takecarewhenyoupour in the rinse aid to avoid it overflowing. Youcanregulatetheamountofrinseaid used by the dishwasher, move the adjuster F which you will find under lid C. 10 F D You can choose from six different positions. It is normally set to 4. C - The amount of rinse aid needs to be increased if the dishes appear dull or you can see circular stains. - The amount of rinse aid needs to be reduced if the dishes are sticky or you can see white streaks. D ISHWASHER Loading your Dishwasher First of all. Before placing dishes in the baskets, remove all course food remains. This avoids blocking the filter, which would reduce the efficiency of the wash. If saucepans and frying pans are very dirty, allow them to soak before being washed. To make it easier to load your dishes, pull the baskets out. What goes into the lower basket? We recommend you place the most difficult dishes to wash into the lower basket:saucepans,lids,soupdishesand plates (a load example is shown in the photo). • Serving dishes and large lids: place them on the sides of the basket. • Saucepans, salad bowls: must alwaysbeplacedupsidedown • Very deep dishes: place them obliquely, thus allowing water to run downthemandcleaningthembetter Placethecutlerywiththehandlesatthe bottom;ifthebasketistheonewithside inserts, then insert the tea spoons one by one into the slots. It is best if you place longer utensils horizontally at the front of the upper basket. After loading the dishes, remember to checkthatthe sprayarmscanturnfreely without hitting against any dishes. Load examples What goes into the upper basket? Placedelicateandlightweightdishesin theupperbasket:glasses,teacupsand coffeecups,saucersandplates-shallow saladbowls,slightlydirtyfryingpansand shallowpans. Position lightweight dishes in such as way as to avoid their being moved by thesprayofwater. upper basket upper basket How to adjust the upper basket. The upper basket can be set in high or low position to enable you to organise yourdisheseffortlessly. lower basket 1 lower basket 2 3 Fig.F 4 Open the rail stop flaps and pull the basket out completely. Now place it in high or low position, then slide it along the guide rails until the front wheels also go in. Now close the rail stop flaps. Follow the sequence of actions illustrated in figure "F". What can I Wash Items not suitable for the dishwasher: • Cutleryandtablewaremadefromwoodorpartwood-Theymaybecomefadedandunsightlyinappearance. • Avoidwashinghornhandledandbronzecutleryinthemachine. • Delicate/decorativeglasswareandvases,specialantiqueorirreplaceablechina-thedecorativepatternsprintedonthese items will not be dishwasher proof. • Plastic objects that are not resistant to hot water. • CopperandPewterutensils.AluminiumandSliverobjects. • Sometypesofglasscanbecomeopaqueinappearanceaftertheyhavebeenwashedtoomanytimesinadishwasher. • Highlyabsorbentmaterialssuchasspongesandtowelsshouldneverbeplacedinadishwasher. • If in any doubt, check with the manufacturer on items suitability for dishwasher’s. WARNING: Dishes or cutlery soiled with tobacco ash, wax, lubricating grease or paint should not be put in the dishwasher. Our recommendation: In future, only purchase table or kitchenware that has been confirmed - dishwasher proof. 11 D ISHWASHER Care and Cleaning Unplug the appliance. Cleaning the spray arms. Before carrying out any cleaning or maintenance on the dishwasher, always remove the plug from the electricity socket. Foodresiduemaybecomeencrusted onto the spray arms and block the holeswherewatercomesout.Check the spray arms regularly and clean them once in a while. After every wash. When the wash cycle has ended, alwaysremembertoturnoffthewater supplytapandtoleavetheappliance doorajar.Thisway,moistureandbad odours will not be trapped inside. The filter assembly • If you want consistent good results from your dishwasher, you need to clean the filter assembly. • Remove the larger food particles trapped inside the cup “C” and the semi-circular filterA after each wash; pullthecuphandleupwardstoremove them. Just rinse them under running water. •The entire filter assembly should be cleanedthoroughlyonceamonth:cup C + semi-circular filterA+ cylindrical filter B. Rotate filter “B” anticlockwise toremoveit. Forcleaning,useanonmetallicbrush. Reassemblethefilterparts(asshown 1 B 2 A C in the figure) and reinsert the whole assemblyintothedishwasher.Position it into its housing and press downwards. The dishwasher is not to be used withoutfilters.Improperreplacement ofthefiltersmayreducetheefficiency of the wash and even damage your dishwasher. 12 Cleaning the Water Inlet Filter Periodically clean the water inlet filter (see figure 2 under "Installation") located on the outlet of the water supply tap.After turning off the water tap, unscrew the end of the water supply hose, remove the filter and clean it carefully under running water. Then, return the filter to its place and tightenthewatersupplyhosebackinto position. The seals. One of the factors that cause unpleasant odours to form inside the dishwasher is food that remains trappedintheseals.Periodiccleaning usingadampspongewillpreventthis fromoccurring. DONOTusesolventsorabrasivesto clean the exterior and rubber parts of yourappliance,donotusesolventsor abrasive cleaning products. Use a clothdampenedwithlukewarmsoapy wateronly. If there are any stains on the surface of the appliance interior, use a cloth dampenedwithwaterandalittlewhite vinegar, or a cleaning product specificallymadefordishwashers. Goingaway If the dishwasher is not going to be used for some time, carry out the following: • run a cycle with the dishwasher empty. • switchoffattheelectricalsocketand unplug. • turn off the water supply tap, disconnecttheinlethoseandallow todrain. • fill the rinse aid dispenser. • leave the door ajar, to prevent the build up of unpleasant odours insidethedishwasher. Before using the dishwasher after a long break, plug in and switch on at the electrical socket. Reconnect the inlethoseandturnonthewatersupply tap. Check there are no deposits of rust inside the water pipe, if there are allowwatertorunfromthesupplytap forafewminutes. Disconnecting the dishwasher. Whendisconnectingthedishwasher it is important that tasks are carried out in the correct sequence. • switch off at the mains and remove the plug from the socket. • turn off the water supply. • disconnect drain and water inlet hose. • pull out the dishwasher, carefully, withdrawing hoses at the same time. Moving the appliance. Drain water from the dishwasher. Securealllooseparts.Onlytransport in an upright position. • If not kept upright during transport, any water remaining inside may seep into the control module and cause subsequent errors with programmefunctions. D ISHWASHER Troubleshooting Caution - Do not forget that repairs should only be carried out by a qualified specialist. Improper repairs can lead to considerable equipment damage, as well as danger to the user. -The dishwasher must first be disconnected from the electricity supply before any repairs or other work can be carried out. Switch off at the mains socket andwatersupplyandremovetheplug. Resolving minor problems yourself. Experience has shown that you can resolve most problems that arise during normal daily usage yourself, without having to call out a service engineer. Not only does this save costs but it also means the appliance is available for use again that much sooner. The following list of common occurences and their remedies should help you identify the causes of most problems. If the dishwasher won't start, check... ■ Isthedishwasherpluggedinatthe electricitysocketandswitchedon? ■ Isthereapowerfailure,checkother appliances. ■ Checkthefuse. ■ Isthewatersupplytapturnedon? ■ Is the water inlet hose connected properly? ■ Isthepressureofthewatersupply sufficient? ■ Is the inlet hose kinked? ■ Is the filter on the water supply hoseblocked? ■ Isthedishwasherdoornotclosed properly? If water remains inside the dishwasher,check... ■ the drain hose is not kinked. ■ thedrainsyphonisnotobstructed. ■ the dishwasher filters are not clogged. If the dishes are not being cleaned properly, check... ■ the correct amount of detergent hasbeenadded. ■ thereisregeneratingsaltinthesalt container. ■ the dishes have been loaded correctly. ■ theselectedprogrammeissuitable for the type of dishes and the degreeofsoiling. ■ all filters are clean and positioned correctly. ■ the spray arm nozzles are not obstructed. ■ there is nothing obstructing the rotation of the spray arms. If the dishes fail to dry or remain dirty, check... ■ there is rinse aid inside the rinse aidcontainer. ■ the rinse aid dispenser setting is correct. ■ thedetergentbeingusedisofgood quality and has not lost its effectiveness(forexample,through incorrect storage, with the box left open). Errormessages Your dishwasher is equipped with a safety system which is able to detect operatingfaults. These faults are reported by one or two wash cycle indicator lights "E" flashing rapidly. Take note of which lights are flashing, turn the appliance off and call Creda Service for technicalassistance. Tap off alarm If the dishes show signs of streaking, staining etc. check... ■ the rinse aid dispenser setting is not set too high. If there are visible traces of rust inside the tank, check... ■ the cap off the salt container is securelyclosedandthatthewater softner setting is correct. ■ thecorrectamountofdetergentis beingused.Certaindetergentscan bemorecorrosivethanothers. ■ the tank is made of steel and therefore any rust marks are due toexternalelements(fragmentsof rust from the tank pipes, pots, cutlery etc.) Special products are commerciallyavailabletoremove suchmarks. If you have forgotten to turn the water tapon,yourappliancewillremindyou of this by sounding a few short beeps forafewminutes.Turnthetaponand yourappliancewillstartupagainafter afewminutes.Wereyoutobeabsent when these beeps are sounded, the appliancewillbeblockedautomatically andwashcycle2and3indicatorlights (wash and rinse)willflashrapidly.Turn the appliance off at the ON-OFF button,turnonthewatertapandwaitapproximately 20 seconds before turningtheappliancebackon. Re-selectthewashcycleandthe appliance will start up again. If after all the checks, the appliance still does not operate or the problem persists, call Creda Service (see KEY CONTACTS, back page) and inform themof: - the type of problem - the abbreviation of the model name (Mod.) and the relative numbers (S/N) written on the rating plate located on the inner edge of the door. Switch off at the mains socket and remove the plug. Turn off the water supply. 13 D ISHWASHER INFORMATION FOR TEST LABS Load for 12 Standard Settings tests (upper rack at top position) Detergent Detergent specifically intended for use with dishwashers must be used. The dispenser must be refilled before the start of each wash cycle following the instructions provided in the "Programme Chart". The detergent dispenser is located on the inside panel of the door. The rinse aid This product makes dishes sparkle more as it improves their drying. The rinse aid container is situated on the inside of the door, you should refill it when light “D” indicates that it is empty. (If your dishwasher is fitted with a “low rinse aid” indicator light, fill the container up when the indicator light flashes or lights up). Loading the detergent To open lid "A", press button "B". The cleaning detergent should be introduced into the three containers "1", “2”and “3”. "(see table at the end of the page) After pouring in the detergent, replace the lid, pressing down until it clicks. D B Comp1 Loading the Rinse Aid To open the dispenser, turn the "C" cap in the anti-clockwise direction and then pour in the rinse aid, making sure not to overfill. The amount of rinse aid used for each cycle can be regulated by turning the dose adjuster ‘F’ which you will find under lid ‘C’. There are 6 different settings; the normal dosage is setting 5. Comp2 F Comp3 C A Cycle Total detergent EN 50242 See booklet 30 gr. IEC/ DIN 30 gr. See booklet Comp.1 10 Comp.2 Comp.3 25 5 20 To use the Normal or daily wash cycles (See Programm Chart in the instruction booklet) 14 D ISHWASHER Notes 15 Key Contacts After Sales Service Over 1200 trained specialists, directly employed by us, ensure that you can have complete confidence in both the appliances and services we offer. Repair Service and Information Desk UK: 08709 066 066 (Open 8 to 8 Mon - Fri, 8 to 6 Sat, 10 to 4 Sun & Bank Holidays) www.theservicecentre.co.uk Republic of Ireland: 1850 302 200 Note: Our operators will require the following information: Model number: Serial number: Extended Warranties UK: 08709 088 088 (Open 8 to 8 Mon - Sun) www.theservicecentre.co.uk Republic of Ireland: 1850 502 200 Genuine Parts and Accessories UK: 08709 077 077 (Open 8-30 to 5-30 Mon - Fri & 9 to 12 Sat) www.theservicecentre.co.uk Republic of Ireland: (01) 842 6836 General Domestic Appliances Limited, Morley Way, Peterborough, PE2 9JB. 195.036.729.00 January 2003 Part no. FP188 - 01