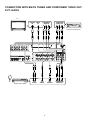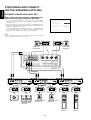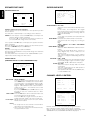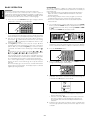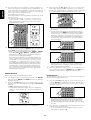
1
R
Model PS-17 User Guide
AV Amplifier
ENGLISH
WARRANTY
For warranty information, contact your local Marantz distributor.
RETAIN YOUR PURCHASE RECEIPT
Your purchase receipt is your permanent record of a valuable purchase.
It should be kept in a safe place to be referred to as necessary for
insurance purposes or when corresponding with Marantz.
IMPORTANT
When seeking warranty service, it is the responsibility of the consumer
to establish proof and date of purchase. Your purchase receipt or invoice is adequate for such proof.
FOR U.K. ONLY
This undertaking is in addition to a consumer's statutory rights and does
not affect those rights in any way.
FRANÇAIS
GARANTIE
Non sono coperti da garanzia difetti derivanti da uso improprio, errata
installazione, manutenzione effettuata da personale non autorizzato o,
comunque, da circostanze che non possano riferirsi a difetti di
funzionamento dell’apparecchio. Sono inoltre esclusi dalla garanzia gli
interventi inerenti l’installazione e l’allacciamento agli impianti di
alimentazione.
Gli apparecchi verranno riparati presso i nostri Centri di Assistenza
Autorizzati. Le spese ed i rischi di trasporto sono a carico del cliente.
La casa costruttrice declina ogni responsabilità per danni diretti o indiretti
provocati dalla inosservanza delle prescrizioni di installazione, uso e
manutenzione dettagliate nel presente manuale o per guasti dovuti ad
uso continuato a fini professionali.
PORTUGUÊS
GARANTIA
Para informações sobre a garantia, contactar o distribuidor Marantz
local.
GUARDAR O RECIBO DE COMPRA
Pour des informations sur la garantie, contacter le distributeur local
Marantz.
O recibo é o registo permanente da compra que fez. Deve ser guardado
num local seguro, para ser apresentado em questões relacionadas com
o seguro ou para quando tiver de contactar a Marantz.
CONSERVER L'ATTESTATION D'ACHAT
IMPORTANTE
L'attestation d'achat est la preuve permanente d'un achat de valeur. La
conserver en lieu sur pour s'y reporter aux fins d'obtention d'une
couverture d'assurance ou dans le cadre de correspondances avec
Marantz.
Quando procurar assisténcia técnica ao abrigo da garantia, é da
responsabilidade do consumidor estabelecer a prova e data de compra.
O recibe é prova adequada.
IMPORTANT
Pour l'obtention d'un service couvert par la garantie, il incombe au client d'établir la preuve de l'achat et d'en corroborer la date. Le reçu ou la
facture constituent des preuves suffisantes.
DEUTSCH
GARANTIE
Bei Garantiefragen wenden Sie sich bitte an Ihren Marantz-Händler.
HEBEN SIE IHRE QUITTING GUT AUF
Die Quittung dient Ihnen als bleibende Unterlage für Ihren wertvollen
Einkauf Das Aufbewahren der Quittung ist wichtig, da die darin
enthaltenen Angaben für Versicherungswecke oder bei Korrespondenz
mit Marantz angeführt werden müssen.
ESPAÑOL
GARANTIA
Para obtener información acerca de la garantia póngase en contacto
con su distribuidor Marantz.
GUARDE SU RECIBO DE COMPRA
Su recibo de compra es su prueba permanente de haber adquirido un
aparato de valor, Este recibo deberá guardarlo en un lugar seguro y
utilizarlo como referencia cuando tenga que hacer uso del seguro o se
ponga en contacto con Marantz.
IMPORTANTE
Cuando solicite el servicio otorgado por la garantia el usuario tiene la
responsabilidad de demonstrar cuá¥do efectuó la compra. En este caso,
su recibo de compra será la prueba apropiada.
WICHTIG!
Bei Garantiefragen muß der Kunde eine Kaufunterlage mit Kaufdatum
vorlegen. Ihren Quittung oder Rechnung ist als Unterlage ausreichend.
SVENSKA
GARANTI
NEDERLANDS
GARANTIE
För information om garantin, kontakta Marantz lokalagent.
SPAR KVITTOT
Voor inlichtingen omtrent garantie dient u zich tot uw plaatselijke Marantz.
Kvittot är ett inköpsbevis på en värdefull vara. Det skall förvaras säkert
och hänvisas till vid försäkringsfall eller vidkorrespondens mod Marantz.
UW KWITANTIE, KASSABON E.D. BEWAREN
VIKTIGT
Uw kwitantie, kassabon e.d. vormen uw bewijs van aankoop van een
waardevol artikel en dienen op een veilige plaats bewaard te worden
voor evt, verwijzing bijv, in verbend met verzekering of bij correspondentie
met Marantz.
Fö att garantin skall gälla är det kundens sak att framställa bevis och
datum om köpet. Kvitto eller faktura är tillräokligt bevis fö detta.
BELANGRIJK
Bij een evt, beroep op de garantie is het de verantwoordelijkheid van de
consument een gedateerd bewijs van aankoop te tonen. Uw kassabon
of factuurzijn voldoende bewijs.
DANSK
GARANTI
Henvend dem til Deres MARANTZ-forhandler angående inrformation
om garantien.
GEM DERES KVITTERING
ITALIANOI
GARANZIA
L’apparecchio è coperto da una garanzia di buon funzionamento della
durata di un anno, o del periodo previsto dalla legge, a partire dalla
data di acquisto comprovata da un documento attestante il nominativo
del Rivenditore e la data di vendita. La garanzia sarà prestata con la
sostituzione o la riparazione gratuita delle parti difettose.
Deres købskvittering er Deres varige bevis på et dyrt køb. Den bør
gemmes godt og anvendes som bevis, hvis De vil tegne en forsikring,
eller hvis De kommunikerer med Marantz.
VIGTIGT
Det påhviler forbrugeren at skaffe bevis for købet og købsdatoen, hvis
han eller hun ønsker garantiservice. Deres købskvittering eller faktura
er et fuldgyldigt bevis herpå.
CE MARKING
English
The PS-17 is in conformity with the EMC directive and low-voltage directive.
Français
Le PS-17 est conforme à la directive EMC et à la directive sur les basses tensions.
Deutsch
Das Modell PS-17 entspricht den EMC-Richtlinien und den Richtlinien für Niederspannungsgeräte.
Nederlands
De PS-17 voldoet aan de EMC eisen en de vereisten voor laag-voltage.
Español
El PS-17 está de acuerdo con las normas EMC y las relacionadas con baja tensión.
Italiano
Il PS-17 è conforme alle direttive CEE ed a quelle per i bassi voltaggi.
Português
O PS-17 conforma com as diretrizes EMC e de baixa voltagem.
Svenska
PS-17 är tillverkad i enlighet med EMC direktiven och direktiven för lågvoltsutrusning.
Dansk
Model PS-17 er i overensstemmelse med EMC-direktiveet og direktivet om lavspænding.
English
To ventilate the unit, do not install the unit in a rack or bookshelf, and
note the followings.
- Do not touch the top of the enclosure during operation.
- Do not block the openings in the enclosure during operation.
- Do not insert objects beneath the unit.
- Do not block the ventilation slots at the top of the unit.
Do not place anything about 1 meter above the top panel.
- Make a space of about 0.2 meter around the unit.
Italiano
Perch é l'unità possa essere sempre ben ventilata, non installarla in
scaffali o librerie e tenere presente quanto segue.
- Non toccare la parte superiore del rivestimento durante il
funzionamento.
- Non bloccare le aperture sul rivestimento durante il funzionamento.
- Non inserire oggetti al di sotto dell'unità.
- Non bloccare le fessure di ventilazione sopra l'unità.
Non posare nulla per circa un metro sopra il pannello superiore.
- Lasciare 0,2 metro liberi tutto intorno l'unità.
Français
Pour que l'appareil puisse être correctement ventilé, ne pas l'installer
dans un meuble ou une bibliothèque et respecter ce qui suit.
- Ne pas toucher le dessus du coffret.
- Ne pas obstruer les ouïes de ventilation du coffret pendant le
fonctionnement.
- Ne placer aucun objet sous l'appareil.
- Ne pas obstruer les ouães de ventilation du panneau supérieur. Ne
placer aucun objet à moins d'un mètre environ du panneau supérieur.
- Veiller à ce qu'aucun objet ne soit à moins de 0,2 mètre des côtés de
l'appareil.
Português
Para ventilar o aparelho, não instalá-lo dentro duma estante ou algo
similar, e observar as seguintes recomendações:
- Não tocar a parte superior do aparelho durante a operação.
- Não bloquear as aberturas do aparelho durante a operação.
- Não insertar objectos debaixo do aparelho.
- Não bloquear as aberturas de ventilação na parte de cima do
aparelho. Deixar um espaço completamente livre de cerca de 1 metro
acima do painel superior.
- Deixar um espaço de cerca de 0,2 metro ao redor do aparelho.
Deutsch
Um eine einwandfreie Belüftung des Geräts zu gewährleisten, darf das
Gerät nicht in einem Gestell oder Bücherregal aufgestellt werden; die
folgenden Punkte sind besonders zu beachten:
- Während des Betriebs das Oberteil des Gehäuses nicht berühren.
- Während des Betriebs die Öffnungen im Gehäuse nicht blockieren.
- Keine Gegenstände in das Gerät einführen.
- Die Belüftungsschlitze an der Oberseite des Geräts dürfen nicht
blockiert werden. Darauf achten, daß über dem Gerät ein Freiraum
von mindestens 1 meter vorhanden ist.
- Auf allen Geräteseiten muß ein Zwischenraum von ungefähr 0,2 meter
vorhanden sein.
Svenska
För att ventilera enheten, ställ den inte i ett ställ eller bokhylla och tänk
på följande.
- Vidrör inte ytterhöljets ovansida under pågående drift.
- Blockera inte öppningarna i ytterhöljet under pågående drift.
- Stick inte in föremål under enheten.
- Blockera inte ventialtionshålen ovanpå enheten.
Placera inte någonting närmare än 1 meter ovanför apparaten eller
enheten.
- Se till att det finns omkring 0,2 meter fri plats runt omkring enheten.
Nederlands
Installeer het toestel niet in een rek of boekenkast waar de ventilatie
mogelijk wordt gehinderd. Let tevens op de volgende punten:
- Raak de bovenkant van het toestel niet aan als het in gebruik is.
- Blokkeer de openingen van het toestel niet als het in gebruik is.
- Plaats geen onderwerpen onder het toestel.
- Blokkeer de ventilatie-openingen aan de bovenkant van het toestel
niet. Zorg dat er tenminste 1 meter vrije ruimte boven het toestel is.
- Zorg dat er 0,2 meter vrije ruimte rond het toestel is.
Español
Para ventilar la unidad no la instale en una estantería ni estante para
libros, y tenga en cuenta lo siguiente:
- No toque la parte superior de la caja durante el funcionamiento.
- No tape las ranuras en la caja durante el funcionamiento
- No ponga objetos debajo de la unidad.
- No tape las ranuras de ventilación de la parte superior de la unidad.
No ponga nada a menos de 1 metro por encima del panel superior.
- Deje un espacio de unos 0,2 metro alrededor de la unidad.
Dansk
Anbring ikke apparatet i et rack eller en boghylde, da dette kan bloke
luftcirkulationen omkring apparatet. Iagttag ligeledes følgende:
- Berør ikke oversiden af kabinettet under anvendelsen.
- Bloker ikke åbningerne i kabinettet under anvendelsen.
- Stik ikke genstande ind under apparatet.
- Bloker ikke ventilationsåbningerne ovenpå apparatet.
Anbring ikke noget nærmere end 1 m over apparatets overside,
- Sørg for, at der er et frit område på omkring 0,2 m omkring apparatet.
CONNECTIONS FOR AUDIO COMPONENTS
FRONT
SURR.
CENTER
FRONT
SURR.
BACK
CENTER
SURR.
SPEAKERS
MAIN IN
R
L
6CH
INPUT
PRE
OUT
R
L
L
R
R
S.WOOFER
CD
L
L
R
R
AC IN
∼
S.WOOFER
TAPE/TUNER
PHONO(MM)
IN
OUT
PHONO(MM)
L
CD
CDR/MD
IN
OUT
TAPE/TUNER
DVD
LD
DSS/VCR2
VCR1CDR/MD
TV
TV
IN
OUT
IN
IN
IN
OUT
D
OUT
OUT
SPEAKERS IMPEDANCE :4-16 OHMS
L
L
L
R
R
R
AUDIO
AUDIO
TV
DVD
LD
S2
S2
S2
VCR1
S2
DSS/VCR2
S
S2
S
DIGITAL-IN
1
2
3
4
DIGITAL OUT
5
6
COAX
REMOTE CONT.
OPT
IN
OUT
COMPONENT VIDEO
MONI.
DVD IN
S2 OUT
DDS/VCR2 IN MONITOR OUT
PR
/
CR
S-VIDEO
IN
OUT
IN
OUT
PB
/
CB
VIDEO
Y
CD PLAYER
DIGITAL-IN
OUTPUT
L
R
OUT IN
L
L
R
R
OUT IN
L
L
R
R
CD RECORDER / MD PLAYER
TAPE DECK / TUNER
Ensure that the components are connected properly by checking which is the left channel (L) connection and
which is the right one (R) and whether connection is to be made to the input (IN) or output (OUT) jacks. Refer to
page 5 for details on the digital signal connections.
The signals from the source played by the unit are output to the TAPE/TUNER-OUT and CD-R/MD-OUT jacks.
1
CONNECTIONS FOR VIDEO COMPONENTS
LD PLAYER
AUDIO VIDEO S-VIDEO
OUT
OUT
OUT
L
FRONT
SURR.
CENTER
R
FRONT
SURR.
BACK
CENTER
SURR.
SPEAKERS
MAIN IN
R
L
L
6CH
INPUT
PRE
R
TAPE/TUNER
IN
L
L
R
R
R
OUT
DVD
TV
S.WOOFER
CD
PHONO(MM)
R
LDS.WOOFER
CDR/MD
OUT
IN
L
L
TV
AC IN
DSS/VCR2
VCR1
IN
DVD
LD
OUT
OUT
IN
VCR1
IN
OUT
∼
SPEAKERS IMPEDANCE :4-16 OHMS
OUT
DSS/VCR2
IN
SPEAKERS IMPEDANCE :4-16 OHMS
OUT
L
L
R
R
AUDIO
AUDIO
TV
DVD
LD
S2
S2
S2
VCR1
S2
DSS/VCR2
S
S2
S
DIGITAL-IN
1
2
3
4
DIGITAL OUT
5
6
COAX
OPT
REMOTE CONT.
IN
COMPONENT VIDEO
MONI.
DVD IN
S2 OUT
DDS/VCR2 IN MONITOR OUT
PR
/
CR
S-VIDEO
TV
OUT
IN
DVD
OUT
S2
VIDEO
IN
S2
LD
VCR1
P
B
OUT
S2
S2
/
CB
S
Y
S-VIDEO
AL-IN
4
DIGITAL OUT
5
6
COAX
OPT
REMOTE CONT.
IN
OUT
IN
OUT
VIDEO
DVD PLAYER
L
R
L
OUT
OUT
OUT
AUDIO VIDEO S-VIDEO
R
OUT
AUDIO
VIDEO
2
L
R
IN
OUT IN OUT IN
AUDIO VIDEO S-VIDEO
CONNECTION FOR TV
AUDIO VIDEO S-VIDEO
OUT
OUT
OUT
S-VIDEO VIDEO COMPONENT
IN
IN
VIDEO IN
Y
Cb
Cr
L R
FRONT
SURR.
CENTER
FRONT
SURR.
BACK
CENTER
SURR.
SPEAKERS
MAIN IN
R
L
6CH
INPUT
PRE
OUT
R
L
L
R
R
S.WOOFER
CD
PHONO(MM)
L
R
R
AC IN
∼
S.WOOFER
TAPE/TUNER
IN
L
L
OUT
CDR/MD
IN
DVD
TV
LD
OUT
DSS/VCR2
VCR1
IN
IN
OUT
SPEAKERS IMPEDANCE :4-16 OHMS
OUT
L
R
AUDIO
TV
DVD
LD
S2
S2
S2
VCR1
S2
DSS/VCR2
S
S2
TV
DVD
DIGITAL-IN
LD
T
VCR1
IN
1
OUT
DIGITAL OUT
DSS/VCR2
2
3
4
IN
5
OUT
6
COAX
OPT
DVD IN
S2 OUT
DDS/VCR2 IN MONITOR OUT
PR
/
CR
REMOTE CONT.
IN
COMPONENT VIDEO
MONI.
S
S-VIDEO
SPEAKERS
IMPEDANCE :4-16 OHMS
OUT
IN
OUT
IN
PB
/
CB
OUT
VIDEO
L
Y
R
AUDIO
TV
DVD
LD
S2
S2
S2
VCR1
S2
DSS/VCR2
S
S2
S
4
DIGITAL OUT
5
6
COAX
OPT
REMOTE CONT.
IN
DVD IN
PR
/
CR
S-VIDEO
TAL-IN
COMPONENT VIDEO
MONI.
S2 OUT
OUT
IN
OUT
IN
OUT
PB
/
CB
VIDEO
Y
3
DDS/VCR2 IN MONITOR OUT
CONNECTION WITH BS/CS TUNER AND COMPONENT VIDEO OUTPUT JACKS
TV
S-VIDEO VIDEO
IN
IN
COMPONENT
VIDEO IN
Y
Cb
COMPONENT
VIDEO OUT
Cr
Y
Cb
Cr
DVD player equipped with
component output jacks
FRONT
SURR.
CENTER
FRONT
SURR.
BACK
CENTER
SURR.
SPEAKERS
MAIN IN
R
L
TV
DVD
T
6CH
INPUT
R
LD
PRE
OUT
CD
L
R
R
R
IN
OUT
S.WOOFER
TAPE/TUNER
IN
L
L
R
DSS/VCR2
VCR1
IN
PHONO(MM)
L
OUT
SPEAKERS IMPEDANCE :4-16 OHMS
AC IN
∼
OUT
S.WOOFER
CDR/MD
IN
L
DVD
TV
OUT
LD
L
DSS/VCR2
VCR1
IN
IN
OUT
SPEAKERS IMPEDANCE :4-16 OHMS
OUT
L
R
R
AUDIO
AUDIO
TV
DVD
LD
S2
S2
S2
VCR1
S2
DSS/VCR2
S
S2
COMPONENT VIDEO
MONI.
S
DVD IN
S2 OUT
DIGITAL-IN
1
2
3
4
DIGITAL OUT
5
6
COAX
OPT
TV
REMOTE CONT.
IN
OUT
S2
DVD
LD
S2
S2
VCR1
S2
DSS/VCR2
S
IN
OUT
S2IN
OUT
S
PB
DIGITAL OUT
5
6
COAX
OPT
Y
REMOTE CONT.
IN
OUT
IN
OUT
IN
DVD IN
/
S2 OUT
CB
S-VIDEO
4
COMPONENT VIDEO
MONI.
VIDEO
TAL-IN
DDS/VCR2 IN MONITOR OUT
PR
/
CR
S-VIDEO
OUT
DDS/VCR2 IN MONITOR OUT
PR
/
CR
PB
/
CB
VIDEO
Y
L
SATELLITE TUNER
R
OUT
AUDIO
Y
OUT
VIDEO
4
OUT
S-VIDEO
Cb
Cr
COMPONENT
VIDEO OUT
CONNECTIONS FOR DIGITAL SIGNALS
FRONT
SURR.
CENTER
FRONT
SURR.
BACK
CENTER
SURR.
SPEAKERS
MAIN IN
R
L
6CH
INPUT
PRE
OUT
R
L
L
R
R
S.WOOFER
DIGITAL
OUT
CD
PHONO(MM)
L
L
R
R
AC IN
∼
S.WOOFER
TAPE/TUNER
IN
L
OUT
CDR/MD
IN
DVD
TV
LD
OUT
DSS/VCR2
VCR1
IN
IN
OUT
SPEAKERS IMPEDANCE :4-16 OHMS
OUT
L
R
AUDIO
DIGITAL-IN
1
2
3
1
DIGITAL OUT
4
DIGITAL-IN
2
3
5
4
5
6
DIGITAL
OUT
6
COAX
COAX
OPT
REMOTE CONT.
OPT
IN
TV
DVD
LD
S2
S2
S2
VCR1
S2
DSS/VCR2
S
S2
S
IN
COMPONENT VIDEO
MONI.
DVD IN
S2 OUT
DDS/VCR2 IN MONITOR OUT
PR
/
CR
REMOTE CONT.
S-VIDEO
OUT
OUT
IN
OUT
IN
PB
/
CB
OUT
VIDEO
Y
LD PLAYER
DIGITAL DIGITAL
OUT
IN
DIGITAL
OUT
DIGITAL
OUT
CD RECORDER
DIGITAL
OUT
MD PLAYER
DVD PLAYER
CD PLAYER
BS/CS TUNER
DIGITAL
IN
CONNECTIONS FOR 6-CHANNEL EXTERNAL DECODER INPUT JACKS
SACD/DVD AUDIO PLAYER
L
C
LS
R
SW
RS
FRONT
SURR.
CENTER
FRONT
SURR.
BACK
CENTER
SURR.
SPEAKERS
MAIN IN
R
L
6CH
INPUT
L
FRONT
L
R
PRE
OUT
SURR.
R
S.WOOFER
CD
PHONO(MM)
L
R
R
6CH
INPUT
AC IN
∼
S.WOOFER
TAPE/TUNER
IN
L
L
L
CENTER
R
OUT
CDR/MD
IN
TV
DVD
LD
OUT
DSS/VCR2
VCR1
IN
OUT
IN
SPEAKERS IMPEDANCE :4-16 OHMS
OUT
R
L
S.WOOFER
R
AUDIO
TV
DVD
LD
S2
S2
S2
VCR1
S2
DSS/VCR2
S
S2
S
DIGITAL-IN
1
2
3
4
DIGITAL OUT
5
6
COAX
OPT
REMOTE CONT.
IN
OUT
COMPONENT VIDEO
MONI.
DVD IN
S2 OUT
PR
/
CR
S-VIDEO
IN
OUT
IN
OUT
PB
/
CB
VIDEO
Y
5
DDS/VCR2 IN MONITOR OUT
REMOTE CONTROL CONNECTIONS
FRONT
SURR.
CENTER
FRONT
SURR.
BACK
CENTER
SURR.
SPEAKERS
MAIN IN
R
L
6CH
INPUT
PRE
OUT
R
L
L
R
R
S.WOOFER
CD
PHONO(MM)
L
L
R
R
AC IN
∼
S.WOOFER
TAPE/TUNER
IN
L
OUT
CDR/MD
IN
TV
DVD
LD
OUT
DSS/VCR2
VCR1
IN
OUT
IN
SPEAKERS IMPEDANCE :4-16 OHMS
OUT
L
R
AUDIO
TV
DVD
S-VIDEO
S2
S2
AL OUT
DIGITAL-IN
1
2
3
4
REMOTE CONT.
DIGITAL OUT
5
6
OPT
COAX
OPT
LD
S2
VCR1
S2
DSS/VCR2
S
S2
S
IN
OUT
OUT
IN
VIDEO
DVD IN
DDS/VCR2 IN MONITOR OUT
PR
/
CR
REMOTE CONT.
IN
COMPONENT VIDEO
MONI.
S2 OUT
S-VIDEO
OUT
IN
PB
/
CB
OUT
VIDEO
Y
EXTERNAL
INTERNAL
REMOTE CONTROL
IN
OUT
DVD PLAYER
EXTERNAL
INTERNAL
REMOTE CONTROL
IN
OUT
CD RECORDER
EXTERNAL
INTERNAL
REMOTE CONTROL
IN
OUT
CD PLAYER
As shown in the figure above, it is possible to connect the REMOTE CONTROL jacks on the unit
with the corresponding jacks on other Marantz products. By performing these connections, all
the other Marantz products can be controlled together using the accessory remote control unit.
When these connections are to be performed, set the REMOTE CONTROL SELECTOR switch
on each unit to EXT (external).
Proceed with the connections while referring to the User Guide of each component to be
connected as well.
6
!4
!3
!2
DVD
TV
LD
AV AMPLIFIER PS-17
VCR1
CDR/MD
DSS/
VCR2
TAPE/
TUNER
CD
TEMP
PHONO
MIN
INPUT SELECTOR
MAX
VOLUME
STANDBY
SOURCE PURE
6CH INPUT A/D
SRS
AUTO
6.1
POWER ON/OFF
-DIRECT-
- BASS +
q
we r ty
(3)
PHONES
STEREO 5chSTEREO NIGHT
- TREBLE +
u io
!0 !1
(4)
(7)
(2)
(1)
SURR.
[15]
CENTER
[14]
FRONT
SURR.
BACK
CENTER
[13]
SURR.
[20]
[21]
SPEAKERS
MAIN IN
R
L
6CH
INPUT
PRE
OUT
R
R
R
S.WOOFER
CD
L
L
R
R
AC IN
∼
S.WOOFER
TAPE/TUNER
IN
L
L
L
PHONO(MM)
(12)
(5)(6) (8) (9)(11)
[16]
FRONT
(10)
OUT
CDR/MD
IN
TV
DVD
LD
OUT
DSS/VCR2
VCR1
IN
OUT
IN
SPEAKERS IMPEDANCE :4-16 OHMS
OUT
L
R
AUDIO
TV
DVD
LD
S2
S2
S2
VCR1
S2
DSS/VCR2
S
S2
S
DIGITAL-IN
2
3
4
DIGITAL OUT
5
6
COAX
OPT
REMOTE CONT.
IN
DVD IN
DDS/VCR2 IN MONITOR OUT
PR
/
CR
S-VIDEO
1
COMPONENT VIDEO
MONI.
S2 OUT
OUT
IN
OUT
IN
OUT
PB
/
CB
VIDEO
Y
[1]
[2] [3]
[17]
[4] [18] [5] [19] [7]
7
[6]
[8] [9] [12] [10] [11]
INTRODUCTION .............................................................................................................................................................. 3
DESCRIPTION................................................................................................................................................................. 3
FEATURES ...................................................................................................................................................................... 3
FRONT PANEL FEATURES ............................................................................................................................................ 4
DISPLAY .......................................................................................................................................................................... 5
REAR PANEL CONNECTIONS ....................................................................................................................................... 6
POSITIONING AND CONNECTING THE SPEAKERS ................................................................................................... 7
POSITIONING AND CONNECTING THE SPEAKERS (BASIC) .................................................................................... 8
SPEAKER CONNECTIONS (BASIC) .............................................................................................................................. 9
POSITIONING AND CONNECTING THE SPEAKERS (APPLIED) .............................................................................. 10
SET-UP .......................................................................................................................................................................... 11
ON SCREEN DISPLAY MENU SYSTEM ............................................................................................................................................................... 11
OSD MAIN MENU .................................................................................................................................................................................................. 12
SYSTEM SETUP .................................................................................................................................................................................................... 12
SPEAKER SETUP .................................................................................................................................................................................................. 13
SPEAKER DISTANCE ............................................................................................................................................................................................ 14
SURROUND MODE ............................................................................................................................................................................................... 14
CHANNEL LEVEL CONTROL ................................................................................................................................................................................ 14
BASIC OPERATION ...................................................................................................................................................... 15
SURROUND MODES .................................................................................................................................................... 17
LISTENING THROUGH HEADPHONES ....................................................................................................................... 19
ON SCREEN DISPLAY INFOMATION .......................................................................................................................... 20
REMOTE CONTROL UNIT RC-17PS ............................................................................................................................ 21
NAMES OF BUTTONS & FUNCTIONS ................................................................................................................................................................. 21
OPERATION OF REMOTE CONTROL UNIT ........................................................................................................................................................ 23
BASIC OPERATION ............................................................................................................................................................................................... 24
OTHER FUNCTIONS ............................................................................................................................................................................................. 30
BATTERY LIFE ....................................................................................................................................................................................................... 30
NUMBER OF LEARNABLE CODES ...................................................................................................................................................................... 30
JOG DIAL COMMAND FUNCTIONS LISTING ...................................................................................................................................................... 31
TROUBLESHOOTING ................................................................................................................................................... 32
1
ENGLISH
TABLE OF CONTENTS
ENGLISH
FOREWORD
PRECAUTIONS
This section must be read before any connection is made to the
mains supply.
The following precautions should be taken when operating the
equipment.
WARNINGS
GENERAL PRECAUTIONS
When siting the equipment ensure that:
— the ventilation holes are not covered;
— air is allowed to circulate freely around the equipment
— it is on a vibration free-surface;
— it will not be exposed to interference from an external source;
— it will not be exposed to excessive heat, cold, moisture or dust;
— it will not be exposed to direct sunlight;
— it will not be exposed to electrostatic discharges
Never place heavy objects on the equipment.
If a foreign body or water does enter the equipment, contact your
nearest dealer or service centre.
Do not pull out the plug by pulling on the mains lead, hold the plug.
It is advisable when leaving the house, or during a thunderstorm, to
disconnect the equipment from the mains supply.
Do not expose the equipment to rain or moisture.
Do not remove the cover from the equipment.
Do not push anything inside the equipment through the
ventilation holes.
Do not handle the mains lead with wet hands.
EQUIPMENT MAINS WORKING SETTING
Your Marantz product has been prepared to comply with the
household power and safety requirements that exist in your area.
PS-17 can be powered by 230 V AC only.
IMPORTANT: (For UK version)
This apparatus is fitted with an approved moulded 13 Amp plug.
To change a fuse in this type of plug proceed as follows:
1. Remove fuse cover and fuse.
2. Fix new fuse which should be a BS1362 13A, A.S.T.A. or BSI
approved type.
3. Refit the fuse cover.
If the fitted plug is not suitable for your socket outlets, it should be cut
off and an appropriate plug fitted in its place.
If the mains plug contains a fuse, this should have a value of 13A. If a
plug without a fuse is used, the fuse at the distribution board should
not be greater than 5A.
PRECAUTIONS IN CONNECTION
n Be sure to unplug the power cable from the AC outlet or turn off the
POWER switch before proceeding with any connection.
n Connect one cable at a time observing the “input” and “output”.
This will avoid any cross connection between channels and signal
inputs and outputs.
n Insert the plugs securely. Incomplete connection may result in noise.
n Prior to connecting other audio and video equipment to the PS-17,
please read their owner’s manuals.
Note:
The severed plug must be destroyed to avoid a possible shock
hazard should it be inserted into a 13A socket elsewhere.
INSTALLATION
How to connect a plug
I f t h i s u n i t o r a n o t h e r e l e c t r o n i c d e vi c e i n c o r p o r a t i n g a
microcomputer is used at the same time with the tuner or television,
picture disturbance or noise may occur. In such a case, install the
unit according to the following guide points.
n Separate the unit as far as possible from the tuner or television.
The wires in the mains lead are coloured in accordance with the following code:
BLUE—“NEUTRAL” (“N”)
BROWN—“LIVE” (“L”)
1. The BLUE wire must be connected to the terminal which is marked
with the letter “N” or coloured BLACK.
2. The BROWN wire must be connected to the terminal which is marked
with the letter “L” or coloured RED.
3. Do not connect either wires to the earth terminal in the plug which is
marked by the letter “E” or by the safety earth symbol or coloured
green or green-and-yellow.
Before replacing the plug cover, make certain that the cord grip is
clamped over the sheath of the lead — not simply over the two wires.
n Place the antenna wire for the tuner or TV apart from the power
cable and audio and video connection cables of this unit.
n Since the phenomenon is likely to occur when using an indoor
antenna and/or 300-ohm feeder wire, we recommend using an
outdoor antenna and 75-ohm coaxial cable.
COPYRIGHT
Recording and playback of any material may require consent. For
further information refer to the following:
— Copyright Act 1956
— Dramatic and Musical Performers Act 1958
— Performers Protection Acts 1963 and 1972
— any subsequent statutory enactments and orders
ABOUT THIS USER GUIDE
Refer to the figures on page iv of this user guide. The numbers on the
figures correspond to those in the text. All references to the
connections and controls that are printed in BOLD type are as they
appear on the unit.
2
FEATURES
Thank you for purchasing the Marantz PS-17 DTS/Dolby Digital
Surround amplifier.
This remarkable component has been engineered to provide you with
many years of home theater enjoyment.
Please take a few minutes to read this manual thoroughly before you
connect and operate the PS-17.
As there are a number of connection and configurations options, you
are encouraged to discuss your own particular home theater setup
with your Marantz A/V specialist dealer.
n Configured with the same twin monaural construction as a hi-fi
stereo amplifier
n Built-in full-blown 2-channel current-feedback power amplifier
incorporating HDAM which is original Marantz feature
n Rigid vibration-damping cabinet using extravagant amounts of
aluminum employed for the chassis which houses the audio
amplifier unit, DSP unit and video amplifier unit separately
n Super ring core toroidal power transformer as well as a separate
power transformer for the digital unit
n Speaker terminals manufactured by WBT
n Flexible support for configurations ranging from a virtual amplifier
where the unit is used as a discrete component to a full-channel
system where it is combined with a power amplifier
n Surround sound effect reproduced through left and right speakers
by Dolby Virtual processing when the unit is used as a discrete
component
n Decoder/processor unit with a 3DSP configuration and
sophisticated specifications
n 6.1 Channel Surround and CS (Circle Surround) decoders featured
alongside Dolby Digital and DTS processing
n Dolby Headphone for a superior localization of sound beyond the
confines of the user's head
n SRS UltraSurround and CS Virtual modes
n Model RC17PS learning remote control unit containing LCD display
with macro functions
DESCRIPTION
DTS was introduced in 1994 to provide 5.1 channels of discrete
digital audio into home theater systems.
DTS brings you premium quality, discrete multi-channel digital sound
to both movies and music.
DTS is a multi-channel sound system designed to create full range
digital sound reproduction.
The no compromise DTS digital process sets the standard of quality
for cinema sound by delivering an exact copy of the studio master
recordings to neighborhood and home theaters.
Now, every moviegoer can hear the sound exactly as the moviemaker
intended.
DTS can be enjoyed in the home for either movies or music on DVD’s,
LD’s, and CD’s.
Dolby Digital lets you enjoy Digital TV, Digital Satellite as well as DVD
and LD software in digital surround, which is the next step above
Dolby Pro Logic.
In comparison with Dolby Pro Logic, Dolby Digital can provide
separate left and right surround channels, for more precise
localization of sounds and a more convincing, realistic ambience.
And, with Dolby Digital, all five main channels can be full range and a
subwoofer can be added to each channel ,if desired. By providing up
to 5.1channels of digital audio independently, Dolby Digital lets you
enjoy better sound quality and more powerful presence than
conventional Dolby Surround.
“Dolby”, “AC-3”, “Pro Logic” and the double-D symbol are trademarks
of Dolby Laboratories.
“DTS” and “DTS Digital Surround” are trademarks of Digital Theater
Systems, Inc.
“CS-5.1”, “TruSurround Digital 5.1CH”, “Circle Surround Virtual”,
“UltraSurround” and “SRS mark” symbol are trademarks of SRS Labs,
Inc. “CS-5.1”, “TruSurround Digital 5.1CH”, “Circle Surround Virtual”,
“UltraSurround” technology is incorporated under license from SRS
Labs, Inc.
3
ENGLISH
INTRODUCTION
!1 INFRARED SENSOR window
FRONT PANEL (SEE PAGE VII)
This window receives infrared signals from the remote control unit.
ENGLISH
q POWER switch and STANDBY indicator
!2 VOLUME control knob
You can turn on and off the unit’s power using the front panel power
switch.
However, if you turn the unit off with the front panel switch, the unit
goes completely off rather than to the “standby mode” (Red LED
indicator light glows in the standby mode).
The unit cannot be turned on with the remote control when it is not in
the standby mode. When the red LED is on, the unit can be turned on
via the remote control or by pressing any input selector button on the
front panel.
Adjusts the overall sound level. Turning the control clockwise
increases the sound level.
The sound level operations can also be controlled from the provided
remote controll unit.
!3 Warm-up meter
With any audio unit, the real sound quality cannot be obtained
immediately after the power is turned on, and warming up is required
to make the unit exhibit its full performance. As time passes after the
power has been turned ON, the temperatures of different parts of the
unit become constant and the electrolytic capacitors become active.
This meter allows to check the warm-up condition of the unit.
The meter needle starts to swing gradually in a little while after the
power is turned ON and reaches about 2/3 of the meter’s full scale in
about 30 minutes. Now the unit has almost been warmed up and can
reproduce music with its original performance.
The meter positions immediately after turning power on and at the
end of warming up and the time taken for warming up are variable
depending on the temperature, ventilation and other conditions of the
listening room where the unit is located.
w 6CH INPUT button
Press this button to select the output of an external multi channel
decoder.
e A/D (Analog/Digital) SELECTOR button
This is used to select between the analog and digital inputs.
Note:
This button is not used for an input source that is not connected to
a digital input in the system setup 2/2.
The selection made with this button is not stored in the unit's
memory. This means that the status which was set in the SYSTEM
SETUP 2/2 will be restored when the input function is switched or
after the unit has been placed in the standby mode.
!4 INPUT SELECTOR knob
When this knob is turned, the input signal is switched in the following
sequence.
PHONO
CD
TAPE/TUNER
CD-R/MD
TV
r BASS and TREBLE tone controls
These controls are used to boost or cut high and low frequencies.
TREBLE: Adjusts the tone of high-frequency sound.
BASS: Adjusts the tone of low-frequency sound.
DSS/VCR2
VCR1
LD
DVD
This knob can also be used to turn the unit’s power on when it is in the
standby mode.
Notes:
These buttons are disable in Source Direct mode,Pure Direct
mode, SRS mode, Dolby Virtual mode, 6ch input, and Dolby
Headphone mode.
Additionally these are not effective during playback of 96k PCM
audio signal.
t SOURCE DIRECT button
When this button is pressed, the tone control circuitry is bypassed as
well as Bass Management.
y PURE DIRECT button
This is used to select the PURE DIRECT mode.
In contrast to the SOURCE-DIRECT mode, the front panel display
circuit is completely shut down, and then the video output circuit is
shut down.
u Surround MODE buttons
(AUTO, 2, SRS, 6.1, STEREO, 5ch STEREO)
Press the desired button to select surround mode.
i NIGHT MODE buttons
This is used to select the NIGHT mode.
Selecting the Night Mode On is effective in Dolby Digital only, and it
compresses the dynamic range.
This softens loud passages such as sudden explosions, to help
prevent disturbing others late at night.
o DOLBY HEADPHONE MODE buttons
This is used to select the operation mode of the Dolby Headphone
when using headphones for listening.
!0 PHONES jack for stereo headphones
Conventional dynamic headphones can be plugged in here.
4
DISPLAY
ENGLISH
(1) Main Information Display
This display shows messages relating to the status, input source,
surround mode, volume level or other aspects of unit’s operation.
(2) ENCODED SIGNAL indicators
2DIGITAL, 2SURROUND, dts and PCM
When the selected input is a digital source, one of these indicators
will light to display the specific type of signal in use.
(3) ANALOG : Analog Input Indicator
This indicator lights when an analog input source has been selected.
(4) DIRECT : SOURCE DIRECT Indicator
This indicator lights when the PS-17 is in the SOURCE DIRECT mode.
(5) SLEEP Indicator
This indicator lights when the Sleep function is in use.
(6) COPY Indicator
This indicator lights when DIGITAL COPY system is active.
(7) D.H mark : DOLBY HEADPHONE
Indicator
This indicator lights when headphones are used and the Dolby
Headphone function is activated.
(8) NIGHT Mode Indicator
This indicator lights when the PS-17 is in the Night mode, which
reduces the dynamic range of digital program material at low volume
levels.
(9) EQ : HT-EQ (Home Theater EQ)
indicator
This indicator lights when HT-EQ is active.
(10) PEAK indicator
This indicator is a monitor for an analog audio input signal. If the
selected analog audio input signal is greater than the capable level of
internal processing, this will light. If this happens, you should press
the ATT button on the remote controller.
(11) ATT : Attenuation indicator
This indicator lights when the attenuation function is active.
(12) ENCODED CHANNEL STATUS indicators
These indicators display the channels that are encoded with a digital
input signal. If the selected digital input signal is Dolby Digital 5.1ch
or DTS 5.1ch, “L”, “C”, “R”, “LS”, “RS” and “LFE” will light up.If the
digital input signal is 2 channel PCM-audio, “L” and “R” will be
displayed. If Dolby Digital 5.1ch signal with Surround EX flag comes
in, “L”, “C”, “R”, “LS”, “S” , “RS” and “LFE” will show.
5
ENGLISH
REAR PANEL CONNECTIONS
[10] Two Component-video inputs
All connections to the rear panel should be made with the entire
system powered off.
To avoid errors, it is advisable to connect one cable at a time between
the various components.
DVD, DSS,/VCR2 :
Connect the Y/Cr/Cb component video output of each your video
product to these jacks.
[11] Component Video Outputs
[1] PHONO input / GND (GROUND)
terminal
Connect these outputs to the component video inputs of a video
projector or monitor. When a source connected to one of the two
Component Video Inputs is selected the signal will be sent to these
jacks.
Connect directly when the cartridge is MM (Moving Magnet) type.
Use the Step-up transfomer when the cartridge is MC (Moving Coil)
type.
And connect the grounding wire fom the Analog turntable to this
terminal.
[12] Monitor. (VIDEO/S-VIDEO) output jacks
Connect this jack to the composite or S-Video input of a TV monitor or
video projector to view the on-screen menus and the output of any
standard video source selected by the receiver’s video switcher.
[2] Three analog audio inputs
CD, TAPE/TUNER, and CD-R/MD :
Connect the audio outputs of your source components to the input
jacks on the amplifier.
[13] Main Amplifier Inputs:
Connect the pre-output jacks of your pre-amp to these jacks at the
SEPARATE position of the system setup 1/2.
[3] Two analog audio outputs for audio
source equipment
[14] Preamp Outputs (L, R, SL, SR, SBL,
SBR, C)
TAPE/TUNER and CD-R/MD :
Connect each output to the audio inputs (REC in) of your recording
equipment.
These jacks may be connected to an external power amplifier.
[15] SUB WOOFER output jack
[4] Five analog audio inputs for video
source equipment
Connect to the input jack(s) of the power amplifier for subwoofer
channel or powered subwoofer.
TV,LD,DVD, VCR1, and DSS/VCR2 :
Connect each input to the audio outputs of your video source
equipment.
[16] 6 CH INPUT jacks
Connect to the outputs of an external multichannel decoder or DVD
player with multichannel decoder.
[5] Two analog audio outputs for video
source equipment
[17] Six DIGITAL inputs
Dig.1,2,3 (coaxial) and Dig.4,5,6 (Optical)
Connect the digital output from a DVD player, HDTV receiver, LD
player or CD player to these jacks. The signal may be either a Dolby
Digital signal, DTS signal or a standard PCM digital source.
VCR1, and DSS/VCR2 :
Connect each output to the audio inputs (REC in) of your video
recording equipment.
Note :
The coaxial connections are not for AC-3 RF from an LD, If you
want to decode this type of signal, an external demodulator must
be used.
[6] Five video inputs
TV, DVD, VCR1, and DSS/VCR2 :
Connect each input to the video outputs of your video source
equipment.
[18] Digital Audio Outputs (Optical, Coaxial)
Connect these jacks to the matching digital input connector on a
digital recorder such as a CD-R or Mini Disc recorder.
[7] Five S-video inputs
TV, DVD, VCR1,and DSS/VCR2 :
Connect each input to the S-video outputs of your video source
equipment.
This unit's S-VIDEO input jacks support the S2 type. For details on
the screen mode of the wide-screen TV set that is connected
depending on the type of the external component's video system,
refer to the User Guide of the playback component and TV set which
are connected. These inputs are completely interchangeable with
the conventional S-VIDEO inputs.
[19] REMOTE CONT. IN/OUT terminals
Connect to a Marantz component equipped with remote control (RC5) terminals.
[20] Speaker Outputs terminals
Connect to the left and right speakers.
[21] AC INLET
[8] Two video outputs
Connect the provided detachable power cord, and connect the AC
plug to an unswitched AC wall output.
VCR1, and DSS/VCR2 :
Connect each output to the video input (REC in) of your video
recording equipment.
[9] Two S-video outputs
VCR1, and DSS/VCR2 :
Connect each output terminals to S-video input (REC in) of your video
recording equipment.
6
Front speakers (left, right and center)
The midrange and high-range speaker units of the three front
speakers should be arranged at the same height as far as this is
possible.
This means placing the center speaker either directly on top of the TV
set or directly underneath it.
A layout like this necessitates the use of the kind of center speaker
which is protected from magnetic fields.
The ideal number of channels in a system for reproducing surround
sound with this unit is 8, namely, the front left and front right, center,
left surround and right surround, back left and back right surround,
and subwoofer.
The number of speakers minimally required in a system for surround
sound reproduction is 4, namely, the front left and right speakers and
the left and right surround speakers. However, 6.1-channel surround
sound cannot be reproduced with this kind of setup.
With this unit, the system is set to match the number and positions of
the speakers and the output characteristics of their bass range.
POSITIONING THE SPEAKERS
The speakers are placed in different positions depending on the size
of the room and other factors present. The basic layout of the
speakers and some layout tips are given below.
Layout tips
Left surround
speaker
Back left surround
speaker
150°
Subwoofer
Front left
speaker
Surround speakers
These should be positioned about 70 cm to a meter above the listener
as space allows. This will ensure that the sound field will not be
conspicuously localized but perceived as pervading the whole room.
Front center
speaker
Front right
speaker
Back right surround
speaker
70cm
∼ 1m
Right surround speaker
Front left and right speakers
It is recommended that these speakers be positioned at an angle of
45 to 60 toward the rear as seen from the listening position.
Center speaker
This is placed with its front aligned with the front left and right
speakers or slightly offset to the rear.
Left and right surround speakers
These are placed somewhere between the sides of the listening
position and the front. They are not placed behind the listening
position.
Back left and right surround speakers
These are positioned behind the listening position. Place them at the
angles shown in the figure.
Subwoofer
Use of a subwoofer is recommended in order to maximize the bass
effect. The subwoofer handles only the bass range so it can be
placed anywhere in the room.
7
ENGLISH
HEIGHT
POSITIONING AND CONNECTING THE SPEAKERS
ENGLISH
POSITIONING AND CONNECTING THE SPEAKERS (BASIC)
CONNECTION OF SPEAKER SYSTEMS
CONNECTION OF SPEAKER CORD
n The speakers in the speaker system should have an impedance
between 4 and 16 ohms. If speakers with an impedance of less
than 4 ohms are connected, the protection circuit may be
activated during play.
n The output terminals have positive ( : Red) and negative ( :
white) polarity, and each speakers also has the same polarity (
and ). When connecting the speaker, be sure to connect the
terminals with the same polarity ( with ,
with ).
Strip coating from extermity.
Twist conductors.
Speaker cord
CAUTION:
When connecting two pairs of speaker systems simultaneously,
the impedance of each speaker system should be no less than 8
ohm .
Connecting a speaker system with a lower impedance than 8
ohm may activate the protection circuitry and make normal
stereo reproduction impossible.
Turn counterclockwise to
loosen.
Insert
conductors.
Turn clockwise
to tighten.
Banana plugs can also be used in the same way.
Turn counterclockwise to loosen.
Insert the
banana plug.
Turn clockwise
to tighten.
WHEN USING ONLY THE FRONT LEFT AND RIGHT SPEAKERS
FRONT
SURR.
CENTER
FRONT
SURR.
BACK
CENTER
SURR.
SPEAKERS
MAIN IN
R
L
L
L
L
SPEAKERS
6CH
INPUT
PRE
OUT
R
R
R
S.WOOFER
CD
PHONO(MM)
IN
L
L
R
R
R
L
AC IN
∼
S.WOOFER
TAPE/TUNER
OUT
CDR/MD
IN
TV
DVD
LD
OUT
DSS/VCR2
VCR1
IN
OUT
IN
SPEAKERS IMPEDANCE :4-16 OHMS
OUT
L
R
AUDIO
When the components have been
connected as shown above, select
NONE for SUB WOOFER, NONE for
CENTER, NONE for SURROUND and
NONE for SURR.BACK as the settings
for SPEAKER SETUP described later.
SPEAKERS IMPEDANCE :4-16 OHMS
TV
DVD
LD
S2
S2
S2
VCR1
S2
DSS/VCR2
S
S2
S
DIGITAL-IN
1
2
3
4
DIGITAL OUT
5
6
COAX
OPT
REMOTE CONT.
IN
OUT
COMPONENT VIDEO
MONI.
DVD IN
S2 OUT
DDS/VCR2 IN MONITOR OUT
PR
/
CR
S-VIDEO
IN
OUT
IN
OUT
S P K R S
PB
/
CB
VIDEO
S E T U P
S E T U P
:
U N L O C K E D
S U BW O O F E R
:
N O N E
C E N T E R
:
N O N E
S U R R O U N D
:
N O N E
S U R R . B A C K
:
N O N E
Y
N E X T
FRONT R
FRONT L
8
SPEAKER CONNECTIONS (BASIC)
ENGLISH
When using the unit's internal power amplifier for the front left and
right speakers, and an external power amplifier for connection to the
center speaker, left and right surround speakers, back surround
speakers and subwoofer with internal amplifier
* Select YES for SUB WOOFER, YES for CENTER, YES for
SURROUND and 1ch for SURR.BACK as the settings on SPEAKER
SETUP 1/4 of the OSD menu system.
S P K R S
S E T U P
S E T U P
:
U N L O C K E D
S U BW O O F E R
:
Y E S
C E N T E R
:
Y E S
S U R R O U N D
:
Y E S
S U R R . B A C K
:
1 C H
N E X T
FRONT R
FRONT L
SPEAKERS
FRONT
SURR.
CENTER
FRONT
SURR.
BACK
CENTER
SURR.
R
L
AC OUTLETS
SPEAKERS
MAIN IN
R
L
6CH
INPUT
FRONT
L
R
PRE
OUT
L
L
R
PRE
OUT
SWITCHED
100W MAX TOTAL
L
MAIN IN
L
R
AC IN
∼
S.WOOFER
TAPE
IN
L
L
SURR.
R
S.WOOFER
CD
PHONO(MM)
SURR.
BACK
CENTER
CDR/MD
OUT
IN
TV
DVD
LD
DSS/VCR2
VCR1
OUT
IN
IN
OUT
R
SPEAKERS IMPEDANCE :4-16 OHMS
OUT
R
L
SPEAKERS IMPEDANCE :4-16 OHMS
S.WOOFER
R
R
UN SWITCHED
100W MAX
AUDIO
100V 50/60HZ
TV
DVD
LD
S2
S2
S2
VCR1
S2
DSS/VCR2
S
S2
S
1
2
3
4
DIGITAL OUT
5
6
COAX
REMOTE CONT.
OPT
IN
COMPONENT VIDEO
DVD IN
S2 OUT
DDS/VCR2 IN MONITOR OUT
PR
/
CR
S-VIDEO
DIGITAL-IN
MONI.
OUT
IN
OUT
IN
OUT
PB
/
CB
VIDEO
Y
R
L
R+
L+
R
R-
L-
L
R
ATT
0
-6
(dB)
SUBWOOFER WITH
INTERNAL AMPLIFIER
L
R+
L+
R
R-
L-
L
ATT
NORMAL
INPUT
BTL
R
L
BTL OUT
BTL
SPEAKERS IMPEDANCE L+R:4-8 OHMS BTL:8-16 OHMS
SPEAKERS
SURROUND
BACK SPEAKER
FRONT CENTER
SPEAKER
9
0
-6
(dB)
NORMAL
INPUT
BTL
R
L
BTL OUT
BTL
SPEAKERS IMPEDANCE L+R:4-8 OHMS BTL:8-16 OHMS
SPEAKERS
SURROUND
SPEAKER R
SURROUND
SPEAKER L
ENGLISH
POSITIONING AND CONNECTING THE SPEAKERS (APPLIED)
SPEAKER CONNECTIONS (APPLIED)
WHEN USING THE UNIT'S INTERNAL POWER AMPLIFIER
FOR THE LEFT AND RIGHT SURROUND SPEAKERS
n The external power amplifier is used for the front left and right
speakers, center speaker, back left and right surround speakers
and subwoofer.
n Insert the supplied short plugs between the SURROUND L and
MAIN IN-L jacks and between the SURROUND R and MAIN IN-R
jacks in the PRE OUT jack section.
Next, select SEPARATE as the MAIN IN setting on SYSTEM SETUP
1/2 of the OSD menu system. (Page 12) The left and right surround
signals are now output from the unit's speaker terminals.
S Y S T E M
S E T U P
1 / 2
:
S E P A R A TE
6 C H - I N P U T
:
6 c h
D I G I T A L
:
S O U R C E
M A I N
O S D
I N
SW
O U T
I N F O
S . P . C .
R E T U R N
:
E N A B L E
:
D I S A B L E
N E X T
E X I T
Note:
Use the supplied short plugs for the above application only and no
other. Otherwise, trouble may be caused.
SURROUND
SPEAKER R
SURROUND
SPEAKER L
Short plugs (supplied)
SPEAKERS
FRONT
SURR.
CENTER
FRONT
SURR.
BACK
CENTER
SURR.
R
L
AC OUTLETS
SPEAKERS
MAIN IN
R
L
6CH
INPUT
FRONT
L
R
PRE
OUT
L
L
R
PRE
OUT
SWITCHED
100W MAX TOTAL
L
MAIN IN
L
R
AC IN
∼
S.WOOFER
TAPE
IN
L
L
SURR.
R
S.WOOFER
CD
PHONO(MM)
SURR.
BACK
CENTER
CDR/MD
OUT
IN
TV
DVD
LD
DSS/VCR2
VCR1
OUT
IN
IN
OUT
R
SPEAKERS IMPEDANCE :4-16 OHMS
OUT
R
L
SPEAKERS IMPEDANCE :4-16 OHMS
S.WOOFER
R
R
UN SWITCHED
100W MAX
AUDIO
100V 50/60HZ
TV
DVD
LD
S2
S2
S2
VCR1
S2
DSS/VCR2
S
S2
S
2
3
4
DIGITAL OUT
5
6
COAX
REMOTE CONT.
OPT
IN
COMPONENT VIDEO
DVD IN
DDS/VCR2 IN MONITOR OUT
PR
/
CR
S-VIDEO
DIGITAL-IN
1
MONI.
S2 OUT
OUT
IN
OUT
IN
OUT
PB
/
CB
VIDEO
Y
R
R+
L
L
R
L+
L
R
L+
NORMAL
INPUT
BTL
L-
R
L
BTL OUT
SUB WOOFER
FRONT CENTER
SPEAKER
0
-6
(dB)
L
L+
ATT
R-
R
BTL
SPEAKERS IMPEDANCE L+R:4-8 OHMS BTL:8-16 OHMS
SPEAKERS
R+
L
ATT
R-
R
-6
(dB)
R+
L
ATT
0
NORMAL
INPUT
BTL
L-
R
L
BTL OUT
SURROUND BACK
SPEAKER R
R-
R
BTL
SPEAKERS IMPEDANCE L+R:4-8 OHMS BTL:8-16 OHMS
SPEAKERS
0
-6
(dB)
NORMAL
INPUT
BTL
L-
R
L
BTL OUT
SURROUND BACK
SPEAKER L
FRONT R
10
BTL
SPEAKERS IMPEDANCE L+R:4-8 OHMS BTL:8-16 OHMS
SPEAKERS
FRONT L
Note:
Each video input function is set PAL or NTSC for TV format of OSD. If
this setup does not meet the video input signal, character of OSD can
notsynchronize.
So you can select these format function by function.
Press OSD button ⁄7 on the remote controller for 3 seconds or more.
“PAL” or “NTSC” will be shown on the FL display of PS-17, press OSD
button ⁄7 again to change the TV format.
The indicator on FL display will change “PAL” fi “NTSC” fi “PAL” fi .
This setup is memorized with each video input function.
After all components are connected, initial setup must be performed.
ON SCREEN DISPLAY MENU SYSTEM
The PS-17 incorporates an on-screen menu system, which makes
various operations possible by using the cursor (< , >, ^, v) and OK
buttons on the remote controller.
The settings made with these buttons are also shown in the on-screen
display.
O S D
M A I N
S U R R O U N D
C H A N N E L
M E N U
M O D E
L E V E L
S Y S T E M
S E T U P
S P E A K R
S E T U P
E X I T
S U R R O U N D
S O U R C E
M O D E
D I R E C T
S U R R - M O D E
N I G H T
L F E
:
S Y S T E M
:
O F F
A U T O
M O D E
:
L E V E L
H T - E Q
O F F
:
0
:
O F F
M A I N
S E T U P
I N
SW
C H .
L E V E L
6 c h
S U BW O O F E R
:
:
S O U R C E
C E N T E R
:
S U R R O U N D
:
Y E S
:
E N A B L E
S U R R . B A C K
:
2 C H
:
D I S A B L E
O S D
I N F O
R E T U R N
I n p u t
N E X T
E X I T
D i g - 1 2 3 4 5 6
- - - - - -
o
o
:
0 d B
T A P E
- - - - - -
-
:
0 d B
C D - R
- - - - - -
-
:
0 d B
T V
S U R R
- - - - - -
o
o
- - - - - -
-
- - - - - -
-
V C R 1
- - - - - -
-
D S S
- - - - - -
E X I T
L & R
C E N T E R
S U R R O U N D
o
o
o
S U R R . B A C K
o
> L A R G E
R E T U R N
N E X T
S P K R S
U N I T
:
0 d B
L
S U R R O U N D
L
:
0 d B
3 . 0
S U R R O U N D
R
:
0 d B
C E N T E R
S E T U P
F R O N T
o
L E V E L
C H .
S I Z E
o
-
L D
D V D
R E T U R N
S P E A K E R
-
L
Y E S
N E X T
A n a
R
E X I T
Y E S
:
O U T
F R O N T
N E X T
U N L O C K E D
D I G I T A L
F R O N T
R E T U R N
:
6 C H - I N P U T
C D
S U BW O O F E R
S E T U P
C O U P L E D
d B
E X I T
M A I N
S P K R S
S E T U P
:
S . P . C .
R E T U R N
1 / 2
E X I T
S E T U P
:
S M A L L
3 / 4
m
C
R
3 . 0
3 . 0
S L
S U R R . B A C K
L
:
0 d B
S U R R . B A C K
R
:
0 d B
S R
3 . 0
3 . 0
E N T E R
R E T U R N
E X I T
R E T U R N
N E X T
L E V E L S
S E T U P
T E S T
M O D E
T E S T
T O N E : O N
L
E X I T
:
4 / 4
M A N U A L
C
0
SW
R
0
0
0
S L
S R
0
S B L
S B R
0
0
R E T U R N
11
0
E X I T
ENGLISH
SET-UP
S.P.C. : ENABLE > DISABLE
System Power Control : If you select “ENABLE”,
the PS-17 will output a power On/Off command
for a CD player, MD player, or DVD player, from
the remote output terminal.
If you have corresponding marantz products ,
you can turn them on/off simultaneously with PS17.
NEXT/RETURN/EXIT
NEXT: Move cursor to here, and press “ok” button to
go to SPEAKERS SETUP 2/2.
RETURN:If you desire to return the main menu, press the
“ok” button on RETURN.
EXIT: If you desire to exit from OSD menu system,
press the “ok” button on EXIT.
OSD MAIN MENU
ENGLISH
O S D
M A I N
S U R R O U N D
C H A N N E L
M E N U
M O D E
L E V E L
S Y S T E M
S E T U P
S P E A K R
S E T U P
E X I T
1.
2.
Press the AMP button ,.
Press any one of the cursor buttons (<, >, ^, v and OK buttons) to
display the “MAIN MENU” of the on-screen display menu.
Choose a desired item in the contents with ^ or v button, and
press the OK button to select.
Display will change to menu for each item.
SYSTEM SETUP 2/2 (SELECTING DIGITAL INPUT)
Six digital inputs can be assigned as the desired source.
Use this menu to set the PS-17 for connected equipment and type of
connection.
I n p u t
SYSTEM SETUP
SYSTEM SETUP 1/2
D i g - 1 2 3 4 5 6
- - - - - -
-
T A P E
- - - - - -
-
C D - R
- - - - - -
-
T V
- - - - - -
-
L D
- - - - - -
-
D V D
- - - - - -
-
V C R 1
- - - - - -
-
D S S
- - - - - -
-
R E T U R N
S Y S T E M
S E T U P
:
C O U P L E D
:
6 c h
D I G I T A L
:
S O U R C E
:
E N A B L E
:
D I S A B L E
O S D
I N
I N F O
S . P . C .
R E T U R N
SW
O U T
N E X T
E X I T
1 / 2
6 C H - I N P U T
M A I N
A n a
C D
Example;
When the digital output of a DVD player is connected to Digital 4
(input jack) of the PS-17;
1. Move the cursor on the line of the DVD with cursor buttons ^ or v.
2. Move the cursor on “Dig 4” with cursor buttons < or >.
3. Press the OK button to chose.
4. If you desire to continue the next setup, press the OK button on
RETURN.
If you desire to exit from OSD menu system, press the OK button
on EXIT.
E X I T
MAIN IN SW : CUPPLE > SEPARATE
This selects the connection to the unit's internal
2-channel amplifier.
COUPLED: This setting is used when the
internal amplifier is to be used for the unit's left
and right channel applications.
SEPARATE:This setting is used when the
internal amplifier is to be used for the unit's
MAIN INPUT applications. Select it when the
internal amplifier is to be used for surround
channel applications by means of the supplied
short plugs.
6CH. INPUT : 6CH > 2CH
The 6 channel input of the PS-17 can be
selected to use a 6channel input or front
2channel input. Select 6channel use or
2channel use by < or > button.
DIGITAL OUT :This lets you chose which digital input will be
output for digital recording.
SOURCE
DIG.1
DIG.2
DIG.3
Notes
• The PHONO is fixed to the analog input, and cannot be selected
for any digital input.
• When a DTS-LD or DTS-CD is playing, this setup is not
available.
This is to avoid noise being generated from the analog input.
In this case, the DTS audio must be played through the player’s
digital output to the digital input on the PS-17. This is because
the DTS soundtracks replace the standard PCM soundtracks on
DTS discs.
• The PS-17 does not switch from digital input to analog input or
vice versa automatically.
In case both digital and analog inputs are connected to the PS17,if you desire to switch to analog input temporarily, you can
do so by pressing the A/D button.
OFF
DIG.6
DIG.5
DIG.4
To determine each source, display the desired
source and press the < or > button.
OSD Info :If you select enable, PS-17 will display the
status of the feature (Volume up/down, input
select, etc..) on the TV monitor.
But if you do not desire this information , select
“DISABLE “.
12
SPEAKER SIZE SETUP
SPEAKER SETUP 2/4
S P K R S
S E T U P
S E T U P
:
U N L O C K E D
S U BW O O F E R
:
Y E S
C E N T E R
:
Y E S
S U R R O U N D
:
Y E S
S U R R . B A C K
:
2 C H
S P E A K E R
o
S I Z E
S E T U P
o
o
o
o
F R O N T
o
L & R
C E N T E R
S U R R O U N D
o
o
o
o
S U R R . B A C K
> L A R G E
S M A L L
N E X T
R E T U R N
N E X T
E X I T
First, set whether the speakers are connected to the connected
channels.
SPKR SIZE
This menu enters the information about which type of speakers will be
used for each channel.
In turn, these settings will determine which speakers receive low
frequency information.
For the purpose of establishing proper bass reproduction, use the
LARGE settings if the speaker being used at any position is a
traditional full-range loudspeaker that is capable of reproducing
sound below 100 Hz and you are not using a subwoofer.
Use the SMALL setting for smaller, frequency-limited speakers that are not
able to reproduce sounds below 100Hz and you are using a subwoofer.
Low frequencies will be diverted from the speaker to the subwoofer.
Note that when “small” speakers are used it is advisable to install a
separate subwoofer, especially if you wish to appreciate the full
impact of a good home theater soundtrack.
SPEAKER SETUP 1/4
SETUP:Select “LOCKED” with < or > button in order to
lock the contents of the SPKR SET UP MENU.
Then, when you want to change the contents of
this setup, select “UNLOCKED”.
SUBWOOFER :YES > NONE
Select “YES”with < or > button if a subwoofer is
connected to your system, select “NONE”
subwoofer is NOT connected to your system.
CENTER :YES > NONE
Select “YES”with < or > button if a subwoofer is
connected to your system, select “NONE”
subwoofer is NOT connected to your system.
SURROUND : YES > NONE
Select “YES”with < or > button if a subwoofer is
connected to your system, select “NONE”
subwoofer is NOT connected to your system.
SURR. BACK :Select the number of surround back channels,
“2ch”, “1ch” or“NONE”, with < or > button.
If you have two one speakers for the surround
back channel, select “2CH”.
If you have only one speaker for the surround
back channel, select “1CH”
(Note: If 1CH is selected, the signal of surround
back will go out from pre output of surround
back L ch only. In that case, connect your
external amplifier to this output terminal.)
Select “NONE”, if a surround back speaker is
NOT connected to your system.
(Note: If the surround back speaker is selected
“NONE”, 6.1 Surround mode is not available.)
These speakers are very effective for
reproducing signals which have been
processed by Dolby Surround EX or DTS-ES.
FRONT -L/R :LARGE > SMALL
Select the size of front L/R speakers, “SMALL”
or “LARGE” with < or > button.
CENTER :Select the size of Center speaker, “SMALL” or
“LARGE” with < or > button.
SURR-L/R :Select the size of Surround L/R speakers,
“SMALL” or “LARGE” with < or > button.
SURR.BACK-L/R :Select the size of Surround back speaker(s),
“SMALL” or “LARGE” with < or > button.
Notes:
The SUBWOOFER cannot be set to None when the front speakers are
set to SMALL.
This speaker size setup is not effective when the SOURCE-DIRECT or
6CH. Input is selected.
13
ENGLISH
SPEAKER SETUP
SPEAKER DISTANCE
SURROUND MODE
ENGLISH
SPEAKER SETUP 3/4
S U R R O U N D
S O U R C E
S P K R S
U N I T
L
S E T U P
:
3 / 4
D I R E C T
S U R R - M O D E
m
N I G H T
C
3 . 0
M O D E
R
3 . 0
L F E
3 . 0
S L
:
:
O F F
A U T O
M O D E
:
L E V E L
H T - E Q
O F F
:
0
:
O F F
d B
S R
3 . 0
3 . 0
R E T U R N
E X I T
E N T E R
R E T U R N
N E X T
E X I T
SOURCE DIRECT : ON > OFF
Switch the source direct ON or OFF with < or >
button.
In this mode, PS-17 bypasses the digital
processing and crossover for the main speakers
(front left and right will be full range and the
subwoofer will be ON)
Note:
Source Direct mode will be off if Surround mode
is changed.
SURR-MODE : Select the surround mode with < or > button.
Surround mode will change by scrolling as
follow.
e.g.
AUTO fi DOLBY fi 6.1 fi SRS fi 5CH STEREO
fi STEREO
NIGHT MODE : ON > OFF
Switch the NIGHT MODE ON or OFF with < or >
button.
Selecting the Night Mode ON is effective in
Dolby Digital only, and it compresses the
dynamic range.
This softens loud passages such as sudden
explosions, to help prevent disturbing others late
at night.
LFE LEVEL : 0dB > -10dB
Select the output level of the LFE signal included
in the Dolby Digital signal or the DTS signal.
Select 0dB, -10 dB or OFF with < or > button.
HT-EQ: ON > OFF
Switch the HT (Home Theater) - EQ on or off with
< or > button.
This mode compensates for the audio portion of
a movie sounding “bright”.
This equalizer is effective in AUTO, DOLBY, DTS,
6.1 and STEREO mode.
Speaker distance for time alignment
Use this parameter to specify the distance of the speaker’s position
from the listener.
The delay time is automatically set according to these distances.
UNITS:The units may be selected with OK button, and input each
speaker’s distance with < or > button.
If you select “m”, it will change in 0.3 meters increments. If
you select “ft” it will change in 1foot increments.
Select speaker with OK button, and input each speaker’s distance
with < or > button.
When the input for each speaker’s distance has been finished, move
the cursor to ENTER and press the OK button.
NOTES :
If your are out of range, the OSD text will blink.
Placement beyond that distance is beyond the range of the automatic
time delay feature.
The delay feature does not function in the SOURCE-DIRECT ,6 CHInput modes and decoding of 96 kHz sources.
LEVELS SETUP
(SPEAKER SETUP 4/4, TEST TONEGENERATOR)
L E V E L S
S E T U P
T E S T
M O D E
T E S T
T O N E : O N
L
:
4 / 4
M A N U A L
C
0
SW
R
0
0
0
S L
S R
0
S B L
S B R
0
0
R E T U R N
0
E X I T
CHANNEL LEVEL CONTROL
TEST MODE : AUTO > MANUAL
Selects the mode for generating the test tone. If you
select AUTO with < or > button, the test tone will be
cycled through in a circular pattern which is Leftfi
Center fi Right fi Surround Right fi Surround Back
Right fi Surround Back Left fi Surround Left fi
Subwoofer fi Left fi ...in increments of 3 seconds
for each channel.
If you select MANUAL, press the Ok button to cycle
through the test tone channels after the “TEST
TONE ON”.
TEST TONE: Press the Ok button, ON is indicated and the test
tone starts from the front left speaker.
Press the Ok button again on this item. OFF is
indicated and the output of the test tone will stop.
Level adjust : Adjust the level of the test tone for each channel
with the < or > buttons.
M A I N
C H .
L E V E L
F R O N T
L
:
0 d B
F R O N T
R
:
0 d B
:
0 d B
S U BW O O F E R
R E T U R N
S U R R
N E X T
L E V E L
C H .
:
0 d B
S U R R O U N D
L
:
0 d B
S U R R O U N D
R
:
0 d B
C E N T E R
S U R R . B A C K
L
:
0 d B
S U R R . B A C K
R
:
0 d B
R E T U R N
Notes:
• The setup level for each channel is memorized for
reproduction in all surround mode.
• These levels are common for all surround modes,
except 6CH-INPUT mode.
E X I T
E X I T
Desired channels can be selected by pressing ^ or v button.
Each channel level will be adjusted by pressing < or > button.
Only the usable channels which are determined depending on the
SURROUND mode, and SPEAKER SETTING are displayed.
14
This is playback in the Multi-channel mode/Digital Input.
PLAYBACK OPERATION
Playing the DVD player/Digital Input.
1. Set the INPUT SELECTOR knob to DVD on the front panel or
press the DVD of FUNCTION buttons twice on the remote unit.
2. Press the AUTO of Surround mode buttons on the front panel or
press the AUTO on the remote unit in the AMP MODE.
This is playback in the stereo mode.
Playing the analog disk/Analog input.
1. Press the POWER ON button on the remote. When the red LED is
on, the unit can be turned on” by pressing any input selector
knob on the front panel.
2. Set the INPUT SELECTOR knob to PHONO on the front panel or
press the PHONO of FUNCTION buttons twice on the remote
unit.
3. Press the SOURCE DIRECT of Surround mode buttons on the
front panel or press the P-DIRE on the remote unit in the AMP
MODE.
4.
5.
Play the DVD Player.
4.
Adjust the volume level using the VOLUME knob !2 on the front
panel or press the VOL 5/ button . on the remote.
If necessary, adjust the tone, select the TRB+, TRB– and BAS+,
BAS– by the Jog Dial n and press ENT button m in the AMP
MODE on the remote unit.
Play the analog turntable.
Adjust the volume level using the VOLUME knob !2 on the front
panel or press the VOL 5/ button . on the remote.
Caution for analog disk play
• Reduce the volume to the minimum position before replacing the
cartridge or placing the stylus on the disk.
• Do not apply shock to the turntable during play. Otherwise the
stylus may jump and damage the disk surface.
• Avoid installing the turntable near a speaker, for this may cause
howling and make it impossible to increase the listening volume.
• Do not turn power of the turntable off while the stylus is placed on a
disk.
Playing the DVD player/6ch-INPUT.
1. Set the INPUT SELECTOR knob to DVD on the front panel or
press the DVD of FUNCTION buttons twice on the remote unit.
2. Press the 6CH-INPUT on the front panel.
Select the 6-DIR by the Jog Dial n and press ENT button m in
the AMP MODE on the remote unit.
Playing the CD player/Digital Input.
1. Set the INPUT SELECTOR knob to CD on the front panel or press
the CD of FUNCTION buttons twice on the remote unit.
2. Press the AUTO of Surround mode buttons on the front panel or
press the AUTO on the remote unit in the AMP MODE.
3.
4.
3.
3.
4.
Play the DVD Player.
Adjust the volume level using the VOLUME knob !2 on the front
panel or press the VOL 5/ button . on the remote.
Note.
The following functions do not work while 6CH-INPUT is selected:
input selection, surround mode selection, tone controls, attenuator.
To select the input, release the 6CH-INPUT first.
The same status prior to the selection of 6CH-INPUT is maintained for
the video output. If, for instance, 6CH-INPUT is selected after DVD
was selected, the audio system will change to 6CH-INPUT but DVD is
maintained for the video output.
Play the CD Player.
Adjust the volume level using the VOLUME knob !2 on the front
panel or press the VOL 5/ button . on the remote.
If necessary, adjust the tone, select the TRB+, TRB– and BAS+,
BAS– by the Jog Dial n and press ENT button m in the AMP
MODE on the remote unit.
15
ENGLISH
BASIC OPERATION
ENGLISH
Example 1:
Digital recording onto an MD from CD:DIG.4 while playing and
listening to a DVD using the DVD:DIG.5 input
(The digital signals have already been connected as in the
connection example.)
PREPARATIONS FOR RECORDING USING
DIGITAL SIGNALS
Select the following settings on the OSD MAIN MENU before using
the unit's digital copy function.
1.
1.
2.
3.
Press the AMP button on the remote control unit to set the remote
control unit to the amplifier mode.
Press the remote control unit's <, >, ^, v cursor button or the OK
button.
Press the < or > cursor button to select the SYSTEM SETUP item
on the OSD MAIN MENU, and press the OK button to enter the
selection.
2.
Press the function button (DVD) to select DVD. In this example,
DIG.5 has already been set to DVD.
Proceed with the steps for "Preparations for recording using
digital signals," and select DIG.4.
The COPY indicator now lights.
S Y S T E M
M A I N
O S D
M A I N
S U R R O U N D
C H A N N E L
M E N U
I N
S E T U P
1 / 2
SW
C O U P L E D
:
6 C H - I N P U T
:
6 c h
D I G I T A L
:
D I G 4
O U T
M O D E
O S D
L E V E L
S Y S T E M
S E T U P
S P E A K R
S E T U P
I N F O
S . P . C .
R E T U R N
:
E N A B L E
:
D I S A B L E
N E X T
E X I T
E X I T
4.
Press the ^ or v cursor button to move to the DIGITAL OUT item.
S Y S T E M
M A I N
I N
S E T U P
1 / 2
SW
C O U P L E D
:
6 C H - I N P U T
:
6 c h
D I G I T A L
:
S O U R C E
O S D
O U T
I N F O
S . P . C .
R E T U R N
:
E N A B L E
:
D I S A B L E
N E X T
3.
4.
Set the digital input for the MD player, and set the player to a
recording standby status (such as synchro REC).
For further details, refer to the MD player's User Guide.
Play the disc in the CD player.
Recording now starts.
E X I T
OTHER FUNCTIONS
5.
6.
SETTING THE SLEEP TIMER (ONLY REMOTE
CONTROL UNIT)
Set the sleep timer while the power is turned on.
Press the < or > cursor button to select the output status.
n The status changes in the following sequence:
SOURCE
DIGITAL 1
DIGITAL 2
DIGITAL 3
1.
OFF
DIGITAL 6
DIGITAL 5
DIGITAL 4
2.
n When SOURCE is selected, the input signals from the
component selected by the function button are output. The
selected input will not be output unless the digital signal input
has been set.
n It is recommended that OFF be selected as the setting if no
component has been connected to the DIGITAL OUT jacks.
Press the OK button to return to the regular display.
Turn the power ON and press the SLEEP button ⁄7 in the AMP
MODE.
Press the SLEEP button ⁄7 the number of times to set the desired
sleep time.
Each press of the SLEEP button ⁄7 changes the display in the
following order:
10
20
30
40
50
OFF
90
80
70
60
“SLEEP” stops blinking and lights steadily.
While the sleep timer is activated, the remaining time can be
displayed for approx. 2 seconds by pressing theSLEEP button.
To cancel the sleep timer, press the SLEEPbutton ⁄7 and then press
the CLEAR button.
16
The PS-17 incorporates digital signal processors (DSP) which can reproduce various surround effects you experience in concert halls and movie
theaters, etc. Nine Surround Modes, are provided to reproduce a variety of surround sound effects, according to the content of the source to be played.
FEATURES
Surroud mode
AUTO
When this mode is selected, the receiver determines whether the digital input signal is Dolby Digital, PCM-audio or DTS.
Note:
When a Dolby Digital or DTS signal is input, the number of channels for which the corresponding signal is encoded will be
played.
Inputting a Dolby Digital two channel signal with Dolby surround status automatically subjects that signal to Pro-Logic
processing before play.
96 kHz source material can be play back in this mode.
Analog input sound is reproduced in stereo.
Dolby Virtual surround sound playback is initiated automatically if 5.1-channel signals or Dolby Surround signals are input
when the setting does not call for the surround speakers to be used.
DOLBY
With a setting which does not call for the surround speakers to be used, Dolby Virtual surround sound playback is initiated.
Using only the front left and right speakers, virtual surround sound playback results to give the impression that surround
speakers are present.
(Note: The effect will differ depending on the playback source and viewing/listening position.)
With a setting which calls for the surround speakers to be used, the Dolby Digital 5.1-channel signal input is played back as
is. On the other hand, 2-channel input signals (both analog and digital) are subject to Dolby Pro Logic processing and played
back.
Note:
Playback is not initiated for DTS input signals or 96 kHz PCM input signals.
STEREO
This mode bypasses all surround processing.
Stereo program sources the left and right channels play normaly when PCM-audio or analog stereo is input.
With Dolby Digital and DTS sources, the 5.1 multi-channels are converted to two channel stereo. 96 kHz source material can
be play back in stereo mode.
5ch STEREO
This mode is used to create a wider, deeper and more natural soundstage from two channel source material.
This is done by feeding the left channel signal to both left front and left surround speaker and the right channel signal to both
right front and right surround speaker. Addtionally, the center channel reproduces a mix of the right and left channel.
The 96 kHz sampling frequency mutes output.
SOURCE-DIRECT
In the source direct mode, the tone control circuite and bass management configuration are bypassed for full range
frequeancy responce and the purist audio reproduction.
96 Khz source matirial can be play back in this mode.
When analog signal input is selected, the digital unit's processing is stopped to minimize the effects of the high-frequency
clock, etc.
Notes:
Internal speaker size is setup to front L/R = Large, Center = Large, Surround L/R = Large and Subwoofer = yes automatically.
Tone controls are also defeated.
PURE-DIRECT
In contrast to the SOURCE DIRECT mode, the front panel display circuit is completely shut down, and then the video output
circuit is shut down to eliminate superfluous processing in operations other than the audio output. As a result, high-quality
music reproduction is achieved.
SRS
The playback mode is selected as follows depending on the input signals and speakers used.
n When the setting calls for the surround speakers to be used:
UltraSurround processing is added when multi-channel signals are input. This causes the sound to be reproduced in a wide
sound field with improved links between the channels.
Circle Surround playback is performed when 2-channel signals are input. In this case, either music mode or cinema mode
can be selected.
CS CINEMA: This is suited to movie playback. Conventional movies recorded in surround sound will also be played back as
5.1-channel sound.
CS MUSIC: This is suited to music playback. Two-channel music sources are converted into 5.1-channel sound for playback.
n When the setting does not call for the surround speakers to be used:
Using only the front speakers, virtual surround sound playback results to give the impression that surround speakers are
present.
Virtual surround sound playback using TruSurround is performed when multi-channel sound is input.
CS Virtual surround sound playback is performed when 2-channel signals are input. In this case, the Circle Surround effect
can be enjoyed by the front speakers alone.
Note:
The effect will differ depending on the playback source and viewing/listening position. The sound of some sources may be
played back unnaturally. Playback is not initiated for 96 kHz PCM input signals.
6.1 Surround
This can be used when back surround speakers are used.
Unique matrix processing is performed for the surround channels among the 5.1-channel signals to generate back surround
channels. This further enhances the sound of the source subjected to Surround EX or DTS-ES processing.
17
ENGLISH
SURROUND MODES
ENGLISH
Caution for 96kHz PCM-audio signal:
This signal can be played when a DVD-player or DAT-player
connected to the PS-17 is capable of 96 kHz PCM output. For details,
refer to the player’s operation manual.
The signal can be played when STEREO or AUTO has been selected
for the Surround mode.
Some DVD formatted discs featured copy protect. When use such
disc, 96 kHz PCM signal is not output from the DVD player. For
details, refer to the player's operation manual.
Caution for DTS signal:
This signal can be played when the connected DVD-player, laserdisc player or CD-player is capable of DTS-digital output. For
details, refer to the player's operation manual.
Depending on the player used, DTS play may produce noise. If that
happens, set the Surround mode to DTS.
Playing a DTS-CD or DTS laser disc causes the player’s analog
output terminal to output noise. Before playing DTS sources, be
sure to connect the player’s digital output to the PS-17’s digital
input. Be careful when connecting the output of these players to
analog audio input.
Note that the PS-17 has the following restrictive functions built in to
reduce noise emission as much as possible.
If DTS is selected while in the Surround mode, digital input cannot
be switched to analog input. When the analog input function has
been selected, Surround mode cannot be switched to DTS.
While signals from DTS-laser disc or CD are playing in another
Surround mode, you cannot switch to digital input or from digital
input to analog input.
18
LISTENING THROUGH HEADPHONES
The following surround sound effects can be selected while the Dolby
Headphone function is operating:
AUTO, DOLBY SURR., SRS, STEREO
This unit features a "Dolby Headphone" function.
The Dolby Headphone is ideal for users who do not have the space to
install five speakers in their room and for users who want to enjoy
movies or music at high volume levels late at night but cannot do so.
They were developed to enable users to experience the 3dimensional acoustics of multi-channel or stereo channel sound while
wearing headphones.
OPERATION
1.
2.
3.
EFFECTS OF DOLBY HEADPHONE
Usually when stereo sound is heard through headphones, the sound
is not localized somewhere in front of the listener's eyes as it does
with speakers: instead, all the sound is localized inside the listener's
head which feels unnatural to the listener.
When sound is heard using the Dolby Headphone function, however,
it is heard as if it is being reproduced from the speakers installed in
the room.
4.
Normally, the sound delivered by the left speaker is heard in both the
listener's left and right ears, and the differences in level, time and
characteristics of the sound cause the listener to perceive a
directionality. Furthermore, in addition to the direct sound, the
indirect sound produced by reflection in the room also reaches the
listener's ears.
5.
6.
Listening to sound with headphones means that the listener hears the
left sound directly through his or her left ear only so that no sound
image is heard in front.
The Dolby Headphone provides virtual room simulation and the
resulting acoustic characteristics are overlaid onto, and incorporated
into, the left and right headphone signals. For instance, what
happens to the left-channel sound mentioned above is that its
reverberation components and components of the sound reflected
from the room are combined with the left and right speaker (channel)
sound and output to the left and right headphones. Since the listener
hears in both ears components with the same quality as when
listening to sound through speakers, he or she feels as if the sound
source were located in front.
Notes:
The Dolby Headphone function will not work when 96 kHz PCM digital
signals are input.
In this case, first supply the analog output signals of the DVD player
to the unit, and then activate the Dolby Headphone function.
The Dolby Headphone function will not work for 6-channel input
signals.
The Dolby Headphone function will not work when SOURCE DIRECT
has been selected while the headphones are being used.
Although this function does not require the use of a special pair of
headphones, its effect will differ somewhat depending on the type of
headphones used.
This kind of processing necessitates a vast number of complex
operations but it has been achieved by improving the performance of
the DSP. Whereas stereotypical systems available to date had to
optimize the characteristics for each individual listener, the most
salient feature of the Dolby Headphone is that they remain essentially
unaffected by the listener or type of headphones (even if some small
variations exist due to differences in sensitivity and characteristics
balance).
The room simulation pattern that provides this effect can be selected
from the following three types.
DH1 : The size of a typical living room space is simulated.
DH2 : The expansiveness of a structure as large as a music hall is
simulated.
DH3 : A large space such as that found in a movie theater is
simulated.
DVD
LD
TV
AV AMPLIFIER PS-17SA
VCR1
CDR/MD
DSS/
VCR2
TAPE
CD
TEMP
PHONO
MIN
INPUT SELECTOR
MAX
VOLUME
STANDBY
6CH INPUT A/D
SOURCE PURE
AUTO
SRS
6.1
POEWER ON/OFF
-DIRECT-
- BASS +
- TREBLE +
STEREO 5chSTEREO NIGHT
Turn the VOLUME control knob counterclockwise to the lowest
setting.
Insert the plug on your headphones into the headphones jack.
Select the desired Dolby Headphone's room simulation pattern
button on the unit's front panel.
by pressing the
Alternatively, it can be selected by pressing the Dolby H button
on the remote control unit.
Each time the button is pressed, the mode is selected in the
following sequence: BP fi DH1 fi DH2 fi DH3 fi BP.
Select the desired surround mode.
Press the surround mode button on the unit's front panel or on the
remote control unit.
AUTO, 2, SRS or STEREO can be selected.
Turn the VOLUME control knob clockwise to set the desired
volume level.
If distortion or other problems arise during LFE signal playback
due to inadequate reproduction of the bass which is the case with
some headphones, adjust by selecting -10dB or OFF for LFE
LEVEL in the SURROUND MODE item on the OSD menu.
PHONES
Headphones plug
19
ENGLISH
The same bypass (BP) mode as with conventional headphones
playback can also be selected.
2. FUCTION SELECT & SURROUND MODE
ENGLISH
ON SCREEN DISPLAY
INFOMATION
The on-screen display, which can be activated by the Main unit or
remote, appears on the TV screen to show the current setting status
of the PS-17.
These are available, when OSD INFO setup is selected “ENABLE”.
Note:
Each video input function is set PAL or NTSC for TV format of OSD. If
this setup does not meet the video input signal, character of OSD can
notsynchronize.
So you can select these format function by function.
Press OSD button ⁄7 on the remote controller for 3 seconds or more.
“PAL” or “NTSC” will be shown on the FL display of PS-17, press OSD
button ⁄7 again to change the TV format.
The indicator on FL display will change “PAL”fi “NTSC” fi “PAL” fi .
This setup is memorized with each video input function.
L F E
When the OSD button is pressed, the current settings are displayed
on the TV monitor.
Press the OSD button again, and this display will disappear.
This information will disappear automatically in about 10 seconds
after the button is pressed.
ROOM
0 d B
When a function or surround mode button is selected:
VIDEO: Displays the current video source. When DSS/TV, LD,
DVD, VCR or AUX is selected with the function selector,
both AUDIO and VIDEO shows the same name.
AUDIO: Displays the current analog audio input source.
DIGITAL: Displays the current digital input source.
SURR-MODE: Displays the current Surround mode as follows;
e.g.
AUTO, DOLBY, 6.1, SRS, 5-STEREO, STEREO, SDIRECT or 6CH INPUT.
LFE LEVEL: Displays the current LFE LEVEL.
1. GENERAL INFORMATION
DH
L EVEL
3. MASTER VOLUME CONTROL
DH1
MA I N
MA I N
Displayed when the MASTER volume is varied or a buttons of the
remote handset is pressed.
The box display indicates the 0 dB level with a solid box “ ”.
VIDEO: Displays the current video source being
selected with the function selector
TV, LD, DVD, VCR1, DSS.
AUDIO: Displays the current audio source being
selected with the function selector
PHONO, CD, TAPE or CD-R.
DIGITAL INPUT: Displays the selected digital input .
DIG-1, DIG-2, DIG-3 , DIG-4 , DIG-5 or DIG-6.
DIGITAL OUTPUT: Displays the digital output that is being used
for recording
SOURCE , DIG-1, DIG-2, DIG-3 , DIG-4 , DIG5, DIG-6, OFF.
SURR-MODE: Displays the current surround mode
e.g.
AUTO, DOLBY, 6.1, SRS, 5-STEREO,
STEREO, S-DIRECTor 6CH INPUT.
DH ROOM: Displays the current DOLBY HEADPHONE
ROOM DH1, DH2, DH3 or BP (Bypass).
MAIN VOLUME: Displays the current volume level.
The volume level moves higher to right of the
display, and the pointer changes to “ ” at 0
dB.
4. MUTE
When the MUTE ⁄3 button is pressed on the remote control, “MUTE”
will be shown on screen. Pressing MUTE button again will clear the
display, or adjust the volume.
5. SLEEP TIMER
Note:
• The On-Screen Display signals can be output from the TV MONI
composite video (RCA) output and the TV MONI, S-Video output
jacks.
• With some video equipment or software, the On-Screen Display
characters may be distorted due to noise or tracking adjustment
error.
When the SLEEP button is pressed, the setting on or off and the
remaining time of the sleep timer function are displayed.
You can change the mode between on, off and the amount of time to
elapse before the unit will shut itself off by cycling the SLEEP button.
20
REMOTE CONTROL UNIT RC-17PS
z MODE button
Used to change the operation mode of the remote controller.
Pressing this button cycles the remote controller through USE fi
LEARN fi NAME fi USE, with the currently selected mode
displayed on the LCD.
x MACRO button
POWER
Used to switch the remote controller in and out of the MACRO mode,
which is used to program complex operational sequences (macros),
with the currently selected mode displayed on the LCD.
SOURCE
ON
OFF
ON / OFF
LEARNING REMOTE
CONTROL RC-17PS
MACRO
MODE
c Power ON and OFF buttons
Used to turn the main system component (usually a amplifier) ON and
OFF.
v Source ON/OFF button
Used to turn specific sources (such as DVD players, etc.) ON and
OFF independently from the rest of the system.
b LCD
ENT
Used to display information about currently selected modes and
functions.
ENT
n Jog Dial
CH
VOL
OK
DVD
CD
TV
VCR
PHONO
LD
TUNER
TAPE
AMP
CLEAR
MEMO
2
SRS
m ENT buttons
CD-R/MD
DSS
AUTO
Used to select the operation content for each source. 10 types of
direct operation are possible for each of the 11 functions including
LD, TV, AMP, etc. After selecting the desired function, press either of
the ENT button mto transmit the signal.
GUIDE
MUTE
6.1
DTS
5ch-ST.
HALL
1
2
3
4
5
Dolby H
P-DIRE.
2CH
OSD
SLEEP
6
7
8
9
0
Used to execute a function selected with the Jog Dialn.
There are 2 enter buttons, one on each side, so that the remote
controller can be used just as easily with either hand.
The characters on the display can also be programmed.
Function Jog Dial command
AMP
1 MODE
2 A/D
3 ATT
4 NIGHT
5 MULTI
6 6-DIR
7 TRB+
8 TRB9 BAS+
0 BAS-
Note
selects surround mode
switches analog/digital input
switches attenuator for analog input
selects NIGHT mode for Dolby Digital
activates multi-room mode
activates 6-channel setup
increases treble
decreases treble
increases bass
decreases bass
, Function buttons
Used to switch the remote controller to the command sets for specific
sources (amplifier, receiver, etc.), thereby allowing a single remote
controller to control up to 11 different components. To use these
buttons to switch the amplifier’s source, press the desired button
twice within 2 seconds. The AMP button ,is used only to switch
command set of the remote controller itself and therefore does not
transmit any signal. Further, the function buttons may also be
programmed to execute macros. (A macro allows a complex string of
operations to be performed in series simply by pressing a single
button.) One button can be programmed to learn sequences
containing up to 10 commands. The following is an example of such a
sequence that can be activated automatically using a macro:
Turn the amplifier ON fi Switch the function to DVD fi Set the
Surround Mode to Dolby Digital fi Switch the TV to video input fi Set
the DVD player to Play.
21
ENGLISH
NAMES OF BUTTONS & FUNCTIONS
. VOLUME
up /
down buttons
LCD (Liquid Crystal Display)
ENGLISH
Used to adjust the volume on amplifier and other components
equipped with volume control.
Information about currently selected functions and modes is
displayed on the LCD. Pressing any buttons will call up a full display
of information on the status of that function or mode. This display will
disappear after approximately 1 minute, except for the Function
Name indicator a, which is always displayed.
⁄0 CURSOR/TRANSPORT CONTROL buttons
Used to operate on-screen and other displays used by amplifier and
other components, as well as to operate the PLAY, STOP, PAUSE,
NEXT, and PREVIOUS functions of each source.
a
⁄1 < • 3 (CURSOR/ TRANSPORT
CONTROL switching) button
Used to switch the function of the CURSOR/ TRANSPORT CONTROL
buttons ⁄0 between the CURSOR and TRANSPORT CONTROL
functions, with the currently selected function displayed on the LCD
when the DVD, LD, or VCR functions are selected. When functions
other than DVD, LD, or VCR are selected, the < • 3 button remains
inactive.
b
i
j
c
e
d
⁄2 Channel
f
up /
h
down buttons
Used to controls the up/down function of tuner, or to cycle through the
tuner presets.
g
a Function Name indicator
Displays the name of the currently selected function (LD, TV, etc.)
using up to 5 characters.
⁄3 MUTE button
Used to temporarily mute the sound for preamplifiers, receivers, etc.
b Command Name indicator
⁄4 GUIDE button
Displays up to 10 types of commands for each function using up to 5
characters.
Used to call up the on-screen menus used to control DVD players,
digital satellite systems (DSS), and other menu-equipped systems.
c Command Page indicator
Used to clear the contents of memory or programmed functions.
Allows confirmation of current command page. Also, when setting or
transmitting macros, displays information such as the number of
macro steps and the time intervals between command transmissions.
⁄6 MEMO button
d Transmission indicator
Used to program your CD player’s track memory, or to enter a VCR
recording program, and can be used to provide the MEMO function
included with other components in your system.
Indicates when the remote controller is transmitting a signal.
⁄7 Ten-Key pad/Surround Mode buttons
For normal operation the USE indicator is displayed.
Used to enter numeric digits, useful for finding a specific track on a
CD or DVD, etc. When the function is set to AMP, it is possible to
choose Surround Mode, etc.
f LEARN indicator
⁄8 Infrared Transmitter/Receiver Window
g NAME indicator
Used to transmit remote control signals based on beams of infrared
light to system components. To ensure that these signals are
properly received, make sure that this window is pointing in the
general direction of the infrared receiver on the amplifier or other
components. This window should also be pointed toward the source
remote controller when using Programmable Learning function.
Indicates when the remote controller is in the NAME mode and a
function name is being changed.
⁄5 CLEAR button
e USE indicator
Indicates when the remote controller is in the LEARN mode.
h MACRO indicator
Indicates when the remote controller is in the MACRO mode.
Note:
The MODE z, MACRO x, Jog Dial nand < • 3 (CURSOR/
TRANSPORT CONTROL switching) ⁄1 cannot be programmed.
i CURSOR indicator
Indicates when the CURSOR/TRANSPORT CONTROL button is in the
cursor mode.
j CONTROL indicator
Indicates when the < • 3 (CURSOR/TRANSPORT CONTROL
switching) ⁄1 is in a transport control mode such as PLAY, STOP, etc.
• If the LCD flickers when a button is pressed in order to transmit a
command or when in the LEARN mode, the transmission or
learning is not possible. In such a case, please replace the
batteries.
• This remote controller uses non-volatile memory, so that learned
codes and macros will be preserved even if the batteries are
removed.
22
OPERATION OF REMOTE CONTROL UNIT
ENGLISH
1. Remote control
The distance between the transmitter of the remote control unit and
the IR SENSOR of the PS-17 should be less than about 5 meters. If
the transmitter is pointed to a direction other than the IR SENSOR or if
there is an obstacle between them, remote control may not be
possible.
Remote-controllable range
PS-17
Approx. 5m
60°
Remote control unit (RC-17PS)
2. Loading batteries
The life of the batteries used with the remote control unit is about 6
months with normal use. Also be sure to replace batteries earlier
when you notice that they are getting weak.
(1) Remove the back cover.
(2) Insert the new batteries (AA type) with correct (+) and (–)
polarity.
(3) Close until it clicks.
23
LEARN MODE
BASIC OPERATION
4.
CLEAR
MEMO
AUTO
2
SRS
GUIDE
MUTE
6.1
5ch-ST.
1
2
3
4
5
Dolby H
P-DIRE.
2CH
OSD
SLEEP
6
7
8
9
0
Use a ballpoint pen or other sharp point to press the MODE
button z until the LEARN indicator is displayed. Each time you
press this button, the mode will cycle through LEARN fi NAME
fi USE.
Stop when the LEARN indicator starts to blink.
2.
Place the laser disc’s remote controller so that its infrared signal
transmitter is facing the infrared signal receiver on the Marantz
remote controller at a distance of about 5 centimeters (2 inches).
3.
Press the LD Function button ,.
OFF
LD will be displayed on the LCD and the function codes will be
set to operate the laser disc player, and if you double clicked the
LD function button, the preamplifier input will be changed as well.
Now you can operate the laser disc player. When a button is
pressed, the
symbol indicates that a remote code is being
is not displayed if a button for which no code
transmitted.
has been set is pressed.
The Jog Dial n is used to select any one of up to 10 direct
operations that can be performed for each of the 11 functions
(LD, TV, AMP, etc.). Rotate the Jog Dial n to select one of these
commands. The number of the current page is indicated by .
Page numbers cycle up or down, for example
fi
fi
fi
fi etc. or
fi
fi
fi
fi etc. depending on which
way the Jog Dial n is rotated then press OK ⁄0 button.
The last page position for any given command function is
retained in the memory even if the remote controller is switched to
the command function for another component. (Last Memory)
If it is left for approximately 1 minute without pressing any
buttons, all items on the LCD will go off except the function
indicator.
Even if the display goes off, the remote controller will hold the
page position and other data. The display may be activated
again by pressing any button.
1.
TV
VCR
PHONO
TUNER
TAPE
AMP
DSS
LD
4.
CLEAR
MEMO
AUTO
2
GUIDE
MUTE
6.1
5ch-ST.
1
2
3
4
5
Dolby H
P-DIRE.
2CH
OSD
SLEEP
6
7
8
9
0
Press the PLAY button ⁄0 (3 OK). The LEARN indicator
changes from blinking to continuously lit.
CH
OK
CD
5.
SRS
VOL
AMP
OK
TAPE
CH
TUNER
ENT
LD
MODE
PHONO
SOURCE
VCR
ON / OFF
TV
ENT
3.
DSS
POWER
2.
Press once one of the Function buttons , to change to another
component’s commands, such as LD button.
ON
1.
MACRO
The remote controller will normally be used in the USE mode.
It comes preset with codes commonly used to control 11 types of
components manufactured by Marantz and Philips, including DSS,
DVD, TV, LD, VCR, TUNER, CD, TAPE, CD-R/MD, and AMP, as well
as many others that utilize the RC-5 remote control language.
LEARNING REMOTE
CONTROL RC-17PS
ENGLISH
The remote controller is capable of learning and memorizing the
remote control codes used by almost any other remote controller you
may already own.
• If no commands have been programmed for a particular function
button, the remote controller will transmit whatever codes have
been factory preset.
• The following example shows how to program your remote
controller and how to use the codes for a laser disc player (LD).
• The remote controller infrared receiver is located at the top of the
remotecontroller.
USE MODE
DVD
VOL
CD-R/MD
Press and hold the PLAY button on the laser disc player’s remote
controller. The remote controller has finished learning the
command when OK appears on the LCD a.
• If AGAIN appears on the LCD, some error has prevented the
command from being learned. If this happens, simply repeat
the procedure from step 4.
• In the rare event that NG appears on the LCD, it means that
the remote controller you are attempting to learn from uses
special signals that cannot be learned by the Marantz remote
controller.
6.
24
Follow the same procedure to make the remote controller learn
the ten-key ⁄7 operation used by the laser disc player’s remote
controller.
8.
PROGRAMMING THE JOG DIAL
Repeat the procedure from step 3 to have the remote controller
learn the signal codes for the other components such as TV, VCR,
etc.
• If no buttons are pressed for approximately 1 minute while in
the LEARN mode, the remote controller automatically returns
to the USE mode.
• When programming the function buttons, first switch to the
desired function, then press the button again.
Let’s use the example of setting
as the SIDE-B code for the laser
disc player.
1. Use a ballpoint pen or other sharp point to press the MODE
button z until the LEARN indicator is displayed and starts to
blink.
2. Place the laser disc’s remote controller so that its infrared
transmitter window is facing the infrared signal receiver window
on the Marantz remote controller at a distance of about 5
centimeters (2 inches).
3. Press the LD Function button ,.
4. Rotate the Jog Dial n left or right until
is displayed, then press
the ENT button m.
• The LEARN and NAME indicators will both be displayed.
When you have finished programming the remote controller, use
a ballpoint pen or other sharp point to once again press the
MODE button z to return it to the USE mode. The LCD displays
the USE indicator, and the newly programmed codes now can be
used.
If FULL is displayed on the LCD
If FULL is displayed on the LCD b when programming in the LEARN
mode, it means that the memory has become too full to hold any
further codes.
If FULL is displayed no matter how many times you attempt to enter
new codes, it means that the remote controller cannot accept any
new codes until some of the previously learned codes are deleted to
make space in the memory. Select unneeded codes for each of the
Jog Dial control nand Functionbuttons ,
, which show FULL and
delete them from the memory.
5.
Note:
The power ON and OFF buttons ccan only be programmed to
learn one type of code, regardless of the function button that has
been selected.
Press the SIDE-B button on the laser disc’s remote controller
continuously until OK is displayed on the Marantz remote
controller’s LCD, indicating that the programming has been
completed.
• If AGAIN appears on the LCD, some error has prevented the
command from being learned. If this happens, simply repeat
the procedure from step 4.
When the programming has been completed, the remote
controller automatically switches to the NAME mode.
The left hand position on the LCD b blinks, indicating the
character in the name to be rewritten.
• If you do not wish to rewrite the name, simply press the
OK
Cursor button ⁄0.
• If you wish to rewrite the name, input the desired characters
using the ten-key pad ⁄7. The part of the display that is being
rewritten may be selected using the < and > Cursor buttons
⁄0. When you are finished rewriting, press the
OK Cursor
button ⁄0.
To simply erase already existing characters, press the 0
button to replace them with a blank space.
6.
7.
25
(Refer to next section on rewriting names)
Use the same procedure to program the codes for other 1-6 with
the Jog Dial n.
When finished programming the codes for each of the buttons,
use a ballpoint pen or other sharp point to press the MODE
button z to return the remote controller to the USE mode. Once
USE is displayed on the LCD, the newly memorized codes are
available for use.
ENGLISH
7.
REWRITING NAMES
7.
ENGLISH
This remote controller allows the names accessible by Jog Dial
control nto be rewritten with new ones of your choosing.
• Rewriting of names is performed for each individual function.
• Let’s use a laser disc player as an example to show how to change
the ’s “SIDE-A” to “LD-A”.
1.
2.
Use a ballpoint pen or other sharp point to press the MODE
button z to switch the remote controller to the NAME mode. The
NAME indicator blinks.
Press the LD Function button ,.
TV
VCR
PHONO
TUNER
TAPE
AMP
DSS
LD
3.
4.
Follow the same procedure to enter “D-A”. When finished, press
the OK Cursor button ⁄0 . Pressing OK permanently fixes the
newly written characters.
CLEAR
MEMO
AUTO
2
SRS
GUIDE
MUTE
6.1
5ch-ST.
1
2
3
4
5
Dolby H
P-DIRE.
2CH
OSD
SLEEP
6
7
8
9
0
• Up to 5 alphanumeric characters may be entered in the
Command Name indicator of the LCD.
• To rewrite the names of the other items in the Command
Name indicator, use the Jog Dial n to select the desired
command and repeat from step 5.
8.
Use the Jog Dial n to select the page for which you wish to enter
a new name.
The character on the left-hand side of the Command Name
indicator on LCD b will flash, indicating that it is the character
ready to be rewritten. New characters entered will be written over
the top of the current character so that the current character is
erased.
Use the < and > Cursor buttons ⁄0 to select the characters to be
rewritten.
When you are finished rewriting, use a ballpoint pen or other
sharp point to press the MODE button z to return the remote
controller to the USE mode. The USE indicator is displayed on
the LCD, and the newly programmed codes now can be used.
POWER
SOURCE
ON
OFF
ON / OFF
LEARNING REMOTE
CONTROL RC-17PS
MACRO
MODE
ERASING PROGRAMMED CODES
(Returning to Factory Presets)
Codes that have been programmed into the memory can be erased in
3 ways: by button(s), by function(s), and by Jog Dial command.
1.
5.
Use the ten-key pad ⁄7 to select the desired alphanumeric
characters.
Pressing the number buttons on the ten-key pad will cycle
through the alphanumeric characters as follows:
Ten keypad
1
2
3
4
5
6
7
8
9
0
6.
Use a ballpoint pen or other sharp point to press the MODE
button z to switch the remote controller to the LEARN mode, so
that the LEARN indicator is blinking on the LCD.
Note:
Erasing of programmed codes is only possible in the LEARN
mode.
2. Erasing by Button(s)
To erase the codes and names programmed for any button,
press and hold the CLEAR button ⁄5, then press the button to be
erased twice. This will return the button to its factory presets or
leave it empty if no factory presets are available.
Jog Dial codes may be erased in the same way, by pressing and
holding the CLEAR button ⁄5 while using the Jog Dial n to call
up the command to be erased, then pressing one of the ENT
buttons m on either side of the Jog Dial n twice. This will return
the button to its factory presets or leave it empty if no factory
presets are available.
To erase codes programmed for the CLEAR button ⁄5, simply
press the CLEAR button ⁄5 continuously for 3 seconds.
As an example, let’s clear the PLAY command from the laser disc
player command set.
Press, press again, press again, etc.
A fi B fi C fi 1 fi A
D fi E fi F fi 2 fi D
G fi H fi I fi 3 fi G
J fi K fi L fi 4 fi J
M fi N fi O fi 5 fi M
P fi Q fi R fi 6 fi P
S fi T fi U fi 7 fi S
V fi W fi X fi 8 fi V
Y fi Z fi / fi 9 fi Y
SPACE fi + fi — fi , fi ’ fi 0 fi SPACE ( )
Therefore, to enter the letter “L”, press the 4-key on the ten-key
pad ⁄7 3 times in a row to cycle from J to K to L.
ENT
ENT
CH
Once the desired character “L” appears, press either of the <
and > Cursor buttons ⁄0 and the L will be permanently written
over the former character. Press the 0-key in order to replace
unneeded extra characters with spaces.
DVD
CD
LD
CD-R/MD
TV
VCR
PHONO
TUNER
TAPE
AMP
DSS
26
VOL
OK
CLEAR
MEMO
AUTO
2
1
2
GUIDE
MUTE
SRS
6.1
5ch-ST.
3
4
5
PROGRAMMING MACROS
Erasing Jog Dial Codes
To clear all codes and names previously set for each of the
functions (LD, TV, etc.).
1) Press the function you want to erase.
2) Hold down the CLEAR button ⁄5 and press both ENT
buttons m at the same time. LCD b will display CLR?.
ENT
Macros make it possible to use a single function button to perform
more complex series of operations that would normally require
pressing several buttons. A single button can be programmed to
perform up to 10 steps in sequence. A typical example of such a
series might be as follows:
• Turn the main amplifier power ON fi Switch the function to LD fi
Set the Surround Mode to Pro Logic fi Switch the TV to video input
fi Set the laser disc player to PLAY.
• No signals may be transmitted during macro programming.
• The various steps that make up a macro are set initially to be sent
one after another in 1 second intervals, however these intervals
may be shortened to as little as 0.5 seconds or lengthened to as
much as 5 seconds using the Setup mode.
• In the macro mode, the number of steps the macro contains is
displayed on LCD c. Macros may be programmed for each of the
11 function buttons, from LD to AMP.
ENT
CH
VOL
OK
DVD
CD
LD
CLEAR
CD-R/MD
TV
VCR
PHONO
TUNER
TAPE
AMP
DSS
MEMO
2
AUTO
GUIDE
MUTE
6.1
5ch-ST.
SRS
1
2
3
4
5
Dolby H
P-DIRE.
2CH
OSD
SLEEP
1.
3) If you wish to continue the clearing operation, press the
OK
Cursor button ⁄0. This will return all 10 commands in the Jog
Dial to their factory presets, or leave them empty if no factorypresets are available. Accordingly, the LCD b will return to
the factory preset displays, or will simply be empty.
CH
DVD
CD
POWER
SOURCE
ON
2.
CD-R/MD
• Use a similar operation to erase the Jog Dial codes for each
function.
• To cancel the memory clearing operation, do not press
OK
Cursor button ⁄0 and simply touch any other button.
4.
Erasing Code s by Function
To clear all codes and names previously set for each of the
functions (LD, TV, etc.), press and hold the CLEAR button ⁄5,
then press the button for the function to be cleared twice. CLR?
will appear on LCD b. If you wish to continue the clearing
operation, press the OK Cursor button ⁄0.
DVD
CD
LD
CD-R/MD
TV
VCR
PHONO
TUNER
TAPE
AMP
DSS
CLEAR
MEMO
AUTO
2
SRS
GUIDE
MUTE
6.1
5ch-ST.
1
2
3
4
5
Dolby H
P-DIRE.
2CH
OSD
SLEEP
ON / OFF
LEARNING REMOTE
CONTROL RC-17PS
VOL
OK
Use a ballpoint pen or other sharp point to press the MACRO
button x until the MACRO and LEARN indicators are displayed
blinking on the LCD.
This will return the button to its factory-presets or leave it empty if
no factory presets are available. Accordingly, the LCD b will
return to the factory preset displays, or will simply be empty.
• To cancel the memory clearing operation, do not press the
OK Cursor button ⁄0 and simply touch any other button.
• The codes for the < • 3 button ⁄1 cannot be cleared.
27
MACRO
OFF
MODE
Press the Function button , for which you wish to program a
series of operations. In this case, let’s use the example of the
laser disc player.
Press the LD Function button ,. The LCD a will display LD-M.
Characters displayed on LCD a include the following,
depending on the function button for which the macro is being
programmed:
LD-M, DVD-M, TV-M, DSS-M, VCR-M, AUX-M, TUN-M, CD-M, TPM, AMP-M, CDR-M (or MD-M for remote controller set for MD).
• If a macro has already been set for the selected function
button, the LCD a will blink. Also, the number of steps in the
macro is displayed on LCD c.
ENGLISH
3.
3.
ENGLISH
Press the buttons for the operations you wish to program as a
macro in the sequence you want the macro to program them. The
name of the button pressed appears on LCD a. The number of
steps in the macro is displayed on LCD c and this number
increases by 1 with each button pressed.
For example, press LD, PLAY.
Each function button can be programmed to perform up to 10
steps in sequence.
• If, while programming, no buttons are pressed for
approximately 1 minute, the remote controller will
automatically return to normal mode, and no macro will be
programmed in the memory.
3.
While pressing the VOL button ., use the ^ and v Cursor
buttons ⁄0 to call up the portion of the macro to be changed.
Pressing the ^ button advances through the macro steps and
pressing the v button regresses through the macro steps.
CH
DVD
CD
DSS
CH
DVD
CD
LD
4.
CD-R/MD
TV
VCR
PHONO
TUNER
TAPE
AMP
DSS
CLEAR
MEMO
AUTO
2
SRS
GUIDE
MUTE
6.1
5ch-ST.
1
2
3
4
5
Dolby H
P-DIRE.
2CH
OSD
SLEEP
6
7
8
9
0
TV
CD-R/MD
PHONO
VCR
• To rewrite an existing macro step, simply press the button for
the new step. The old step will be erased and rewritten with
the new step.
• To insert a new step in between existing steps in a macro,
after step 3 press the MEMO button ⁄6 , then press the button
for the new step. The numbers of the other steps will be
adjusted accordingly to accommodate the new step. Since
only 10 steps may be stored in any macro, the tenth step will
be erased if an step is inserted when the total number of
steps is already 10.
VOL
OK
VOL
OK
LD
When you are finished programming macros, use a ballpoint pen
or other sharp point to press the MACRO button x. LCD a will
display END, and the display will return to normal.
• Macros cannot be programmed for the MODE z, MACRO
x, < • 3 ⁄1, VOL / ., MEMO ⁄6 or CLEAR ⁄5 buttons.
In the macro mode it is possible to program the memory to
perform macros containing up to 10 steps.
Each of the function operations (11 including CD, DVD, etc.)
can be used in a macro more than once, however for all
except AMP, only the first function operation will be
transmitted as a signal from the remote controller.
Accordingly, within a single macro, it is not possible to switch
between multiple function operations. (This is to prevent the
switching of the receiver function operation.) Within a macro,
the second time a function operation is used, it will only be
used on the remote controller itself and no signal will be
transmitted to the component.
TUNER
CLEAR
MEMO
AUTO
2
TAPE
SRS
AMP
GUIDE
MUTE
6.1
5ch-ST.
1
2
3
4
5
Dolby H
P-DIRE.
2CH
OSD
SLEEP
6
7
8
9
0
• To erase a step in a macro, after step 3 call up the number of
the step to be erased and press the CLEAR button ⁄5.
LD
TUNER
CLEAR
MEMO
AUTO
2
TAPE
SRS
AMP
GUIDE
MUTE
6.1
5ch-ST.
1
2
3
4
5
Dolby H
P-DIRE.
2CH
OSD
SLEEP
6
7
8
9
0
• If while editing macros no buttons are pressed for
approximately 1 minute, the remote controller will
automatically return to normal mode, and no macro changes
will be programmed in the memory.
4.
When you are finished editing macros, use a ballpoint pen or
other sharp point to press the MACRO button x. END will be
displayed on LCD a and the display will return to normal.
EDITING MACROS
Macros may be edited using following procedure.
1.
2.
USING MACROS
The following procedure will show how to use the function buttons for
which you have programmed macros.
Use a ballpoint pen or other sharp point to press the MACRO
button x until the MACRO and LEARN indicators are displayed
blinking on the LCD.
Press the Function button , to be changed. Let’s use the
example of the laser disc player, by pressing the LD Function
button ,.
• LD-M is displayed blinking on LCD a.
• The number of steps in the completed macro is highlighted
on LCD c. In this example there are 3 macro programs in
memory.
1.
Press the Function button , for the desired macro for 3
seconds. MACRO is displayed on LCD a for approximately 1
second, after which the number of steps in the macro is
displayed on LCD c.
TV
VCR
PHONO
TUNER
TAPE
AMP
DSS
LD
CLEAR
MEMO
AUTO
2
SRS
GUIDE
MUTE
6.1
5ch-ST.
1
2
3
4
5
Dolby H
P-DIRE.
2CH
OSD
SLEEP
6
7
8
9
0
• The remote controller will do nothing if no macros are
programmed. The macro steps are executed in order and the
names of their buttons are displayed on the LCD. Also, the
step numbers displayed on LCD c disappear as each step is
executed.
The
is highlighted if no macros have been programmed,
and the remote controller is ready for macro programming.
2.
28
After all macro commands have been transmitted, the remote
controller returns to normal mode.
• To cancel the transmission of a programmed macro, use the
Cursor buttons ⁄0 to press 7.
Example 2
Turn the main amplifier ON fi Change the amplifier’s input source to
LD fi Set the Surround mode to DOLBY fi Switch the TV to video
input fi Set the laser disc player to PLAY
Example 1
Change the input source for the amplifier to CD and play the 3rd track
on a CD in the CD player.
1.
1.
Use a ballpoint pen or other sharp point to press the MACRO
button x, then press the CD Function button ,. CD-M is
displayed on the LCD.
Use a ballpoint pen or other sharp point to press the MACRO
button x.
POWER
SOURCE
POWER
ON
SOURCE
ON
LEARNING REMOTE
CONTROL RC-17PS
LEARNING REMOTE
CONTROL RC-17PS
2.
MACRO
ENT
ENT
DVD
Press the LD Function button ,.
• Here the LD Function button , is used as the macro button,
but any function button can in fact be used.
3.
To set the various steps of the macro, press the following buttons
in order: POWER ON c, LD ,, AMP* ,, 2 (DOLBY) ⁄7, TV* ,,
VIDEO (use Jog Dial n to select VIDEO and press ENT button
m) , LD* ,, 3 ⁄0.
When you are finished programming the macro, use a ballpoint
pen or other sharp point to press the MACRO button x. The
remote controller returns to normal mode.
LD
CD-R/MD
TV
VCR
PHONO
TUNER
TAPE
AMP
DSS
CLEAR
MEMO
AUTO
2
SRS
GUIDE
MUTE
6.1
5ch-ST.
1
2
3
4
5
Dolby H
P-DIRE.
2CH
OSD
SLEEP
6
7
8
9
0
Now, execute the macro you just programmed.
1. Press the LD Function button , for 3 seconds.
The macro commands are transmitted in order, and the names of
the operations being performed are displayed on LCD a in
order.
When you are finished programming the macro, use a ballpoint
pen or other sharp point to press the MACRO button x.
SOURCE
LEARNING REMOTE
CONTROL RC-17PS
OFF
MACRO
MODE
DVD
CD
LD
CLEAR
VCR
PHONO
TUNER
TAPE
AMP
2.
GUIDE
PHONO
TUNER
TAPE
AMP
CLEAR
MEMO
AUTO
2
SRS
GUIDE
MUTE
6.1
5ch-ST.
1
2
3
4
5
Dolby H
P-DIRE.
2CH
OSD
SLEEP
6
7
8
9
0
The following procedure is used to erase macros you have
programmed into the remote controller’s memory.
1. Press and hold the CLEAR button ⁄5 , then the button for the
function , to be cleared (in this case LD) for 3 seconds. LDCL?
will appear on LCD a. If you wish to continue the clearing
operation, press the OK Cursor button ⁄0.
CD-R/MD
TV
MEMO
VCR
CLEARING MACRO PROGRAMS
Now, execute the macro you just programmed.
1. Press the CD Function button , for 3 seconds.
DSS
CD-R/MD
TV
• When executing this macro, function operations AMP*, TV*,
and LD* only switch the command set of the remote controller
and no signal is transmitted to the component.
• To cancel the transmission of a programmed macro, use the
Cursor buttons ⁄0 to press 7.
POWER
ON / OFF
DVD
CD
DSS
LD
ON
MODE
2.
4.
VOL
OK
CD
MACRO
MODE
Press CD ,, 3 ⁄7, and 3 ⁄0 buttons.
CH
OFF
ON / OFF
OFF
ON / OFF
DVD
CD
CD-R/MD
MUTE
TV
VCR
PHONO
TUNER
TAPE
AMP
DSS
AUTO
2
SRS
6.1
5ch-ST.
1
2
3
4
5
LD
The macro commands are transmitted to the components in
order, and the names of the operations being performed are
displayed on the LCD in order.
CLEAR
MEMO
AUTO
2
SRS
GUIDE
MUTE
6.1
5ch-ST.
1
2
3
4
5
Dolby H
P-DIRE.
2CH
OSD
SLEEP
6
7
8
9
0
• To cancel the memory clearing operation, do not press
Cursor button ⁄0 and simply touch any other button.
29
OK
ENGLISH
EXAMPLES OF MACRO PROGRAMS
ENGLISH
OTHER FUNCTIONS
BATTERY LIFE
LUMINOUS BUTTONS
• New batteries will last about 6 months assuming an average of 30
uses per day.
The buttons on this remote controller are designed to remain
luminous in dim lighting conditions. If the buttons are no longer
luminous when the remote controller is used in low light, recharge
them by placing it near a fluorescent or other light source for a
sufficient amount of time. This should return the buttons to their
luminous condition.
Note:
The batteries shipped with the remote controller are for the
purpose of checking function and may not last as long as new
batteries.
SETUP
Switch the RC-5 destination or adjust the time interval between
transmissions of macro operations as follows:
1. While pressing the MEMO button ⁄6 , press the OK Cursor button
⁄0. This will switch the remote controller to the Setup mode.
CH
DVD
CD
LD
CD-R/MD
TV
VCR
PHONO
TUNER
TAPE
AMP
CLEAR
MEMO
AUTO
2
SRS
The remote controller (RC-17PS) uses 128-Kbyte large-capacity nonvolatile memory (EEPROM) and is therefore capable of learning a
maximum of 330 remote control codes. This applies only to Philips
RC-5 remote programming language codes, however, and
depending on the type of other codes that are programmed, the
remote controller can learn less than 330 codes.
VOL
OK
DSS
NUMBER OF LEARNABLE CODES
GUIDE
MUTE
6.1
5ch-ST.
1
2
3
4
5
Dolby H
P-DIRE.
2CH
OSD
SLEEP
The Setup mode includes the following items, which may be
accessed using the ^ and v Cursor buttons ⁄0.
• Switch destination (version) (VER)
• Adjust time interval between transmissions of macro
operations(MACRO)
VER: Switches the type of preset codes contained in the remote
controller .
LCD a displays VER, while LCD b displays either USA or REST.
USA means that the CD-R/MD Function button , is set to CD-R.
REST means that the CD-R/MD Function button , is set to MD.
Use the < and > Cursor buttons ⁄0 to select the desired version, then
press the OK Cursor button ⁄0 . This will finish the operation and
return the LCD to its original state.
• To cancel the setting, press any button other than the Cursor
buttons ⁄0.
• To continue the setting, press the v Cursor button ⁄0.
Note:
Codes that have been programmed will not be erased even if the
VER setting is changed, however the NAME indicator displays
associated with the Jog Dial command will be changed. Also, the
Jog Dial commands for CD-R/MD functions that are contained
within macros will also change.
MACRO: Adjusts the time interval between transmissions of
macro operations
When the v Cursor button ⁄0 is pressed, LCD a displays MACRO,
while LCD b displays STEP.
One square (7) in LCD c is equivalent to an interval of 0.5 seconds,
allowing intervals of up to 5 seconds to be set. The remote controller
is set at the factory with an interval of 1 second, as indicated by
(77&&&&&&&&). Adjust the interval between transmission of
operation codes using the ^ and v Cursor buttons ⁄0, then press the
OK Cursor button ⁄0.
• To cancel the setting, press any button other than the Cursor
button ⁄0.
• To continue the setting, press the v Cursor buttons ⁄0.
30
Function Jog Dial command
VCR
1 REC
2 SELCT
3 2XPLY
4 LOW
5 STIL
6 OTR
7 AUDIO
8 SKIP
9 VIS+
0 VISDSS
1 DISP
2 PREV
3 SELCT
4 AUDIO
5 FAV
6 ALT
7 FTCH
8ANT
9 REC
0 OTR
PHONO 1 PHONO
2 PHONO
3 PHONO
4 PHONO
5 PHONO
6 PHONO
7 PHONO
8 PHONO
9 PHONO
0 PHONO
DVD
1 OSD
2 TITLE
3 ZOOM
4 MENU
5 10+
6 SETUP
7 ANGLE
8 SUB-T
9 RESUM
0 AUDIO
Each of the 10 Jog Dial commands on the LCD has 5 character labels
attached for pre-programmed remote commands. These commands
can be used with various Marantz A/V components, or other
components using the Philips RC-5 remote control language.
You can easily replace the factory-supplied remote command codes
with different codes from other brands of component. Most of the
supplied functions apply to a wide variety of component from many
companies. The following list shows the remote code assignments for
the Jog Dial commands, for each of the 11 Function buttons, as
supplied from the factory. You can add or replace Jog Dial commands,
including re-naming them if you wish, in order to customize the remote
controller for your own particular selection of A/V components.
Function Jog Dial command
AMP
1 MODE
2 A/D
3 ATT
4 NIGHT
5 MULTI
6 6-DIR
7 TRB+
8 TRB9 BAS+
0 BASTUNER 1 FM
2 AM
3 LW
4 T-MOD
5 SCAN
6 STM
7 AF
8 PTY
9 DISP
0 DWR
TV
1 A/CH
2 100S
3 VIDEO
4 INFO
5 S-PIC
6 S-SUD
7 S-CH
8 ADV
9 OSD
0 MENU
CD
1 DISC+
2 DISC3 TEXT
4 SHUFL
5 REPT
6 TRAY
7 AMS
8 TIME
9 FF
0 REW
LD
1 SID-A
2 SID-B
3 DISP
4 AMS
5 AUDIO
6 RPT-A
7 RPT-B
8 CP/F
9 EDIT
0 D/CX
TAPE
1 TP-A
2 TP-B
3 DIR
4 TIME
5 TRAY
6 AMS
7 REC
8 PAUSE
9
0
Note
selects surround mode
switches analog/digital input
switches attenuator for analog input
selects NIGHT mode for Dolby Digital
activates multi-room mode
activates 6-channel setup
increases treble
decreases treble
increases bass
decreases bass
FM band
AM/MW band
Long Wave band
mono/stereo/muting mode selector
programmed preset channel scan
selects station mode
selects AF function
selects PTY function
selects display function
selects DSR wave range
alternate channel
100's
selects video
information
smart picture
smart sound
smart channel
advance
activates on-screen display
menu
CD changer next disc
CD changer previous disc
activates text function
shuffle play function
repeat function
tray open/close
automatic music scan
time display elapsed/remaining/total
fast forward
rewind
side A
side B
display on/off
automatic music scan
selects audio mode
repeat A start point
repeat B stop point
selects chapter or frame
activates edit function
selects digital audio/analog audio/CX NR
selects tape deck A
selects tape deck B
auto reverse direction
time display
tray open/close
automatic music scan
record
pause
Note
record
selects TV or VCR
twice normal playback speed
slower than normal playback speed
still frame
one touch recording
audio track selector
skip to next program marker
VHS index search next
VHS index search previous
brings up on-screen channel marker
goes to previously selected channel
selects TV or VCR
audio track selector
favorite users and channel lists
alternate audio channel, languages
brings up on-screen channel logos
select broadcast or cable antenna
record
one touch recording
pre code data
pre code data
pre code data
pre code data
pre code data
pre code data
pre code data
pre code data
pre code data
pre code data
activates on-screen display
selects title menu
zoom mode on/off
selects main menu
digit entry +10
selects setup menu
selects angle
selects subtitle
resume function
selects audio
For USA setups
Function Jog Dial command
CDR
1 INPUT
2 INCR
3 SYNC
4 REC
5 PROG
6 TRAY
7 DISP
8 FINAL
9 BLANK
0 REPT
Note
selects input source
increments track number
activates SYNCRO. recording
records pause
activates program mode
tray open/close
display mode
finalizes (writes TOC)
records blank
activates repeat mode
For REST setups
Function Jog Dial command
MD
1 REC
2 REPT
3 RANDM
4 DISP
5 EDIT
6 EJCT
7 LP
8 DEL
9 ENTER
0 SYNC
31
Note
records pause
selects repeat mode
random play
selects display mode
selects edit mode
eject
selects SP/LP mode
selects delete
selects enter
SYNCRO. recording
ENGLISH
JOG DIAL COMMAND FUNCTIONS LISTING
TROUBLESHOOTING
ENGLISH
If the unit does not operate properly, check items shown in the following
table.
If your trouble cannot be recovered with the remedy actions listed in
the following table, malfunction of the internal circuitry is suspected;
immediately unplug the power cable and contact your dealer, nearest
Marantz distributor or the Marantz Service Center in your country.
In case of trouble, check the following before calling for service:
1. Are the connections made properly ?
2. Are you operating the unit properly following user’s guide ?
3. Are the power amplifiers and speaker working properly ?
SYMPTOM
PS-17 cannot be turned up.
CAUSE
REMEDY
The power plug is not connected.
Connect the power plug to the outlet.
No sound and picture are output Mute is on.
even when power is on.
The input cable is not connected correctly.
The master volume control is turned all the way down.
The function selector position is wrong.
Cancel mute using the remote control unit.
See the connection diagram and connect the cables correctly.
Adjust the master volume.
Select correct position.
Speaker not outputting any sound. The headphones are connected to the headphone jack.
Disconnect the headphones. (Speakers will not output sound when
headphones are connected.)
MAIN IN SW=SEPALATE has been selected in SYSTEM Select MAIN IN SW=COUPLED.
mode.
Sound and pictures from other Input cable connected incorrectly.
than equipment selected with the
function selector.
Connect the cable correctly by referring to the connection
diagram.
Sound from the wrong channel is Speaker cable connected incorrectly.
output from the speaker.
Connect the cable correctly by referring to the connection
diagram.
No sound is output from the center The center speaker cable connection is incomplete.
speaker.
Center = NONE has been selected in SETUP mode.
STEREO has been selected for Surround mode.
Connect the cable correctly.
Make the correct setting.
When STEREO is selected for Surround mode, no sound will be
output from the center speaker. Set another Surround mode.
Center components have not been recorded in the input Check whether "C" on the program channel display in the unit's
source.
front panel display area has gone off.
No sound is output from the The surround speaker cable connection is incomplete.
surround speaker.
Surround = NONE has been selected in SETUP mode.
STEREO has been selected for Surround mode.
Connect the cable correctly.
Make the correct setting.
When STEREO has been selected for Surround mode, no sound will
be output from the surround speaker. Set another Surround mode.
Surround sound components have not been recorded for Check whether "SL" and "SR" on the program channel display in the
the input components.
unit's front panel display area have gone off.
No sound is output from the The surround back speaker cable connection is Connect the cable correctly.
surround back speaker.
incomplete.
Surr. Back=NONE has been selected in SETUP mode. Make the correct setting.
Surround mode is not 6.1 surround.
Surround back channel is active in 6.1 surround mode, in other
Surround mode, no sound will be output from the surround back
speaker.
Surround sound components have not been recorded in
the input source.
No output to Sub Woofer Out.
Sub-woofer = NONE has been selected in SETUP mode. Select Sub-woofer = YES.
Two-channel signals have been played back with Select STEREO for the surround mode to play back the 2-channel
SOURCE-DIRECT or PURE-DIRECT selected for the sound.
surround mode.
DTS sources cannot be played.
Surround mode is set to DOLBY.
The DVD or LD player is not DTS digital out capable.
Select other mode.
Use a player which responds to DTS-digital out.
96kHz PCM signal cannot be The disc player is not 96kHz PCM digital out capable.
played.
Surround mode is set to other than STEREO and AUTO.
Use a player that responds to 96kHz PCM digital out.
Set Surround mode to STEREO or AUTO.
A specific channel does not Nothing recorded on source.
produce output.
Check the encoded channel on the source side.
N o t h i n g a p p e a r s o n t h e F L Surround mode is PURE-DIRECT.
display, no picture is output from
Video MONI.
Sulect other mode.
Nothing appears on the remote Batteries are consumed.
commander display.
Replace all the batteries with new ones.
Control with the remote control unit Batteries are consumed..
fails.
Remote controller's function-key setting is wrong.
The distance between this PS-17 and the remote
commander is too far.
Something is blocking PS-17 and the remote commander.
Replace all the batteries with new ones..
Select different position from which equipment will be controlled.
Move closer to this PS-17.
Sound from the analog turntable is Input cable connected incorrectly.
not output or very noisy (hum
noise).
Ground cable connected incorrectly.
Connect the cable cprrectly by referring to the connection
diagram.
Connect the cable cprrectly by referring to the connection
diagram.
Check that the cartridge is attached properly to the tone arm.
Remove the power plug of the turntable from the power outlet and
insert it again by inverting the relationship of the left and right
blades with respect to the power outlet slots.
The Cartridge is not attached properly to the tone arm.
32
Remove offending object.
HOW TO RESET THE UNIT
Should the operation or display seem to be abnormal, reset the unit
with the following procedure.
The PS-17 is turned on, press and hold the
A/D e and SRS u
buttons simultaneously for 3 seconds or more.
Remember that the procedure will reset the settings of the function
selector, Surround mode, delay time, etc., to their initial settings.
If the equipment malfunctions, this may be because an electrostatic
discharge or AC line interference has corrupted the information in
the equipment memory circuits. Therefore:
- disconnect the plug from the AC line supply
- after waiting at least three minutes, reconnect the plug to the AC
line supply
- re-attempt to operate the equipment
ERROR MESSAGES
When the display indicates some error messages (e.g. ERROR **),
unplug the power cable immediately. Contact your dealer, nearest
Marantz distributor or the Marantz service center in your area.
Last memory
This unit contains a non-volatile memory called as an
"EEPROM" to ensure that the following data will be retained in
the memory even when the unit's power is turned off.
• inputfunction
• Surroundmode
• OSD SET UP
33
ENGLISH
GENERAL MALFUNCTION
TECHNICAL SPECIFICATIONS
POWER AMP SECTION
Rated Power Output (20 Hz to 20 kHz, 2 ch simultaneous drive) ....................................................................... 60 W·2 (8 W load)
80 W·2 (6 W load)
100 W·2 (4 W load)
AUDIO SECTION
Total harmonic distortion (20 Hz to 20 kHz, 2 ch drive, 8 W load) .......................................................................................... 0.01 %
Cross-modulation distortion (SMPTE) .................................................................................................................................... 0.01 %
Output bandwidth (8 W load, 0.04 %) ...................................................................................................................... 10 Hz to 50 kHz
Frequency response ............................................................................................................................. 5 Hz to 100 kHz (+0 / -1 dB)
Damping factor (8 W load, 20 Hz to 20 kHz) ............................................................................................................................... 100
Signal to Noise Ratio ............................................................................................................................................................. 112 dB
DECODER SECTION
Decoding ..................................................................................................................................... PCM Audio (fs=32 kHz, 44.1 kHz)
Frequency response
Analog input: Source direct ............................................................................................................... 5 Hz to 100 kHz (+0 / -1 dB)
Digital input: PCM 96 kHz ................................................................................................................... 5 Hz to 45 kHz (+0 / -3 dB)
Signal to Noise Ratio (Source direct mode) .......................................................................................................................... 104 dB
VIDEO SECTION
Television Format ........................................................................................................................................................... PAL/NTSC
Input Level/Impedance ................................................................................................................................................. 1 Vp-p/75 W
Output Level/Impedance .............................................................................................................................................. 1 Vp-p/75 W
S/N .......................................................................................................................................................................................... 60 dB
Video Frequency Response
Video, S-video ................................................................................................................................... 5 Hz to 10 MHz (+0 / -3 dB)
Component video ............................................................................................................................... 5 Hz to 45 MHz (+0 / -3 dB)
GENERAL
Power Requirement ................................................................................................................................................ AC 230 V 50 Hz
Dimension (MAX)
Width ................................................................................................................................................................................. 458 mm
Height ................................................................................................................................................................................ 166 mm
Depth ................................................................................................................................................................................ 491 mm
Weight ............................................................................................................................................................................... 19.0 Kg
ACCESSORIES
Remote Control Unit RC-17PS ....................................................................................................................................................... 1
AA-size batteries ............................................................................................................................................................................ 2
Specifications subject to change without prior notice.