1
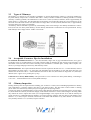
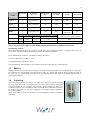
Installation / Operator /
Maintenance Manual for
Etna, Elbrus, Vesuv & Meru
Manufactured by:
Imported by:
Frohnhof 9
91580 Petersaurach
Germany
T: ++49 9802 951473
F: ++ 49 9802 9589909
www.wolf-bavaria.com
PO Box 120
Pound Ridge, NY
USA
T: 914 764 5679
F: 614 764 0465
www.wittus.com
2
Installation / Operator / Maintenance Manual
VESUV
ETNA
Model: 0400 (Glass Sims)
Model: 0402 (Tile Sims)
Model: 0300 (Glass Sims)
Model: 0302 (Tile Sims)
ELBRUS
MERU
Model: 0200
Model: 0901 (Tiles)
Model 0902 (Soap Stone)
3
IMPORTANT!
CAUTION: Please read this entire manual before you install and use your new room heater. For your safety, follow these
installation, operation and maintenance instructions exactly, without deviation. Failure to follow these instructions may
result in property damage, bodily injury, or even death. If this appliance is not properly installed, a house fire may result.
Contact your local building or fire officials about restrictions and installation inspection requirements in your area.
1.
2.
3.
4.
5.
6.
7.
8.
9.
10.
11.
12.
13.
14.
15.
16.
17.
If using an older chimney, it must be inspected for adequate serviceability. Refer to Chimney Inspection on page 11 of
this manual.
The minimum clearances must be maintained for all combustible surfaces and materials, including furniture, carpet,
drapes, clothing, wood, papers, etc. Do not store firewood within this clearance space. Failure to maintain clearances to
all combustible materials may result in a house fire.
This appliance requires non-combustible floor protection as outlined in this manual (see Floor Protection on page 9 for
additional information).
Minimum ceiling height must be 7 feet (213 cm) (measured from base of appliance to ceiling).
DO NOT CONNECT THIS UNIT TO A CHIMNEY FLUE THAT IS CONNECTED TO ANOTHER APPLIANCE.
Do not connect this appliance to air ducts or any air distribution system.
PREVENT CREOSOTE FIRE: Inspect and clean chimney frequently. Under certain conditions of use, creosote buildup can occur rapidly. Inspect chimney connector and chimney twice monthly and clean if necessary. Using green or inadequately seasoned wood can greatly increase creosote build-up. Use dry wood only to minimize creosote build-up.
USE SOLID WOOD FUEL ONLY: This appliance is approved for burning dry, seasoned, natural wood only. CAUTION: BURN UNTREATED WOOD ONLY. DO NOT BURN GARBAGE OR FLAMMABLE FLUIDS, SUCH AS
GASOLINE, NAPHTHA OR ENGINE OIL.
Never use gasoline, gasoline-type lantern fuel, kerosene, charcoal lighter fluid, or similar liquids to start or “freshen
up” a fire in this heater. Keep all such liquids well away from heater while it is in use.
DO NOT OVERFIRE: If heater or chimney connector glows, you are overfiring. Overfiring this appliance could cause
a house fire. Overfiring is a condition where the appliance is operated at temperatures above its design capabilities.
Overfiring can be caused by improper installation, improper operation, lack of maintenance or improper fuel usage.
Damage caused from overfiring is NOT covered under the manufacturer’s limited warranty.
NEVER LEAVE AN UNATTENDED WOODSTOVE BURNING ON HIGH. Operation of the woodstove with the
primary air control at its highest burn rate setting for extended periods can cause dangerous overfiring conditions. The
primary air control should only be positioned at the highest setting during start-up procedures and for short durations.
If leaving the woodstove unattended, ensure that the primary air control is set to the low or medium low range.
Use the metal ash drawer only to dispose of ashes.
IN THE EVENT OF A COMPONENT FAILURE, USE ONLY COMPONENTS PROVIDED BY THE MANUFACTURER AS REPLACEMENT PARTS.
Burning any kind of fuel uses oxygen from the dwelling. Be sure that you allow an adequate source of fresh air into the
room where the woodstove is operating (see Ventilation and Fresh Air on page 9).
CAUTION: HOT WHILE IN OPERATION. An appliance hot enough to warm your home can severely burn anyone
touching it. Keep children, clothing and furniture away. Contact may cause skin burns. Do not let children touch the
appliance. Train them to stay a safe distance from the unit.
Do not operate this appliance without the firebox baffle brick properly installed.
Build fires directly upon the brick surface inside the woodstove. Do not use grates, irons or any other method to elevate
the fire.
SAVE THESE INSTRUCTIONS.
See the listing label located on the back of woodstove (or see Safety on page 18).
It is highly recommended to install a smoke detector in the home when installing a wood stove.
4
Congratulations on the purchase of your new woodstove manufactured by Wolf Bavaria in
Germany.
When you purchased your new woodstove, you joined the ranks of thousands of concerned individuals whose answer to
their home heating needs reflects their concern for aesthetics, efficiency and our environment. We extend our continued
support to help you achieve the maximum benefit and enjoyment available from your new German woodstove.
It is our goal at Wolf Bavaria to provide you, our valued customer, with an appliance that will provide you with years of
trouble-free warmth and pleasure.
Thank you for selecting a Wolf Bavaria Products woodstove as the answer to your home heating needs.
Sincerely,
All of us at Wolf Bavaria
5
TABLE OF CONTENTS
1.
Planning Your Installation
1.1
1.2
1.3
1.4
1.5
1.6
1.7
Questions to Ask Local Building Officials
Smoke Detectors
Selecting a Location
Clearance from Combustible Walls
Floor Protection
Ventilation
Fresh Air
2.
Installation
2.1
2.2
2.3
2.4
2.5
2.6
2.7
2.8
Installing Marble Accents
Baffle Bricks
Types of Chimneys
Acceptable Connector Pipe for Installations
Chimney Inspection
Chimney Height Requirements
Draft Requirements
Combustible Wall Chimney Connector Pass-Throughs
3.
User’s Guide
3.1
3.2
3.3
3.4
3.5
Hand Protection
Technical Data and Dimensions
Delivery
Unpacking
Acceptable Fuel
4.
5.
6.
Safety (Please read, very important!!!)
Fresh Air Supply
Operating Your Woodstove
6.1
6.2
Regulating the Heat
Door
7.
Heating Operation
7.1
7.2
7.3
7.4
7.5
7.6
7.7
First Use
Starting a Fire
Environmentally Safe Heating
Adding Wood
Maximum Fuel Supply
Putting the Fire Out
Heating During Transition Periods
8.
Cleaning and Maintenance
8.1
8.2
Door Gasket Seal
Cleaning the Woodstove
9.
Troubleshooting
9.1
9.2
9.3
Poor Draft Conditions
Woodstove does not give off enough heat
Woodstove gives off too much heat
10.
11.
Important
Fire Safety (Please read – VERY IMPORTANT!!!)
7
7
7
7
8
9
9
9
10
10
10
11
11
11
12
12
14
15
15
15
17
17
18
18
19
20
20
21
22
22
22
23
23
23
23
23
24
24
24
25
25
25
25
25
25
6
12.
13.
Warranty
Replacement Parts List
13.1
13.2
Replace Tiles
Replace Glass
13.2.1
13.2.2
13.2.3
Replace glass and door handle on Etna, Vesuv and Elbrus
Replace glass and door handle on Meru
Replace baffel bricks on Etna, Vesuv, Elbrus and Meru
25
26
26
26
26
27
28
Testing/Listing
Appliance Type: Solid Fuel Room Heater
U.S. Test Standard: UL 1482
Canadian Test Standard: CAN/ULC-S627
EPA Exemption Certification
Packaging List
(1)
(1)
(1)
(1)
(1)
(1)
Installation / Operation / Instruction Manual
Warranty
Set of Baffle Bricks
Set of Tiles or Soap Stone
Glove
Lever for Secondary Air
Using this Manual
Please read and carefully follow all of the instructions found in this manual. Please pay special attention to the safety
instructions provided in this manual. The Homeowner’s Care and Operation Instructions included here will assure
that you have many years of dependable and enjoyable service from your appliance.
7
1.
Planning Your Installation
1.1
Questions to Ask Local Building Officials
A correct installation is critical and imperative for reducing fire hazards and perilous conditions that can arise when wood
burning appliances are improperly installed. The installer must follow all of the manufacture’s instructions.
The installation of a wood burning appliance must conform to local codes and applicable state and federal requirements.
Familiarity with these requirements before installation is essential. Important considerations to discuss with local building
officials include:
Local restrictions?
Is a permit required – cost?
(You may wish to contact your insurance company to ask if they require this.)
Is outside combustion air required?
Rooms where the installation is not allowed?
1.2
Smoke Detectors
Since there are always several potential sources of fire in any home, we recommend installing smoke detectors. If possible,
install the smoke detector in a hallway adjacent to the room (to reduce the possibility of occasional false activation from the
heat produced by the woodstove). If your local code requires that a smoke detector be installed within the same room, you
must follow the requirements of your local code. Check with your local building department in your area.
Note – This appliance is NOT approved for installation in a manufactured (mobile) home.
1.3
Selecting a Location
The design of your home and where you place your woodstove will determine its value as a source of heat. A woodstove
depends primarily on air circulation (convection) to disperse its heat. Therefore, a central location is often best. There are
other practical considerations, which must be considered before a final selection of location is made.
?
?
?
?
?
?
?
Existing Chimneys
Wood Storage
Aesthetic Considerations
Roof Design (Rafter Locations & Roof Pitch)
Room Traffic
Proximity to Combustibles
Electrical Wiring
The installation of this stove will require some research. Once your options are determined, consult with your local building
department as to the necessary installation requirements for your area (Is a building permit required, Rooms where installation may not be allowed, etc.).
Warning: Check all local building and safety codes before installation. The installation instructions and
appropriate code requirements must be followed exactly and without compromise. Alterations to the
stove are not allowed. Do not connect the stove to a chimney system serving another stove, appliance, or
any air distribution duct. Failure to follow these instructions will void the manufacturer’s warranty.
If you plan to vent your woodstove into an existing masonry chimney, have it inspected by a local fire marshal or qualified
installer. Remember that a woodstove’s performance is heavily influenced by the chimney and its location on the roof. An
oversized flue may not provide effective draw, and a flue liner may be required (see Draft Requirements, page 12). Consult
your dealer or qualified installer before final selection is made.
This woodstove requires pre-installation, including the preparation of the floor and appropriate hearth pad for acceptance of
outside air (if applicable), and modifications for flue and chimney.
8
1.4
Clearance from Combustible Walls
WARNING: IT IS VERY IMPORTANT THAT YOU OBSERVE THE MINIMUM CLEARANCES.
There are listed clearances for your stove which were determined in a laboratory test, using various “classes” of stove pipe
or chimney. Minimums are first established for the stove itself and then increased, based on how much heat is transferred
by each class of pipe.
Residential Standard (not approved for manufactured [mobile] homes)
Using single wall pipe connector to the top of the woodstove.
Clearances – USA & Canada (inches / millimeters)
A:
18 / 460
C:
18 / 460
E:
B:
15 / 380
D:
15 / 380
B
A
18 / 460
C
D
E
D
PROTECTED WALL CLEARANCE
If the woodstove is installed adjacent to a protected wall system, the variance must be approved by your local building
official. Normally, the protected wall system is defined as a non-combustible material, with a minimum of 1” air space
behind it. Check your local building codes or consult a qualified installer (Ref. NFPA 211).
9
1.5
Floor Protection
This appliance requires a non-combustible floor protection to protect against burning embers. If the floor is to be stone, tile,
brick, etc., it must be mortared or grouted to form a continuous, non-combustible surface. If a chimney connector extends
horizontally over the floor, protection must cover the floor under the connector and at least 2” (51 mm) to either side.
The floor protection must extend completely beneath the woodstove and to the front, sides, and rear as indicated.
USA REQUIREMENTS
16” minimum to the front of the glass door
8” (203 mm) minimum beyond the sides of the door opening
0” minimum to the back of the stove body
CANADA REQUIREMENTS
18” (457 mm) minimum to the front of the glass door
8” (203 mm) minimum beyond the sides of the door opening
8” (203 mm) minimum to the back of the stove body
1.6
Ventilation
(Residential homes which do not require an outside air inlet). Ventilation is essential when using a solid fuel woodstove.
The combustion process uses oxygen from inside the home, and it may be necessary to open a window or install a vent to
provide fresh air in a house that is well insulated.
1.7
Fresh Air
In all manufactured homes and in many site-built residences (subject to local code), a woodstove may require outside air for
combustion. A Ø120 mm outside air floor duct is available through your dealer.
This woodstove can take in outside air directly through the base. This type of installation requires a hole through the floor
protector and the use of an outside air floor duct to penetrate into the air space below the home.
The possible effects of room air starvation, icing, exhaust fans, etc. and the need for adequate ventilation.
The following is not mandatory, but may be included for information. Provision for outside combustion air may be necessary to ensure that fuel-burning appliances do not discharge combustion products into the house. Guidelines to determine
the need for additional combustion air may not be adequate for every situation. If in doubt, it is advisable to provide additional air.
a)
Outside combustion air may be required if:
1.
2.
3.
4.
5.
6.
The solid-fuel-fired appliance does not draw steadily, smoke rollout occurs, fuel burns poorly, or back-drafts occur, whether or not there is combustion present.
Existing fuel-fired equipment in the house, such as fireplaces or other heating appliances, smell, do not operate
properly, suffer smoke roll-out when opened, or back-draft, whether or not there is combustion present.
Opening a window slightly on a calm (windless) day alleviates any of the above symptoms.
The house is equipped with a well-sealed vapor barrier and tight fitting windows and/or has any powered devices
that exhaust house air.
There is excessive condensation on windows in the winter.
A ventilation system is installed in the house.
If these or other indications suggest that infiltration air is inadequate, additional combustion air should be provided from the
outdoors. Outside combustion air can be provided to the appliance by the following means:
1.
Direct connection: appliances can only use direct connection of outside combustion air if they are certified for this
type of installation. Installations shall comply with the manufacturer's instructions.
10
2.
3.
Indirect method: for an appliance not certified for direct connection of outside combustion air, the outside air is
ducted to a point no closer than (12 in.) 300 mm from the appliance to avoid an adverse effect on the performance
of the appliance.
A mechanical ventilation system: if the house has ventilation system (air exchange or heat recovery):
a. The ventilation system may be able to provide sufficient combustion make-up air for the solid-fuel-fired appliance.
b. The household owner should be informed that the ventilation system might need to be re-balanced by a ventilation technician after installation of the appliance.
NOTE: Because the base sits 1” (25.4 mm) off the floor, the outside air floor duct can be positioned along the front to rear
center line under the pedestal, but as close to the opening in the base as location permits. The outside air floor duct opening
must be protected from any possible obstructions, including loose floor insulation.
2.
Installation
2.1
Installing Marble Accents
Marble is a natural product, and, therefore, each piece will have its own unique characteristics. Marble can be scratched, so
care should be taken to avoid putting heavy or rough objects (trivet/steamers) on the surface. If the marble should become
scratched, the scratch may be removed or diminished by polishing it with jeweler’s rouge (which can be purchased at many
hardware stores). Do not install the marble before allowing the paint to cure.
The marble set consists of 2 pieces, a large piece which fits onto the stove top and a smaller piece which fits onto the ash
lip, which is located below the fuel door.
Install the marble gasket and marble as follows:
1. Install gasket on stove top as shown in the illustration. The ceramic fiber blanket and strips (cerawool) which come
with each unit must be placed under the marble to insulate it from high temperatures on top of the firebox. Do not
place the marble directly on the top metal surface of the stove, or it will crack.
2. Place top marble piece onto the gasket on stove top
3. Place ash lip marble into recessed area on the stove ash lip (located below the fuel door).
2.2
Baffle Bricks
The baffle bricks are preinstalled by the manufacturer.
IMPORTANT: The baffle bricks require periodic inspection and replacement for proper operation. If
the baffle bricks are fractured or crumbling, they should be replaced. Do not operate this appliance
without the baffle bricks being properly installed.
11
2.3
Types of Chimneys
The chimney is a vital part of your woodstove installation. A properly built masonry chimney or a properly installed, factory built chimney will provide a consistent draft under a variety of weather conditions (a smoking woodstove is usually
caused by a chimney problem). The minimum stove flue size is 6 inches (152 mm) in diameter, which is approximately 28
square inches (711 square mm). The maximum flue size should be no more than three times the cross sectional area, or the
size of the stove flue collar. In this case, that would be no larger than a 10 inch (254 mm) diameter stack, or approximately
85 square inches (216 square cm) maximum.
All chimneys must be installed as specified by local building codes and according to the chimney manufacturer’s instructions (in the case of a factory built chimney). See the chimney manufacturer’s instructions for exact specifications. Factory
built chimneys must comply with UL 103HT or ULC S629.
2.4
Acceptable Connector Pipe for Installations
For Standard Residential Clearances: 6” (152 mm) minimum, single wall, 25 gage minimum thickness, stove pipe is
acceptable. Three (3) pre-drilled holes are provided in the flue collar for fastening the pipe securely to the woodstove. Use
sheet metal screws for each section when connecting to the manufacturer’s transition piece, usually called a dripless connector, to join single wall pipe to the factory built chimney section.
Minimum Flue Size: The required minimum diameter and area required for the flue size is 6” / 152 mm diameter, which is
approximately 28 square inches / 711 square mm. The maximum flue size should be no more than three times the cross
sectional area of the size of the 6” / 152 mm diameter flue collar. In this case, that would be no larger than 10” (254 mm) in
diameter (area = approx. 85 sq. inches [216 sq. cm]).
Connection To A Factory Built Chimney: This space heater is to be connected to a factory-built chimney, conforming to
CAN / ULC – S629 Standard for 650°C Factory-Built Chimneys.
2.5
Chimney Inspection
Existing chimneys must be inspected before installing your woodstove. Consult your local building department for chimney
code requirements. A masonry chimney must have a code approved liner. This liner must not have broken or missing
pieces. Some non-code masonry chimneys may be brought up to code by being relined.
(Consult your dealer or qualified chimney sweep). Factory built chimneys should also be inspected, first for creosote deposits (which should be removed), and then for integrity of the stainless steel liner. Look for obvious bulges in the lining which
may indicate the need to replace that section (use a bright flashlight). Also, inspect the attic to see that the chimney has
proper clearance to combustible framing members. For interior masonry chimneys and most factory built chimneys, this
must be a 2” (51 mm) air space clearance, which must not be filled with insulation or any other material. An exterior masonry chimney must have a 1” (25.4 mm) air space clearance.
12
Vapor Barrier At Chimney Penetration
Install all venting components according to the vent manufacturer’s installation instructions. Ensure that there is an effective vapor barrier at the location where the chimney penetrates the exterior of the structure. This can be accomplished by
applying a non-hardening, waterproof sealant to the following components:
?
?
?
Around the chimney at the point where the storm collar will meet the chimney, just above the flashing.
Along the vertical seam of the chimney pipe, where it is exposed to the weather.
On each nail head on the flashing.
NOTE:
On a flat or tarred and graveled roof, nail and seal the flat roof flashing to the roof on all sides with roofing compound. Do not put screws through the flashing into the chimney pipe.
2.6
Chimney Height Requirements
The chimney must be 3 feet (914 mm) above the level of the roof penetration and a minimum of 2 feet (610 mm) higher
than any roof surface within 10 feet (305 cm) (see below). Check with your local building officials for any additional requirements for your area.
Due to prevailing winds, local terrain, adjacent tall trees, a hill or ravine near the home, or adjacent structures, additional
chimney height or a special chimney cap may be required to ensure optimum performance.
To achieve a stable draft, the total flue height required (from the appliance to termination) is 12 to 15 feet (366 to 457 cm)
minimum.
2.7
Draft Requirements
The stove appliance is merely one component of a larger system. The other equally important component is the venting
system. This is necessary for achieving the required flow of combustion air into the forechamber and for safely removing
unwanted combustion byproducts from the appliance. If the venting system’s design does not promote these ends, the system may not function properly. A poorly functioning venting system may create performance problems, as well as safety
hazards (i.e. an oversized chimney may result in less than optimum performance. Installations into a large, masonry chimney may require a liner to improve performance). A draft test should read greater than .04” W.C. (inches water column) and
less than .08” W.C.
American National Standard Institute ANSI/NFPA 211-92, draft 1-7: A chimney or vent shall be so designed and constructed to develop a flow sufficient to completely remove all flue and vent gases to the outside atmosphere. The venting
system shall satisfy the draft requirements of the connected appliance in accordance with the manufacturer’s instructions.
13
14
2.8
Combustible Wall Chimney Connector Pass-Throughs
Method A. 12” (305 mm) Clearance to Combustible Wall Member: Using a
minimum thickness of 3.5” (90 mm) brick and a 5/8” (16 mm) minimum
wall thickness clay liner, construct a wall pass-through. The clay liner must
conform to ASTM C315 (Standard Specification for Clay Fire Linings) or
its equivalent. Keep a minimum of 12” (305 mm) of brick masonry between
the clay liner und wall combustibles. The clay liner shall run from the brick
masonry outer surface to the inner surface of the chimney flue liner but not
past the inner surface. Firmly grout or cement the clay liner in place to the
chimney flue liner.
Method B. 9” (229 mm) Clearance to Combustible Wall Member: Using 6”
(152 mm) inside diameter, listed, factory-built Solid-Pak chimney section
with insulation of 1” (25.4 mm) or more, build a wall pass-through with a
minimum 9” (229 mm) air space between the outer wall of chimney length
and wall combustibles. Use sheet metal supports fastened securely to wall
surfaces on all sides, to maintain the 9” (229 mm) air space. When fastening
support to chimney length, do not penetrate the chimney liner (the inside
wall of the Solid-Pak chimney). The inner end of the Solid-Pak chimney
section shall be flush with the inside of the masonry chimney flue and
sealed with a non-watersoluble, refractory cement. Use this cement to also
seal to the brick masonry penetration.
Method C. 6” (152 mm) Clearance to Combustible Wall Member: Starting
with a minimum 24 gage (.024 inch [.61 mm]), 6” metal chimney connector, and a minimum 24 gage ventilated wall thimble which has two air
channels of 1” ( 25.4 mm) each, construct a wall pass-through. There shall
be a minimum 6” (152 mm) separation area containing fiber glass insulation, from the wall thimble, and cover its opening with a 24-gage minimum
sheet metal support. Maintain the 6” (152 mm) space. There should also be
a support sized to fit and hold the metal chimney connector. See that the
support is fastened securely to wall surfaces on all sides. Make sure fasteners used to secure the metal chimney connector do not penetrate chimney
flue liner.
Method D. 2” (51 mm) Clearance to Combustible Wall Member: Start with
a Solid-Pak listed factory built chimney section, at least 12” (305 mm) long,
with insulation of 1” (25.4 mm) or more, and an inside diameter of 8” (2”
[51 mm] larger than the 6” [152 mm] chimney connector). Use this as a
pass-through for a minimum 24 gage single wall steel chimney connector.
Keep Solid-Pak section concentric with and spaced 1” (25.4 mm) off the
chimney connector by wall of steel metal support plates at both ends of
chimney section. Cover opening with and support chimney section on both
sides with 24 gage minimum sheet metal supports. See that the supports are
fastened securely to wall surfaces on all sides. Make sure fasteners used to
secure chimney section do not penetrate chimney flue liner.
NOTES:
1. Connectors to a masonry chimney, except for method B, shall extend in one continuous section through the wall
pass-through system and the chimney wall, up to but not past the inner liner face.
2. A chimney connector shall not pass through an attic or roof space, closet or similar concealed space, or a floor or
ceiling.
3. Where passage through a wall or partition of combustible construction is desired, the installation shall conform to
CAN/CSA-B365.
15
3.
User’s Guide
3.1
Hand Protection
Please use a protective glove when opening the doors!!! You can then add wood while the handle is hot
3.2
Technical Data and Dimensions
VESUV
ETNA
16
ELBRUS
MERU
17
Heat Output
Dimensions
Flue Diameter
Center Height
hxwxd
(inner)
rear design
Weight
Area Heated
(kW)
(mm)
(mm)
(mm)
(kg)
(m3 )
VESUV
8
1478 x 828x 636
150
1250
285
180
ETNA
8
1478 x 992x 636
150
1250
260
180
ELBRUS
8
1478 x 702x 619
150
1250
290
180
MERU
8
1024 x 598 x 473
150
858
160 (ceramic)
190 (stone)
180
Model
Chimney Data
Flue Gas
Flue Gas Heat
Average Wood Use – Single Load
3-4 pieces of wood, 15-20% moisture
(Pa)
2
(cm )
(g/s)
(oC)
(kg/h)
10
225
7,41
350
2.6
Draft
Average
Note: We reserve the right to make modifications in the interest of technical advances!
Room Heating Capacity
The room heating capacity has a nominal value of 8 kW and is to be calculated as follows, according to DIN 18 893, for
rooms that do not have insulation that complies with the Heat Insulation Ordinance:
For favorable heating conditions – calculated according to DIN 4701
At less favorable heating conditions - 145 m³
At unfavorable heating conditions - 98 m³
For interval heating, with interruptions of more than 8 hours, the heating capacity is reduced by 25%.
3.3
Delivery
Damage can occur to the product during transport, even though the packaging appears to be undamaged upon visual inspection. Therefore, it is important that you inspect the stove itself very carefully and report all damages within one week. In
the event of obvious visual damage to the product or its packaging, make a note of this on the shipping papers before accepting the merchandise.
3.4
Unpacking
All cardboard and synthetic materials are recyclable. Please dispose of these at your local
recycling center. None of the wooden parts have been surface treated, and they can be used
as heating materials for your woodstove. Very carefully open the packaging so that you do
not damage anything. Prior to installation, make sure that the base construction can support
the weight of the stove! Use only proper lifting aids with adequate support capacities to
move your woodstove.
Please do not stand on top of your woodstove; it is not designed to be used as a ladder or
scaffolding.
18
3.5
Acceptable Fuel
Acceptable fuel sources are pieces of wood with a length of 30 cm (12”) and a diameter of 10 cm (4”), as well as wood
briquettes.
Only air-dried wood should be used. The burning of waste materials, in particular synthetic materials, is not permitted, according to federal laws regulating emissions. In addition, this causes damage to the fireplace and chimney. Airdried wood will achieve a maximum water content of 30% after at least 1 year (soft woods) and/or 2 years (hard woods).
Wood is not designed for continuous burning, i.e. heating the fireplace overnight with wood is not possible.
4.
?
?
?
?
?
?
?
?
?
?
?
?
?
?
?
Safety (Please read, very important!!!)
Check on a regular basis to make sure that the woodstove has been attached to the chimney in compliance with
all regulations.
Carefully read the User’s Guide before you use your woodstove for the first time. This will provide you with
information about how to safely operate your stove.
During operation, the woodstove’s surface will become very hot. Pay attention, in particular, to children playing
in the vicinity of the stove, as they are most likely to be at risk of injury. Keep small children away from the
stove.
Make sure that no combustible material is located in the vicinity of or on top of the woodstove.
Keep the door to the fireplace closed at all times, even if the woodstove is not in operation (with the exception of
the initial heating up cycle).
Avoid overloading your woodstove by adding too much fuel at one time.
Never use alcohol, gasoline or other illegal, fire accelerators to start your fire.
No combustible elements should be located within the heat radiation area of your woodstove.
Empty the ash drawer on a regular basis so that it never completely fills up with ashes. Otherwise, the air supply to the woodstove will be blocked.
Always slide the ash drawer all the way to the back, up to the stop position.
Be sure to provide an adequate supply of fresh air to the woodstove. The stove consumes oxygen.
Do not forget that a kitchen fan that is located in the same or an adjacent room can cause a vacuum situation,
which results in a smoke build-up within the room. Make sure that you have a sufficient supply of fresh air.
Never remove hot ashes. Store the ashes in a container that is fire-proof and not combustible.
Always use the protective glove when operating the woodstove. Do not touch the stove with your bare hand
when it is in operation.
Do not store any combustible liquids in the vicinity of your woodstove!
19
5.
Fresh Air Supply
The woodstove can only be installed in rooms with a sufficient supply of fresh air intake for combustion purposes. This is
true of rooms that have at least one exterior door or one window that can be opened. Rooms that are connected to the same
fresh air network, i.e. rooms within the same residence or common areas, are also appropriate for installation.
The woodstove requires
approx. 40m³ fresh air per hour for combustion.
With newer, well-insulated houses, and particularly with houses using
mechanical air circulation, it is important to supply a sufficient amount of
fresh air. Models ETNA, VESUV, ELBRUS and MERU have a central air
intake that directly supplies sufficient air into the combustion process.
Therefore, you can supply air through a connecting pipe. Fresh air that is
supplied in this manner can be regulated on the woodstove with the primary
or secondary air control levers.
Central air connector
with diameter of Ø
120 mm; capable of
withstanding temperatures up to 80o C.
Important!
Read the User’s Guide before you use your woodstove / fireplace for the first time, and do not forget to have your
installation inspected by the local authorities before its first fire. Consult your local authorities for any regulations
and other information.
The location that is used to support the base of the woodstove must be horizontal and without any uneven spots.
20
6.
Operating Your Woodstove
Etna, Elbrus und Vesuv
6.1
Regulating the Heat
Draft controls to regulate secondary air are located under the door on the
right and left sides respectively. Pull the control towards you to open.
.
1) Secondary Draft Control
ash
drawer
1
MERU:
Close
Open
1
Pull = Open
Press = Close
The secondary draft control lever regulates the amount of air that is needed to reburn exhaust gases that are produced in
the fireplace during the wood burning process. A portion of this secondary air circulates from the top to the door and helps
to keep the glass window clean.
The fire intensity can be regulated with the secondary draft control lever.
Creosote - Formation and Need for Removal - When wood is burned slowly, it produces tar and other organic vapors,
which combine with expelled moisture to form creosote. The creosote vapors condense in the relatively cool chimney flue
of a slow-burning fire. As a result, creosote residue accumulates on the flue lining. If ignited, this creosote creates an extremely hot fire. Burning wood, the chimney connector and chimney should be inspected at least once every two months
during the heating season to determine if a creosote buildup has occurred.
21
6.2
Door
Caution: Use protective glove!!!
When adding wood, pull the door handle up. The door can also be opened
sideways so that you can clean the glass window. To do this, pull and release the lever on the lower right side. After you have finished, remember to
securely lock the door again by pressing it back in.
Warning: Be careful in using the door. Never operate a stove with a
broken glass door!!!
MERU:
A torsion spring is used to automatically close this door. This spring
should never be disabled (refer to DIN 18891, Type 1). The door
must be locked manually.
door handle
22
6.3.
Ash Drawer
The ashes will fall down into the ash drawer after you pull on the grate lever
several times. Do not forget that ashes will remain hot for several days in
the ash drawer. Only use sheet metal ash containers to empty ashes out!
A fire should never be started in the woodstove if the ash drawer is not
in its proper position!
ash drawer
Disposal of Ashes - Ashes should be placed in a metal container with a
tight fitting lid. The closed container of ashes should be placed on a
noncombustible floor or on the ground, well away from all combustible
materials, pending final disposal. If the ashes are disposed of by burial
in soil or otherwise locally dispersed, they should be retained in the
closed container until all cinders have thoroughly cooled.
7.
Heating Operation
7.1
First Use
Your new woodstove should not be used until after you have obtained approval from the proper authorities regarding its
proper installation and conditions of use.
The woodstove is designed to burn only wood, i.e. pieces of wood or wood briquettes.
The wood must be dry (moisture ? 20%) and untreated. The burning of any other materials, such as chipboard, painted,
laminated, impregnated, or synthetic coated wood, garbage, etc. is prohibited and causes irresponsible damage to the environment, as well as damage to your complete fireplace system.
?
?
?
?
Have you removed all accessories from the ash pan and the fireplace?
Check to make sure that no objects are located on top of the woodstove.
Are the conventional / standard openings free and accessible?
Keep the door to the fireplace partially open during the first lighting of your woodstove, as long as the fire has not gone
out. The same applies to the ash pan. A special, heat-treated paint was used on your stove, and its hardening process is
not completely “burned in” until after the first lighting. By keeping the door and ash pan partially open, this will prevent the gasket seals from adhering to the paint.
Unpleasant smells that occur during the first lighting are normal. Provide good air ventilation to your room to remove these odors.
(!!! Heat until peak temperature is reached !!!)
7.2
Starting a Fire
It is important to engage the wood in a trouble-free combustion process as quickly and safely as possible. In order to accomplish this, the wood should be layered in the woodstove as follows:
Never use alcohol, gasoline or similar substances, including glossy paper, to light the fire. It does not burn properly,
and its printed colors produce highly toxic elements in the fumes.
?
?
?
Place newspaper or a solid fire starter, along with some kindling wood, in the fireplace. Stack the wood in a crisscrossed pile. Open the primary and secondary draft controls as far as possible. As long as the fire has not started burning completely, you can leave the ash pan slightly opened. This will warm up the glass window and prevent soot coating.
As soon as the fire gets going, close the ash pan.
For the next supply of fuel, spread out the burning embers in even layers and add approximately three (3) larger pieces
of wood. After the wood starts to burn, you can close the primary draft control. The secondary draft control remains
open.
23
?
?
7.3
After a period of time, as soon as the fire is burning well, it might seem as if the heat output is less. Regulate the burning process first by the amount of wood in the stove. At the same time, the secondary draft can be reduced.
The air supply for burning and for heat output is dependent upon the fireplace draft, moisture and size of wood.
Environmentally Safe Heating
Too much wood can result in an overheating situation. In this case, there is too much stress on the woodstove, and poor flue
gas values result. If there is not enough wood, then the stove will not reach the required operating temperature. As a result,
the wood does not burn up cleanly, and soot is built up on the glass and the fireclay walls. Therefore, fill your woodstove
about halfway with wood pieces and replenish on a regular basis. Your woodstove is not a garbage burning incinerator. Use
only wood or wood briquettes for fuel.
7.4
Adding Wood
Do not add wood until the flames have stopped blazing.
First, open the draft controls completely, then slowly open the doors and add wood. Be sure to open the doors slowly to
avoid a possible flame-up.
Close the doors after you have added the wood. If the fire was almost burned out before you added more wood, keep the
draft controls in a fully open position for approx. 5-10 minutes. Then move the controls to the center position for normal
operation. After heating up and the addition of wood, soot can accumulate on the fireclay parts and glass window, but this
will burn itself off again with the increase in fireplace temperature. If wet wood is used, a large amount of soot will accumulate on your woodstove. Therefore, do not burn wood with a moisture content of more than 20%.
7.5
Maximum Fuel Supply
The woodstove is designed for a maximum fuel supply, per load, of 2.5 kg of split wood or 1.5 kg of wood briquettes. If
these maximum levels are exceeded, this may result in damage to your stove.
7.6
Putting the Fire Out
As soon as the fire has burned down and the wood is no longer glowing, close the primary and secondary draft air supplies.
If the air supply controls are closed while the fire is still burning or the wood is still glowing, the resultant exhaust
gas buildup in the woodstove can cause an explosion which breaks the glass window. The woodstove will continue to
give off heat for some time. Otherwise, the stove will cool faster, due to the supply of fresh (cold) air, i.e. the thermal energy escapes out the chimney.
7.7
Heating during Transition Periods
During transition periods (Spring / Fall), outside temperatures of over 16°C can cause a smoke buildup in the woodstove. If
sufficient draft cannot be created with a startup fire at this temperature (i.e., rapid generation of high heat by quick burning
of newspaper), so that the fumes are not completely removed, then you should abandon your plans for a fire. Use newspaper as fuel for a startup fire. Add less wood during transition periods or wait longer before adding more wood.
The fireplace should be filled with less fuel (wood) and operated at a higher setting of the primary draft control lever so that
the existing fuel burns faster (in flames), which will stabilize the chimney draft. In addition, the wait time between adding
wood for reheating should be extended. To avoid resistance in the fired, ashes should be carefully scraped off on a regular
basis.
24
8.
Cleaning and Maintenance
Very important:
All cleaning and maintenance work must only be performed on a compla2 l 531ool ondown firTj 23.732 0 TD (e.0362 Tc 0 Tw (c
Top and bottom seals are
fastened
with
three
screws to bracket.
Side seal is glued in
with special stove
cement.
25
9.
Troubleshooting
9.1
Poor Draft Conditions
?
?
?
?
Is the chimney too short?
Is the chimney or flue leaking?
Is the flue protruding out from the chimney?
Is the door from another fireplace that is connected to the same chimney, open?
9.2
Woodstove does not give off enough heat
?
?
?
?
?
?
Is the room too large?
Are there too many ashes on the grate?
Is the ash pan full?
Is the flue obstructed?
Are the primary and secondary draft air control levers closed?
Is the connection between the stove and the chimney sealed or leaking?
9.3
Woodstove gives off too much heat
?
?
?
?
Are the primary and secondary draft air control levels open too far?
Is the stove door closed properly? Is the ash pan completely closed?
Is the chimney too tall?
Have you added too much wood?
10. Important
Damages that occur as a result of improper operation are not covered under warranty.
11. Fire Safety (Please read – VERY IMPORTANT!!!)
Teach your children about fire safety, and, in particular, keep them as far away as possible from the woodstove while it is in
operation. The heating process causes the top surface of the woodstove, as well as its operating elements, including the
window and flue, to become extremely hot. Do not touch any of these parts without appropriate protective gear or tools,
e.g. heat protection gloves. Never put laundry or other objects on the stove to dry. Objects that are not heat-resistant should
never be placed on top of the woodstove or in the vicinity of the stove. Drying racks for drying clothing or similar items
must be set up at a sufficient distance away from the heating device. Never heat and/or store flammable or explosive materials, such as empty spray cans and similar objects, in or around the immediate fireplace area as this can cause an explosion.
Do not wear loose or easily combustible clothing when starting the fire or adding wood. As long as your woodstove is in
operation, do not work with easily combustible or explosive materials in the same or adjacent rooms.
12. Warranty
It is important for you to read the attached Warranty Statement before operating your woodstove. It contains information about the duties and responsibilities that must be met before a warranty claim can be
made.
26
13. Replacement Parts List
13.1 Replace Tiles
13.2 Replace Glass
13.2.1
Replace glass and door handle on Etna, Vesuv and Elbrus
Glass Dimensions:
Height:
Width:
Thickness:
Radius:
486.0mm
394.4mm
4.0mm
420.0mm
IMPORTANT: Replace glass only with glass from the manufacturer or distributor
of this appliance.
27
13.2.2
Replace glass and door handle on Meru
Glass Dimensions:
Height:
Width:
Thickness:
Radius:
550.0mm
350.0mm
4.0mm
504.0mm
IMPORTANT: Replace glass only with glass from the manufacturer or distributor
of this appliance
28
13.2.3
Replace baffel bricks on Etna, Vesuv, Elbrus and Meru
IMPORTANT: Replace baffel bricks only with baffel bricks from the manufacturer or distributor of this appliance.
We sincerely hope that your Wolf Bavaria woodstove provides you with many cozy
hours of warmth and enjoyment.
Manufactured by:
Imported by:
Frohnhof 9
91580 Petersaurach
Germany
T: ++49 9802 951473
F: ++ 49 9802 9589909
www.wolf-bavaria.com
PO Box 120
Pound Ridge, NY
USA
T: 914 764 5679
F: 614 764 0465
www.wittus.com