1
FM / AM - Stereo Tuner
User's Manual
1
2
Contents
1
Preface..........................................................................................5
1.1
Included.........................................................................................6
1.2
Transport .......................................................................................6
2
Overview front panel ..................................................................7
3
Overview back panel...................................................................8
4
Installation and power supply....................................................9
4.1
Placement ......................................................................................9
4.2
Mains connection ..........................................................................9
4.3
Orientation of mains plug ...........................................................10
5
Inputs and outputs ....................................................................11
5.1
Antenna inputs ............................................................................11
5.2
Audio outputs ..............................................................................11
5.3
Audionet Link .............................................................................11
5.4
External power supply EPS.........................................................12
6
Usage ..........................................................................................13
6.1
Powering up ................................................................................13
6.2
Switching on and off ...................................................................13
6.3
Mains phase detection .................................................................14
6.4
Using Audionet Link...................................................................15
6.5
AutoStart function.......................................................................15
6.6
Control elements on the front panel ............................................15
6.7
Display ........................................................................................16
6.8
Switching frequency bands .........................................................17
6.9
Automatic search.........................................................................17
6.10
Manual search .............................................................................18
6.11
Direct frequency input.................................................................18
6.12
Info function Show......................................................................20
7
Presets ........................................................................................21
7.1
Save preset ..................................................................................21
3
7.2
Load preset ..................................................................................22
8
Setup menu ................................................................................24
8.1
Set RDS Option...........................................................................26
8.2
Set FM-Receiver .........................................................................27
8.3
Set Dim Level .............................................................................28
8.4
Set Mode .....................................................................................29
8.5
Set FM-Input ...............................................................................30
8.6
Search Level FM .........................................................................30
8.7
Set Language for PTY.................................................................31
8.8
Set AutoStart ...............................................................................31
8.9
Set Off-Text ................................................................................32
8.10
Factory defaults ...........................................................................32
9
Audionet System Remote Control ...........................................33
9.1
Key assignments CAT.................................................................35
9.2
Screen 1.......................................................................................37
9.3
Screen 2.......................................................................................37
9.4
Screen 3.......................................................................................38
10
Security advice...........................................................................39
11
Technical data............................................................................40
4
1
Preface
The Audionet Team congratulates you on your purchase of this unit.
The CAT builds the bridge between the classic and the avant-garde. As
an analog audio tuner, it receives the well-known broadcast program in
highest quality.
The CAT plays analog programs sleekly as well as colourfully and convinces by high information density and interference insensitivity. The
analog tuner unit decodes antenna and cable signals accurately and with
high sensitivity. Further signal processing is done with Audionet's proven
circuit technology. The frequency search of the CAT has switchable sensitivities. Station names and other radio data are also displayed.
The CAT makes radio a new experience. With hitherto unheard clearness,
transparency and dynamic. Get on the air!
But before you start listening to your new Audionet CAT, please read this
manual carefully so you are able to use and enjoy all functions of this unit
without drawback on music quality.
5
1.1 Included
Included you will find the following items:
·
the Audionet tuner CAT
·
the user's manual (that you are currently reading)
·
one standard mains cord
1.2 Transport
Important
·
Please transport the CAT only in the included package.
·
Always use the plastic bag to prevent scratches on the casing.
·
Please allow the CAT to adapt to the climatic conditions in your listening room before you switch on the unit for the first time after
transport.
6
power
key
power
set
key
set
Remote control
receiver
Display
FM / AM – Stereo Tuner
CAT
down
down
key
up
up
key
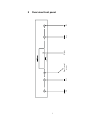
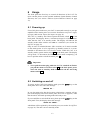
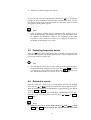
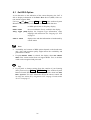
2
Overview front panel
7
1
8
FM antenna input
AM antenna input
'Audionet Link' input
Balanced (XLR) output Right
Cinch output Right
2
3
4
5
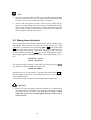
3
1
2
4
5
Marking mains phase
Mains switch
11
Mains input
Input for external precisdion power supply EPS
Balanced (XLR) output Left
Cinch output Left
7
10
9
8
7
6
6
8
9
10 11
3
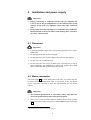
Overview back panel
4
Installation and power supply
Important
·
During connecting or removing to/from your pre amplifier the
CAT as well as the pre amplifier have to be switched off to avoid
damage on the CAT, pre amplifier and/or any other connected
unit.
·
Please make sure that all cables are in absolute best conditions!
Broken shields or short-cut cables could damage the CAT and/or
any other connected unit.
4.1 Placement
Important
·
It is recommended to place the CAT into a high quality rack or onto a
stable table.
·
Do not expose the unit to direct sunlight
·
Do not place the CAT in close range to heat sources like radiators.
·
Do not cover the ventilation slots.
·
Do not place the CAT on top of other units, especially not on top of
power amplifiers, pre amplifiers or similar that produce heat. Both
units could suffer damage from thermal overload.
4.2 Mains connection
The mains input 9 * is on the back panel of the CAT. To connect the unit
to mains use the included mains cord. If you prefer to use a different
power cord make sure that it meets the specifications for your home
country.
Important
·
The electrical specifications of your home country must meet the
electrical specifications printed onto the back panel.
·
The CAT is a Class I unit and must be earthed. Please ensure a stable
earth connection. Phase ('hot' pin) is marked phase on the back panel
10 .
*
see numbers in section 'Overview back panel' on page 8
9
·
If you connect the mains cord please make sure that mains switch
11 at the back panel is switched off
·
Never pull the mains plug while the CAT is switched on! Before you
pull the mains cord off its socket 9 at the back panel, power down the
unit to stand-by mode and switch off the unit using mains switch 11 .
Only in cases of extended absence – like vacations – or if massive trouble
on the mains power is to be expected you should switch off the CAT
from the mains using mains switch 11 . To disconnect the unit completely from mains pull the mains plug.
Tip
·
The use of high quality mains cords could improve sound quality.
Ask your local dealer for more information.
4.3 Orientation of mains plug
The correct polarization of mains is important for reasons of audio clarity
and stability. Please connect the mains cord so that the hot pin of the wall
outlet is connected to the pin of the mains input 9 marked phase 10 .
Note
·
While powering up your Audionet CAT from stand-by mode by using the power key on the front panel, the unit detects a wrong polarization of the mains plug and issues the warning:
Attention: Mains
Phase incorrect!
in the display of the front panel. In this case switch off the unit and
flip the mains plug in the wall outlet (see section 'Mains phase detection' on page 14).
10
5
Inputs and outputs
Important
·
During connecting or removing to/from your pre amplifier the
CAT as well as the pre amplifier have to be switched off to avoid
damage on the CAT, pre amplifier and/or any other connected
unit.
·
Please make sure that all cables are in absolute best conditions!
Broken shields or short-cut cables could damage the CAT and/or
any other connected unit.
5.1 Antenna inputs
On the back panel are two antenna inputs. For FM reception connect your
FM antenna or cable to antenna input FM 1 .
For AM reception connect your AM antenna to the clip connectors of
antenna input AM 2 .
5.2 Audio outputs
The CAT is equipped with a pair of Cinch (Line) outputs 5 and 6 as well
as a pair of balanced (XLR) outputs 4 and 7 . Use the Cinch outputs to
connect the CAT to your pre amplifier using high quality Cinch cables.
Alternatively, you may connect the CAT to your pre amplifier using the
balanced (XLR) outputs in case your pre amplifier does not support
Cinch (Line) inputs.
Tip
Pinning of the balanced (XLR) outputs:
2: Positive
1: Ground
3: Negative
The pins are marked with numbers as in the picture above.
5.3 Audionet Link
For your convenience, the CAT can be switched on/off remotely by one
of Audionet's multi-channel pre amplifiers (e.g. MAP or MAP 1) as well
11
as one of Audionet's stereo pre amplifiers (e.g. PRE or PRE 1 G3) using
the 'Audionet Link' interface.
You only need a simple optical 'Toslink' cable to connect the 'Audionet
Link' output of your Audionet pre amplifier to the 'Audionet Link' input
audionet link 3 of the CAT. Now, the CAT and all other units connected via 'Audionet Link' will be switched on/off automatically, when
you switch on/off your pre amplifier at the front panel or by remote control.
5.4 External power supply EPS
In order to use the optional external precision power supply Audionet
EPS (External Power Supply) with you CAT please proceed as follows:
1. Make sure both CAT and EPS are switched off and disconnected
from mains.
2. Connect the EPS with the included cable to input jack ext. power
8 on the back panel of the CAT. The shape of the plug prevents a
wrong polarity. The small 'nose' inside the plug has to face upwards. Now screw the ring of the plug onto the EPS input jack 8 .
3. Use the mains cord that came with the CAT to connect the EPS to
mains.
4. Switch on the EPS with the mains switch on its back panel.
5. Use the power key on the front panel or the keys Power On or
Power Toggle *) of the Audionet System Remote Control Harmony One to switch on the CAT. The unit is now ready to use and
gets its power from the external power supply EPS.
6. To switch off the CAT into stand-by mode, use the power key on
the front panel or keys Power Off or Power Toggle *) of the
Audionet System Remote Control Harmony One.
Important
·
Never switch on or off the EPS on its back panel while the CAT is
operating.
·
For further information referring to the external power supply EPS
please consult its user's manual.
Tip
·
Use a high quality cable to connect the EPS to mains. The sound will
improve.
*)
or switched on/off by Activities on the Audionet System Remote Control; see separate user's
manual Harmony One
12
6
Usage
The front panel has four keys to control all functions of the CAT. For
more comfort please use the optional Audionet System Remote Control
Harmony One (see section 'Audionet System Remote Control' on page
33).
6.1 Powering up
First of all, please make sure your CAT is connected correctly to your pre
amplifier and to mains power (see section 'Installation and power supply'
on page 9 and section 'Inputs and outputs' on page 11).
The CAT is a stand-by unit. Please operate the mains switch 11 on the
back panel. The display shows a welcome message for a brief moment.
After that the CAT is in stand-by mode. The display will indicate the
stand-by mode either with the text off or a small dot (see section 'Set
Off-Text' on page 32).
Only in cases of extended absence (like vacations) or if massive trouble
on the mains power is to be expected (e.g. thunder storms) it is recommended to disconnect the CAT from the mains. While the CAT is in
stand-by mode, operate mains switch 11 on the back panel. The display
will go dark. To disconnect the PRE1 G3 from mains completely, you
have to pull the mains cord off the mains jack 9 .
Important
·
Never pull the mains plug while the CAT is switched on! Before
you pull the mains cord off its socket 9 at the back panel, power
down the unit to stand-by mode and switch off the unit using
mains switch 11 .
6.2 Switching on and off
To power up the CAT from stand-by mode, press the power key on the
front panel. The CAT issues the message:
WAKING UP...
In case the mains plug has the incorrect polarization a warning will appear in the display (see section 'Mains phase detection' on page 14). After
that the unit is in normal operating mode and ready to use.
If you would like to switch off the unit, please press the power key on the
front panel. First, the display shows the message:
GOING TO SLEEP..
which then will be replaced by the stand-by text (see section 'Set Off-Text'
on page 32). The unit is now in stand-by mode.
13
Note
·
Of course, you may switch on/off the CAT with the Audionet System
Remote Control Harmony One. For detailed information please refer
to section 'Audionet System Remote Control' on page 33.
·
All user and setup options, presets, current receiver mode and frequency are saved during power down and are available after switching on again. The last mode before switching off to stand by mode
will be restored. All saved information is non-volatile even after disconnecting the CAT from mains power
6.3 Mains phase detection
The correct polarization of mains is important for reasons of audio clarity
and stability. Please connect the mains cord so that the 'hot' pin of the
wall outlet is connected to the pin marked phase 10 of the mains input
9 on the back panel. The CAT recognizes the incorrect polarization of
the mains plug automatically. Right after switching on the unit from
stand-by mode by pressing the power key on the front panel the following message appears in the display in case the mains polarization is incorrect:
Attention: Mains
Phase incorrect!
If you read the above message, switch off the unit by pressing the power
key. Please wait until the display no longer reads
GOING TO SLEEP..
Disconnect the CAT from mains by operating the mains switch 11 on
the back panel. Now pull the mains plug and re-insert it into the mains
socket rotated by 180°.
If you switch on the unit again, the warning should not appear now.
Important
·
If the CAT issues the mains polarization warning or no warning at all
for both positions of the mains plug, check the connection to earth of
your mains socket and mains cord. You have to ensure a stable
connection to earth for the mains phase detection of the CAT to
work correctly!
14
6.4 Using Audionet Link
If you connected the CAT to an Audionet pre amplifier via 'Audionet
Link', you can comfortably switch on/off the CAT (and all other units
connected by 'Audionet Link') with the remote control of the pre amplifier.
Please refer to section 'Audionet Link' on page 11 for information on how
to set up the necessary connections.
Note
·
Some Audionet devices issue the 'switch on/off' signal to any further
Audionet units daisy chained to their 'Audionet Link' output with a
little delay to avoid all units switching on at the same moment, which
could cause an overload of your mains fuse. Please consult the user's
manual of your other Audionet units on this subject, too.
·
Independently from the 'Audionet Link' interface, you can switch
on/off manually your CAT at any time by using the power key on the
front plate or the remote control.
6.5 AutoStart function
If the AutoStart function of the CAT is active, the unit does not stay in
stand-by mode after connecting to mains (e.g. by using the mains switch
on the back panel), but switches on automatically. Use this option to
power on the unit automatically using a timer device. Refer to section 'Set
AutoStart' on page 31 for detailed information how to setup the AutoStart
function.
6.6 Control elements on the front panel
The front panel has four keys to control the CAT (see section 'Overview
front panel' on page 7). With these keys you can control all functions as
well as all setup options to adjust the unit to your preferences (see section
'Setup menu' on page 24).
power
Use key to switch on/off the unit (see section 'Switching on
and off' on page 13).
set
Push key shortly to navigate through the setup menu (see section 'Setup menu' on page 24).
Keep key pushed for longer than two seconds to toggle between FM and AM reception (see section 'Switching frequency bands' on page 17) or to exit the setup menu (see section 'Setup menu' on page 24).
15
up /down Push keys to start automatic search (see section 'Automatic
search' on page 17), tune manually (see section 'Manual
search' on page 18) or adjust any setup option (see section
'Setup menu' on page 24).
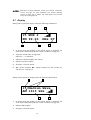
6.7 Display
During FM reception the display offers the following information:
1
3
2
15 WDR 2
FM 99.20
_▄█
MHz ST
6
5
4
1
in Preset mode the number of the current preset is displayed, the
Scan mode is indicated by SC (see section 'Set Mode' on page 29)
2
shows the station name, if supported;
otherwise - - is indicated.
3
indication of field strength (max. 4 bars)
4
indicator for FM reception
5
frequency of current station
6
ST = Stereo reception, MO = Mono reception (see also section 'Set
FM-Receiver' on page 27)
During AM reception the display offers the following information:
2
1
15 Medium Wave
AM 1613 kHz _▄█
3
4
1
in Preset mode the number of the current preset is displayed, the
Scan mode is indicated by SC (see section 'Set Mode' on page 29)
2
indicates AM reception
3
frequency of current station
16
4
indication of field strength (max. 4 bars)
As soon as you enter the setup menu by pushing the set key, the display
changes to show information related to the selected menu item. For further display details refer to the description of each menu item in section
'Setup menu' starting from page 24.
Note
·
After 10 minutes without any user interaction the 'display saver' is
invoked automatically. The display then shows only the station name
(if supported by the station, otherwise the frequency) or the radio
text. Please refer to section 'Set Dim Level' on page 28 for further information on the 'display saver' mode.
6.8 Switching frequency bands
Press key set on the front panel longer than 2 seconds to toggle between
FM and AM reception. The display indicates the current reception mode
(see section 'Display' on page 16).
Tip
·
You can directly select the reception mode with the optional Audionet System Remote Control Harmony One. Press key FM on screen
2 to switch the CAT to FM reception. Press key AM to put the CAT
into AM reception mode (see section 'Screen 1' on page 37).
6.9 Automatic search
Start the automatic search in the corresponding direction by holding
down the key up or down on the front panel for longer than 2 seconds.
With the optional Audionet System Remote Control Harmony One please
use keys Ch+ and Ch- .
If the next station is found, the search stops automatically. It also stops
manually at the current position if you use keys up / down or Ch+ /
Ch- again.
Note
·
While the CAT is in Preset mode, the keys up and down or keys
Ch+ and Ch- switch between the Presets. Put the CAT into
17
Scan mode in order to manually tune with keys above (see section
'Set Mode' on page 29).
·
If the search reaches the upper or lower end of the frequency range
without finding a station, the search continues at the corresponding
opposite end of the frequency range maintaining the search direction.
6.10 Manual search
Use keys up and down on the front panel or keys ‡ and ˆ of the
Audionet System Remote Control Harmony One to tune the CAT manually.
up or ‡ increases the frequency one step. down or ˆ decreases the
frequency one step. The step size is 50 kHz in FM reception mode and
9 kHz in AM reception mode.
Note
·
If you reach the upper or lower end of the frequency range, the search
continues at the corresponding opposite end of the frequency range
maintaining the search direction.
6.11 Direct frequency input
In FM reception mode you are able to enter the desired frequency directly
using the digit keys of the optional Audionet System Remote Control
Harmony One.
First, press key # enter to invoke the Direct Frequency Input dialog.
The display shows:
Frequency Input:
FM _ _ _._ _ MHz
Now use the digit keys on screen 1 of the Harmony One to enter the desired frequency digit by digit from the left to the right. As soon as the last
digit is entered, the CAT tunes to the new frequency. In case you would
like to exit this mode without completing the input just press key # enter again.
18
While in Direct Frequency Input mode please follow these rules:
·
Only frequencies in the range from 87.50 MHz to 108.00 MHz are
allowed. Therefore, only digits 8, 9 or 1 are permitted as first digit.
All other entries are ignored.
·
It is not necessary to enter a leading zero (for frequencies below
100 MHz). Simply press 8 or 9 . The CAT automatically adds the
leading zero. Example: Press 9 6 5 0 to enter the frequency of
96.50 MHz.
·
To enter frequencies greater than 100 MHz press 1 for the fist digit.
The CAT automatically recognizes the input as 10. You are spared
from unnecessary inputs. Example: Press 1 6 7 0 to enter the
frequency of 106.70 MHz.
·
During FM reception the smallest possible frequency step is 50 kHz,
hence the last digit of the frequency has to be 0 or 5. Press digit key
0 to enter a 0. Any other digit key enters automatically a 5 as last
digit.
Note
·
Direct Frequency Input mode is only available using the optional
Audionet System Remote Control Harmony One.
·
This function is only available in FM reception mode.
19
6.12 Info function Show
Independently from the display settings you are able to call up all relevant information on the currently tuned station with a single keystroke.
For this press key set on the front panel once for less than 2 seconds, or
use keys Guide or Show on screen 2 of the optional Audionet System Remote Control Harmony One (see section 'Key assignments CAT'
on page 35 and section 'Screen 2' on page 37).
For a short time the display offers the following information:
FM reception mode
4
2
4
3
5
15 WDR 2
FM 99.20
AM reception mode
_▄█
MHz ST
1
2
15 Medium Wave
AM 1613 kHz _▄█
6
28.04.2003 16:57
Pop Musik
2
1
3
7
8
1
2
3
4
5
6
7
8
Frequency of station 1
Reception mode indicator 1
Field strength 1
Preset number or Scan mode indicator 2
Station name (if supported by station) 1
Playback mode (ST= Stereo or MO=Mono) 3
Time and date (if supported by station) 4
Program type PTY (if supported by station) 4
Note
·
The info function is active for about 12 seconds. After that the CAT
switches back to displaying information according to the settings you
made.
·
While displaying the info function the display is set to 100% brightness for better readability. After leaving this function the display
brightness is reset to the user selected level.
·
While in FM reception mode time, date and program type are displayed separately after approx. 6 seconds.
1
See section 'Display' on page 5
2
See section 'Set Mode' on page 29
3
See section 'Set FM-Receiver' on page 27
4
See section 'Set RDS Option' on page 26
20
7
Presets
The CAT offers up to 99 presets to save stations. Each preset comprises
the reception mode (FM or AM) and the frequency of a station. Preset
numbers can be selected freely in the range from 1 to 99.
7.1 Save preset
Tune the CAT to the station you would like to save into a preset. For
details on how to tune to a station please refer to section 'Automatic
search' on page 17, to section 'Manual search' on page 18 and to section
'Direct frequency input' on page 18. Now press the set key on the front
panel 3 times for less than 2 seconds until the display reads:
SAVE PRESET: 0_
Use the up and down keys to select the 2nd digit of the preset number.
Hold down the set key longer than 2 seconds to acknowledge the 2nd digit
of the preset number. Now use the up and down keys to adjust the 1st
digit of the preset number.
Keep set pressed for longer than 2 seconds to acknowledge the 1st digit.
The preset number is now entered completely. The 2nd line of the display
now reads:
SET = save
If you are sure to save the current station to the selected preset number
hold down the set key longer than 2 seconds to save.
In case you would like to save the current station to a different preset
number then just press key set shortly (less than 2 seconds) and start the
selection procedure again.
Note
·
You can always exit the save dialogue by pressing the set key
shortly.
Tip
·
It is much more comfortable to save a station using the optional
Audionet System Remote Control Harmony One. Just press key
Save Preset on screen 2 of the device menu CAT (see section
'Screen 2' on page 37).
The display reads:
SAVE PRESET: _ _
21
Now use the digit keys on screen 1 to enter the desired preset number. Afterwards the display prompts:
Enter = save
Press key enter to save the current station to the preset number entered above.
Note
·
In case you would like to cancel the save procedure just press
Save Preset again.
Important
·
By saving to an already occupied preset the old information will
be irretrievably overwritten!
7.2 Load preset
To load a previously saved station press the set key on the front panel
twice for less than 2 seconds. The display reads:
LOAD PRESET: 0_
Now use the up- and down keys to select the 1st digit of the preset number.
Hold the set key down for longer than 2 seconds to proceed. Use the upand down keys to select the 2nd digit of the preset number.
Proceed with a long keystroke on set (longer than 2 seconds). The preset
number is now entered completely. To load the selected preset press and
hold set for at least 2 seconds. The display shows:
loading...
in the second line while loading the preset.
Note
·
You may quit the load preset dialogue at any time by pressing the set
key for less than 2 seconds.
22
Tip
·
Loading a previously saved preset is done much more comfortably by
using the optional Audionet System Remote Control Harmony One.
Press key Load Preset on screen 1 in the device menu CAT (see
section 'Screen 2' on page 37).
The display shows:
LOAD PRESET: _ _
Now use the digit keys on the same screen to enter the desired preset
number. After entering the complete preset number the CAT loads
the previously saved station. Loading is indicated by:
loading...
in the display.
Note
·
If you like to exit the load station dialogue simply press key
Load Preset again.
23
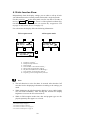
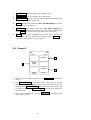
8
Setup menu
To adjust the CAT to your preferences, please use the setup menu.
Push the set key on the front panel 4 times for less than two seconds to
get to the first item of the setup menu. Navigate to the next menu item by
pushing the set for less than two seconds again.
After the last menu item you will leave the setup menu automatically. Of
course, you may exit the setup menu from each menu item by holding
down the set key down for longer than two seconds (long keystroke). The
CAT then returns to the normal operating mode.
The following figure provides a good overview of the structure of the
setup menu:
ê
Info-Funktion Show
ê
Load Preset è 2nd digit
ê
Save Preset è 2nd digit
Show or Guide
Load Preset
è 1st digit
è load preset
Save Preset
è 1st digit
è save preset?
è preset is saved
ê
Set RDS Option*)
RDS / Info
ê
Set FM-Receiver*)
Mono
ê
Set Dim Level
Dim
ê
Set Mode
Preset / Scan
ê
Set FM-Input
Set or Menu
ê or Set or Menu
Set Search Level
ê or Set or Menu
Set Language for PTY
ê or Set or Menu
Set AutoStart
ê or Set or Menu
Set Off-Text
*)
ê
è
xxx
only while in FM reception mode
= short keystroke on set (less than 2 seconds)
= long keystroke on set (longer than 2 seconds)
= key on Audionet System Remote Control Harmony One for direct access of function xxx
24
Change any setting of a menu item by using the keys up and down on the
front panel or Ch+ and Ch- of the Audionet System Remote Control
Harmony One.
Tip
·
All settings of the setup menu can be dealt with by using the keys on
the front panel. However, if you prefer to change settings from the
comfort of your listening chair, please use the Audionet System Remote Control Harmony One. For more information about the remote
control and its usage see section 'Audionet System Remote Control'
on page 33.
Note
·
If you make no adjustments for longer than 12 seconds the CAT
automatically leaves the setup menu and returns to normal operating
mode.
·
While you are in the setup menu the display brightness is set to 100%
for better readability. After leaving the setup menu the display
brightness is automatically reset to its user selected level.
·
If you power down the CAT to stand-by mode all settings are stored
automatically in the non-volatile memory of the unit. Even after disconnecting from mains power the CAT still remembers your settings.
·
The key Set or Menu of the Audionet System Remote Control
leads directly to the menu item 'Set FM-Input'. Navigate to each next
menu item by pressing the key Set or Menu (the figure on page
24 shows the order of the menu items).
·
Access menu items 'Set RDS Option', 'Set FM-Receiver', 'Set Dim
Level' and 'Set Mode' directly by using the corresponding key of the
Audionet System Remote Control. Consult section 'Audionet System
Remote Control' on page 33 for details.
In the following all options of the setup menu are explained in detail.
25
8.1 Set RDS Option
As an alternative to the indication of the current frequency the CAT is
able to display information of the Radio Data Service (RDS) if the current station supports RDS.
Use keys up and down or keys Ch+ and Ch- of the Audionet System
Remote Control Harmony One to select the desired RDS function:
None
no RDS option, back to frequency display
Radio Text
the received Radio Text is scrolled in the display
Prog. Type (PTY) displays the Program Type information, select
language with menu item 'Set Language for PTY'
on page 31
Time & Date
displays time and date information as broadcasted by
current station
Note
·
Availability and contents of RDS options depend on the broadcaster
only. Also, bad reception quality might narrow the availability and
performance of RDS.
·
If option Radio Text is selected, the display shows No Radio
Text if the current station does not support Radio Text, or the data
could not be recognized and processed.
Tip
·
If you prefer to change settings from the comfort of your listening
chair, please use keys Info or RDS / Info of the Audionet System
Remote Control Harmony One to directly access the menu item Set
RDS Option. For more information about the remote control and
its usage see section 'Key assignments CAT' on page 35 and section
'Screen 2' on page 37.
26
8.2 Set FM-Receiver
Use this option to choose if the program of the current FM station is presented in stereo or mono.
Note
·
If the current FM station broadcasts only a mono program or the reception quality is too low, the output is mono although this option is
set to Stereo.
Press key down on the front panel or key Ch- of the Audionet System
Remote Control Harmony One to enable stereo playback (if supported by
the broadcaster). The display shows Stereo.
Press key up on the front panel or key Ch+ of the Audionet System
Remote Control Harmony One to force mono playback. The display
shows Mono.
Note
·
This function is only available in FM reception mode. AM radio programs are broadcasted and played back in mono on principle.
Tip
·
If you prefer to change settings from the comfort of your listening
chair, please use the key Mono of the Audionet System Remote
Control Harmony One to directly access the menu item Set FMReceiver. For more information about the remote control and its
usage see section 'Screen 2' on page 37.
27
8.3 Set Dim Level
Select the brightness of the display on the front panel. Five settings are
available: 100%, 75%, 50%, 25% and OFF. Use keys up/down or Ch+ /
Ch- of the Audionet System Remote Control Harmony One to set the
desired brightness.
Important
·
Long-term usage of the display set to maximum brightness (setting 100%) may cause extended signs of wear resulting in a decay
of contrast or brightness of individual dots in the display. Do not
use the display with a brightness set higher than the factory default of 50% over a longer period of time!
Note
·
Is the brightness set to Off the display is only on during setup adjustments, switching on/off and tuning/searching stations. It switches
off automatically several seconds after the last user entry.
·
The CAT activates the 'display saver' automatically after 10 minutes
without any user entry.
·
During active 'display saver', the display shows only the station
name, if supported by the station (e.g. WDR 2). Otherwise the display
shows the frequency of the station (e.g. 106.7 MHz). The display
brightness is always reduced to 25%, and the location of the information text will change randomly every 12 seconds to prevent any 'burnin' effect of the display.
·
If the RDS option Radio Text is selected (see section 'Set RDS
Option' on page 26), the received Radio Text is scrolled alternately in
the top or bottom line of the display. If the current station does not
support Radio Text the display shows No Radio Text.
·
The 'display saver' is de-activated and the display returns to its normal mode as soon as any user entry is detected.
·
The user cannot switch off the automatic 'display saver' function!
Tip
·
If you would like to de-activate the 'display saver' and return to the
normal display mode press key set for less than 2 seconds, or press
keys Show or Guide of the Audionet System Remote Control
Harmony One (see section 'Info function Show' on page 20).
·
If you prefer to change settings from the comfort of your listening
chair, please use the key Dim Display on screen 1 of the Audionet
System Remote Control Harmony One to directly access the menu
item Set Dim Level (see section 'Screen 1' on page 37).
28
8.4 Set Mode
This option selects the function of the keys up and down on the front
panel or the keys Ch+ and Ch- of the Audionet System Remote Control in normal operating mode.
Press key down or Ch- to enter the Scan mode. The display shows
Scan.
In Scan mode a short keystroke (less than 2 seconds) on up/down tunes
the CAT one frequency step (FM mode 50 kHz, AM mode 9 kHz) in the
corresponding direction for manual search.
Use a long keystroke on up/down or Ch+ / Ch- on the Audionet System Remote Control Harmony One to start the automatic search in the
corresponding direction. The search stops automatically at the next found
station (see section 'Automatic search' on page 17).
Note
·
During normal display mode the CAT indicates the Scan mode with
the symbol SC in the upper left corner of the display (see section
'Display' on page 16).
Press key up or Ch+ to enter the Preset mode. The display shows Preset.
In Preset mode a short keystroke on up or Ch+ selects the next preset.
A short keystroke on down or Ch- loads the previous preset.
Note
·
During normal display mode the CAT shows the number of the current preset in the upper left corner of the display (see section 'Display'
on page 16).
·
In case you tuned to a different frequency manually the display
shows – – instead of the preset number.
·
You still may start the automatic search with a long keystroke on up
or down.
Tip
·
You can switch between Scan and Preset mode much more comfortably using the optional Audionet System Remote Control Harmony
One. Key Preset / Scan on screen 2 toggles between both modes
directly without entering the setup menu (see section 'Screen 3' on
page 38).
29
8.5 Set FM-Input
Adjust the sensitivity of the FM receiver according to the signal strength
of the input signal (antenna signal). Two settings are available.
Press key up on the front panel or key Ch+ of the Audionet System
Remote control Harmony One to configure the CAT for high level input
signals (e.g. cable radio). The display shows Cable.
Press key down on the front panel or key Ch- of the Audionet System
Remote Control Harmony One to configure the CAT for low level inputs
(e.g. FM antenna). The display shows Aerial.
Note
·
This function is only available in FM reception mode.
8.6 Search Level FM
There are three settings available to adjust the threshold of the automatic
search function (see section 'Automatic search' on page 17). The greater
the threshold, the stronger the signal of a station has to be in order to be
detected by the automatic search function and to stop the search. Use the
up or Ch+ key to increase the threshold. Press key down or Ch- to
decrease the threshold.
The three threshold levels 70 dBu, 80 dBu and 90 dBu are available.
Note
·
This function is only available in FM reception mode.
·
If the automatic search function (see section 'Automatic search' on
page 17) stops too often without finding a suitable station, increase
the threshold. If not all expected stations are found by the search
function, decrease the threshold.
·
The threshold for the automatic search function is only adjustable for
FM reception mode. While in AM reception mode the threshold is
fixed.
30
8.7 Set Language for PTY
Use the keys up and down on the front panel or keys Ch+ and Ch- of
the Audionet System Remote Control Harmony One to select the language for displaying the program type (PTY). PTY is part of the Radio
Data Service (RDS). Available languages are: English, German, Swedish, Dutch and Spanish.
Note
·
Information about the program type is only available if the CAT is in
FM reception mode and tuned to a station supporting RDS. Also, the
option SET RDS OPTION has to be set to Prog. Type (PTY).
8.8 Set AutoStart
If the AutoStart function of the CAT is active, the unit switches on to
normal operating mode automatically (instead of remaining in stand-by
mode) as soon as it is connected to mains power (e.g. by using the mains
switch 11 on the back panel). Activate this option if you are using the
CAT with a timer device.
Use keys up and down on the front panel or keys Ch+ and Ch- of the
Audionet System Remote Control Harmony One to select the desired
function:
disabled
The AutoStart function is disabled. After connecting the
CAT to mains power, the unit stays in stand-by mode.
You have to use the power key on the front panel or the
remote control, or the 'Audionet Link' to switch on the
CAT to normal operating mode.
active
The AutoStart function is active. As soon as you connect
the CAT to mains power (e.g. using the mains switch 11
on the back panel) the unit starts up automatically to
normal operating mode. Use this setting for timer controlled switching on/off.
Note
·
In order to use the AutoStart function with a timer device, the mains
switch 11 on the back panel has to be in position 'on' all the time.
The connection to mains power is switched by the timer device in this
case.
31
8.9 Set Off-Text
Select here how the CAT indicates the stand-by mode. Use keys up and
down on the front panel or keys Ch+ and Ch- of the Audionet System
Remote Control Harmony One to select the desired indicator:
off
The stand-by mode is indicated by the text off.
dot
The stand-by mode is indicated by a small dot (pixel) in the
display.
Note
·
Approx. every 12 seconds the stand-by mode indicator changes positions randomly in the display to prevent any 'burn in' effect (see section 'Set Dim Level' on page 28).
8.10 Factory defaults
Option
Setting
SET RDS OPTION
none
SET FM-RECEIVER
Stereo
SET DIM VALUE
50%
SET MODE
Scan
SET FM-INPUT
Aerial
SEARCH LEVEL FM
70 dBu
SET LANGUAGE FOR PTY
English
SET AUTOSTART
disabled
SET OFF-TEXT
dot
32
9
Audionet System Remote Control
All functions of the CAT can be controlled using the optional Audionet
system remote control Harmony One. Furthermore, it is possible to control up to 14 additional devices with the Harmony One.
Press key Devices to enter Device Mode. The display now lists all
devices included in the current configuration of the Harmony One. Select
CAT from the list to set the Harmony One to controlling the CAT. Device Mode gives you access to all the possible commands to control your
CAT. The following explains all these commands in detail.
Important
·
During everyday use, you should never need to use the Device Mode
of your Harmony One, but control the CAT (and other devices of
your audio setup) by customizing your Activities. For detailed information on how to customize and use Activities on your Harmony
One please consult the separate user's manual that came with your
Harmony One.
1
2
My Activities:
Mi 14:51
1/2 pages
Listen to CDs
Watch a DVD
3
3
CD with VIPG3
Options
Devices
4
5
1
Power key for use with Activities, turns all devices off that are included into the current Activity. See separate user's manual of Harmony One.
2
Depending on the operational mode, the touch screen of the Harmony One shows a list of Activities or Devices, help or infrared
commands and any available listings.
3
If a menu or listing stretches over more than one screen page, use the
corresponding arrow buttons to go to the next or previous page of the
menu or listing. (see also separate user's manual of the Harmony
One).
4
Devices key, lists all the devices on the display, and allows you to
select and directly control any device included in the configuration of
the remote control (see separate user's manual of Harmony One). Select CAT to enter Device Mode for controlling the CAT.
33
5
Activities key: Press this key to view a list of Activities you have
added. Press the button next to the Activity you want to select, and
the Harmony One will control your entertainment system (see separate user's manual of Harmony One).
Important
·
The Power key
is only available for Activities. In Device
Mode the Power key has no function.
·
Even without using an Activity, the user is able to control all
functions of the CAT using the Harmony One in Device Mode.
·
The keys described below to control the CAT refer to the factory
default programming of the Audionet System Remote Control
Harmony One. Understandably, any changes done to this setup
by the user cannot be discussed here.
Tip
·
In order to switch the CAT on/off, without using an Activity, please
use the keys Power On , Power Off and/or Power Toggle on
screen 3 (see section 'Screen 3' on page 38). Of course, it is possible
to control the CAT without any Activity, but to tap the full potential
of the Harmony One you need to configure Activities customized to
your needs (please refer to separate manual of the remote control
Harmony One).
Note
·
Please read the separate user's manual to your Audionet system remote control Harmony One. Activities, Devices and Device Mode as
well as customizing the remote control are discussed there.
34
9.1 Key assignments CAT
CAT:
Mi 14:51
1/3 pages
FM
AM
Dim Display
Set
Current
Activity
Devices
1
3
2
5
4
6
7
8
9
1
Menu calls the setup menu, press again to navigate to next menu
item (see section 'Setup menu' on page 24). This key has the same
function as key Set (see section 'Screen 1' on page 37).
2
Info calls directly menu item SET RDS OPTION (see section 'Set
RDS Option' on page 26). This key has the same function as key
RDS / Info (see section 'Screen 2' on page 37).
3
Manual tuning upwards (see section 'Manual search' on page 18).
4
Manual tuning downwards (see section 'Manual search' on page 18).
35
5
Press key Guide to display current information (see section 'Info
function Show' on page 20). This key has the same function as key
Show (see section 'Screen 2' on page 37).
6
Ch+ , automatic search upwards (see section 'Automatic search' on
page 17), select next preset (see section 'Set Mode' on page 29) or adjust an option from the setup menu (equivalent to key up on the front
panel).
7
Ch- , automatic search downwards (see section 'Automatic search'
on page 17), select the previous preset (see section 'Set Mode' on
page 29) or adjust an option from the setup menu (equivalent to key
down on the front panel).
8
Digit keys for frequency direct input in FM reception mode (see
section 'Direct frequency input' on page 18) or for selecting the number of the preset to be loaded/saved (see section 'Presets' on page
21).
9
Enter key enter , acknowledges saving of presets (see section
'Save preset' on page 21) or calls up the frequency direct input dialogue (see section 'Direct frequency input' on page 18).
36
9.2 Screen 1
CAT:
Mi 14:51
1/3 pages
1
FM
AM
2
3
Dim Display
Set
4
Current
Activity
Devices
1
FM switches the CAT to FM reception mode (see section 'Switching
frequency bands' on page 17).
2
AM switches the CAT to AM reception mode (see section
'Switching frequency bands' on page 17).
3
Dim Display calls directly menu item SET DIM VALUE (see section 'Set Dim Level' on page 28).
4
Set calls the setup menu, press again to navigate to next menu item
(see section 'Setup menu' on page 24). This key has the same function
as key Menu (see section 'Key assignments CAT' on page 35).
9.3 Screen 2
CAT:
Mi 14:51
2/3 pages
1
Load Preset
Save Preset
2
3
Preset /
Scan
Mono
4
5
RDS / Info
Show
6
Current
Activity
Devices
37
1
Load Preset calls the dialogue for loading presets.
2
Save Preset calls the dialogue for saving presets.
3
Preset / Scan toggles directly between Preset and Scan mode
(see section 'Set Mode' on page 29)
4
Mono calls directly menu item SET FM-RECEIVER (see section
'Set FM-Receiver' on page 27)
5
RDS / Info calls directly menu item SET RDS OPTION (see
section 'Set RDS Option' on page 26). This key has the same function
as key Info (see section 'Key assignments CAT' on page 35).
6
Show shows current information (see section 'Info function Show'
on page 20). This key has the same function as key Guide (see
section 'Key assignments CAT' on page 35).
9.4 Screen 3
CAT:
Mi 14:51
3/3 pages
2
Power On
1
Power Off
3
Power
Toggle
Current
Activity
Devices
1
If the CAT is in stand-by mode, press key Power On to switch the
unit on.
2
Use Power Toggle to switch on/off the CAT. This key has the
same function as the power key on the front panel. If the CAT is in
stand-by mode, Power Toggle will switch on the unit. If the CAT
is already switched on, Power Toggle will switch off the unit to
stand-by mode.
3
If the CAT is switched on, use key Power Off to switch the unit
off to stand-by mode.
38
10
Security advice
Important
·
Avoid packaging material, especially plastic bags, coming into children's hands!
·
Store and operate the unit in a dry room at a reasonable room temperature only!
·
Avoid moisture, any liquids, dirt or small objects getting into the
unit!
·
Set up the unit in a sufficiently ventilated environment!
·
Do not cover the unit!
·
Do not open the unit. Unauthorised opening will void warranty!
·
Do not short-circuit the outputs!
·
During connecting or removing the CAT to/from your pre amplifier
all units have to be switched off to prevent damage of the CAT or any
of the other connected units.
·
Use dry cloth for cleaning!
We would like to wish you many exciting listening experiences with your
new Audionet product.
If you still have any questions, do not hesitate to ask your competent
Audionet dealer or contact us directly
39
11 Technical data
Function
configurable FM/AM tuner
Frequency range
FM
AM
Frequency response
30 – 15,000 Hz (+/- 1 dB)
SNR
> 66 dB
Inputs
1 FM antenna, 75 Ohms,
1 AM antenna, double pole
7-pin connector for Audionet EPS,
1 Audionet Link
Outputs
1 pair Line Out, Cinch, gold plated
1 pair Balanced Out, Neutrik XLR, gold plated
Output impedance
68 Ohms
Mains
230 V, 50..60 Hz
Power consumption
30 Watts max.
Dimensions
Width:
Height:
Depth:
Weight
8 kg
Finish
Front: brushed aluminium, 10 mm, black anodised, white
print or aluminium 'nature', anodised, black print
Display: red or blue
Cover: aluminium, black anodised, 6 mm
Chassis: steel, black coated
Features
-
Radio Data System (RDS)
configurable antenna sensitivity for FM
automatic mains phase detection
two lines vacuum fluorescent display
remote switch on/off via Audionet Link (optical)
AutoStart function for timer control
Options
-
Audionet System Remote Control Harmony One
external precision power supply EPS
87.5 – 108.0 MHz
522 – 1611 kHz
430 mm
70 mm
310 mm
Errors and omissions excepted. Specifications and design are subject to changes without prior notice.
audionet is a trademark of Idektron GmbH & Co KG
Engineered and produced by:
Idektron GmbH & Co. KG, Herner Str. 299, Gebäude 6, 44809 Bochum, Germany
www.audionet.de
[email protected]
40