1
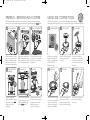
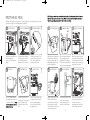
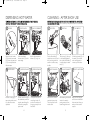
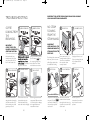
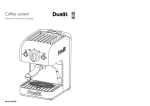
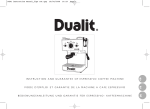
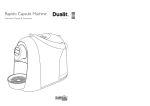
dcm1 ib_2009.2.25.qxp
27/02/2009
14:34
Coffee machine
Instruction Manual & Guarantee
Page 1
dcm1 ib_2009.2.25.qxp
27/02/2009
14:07
Page 2
YOUR ESPRESSIVO
CONTENTS
Designed for the coffee enthusiast, the Espressivo delivers the ultimate
cup every time with each component crafted to ensure a deliciously
rich flavour. From the 15 BAR pump delivering the optimum pressure
needed to create a perfect ‘crema’, to the Thermabloc water heating
system providing instant hot water and steam on demand, Dualit have
thought of everything.
Your Espressivo............................................................ 2
•
Self-priming 15 BAR pressure pump – the ideal pressure to give
efficient coffee extraction combined with reliability.
Priming - Before each coffee.............................. 8
•
Thermobloc (water-heating on demand).
Using ESE coffee pods............................................ 9
•
1.5L removable easy-fill water tank.
Using ground coffee................................................. 10
•
Easy-froth nozzle makes perfect froth, every time.
The Espresso shot..................................................... 11
•
Cast aluminium chassis and stainless steel body for Dualit quality
and robustness.
Frothing milk................................................................. 12
•
Large cup holder with rail.
Dispensing hot water............................................... 14
•
Extra cup height clearance - fits a full size mug under the filter
nozzles.
Cleaning - After each use..................................... 15
•
Pop-up feature in drip tray indicates when full.
Cleaning - As required............................................ 16
•
Three coffee options: single serve; dual serve; and ESE pod.
•
Accessory holder that keeps filters and froth nozzle to hand.
Safety precautions...................................................... 4
Before first use............................................................ 5
Know your coffee machine.................................. 6
Descaling......................................................................... 17
Troubleshooting.......................................................... 18
Recipes............................................................................. 22
Guarantee...................................................................... 23
3
dcm1 ib_2009.2.25.qxp
27/02/2009
14:07
Page 4
SAFETY PRECAUTIONS
•
Unplug the appliance from the mains
before cleaning or maintaining.
•
Do not immerse in water or other
liquids.
•
Do not leave the machine in a room
with a temperature below 0°C, as any
water remaining in the appliance could
freeze and cause damage.
•
WARNING: This appliance must be
earthed.
•
Before refilling the water reservoir,
unplug the appliance from the mains.
Ensure that the voltage of the appliance
corresponds to that of the mains
supply. Do not place the coffee machine
on a metal tray or other metal surface
during use.
•
Do not overfill the water reservoir.
This appliance is not intended for use
by persons (including children) with
reduced physical, sensory or mental
capabilities, or lack of experience and
knowledge, unless they have been given
supervision or instruction concerning
use of the appliance by a person
responsible for their safety.
•
Do not use sparkling water (with
carbon dioxide).
•
Never fill the reservoir with hot or
boiling water.
READ ALL
INSTRUCTIONS
BEFORE USING THE COFFEE MACHINE.
KEEP THESE INSTRUCTIONS FOR
FUTURE REFERENCE.
•
•
•
Do not lift the appliance up using the
water reservoir. Only hold the appliance
body.
•
Do not place the appliance on a
polished wood surface, it could damage
the wood.
•
•
Do not place on a tray or surface that
may collect liquid.
•
•
Do not place the appliance over or
close to sources of heat such as electric
rings, hot ovens or open flames.
•
•
The use of extension cables not
authorised by the manufacturer may
cause damage or accidents.
•
Do not use the machine without water,
as this may cause the pump to burn
out.
•
BEFORE
FIRST USE
•
•
The power supply cable should not be
allowed to come into contact with hot
surfaces.
4
Only use the appliance with the drip
tray correctly fitted.
The appliance is not designed for
commercial or industrial use; it is for
domestic use only.
Do not touch the metal parts, the filter
holder or its housing when the
appliance is in use, as this may
cause burns or scalding.
•
Unpack the box with care, keeping all the
packaging materials until you are satisfied
everything is present and in working order.
Once satisfied remove any tags from the
coffee machine and recycle the packaging
appropriately.
THE COFFEE MACHINE MUST BE
FLUSHED THROUGH WITH
WATER BEFORE THE FIRST USE.
Children should be supervised to
ensure they do not play with the coffee
machine.
•
Do not operate on an uneven surface.
•
Do not leave this appliance unattended.
•
Turn the appliance and main power off
when not in use.
1.
Follow the instructions as if priming the
machine, pages 8, leave the filter holder
(7) empty, i.e. no filter (17), (18) or (19)
and no ground coffee.
Empty the whole water tank (11)
through the machine; this will rinse the
internals ready for brewing coffee.
SAVE THESE
INSTRUCTIONS
Do not operate this appliance with a
damaged cord or plug. If the supply
cord is damaged, it must be replaced by
Dualit Ltd, its service agent or similarly
qualified person in order to avoid a
hazard.
2.
Refill the tank and steam as per
instructions on page 12 for 15 seconds
then dispense hot water as on page 14
for 15 seconds.
3.
Before they are used the filter holder,
measuring spoon, filters, water tank and
froth nozzle (16) must be washed with
detergent and lukewarm water, then
rinsed and dried.
NOTE: The control knob (5) may be a
harder to turn when the machine is new.
This will loosen with use.
This appliance conforms to directive
89/336 CEE regarding electromagnetic
compatibility.
5
dcm1 ib_2009.2.25.qxp
27/02/2009
14:07
Page 6
KNOW YOUR COFFEE MACHINE
9. CUP HOLDING
10. ACCESSORY HOLDER FOR
PLATE WITH RAIL
FILTERS AND NOZZLE
11. 1.5 LITRE REMOVABLE
1. POWER INDICATOR LIGHT
WATER TANK
2. POWER ON/OFF SWITCH
12. TEMPERATURE INDICATOR
3. COFFEE/OFF/STEAM
13. STEAM/WATER SELECTOR
CONTROL KNOB
14. STEAM WAND
4. BREWHEAD,
SHOWER HEAD AND GASKET
15. FROTH NOZZLE
5. FILTER HOLDER
16. ESE POD FILTER
6. REMOVABLE DRIP TRAY
17. 1 CUP FILTER
AND COVER
18. 2 CUP FILTER
7. TRAY FULL INDICATOR
8. NON-SLIP RUBBER FEET
19.
7G MEASURING SPOON
WITH INTEGRATED TAMPER
All illustrations are for representation only,
your model may vary from illustrations shown.
6
7
dcm1 ib_2009.2.25.qxp
27/02/2009
14:09
Page 8
PRIMING - BEFORE EACH COFFEE
USING ESE COFFEE PODS
The brewhead (4), filter holder (5) and cup must be the correct operating temperature
before the first use.Thereafter subsequent cups must be pre-warmed before EACH coffee.
ESE (Easy Serving Espresso) pods are individually wrapped and pre-tamped
ensuring the perfect espresso every time. Look for the ESE logo on compatible coffee pods.
1 FILL WATER TANK
2 TURN ON
3 WAIT 40 SECONDS
1 PURCHASE PODS
2 THE ESE FILTER
3 INSERT POD
40
SEC
Fill the water tank (11) with
water; do not go above the
‘MAX’ mark. Filtered water
will reduce the build up of
limescale inside the machine.
4 PRE-HEAT FILTER
Set the power switch (2) to
‘ON’.The thermobloc water
heater system is now heating
to the correct temperature.
5 WARM CUP
The temperature neon will
go out once the thermobloc
is at the correct operating
temperature.
Coffee pods are available
directly from the Dualit
website or call Dualit sales
on 01293 652 500
(UK delivery only).
4 CHECK SEAL
6 READY
Select the ESE pod filter (16)
and snap into the filter
holder (5).
5 TUCK TAB
Each pod is individually
wrapped so you only use
what you need. Place one
fresh coffee pod into the
ESE filter.
6 REMOVE WITH TAB
HOLDER
MILK
CHOC
PODS
Dispense a mug full of
water (min 240ml) through
the machine. Ensure NO
coffee is in the filter
holder (5).
If you like your coffee extra
hot, the serving cup or mug
must be warmed through
before EACH coffee.
8
Discard the water from the
pre-warmed cup or mug, dry
and place back under the
filter holder and your
machine is ready to go...
Make sure there is no gap
between the pod and filter
edge, or water will flow
round the pod and your
espresso will be diluted.
Make sure all the paper is
tucked inside the filter
before attaching the filter
holder to the brewhead (4).
9
Use the tab to remove the
pod once the coffee has
been made.
dcm1 ib_2009.2.25.qxp
27/02/2009
14:47
Page 10
USING GROUND COFFEE
THE ESPRESSO SHOT
Ground coffee only has a three day shelf-life, so grind only what you need each time. If
using pre-ground coffee, use a medium to fine grind suitable for espresso machines.
The basis of all the coffee drinks is the espresso shot.
1 THE COFFEE
2 THE FILTER
3 7 GRAM DOSE
1 ATTACH HOLDER
2 CUPS OR MUGS
3 TURN ON
LOCK
COFFEE
Freshly grind your beans
using the Dualit coffee
grinder or use a pre-ground
coffee suitable for espresso
machines.
4 TAMP
With the other end of the
measuring spoon, ‘tamp’ the
coffee grounds.You are
aiming for a firm but not
too tightly packed filter.
Select the appropriate sized
filter (17 -18) depending on
whether you are making one
espresso, a double or two
singles. Make sure it’s dry.
5 WIPE
Using the measuring spoon
(19), measure out one level
spoon per serving into the
filter. Use 2 level spoons if
using the 2 cup filter.
Align the filter holder (5)
with the open lock symbol,
insert, then rotate 450 to the
closed lock symbol.
4 EXTRACTION
Wipe the edge of the filter
clean. If you don’t, a water
tight seal will not form and
water or coffee will leak
from the brewhead (4).
10
The espresso will flow out of
the filter nozzles.This may
take a few seconds.The
temperature light (12) may
cycle on / off; this is normal.
Place 1 or 2 warmed cups
or mugs under the nozzles
of the filter holder. Make
sure your cups are directly
under both nozzles.
5 TURN OFF
When the cup has been
filled to the desired level
(about 15-20 seconds for an
espresso) turn the control
knob to the off position.
11
To pour your espresso, turn
the control knob (3)
anti-clockwise to the cup
symbol.You will hear the
pump operating.
6 SERVE
Serve immediately or add
your combination of frothed
milk or water. Remove the
filter holder, rotate to open
lock symbol, then clean.
dcm1 ib_2009.2.25.qxp
27/02/2009
14:11
Page 12
FROTHING MILK
Transform your silky smooth espresso to a frothy cappuccino or velvety latte.You will need
a stainless steel jug and a milk thermometer (optional).
1 SELECT STEAM
2 WAIT 40 SECONDS
3 ATTACH NOZZLE
N.B. When you switch the control knob back to the off positon, steam will vent from the
drip tray. This is not a cause for concern. Water is being purged through the machine to
reduce the operating temperature ready for the next coffee.
7 THE TECHNIQUE
8 BOILING POINT
9 STOP STEAMING
79
MAX
40
SEC
Turn the machine ‘ON’ and
set the steam/water
selector (13) to the steam
setting.
4 THE MILK
The temperature indicator
(12) will go out when the
correct temperature for
frothing has been reached.
5 POSITION JUG
Put the froth nozzle (15) on
the end of the steam wand
(14). Push up against the
stopper shown above.
6 START STEAM
Hold the jug at an angle and
slowly raise and lower the
jug in the frothing milk. The
temperature light will cycle
on and off during use.
10 TAP AND SWIRL
If the milk starts producing
large bursting bubbles it
means that it has reached
79°C and is boiling. Milk will
not froth at this temperature.
11 CLEAN NOZZLE
Once you have the desired
amount of frothed milk, turn
the control knob to the off
position then move the jug
away from the nozzle.
12 WIPE AND FLUSH
15
SEC
TAP
SWIRL
Use 75 - 200ml of milk for
each cappuccino or latte. It
is easier to make froth using
cold semi skimmed milk in a
stainless steel jug.
Place the jug under the
steam wand so the head of
the froth nozzle is just
under the surface of the
milk.
12
Turn the control knob (3) to
the steam position.You will
hear the pump operating;
this is quite normal. Steam
will begin to flow.
Gently tap the jug on a firm
surface, let stand for 15
seconds then swirl the jug,
this will create a smooth
velvety froth. Pour into your
cup or mug and serve.
Pull the froth nozzle off the
steam wand and wash
under running water to
remove any milk residue.
13
After each use, wipe the
steam wand and flush the
inside of the wand by
dispensing water and some
steam through the wand.
dcm1 ib_2009.2.25.qxp
27/02/2009
14:13
Page 14
DISPENSING HOT WATER
CLEANING - AFTER EACH USE
CAUTION: WATER WILL BE HOT AND BE DISPENSED AT HIGH PRESSURE.
SUBMERGE THE WAND TO REDUCE SPLASHING.
BEFORE CLEANING, MAKE SURE THE MACHINE IS SWITCHED OFF, UNPLUGGED
AND ALLOWED TO COOL. Do not wash any of the plastic accessories in a dishwasher.
1 PREPARE
2 SELECT WATER
3 WAIT 40 SECONDS
1 THE FILTERS
2 DRIP TRAY
3 THE NOZZLE
40
SEC
Remove the froth nozzle
(15) from the steam wand
(14). Ensure the water tank
(11) is correctly fitted and
filled with water.
4 INSERT WAND
Insert into a deep jug or
teapot and point the wand
to a side wall to reduce
splashback.
Set the steam/water
selector switch (13) to the
water setting.
5 START DISPENSING
Turn the control knob (3) to
the steam/water position to
start the water flowing.You
will hear the pump; this is
quite normal.
14
Turn the filter holder (5)
upside down over a bin and
knock out the grounds. Be
careful not to throw away
the filter.
The drip tray (6) will need
to be emptied regularly. If
the red tray full indicator (7)
is visable, empty the water
tank (11).
Pull the froth nozzle (15) off
the wand (14) and wash
under running water to
remove any milk residue.
6 STOP DISPENCING
4 WIPE THE WAND
5 FLUSH THE WAND
6 EMPTY WATER TANK
To stop the flow, turn the
control knob to the off
position.The machine will
purge to get ready for the
next coffee.
After each use, clean the
wand with a damp cloth.
There should be no milk
residue visible.
Wait for the temperature
indicator (12) to go out.
After steaming milk, flush the
inside of the wand by
passing water and some
steam through the wand.
15
Empty and rinse out after
each session and refill with
fresh water just before you
make your next round of
espresso.
dcm1 ib_2009.2.25.qxp
27/02/2009
14:14
Page 16
CLEANING - AS REQUIRED
DESCALING
BEFORE CLEANING, ENSURE THE MACHINE IS SWITCHED OFF, UNPLUGGED AND
ALLOWED TO COOL. USE ESE PODS TO REDUCE FREQUENCY OF CLEANING.
PRODUCT FAILURE DUE TO THE BUILD-UP OF LIMESCALE IS NOT COVERED BY
GUARANTEE - DESCALE REGULARLY.
1 THE MAIN BODY
2 WIPE BREWHEAD
3 LOOSEN SCREW
1 THE DESCALER
2 FILL TANK
3 DESCALE
LER
CA
DES
TER
WA
Wipe the outside of your
Espressivo with a damp
cloth.Then polish with a dry
cloth.
4 CLEAN BREWHEAD
Wipe the entire brewhead
(4) area and ensure it is
completely free of coffee
grounds. Get inside all the
grooves and clean.
5 UNBLOCK HOLES
Using a screwdriver (pozi
no 2) and hammer, gently
tap the screw to dislodge
any dried coffee.Then
unscrew anti-clockwise.
6 UNBLOCK FILTERS
Ensure that the descaling
product is suitable for
coffee machines. FOLLOW
THE INSTRUCTIONS
ON THE PACK.
4 RINSE TANK
Fill the water tank (11) with
the descaling solution.
Place a large container on
the drip tray. Operate as if
making coffee and steaming
until the tank is empty.
6 STORAGE
5 FLUSH
TER
WA
Remove the showerhead
and gasket then thoroughly
clean the area with a soft
brush removing any coffee
grounds you can see.
Unblock the holes of the
showerhead using a pin.
Wash the gasket and
showerhead with warm
soapy water and rinse
thouroughly.
16
To unblock the filter (16, 17
& 18), use a small pin and
gently push through the
hole on the underside to
unblock.
Rinse the water tank and fill
with water.
Operate as if making coffee
and flush water through the
machine. This will remove
any traces of the descaling
solution.
17
Store the cleaned coffee
machine unplugged with no
coffee in the filter and with
the water tank empty.
dcm1 ib_2009.2.25.qxp
27/02/2009
14:16
Page 18
IMPORTANT: FAILURE TO DESCALE AND CLEAN YOUR MACHINE
WILL INVALIDATE YOUR GUARANTEE.
TROUBLESHOOTING
MY COFFEE
IS NOT HOT
ENOUGH.
1 TURN ON
2 WAIT 40 SECONDS
40
SEC
IMPORTANT:
It is imperative to pre-heat
the thermobloc, filter holder
and cup to the correct
operating temperature
before the first use.
Thereafter subsequent
cups must be pre-warmed
before EACH coffee.
3 PRE-HEAT
Set the power switch (2) to
‘ON’.The thermobloc water
heater system is now heating
to the correct temperature.
4 WARM CUP
The temperature indicator
(12) will go out once the
thermobloc is at the correct
operating temperature.
5 READY
NO COFFEE
FLOWING
FROM THE
BREWHEAD.
IMPORTANT:
If you can hear the pump
operating but no water
comes out, SWITCH
OFF THE MACHINE
IMMEDIATELY, leave for
30 minutes to allow any
pressure built up in the
machine to dissipate to
avoid scalding.
3 CHECK THE TAMP
1 CHECK TANK
Ensure water tank (11) is
correctly seated in position.
You will see air bubbles at
the connection when
correctly located.
2 DISPENSE TEST
Dispense water through the
brewhead (4). Ensure NO
coffee is in the filter. If you see
water go to fig 3. If not, turn
off immediately and see fig 4.
4 CHECK FOR BLOCKAGES
Lightly
MILK
CHOC
PODS
Dispense a mug full of
water (min 240ml) through
the machine. Ensure NO
coffee is in the filter
holder (5).
If you like your coffee extra
hot, the serving cup or mug
must be warmed through
before EACH coffee.
18
Discard the water from the
pre-warmed cup and dry.
Add your ground coffee or
ESE pod and your machine is
ready to go...
Ensure you are not tamping
too hard, the water will not
be able to flow through the
ground coffee.
Your brewhead or filter may
be blocked with fine coffee
grounds or limescale.
Remove showerhead and
clean the brewhead.
19
To unblock the filter, use a
small pin and gently push
through the hole on the
underside to unblock.
Once re-assembled, descale
as per page 17.
dcm1 ib_2009.2.25.qxp
27/02/2009
14:17
Page 20
TROUBLESHOOTING
COFFEE
LEAKING FROM
THE
BREWHEAD.
1 LOOSE GROUNDS
IMPORTANT:
CHECK THE FILTER
HOLDER IS CORRECTLY
SEATED IN POSITION
You should descale and clean
the brewhead at least
Wipe the entire brewhead
monthly, more often if you
area (4) and ensure it is
use your machine daily or
completely free of loose
live in a hard water area.
coffee grounds. Get inside all
the grooves and clean.
3 CLEAN BREWHEAD
4 UNBLOCK HOLES
IMPORTANT: FAILURE TO DESCALE AND CLEAN YOUR MACHINE
WILL INVALIDATE YOUR GUARANTEE.
2 LOOSEN SCREW
NO STEAM
FLOWING
FROM THE
STEAM WAND.
1 CHECK TANK
2 UNBLOCK WAND
IMPORTANT:
WIPE AND FLUSH THE
WAND AND WASH THE
STEAM NOZZLE AFTER
EVERY USE.
Using a screwdriver (pozi no
2) and hammer, gently tap
the screw to dislodge any
dried coffee.Then rotate
anti-clockwise to unscrew.
5 WASH GASKET
Flush through the steam wand
after every session as some
milk will get sucked inside
the wand after frothing.
3 WIPE CLEAN
Ensure water tank (11) is
correctly seated in position.
You will see air bubbles at
the connection when
correctly located.
4 FLUSH THROUGH
Unplug and allow to cool.
Push a pin through the end
of the steam wand to
unblock.
5 DESCALE
LER
CA
DES
T ER
WA
TER
WA
Clean after EACH use
Remove the showerhead
and gasket then thoroughly
clean the area with a soft
brush removing any coffee
grounds you can see.
Unblock the holes of the
showerhead using a pin.
Wash with warm soapy
water and rinse thouroughly.
20
Wash the gasket with warm
soapy water. Make sure there
is no dried coffee or damage
to the gasket. Reverse to
re-assemble and test.
Wipe all the frothed milk off
the wand (14) after EVERY
use. Remove nozzle (15),
rinse and wipe dry after
each session.
After each session flush
steam and then hot water
through the tube into a jug
of water to rinse the inside
of the wand.
21
Descale as per the
instructions if you notice a
drop in steam or water
pressure.
dcm1 ib_2009.2.25.qxp
27/02/2009
14:17
Page 22
RECIPES
GUARANTEE
Once the espresso is extracted, the basis of most coffee drinks, add water or milk to the
coffee to create different types of drinks.
WITH WATER...
WITH MILK...
This appliance is of excellent quality and construction. However, if any defects in materials
or workmanship do appear during the relevant guarantee period, we will, at our discretion,
either repair or replace the defective parts, free of charge, subject to the terms and
conditions of our Guarantee shown below.
AMERICANO style coffee is made
CAPPUCCINO comprises equal parts
This Guarantee covers both parts and
labour. Carriage is not included.
•
Your mains electricity supply is
functional.
with hot water topped with an espresso.
This gives a similar strength (but different
flavour) to a filter coffee machine.
of espresso coffee, milk and froth, sometimes
sprinkled with cinnamon or powdered
cocoa.
Your guarantee period is as follows:
•
The defect is not due to a blown fuse.
•
If you wish to claim under this Guarantee
you should:
LONG BLACK is similar to Americano, CAFFÈ LATTE is often called simply
but prepared in a different order (espresso
is added to water instead of vice versa).
LUNGO is different from an Americano.
It is usually a double shot of espresso run
through the machine; all the water runs
through the beans, as opposed to adding
water.
RISTRETTO
is an espresso made with
less than the usual amount of water, filling a
small espresso cup half-full of very strong
coffee.
latte. It is espresso with steamed milk,
traditionally topped with the froth created
when steaming the milk.
A latte comprises one-third espresso and
nearly two-thirds steamed milk. More
frothed milk makes it weaker than a
cappuccino. A latte is also commonly served
in a tall glass; if the espresso is slowly poured
into the frothed milk from the rim of the
glass, three layers of different shades will
form, with the milk at the bottom, the froth
on top and the espresso in between.
This Guarantee provides benefits which are
additional to, and do not affect, your
statutory rights.This Guarantee does not
cover the cost of returning the product to
the dealer from whom it was purchased or
to ourselves.This Guarantee applies only to
products sold and located in mainland
Great Britain. It does not cover liability in
respect of or replacement of plugs, cables
or fuses and also does not cover defects
due to:
•
Failure to use or maintain product in
accordance with Dualit's instructions.
•
The product being connected to an
unsuitable electricity supply.
•
Accidental damage to or abuse or
misuse of the product.
•
The product modified except by Dualit
or approved agent.
•
Dismantling of or interference with the
product.
•
Theft or attempted theft of the
product.
MOCHA is a latte with chocolate added.
CAFFÈ MACCHIATO
—
macchiato meaning "marked" or "spotted" —
is an espresso with a little steamed milk
added to the top, usually 1–2 oz, sometimes
sweetened with sugar or flavoured syrup.
1 year
22
Send the product, postage or carriage
paid, to the dealer from whom it was
purchased.
•
Ensure that the product is clean and
packed carefully (preferably in its
original carton).
•
Enclose details of your name, address
and telephone number and when and
where the product was purchased,
together with proof of purchase (e.g. a
till receipt).
•
Give exact details of the nature of the
defect.
This Guarantee does not cover any other
claims whatsoever, including, without
limitation, any liability for incidental, indirect
or consequential damage, nor does it cover
any claims for conversion or modification or
for the costs of repair carried out by any
third party without the prior consent of
Dualit. If replacement parts are fitted to the
product this will not extend the period of
the Guarantee.
Before returning any product under this
Guarantee, please check that:
•
•
For further advice contact the Dualit
customer helpline on +44 (0)1293 652 500
(09:00 to 17:00 Monday to Friday).
You have followed the product
instructions correctly.
Alternatively, email Dualit at [email protected]
or visit www.dualit.com.
23
dcm1 ib_2009.2.25.qxp
27/02/2009
14:17
Page 24
Dualit Limited County Oak Way Crawley West Sussex RH11 7ST
Telephone: +44 (0) 1293 652 500 Facsimile: +44 (0) 1293 652 555
Email: info @ dualit.com Web: www.dualit.com
GB0209