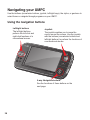
1
R50A
Ultra Mobile PC
User Manual
E3850
First Edition
August 2008
Copyright © 2008 ASUSTeK Computer, Inc. All Rights Reserved.
No part of this manual, including the products and software described in it, may be reproduced,
transmitted, transcribed, stored in a retrieval system, or translated into any language in any form
or by any means, except documentation kept by the purchaser for backup purposes, without the
express written permission of ASUSTeK Computer Inc. (“ASUS”).
Product warranty or service will not be extended if: (1) the product is repaired, modified or
altered, unless such repair, modification of alteration is authorized in writing by ASUS; or (2) the
serial number of the product is defaced or missing.
ASUS PROVIDES THIS MANUAL “AS IS” WITHOUT WARRANTY OF ANY KIND, EITHER
EXPRESS OR IMPLIED, INCLUDING BUT NOT LIMITED TO THE IMPLIED WARRANTIES
OR CONDITIONS OF MERCHANTABILITY OR FITNESS FOR A PARTICULAR PURPOSE.
IN NO EVENT SHALL ASUS, ITS DIRECTORS, OFFICERS, EMPLOYEES OR AGENTS BE
LIABLE FOR ANY INDIRECT, SPECIAL, INCIDENTAL, OR CONSEQUENTIAL DAMAGES
(INCLUDING DAMAGES FOR LOSS OF PROFITS, LOSS OF BUSINESS, LOSS OF USE OR
DATA, INTERRUPTION OF BUSINESS AND THE LIKE), EVEN IF ASUS HAS BEEN ADVISED
OF THE POSSIBILITY OF SUCH DAMAGES ARISING FROM ANY DEFECT OR ERROR IN
THIS MANUAL OR PRODUCT.
SPECIFICATIONS AND INFORMATION CONTAINED IN THIS MANUAL ARE FURNISHED
FOR INFORMATIONAL USE ONLY, AND ARE SUBJECT TO CHANGE AT ANY TIME WITHOUT
NOTICE, AND SHOULD NOT BE CONSTRUED AS A COMMITMENT BY ASUS. ASUS
ASSUMES NO RESPONSIBILITY OR LIABILITY FOR ANY ERRORS OR INACCURACIES
THAT MAY APPEAR IN THIS MANUAL, INCLUDING THE PRODUCTS AND SOFTWARE
DESCRIBED IN IT.
Products and corporate names appearing in this manual may or may not be registered
trademarks or copyrights of their respective companies, and are used only for identification or
explanation and to the owners’ benefit, without intent to infringe.
Table of Contents
About this guide.................................................................6
How this guide is organized.....................................................6
Conventions used in this guide................................................7
Safety information..............................................................8
Transportation Precautions . ..................................................9
Package contents.............................................................10
Standard items.......................................................................10
Optional items........................................................................10
Special features................................................................11
Product highlights.................................................................. 11
Chapter 1: Getting started
Proper posture when using your UMPC.........................14
Maintaining the proper posture..............................................14
Getting to know your UMPC............................................15
Front features........................................................................15
Right features........................................................................18
Left features...........................................................................19
Top features...........................................................................20
Bottom features.....................................................................21
Back features.........................................................................22
Getting your UMPC ready................................................23
Charging the battery pack......................................................23
Installing/removing a microSD card.......................................25
Installing an external foldable USB keyboard........................26
Connecting an external monitor.............................................28
Connecting an external mouse (optional)..............................30
Connecting an external headphone.......................................30
Connecting to a port bar (optional)........................................31
Connecting an external ODD (optional).................................32
Connecting an external TV antenna (optional)......................33
Starting up.........................................................................34
Powering on your UMPC.......................................................34
Managing power settings.......................................................35
Chapter 2: Using your UMPC
Navigating your UMPC.....................................................38
Using the navigation buttons.................................................38
Using the stylus.....................................................................39
Entering data.....................................................................40
Using the Tablet PC Input Panel............................................40
Using gestures.......................................................................43
Calibrating the screen......................................................46
Securing your UMPC........................................................46
Using the ASUS Security Protect Manager...........................46
Getting Windows® Help and Support..............................48
Chapter 3: Multimedia features
Using the Windows® Media Center.................................50
Using the camera.............................................................51
Launching the camera...........................................................51
Taking photos.........................................................................52
Configuring the camera settings............................................53
Using the Preview mode........................................................54
Chapter 4: Getting connected
Using Bluetooth®..............................................................56
Setting up a Bluetooth connection.........................................56
Adding other Bluetooth-enabled devices..............................57
Using a 3G SIM card (optional).......................................58
Installing a 3G SIM card........................................................58
Activating your 3G SIM card..................................................59
Using GPS.........................................................................62
Connecting to a wireless network..................................63
Troubleshooting
Troubleshooting...............................................................66
Appendices
Notices..............................................................................70
ASUS Contact information..............................................76
About this guide
This user guide provides information on the various components of the Ultra Mobile PC
(UMPC) and how to use them.
How this guide is organized
• Chapter 1: Getting started
This chapter describes the features of your UMPC.
• Chapter 2: Using your UMPC
This chapter provides you the steps in using your UMPC.
• Chapter 3: Multimedia features
This chapter provides you with information on the multimedia features of your
UMPC.
• Chapter 4: Getting connected
This chapter provides you with information on the connection features of your
UMPC.
• Troubleshooting
This chapter provides you with solutions to some problems in using the UMPC.
• Appendices
This chapter provides you with additional information.
Conventions used in this guide
To ensure that you perform certain tasks properly, take note of the following symbols
used throughout this manual.
DANGER/WARNING: Information to prevent injury to yourself
when trying to complete a task.
CAUTION: Information to prevent damage to the components
when trying to complete a task.
IMPORTANT: Instructions that you MUST follow to complete a
task.
NOTE: Tips and additional information to help you complete a
task.
Safety information
IMPORTANT! Disconnect the AC power and remove the battery pack before cleaning.
Wipe the UMPC using a clean cellulose sponge or chamois cloth dampened with a
solution of nonabrasive detergent and a few drops of warm water then remove any
extra moisture with a dry cloth.
DO NOT place on uneven or
unstable work surfaces. Seek
servicing if the casing has been
damaged.
DO NOT place or drop objects
on top and do not shove any
foreign objects into the UMPC.
DO NOT scratch the display
panel. Do not place together with
small items that may scratch or
enter the UMPC vents.
DO NOT expose to strong
magnetic or electrical fields.
DO NOT expose to dirty or dusty
environments. DO NOT operate
during a gas leak.
DO NOT expose to or use near
liquids, rain, or moisture.
DO NOT leave the UMPC on
your lap or any part of the body
in order to prevent discomfort or
injury from heat exposure.
Battery safety warning:
DO NOT throw the battery in fire.
DO NOT short circuit the
contacts.
DO NOT disassemble the
battery.
SAFE TEMP: This UMPC should
only be used in environments
with ambient temperatures
between 5°C (41°F) and 35°C
(95°F)
INPUT RATING: Refer to the
rating label on the bottom of
the UMPC and ensure that your
power adapter complies with the
rating.
DO NOT throw the UMPC in
municipal waste. Check local
regulations for disposal of
electronic products.
DO NOT carry or cover a UMPC
that is powered ON with any
materials that will reduce air
circulation such as a carrying
bag.
Transportation Precautions
To prepare the UMPC for transport, turn it OFF and disconnect all external
peripherals to prevent damage to the connectors. The hard disk drive’s head
retracts when the power is turned OFF to prevent scratching of the hard disk surface
during transport. Hence, do not transport the UMPC while it is still turned ON.
Cover Your UMPC
Cover your UMPC with the bundled protection bag to protect it from dirt, water, shock,
and scratches.
Charge Your Batteries
If you intend to use battery power, be sure to fully charge your battery pack and any
optional battery packs before going on long trips. Remember that the power adapter
charges the battery pack as long as it is plugged into the computer and an AC power
source. Be aware that it takes much longer to charge the battery pack when the UMPC
is in use.
Airplane Precautions
Contact your airline if you want to use the UMPC onboard the aircraft. Most airlines
restrict the use of electronic devices. Most airlines only allow the use of electronic
devices between and not during takeoffs and landings.
CAUTION:
There are three main types of airport security devices: X-ray
machines (used on items placed on conveyor belts), magnetic detectors (used on
people walking through security checks), and magnetic wands (hand-held devices
used on people or individual items). You can send your UMPC through airport X-ray
machines. However, it is recommended that you do not send your UMPC through
airport magnetic detectors or expose them to magnetic wands.
Package contents
Standard items
Check your UMPC package for the following items:
Standard Items
R50A UMPC
•
Protection bag
•
Mini-USB audio cable
•
DigiPen stylus
•
10-pin VGA out cable
•
User Guide
•
Screen protector
•
Quick Start Guide
•
Adapter
•
Driver CD
•
Adapter plug
•
Recovery DVD
•
Wrist strap
•
Earphone
•
USB keyboard
•
Earphone plug
•
NOTE: If any of the above items is damaged or missing, contact your retailer.
Optional items
Use the following items with your UMPC:
Optional Items
•
Car charger
•
TV external antenna
•
Car holder
•
TV external antenna for car
•
GPS antenna
•
USB external ODD
•
Bluetooth mouse
•
ODD USB cable
•
USB port bar (ACP45)
•
ODD charger
NOTE: Optional items are purchased separately and are not included in the UMPC
package.
1010
Special features
Product highlights
Power and Mobility
ASUS R50A provides you with a secure and convenient computing experience. It
offers a smart balance between mobility and performance with comprehensive security
features that protect both software and hardware solutions.
Portable and lightweight design
ASUS R50A’s portable and lightweight design is packed with computing, multimedia,
and connectivity features. It packs all the latest technologies that allow you to surf
the Internet, connect to your network wirelessly, find locations, or other tasks that you
would normally do on a standard desktop PC.
Connection features
ASUS R50A’s built-in Bluetooth 2.0 EDR ( Enhanced Data Rate), and WLAN 802.11
a/b/g offer you high-speed Internet and wireless network connections.
GPS navigation
ASUS R50A provides you with a comprehensive travel guide via its built-in GPS
transceiver. It enables you to find directions and navigate your way to places that you
want to go to.
Solid Security Management for Protected Computing
ASUS R50A offers a total data protection that meets the evolving security needs of
both software and hardware solutions.
The protected computing starts with fingerprint authentication that grants strict access
only to the authorized user. For the most accurate reading, the electronic imaging
mechanism scans fingerprint pattern from the live layer of the skin , bypassing any
common skin surface conditions.
1111
The exclusive ASUS Security Protect Management (ASPM) guards access to
the device and network. Users can choose to setup multi-factor authentication
requirements for different security levels while enjoying the Single Sign On (SSO) onetime login convenience without compromising security integrity.
Intuitive Usage Experience
ASUS R50A includes the Windows® Vista Tablet PC Edition with Touch Pack software
and ergonomic hardware interface designs. With complete function keys laid out on
both sides of the front panel, you can enjoy comfortable operation to a full set of control
keys, including joystick, navigation keys, as well as on-screen keypad.
Easier and Safer Digital Data Transmission
ASUS R50A integrates secure digital media slot. It gives you the immediate benefit
of easy file sharing with different devices and users, while opening the door for future
technologies like secure digital I/O.
1212
1
Getting
started
In this chapter
• Proper posture when using your UMPC
• Getting to know your UMPC
• Getting your UMPC ready
• Starting up
Proper posture when using your UMPC
When using your UMPC, maintaining the proper posture is necessary to prevent strain
to your wrists, hands, and other joints or muscles. This section provides you with tips
on avoiding physical discomfort and possible injury while using and fully enjoying your
UMPC.
Maintaining the proper posture
•
•
•
•
•
Do not place your UMPC on your lap or close to your skin for a long time.
Use your UMPC in a comfortably-lit and well-ventilated area.
Always clean your UMPC’s screen.
While making or taking calls using your UMPC, use an external headphone.
If you are going to use your UMPC for a long time:
• Connect an external keyboard instead of using your UMPC’s onscreen or virtual keyboard.
, • Attach an external mouse instead of using your UMPC’s navigation buttons or joystick.
• Place your UMPC in a universal docking station and adjust it so that your UMPC is within your line of sight.
• Take mini-breaks from using your UMPC.
NOTES:
• For details on connecting an external keyboard or mouse to your UMPC, refer to the section Getting your UMPC ready in Chapter 1.
• A universal docking station is purchased separately and is not included in your UMPC package.
1414
Getting to know your UMPC
Front features
1
2
14
3
13
12
4
11
10
5
9
6
8
7
Features
1
Display Panel
The 5.6-inch active matrix, 1024 x 600 resolution TFT LCD screen provides you with
excellent viewing similar to that of desktop monitors.
2
Front camera lens
This 0.3 megapixel built-in camera is used for video conferencing and other
interactive applications.
3
Joystick
This a pointing device that mimics the functions of a desktop mouse.
1515
Features
4
Status indicators
Allows you to check the status of your battery, drive activity, WLAN, and Bluetooth.
The LED notifies the following:
Power
• White: The UMPC is turned on.
• Blinking white: The UMPC is in the Sleep/Standby mode.
• Off: The UMPC is turned off or in Hibernation mode.
Battery
• Red: The battery is charging.
• Blinking red: The battery capacity is less than 10%.
• Off: The battery is fully-charged.
HDD
• White: The UMPC is accessing the hard disk drive.
• Blinking white: The UMPC is in reading/writing mode.
Message
• On: There is an incoming message.
WLAN
• On: The built-in wireless LAN (WLAN) is enabled.
Bluetooth
• On: The built-in Bluetooth function is activated.
3G
• On: The 3G function is activated.
GPS
• On: The GPS function is activated.
1616
5
Fingerprint sensor
The built-in fingerprint sensor allows you to use your fingerprint as your identity key
for added security.
6
5-way navigation buttons
The arrow keys (left, right, up, down) and the enter key have the same functions as
that on the keyboard.
7
Built-in microphone
The built-in mono microphone is used for video conferencing, voice narrations, or
simple audio recordings.
Features
8
Sleep Mode button
Press this button to put your UMPC into Sleep mode. Slide down the power switch to
awaken your UMPC from Sleep mode.
9
LOGIN button
The LOGIN button sends a [Ctrl + Alt +Del] keyboard combination to the operating
system to show Windows Security for logging in/off, locking, shutting down,
launching the task manager, or changing passwords. This special login feature is
also known as Secure Attention Sequence (SAS).
10
UMPC Settings button
This allows you to set the brightness, volume, resolution or power mode of your
UMPC.
11
Windows® Media Center button
This launches the Windows® Media Center which allows you to view and play media
files such as video clips, music files, or movies.
12
Left button
This key mimics the left-click action of a conventional mouse.
13
Right key
This key mimics the right-click action of a conventional mouse.
14
GPS module location
This is the area where the GPS module is located.
1717
Right features
1
2
3
4
Features
1818
1
Wrist strap hole
Attach the supplied wrist strap into this hole to prevent accidentally dropping the
UMPC when holding it in your hands.
2
VGA port
Use this port with the bundled VGA out cable to connect your UMPC to a monitor.
3
Battery Lock
Keeps the battery secure. Press up then slide the back cover downward to detach
the battery.
4
USB Port (2.0)
Insert USB2.0 devices such as keyboards, pointing devices, hard disk drives,
printers and scanners into this port.
Left features
1
3
2
4
Features
1
Power switch
Turns on/off the UMPC and puts it on Sleep/Standby or Hibernation mode.
2
Mini-USB port
Insert external USB devices into this port.
3
TV tuner port
Connect a TV antenna into this port.
NOTE: The TV antenna is purchased separately and is not included in your UMPC
package.
4
MicroSD slot
Insert a microSD card into this slot.
1919
Top features
7
1
2
3
4
5
2
6
Features
1
Camera button
Press to launch the camera application and take photos or video clips.
2
Speaker system
The built-in speaker system allows you to listen to rich and vibrant high-quality stereo
sound.
3
Power (DC) port
Insert the AC adapter into this port to connect your UMPC to an external power
source.
4
Headphone jack
Insert R50A headphone into this port.
5
Hold key
Move this key to the left to disable the buttons and LCD of th UMPC.
6
GPS port
Attach an external GPS antenna for better signal reception.
7
Stylus
Like the mouse pointer on your UMPC, the stylus also mimics the functions of a
desktop mouse such as left-click, double-click, or right-click.
IMPORTANT!
Underwriters Laboratories Inc. (“UL”) has not tested the
performance or reliability of the Global Positioning System (“GPS”) hardware,
operating software or other aspects of this product. UL has only tested for fire, shock or
casualties as outlined in UL’s Standard(s) for Safety. UL60950-1 Certification does not
cover the performance or reliability of the GPS hardware and GPS operating software.
UL MAKES NO REPRESENTATIONS, WARRANTIES OR CERTIFICATIONS
WHATSOEVER REGARDING THE PERFORMANCE OR RELIABILITY OF ANY GPS
RELATED FUNCTIONS OF THIS PRODUCT.
2020
Bottom features
1
2
3
Features
1
Wrist strap hole
Attach the supplied wrist strap into this hole to prevent accidentally dropping the
UMPC when holding it in your hands.
2
Reset button
Insert a sharp-pointed object such as a clip or a ballpen into this hole to reset your
UMPC.
3
Air vent
The air vent allows cool air to enter and warm air to exit the system.
2121
Back features
1
2
Features
2222
1
Battery Pack
The battery pack provides power to the UMPC. To charge the battery, connect the
UMPC to an external power source using the AC adapter.
2
Back camera lens
The 2.0 megapixel auto-focus built-in camera allows you to take photos or videos.
Getting your UMPC ready
Before using the UMPC for the first time, ensure that the battery pack is fully charged.
Charging the battery pack
Your UMPC package comes with a universal AC-DC adapter which charges the battery
pack, and in turn supplies power to your UMPC. You may connect the adapter to a 100120V or 220V-240V outlet without setting switches or using power converters.
To charge the battery pack:
1. Connect the adapter plug to the AC adapter.
2. Connect the adapter to the DC port located at the top of the UMPC.
3. Plug the adapter to a power outlet.
1
PUSH
2
3
NOTES:
• Use only the AC/DC adapter provided in your UMPC package.
• Refer to the section AC adapters on the next page to determine the type of AC adapters applicable to the type of power plugs available in your area.
WARNING: The adapter may become warm to hot when in use. Keep the adapter
away from your body.
2323
AC Adapters
The following is the list of AC adapters that are compatible with various power plugs or
sockets used in specific countries.
A
Area
Country/District
Voltage
Cycle
Socket
Asia
Korea
100.220
60
(A)(C)(E)
Japan
100
50
(A)
Hong Kong
200
50
(D)(F)
Mainland China
220
50
(A)(C)(D)(E)(F)
Philippines
220-230
60
(A)(C)(E)
Thailand
220
50
(C)(D)
Singapore
230
50
(B)(C)(D)
India
230
50
(B)(C)
Australia
240
50
(E)
New Zeland
230
50
(E)
USA
120
60
(A)
Hawaii
120
60
(A)
Guam, Saipan
120
60
(A)
B
C
D
E
F
2424
Oceania
North America
Canada
120
60
(A)
Central America
Mexico
127
60
(A)
Europe
United Kingdom
240
50
(D)
France
127.220
50
(D)
Italy
220
50
(C)
Spain
127.220
50
(A)(C)
Greece
220
50
(C)
Sweden
220
50
(C)
Austria
220
50
(C)
Germany
220
50
(C)
Netherlands
220
50
(C)
Norway, Sweden
220
50
(C)
Russia
127.220
50
(A)(C)
Installing/removing a microSD card
Your UMPC is equipped with a microSD card slot. A microSD card provides you with
additional storage space for your files.
To install the microSD card:
1. Locate the microSD card slot at the left
side of the UMPC.
2. Lift to open the slot cover.
3. With the golden fingers facing down, insert
the microSD into the slot until it fits in
place.
4. Replace the slot cover.
To remove the microSD card:
1. Lift to open the slot cover.
2. Push the card to eject, then remove the microSD card.
3. Replace the slot cover.
2525
Installing an external foldable USB keyboard
To install an external foldable USB keyboard:
1. Slide the latch downward to unlock the
USB keyboard.
2. Gently pull up to open the keyboard.
3. Locate the Lock/Unlock latch and slide the latch leftward to lock the keyboard in its
open position.
LOCK
2626
UNLOCK
4. Gently pull both ends of the mini-USB
cable to extend it.
5. Connect the mini-USB cable to the
mini-USB port on the USB keyboard,
and connect the other end of the
cable to the mini-USB port on the
UMPC.
2727
Connecting an external monitor
You can connect your UMPC to an external monitor. The screen display on the external
monitor is synchronized with that on the LCD monitor of your UMPC. In this way, the
lifespan of the LCD monitor is extended.
To connect your UMPC to an external monitor:
1. Turn off your UMPC.
2. Plug one end of the external monitor cable to a port on your UMPC and the other
end to the 15-pin D connector of the external monitor.
CAUTION: Do not apply too much force in connecting your UMPC to an external
monitor. The plug of the external monitor line fits in only one orientation.
2828
To switch screen display after powering on your UMPC:
1. Turn on your UMPC.
2. Select from any of these display modes:
a. Display on your UMPC and the external monitor (default).
b. Different display on your UMPC and the external monitor.
c. Display only on the external monitor.
3. Click OK.
To switch screen display manually:
1. Click
> Windows Media Center.
2. Select Connect to monitor.
3. Select from the three modes.
4. Click OK.
To adjust the display resolution:
1. Right-click blank space from your desktop. Select Contents > Personalize.
2. Select the second monitor. Adjust the display resolution to the highest value.
3. Click Apply.
2929
Connecting an external mouse (optional)
This UMPC comes with a few USB ports for connecting devices such as a USB
keyboard / mouse.
To connect an external mouse:
• Connect the USB plug of your USB mouse to a USB port on your UMPC.
CAUTION: Do not apply too much force when connecting a USB keyboard / mouse to
a USB port on your UMPC. The USB plug fits in only one correct orientation.
Connecting an external headphone
This UMPC comes with a Line Out port for connecting an external headphone or
speaker.
To connect your UMPC to an external headphone:
1. Connect your headphone to the headphone port on your UMPC.
1. Adjust the volume level on your UMPC and on the external headphone.
3030
Connecting to a port bar (optional)
This optional external PortBar comes with a D-Sub port, S/PDIF Out port, LAN (RJ-45)
port and USB 2.0/1.1 ports. Use this external PortBar to quickly connect peripherals,
such as keyboard, mouse, or CRT monitor, to your UMPC.
NOTE: The port bar is purchased separately and is not included in your UMPC
package.
UP
DC
5V
IMPORTANT:
• Use an AC power adapter when using the port bar. The port bar cannot be used when the UMPC is in battery mode.
• We recommend that you use two AC power adapters (one on the UMPC and one on the port bar) when using all ports on both the UMPC and port bar.
• The port bar disables the UMPC’s LAN port when connected.
3131
Connecting an external ODD (optional)
To connect an external ODD:
1 Connect one end of the ODD USB cable to the mini-USB port at the back of the
ODD and the other end to a USB port on your UMPC.
2. Connect the adapter plug to the ODD AC adapter.
3. Connect the adapter to the ODD’s DC port.
4. Plug the ODD adapter to a power outlet.
PUSH
3232
Connecting an external TV antenna (optional)
Connect your UMPC to a TV antenna for home or car use.
To connect an external TV antenna:
1. Connect the TV antenna cable to the antenna port on the left side of your UMPC.
2. Relocate or reorientate the antenna to get the best signal reception.
3. Click
> Programs > TVB-T Mobility > TVB-T Mobility to launch the TV
antenna application.
4. Select channels, adjust volumes, or record videos.
3333
Starting up
Powering on your UMPC
Like a regular desktop PC, your UMPC automatically runs a series of diagnostic tests
called Power-On Self Test (POST) upon turning it on. After POST is completed, your
UMPC boots up, then its Windows® operating system starts automatically.
To power on your UMPC:
1. Locate the power switch at the left side
of your UMPC.
2. Press the switch down to turn on the
UMPC. The UMPC boots up, then the
operating system starts automatically.
3. Use your UMPC as you would use a
regular desktop PC.
NOTE: If your UMPC does not turn on, check if the Hold button is in Hold (red) mode
or if the battery pack is charged.
3434
Managing power settings
Your UMPC allows you to control and manage the power settings to save battery
power, maximize system performance, or to achieve both.
Selecting a power plan
Your UMPC provides you with power plans, which are collections of power
management settings. These power plans make use of the ASUS Power4 Gear
eXtreme, an ASUS utility that allows you to adjust system settings such as display
brightness and CPU frequency to maximize performance as well as to extend battery
life.
To select a power plan:
1. From your UMPC screen, go to
> Control Panel > Classic View > Power
Options.
2. Select a power plan from these three existing power plans:
Power Plan
Description
Power4 Gear Entertainment
Provides high performance and saves battery
power for online gaming or playing DVD.
Power4 Gear Battery Saving
Provides the longest battery life and reduces
your UMPC’s performance where possible.
Power4 Gear High Performance
Maximizes your UMPC’s performance, but
provides the shortest battery life.
3. To adjust the plan’s settings, click Change plan settings. You may adjust the plan’s
sleep and display settings when your UMPC is on battery or plugged in.
For more advanced settings, click Change advanced power settings.
3535
Creating a power plan
To create a power plan:
1. From your UMPC screen, go to
> Control Panel > Classic View > Power
Options.
2. Click Create a power plan.
3. Select from these power plan options:
Power Plan
Description
Balanced
Balances your UMPC’s performance with its energy
usage.
Power saver
Provides you with the longest battery life and reduces
your UMPC’s performance where possible.
High performance
Maximizes your UMPC’s performance, but uses more
battery power.
4. In the Plan name field, key in the name for your customized power plan, then click
Next.
5. Make your desired settings, then click Create.
Putting your UMPC on Sleep mode
In Sleep mode, all open data and programs are saved to the physical memory (RAM)
and puts your UMPC into a power-saving state.
To put your UMPC on Sleep mode, do any of the following:
1. Click
>
.
2. Click
>
> Sleep.
3. Press the Sleep button
located at the front panel of your
UMPC.
To awaken your UMPC from its
Sleep mode, tap the LCD screen,
or press down the Power button
located at the left side of your
UMPC.
3636
2
Using your
UMPC
In this chapter
• Navigating your UMPC
• Entering data
• Securing your UMPC
• Getting Windows® Help and Support
Navigating your UMPC
Use the buttons (arrow/enter buttons, joystick, left/right keys), the stylus, or gestures to
select items or navigate through programs on your UMPC.
Using the navigation buttons
Left/right buttons
The left/right buttons
perform the left-click and
right-click functions of a
conventional mouse.
Joystick
The joystick enables you to move the
cursor around the screen. Use the joystick
with the buttons (arrow/enter buttons and
left/right buttons) to perform the functions of
a conventional mouse.
5-way Navigation buttons
See the functions of these buttons on the
next page.
3838
5-way Navigation buttons
Button
FUNCTION
Left arrow
Press to scroll to the left of a page.
On a menu list, press to launch the next menu to the left, or to close
a submenu.
Right arrow
Press to scroll to the right of a page.
On a menu list, press to launch the next menu to the right, or to
launch a submenu.
Up arrow
Press to scroll up a page.
On a selection option, press to move up the selection list.
Down arrow
Press to scroll down a page.
On a selection option, press to move down the selection list.
Press to confirm a command.
Enter button
Using the stylus
Use the DigiPen stylus to select items or navigate through programs on your UMPC, as
well as write characters or text using the input panel on your UMPC.
Like the navigation buttons, the DigiPen stylus also performs the functions of a
conventional mouse.
Stylus functions
Stylus
Mouse
Function
Single tap
Single-click
Tap once to select an item.
Double tap
Double-click
Tap twice to run an item.
Press and hold
Right-click
Press and hold to display the mouse icon,
then tap the right side of the mouse icon.
Press and drag
Drag
Press and drag the item, then move it.
NOTE: With a simple flick of your stylus, you can easily perform navigational and
editing tasks such as copy, paste, undo, and delete. To practice using pen flicks, go to
> Tablet PC Pen Training.
3939
Entering data
You may use a bi-fold keyboard or the Tablet PC Input Panel to write text, characters,
or symbols on your UMPC.
NOTE: The bi-fold keyboard is an optional accessory and is not included in your
UMPC package.
Using the Tablet PC Input Panel
The Microsoft® Vista Tablet PC Input Panel enables you to enter text on your UMPC
without using a standard keyboard. The Tablet PC Input Panel provides you with these
three input methods: Writing Pad, Character Pad, and On-screen Keyboard.
Tablet PC Input Panel icon
Tablet PC Input Panel tab
Tablet PC Input Panel
To launch the Tablet PC Input Panel, do either of the following:
• Launch the application that you want to use such as a web browser or a word
processor. Using your DigiPen stylus, tap on the Tablet PC icon
• Tap the Input Panel tab at the left edge of your screen.
4040
.
Using the Writing Pad
The Writing Pad allows you to write continuously, and converts your handwriting to
typed text.
To use the Writing Pad:
1. Launch a word processor such as WordPad. To do this, go to
> All Programs >
Accessories > WordPad.
2. Tap
to launch the Tablet PC Input Panel.
3. On the input panel, tap
to launch the Writing Pad.
4. Using your DigiPen stylus, write on the screen as you would write on a piece of
paper.
5. When done, tap Insert to enter the text on the WordPad.
IMPORTANT!
Ensure that you write legibly.
NOTE: Use gestures to delete text, or perform basic editing tasks such as inserting
spaces and tabs. For more details, refer to the section Using gestures in this user
manual.
4141
Using the Character Pad
The Character Pad converts each of your handwritten text, symbol, or character into
typed text one at a time.
To use the Character Pad:
1. Launch a word processor such as WordPad. To do this, go to
> All Programs >
Accessories > WordPad.
2. Tap
to launch the Tablet PC Input Panel.
3. On the input panel, tap
to launch the Character Pad.
4. Using your DigiPen stylus, write on the screen as you would write on a piece of
paper. The Character Pad converts each handwritten character or text into typed
text.
5. When done, tap Insert to enter the text on the WordPad.
IMPORTANT: Ensure that you write legibly.
NOTE: Use gestures to delete text, or perform basic editing tasks such as inserting
spaces and tabs. For more details, refer to the section Using gestures in this user
manual.
4242
Using the On-screen Keyboard
The on-screen keyboard is a virtual keyboard that allows you to enter data using the
stylus, mouse, or joystick.
To use the On-screen Keyboard:
1. Launch a word processor such as WordPad. To do this, go to
> All Programs >
Accessories > WordPad.
2. Tap
to launch the Tablet PC Input Panel.
4. On the input panel, tap
to launch the On-screen Keyboard.
5. Tap the keys that you want to enter.
Using gestures
Gestures are symbols that you draw, or movements that you make using your stylus.
In the Tablet PC Input Panel, use gestures to delete text or perform basic editing tasks
such as inserting spaces or tabs. Use two types of gestures in the Tablet PC Input
Panel:
• Scratch-out gestures which make it easy to delete text when you are using the
writing pad or the character pad.
• Editing gestures which you can use to perform some basic editing tasks such as
inserting spaces and tabs.
Using scratch-out gestures
Use scratch-out gestures to delete text in the writing pad or in the character pad. The
Microsoft® Vista Tablet PC edition includes the following scratch-out gestures:
• Vertical scratch-out (in an M or W pattern)
• Angled scratch-out
4343
• Z-shaped scratch-out
• Circular scratch-out
• Vertical scratch-out
Using editing gestures
Use editing gestures in the writing pad or in the character pad. There are two sets of
editing gestures that you can use:
• Common editing gestures used on handheld computers or PDA devices.
• Editing gestures from the Simplified Chinese (PRC) standard, GB/T 18790-2002,
adopted by the Chinese government.
Editing gestures used on handheld computers
Symbol
Description
Enter
Draw a 90-degree angle between the downward an leftward sections of
the stroke.
Backspace
Draw a long line.
Space
Draw a long line.
Tab
• Draw a 90-degree angle between the upward and rightward sections
of the stroke.
• Draw the rightward section of the stroke two to four times longer than
the upward section.
Editing gestures from the Simplified Chinese (PRC) standard, GB/T 18790-2002
Symbol
Description
Enter
Backspace
Space
Tab
4444
Selecting editing gestures
To select the editing gesture:
1. Launch the Tablet PC Input Panel.
2. Tab Tools > Options > Gestures tab.
3. From the Gestures tab, select Use gestures commonly used on handheld
computers or Use gestures from the Simplified Chinese (PRC) standard, GB/T
18790-2002.
NOTE: For more details on gestures and other features of the Tablet PC Input Panel,
refer to the Help menu of the Tablet PC Input Panel or to Microsoft® Windows Help
and Support.
4545
Calibrating the screen
Calibrating the screen ensures that the touchscreen feature of the UMPC works
properly when tapped with the DigiPen stylus or with your finger.
To calibrate the screen:
1. Click
> Control Panel.
2. From the Classic View, tap Tablet PC Settings.
3. From the General tab, click Calibrate.
4. Tap the center of each crosshair that appears near each corner to complete the
calibration process.
5. When done, tap OK to save the calibration data.
Securing your UMPC
Using the ASUS Security Protect Manager
The Security Protect Manager enables you to use your registered credentials, such as
your fingerprint data and password, to log on to Windows and other applications.
Registering your fingerprint data
The fingerprint sensor on the UMPC makes your device more secure from
unauthorized access. With the fingerprint sensor, you can enter your fingerprint data as
your authentication mechanism for your UMPC.
To register your fingerprint data:
1. Click
> Control Panel > ASUS Security Protect Manager.
2. From the Settings and Options list, then Multifactor Authentication.
3. Select the Credentials tab, then Fingerprint Authentication.
4. Tap Register to launch the ASUS Security Protect Manager Registration
Wizard.
5. Follow the onscreen instructions to register a fingerprint data. You need to enter at
least two fingerprint data.
4646
Setting up your password
To set up your password:
1. Click
> Control Panel > ASUS Security Protect Manager.
2. From the Settings and Options list, then Multifactor Authentication.
3. Select the Credentials tab, then Password Authentication.
4. Tap Register to launch the ASUS Security Protect Manager Registration Wizard
appears.
5. Follow the onscreen instructions to set up your password.
Specifying a log-on category
You can specify if you want to use your registered fingerprint data or password, or both,
to log on to Windows and other applications.
To specify a log-on category:
1. Click
> Control Panel > ASUS Security Protect Manager.
2. From the Settings and Options list, select Multifactor Authentication.
3. From the Policies tab, select your log-on category.
4. Click Apply to save the settings.
Configuring the ASUS Protect Manager
To configure the ASUS Protect Manager:
1. Click
> Control Panel > ASUS Security Protect Manager.
2. From the Settings and Options list, select General Options.
3. Select your preferred options.
4. Click Apply to save the settings.
4747
Getting Windows® Help and Support
Windows® Help and Support provides you with guides and answers in using the
applications in Windows® Vista platform.
To launch Windows® Help and Support, go to
4848
> Help and Support.
3
Multimedia
features
In this chapter
• Using the Windows® Media Center
• Using the camera
Using the Windows® Media Center
Windows® Media Center is a media application which allows you to use your UMPC
as a hub for your home-entertainment system. It allows you to watch or record live TV;
view photos and video clips; listen to music; burn CDs and DVDs; or watch/listen to
streaming files, such as movies or music files, from the Internet.
To use the Windows Media Center:
1. Connect your UMPC to an external monitor.
NOTE: Refer to the section Connecting an external monitor in Chapter 1 of this
user manual.
2. Click
> All Programs > Windows Media Center, or press the Windows Media Center button.
Windows® Media
Center button
NOTE: For more details on the other features of Windows Media Center, refer to
Windows Help and Support.
5050
Using the camera
The 2.0 megapixel camera enables you to take photos and video clips, as well make
audio/voice recordings.
Camera button
Launching the camera
To take photos or videos, do any of the following:
• Press the camera button located on top of your UMPC.
• Click
> All Programs > ASUS Utility > LifeFrame.
To exit the camera function, tap the Exit icon
on the camera screen.
Camera features
Tap any of the tabs to view the thumbnails of existing
photos, video clips or voice recordings.
Tap any of the icons to set the
capture mode. Refer to the table on
the next page for the capture modes.
Tap any of the icons to personalize your
photos. For more details on these icons, refer
to the next pages.
5151
Available capture modes
Set your UMPC’s camera feature to any of these capture modes:
Icon
Capture mode
Description
Monitor
Use this mode for video conferencing.
Preview
Use this mode to preview photos, video clips, audio/video
recordings, or recorded video conferences.
Camera
Use this mode to take photos.
Voice recorder
Use this mode for audio/video recording.
Silent camcorder
Use this mode if you want to take videos without any
camera sounds such as shutter sound.
Camcorder
Use this mode to take videos.
Taking photos
To take a photo:
1. Launch the Camera application.
2. Tap
to set the capture mode to Camera mode.
3. Aim your UMPC at your subject, then press the camera button.
4. Repeat step 3 to take more photos.
NOTE: By default, the photo is automatically saved to the LifeFrame folder at C://
Users/Your User Name/Documents/ASUS/LifeFrame/Image.
5252
Configuring the camera settings
Use the following camera setting icons to configure the camera settings:
Icon
Description
Shooting mode
Tap to set to any of these shooting modes: Night Scene, Portrait, Slow
Shutter, and Custom.
Flash
Tap to turn the flash mode on/off.
Timer
Tap to set the timer to 5 or 10 seconds, or tap to turn off the timer.
Continuous Shoot
Tap this icon to create a seamless effect when taking successive photos.
Resolution
Tap to set the screen resolution to 160 x 120, 176 x 240, 320 x 240, 352 x 288,
or 640 x 480.
Date
Tap to set the date stamp format that you want to add to your photo.
JPG Quality
If your photo is a .jpg file, tap this icon to set the jpg quality to Good, Fine, or
Normal.
Image File Type
Tap this icon to set the photo’s file type to BMP, JPG, GIF, PNG, or TIFF.
Brightness
Tap to set the level of brightness.
Contrast
Tap to set the contrast level.
Default
Tap this icon to restore the camera settings to its default values.
Filter
Tap to add filter effects to your photo.
Frame
Tap to add frame effects to your photo.
Advanced Settings
Tap to configure the advanced settings.
5353
Using the Preview mode
Use the preview mode to preview stored photos, and playback video clips, audio/voice
recordings, or video conferences.
To use the Preview mode:
1. Launch the Camera application.
2. Tap
to set the mode to Preview mode.
3. Tap any of the tabs to preview photos, and playback video clips, audio/voice
recordings, or video conferences.
•
•
•
•
Tap the Camera tab
the default tab.
Tap the Video tab
Tap the Audio tab
Tap the Monitor tab
to display the stored photos. The Camera tab is to display the stored video clips.
to display the stored audio/voice recordings.
to display the stored video conferences.
4. Tap the playback buttons
to navigate to the next or previous
items.
You can add effects, or undo editing changes to your photos, and delete/email your
photos from the Preview mode.
5454
TO
DO THIS
Apply a filter effect to
a photo
Tap the photo that you want to apply a filter effect to, then tap
and then select the filter effect.
Apply a frame to a
photo
Tap the photo that you want to apply a framed effect to, then
tap
and then select the frame.
Change the color of
the pen/editing stroke
Tap
and then select the color. Draw text or symbols on the
photo that you want to edit.
Add stamp to a photo
Tap the photo that you want to add a stamp to, then tap
and then select the stamp.
Undo editing changes
Right-click on the photo you had just edited, then select Undo.
Print a photo
Right-click on the photo that you want to print, then tap Print.
Set a photo as the
desktop background
Right-click on the photo that you want to use as the desktop
background, then tap Set as Desktop Background.
Copy a photo to
another folder
Right-click on the photo that you want to copy to another
folder, then tap Copy To.
4
Getting
connected
In this chapter
• Using Bluetooth
• Using a 3G SIM card
• Using GPS
• Connecting to a wireless network
Using Bluetooth®
Bluetooth® is a short-range wireless technology that allows your UMPC to communicate
with other Bluetooth-enabled devices, such as PCs, mobile devices, headsets, GPS
receivers, and headset, within a short range of about 10 meters or 30 feet. Bluetooth®
devices only need to be within the specified range to exchange information and the
devices do not need any physical connection.
NOTE: By default, Bluetooth function is turned off on your UMPC.
Setting up a Bluetooth connection
Your UMPC is equipped with a built-in Bluetooth® transceiver. Before your UMPC can
communicate with another device, you need to create a Bluetooth connection between
your UMPC and the other Bluetooth-enabled device.
To set up a Bluetooth connection with other devices:
1. Ensure that both your UMPC and the other device are within close range and are
both set to discoverable.
IMPORTANT: To make the other device discoverable, refer to its user manual.
2. From the Devices tab, click Add. Select My device is set up and ready to be
found.
3. Click Next to start searching for other Bluetooth devices.
4. From the list of available Bluetooth devices, select the device you want to connect
to, then click Next.
5. Enter a passkey between 8 to 16 digits on your UMPC, and click Next.
NOTE: Some Bluetooth devices comes with a built-in passkey. Refer to the device’s
user manual for the passkey.
6. Enter the same passkey on the other device.
7. Click Finish when done.
NOTE: Once you have created a Bluetooth connection between your UMPC and another device, the devices need not be discoverable to beam information between
them. Bluetooth® needs only to be turned on.
5656
Adding other Bluetooth-enabled devices
You may use peripherals such as a Bluetooth printer, mouse, or keyboard with your
UMPC.
To add other Bluetooth-enabled devices:
1. From the Devices tab, click Add. The Add Bluetooth Device Wizard appears.
Select My device is set up and ready to be found.
2. Click Next to start searching for other Bluetooth devices.
3. From the list of available Bluetooth devices, select the device you want to use with
your UMPC, then click Next.
4. Select Don’t use a passkey and click Next to add the device.
5. Click Finish when done.
IMPORTANT: Depending on the model, your UMPC may or may not include a built-in
Bluetooth transceiver.
5757
Using a 3G SIM card (optional)
Your UMPC allows you to install a 3G SIM card into your device, which enables you
to wirelessly connect to the Internet so you can check your e-mail messages, surf the
Internet, or chat online; and make and receive calls using a Bluetooth headset.
IMPORTANT: Depending on the model, your UMPC may or may not include a 3G SIM
card slot. Check your UMPC model if it contains the 3G SIM card slot.
Installing a 3G SIM card
To install a 3G SIM card:
1. Press down the battery latch, then
remove the battery pack.
2. Insert the 3G SIM card with its gold
contacts facing down and the notched
corner oriented to the upper right
corner of the slot as shown.
5858
3. Replace the battery pack.
Activating your 3G SIM card
After installing the 3G SIM card into your UMPC, you first need to activate the 3G SIM
card via the 3G Watcher application.
To activate your 3G SIM card:
1. Launch the 3G Watcher application. To do this, do either of the following:
• Click
> 3G Watcher.
• From the taskbar, double click the 3G Watcher icon
.
If your 3G SIM card has a default passkey, a pop-up window appears asking for your
SIM card passkey.
2. From the 3G Watcher main
screen, click Tools > Options.
5959
2. Click Settings. From the
dropdown list, select your
mobile service provider, then
click Yes. The 3G Watcher
returns to its main screen.
3. Click Connect to start the
wireless connection.
4. The 3G Watcher displays the
connection status. You may
start to surf the Internet, or
check your e-mail messages.
6060
Switching on/off your wireless connection
To switch off your wireless
connection:
• From the 3G Watcher main screen,
click Tools > Turn Radio Off.
To switch on your wireless
connection:
• From the 3G Watcher main screen,
click Tools >Turn Radio On.
6161
Using GPS
Your UMPC comes with a built-in GPS transceiver and acts as a GPS device with its
GPS function.
CAUTION: DO NOT
cover this area. It may
interfere with the GPS
signal.
Installing an external GPS antenna (optional)
We recommend that you install an external GPS antenna to get the best GPS signal
reception.
NOTE: Keep the external GPS antenna in a cool place when it is not in use.
GPS
Setting up the GPS function:
To set up the GPS function:
1. Select
> ASUSMAP GPS.
2. Select COM2 in the GPS Interface field and 4800 in the Baudrate field, then click
OK.
3. Click xxx. The Position mode launches. The position state appears on the upper
right corner of the screen: ? In progress, X Fail, Tick Finished.
4. Check GPS signal, search for maps, and other GPS-related functions.
6262
Connecting to a wireless network
With its wireless function, your UMPC allows you to wirelessly connect to a network.
To connect to a wireless network:
NOTE: Ensure that a wireless adapter is installed or plugged in your UMPC.
1. Double click the Wireless Console
icon
on the taskbar and select any
of these icons:
Icon
Function
Click to activate both wireless
and Bluetooth functions.
Click to activate the Wireless
function only.
Click to activate the Bluetooth
function only.
2. Right-click the WLAN icon and select
Connect to a network.
4. Select Show Wireless if you have
many networks in your area.
6363
4. Select the wireless network that you
want to connect to.
5. When connecting, you may have to
key in a password.
5. After establishing a successful
connection, the connection status is
displayed.
6464
5
Troubleshooting
In this chapter
• Troubleshooting
Troubleshooting
Q
A
How can I turn off my UMPC when it hangs?
A
Press the Power button for four to six seconds.
Q
A
What can I do when I cannot turn on my UMPC?
A
1. Check if the battery is correctly installed and if the AC adapter is correctly
connected.
2. Check the HOLD key. Check if the keys are locked or not.
Q
A
What should I do when water gets into my UMPC?
A
1. Do not turn on your UMPC.
2. Disconnect the adapter immediately and remove the external devices such
as ODD, floppy, or storage devices.
3. Dry your UMPC with a dry, clean cloth.
4. Contact a qualified service technician immediately.
Q
A
A
Cannot recover the system.
Possible reasons:
1. Externall storage device/memory data being saved in the wrong place.
2. External devices such as USB, Compact Flash, MMC, or Smart Media
devices, are not compatible with your UMPC.
3. Applications/drivers are not compatible with your UMPC, such as installing
Windows 98 application on Windows XP OS.
4. Operating System (OS) problem management: ACPI (Advanced
Configuration and Power Interface) managed by OS.
6666
Q
A
A
Possible solutions to recovering the system:
1. Uninstall peripheral devices and their drivers.
2. Update the BIOS.
3. Update the drivers.
4. Uninstall the unneccessary applications.
5. Reinstall the OS.
6. Contact a qualified service technician.
Q
A
How to extend the battery life.
A
1. Adjust the LCD brightness.
2. Adjust the volume.
3. Activate the power saving mode.
6767
6868
Appendices
In this chapter
• Notices
• ASUS Contact information
Notices
Federal Communications Commission Statement
This device complies with FCC Rules Part 15. Operation is subject to the following two
conditions:
• This device may not cause harmful interference, and
• This device must accept any interference received, including interference that may
cause undesired operation.
This equipment has been tested and found to comply with the limits for a class B digital
device, pursuant to Part 15 of the Federal Communications Commission (FCC) rules.
These limits are designed to provide reasonable protection against harmful interference
in a residential installation. This equipment generates, uses, and can radiate radio
frequency energy and, if not installed and used in accordance with the instructions, may
cause harmful interference to radio communications. However, there is no guarantee
that interference will not occur in a particular installation. If this equipment does cause
harmful interference to radio or television reception, which can be determined by turning
the equipment off and on, the user is encouraged to try to correct the interference by one
or more of the following measures:
• Reorient or relocate the receiving antenna.
• Increase the separation between the equipment and receiver.
• Connect the equipment into an outlet on a circuit different from that to which the
receiver is connected.
• Consult the dealer or an experienced radio/TV technician for help.
WARNING! The use of a shielded-type power cord is required in order to meet
FCC emission limits and to prevent interference to the nearby radio and television
reception. It is essential that only the supplied power cord be used. Use only shielded
cables to connect I/O devices to this equipment. You are cautioned that changes or
modifications not expressly approved by the party responsible for compliance could
void your authority to operate the equipment.
(Reprinted from the Code of Federal Regulations #47, part 15.193, 1993. Washington
DC: Office of the Federal Register, National Archives and Records Administration, U.S.
Government Printing Office.)
7070
WLAN and GSM/CDMA
The UMPC only support WLAN and GSM/CDMA functions. It does not support voice
transmission function.
Australia SAR requirements
When using a wireless LAN or GSM/WCDMA adapter, the adapter and integrated
antenna shall be positioned not more than 20 cm from your body or nearby persons
during the duration of the GSM/WCDMA transmission.
Declaration of Conformity (R&TTE directive 1999/5/EC)
The following items were completed and are considered relevant and sufficient:
•
•
•
•
•
•
•
•
Essential requirements as in [Article 3]
Protection requirements for health and safety as in [Article 3.1a]
Testing for electric safety according to [EN 60950]
Protection requirements for electromagnetic compatibility in [Article 3.1b]
Testing for electromagnetic compatibility in [EN 301 489-1] & [EN 301]
Testing according to [489-17]
Effective use of the radio spectrum as in [Article 3.2]
Radio test suites according to [EN 300 328-2]
CE Mark Warning
This is a Class B product, in a domestic environment, this product may cause radio
interference, in which case the user may be required to take adequate measures.
IC Radiation Exposure Statement for Canada
This equipment complies with IC radiation exposure limits set forth for an uncontrolled
environment. To maintain compliance with IC RF exposure compliance requirements,
please avoid direct contact to the transmitting antenna during transmitting. End users
must follow the specific operating instructions for satisfying RF exposure compliance.
Operation is subject to the following two conditions:
• This device may not cause interference and
• This device must accept any interference, including interference that may cause
undesired operation of the device.
7171
To prevent radio interference to the licensed service (i.e. co-channel Mobile Satellite
systems) this device is intended to be operated indoors and away from windows
to provide maximum shielding. Equipment (or its transmit antenna) that is installed
outdoors is subject to licensing.
Because high power radars are allocated as primary users (meaning they have priority)
in 5250-5350 MHz, these radars could cause interference and/or damage to license
exempt LAN devices.
Wireless Operation Channel for Different Domains
N. America
2.412-2.462 GHz
Ch01 through CH11
Japan
2.412-2.484 GHz
Ch01 through Ch14
Europe ETSI
2.412-2.472 GHz
Ch01 through Ch13
France Restricted Wireless Frequency Bands
Some areas of France have a restricted frequency band. The worst case maximum
authorized power indoors are:
• 10mW for the entire 2.4 GHz band (2400 MHz–2483.5 MHz)
• 100mW for frequencies between 2446.5 MHz and 2483.5 MHz
NOTE: Channels 10 through 13 inclusive operate in the band 2446.6 MHz to 2483.5 MHz.
There are few possibilities for outdoor use: On private property or on the private
property of public persons, use is subject to a preliminary authorization procedure by
the Ministry of Defense, with maximum authorized power of 100mW in the 2446.5–
2483.5 MHz band. Use outdoors on public property is not permitted.
In the departments listed below, for the entire 2.4 GHz band:
• Maximum authorized power indoors is 100mW
• Maximum authorized power outdoors is 10mW
7272
Departments in which the use of the 2400–2483.5 MHz band is permitted with an EIRP
of less than 100mW indoors and less than 10mW outdoors:
01
Ain Orientales
02
Aisne
03
Allier
08
Ardennes
09
Ariège
11
Aude
16
Charente
24
Dordogne
25
Doubs
32
Gers
36
Indre
37
Indre et Loire
45
Loiret
50
Manche
55
Meuse
59
Nord
60
Oise
61
Orne
64
Pyrénées Atlantique
66
Pyrénées
67
Bas Rhin
70
Haute Saône
71
Saône et Loire
75
Paris
84
Vaucluse
88
Vosges
89
Yonne
94
Val de Marne
41
Loir et Cher
82
Tarn et Garonne
05
Hautes Alpes
58
Nièvre
90
Territoire de Belfort
12
Aveyron
63
Puy du Dôme
26
Drôme
68
Haut Rhin
This requirement is likely to change over time, allowing you to use your wireless LAN
card in more areas within France. Please check with ART for the latest information
(www.art-telecom.fr)
NOTE: Your WLAN Card transmits less than 100mW, but more than 10mW.
7373
UL Safety Notices
Required for UL 1459 covering telecommunications (telephone) equipment intended to
be electrically connected to a telecommunication network that has an operating voltage
to ground that does not exceed 200V peak, 300V peak-to-peak, and 105V rms, and
installed or used in accordance with the National Electrical Code (NFPA 70).
When using the UMPC modem, basic safety precautions should always be followed to
reduce the risk of fire, electric shock, and injury to persons, including the following:
• Do not use the UMPC near water, for example, near a bath tub, wash bowl, kitchen
sink or laundry tub, in a wet basement or near a swimming pool.
• Do not use the UMPC during an electrical storm. There may be a remote risk of
electric shock from lightning.
• Do not use the UMPC in the vicinity of a gas leak.
Required for UL 1642 covering primary (non-rechargeable) and secondary
(rechargeable) lithium batteries for use as power sources in products. These batteries
contain metallic lithium, or a lithium alloy, or a lithium ion, and may consist of a single
electrochemical cell or two or more cells connected in series, parallel, or both, that
convert chemical energy into electrical energy by an irreversible or reversible chemical
reaction.
• Do not dispose the UMPC battery pack in a fire, as they may explode. Check with
local codes for possible special disposal instructions to reduce the risk of injury to
persons due to fire or explosion.
• Do not use power adapters or batteries from other devices to reduce the risk of
injury to persons due to fire or explosion. Use only UL certified power adapters or
batteries supplied by the manufacturer or authorized retailers.
Power Safety Requirement
Products with electrical current ratings up to 6A and weighing more than 3Kg must use
approved power cords greater than or equal to: H05VV-F, 3G, 0.75mm2 or H05VV-F,
2G, 0.75mm2.
7474
Nordic Lithium Cautions (for lithium-ion batteries)
CAUTION! Danger of explosion if battery is incorrectly replaced. Replace only with the
same or equivalent type recommended by the manufacturer. Dispose of used batteries
according to the manufacturer’s instructions. (English)
ATTENZIONE! Rischio di esplosione della batteria se sostituita in modo errato.
Sostituire la batteria con un una di tipo uguale o equivalente consigliata dalla fabbrica.
Non disperdere le batterie nell’ambiente. (Italian)
VORSICHT! Explosionsgetahr bei unsachgemäßen Austausch der Batterie. Ersatz nur
durch denselben oder einem vom Hersteller empfohlenem ähnlichen Typ. Entsorgung
gebrauchter Batterien nach Angaben des Herstellers. (German)
ADVARSELI! Lithiumbatteri - Eksplosionsfare ved fejlagtig håndtering. Udskiftning
må kun ske med batteri af samme fabrikat og type. Levér det brugte batteri tilbage til
leverandøren. (Danish)
VARNING! Explosionsfara vid felaktigt batteribyte. Använd samma batterityp eller en
ekvivalent typ som rekommenderas av apparattillverkaren. Kassera använt batteri enligt
fabrikantens instruktion. (Swedish)
VAROITUS! Paristo voi räjähtää, jos se on virheellisesti asennettu. Vaihda paristo
ainoastaan laitevalmistajan sousittelemaan tyyppiin. Hävitä käytetty paristo valmistagan
ohjeiden mukaisesti. (Finnish)
ATTENTION! Il y a danger d’explosion s’il y a remplacement incorrect de la batterie.
Remplacer uniquement avec une batterie du mêre type ou d’un type équivalent
recommandé par le constructeur. Mettre au rebut les batteries usagées conformément
aux instructions du fabricant. (French)
ADVARSEL! Eksplosjonsfare ved feilaktig skifte av batteri. Benytt samme batteritype
eller en tilsvarende type anbefalt av apparatfabrikanten. Brukte batterier kasseres i
henhold til fabrikantens instruksjoner. (Norwegian)
(Japanese)
7575
ASUS Contact information
ASUSTeK COMPUTER INC. (AsiaPacific)
Address
Website
Technical Support
Telephone
Support Fax
Software download
15 Li-Te Road, Peitou, Taipei, Taiwan 11259
www.asus.com.tw
+886228943447
+886228907698
support.asus.com*
ASUS COMPUTER INTERNATIONAL (America)
Address
Telephone
Fax
Website
Software download
800 Corporate Way, Fremont, CA 94539, USA
+15029550883
+15029338713
usa.asus.com
support.asus.com*
ASUS COMPUTER GmbH (Germany and Austria)
Address
Telephone
Fax
Online contact
Technical Support
Telephone
Fax
Online support
Website
Harkort Str. 25, D40880 Ratingen, Germany
+49210295990
+492102959911
www.asus.com.de/sales
+49210295990
+492102959911
www.asus.com.de/support
www.asus.com.de/news
* Available on this site is an online Technical Inquiry Form that you can fill out to contact technical
support.
7676