1
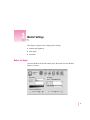
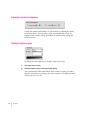
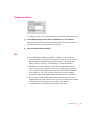
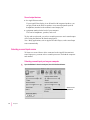
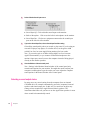
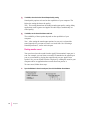
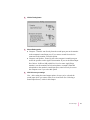
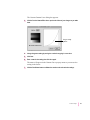
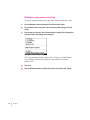
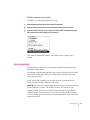
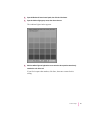
1 Before You Begin Who should read this document If your Mac OS–based computer is running System 7.1, refer to this document for instructions on using the Monitors & Sound control panel and DigitalColor Meter. If your computer is running System 7.5 or later, refer to Macintosh (or Mac OS) Guide and DigitalColor Meter Guide. If you need to set up your AppleVision monitor or install the AppleVision software, refer to the AppleVision Display User’s Manual. IMPORTANT You must install the AppleVision software before attempting to change any of the settings for your monitor. If you reinstall your system software, be sure to also reinstall the latest AppleVision software. Using Adobe Acrobat Reader For help using Adobe Acrobat Reader to view this document, see the file “Help-Reader.pdf,” available in the Acrobat Reader folder. 1 2 The Monitors & Sound Control Panel Use the Monitors & Sound control panel to set color, resolution, sound, geometry, and other controls for your monitor. This chapter describes how to open the control panel and introduces each of its main functions. About Monitors & Sound The Monitors & Sound control panel displays video and sound options based on the capabilities of your computer system. This means that the Monitors & Sound window shown in this manual may appear slightly different than how it looks on your computer. This documentation explains the advanced options that are available when you’re using an AppleVision monitor. With other monitors, many of these options will not be available. 3 Opening Monitors & Sound There are two ways to open the Monitors & Sound control panel: m Choose Control Panels from the Apple (K) menu, then select Monitors & Sound. m Press one of the buttons under the screen on the left-front of your AppleVision monitor. (The buttons on the right won’t open the control panel.) After a moment, the Monitors & Sound control panel appears on your screen. Available only if you have multiple monitors Settings in this window are for this monitor. 4 Chapter 2 Monitors & Sound buttons at a glance The large buttons across the top of the Monitors & Sound control panel are used to select between different types of options. Button Description Use the Monitor button to adjust color depth, resolution, contrast, and brightness. Use the Arrange button to configure more than one monitor. This button appears on your screen if you have more than one monitor or video card connected to your computer. Use the Sound button to set volume and balance settings for speakers attached to your computer, and sound input settings for devices attached to your computer. Use the Alerts button to change your computer’s alert sound. Use the Geometry button to change the image options for your AppleVision monitor. You can change the size and shape of the screen image, adjust screen convergence, and turn overscan on and off. Use the Color button to change color calibration, gamma curve, white point, and ambient light settings, and to import or export a ColorSync profile. Use the Monitor Sound button to control the monitor’s internal speakers and input devices attached directly to your AppleVision monitor. These features are available only if your AppleVision monitor has integrated speakers. The Monitors & Sound Control Panel 5 Using more than one monitor If you have more than one monitor or video card attached to your computer, a separate Monitors & Sound window appears on each monitor, and an Arrange button automatically appears in the Monitors & Sound window on your main monitor. The options available in each Monitors & Sound window reflect the capabilities of the monitor where the window opened, and the settings you choose in that window affect only that monitor. To control how the computer arranges multiple monitors, click the Arrange button. Follow the instructions in the Arrange window to adjust the settings. Your new settings take effect immediately. 6 Chapter 2 Using other devices with Monitors & Sound If you have additional audio or video equipment attached to your computer, such as a sound or video digitizer, you may need to use the separate Sound control panel, or the separate Monitor control panel, to adjust some of the device’s settings. Copies of the Sound control panel and Monitor control panel are available in the AppleVision Extras folder, inside the Apple Extras folder, on your hard drive. Unless you have devices that require it, you don’t need to use either of these control panels. For more information Refer to the other chapters of this document for information about the settings available for each area of Monitors & Sound. For example, refer to Chapter 3, “Monitor Settings,” for instructions on changing the color depth of your monitor. If you’re not sure what something in the control panel does, select Show Balloons from the Help (H) menu; then point to the item you want to know more about. The Monitors & Sound Control Panel 7 3 Monitor Settings This chapter explains how to change these settings: m contrast and brightness m color depth m resolution Before you begin Open the Monitors & Sound control panel, then make sure the Monitor button is selected. 9 Adjusting contrast and brightness Change the contrast and brightness of your monitor by adjusting the sliders to the desired level. For best results, Apple recommends that you set the brightness to the middle setting, then adjust the contrast to the setting that looks best to you. Displaying colors or grays To change the color depth of your monitor, follow these steps: 1 Click either Grays or Colors. 2 Select the number of grays or colors you want to display. Your selection takes effect immediately. If the number of colors you want to display is unavailable, try changing to a lower resolution. The highest number of grays you can set is 256. 10 Chapter 3 Changing resolutions To change the number of pixels displayed by your monitor, follow these steps: 1 Use the Resolution pop-up menu to choose “Recommended” or “All” resolutions. Most of the time, you’ll want to use “Recommended.” These are resolutions that are known to be valid and safe for your monitor. 2 Select a resolution from the scrolling list. Tips m After adjusting the brightness, contrast, resolution, or color depth you should recalibrate your AppleVision monitor. You can choose an option to have the monitor recalibrate automatically whenever you change these settings. Refer to Chapter 5, “Color Settings,” for more information. m The number of colors available at each resolution is determined by the video circuitry in your computer. If you want to display more colors, use a lower resolution. You might be able to add more video RAM (VRAM) to your computer or video card in order to display more colors at higher resolutions. Contact your Apple-authorized dealer for more information. m If you select a resolution that your monitor doesn’t support, the screen might display only black. If this occurs, wait a few seconds and the monitor will return to its previous setting. If you choose only from the recommended list of resolutions, this situation won’t occur. Monitor Settings 11 4 Sound Settings This chapter describes how to adjust sound settings for your computer and the speakers on your AppleVision AV-model monitor. You can connect a sound input source, such as a CD or cassette player, to your AppleVision AV monitor. For information about connecting audio and video equipment, see the manuals that came with your computer and monitor. Sound source options Depending on the kind of computer your AppleVision monitor is connected to, you may have several options for selecting sound input and output. Sound input sources m the AppleVision Display You can record from the built-in microphone or sound equipment attached to the monitor’s sound input port (marked by X) on the left side of the monitor. m an internal CD-ROM drive m equipment attached to the back of your computer This can be an external CD-ROM drive, cassette player, and so on. 13 Sound output devices m the AppleVision monitor If your AppleVision display is an AV-model with integrated speakers, you can play sound on the built-in speakers or on sound equipment (such as headphones) attached to the monitor’s sound output port. m equipment attached to the back of your computer This can be headphones, speakers, and so on. To play and record sound, you select a sound input source and a sound output device using the Monitors & Sound control panel. Note: Many applications, such as AppleCD Audio Player, set the sound input source automatically. Selecting a sound input source To listen to or record from a device connected to the AppleVision monitor’s sound input port, you must select a sound input source for both the computer and monitor. Selecting a sound input port on your computer 1 Open the Monitors & Sound control panel, then click the Sound button. Select a sound input device. 14 Chapter 4 2 The Sound Input portion of the Monitors & Sound window lists the input ports available for your computer. Open the pop-up menu and choose a sound input port. To record or listen to a device connected to your AppleVision monitor, select the computer audio port that your monitor is connected to. On most computers it will be called Microphone. On others it will be called External Microphone, Line In, or External Audio. 3 Click the Listen checkbox to hear sound from the selected input device. If you selected Microphone, Listen will be turned off to prevent audio feedback. If the Listen checkbox is missing from your control panel, or if you select Listen and it deselects itself automatically, then this function is not supported on your computer. Selecting a sound input source for the monitor After you select the sound input source for the computer, select one for the AppleVision monitor. This can be the monitor’s built-in microphone or equipment connected to the sound input port on the monitor. 1 Open the Monitors & Sound control panel, then click the Monitor Sound button. Sound Settings 15 2 Select a Monitor Sound Input source. m Sound Input Off: Click to disable sound input on the monitor. m Built-in Microphone: Click to use the built-in microphone on the monitor. m Sound Input Port: Click to use equipment connected to the sound input port on the left side of the monitor. 3 If you select Sound Input Port, select a Sound Input Port Gain setting. Gain affects sound quality when you record or play sound. If you’re using an external CD player, tape player, or a similar device, set the gain to 0 dB (called Line Level on some AppleVision monitors) for best results. Note: If you set the gain to -10 dB or 0 dB (called Line Level on some AppleVision monitors), or you connect a PlainTalk microphone to the monitor’s input port, sound is sent to the computer instead of being played directly on the monitor speakers. 4 Close the Monitors & Sound control panel. Note: Settings in the Monitor Sound window of the control panel only control sound options for your monitor. You might also need to adjust your computer’s sound options to get the results you want. Adjust the computer sound options in the Sound window of the control panel. Selecting a sound output device In many cases, any sound coming from the computer (from an internal CD-ROM drive, for example) automatically goes to the computer’s internal speakers and sound output port. In this case you won’t have to adjust any settings to hear sound on the AppleVision monitor’s speakers. The instructions that follow tell you how to use the AppleVision speakers in cases where sound isn’t automatically routed. 16 Chapter 4 To select a sound output device, follow these steps: 1 Open the Monitors & Sound control panel, then click the Sound button. Adjust these settings. Confirm this says “Built-in”. Select a quality setting. 2 Select the port the monitor sound cable is connected to. If necessary, select a Sound Output device. For most computers, Sound Output is automatically set to “Built-in” and no selection is necessary. If you have a third-party sound device attached to your computer, there may be additional choices available. Select “Built-in” to use the speakers on your AppleVision monitor. Note: Some third-party devices may not be available through the Monitors & Sound control panel. Use the Sound control panel, installed in the AppleVision Extras folder in the Apple Extras folder, to configure these devices. Sound Settings 17 3 If available, select the desired Sound Output Quality setting. Sound quality options are based on the capabilities of your computer. The higher the setting, the better the quality. Note: This setting determines the default sound output quality setting. Many applications, such as games and AppleCD Audio Player, automatically set sound quality. 4 If available, set the Sound Out balance and level. The availability of these options depends on the capabilities of your computer. Note: After setting the sound output options, be sure you’ve selected the sound input device you want to listen to or record from. See “Selecting a Sound Input Source,” earlier in this chapter. Routing monitor sound You can select where the sound from the AppleVision monitor’s input port is sent. For example, you can listen to an audio CD attached to the sound input port on your monitor by playing the sound directly on your AppleVision speakers. Or, you can record from the CD player by sending the sound to your computer where an application that records sound can process it. To route sound, follow these steps: 1 18 Chapter 4 Open the Monitors & Sound control panel, then click the Monitor Sound button. 2 Click the Routing button. 3 Select a Routing option. m Computer: Sound is sent directly from the sound input port on the monitor to the computer’s sound input port. If you want to record from a device connected to the monitor, select this option. m Computer and Speakers: Sound is sent to the computer’s sound input port and to the speakers on the AppleVision monitor. If you set the Sound Input Port Gain to -10 dB or 0 dB (called Line Level on some AppleVision monitors), use the monitor’s built-in microphone, or attach a PlainTalk microphone to the monitor’s sound input port, sound will only be sent to the computer even if you select this option. 4 Click OK to save your settings. Note: After setting the sound output options, be sure you’ve selected the sound input device you want to listen to or record from. See “Selecting a Sound Input Source,” earlier in this chapter. Sound Settings 19 Setting volume controls Several different volume settings affect how you hear sound on your computer and AppleVision monitor. You use the Monitors & Sound control panel to set these volume levels: m computer speaker m computer sound output m system alert m AppleVision speakers m AppleVision headphones You might need to adjust more than one volume setting in order to obtain the results you want. Adjusting computer speaker volume To adjust the volume of the speaker built into your computer, follow these steps: 1 Open the Monitors & Sound control panel, then click the Sound button. Adjust these settings. 20 Chapter 4 2 Adjust the volume of the computer speaker by moving the Computer Speaker Volume slider. Note: On some computers, the sliders shown may have different names, but they will still adjust the internal speaker settings. 3 Adjust the Computer Speaker Balance slider, if available. If your computer doesn’t support balance adjustment, the slider won’t appear in your control panel. Adjusting computer sound output volume To adjust the volume of the computer’s sound output port (marked by an -), follow these steps: 1 Open the Monitors & Sound control panel, then click the Sound button. Adjust these settings. 2 Adjust the balance of the sound by moving the Sound Out Balance slider, if available. 3 Adjust the volume by moving the Sound Out Level slider. Note: The sound output adjustments change the sound sent to the computer’s headphone jack. If you have RCA-style sound output ports, such as on the Power Macintosh 7600 and 8500, those ports are permanently set to “line level out” with centered balance and are not affected by these controls. Sound Settings 21 Adjusting the alert sound volume To change the volume of the sound the computer makes when it needs your attention, follow these steps: 1 Open the Monitors & Sound control panel, then click the Alerts button. 2 Move the System Alert Volume slider to adjust the volume of the alert sound. For information on selecting and recording an alert sound, refer to Chapter 7, “Alert Settings.” Note: The maximum volume of the alert sound is limited by the current volume setting for the sound output device. You can set the Alert sound quieter than other sounds, but not louder. 22 Chapter 4 Adjusting AppleVision speaker volume If you have an AV-model AppleVision monitor, follow these steps to adjust the speaker volume: 1 Open the Monitors & Sound control panel, then click the Monitor Sound button. 2 Adjust the volume, treble, and bass settings by moving the sliders. 3 If you want to silence the speakers and other devices attached to the monitor, click the Mute Monitor Sound box. Note: The maximum volume of the monitor’s speakers is limited by the current Sound Out Level for your computer, or the volume of the device you have attached to the monitor’s sound input port. Sound Settings 23 Adjusting AppleVision headphones volume To adjust the volume of headphones attached to the AppleVision monitor, follow these steps: 1 Open the Monitors & Sound control panel, then click the Monitor Sound button. 2 Adjust the Headphone Volume slider. 3 To leave the monitor’s speakers on when you connect something, such as a subwoofer, to the headphone port click the Preferences button; then click Mute checkbox to remove the X. Saving energy while the computer sleeps Some models of the AppleVision monitor can turn off their speakers and amplifier when the computer goes to sleep. This stops sound output during sleep and saves energy, but also prevents you from hearing the startup sound when you turn on or restart your computer. To turn on this option, click the Preferences button in the Monitor Sound window, then select the “Turn speakers off in Energy Saver mode” checkbox. If your AppleVision monitor does not support this feature, this checkbox will not appear in the Sound Preferences dialog box. 24 Chapter 4 5 Color Settings 5This chapter explains how to fine-tune the color on your AppleVision monitor. In most cases, you won’t need to change the color settings from their factory adjustments. However, if you’re working with detailed color graphics, you may need to match monitor colors as closely as possible to colors created by a printer or other device. About color Your computer system uses an additive process (a combination of red, green, and blue light) to create monitor colors, and a subtractive process (cyan, magenta, yellow, and black inks) to create printer colors. Because of the differences in these processes, the monitor and printer must be characterized to provide the best color match. Your AppleVision monitor comes with a ColorSync profile that characterizes the monitor. The ColorSync software included with your monitor uses this profile, along with other device profiles, to match colors as closely as possible. For more information about ColorSync, refer to Appendix A in the AppleVision Display User’s Manual. 25 You can use the Color settings in the Monitors & Sound control panel to further characterize the monitor to your preferences and lighting conditions. You can alter these color settings: m Brightness and contrast: Changes to these settings can impact color. The higher the brightness setting for your screen, the more washed-out the colors may appear. For best color, set the brightness to the middle setting, then adjust the contrast to change the overall luminance of the monitor. m Ambient light: The light surrounding your monitor may change how colors appear. For example, colors look different in sunlight than in fluorescent light. Use the AppleVision ambient light controls to adjust the monitor to the lighting conditions in your location. m Gamma curve: The relationship between the input value and output luminance on your display is represented by gamma curve. At a low gamma value, colors are washed out. At a higher gamma value, colors have more contrast. m White point: The white point you select for your monitor sets the mix of red, green, and blue light that make the color white. When the white point changes, monitor colors change. m Recalibration: When you change color settings, it is important to recalibrate the monitor to ensure accuracy. Also, over time, your monitor may become less efficient, causing colors to change. Recalibration ensures that color accuracy is maintained. With the AppleVision software, you create a controlled color environment that takes these conditions into consideration and makes the appropriate adjustments. Combined with Apple’s ColorSync color-matching system, these settings ensure the closest match possible between displayed color and printed color. 26 Chapter 5 About white point All lights have a white point. It’s the measurement of the color content of the light. Midday sun has a color temperature, or white point, of 6500 degrees Kelvin (sometimes represented as D65). Kelvin is a temperature scale used in scientific applications. Lighting used in graphic arts is based on a white point of 5000 degrees Kelvin (or D50). Other common white points are 9300 degrees Kelvin (a standard for computer monitors), 4100 degrees Kelvin (halogen light), and 3300 degrees Kelvin (fluorescent light). Setting a white point You can use a standard white point with your AppleVision monitor, or you can create a custom white point based on popular color standards. Using a white point setting To use a standard white point, or a custom white point you’ve already created, follow these steps: 1 Open the Monitors & Sound control panel, then click the Color button. Select a white point. Click to use the color settings. Color Settings 27 2 In the White Point pop-up menu, choose the setting you want to use. The standard, predefined white points are: m D50: A standard for graphic arts work. m 6500 + 8MPCD: Equivalent to the midday sun. (MPCD stands for Minimum Perceptible Color Difference.) m 9300 + 8MPCD: A standard white point used by most Macintosh computer monitors and high-definition television (HDTV). If you’ve created a custom setting, it also appears in the menu. 3 Click the Recalibrate button to change the monitor’s current setting. Creating a custom white point To define a new white point, follow these steps: 1 Open the Monitors & Sound control panel, then click the Color button. 2 Open the White Point pop-up menu and choose Custom. The Custom White Point dialog box appears. 28 Chapter 5 3 To set the white point in degrees Kelvin, move the slider to the desired setting. Note: Kelvin settings on the slider are not the same as the predefined settings in the White Point pop-up menu. For example, 6500 Kelvin on the slider is different from the 6500 + 8MPCD setting in the White Point menu. 4 To set the white point using CIE xy or CIE u’v’ color spaces, click the appropriate button; then adjust the white point by moving the crosshairs or typing values in the text boxes. The CIE settings are standard color spaces defined by the Commission on Illumination (CIE) in 1931 and 1976. For more information about color spaces, see Chapter 8, “DigitalColor Meter.” 5 Click Save to save your setting. 6 Enter a name for your setting. This name will appear in the White Point pop-up menu so you can select the setting when you want to use it again. 7s Click Recalibrate to change the monitor to the new white point setting. Color Settings 29 Modifying a white point To modify a custom white point that you’ve previously defined, follow these steps: 1 Open the Monitors & Sound control panel, then click the Color button. 2 Open the White Point pop-up menu, then choose the setting you want to modify. 3 Open the pop-up menu again, then choose the Modify command. (The command will include the name of the setting you’re modifying.) The Custom White Point window appears. Adjust the white point setting as desired. See “Creating a Custom White Point” earlier in this chapter for information about using the Custom White Point window. 4 Click Save. The custom white point is updated with your new settings. 5 30 Chapter 5 Click Recalibrate to use the new setting. Deleting a white point setting To remove a custom setting, follow these steps: 1 Open the Monitors & Sound control panel, then click the Color button. 2 Open the White Point pop-up menu and choose the setting you want to delete. 3 Open the White Point pop-up menu again and choose Delete. (The Delete menu item will include the name of the setting you are removing.) The setting is immediately deleted. You cannot recover a setting you’ve deleted. Changing the gamma curve You can adjust the gamma curve to match images you acquire or images you are exporting. For example, most scanners use a gamma value of 1.0, Mac OS–based computers use a gamma of 1.8, Windows-based computers use a gamma of 1.3, and video-editing equipment (such as HDTV) uses a value of 2.2. Using the correct gamma value for the image you’re working with helps ensure color accuracy. Color Settings 31 Using a gamma curve setting To use a standard gamma curve setting, or a custom setting you’ve already created, follow these steps: 1 Open the Monitors & Sound control panel, then click the Color button. Select a gamma curve. Click to use the color settings. 2 Open the gamma curve pop-up menu and choose the setting you want to use. 3 Click the Recalibrate button to calibrate the monitor to the selected color settings. Creating a custom gamma curve setting To define a new gamma curve, follow these steps: 32 Chapter 5 1 Open the Monitors & Sound control panel, then click the Color button. 2 Open the gamma curve pop-up menu and choose Custom. The Custom Gamma Curve dialog box appears. 3 Click the Preview Gamma Effect box to preview the effects of your changes as you make them. Drag to change gamma. 4 Change the gamma setting by moving the crosshairs or typing in a new value. 5 Click Save. 6 Enter a name for the setting, then click Save again. The name will appear in the Gamma Curve pop-up menu so you can use the setting in the future. 7 Click the Recalibrate button to calibrate the monitor to the selected color settings. Color Settings 33 Modifying a custom gamma curve setting To modify a gamma setting you’ve previously defined, follow these steps: 1 Open the Monitors & Sound control panel, then click the Color button. 2 Open the Gamma Curve pop-up menu, then choose the gamma setting you want to modify. 3 Open the pop-up menu again, then choose the Modify command. (The command now includes the name of the setting you’re modifying.) The Custom Gamma window appears. See “Creating a Custom Gamma Curve Setting” earlier in this chapter for instructions on setting the gamma curve. 34 Chapter 5 4 Click Save. 5 Click the Recalibrate button to calibrate the monitor to the selected color settings. Deleting a gamma curve setting To modify a custom setting, follow these steps: 1 Open the Monitors & Sound panel, then click the Color button. 2 Open the Gamma Curve pop-up menu and choose the setting you want to delete. 3 Open the Gamma Curve pop-up menu again and choose Delete. (The Delete menu item will include the name of the setting you are removing.) The setting is immediately deleted. You cannot recover a setting you’ve deleted. About ambient light All light falling on the front of your monitor is called ambient light and can change how colors appear. For example, in fluorescent light, the colors on your monitor may look redder than normal for the white point you’ve defined. Near a window, the colors may look more yellow. To get a truer color rendering, set the white point for your monitor, then correct for ambient light conditions in the room. IMPORTANT To correct for ambient light, the color depth on your monitor must be set to Millions of Colors. The number of colors you can set for your monitor depends on the screen resolution and the amount of video RAM (VRAM) installed in your computer. If you can’t set color depth to Millions of Colors, changing to a lower screen resolution might allow your computer to display more colors. Color Settings 35 Adjusting for ambient light You can adjust your AppleVision monitor for the lighting conditions in your environment. You may want to create and use more than one ambient light setting. For example, if your monitor is near a window, you might want one setting for the morning and another for the afternoon. Note: Adjusting for ambient light will be difficult if the monitor’s screen is in direct sunlight. Creating an ambient light setting To create an ambient light setting, follow these steps: 1 Locate the ambient light tool that came with your monitor. To create an ambient light setting, you match a color sample on your screen to the color of the light reflected from the tool. Make sure the gray side of the tool is facing toward you. IMPORTANT Do not touch the gray, circular part of the ambient light tool. Store the tool in the envelope provided, away from direct sunlight. Otherwise, the gray color in the tool may fade and give you incorrect ambient light readings. 36 Chapter 5 2 Open the Monitors & Sound control panel, then click the Color button. 3 Open the Ambient Light pop-up menu, then choose Custom. The Ambient Light window appears. 4 Hold the ambient light tool against the screen and select the square that most closely matches the color of the tool. If you find a square that matches, click Save; then enter a name for this setting. Color Settings 37 5 If none of the squares match the tool to your satisfaction, select the square that most closely matches; then click More Choices. The Expert Ambient Light window appears. Brightness slider Picker Color sample 38 Chapter 5 6 Hold the tool against the square color sample and look through the hole in the tool. Color sample O ¤ ® Z 7 Drag the picker in the color triangle until the color sample is similar to the gray color on the tool. The picker is the small circle inside the color triangle. Moving the picker makes a general color adjustment. 8 Drag the control on the Brightness slider until the color sample closely matches the tool. When the tool and sample match, the hole in the tool seems to disappear. 9 When you’ve selected a matching color, click Save. 10 Enter a name for this ambient light setting, then click Save again. The name will appear in the Ambient Light pop-up menu so you can select this setting in the future. 11 Click Recalibrate. After a moment, your monitor is recalibrated to correct for ambient light. Color Settings 39 Using an ambient light setting To use an ambient light setting you’ve already created, follow these steps: 1 Open the Monitors & Sound control panel, then click the Color button. 2 Open the Ambient Light pop-up menu, then choose the setting you want use. 3 Click Recalibrate. Modifying an ambient light setting To modify an ambient light setting you’ve previously created, follow these steps: 1 Open the Monitors & Sound control panel, then click the Color button. 2 Open the Ambient Light pop-up menu, then choose the setting you want to use. 3 Open the pop-up menu again, then choose the Modify command near the bottom of the menu. (The Modify command will include the name of the setting you’re modifying.) 4 Modify the setting using the light tool and ambient light window. For more information about using the light tool and selecting a matching setting, see “Creating an Ambient Light Setting” earlier in this chapter. Deleting an ambient light setting To remove an ambient light setting you’ve defined, follow these steps: 1 Open the Monitors & Sound control panel, then click the Color button. 2 Open the Ambient Light pop-up menu, then choose the setting you want to delete. 3 Open the pop-up menu again, then choose the Delete command near the bottom of the menu. (The Delete command will include the name of the setting you’re deleting.) The setting is immediately deleted. You cannot recover a setting after you’ve deleted it. 40 Chapter 5 Recalibrating your AppleVision monitor Whenever you change the white point, ambient light, or gamma value, the changes don’t take effect until you recalibrate your monitor. Also, when you make adjustments such as brightness, contrast, and screen geometry, it’s a good idea to recalibrate to get maximum color accuracy. To recalibrate your monitor, follow these steps: 1 In the Monitors & Sound control panel, click the Color button. Click to use the color settings. 2 Make sure the settings in the Color window are what you want. 3 Click Recalibrate. After a moment, your monitor is recalibrated based on the settings shown in the Color window. Note: If an error occurs during recalibration, make sure the monitor’s contrast is at the middle setting, or higher. For information on adjusting the contrast, see Chapter 3, “Monitor Settings.” Color Settings 41 Recalibrating automatically You can set preferences in the Monitors & Sound control panel so your monitor is recalibrated automatically. To set recalibration preferences, follow these steps: 1 In the Monitors & Sound control panel, click the Color button. 2 Click Preferences. A dialog box appears with a list of recalibration preferences. 3 Click the Recalibrate After checkbox; then select your recalibration preferences. For example, click the Time checkbox, then choose an interval from the Time pop-up menu. 4 Click OK. Your monitor will be automatically recalibrated based on the preferences you selected. 42 Chapter 5 Calibration Accuracy settings The Calibration Accuracy slider adjusts the recalibration cycle. Higher settings take longer to calibrate but provide better accuracy. The Normal setting takes about 30 seconds to calibrate your monitor; the Pro setting takes more than 2 minutes. Depending on the image displayed on your monitor, you might not notice a difference between the results of the Normal and Pro settings. The professional setting is for use with professional equipment, such as offset press and dye-sublimation printers. Using color settings You can save combinations of color settings and use them for different projects. For example, if you’re editing a video tape, you might use a specific combination of white point, gamma value, and ambient light settings. If you’re creating a printed product brochure, you might use a different combination. Saving color settings To save the color settings that you’re currently using, follow these steps: 1 Open the Monitors & Sound control panel, then click the Color button. 2 Make sure the current color settings are as desired. For example, make sure the correct white point and ambient light settings are selected. 3 If desired, click Recalibrate to see how the settings change the screen image. 4 Click Save As. A dialog box appears. 5 Enter a name for your settings, then click Save. All settings in the Color window are saved, and the setting name appears in the settings list. Color Settings 43 Using color settings To use color settings you’ve previously saved, follow these steps: 1 Open the Monitors & Sound control panel, then click the Color button. 2 Click a name in the settings list. 3 Click Recalibrate. Tip: Double-click a name in the Saved Settings list to immediately recalibrate to that setting. Deleting a color setting To delete a color setting, follow these steps: 1 Open the Monitors & Sound control panel, then click the Color button. 2 Select the name of the setting you want to delete from the settings list. 3 Click Delete. The setting is deleted, and the name disappears from the settings list. You cannot recover a setting after it has been deleted. 44 Chapter 5 Importing and exporting ColorSync profiles When you create custom color settings for your monitor, you can share those settings with others you’re working with to ensure consistent color results. See Appendix A, “Using ColorSync,” in the AppleVision User’s Manual for information about setting up ColorSync on your computer. Use the Monitors & Sound control panel to create a ColorSync profile that describes the white point and gamma value of your AppleVision monitor. You can use this profile with any monitor that supports the ColorSync colormatching system. In addition, you can import a ColorSync profile for a different monitor and use it with your AppleVision monitor. Importing a ColorSync profile You can import a ColorSync profile created for another monitor and use it with your AppleVision monitor. 1 Open the Monitors & Sound control panel, then click the Color button. 2 Click Import. A Directory dialog box appears. 3 Select the profile you want to import, then click Open. A ColorSync profile is imported to your monitor, and the settings in the Color window are updated. 4 Enter names for the white point and gamma values you are importing from the profile. If the settings from the ColorSync profile match settings you have already defined, you won’t be asked to provide a new name; the existing names and settings are automatically recognized. 5 Click Recalibrate. To get truer color rendering, you should adjust for ambient light after importing a ColorSync profile. See “Adjusting for Ambient Light” earlier in this chapter. Color Settings 45 Exporting a ColorSync profile To create a ColorSync profile of the current settings of your monitor, follow these steps: 1 Open the Monitors & Sound control panel, then click the Color button. Saves current color settings Use and create ColorSync profiles Recalibrates monitor to current color settings 2 Select the white point and gamma value you want to export. 3 If necessary, click Recalibrate. Before you can create a ColorSync profile, your display must be calibrated to the settings you want to export. If the Export button is dimmed, you need to recalibrate the monitor for the selected settings. 4 Click Export. A Directory dialog box appears. 5 Enter a name for the profile and click Save. A ColorSync profile is created that describes the white point and gamma value for your monitor. Note: The ambient light setting is not saved as part of the ColorSync profile. Ambient light changes as the physical location of the monitor changes; the correct ambient light setting for your monitor will not be correct for another monitor. 46 Chapter 5 6 Geometry Settings This chapter describes how to control the size and shape, or geometry, of the image on your monitor. Normally, these settings don’t need to be adjusted. However, environmental factors of your work area, such as magnetic or electrical interference, might affect your monitor. You can compensate for these factors using the geometry controls in the Monitors & Sound control panel. You can adjust the following settings: m Height/width: When the height and width are set properly, you should be able to see the entire image on the screen with no distortion at the edges. m Position: When the position is properly adjusted, the image is centered on your screen. The black borders surrounding the image are the same width on all sides. m Pincushion: When the pincushion is properly adjusted, the left and right sides of the image are straight and the image is rectangular. m Rotate: When the rotation is properly adjusted, all four sides of the image are parallel to the edges of the screen and the image is rectangular. m Keystone: When keystone is properly adjusted, the top and bottom edges of the image are the same length. m Parallelogram: When parallelogram is properly adjusted, the sides of the image are perpendicular to the top and bottom of the image. 47 Adjusting screen geometry To adjust the height, width, position, pincushion, rotation, keystone, or parallelogram settings, follow these steps: 1 Open the Monitors & Sound control panel, then click the Geometry button. Fine-tune your changes. Select a geometry setting. Use the mouse to adjust the picture. 2 Click the geometry setting you want to adjust. 3 Move the pointer over the picture of the monitor. The shape of the pointer changes when it is over the picture. 4 Hold down the mouse button, and move the pointer to adjust the picture. For example, to adjust the height of the screen, hold down the mouse button and move the top and bottom edges of the picture of the monitor. 5 48 Chapter 6 Fine-tune your setting by clicking the position buttons. Adjusting convergence Red, green, and blue signals in your monitor intersect, or converge, to create the colors you see on your screen. If the convergence is not set properly, images or text on your screen may appear blurred, or you may get a “rainbow” effect in which several colors form the edges of images on the screen. Also, over time the convergence may need to be adjusted to maintain a clear, distinct screen image. To adjust convergence, follow these steps: 1 Open the Monitors & Sound control panel, then click the Geometry button. Click to adjust convergence. 2 Click the Convergence button. The convergence screen appears. Geometry Settings 49 3 Adjust the convergence at the center of the screen by moving the handles on the grid lines. If your AppleVision monitor supports it, there are additional handles near the top and bottom of the monitor. Adjust the top convergence first, then the bottom. You may need to readjust the center convergence after moving the top or bottom. Click the Reset button to undo all your changes. This is a quick way to start over if you’re dissatisfied with your results so far. Move the Convergence Control window to different areas of the screen, then look at the text and picture in the window to judge the results of your adjustments. 4 Click OK to keep your settings, otherwise click Cancel. When you adjust convergence, it’s best to use the center of the screen image as a reference point, rather than the outside edges. You may have to compromise between good convergence at the center of the screen image and good convergence at the edges. 50 Chapter 6 Turning overscan on and off Overscan moves the screen image as far to the edges of the screen as possible. This setting is not recommended for normal use, but can be useful for viewing video. To turn overscan on or off, follow these steps: 1 Open the Monitors & Sound control panel, then click the Geometry button. 2 To turn overscan on, click On. The screen image expands until there is a smaller black border between the image and the edge of the screen. Note: When overscan is on, you cannot adjust screen geometry or convergence. 3 To turn overscan off, click Off. The screen image returns to its previous size. 4 Close the Monitors & Sound control panel. IMPORTANT When overscan is on, you may not be able to choose commands from the menus at the top of the monitor. If this occurs, you can’t use a menu to open the Monitors & Sound control panel. Instead, push one of the control buttons on the left front of your display. The Monitors & Sound control panel will open automatically. Geometry Settings 51 Resetting the screen to original levels The screen geometry for your monitor is set at the factory. If you decide you want to change back to the factory preset levels, follow these steps: 1 Open the Monitors & Sound control panel, then click the Geometry button. 2 Click the Factory Settings button. Your screen image returns to the factory preset geometry and convergence for the current screen resolution. On some AppleVision monitors, you can hold down the Option key while clicking Factory Settings to also restore the brightness and contrast settings. To restore the factory color settings, click the Color button; then double-click Factory Defaults in the Saved Settings list. 52 Chapter 6 7 Alert Settings This chapter describes how to use the Monitors & Sound control panel to change the Mac OS alert sound. The alert sound is played whenever the computer needs your attention, such as when an error message displays on the screen. Changing the alert sound To change the alert sound, follow these steps: 1 Open the Monitors & Sound control panel, then click the Alerts button. 2 To select and hear a sound, click its name in the Alert Sound list. Your new choice takes effect immediately. 53 Recording a new alert sound To record a new alert sound, follow these steps: 1 Open the Monitors & Sound control panel, then click the Alerts button. Select an alert sound to use. Click this button to record a new alert sound. 2 Click the Add button. A recorder dialog box appears. 3 Click Record. When you’re finished, click Stop. 4 To hear your recording, click Play. If you don’t like your recording, you can record it again. 5 To save your recording, click Save. 6 Enter a name for your new alert sound. 7 Your new alert sound appears in the Alert Sounds list. To use it, click its name. Note: New alert sounds are recorded from the current sound input device. For information on selecting a sound input source, see Chapter 4, “Sound Settings.” 54 Chapter 7 Removing an alert sound To delete an alert sound installed on your computer, follow these steps: 1 Open the Monitors & Sound control panel, then click the Alerts button. 2 Select the sound you want to delete from the Alert Sound list. The computer plays the sound when you select it. If you click the sound more than once, it will play once for each click. 3 Click the Delete button. Note: The Simple Beep sound is permanent and can’t be deleted. 3 Click OK to confirm that you want to permanently delete the selected sound. The sound is deleted. It cannot be recovered after you delete it. Tips m If your microphone is in use by another application, or if Speech Recognition is turned on, you won’t be able to record a new alert sound. m The maximum Alert Volume is limited by the other volume settings for your computer and sound output devices. The alert sound can’t be made louder than the highest volume set on your system. Alert Settings 55 8 DigitalColor Meter This chapter explains how to use the DigitalColor Meter application to identify colors displayed on your AppleVision monitor. You can use DigitalColor Meter to identify RGB, CIE, or Pantone colors. About DigitalColor Meter There are many different ways to reproduce color. Printers, for example, form colors by mixing cyan, magenta, and yellow ink. Mixed together in equal quantities these colors create black. By using less of some colors, other colors are created. This is called a subtractive color process. Monitors, on the other hand, create color using an additive process. They start with black (no light at all), and add small amounts of red, green, and blue light to form new colors. Because of the different ways to construct and display colors, it is difficult to describe a color so that it can be exactly reproduced by other devices. The method used to create a color on one device will likely result in a different color on another device. To make it easier to describe colors in a universal way, the Commission on Illumination (CIE) has defined several color spaces that precisely define colors based on where they fall within a certain range, or gamut, of colors. 57 DigitalColor Meter and your AppleVision monitor work together to identify colors on your screen based on the standard color gamuts defined by the CIE. DigitalColor Meter can also identify colors using the Pantone system. Pantone is a color-matching system used to specify ink colors for high-end printers. Pantone colors are described using their printing ink formulation, which is identified by a specific Pantone number. DigitalColor Meter performs color matching and provides Pantone numbers for the coated (CVC), uncoated (UVC), and process (CVP) color samples. Use the Pantone numbers when you have your work professionally printed to ensure that the printer will use colors similar to those displayed on your screen. Finally, you can use DigitalColor Meter to identify the RGB (red, green, blue) values your computer uses to create colors. The RGB number is used by some applications to specify colors. Because the capabilities of monitors vary, RGB values aren’t very useful for accurate color on systems other than your own. Before you begin You can identify any color displayed on your AppleVision monitor. For best results, be sure the color settings (such as ambient light, white point, and gamma) are appropriate for your office conditions and the type of material you are working on. You change these settings using the Monitors & Sound control panel. You should also make sure your AppleVision monitor has been recently recalibrated. Finally, if you have more than one monitor, make sure the color you want to measure is being displayed on an AppleVision monitor. DigitalColor Meter can measure RGB color on any monitor, but measurements of CIE and Pantone colors must be done on an AppleVision monitor. 58 Chapter 8 Launching DigitalColor Meter To use DigitalColor Meter, choose it from the Apple (K) menu. It was installed by the AppleVision software installer. Measuring a color To measure or identify a color, follow these steps: 1 Choose DigitalColor Meter from the Apple (K) menu. The DigitalColor Meter window appears. 2 Adjust the size of the DigitalColor Meter aperture by moving the Aperture Size slider. The aperture determines the number of pixels that DigitalColor Meter uses to identify a color. If you’re measuring a dithered area made up of varied colors, use a larger aperture to obtain an average color for the area. If you’re measuring a solid color, use a smaller aperture. 3 Make sure both the DigitalColor Meter window and the window containing the color you want to measure are both visible at the same time. When you’re finished adjusting the windows, click the DigitalColor Meter window to make it active. DigitalColor Meter 59 4 Point to the color you want to measure. Use the magnified view in the DigitalColor Meter window to help you position the pointer. The rectangular box below the numbers in DigitalColor Meter represents the average color of the aperture area. This is the color that DigitalColor Meter will measure. 5 When the pointer is positioned, press x-H on your keyboard. This holds the color you’re pointing to. After you press the keys, you can move the pointer and DigitalColor Meter will remember the held color. Be careful not to click the mouse before you press the keys. If you do, DigitalColor Meter won’t be the active application and the color won’t be held. 6 Click a button to display the values for the held color using the selected color space. Note: To display RGB values as percentages or pixel values, use the Meter menu to select the appropriate option. 7 Select Copy from the Edit menu to put the current values on the clipboard, if desired. If you want to measure another color, press x-H again to release the currently held color. 60 Chapter 8 Identifying a Pantone color To look up a Pantone color, follow these steps: 1 Choose DigitalColor Meter from the Apple (K) menu. The DigitalColor Meter window appears. 2 Adjust the size of the DigitalColor Meter aperture by moving the Aperture Size slider. The aperture determines the number of pixels that DigitalColor Meter uses to identify a color. If you’re measuring a dithered area made up of varied color, use a larger aperture to obtain an average color for the area. If you’re measuring a solid color, use a smaller aperture. 3 Make sure both the DigitalColor Meter window and the window containing the color you want to measure are both visible at the same time. When you’re finished adjusting the windows, click the DigitalColor Meter window to make it active. 4 Point to the color you want to measure. Use the magnified view in the DigitalColor Meter window to help you position the pointer. 5 Let go of the mouse, then press x-F on your keyboard. After a moment, a Pantone Match window appears. DigitalColor Meter 61 The Pantone Match window displays the color you selected for matching in each of the three standard Pantone color gamuts. The value shown below the color samples (ßE*) indicates how closely DigitalColor Meter was able to match your color with a Pantone color. A small value indicates a better match. If you want to identify another color, repeat the above procedure. Otherwise, close the DigitalColor Meter window to quit the application. Tips m If you have more than one monitor, and you move the DigitalColor Meter window to a monitor other than the one displaying the color you’re measuring, the color samples in DigitalColor Meter might not visually match the source color. However, the color space and Pantone values displayed by DigitalColor Meter will still be correct. m If you select “Show RGB as Actual Value,” DigitalColor Meter displays 2-byte RGB values. Some programs use 1 byte to represent RGB colors. To convert DigitalColor Meter’s values, divide by 256 and round up to the nearest whole number. 62 Chapter 8 Apple Monitors & Sound User’s manual for AppleVision monitors K Apple Computer, Inc. © 1996 Apple Computer, Inc. All rights reserved. Under the copyright laws, this manual may not be copied, in whole or in part, without the written consent of Apple. Your rights to the software are governed by the accompanying software license agreement. The Apple logo is a trademark of Apple Computer, Inc., registered in the U.S. and other countries. Use of the “keyboard” Apple logo (Option-Shift-K) for commercial purposes without the prior written consent of Apple may constitute trademark infringement and unfair competition in violation of federal and state laws. Every effort has been made to ensure that the information in this manual is accurate. Apple is not responsible for printing or clerical errors. Apple Computer, Inc. 1 Infinite Loop Cupertino, CA 95014-2084 (408) 996-1010 http://www.apple.com Apple, the Apple logo, AppleVision, ColorSync, Mac, Macintosh, Power Macintosh, and PlainTalk are trademarks of Apple Computer, Inc., registered in the U.S. and other countries. AppleCD and Balloon Help are trademarks of Apple Computer, Inc. Adobe and Acrobat are trademarks of Adobe Systems Incorporated or its subsidiaries and may be registered in certain jurisdictions. Pantone is a registered trademark of Pantone, Inc. Simultaneously published in the United States and Canada. Mention of third-party products is for informational purposes only and constitutes neither an endorsement nor a recommendation. Apple assumes no responsibility with regard to the performance or use of these products. Contents 1 Before You Begin 1 Who should read this document Using Adobe Acrobat Reader 1 1 2 The Monitors & Sound Control Panel 3 About Monitors & Sound 3 Opening Monitors & Sound 4 Monitors & Sound buttons at a glance Using more than one monitor 5 6 Using other devices with Monitors & Sound For more information 7 7 3 Monitor Settings 9 Before you begin 9 Adjusting contrast and brightness Displaying colors or grays Changing resolutions Tips 10 10 11 11 iii 4 Sound Settings 13 Sound source options 13 Sound input sources 13 Sound output devices 14 Selecting a sound input source 14 Selecting a sound input port on your computer 14 Selecting a sound input source for the monitor 15 Selecting a sound output device Routing monitor sound Setting volume controls 16 18 20 Adjusting computer speaker volume 20 Adjusting computer sound output volume Adjusting the alert sound volume 21 22 Adjusting AppleVision speaker volume 23 Adjusting AppleVision headphones volume Saving energy while the computer sleeps 24 24 5 Color Settings 25 About color 25 About white point 27 Setting a white point 27 Using a white point setting 27 Creating a custom white point Modifying a white point 28 30 Deleting a white point setting Changing the gamma curve 31 31 Using a gamma curve setting 32 Creating a custom gamma curve setting Modifying a custom gamma curve setting Deleting a gamma curve setting iv Contents 35 32 34 About ambient light 35 Adjusting for ambient light 36 Creating an ambient light setting Using an ambient light setting 36 40 Modifying an ambient light setting Deleting an ambient light setting 40 40 Recalibrating your AppleVision monitor Recalibrating automatically 42 Calibration Accuracy settings Using color settings 41 43 43 Saving color settings 43 Using color settings 44 Deleting a color setting 44 Importing and exporting ColorSync profiles Importing a ColorSync profile 45 Exporting a ColorSync profile 46 45 6 Geometry Settings 47 Adjusting screen geometry Adjusting convergence 48 49 Turning overscan on and off 51 Resetting the screen to original levels 52 7 Alert Settings 53 Changing the alert sound 53 Recording a new alert sound Removing an alert sound Tips 54 55 55 Contents v 8 DigitalColor Meter 57 About DigitalColor Meter Before you begin 57 58 Launching DigitalColor Meter Measuring a color 59 Identifying a Pantone color Tips vi Contents 62 61 59