1
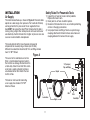
If you have questions or comments, contact us. Pour toute question ou tout commentaire, nous contacter. Si tiene dudas o comentarios, contáctenos. 1-800-4-DeWALT • www.dewalt.com INSTRUCTION MANUAL GUIDE D'UTILISATION MANUAL DE INSTRUCCIONES INSTRUCTIVO DE OPERACIÓN, CENTROS DE SERVICIO Y PÓLIZA DE GARANTÍA. ADVERTENCIA: LÉASE ESTE INSTRUCTIVO ANTES DE USAR EL PRODUCTO. DWMT70773L 1/2" Impact Wrench Heavy Duty Clé à chocs de 12,7 mm (1/2 po) service intensif Llave de impacto de 12,7 mm (1/2”) para servicio pesado English DWMT70773L 1/2" IMPACT WRENCH HEAVY DUTY A. 1/2" Square Drive B. Trigger C. Forward/Reverse Switch D. Ergonomic Handle E. 1/4” Air Inlet F. Shock Resistant Housing Bumpers G. Composite Body H. Twin Hammer Mechanism I. Exhaust J. Adjustable Power Dial FIG.1 F G H J A SPECIFICATIONS MODEL SQUARE DRIVE CLUTCH TYPE MAXIMUM TORQUE (REVERSE) FREE SPEED (@90PSI) BLOWS PER MINUTE NET WEIGHT EXHAUST TYPE AVERAGE AIR CONSUMPTION FREE SPEED AVERAGE AIR CONSUMPTION AT LOAD AIR INTLET SIZE RECOMMENDED HOSE SIZE MAX. AIR PRESSURE DWMT70773L 1/2" Twin Hammer 650 Ft.Lbs (880 Nm) 7500 RPM 1100 BPM 4.63 LBS (2.1Kg.) Handle 41.5SCFM (19.6 L/s) 5.9 CFM (2.8 L/s) 27.2SCFM (12.8 L/s) 3.9 CFM (1.8 L/s) 1/4" NPT(F) 3/8" (10MM) 90 PSI B C D E I 2 E The definitions below describe the level of severity for each signal word. Please read the manual and pay attention to these symbols. DANGER: Indicates an imminently hazardous situation which, if not avoided, will result in death or serious injury. WARNING: Indicates a potentially hazardous situation which, if not avoided, could result in death or serious injury. CAUTION: Indicates a potentially hazardous situation which, if not avoided, may result in minor or moderate injury. CAUTION: Used without the safety alert symbol indicates a potentially hazardous situation which, if not avoided, may result in property damage. SAVE THESE INSTRUCTIONS WARNING: Improper operation or maintenance of this product could result in serious injury and property damage. Read and understand all warnings and operating instructions before using this equipment. When using air tools, basic safety precautions should always be followed to reduce the risk of personal injury. IF YOU HAVE ANY QUESTIONS OR COMMENTS ABOUT THIS OR ANY DeWALT TOOL, CALL US TOLL FREE AT: 1-800-4-DeWALT (1-800-433-9258) WARNING: Read and understand this instruction manual and tool labels before installing, operating or servicing this tool. Keep these instructions in a safe accessible place. Operators and others in work area must wear ANSI Z87.1 CAN/ CSA Z94.3 approved safety glasses with side shields. Operators and others in work area must wear ear protection. IMPORTANT SAFETY INSTRUCTIONS WARNING: Some dust created by power sanding, sawing, grinding, drilling, and other construction activities contains chemicals known to the State of California to cause cancer, birth defects or other reproductive harm. Some example of these chemicals are: • Lead from lead-based paints • Crystalline silica from bricks and cement and other masonry products • Arsenic and chromium from chemically-treated lumber Oil daily for optimal performance. 3 English Your risk from these exposures varies, depending on how often you do this type of work. To reduce your exposure to these chemicals: work in a well ventilated area, and work with approved safety equipment, always wear OSHA/MSHA/NIOSH approved, properly fitting face mask or respirator when using such tools. When using air tools, basic safety precautions should always be followed to reduce the risk of personal injury. WARNING: This product contains chemicals, known to the State of California to cause cancer, and birth defects or other reproductive harm. Wash hands after handling. Definitions: Safety Guidelines English WARNING: • Avoid prolonged use: repetitive motion or exposure to vibration may be harmful to your hands or arms. Use gloves to provide extra cushion, take frequent rest periods, and limit daily time of use. • DO NOT Use oxygen or reactive gases; explosion may occur. • DO NOT Exceed air pressure of 90 PSI. • Read all manuals included with this product carefully. Be thoroughly familiar with the controls and the proper use of the equipment. • Only persons well acquainted with these rules of safe operation should be allowed to use the air tool. • DO NOT exceed any pressure rating of any component in the system. • Disconnect the air tool from air supply before changing tools or attachments and during non-operation. • Always wear safety glasses and ear protection during operation. Always wear approved safety glasses with shields. Always wear approved hearing protection. • DO NOT wear loose fitting clothing or apparel which contains loose straps or ties, etc. Which could become entangled in moving parts of the tool and results in serious personal injury. • DO NOT wear jewelry, watches, identifications, bracelets, necklace, etc. When operating any tool, they may become caught in moving parts and result in serious injury. • DO NOT depress trigger when connecting the air supply hose. • Always use attachments designed for use with air powered impact tools. • DO NOT use damaged or worn attachments. WARNING: DO NOT use hand tool sockets. Use impact quality sockets only. WARNING: • Never trigger the tool when not applied to a work object Attachments must be securely attached. Loose attachments can cause serious injury. • Protect air lines from damage or puncture. • Never point an air tool at oneself or any other person. Serious injury could occur. • Check air hoses for weak or worn condition before each use. Make sure all connections are secure. • Keep all nuts, bolts and screws tight and ensure equipment is in safe working condition. • DO NOT put hands near or under moving parts. 4 WHAT CAN HAPPEN • Abrasive tools such as sanders and grinders, rotating tools such as drills, and impact tools such as wrenches, hammers, and reciprocating saws are capable of generating sparks which could result in ignition of flammable materials. • Exceeding the maximum pressure rating of tools accessories could cause an explosion resulting in serious injury. WARNING: RISK TO BREATHING (ASPHYXIATION) WHAT CAN HAPPEN HOW TO PREVENT IT • Abrasive tools, such as • Always wear MSHA/NIOSH grinders, sanders, and approved, properly fitting face cut-off tools generate dust mask or respirator when and abrasive materials which using such tools. can be harmful to human lungs and respiratory system. • Some materials such as • Always work in a clean, dry, adhesives and tar contain well ventilated area. chemicals whose vapors could cause serious injury with prolonged exposure. HOW TO PREVENT IT • Never operate tools near flammable substances such as gasoline, naptha, cleaning solvents, etc. • Work in a clean, well ventilated area free of combustible materials. • Never use oxygen, carbon dioxide or other bottled gases as a power source for air tools. • Use compressed air regulated to a maximum pressure at or below the rated pressure of any attachments. CAUTION: RISK FROM NOISE WHAT CAN HAPPEN HOW TO PREVENT IT • Long term exposure to noise • Always wear ANSI (S3.19) produced from the operation hearing protection. of air tools can lead to permanent hearing loss. 5 English WARNING: RISK OF EXPLOSION OR FIRE English WHAT CAN HAPPEN • Using inflator nozzles for • DO NOT use inflator nozzles duster applications can cause for duster applications. serious injury. WARNING: RISK OF INJURY WHAT CAN HAPPEN HOW TO PREVENT IT • Tools left unattended, or with • Remove air hose when tool the air hose attached can be is not in use and store tool activated by unauthorized in a secure location away persons leading to their injury from reach of children and/or or injury to others. untrained users. • Air tools can propel loose • Use only parts, fasteners, and objects or other materials accessories recommended by throughout the work area. the manufacturer. • Keep work area clean and free of clutter. Keep children and others away from work area during operation of the tool. • Keep work area well lit. • Air tools can become • Remove air hose to lubricate, activated by accident during add, or replace sockets. maintenance or tool changes. • Never carry the tool by the hose. • Avoid unintentional starting. Don’t carry hooked-up tool with finger on trigger. • Repair service should be done only by an authorized service representative. • A wrench or a key that is left attached to a rotating part of the tool increases the risk of personal injury. HOW TO PREVENT IT • Air tools can cause the work piece to move upon contact leading to injury. • Use clamps or other devices to prevent movement. • Loss of control of the tool can • Never operate tool while lead to injury to self or others under the influence of drugs or alcohol. • Don’t overreach. Keep proper footing and balance at all times. • Keep handles dry, clean, and free from oil and grease. • Stay alert. Watch what you are doing. Use common sense. Do not operate tool when you are tired. • Poor quality, improper, or • Always use tool attachments damaged tools such as rated for the speed of grinding wheels, chisels, the power tool. sockets, drill, etc., can fly • Never use tools which have apart during operation, been dropped, impacted or propelling particles damaged by use. throughout the work area • Use only impact grade sockets causing serious injury. on an impact wrench. • Do not apply excessive force to the tool – let the tool perform the work. • Remove adjusting keys and wrench before turning the tool on. 6 WHAT CAN HAPPEN • Improperly maintained tool and accessories can cause serious injury. • There is a risk of bursting if the tool is damaged. • Fasteners could ricochet or be propelled causing serious injury or property damage. WARNING: RISK OF ELETRIC SHOCK HOW TO PREVENT IT WHAT CAN HAPPEN • Maintain the tool with care. HOW TO PREVENT IT • This tool is not provided with • Avoid body contact with an insulated gripping surface. grounded surfaces such as Contact with a “live” wire will pipes, radiators, ranges, and also make exposed metal refrigerators. There is an parts of the tool “live” increased risk of electric shock and can result in if your body is grounded. electrocution or death. • Thoroughly investigate the workpiece for possible hidden wring before performing work. • Check for misalignment or binding of moving parts, breakage of parts, and any other condition that affects the tool’s operation. If damaged, have the tool serviced before using. • Never point discharge of tool at self or others. • Do not pull trigger unless tool contact safety device is against work surface. • Never attempt to drive fasteners into hard surfaces such as steel, concrete, or tile. • Take care to avoid driving a fastener on top of another fastener. • Position tool carefully so that fasteners will be delivered to the proper location. 7 English WARNING: RISK OF INJURY (CONTINUED) English WARNING: RISK OF CUT OR BURNS WHAT CAN HAPPEN HOW TO PREVENT IT • Tools which cut, shear, • Keep the working part drill, punch, chisel, etc., of the tool away from are capable of causing hands and body. serious injury. WARNING: RISK FROM FLYING OBJECTS WHAT CAN HAPPEN HOW TO PREVENT IT • Always wear ANSI Z87.1 CAN/CSA Z94.3 approved safety glasses with side shields. • Never leave operating tool unattended. Disconnect air hose when tool is not in use. • Compressed air can be • For additional protection use hazardous. The air stream an approved face shield in can cause injury to soft tissue addition to safety glasses. areas such as eyes, ears, etc. Particles or objects propelled by the stream can cause injury. • Tool attachments can be • Make sure that any come loose or break and fly attachments are apart propelling particles at securely assembled. the operator and others in the work area. • Air powered equipment and power tools are capable of propelling materials such as metal chips, saw dust, and other debris at high speed, which could result in serious eye injury. WARNING: RISK OF ENTANGLEMENT WHAT CAN HAPPEN HOW TO PREVENT IT • Tools which contain moving • Never wear loose fitting elements, or drive other clothes, or apparel which moving tools such as grinding contains loose straps or ties, wheels, sockets, sanding etc., which could become discs,etc., can become entangled in moving parts entangled in hair, clothing, of the tool. jewelry and other loose • Remove any jewelry, watches, objects, resulting identifications, bracelets, in severe injury. necklaces, etc., which might become caught by the tool. • Keep hands away from moving parts. Tie up or cover long hair. • Always wear proper fitting clothing and other safety equipment when using this tool. 8 SAVE THESE INSTRUCTIONS FOR FUTURE USE English WARNING: AIR SUPPLY AND CONNECTIONS • Do not use oxygen, combustible gases, or bottled gases as a power source for this tool as the tool may explode, possibly causing injury. • Do not use supply sources which can potentially exceed 200 PSI (13.8 bar) as tool may burst, possibly causing injury. • The connector on the tool must not hold pressure when air supply is disconnected. If a wrong fitting is used, the tool can remain charged with air after disconnecting and thus will be able to after the air line is disconnected possibly causing injury. • Always disconnect air supply: 1) Before making adjustments; 2) When servicing the tool; 3) When tool is not in use; 4) When moving to a different work area, as accidental actuation may occur, possibly causing injury. 9 English FEATURES ADJUSTABLE POWER DIAL The dial (J) controls the torque power. Torque increases with larger circle settings. SQUARE DRIVE The 1/2” square drive (A) allows attachment of sockets with a insulation from cold air passing through the handle. HANDLE This air tool has an ergonomic grip (D) made of molded thermoplastic elastomer (TPE) design for improved comfort, D slippage reduction, and better tool control. AIR INLET I The tool’s air inlet (E) located at the bottom of the handle is used for connecting an air supply with a standard 1/4" NPT American thread. J A TRIGGER The trigger (B) allows the operator to control the start and stop of the air tool. FORWARD/REVERSE SWITCH The forward/reverse switch (C) is easily accessible with one hand B from the left and/or the right side C of the tool for quick directional changeover. TWIN HAMMER MECHANISM This air tool contains a twin hammer mechanism which provides more durability and a longer tool life. COMPOSITE BODY The body of the air tool is a high-impact composite design (G) for reduced weight and superior power-to-weight ratio. The composite body reduces fatigue and provides insulation from cold air passing through the handle. E EXHAUST F The exhaust (I) is located at the base of the handle and allows the exhaust to be directed away from the operator and working area. SHOCK RESISTANT HOUSING BUMPERS The shock resistant housing bumpers (F) provide protection against housing cracks from accidental drops of the air tool. 10 INSTALLATION Air Supply Safety Rules For Pneumatic Tools The recommended hook-up is shown in Figure A. Pneumatic tools operate on a wide range of air pressures. For maximum efficiency and longer tool life, the pressure of the air supplied to these tools MUST not exceed the rated PSI at the tool when the tool is running. Using a higher than rated pressure will cause faster wear and drastically shorten the tool’s life. A higher air pressure can also cause an unsafe condition and explosion. The inside diameter of the hose should be increased to compensate for unusually long air hoses (over 25 feet). Minimum hose diameter should be 3/8" I.D. and fittings should have 1/4” NPT thread. The use of air line lubricators and air line filters is recommended to prevent water in the line that can damage the tool. Drain the air tank daily. Clean the air inlet filter screen on at least a weekly schedule to remove accumulated dirt or other matter that can restrict air flow. Figure A 1/2”(or larger) Pipe and Fittings Coupler Tool The tool’s air inlet used for connecting an air supply has standard 1/4” NPT American thread. Air Hose Oiler Leader Hose 11 Nipple Filter Drain Daily English 1) Inspect the air hose for cracks or other problems. Replace the hose if worn. 2) Never point an air hose at another person. 3) Disconnect the tool when not in use, or before performing service or changing accessories. 4) Use proper hoses and fittings. Never use quick change couplings attached to the tool. Instead, add a hose and coupling between the tool and the air supply. English PREPARATION FOR USE Proper Use Of The Tool Your new 1/2" Drive Impact Wrench is designed for driving, tightening and loosening threaded fasteners, usually nuts and bolts, when fitted with a suitable impact socket. Always use impact-rated extension bars, universal joints and socket adapters between the square output drive of the impact wrench and the female square drive of the socket. Do not use the tool for any other purpose than that specified without consulting the manufacturer or the manufacturer’s authorized supplier. To do so may be dangerous. Never use the impact wrench as a hammer to dislodge or straighten cross threaded fasteners. Never attempt to modify the tool for other uses. easy to reach and operate air shut off valve. The air supply should be lubricated. It is strongly recommended that an air filter, regulator, lubricator (FRL) is used as shown in figure A on page 11 as this will supply clean, lubricated air at the correct pressure to the tool. Details of such equipment can be obtained from your supplier. If such equipment is not used then the tool should be lubricated by shutting off the air supply to the tool and then depressurizing the line by pressing the trigger on the tool. Disconnect the air line and pour into the air inlet 1 teaspoon (5cc.) of a suitable pneumatic motor lubricating oil, preferably incorporating a rust inhibitor. Reconnect tool to air supply and run tool slowly for a few seconds to allow air to circulate the oil. Lubricate tool daily if used frequently, or when it starts to slow or lose power. Work Stations Using An Impact Wrench WARNING: 1) Read all instructions before using this tool. All operators must be fully trained in its use and aware of these safety rules. 2) Do not exceed the maximum working air pressure of 90 psi/6.2 bar. 3) Use personal safety equipment. 4) Use only compressed air at the recommended conditions. 5) If the tool appears to malfunction, remove from use immediately and arrange for service and repair. 6) If the tool is used with a balancer or other support device, ensure that it is fixed securely. 7) Always keep hands away from the working attachment fitted to the tool. 8) The tool is not electrically insulated. Never use the tool if there is any chance of it coming into contact with live electricity. 9) When using the tool, always adopt a firm footing and/or position and grip the tool firmly to counteract any forces or reaction forces that may be generated while using the tool. Your impact wrench should only be used as a hand operated tool. It is always recommended that the tool is used when standing with solid footing. It can be used in other positions but before any such use, the operator must be in a secure position having a firm grip and footing and be aware that when loosening fasteners the tool can move quite quickly away from the fastener being undone. An allowance must always be made for this rearward movement so as to avoid the possibility of hand/arm/body entrapment. Putting Into Service Air Supply CAUTION: This air tool requires lubrication BEFORE initial use, also before and after each additional use. WARNING: Use a clean lubricated air supply that will give a measured air pressure at the tool of 90 psi/6.2 bar when the tool is running with the trigger fully depressed. Use recommended hose size. It is recommended that the tool is connected to the air supply as shown in figure A on page 11. Do not connect the tool to the air line system without incorporating an 12 Using an Impact Wrench Continued PRE-START CHECKLIST • Drain water from air compressor tank and condensation from air lines. (Please refer to air compressor’s operation manual.) • Lubricate the tool. (Please refer to the “Maintenance” section in the manual.) • Select the necessary impact sockets. The sockets have to match with the size of the drive on the air impact wrench. • Connect air impact wrench to air source with the hose of recommended size. WARNING: Risk of unsafe operation. Firmly grasp air hose with hand when installing or disconnenting to prevent hose whip. WARNING: Risk of bursting. Too much air pressure causes a hazardous risk of bursting. Check the manufacturer’s maximum pressure rating for air tools and accessories. The regulator output pressure must never exceed the maximum pressure rating. OPERATING PROCEDURES START-UP (FIG. 1, PG. 2) • Turn on the air compressor and allow the air tank to be filled. • Set the air compressor regulator to 90 PSI. This air tool operates at a maximum of 90 PSI air pressure. • Adjust power dial (if it is available) to desired torque. • Adjust tool either in forward or reverse position. See Features on page 10 for diagram. • Depress the trigger to start operating the tool. SHUT-DOWN (FIG. 1, PG. 2) • Release the trigger in order to stop the tool. • When changing sockets, always disconnect air supply to avoid injury. • When job is completed, turn off the air compressor and store the air tool after lubrication. 13 English 10) Use only genuine Dewalt spare parts or parts which perform equivalently. Do not make temporary or permanent repairs with unauthorized parts. 11) Do not lock, tape, wire, etc., the on/off trigger in the run position. The trigger must always be free to return to the “off” position when it is released. 12) Always shut off the air supply to the tool and depress the trigger to release air from the feed hose before fitting, adjusting or removing the working attachment. 13) Check hoses and fittings regularly for wear. Replace if necessary. Do not carry the tool by its hose. Ensure the hand is removed from the on/off trigger when carrying the tool with the air supply connected. 14) Take care against entanglement of moving tool parts with clothing, ties, hair, cleaning rags, etc. This will cause the body to be drawn towards the tool and can be very dangerous. 15) Safe working practices and observe all relevant legal requirements when installing, using or maintaining the tool. 16) Only install the tool when an easily accessible and easily operable on/off switch is incorporated in the air supply. 17) Take care that the tool exhaust air does not cause problems or blow onto another person. 18) Never lay a tool down unless the working attachment has stopped moving. 19) Always ensure that the forward/reverse switch is in the desired position before starting the tool. 20) Do not use sockets with excessive wear to the input or output drives. Periodically check the square drive on the impact wrench. Make surer the socket, extension bar, or other attachment is securely fitted before operating tool. 21) When loosening fasteners first ensure that there is sufficient clearance behind the tool to avoid hand entrapment. The tool will move away from the threaded joint as the nut/bolt is loosened and rides up the thread, moving the tool with it. English OPERATING INSTRUCTIONS WARNING: Keep out of the reach of children. If taken internally, do not induce vomiting, call a doctor immediately. WARNING: Any excess oil in the motor is immediately expelled from the exhaust port. Always direct exhaust port away from people or objects. • Securely fit the socket or attachment to the impact wrench. • Ensure that the forward/reverse switch is in the correct position for tightening or loosening the fastener. • The nut/bolt can then run down the thread using the power drive of the tool. For loosening a joint the tool can be used in the reverse sequence. Storage: The air tool must be lubricated before storing. Follow the “Lubrication” instruction with exception of step 4. MAINTENANCE Lubrication SERVICE INFORMATION Please have the following information available for all service calls: Model Number _______________________________________ Date and Place of Purchase ______________________________ Air tools require lubrication throughout the lifetime of the tools. The air motor and bearing uses compressed air to power the tool. The compressed air contains moisture that will rust the air motor and other parts in side of the tools, therefore lubrication is required daily. Failure to lubricate the air tool properly will dramatically shorten the life of the tool and will void the warranty CAUTION: This air tool requires lubrication BEFORE initial use, also before and after each additional use. FULL THREE YEARS WARRANTY DeWALT heavy duty industrial tools are warranted for 3 years from date of purchase. We will repair, without charge, any defects due to faulty materials or workmanship. For warranty repair information, call 1-800-4-DeWALT. This warranty does not apply to accessories or damage caused where repairs have been made or attempted by others. This warranty gives you specific legal rights and you may have other rights which vary in certain states or provinces. Latin America: This warranty does not apply to products sold in Latin America. For products sold in Latin America, see country specific warranty information contained either in the packaging, call the local company or see website for warranty information. FREE WARNING LABEL REPLACEMENT: If your warning labels become illegible or are missing, call 1-800-4-DeWALT for a free replacement. To Lubricate The Air Tool Manually: 1. Remove any attachment on the drive of air tools, such as: sockets, chisels and etc. 2. Disconnect the tool from the air supply source, place the air inlet face up. 3. Depress the trigger and place about 1 teaspoon (5cc.) of air tool oil into the air inlet. (Depressing the trigger will help circulate oil in the motor.) NOTE:Use SAE #10 weight oil if air tool oil is not available. 4. Connect the tool to an air source, cover the exhaust end with a towel and run for about 20 to 30 seconds. 14 CAUTION SEE OWNER’S MANUAL FOR BREAK-IN PROCEDURES. ATENCIÓN WARNING CONSULTEZ LE MANUEL DE L’UTILISATEUR POUR LES PROCEDURES DE RODAGE. ADVERTENCIA LAS CAÍDAS PUEDEN CAUSAR LESIONES GRAVES. NO PISAR NI PARARSE EN ESTA ÁREA. CFM: Cubic feet per minute. AVERTISSEMENT LES CHUTES PEUVENT CAUSER DE GRAVES BLESSURES. NE MARCHEZ PAS ET NE VOUS TENEZ PAS SUR CET EMPLACEMENT. TANK DAILY OR AFTER EACH USE. CONDENSATION BUILD-UP MAY CAUSE CORROSION WARNING DRAIN INSIDE TANK RESULTING IN TANK FAILURE. SEE MANUAL FOR INSPECTION PROCEDURES. TO DRAIN TANK OPEN VALVE SLOWLY AND TILT COMPRESSOR TO EMPTY ACCUMULATED WATER. DRENE EL TANQUE A DIARIO O DESPUÉS DE CADA USO. LA ACUMULACIÓN DE CONDENSACIÓN ADVERTENCIA PUEDE OCASIONAR CORROSIÓN DENTRO DEL TANQUE Y PROVOCAR FALLA DEL TANQUE. CONSULTE EL MANUAL PARA CONOCER LOS PROCEDIMIENTOS DE INSPECCIÓN. PARA DRENAR EL TANQUE, ABRA LA VÁLVULA LENTAMENTE E INCLINE EL COMPRESOR PARAELIMINAR EL AGUA ACUMULADA. RÉSERVOIR DE VIDANGE QUOTIDIEN OU APRÈS CHAQUE UTILISATION. L'HABILLAGE DE AVERTISSEMENT CONDENSATION PEUT CAUSER LA CORROSION À L'INTÉRIEUR DU RÉSERVOIR AYANT POUR RÉSULTAT L'ÉCHEC DE RÉSERVOIR. VOIR LE MANUEL POUR DES PROCÉDURES D'INSPECTION. À LA VALVE OUVERTE DE RÉSERVOIR DE VIDANGE LENTEMENT ET AU COMPRESSEUR D'INCLINAISON À L'EAU ACCUMULÉE VIDE. CAUTION SCFM: Standard cubic feet per minute; a unit of measure of air delivery. ATENCIÓN PSI: Pounds per square inch; a unit of measure of pressure. HOLD HOSE FIRMLY TO PREVENT HOSE WHIP. SOSTENGA LA MANGUERA CON FIRMEZA PARA EVITAR EL. Code Certification: Products that bear one or more of the following marks: UL, CUL, ETL, CETL, have been evaluated by OSHA certified independent safety laboratories and meet the applicable Underwriters Laboratories Standards for Safety. ATTENTION BIEN TENIR LE TUYAU POUR ÉVITER UN À-COUP. INCORRECT USE CAN CAUSE HAZARDS. FOLLOW THESE INSTRUCTIONS: RISK OF BURSTING. MAKE SURE THE COMPRESSOR OUTLET PRESSURE IS SET LOWER THAN THE MAXIMUM OPERATING PRESSURE OF THE SPRAY GUN OR TOOL. BEFORE STARTING THE COMPRESSOR, PULL THE RING ON THE SAFETY VALVE TO MAKE SURE THE VALVE MOVES FREELY. DRAIN WATER FROM TANK AFTER EACH USE. RISK OF FIRE OR EXPLOSION. DO NOT SPRAY A FLAMMABLE OR COMBUSTIBLE LIQUID OR PAINT NEAR SPARKS, FLAMES, PILOT LIGHTS, OR IN A CONFINED AREA. THE SPRAY AREA MUST BE WELL VENTILATED. KEEP COMPRESSOR AT LEAST 20 FEET AWAY FROM SPRAY AREA. DO NOT CARRY AND OPERATE THE COMPRESSOR, OR ANY OTHER ELECTRICAL DEVICE NEAR THE SPRAY AREA. NEVER SMOKE WHEN SPRAYING. USE A MINIMUM OF 25 FEET OF HOSE TO CONNECT A SPRAY GUN TO THE COMPRESSOR. RISK OF PERSONAL INJURY. WEAR ANSI Z87 SAFETY GLASSES. NEVER SPRAY COMPRESSED AIR OR MATERIAL AT SELF OR OTHERS. DO NOT USE COMPRESSED AIR FOR BREATHING. REGULATE PRESSURE TO ZERO BEFORE REMOVING HOSE. RISK OF ELECTRICAL SHOCK. HAZARDOUS VOLTAGE. UNPLUG UNIT BEFORE REMOVING COVER. DO NOT EXPOSE TO RAIN, STORE INDOORS. READ OWNER'S MANUAL FOR COMPLETE SAFETY, OPERATION, AND REPAIR INSTRUCTIONS. EL USO INDEBIDO PUEDE GENERAR RIESGOS. SEGUIR ESTAS INSTRUCCIONES: RIESGO DE ESTALLIDO. ASEGÚRESE QUE LA VÁLVULA DE SALIDA DEL COMPRESOR ESTE REGULADA POR DEBAJO DEL MÁXIMO DE LA PRESIÓN DE OPERACIÓN DE LA PISTOLA ROCIADORA O HERRAMIENTA. ANTES DE ARRANCAR EL COMPRESOR, TIRAR DEL ANILLO EN LA VÁLBULA DE SEGURIDAD PARA ASEGURARSE QUE LA VÁLVULA SE MUEVE LIBREMENTE. DRENAR EL AGUA DEL TANQUE DESPUÉS DE CADA USO. RIESGO DE FUEGO O EXPLOSIÓN. NO ROCIAR LÍQUIDO NI PINTURAS INFLAMABLES O COMBUSTIBLES CERCA DE CHISPAS, LLAMAS, LLAMAS DE PILOTO O EN ÁREAS CERRADAS. EL ÂREA DE TRABAJO DEBE ESTAR BIEN VENTILADA. MANTENER EL COMPRESOR ALEJADO POR LO MENOS 20 PIES DEL AREA DE PINTURA. NO LLEVAR NI OPERAR EL COMPRESOR NI DISPOSITIVO ELÉCTRICO ALGUNO CERCA DEL AREA DEL ROCIADO. NUNCA FUME EN EL ÁREA DEL ROCIADO. USAR UNA MANGUERE DE UN MÍNIMO DE 25 PIES PARA CONECTAR LA PISTOLA AL COMPRESOR. RIESGO DE DAÑOS PERSONALES. USAR GAFAS DE SEGURIDAD ANSI Z87. NUNCA APUNTAR EL CHORRO DE AIRE COMPRIMIDO O DE MATERIAL QUE SE ESTÉ ROCIANDO A SÍ MISMO NI A OTRAS PERSONAS. NE RESPIRAR EL AIRE COMPRIMIDO. REDUCIR LA PRESIÓN A CERO ANTES DE DESMONTAR LA MANGUERA. RIESGO DE CHOQUE ELÉCTRICO. ALTO VOLTAJE. DESCONECTAR LA UNIDAD ANTES DE QUITAR LA CUBIERTA. NO EXPONER A LLUVIA. ALMACENAR EN INTERIORES. PARA SEGURIDAD COMPLETA, OPERACIÓN E INSTRUCCIONES PARA REPARAR, LEER EL MANUAL DEL OPERADOR. UNE UTILISATION INCORRECTE PEUT ÊTRE DANGEREUSE. SUIVEZ LES INSTRUCTIONS CI-DESSOUS: RISQUE D'ECLATEMENT. ASSUREZ-VOUS QUE LA PRESSION DE SORTIE DU COMPRESSEUR EST RÉGLÉE À UN NIVEAU INFÉRIEUR À LA PRESSION D'UTILISATION MAXIMUM DU PISTOLET VAPORISATEUR OU DE L'ACCESSOIRE. AVANT DE DÉMARRER LE COMPRESSEUR, TIREZ SUR L'ANNEAU DE LA SOUPAPE DE SÛRETÉ POUR VOUS ASSURER QU'ELLE FONCTIONNE LIBREMENT. VIDANGEZ L'EAU DU RÉSERVOIR À AIR APRÈS CHAQUE UTILISATION. RISQUE D'INCENDIE OU D'EXPLOSION. NE PAS VAPORISER UN LIQUIDE OU UN PEINTURE INFLAMMABLE OU COMBUSTIBLE PRÈS D'ÉTINCELLES, DE FLAMMES, DE VEILLEUSES NI DANS UN ENDROIT RESTREINT OU RENFERMÉ. L'AIRE DE VAPORISATION DOIT ÊTRE BIEN AÉRÉE. GARDEZ LE COMPRESSEUR À UNE DISTANCE D'AU MOINS 20 PIEDS DE LA SURFACE À VAPORISER. NE PORTEZ PAS LE COMPRESSEUR ET NE L'UTILISEZ PAS NI AUCUN AUTRE APPAREIL ÉLECTRIQUE À PROXIMITÉ DE L'AIRE DE VAPORISATION. NE FUMEZ JAMAIS QUAND VOUS VAPORISEZ. UTILISEZ UN FLEXIBLE D'AIR D'UNE LONGUEUR MINIMUM DE 25 PIEDS POUR RELIER LE PISTOLET VAPORISATEUR AU COMPRESSEUR. RISQUE DE BLESSURES CORPORELLES. PORTEZ DES LUNETTES DE PROTECTION ANSI Z87. NE DIRIGEZ JAMAIS L'AIR COMPRIME OU DES MATÉRIAUX VERS SOI OU VERS AUTRUI. NE JAMAIS UTILISER DE L'AIR COMPRIMÉ POUR LA RESPIRATION. RÉGLEZ LA PRESSION À ZÉRO AVANT DE RETIRER LE BOYAU. RISQUE DE CHOC ÉLECTRIQUE. VOLTAGE DANGEREUX. DEBRANCHEZ LA MACHINE AVANT D'ENLEVER BOITIER. N'EXPOSEZ PAS LE COMPRESSEUR À LA PLUIE. REMISEZ-LE À L'INTÉRIEUR. LISEZ LE MANUEL DE L'UTILISATEUR POUR DES INSTRUCTIONS COMPLÈTES CONCERNANT LA SÉCURITÉ, L'UTILISATION ET LES RÉPARATIONS. WARNING RPM: Revolutions per minute; is a measure of the frequency of a rotation ADVERTENCIA BPM: Beats per minute. AVERTISSEMENT NPT: National pipe thread (tapered thread); is a U.S. standard for tapered threads used on threaded pipes and fittings. ID: Inner diameter 15 English FALLS CAN CAUSE SERIOUS INJURIES. DO NOT STEP OR STAND ON THIS AREA. GLOSSARY ATTENTION PARA EL PROCEDIMIENTO DE ASENTADO DE LA MAQUINA, VER MANUAL DEL OPERARIO.