1
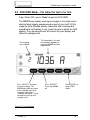
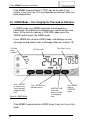
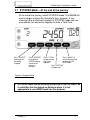
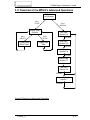
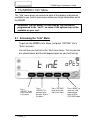
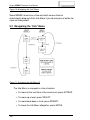
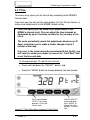
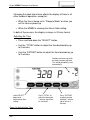
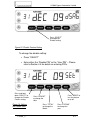
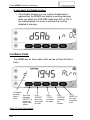
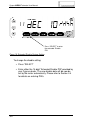
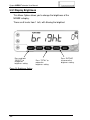
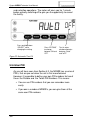
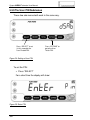
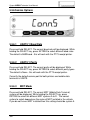
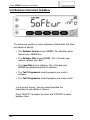
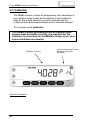
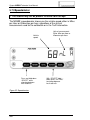
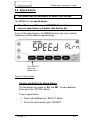
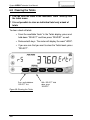
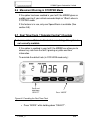
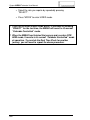
CYGNUS
MR
500
TAXIMETER USER MANUAL
ISSUE 3
Cygnus MR500 Taximeter User Manual
Visit Cygnus Online at:
www.cygnus-automotive.com
ii
© 2009 Cygnus Automotive Limited
Contents
1
ABOUT THIS MANUAL
1
2
THE MR500 TAXIMETER
2
2.1 This Section
2.2 Applying Power to the Meter
2.3 The Internal “Battery”
2.4 "On" and "Off" Modes - When the taxi is not for hire
2.5 FOR HIRE Mode – For when the taxi is for hire
2.6 HIRED Mode – For charging for Time and/or Distance
2.7 STOPPED Mode – At the end of the journey
2.8 Flowchart of the MR500’s Basic Operations
2.9 Using the MR500 with a Receipt Printer
2.9.1 Loading a Receipt Definition
2.9.2 Printing a Receipt
2.9.3 Printing the Meter Totals
2.10 What Next?
2.11 Flowchart of the MR500’s Advanced Operations
3
TARIFFS AND FEATURES WHICH ARE OPTIONAL 12
3.1 Tariffs
3.2 Tariff Code Number
3.3 What Does all of this Mean?
4
5
2
3
3
4
5
6
7
8
9
9
9
9
10
11
PIN NUMBERS
12
13
13
14
4.1 How are PIN Numbers Formed?
4.2 The MR500’s Built-In PIN Numbers
4.2.1 The “Disable” PIN Number
4.2.2 The “Totals” PIN Number
4.2.3 The Clock Set PIN Number
4.3 “User” PIN Numbers
4.4 Entering a PIN Number
4.5 Setting a New PIN Number
14
14
14
15
15
15
15
16
THE MR500’S “INFO” MENU
17
5.1 Accessing the “Info” Menu
5.2 Navigating the “Info” Menu
5.3 Log On/Log Off
5.4 Time Options
5.4.1 Time
5.4.2 Date
5.4.3 Disable Feature
5.4.4 Alarm Clock
5.4.5 Extended Disable Feature
5.5 User Options
5.5.1 Display Brightness
5.5.2 Sounder Setting
5.5.3 Automatic Turn Off Feature
5.5.4 User PIN
C2468_3
17
18
20
22
23
25
26
28
29
31
32
33
33
34
iii
Cygnus MR500 Taximeter User Manual
5.5.5 The User PIN Submenus
5.5.6 Comms Options
5.5.6.1 UART0/1 Baud Rate
5.5.6.2 UART0/1 Parity
5.5.6.3 MDT Mode
5.6 Tariff and Software Information
5.6.1 Serial Number
5.6.2 Tariff Code
5.6.3 Next Code
5.6.4 Printer Code
5.6.5 Software Information Sub-Menu
5.7 Vehicle Options
5.7.1 Calibration
5.7.2 Pulse Check
5.7.3 Speedometer
5.8 Speed Alarms
5.9 “Totals Config”
5.9.1 Totals System
6
TOTALS AND CONDITIONAL ACCESS
6.1
6.2
6.3
6.4
6.5
6.6
6.7
6.8
7
Totals
Conditional Access
The Totals Systems
The Totals Information Stored by the MR500
Totals “Banks”
Reading the Totals
Displaying Journey Summary Information
Clearing the Totals
THE TOTALS/CONDITIONAL ACCESS SYSTEMS
36
38
38
38
38
39
40
40
41
41
42
43
44
45
46
47
49
50
51
51
51
51
52
53
53
55
56
57
7.1 Basic System
7.2 Log on with Totals PIN
57
58
OTHER FEATURES
59
8
8.1 Totalling the Fare and Extras
59
8.2
8.3
8.4
8.5
8.6
8.7
60
60
62
62
63
63
9
The Time Charging Symbol
Speedometer and Journey Distance
“Tariff Year” Indicator
Rate Selection
Movement Warning in STOPPED Mode
Real Time Clock (“Calendar Control”) Override
MESSAGES/GLOSSARY
65
10 SPECIFICATIONS
68
11 MR500 "ALPHABET"
69
12 LIST OF FIGURES
70
13 INDEX
72
iv
© 2009 Cygnus Automotive Limited
C2468_3
v
© 2009 Cygnus Automotive Limited
1 About this Manual
The MR500 Taximeter is designed to be easy to use. The Section
headed “The MR500 Taximeter” shows you how to switch it on and use
it in your taxi. We recommend that you read Section 2 of this manual to
at least get to know your taximeter before you begin to work with it.
If, however, you need to use some of the more advanced features of
the MR500, later sections help you with this. These sections can also
be used for future reference.
The MR500’s features are dependent on the software installed and on
the options selected in the particular tariff installed at any one time. The
behaviour of your particular MR500 may differ in detail from that
described in this User Guide and this may mean that some of the
operations shown here may not be available to you. Also, additional
operations may be available that are not described in this User Guide.
The MR500 helps you, however, by giving easy-to-understand
messages when something unexpected happens.
❢ While every effort is made to make this manual as accurate and
as informative as possible, Cygnus Automotive reserve the
right to change the function and specification of the MR500
Taximeter without notice.
C2468_3
1
Cygnus MR500 Taximeter User Manual
2 The MR500 Taximeter
“Rate
Window”.
Used to show
the rate being
charged. Also
used for other
purposes.
Mode
Indicators.
Here Showing
that the meter
is in HIRED
mode.
Tariff Programming
Connector (Covered
by Seal Retainer).
“Fare Window”.
Shows the Fare
being charged.
Also used for
other purposes.
Seal to prevent
unauthorised
tampering with the
Taximeter.
Seal to prevent
unauthorised
removal and
replacement of
the taximeter in
the vehicle.
“Extras Window”.
Shows the Extras
being charged. Also
used for other
purposes.
Operating Buttons:
SELECT
REVERT
MODE
TOTAL
EXTRAS
Figure 1: Front Panel Features
2.1 This Section
This section contains the basics of operating the MR500 Taximeter.
There are many other features, which can be accessed by pressing the
buttons other than those shown here. Please consult later sections for
details of these.
2
© 2009 Cygnus Automotive Limited
2.2 Applying Power to the Meter
The MR500 is designed for permanent connection to the vehicle’s
power.
However, when you first connect power to the meter, it completes a
series of power-up tests.
During these tests, the MR500 first illuminates the
symbol for 2
seconds before illuminating all segments for two seconds emitting a
"beep". When the checks are complete the MR500 enters ‘On’ mode.
If the
symbol remains lit and the MR500 does not enter ‘On’ mode
then consult your Cygnus Dealer.
If the date and time have not been set the MR500 will automatically
select the Set Time option (consult your dealer for details). After the
time has been set it will enter the ‘For Hire’ mode.
Figure 2: Display during Power-Up self test
2.3 The Internal “Battery”
The MR500 has an internal battery which maintains the internal
clock when power is removed.
❢ If the time is not maintained when power is removed, the
internal battery will need to be replaced. See your dealer.
C2468_3
3
Cygnus MR500 Taximeter User Manual
2.4 "On" and "Off" Modes - When the taxi is not for hire
When in OFF mode, the meter’s display is blank. In ON mode,
there is a dot shown in the Rate Window. There may also be a
clock display in the Fare Window.
If the meter is in ON mode and your vehicle does not move for 30
seconds, it changes automatically to OFF mode. If the meter is in
OFF mode and your vehicle moves, it changes to ON mode.
Press “REVERT” to
revert to OFF Mode.
Figure 3: On Mode
4
Press “MODE” to
enter FOR HIRE
mode.
© 2009 Cygnus Automotive Limited
2.5 FOR HIRE Mode – For when the taxi is for hire
From ON or OFF, press “Mode" to get into FOR HIRE.
The MR500 may display warning messages in this mode and a
clock or blank display programmed as part of your tariff. At this
stage the Rate Window usually shows the rate to charge but,
according to tariff option, it may show the year to which the tariff
applies. If so, pressing Revert will cancel the year display and
show the charging rate.
The charging
rate selected.
Press “SELECT” to choose
the rate to charge. The
MR500 may allow only some
of the available rates to be
selected if your tariff is
“Calendar Controlled”. It may
not allow any manual rate
selection at all.
The information in this part
of the display depends on
how your MR500 has been
programmed.
Press “REVERT”
to turn the MR500
off.
Press “MODE” to
go to HIRED
mode.
Figure 4: For Hire Mode
C2468_3
5
Cygnus MR500 Taximeter User Manual
If the MR500 is connected to a “TAXI” sign on the roof of your
vehicle, it may turn it on. This also depends on how your meter has
been programmed.
2.6 HIRED Mode – For charging for Time and/or Distance
In HIRED mode, your MR500 calculates a fare based on a
combination of the distance travelled by your vehicle and the time
taken. At the start of a journey in FOR HIRE mode, press the
“MODE” button to get into HIRED mode.
If your MR500 will not enter HIRED mode, and displays an error
message instead, please refer to Messages/Glossary (section 10).
The Rate
being
charged.
Press “SELECT”
to select a new
rate to charge if
allowed by your
tariff.
Figure 5: HIRED Mode
The Fare so far.
The “Extras” so far.
Press “EXTRAS” to
add more extras.
WAITING TIME
illuminates
when the meter
is charging for
time.
Press “MODE”
to go to
STOPPED
mode.
If the MR500 is connected to a HIRED lamp, it may turn it on in this
mode.
6
© 2009 Cygnus Automotive Limited
2.7 STOPPED Mode – At the end of the journey
At the end of the journey, select STOPPED mode. The MR500 will
now no longer increase the fare due to time. However, it may
increase it due to distance travelled. In STOPPED mode you can
also add the fare and extras together to show a Total Fare.
Press “SELECT”
to change the
rate being
charged.
Press “REVERT”
to go back to
HIRED mode to
continue the
journey if
allowed.
Press “TOTAL”
to add the fare
and extras
together.
Press “MODE” to
end the journey and
go back to FOR
HIRE mode.
Press “EXTRAS”
to add extras.
Figure 6: Stopped Mode
❢ STOPPED mode can be used by authorities to test the meter, as
it calculates the fare based on distance alone. It is not
appropriate to use HIRED mode for this purpose.
C2468_3
7
Cygnus MR500 Taximeter User Manual
2.8 Flowchart of the MR500’s Basic Operations
Figure 7: Flowchart of Basic Operations
8
© 2009 Cygnus Automotive Limited
2.9 Using the MR500 with a Receipt Printer
The MR500 supports the use of the PT73 printer to produce
receipts and to create copies of the totals (see section 6 for more
information on the MR500’s totals facility).
2.9.1 Loading a Receipt Definition
Receipt definitions are programmed onto a normal tariff card and
loaded in the same way as a tariff. The MR500 is able to distinguish
between a tariff card carrying a tariff or a receipt definition. If the receipt
definition contains bitmaps it should also be loaded into the printer (see
PT73 User Guide).
As well as defining the receipt appearance, it is also possible to include
in the receipt definition a customised header for the Totals printout.
2.9.2 Printing a Receipt
Printing a receipt is accomplished by pressing either the Select or the
Totals button (according to tariff option) on the meter whilst in
STOPPED mode. There is also a tariff option to print a receipt when
going from STOPPED mode to FOR HIRE mode, if a receipt has not
already been printed.
2.9.3 Printing the Meter Totals
To print the Totals press the EXTRAS button on the meter whilst
viewing the totals to be printed.
❢ For more information please read the Cygnus PT73 Receipt
Printer User Guide, part no. C2021.
C2468_3
9
Cygnus MR500 Taximeter User Manual
2.10 What Next?
This section has shown you the most important parts of operating
the MR500, namely:
• Switching it on.
• Working out the fare for a journey.
• Finding out the amount to charge the customer at the end of the
journey.
The MR500, however, has many more options and features
available to you if you want to use them.
From FOR HIRE and ON Modes, you can access two “menus”.
These are:
• The “Info” Menu.
• The “Totals” Menu.
These allow you to set up options and view information.
Firstly, however, there are some important ideas, which need to be
explained before going into the detail. The next sections will deal
with these.
10
© 2009 Cygnus Automotive Limited
2.11 Flowchart of the MR500’s Advanced Operations
FOR HIRE
or ON mode
Press
“TOTAL”
Press
“EXTRAS”
Display Totals
Section 6
Press
“SELECT”
Display Next
Set of Totals
Time Opts
Section 5.4
Press
“TOTAL”
Display Next
Total
“EXTRAS”
User Opts
Section 5.5
“EXTRAS”
Trf/Sw Info
Section 5.6
“EXTRAS”
Vehicle Opts
Section 5.7
“EXTRAS”
Total Conf
Section 5.9
“EXTRAS”
Driver Log On/Off
Section 7
“EXTRAS”
Figure 8 Flowchart of Advanced Operations
C2468_3
11
Cygnus MR500 Taximeter User Manual
3 Tariffs and Features Which Are Optional
The rules affecting taximeters can be confusing and vary greatly from
one area to another.
Fortunately, the MR500 taximeter has been designed to be simple to
understand and use. However, this does mean that the programming of
your MR500 depends on where you work and on what your local
authority requires taximeters to do. This is how Cygnus deals with this
problem:
3.1 Tariffs
In order to work correctly, the MR500 needs to be programmed
with a Tariff. As well as containing the charges, times, distances
etc., it also contains information such as:
• The times and days of the week when particular rates
are being charged.
• The times and dates (e.g.: Bank Holidays) when
particular rates are to be charged.
• The amounts of money allowed to be added as
“Extras”.
• When to activate the circuits to control the Hire Sign
and other external equipment.
• Other options governing the behaviour of the meter.
❢ If your MR500 has no tariff programmed into it, it cannot
function effectively as a Taximeter, since it does not know what
to do!
If your MR500 somehow gets into this position, for example, if
something goes wrong during “Tariff Programming”, it will give
messages to diagnose the problem.
12
© 2009 Cygnus Automotive Limited
3.2 Tariff Code Number
You will see later on that you can find out the tariff code number
of the tariff in your MR500. When the information in the tariff is
programmed, it is given a unique number.
From your tariff code number we can find out how your meter has
been programmed and deal with any queries you may have.
3.3 What Does all of this Mean?
It means that your MR500 may behave differently from another
one, if that unit is subject to different rules and regulations to yours.
From now on in this User Guide, we have put a note against every
feature to warn you where there may be differences from your unit.
C2468_3
13
Cygnus MR500 Taximeter User Manual
4 PIN Numbers
We have borrowed the term “PIN” from the banking industry. It stands
for “Personal Identification Number”.
The MR500 uses PINs, or as we frequently call them “PIN Numbers”,
extensively to control functions that are important to the security of the
information in the meter and in controlling its use.
The use of the specific PINs is explained in later sections. However,
this section contains an overview.
4.1 How are PIN Numbers Formed?
• A PIN number for an MR500 may contain only the digits
1,2,3,4 or 5. This makes a PIN number easy to enter into
the front panel of the meter by using the five buttons.
• PIN numbers may be either 3 or 6 digits long.
4.2 The MR500’s Built-In PIN Numbers
The MR500 has three PIN numbers, which are programmed into it
when it is first manufactured. These cannot be changed. These are
all six-digit numbers, which provide 15,625 possible combinations.
A record of these numbers is provided with your new MR500.
The numbers are:
4.2.1 The “Disable” PIN Number
This PIN allows you to control the use of your MR500 by only
allowing it to work for a pre-set period of time before it is disabled.
See section 5.4.3 for details.
❢ The “Disable Feature” is dependent on the settings in your
Tariff. It may not, therefore, be available on your MR500.
14
© 2009 Cygnus Automotive Limited
4.2.2 The “Totals” PIN Number
This PIN allows the use of the “access control” facility of the
MR500.
4.2.3 The Clock Set PIN Number
This is used to set the clock of the MR500 if required, perhaps due
to the internal battery going flat. The MR500 will prompt you if this
is required.
4.3 “User” PIN Numbers
If you do not want to have to remember the factory set “Disable”
and “Totals” PIN numbers, you can set your own numbers and use
these instead.
The MR500 allows you to set a number to use for the Disable PIN,
and another number to use for the Totals PIN. These two PINs
may be changed as often as desired. Both your “User” PINs, and
the original factory set ones will work.
Section 5.5.4 explains how to set the User PIN’s.
4.4 Entering a PIN Number
At various points, your MR500 will need you to enter a PIN
Number. This is how it is done:
C2468_3
15
Cygnus MR500 Taximeter User Manual
A flashing dash appears at the position of
digit to be entered. The dash becomes
steady once the digit has been entered.
Use the buttons as if
they were numbered 1
to 5 from left to right.
1
2
3
4
5
Figure 9: Entering a PIN Number
If you do not press a button for 20 seconds, the MR500 times out
and goes back to its previous state.
4.5
Setting a New PIN Number
Whenever you need to set a new PIN Number, the MR500 always
gets you to enter it twice to make sure that you have not made any
typing errors.
If you enter a different number the second time, you will have to
start the whole operation again.
16
© 2009 Cygnus Automotive Limited
5 The MR500’s “Info” Menu
The “Info” menu gives you access to most of the options and features
available to you, and in some cases allows you to get information out of
the MR500.
❢ Remember that the MR500 is controlled by the information
programmed in the “tariff”, so some of the options may not be
available on your unit.
5.1 Accessing the “Info” Menu
To get into the MR500’s Info. Menu, just press “EXTRAS” (As in
“Extra” features)
You will then see the first of the “Info” menu items. This may be the
one shown below, but this will depend again on your tariff set-up.
Press
“SELECT” to go
to the next level
in the menu.
C2468_3
Press
“REVERT” to
go back to the
previous level in
the Menu.
Press “EXTRAS”
to go to the next
item in the menu.
Press “MODE” to
leave the “Info”
mode and go
back to ON or
FOR HIRE mode.
17
Cygnus MR500 Taximeter User Manual
Figure 10: Navigating the "Info" Menu
Some MR500’s also have a time-out which causes them to
automatically drop-out of the Info Menu if you do not press a button for
a pre-set time period.
5.2 Navigating the “Info” Menu
Figure 11: Navigating the Info Menu (2)
The Info Menu is arranged in a tree structure:
• To move to the next item at the same level, press EXTRAS.
• To move up a level, press SELECT.
• To move back down a level, press REVERT.
• To leave the Info Menu altogether, press MODE.
18
© 2009 Cygnus Automotive Limited
• If, at any time, you get lost in the Info Menu structure, just
press MODE to leave it
The rest of this Section describes what each of the Info Menu
items are for, and how to use them. Some of the features are
described more fully later in this User Guide.
C2468_3
19
Cygnus MR500 Taximeter User Manual
5.3 Log On/Log Off
❢ This option is not present for all “Totals Systems”. Where it is
present, its exact behaviour depends on the options selected in
the Tariff. If this item does not appear on your meter, then you
do not need to log on and off to make it work. See sections
5.9.1 and 6.3
This menu entry allows a driver to log on and off the taximeter. If
there is no driver logged on to the meter, it will not allow you to
enter HIRED mode at the beginning of the journey but will instead
ask for the "Totals" PIN number.
Flashing
between
these two
Press SELECT to
log On or Off.
20
© 2009 Cygnus Automotive Limited
Logging Off
• If the display says, DRIVER LOG/OFF, it means that you
are already logged on to the meter. Press SELECT once to
log off. The display will then change to DRIVER LOG/ON.
Logging On
If the display says, DRIVER LOG/ON, it means that you are not
logged on. Press SELECT to log on.
The MR500 prompts you for a PIN number. You can use either of
two PIN’s to log on:
• The Totals PIN
• The User Totals PIN
❢ Please see Sections 6 and 7 for information on using the
different Totals Systems available to you.
C2468_3
21
Cygnus MR500 Taximeter User Manual
5.4 Time Options
❢ Important: The time and date setting of the MR500 can be very
important, particularly if your tariff is “Calendar Controlled”. An
error in the date setting, for example, can make the meter
charge the wrong fare on a particular date or time. We
recommend that you check your MR500’s time and date setting
periodically. If there is an error, you may be able to correct it
with a minor “User Adjustment”. If not, your dealer will need to
re-set the time.
The “Time Options” are a group of menu items generally to do with
the time or date. To go into these options, press SELECT once.
You can then move around the options by pressing the EXTRAS
button.
Press “SELECT” to
enter the “Time
Options” sub-menu.
The sub-menu entries accessed from “Time Options” are:
22
© 2009 Cygnus Automotive Limited
5.4.1 Time
This menu entry gives you the time of day according to the MR500’s
internal clock.
From here you can also set the clock display to 12 or 24 hour format, or
make minor adjustments to the MR500’s clock setting.
❢ From this option you can make minor adjustments to the
MR500’s internal clock. You can adjust the time forwards or
backwards by up to 3 minutes, to allow for the accuracy of the
clock.
The meter periodically resets this adjustment (about every 49
days), and allows you to make a further change of up to 3
minutes either way.
If an error in the clock cannot be corrected with this facility, you
will need to contact your dealer to remove the “Tariff Seal” and
re-set the time and date.
To change between 12 and 24 hour formats.
• Press and hold down the “SELECT” button, and:
• Press the “MODE” button to change between the two formats.
Press and hold down
“SELECT” to change
between 12 hour and
24 hour clock.
Figure 12: "Time" Menu Entry: Showing 12 Hour Clock
C2468_3
With the “SELECT”
button held down,
press “MODE” to
change the clock
between 12 and 24
hour.
23
Cygnus MR500 Taximeter User Manual
Changing the clock format here affects the display of times in all
other modes of operation, except for:
• When the time is being set in “Program Mode” or when you
set the time on power up.
• When the MR500 is showing the Alarm Clock setting.
In both of these cases, the display is always in 24-hour format.
Adjusting the Time
• Press and hold down the “SELECT” button.
• Use the “TOTAL” button to adjust the time backward by up
to 3 minutes.
• User the “EXTRAS” button to adjust the time forwards by up
to 3 minutes.
Number of minutes by which
the time has been adjusted.
This will be periodically reset
automatically.
Hold “SELECT”
down while
adjusting the time
setting.
Figure 13: Adjusting the Time
24
Press “TOTAL” to
adjust the time back
1 minute. (up to limit
of 3 minutes).
Press “EXTRAS”
to adjust the time
forwards 1 minute.
(up to limit of 3
minutes).
© 2009 Cygnus Automotive Limited
5.4.2 Date
This entry shows the date according to the MR500’s internal clock.
The display is for information only.
Figure 14: Date Menu Entry Showing Tuesday 7th April 2008.
❢ Important Note: The year is shown as 2 digits, representing the
years 2000 to 2099.
C2468_3
25
Cygnus MR500 Taximeter User Manual
5.4.3 Disable Feature
❢ This option may not be present for some Tariff set-ups. If the
Disable Feature menu entry does not appear on your MR500,
then the feature is not available. Contact your dealer to obtain a
tariff with this feature enabled.
This feature is sometimes known as “Date Stop”.
The Disable Feature allows you to tell the MR500 to work only until
a certain date. After that date it will not allow you to enter “HIRED”
mode from “FOR HIRE” mode.
This means that you can allow someone else to use your MR500
until a date of your choice. Beyond this date they will have to return
the meter to you to get the Disable Feature turned off or another
date entered into it.
The date shown represents the date from which the MR500 will no
longer work. For example, if the date shown is “23 OCT 11”, then
the meter will work until 11.59PM on 22nd October 2011. From
12.00 AM onwards, it will be disabled.
❢ To use the Disable Feature, you need to know the MR500’s
“Disable PIN Number”. You can use either this or the “User Pin
Number”. If you do not have the PIN number then you can only
view the information here. Please see section 4 for more
information.
The menu entry shows the Disable date if it is set. If the fare
window says OFF, then there is no disable date set.
26
© 2009 Cygnus Automotive Limited
Press “SELECT”
to change the
Disable setting.
Figure 15: Disable Feature Setting
To change the disable setting:
• Press “SELECT”
• Enter either the “Disable PIN” or the “User PIN” – Please
refer to Section 4.4 for details on entering PIN’s.
Press and hold
down “SELECT” to
change the Disable
Feature setting.
Figure 16: Setting
the Disable Date
C2468_3
Press “REVERT”
to change the
date.
Press “TOTAL”
to change the
Month.
Press “MODE” to
turn the feature
on or off.
Press “EXTRAS”
to change the
year.
27
Cygnus MR500 Taximeter User Manual
A note about the Disable Feature
• If the Disable Feature is in use, and the Disable date is
approaching, the MR500 may display a warning message
when you switch it to FOR HIRE mode from OFF or ON. In
the example below, the meter is warning that it will be
disabled in two days.
5.4.4 Alarm Clock
The MR500 has an alarm clock, which can be set from this Menu
Entry.
'd' indicates
that daily
Press and
alarm is
hold down
active.
“SELECT” to
change the
Alarm Clock
setting.
Figure 17: Alarm Clock Setting
28
Press
“REVERT”
to turn the
alarm clock
on or off.
Press
“TOTAL”
to change
the hours.
Press
“EXTRAS”
to change
the
minutes.
Press
“MODE” to
turn 'daily'
function on
or off.
© 2009 Cygnus Automotive Limited
If you set the alarm clock to ON, the alarm will sound at the time
you have set.
The alarm sounds for a maximum of 30 seconds. You can cancel
the alarm while it is sounding by pressing any of the five buttons
once. Their normal function is disabled for this one depression (the
meter could be in any mode).
If the 'daily' function is not activated then, once the alarm has
sounded, it is automatically disabled, so the next time you look at
the setting in the Info Menu, it will be turned off, (display shows
“off”).
Note that, if the Alarm clock setting menu is being viewed when the
alarm time is reached, the alarm will only give one bleep.
❢ The Alarm Setting is always shown in 24 hour format,
regardless of the format you have chosen in the “Time” menu
entry.
5.4.5 Extended Disable Feature
❢ This option may not be present for some Tariff set-ups. If the
Disable Feature menu entry does not appear on your MR500, or
the Disable Feature is off, then the Extended Disable Feature
menu entry is not available. Contact your dealer to obtain a
tariff with this feature enabled.
The Extended Disable Feature is an enhancement to the Disable
Feature (see Section 5.4.3). It is useful if you own a number of
meters and do not want to give out their Disable PINs.
If the Disable Feature is enabled, the Extended Disable Feature
allows you to extend the working period of your MR500 until a
given date. After that date it will not allow you to enter “HIRED”
mode from “FOR HIRE” mode. An Extended Disable PIN can be
obtained from your Cygnus Dealer.
The menu entry shows the Disable date. If no Disable date is set,
the menu entry does not appear.
C2468_3
29
Cygnus MR500 Taximeter User Manual
Press “SELECT” to enter
the extended Disable
PIN.
Figure 18: Extended Disable Feature Setting
To change the disable setting:
• Press “SELECT”
• Enter either the 14-digit “Extended Disable PIN” provided by
your Cygnus dealer. The new disable date will be now be
set by the meter automatically. Please refer to Section 4.4
for details on entering PIN’s.
30
© 2009 Cygnus Automotive Limited
5.5 User Options
The “User Options” are a group of menu items, which allow you
customise the way in which the MR500 operates.
Press “SELECT” to
enter the User
Options sub-menu.
Figure 19: User Options
The sub-menu entries accessed from “User Options” are:
C2468_3
31
Cygnus MR500 Taximeter User Manual
5.5.1 Display Brightness
This Menu Option allows you to change the brightness of the
MR500’s display.
There are 5 levels from 1 to 5, with 5 being the brightest.
Press and hold
“SELECT” to
change the
brightness setting.
Figure 20: Brightness Setting
32
Press “TOTAL” to
reduce the
brightness setting.
Press “EXTRAS”
to increase the
brightness setting.
© 2009 Cygnus Automotive Limited
5.5.2 Sounder Setting
As you will have noticed, the MR500 makes various sounds when
you press buttons, change modes etc.
If you prefer your meter not to make these sounds, you can turn
them off here.
Press and hold
“SELECT” while
changing the
sound setting.
Press “EXTRAS” to
change the setting
between ON and
OFF.
Figure 21: Sounder Setting
❢ Note: Turning the sound off here does not affect the sounding
of some alarms and warnings, including the Speed Alarms and
Alarm Clock.
5.5.3 Automatic Turn Off Feature
The MR500 has an optional facility designed to prevent excessive
drain on your vehicle’s battery if you accidentally leave the meter in
FOR HIRE mode for an extended period of time.
With the feature turned ‘ON’, the meter will time out after 2 hours if
left in FOR HIRE mode with no signal received from the pulse input
C2468_3
33
Cygnus MR500 Taximeter User Manual
and no button operations. The meter will warn you for 1 minute
before actually switching off to give you the opportunity to cancel
the facility.
Press and hold down
“SELECT” while
changing the setting.
Press “EXTRAS”
to change
between ON and
OFF.
Text in extras
window alternates
between "Auto"
and "oFF".
Figure 22: Automatic Turn Off
5.5.4 User PIN
As you will have seen from Section 4.3, the MR500 has a series of
PIN’s, that are pre-set when the unit is first manufactured.
However, it is possible to define your own PIN numbers for two of
these: the Disable and the Totals PIN Numbers. This means:
• You can use PIN numbers that you can remember more
easily.
• If you own a number of MR500’s, you can give them all the
same user PIN numbers.
34
© 2009 Cygnus Automotive Limited
❢ Warning: The User PIN numbers can be set as often as
required. It is important that you keep a record of them as they
are known only to you. If you lose the numbers, we will not be
able to find them again. However the factory set PIN’s will
continue to work.
Also, we recommend that you do not choose numbers which
are easy to guess, like “111111”.
Press “SELECT”
to enter the User
PIN options.
Figure 23: User PIN
• To enter the User PIN sub-menu, press the “SELECT”
button.
C2468_3
35
Cygnus MR500 Taximeter User Manual
5.5.5 The User PIN Submenus
These two sub-menus both work in the same way.
Press “SELECT” to set
(in this example) the
User Disable PIN.
Press “EXTRAS” to
go to the User
Totals PIN.
Figure 24: Setting a User PIN
To set the PIN:
• Press “SELECT”
For a short time the display will show:
Figure 25: Enter PIN
36
© 2009 Cygnus Automotive Limited
• When "Enter
Enter PIN"
PIN has cleared, for the example above, the
dSAb"
Pin"
words "dSAb
dSAb and "Pin
Pin will flash alternately in the Extras
window. Enter the Disable PIN for the MR500. In the case
of the Totals User PIN, use the meter’s Totals PIN.
• If the PIN is not entered within the allocated time, the meter
will start to beep and a timeout warning will be displayed. If
you begin to enter the PIN while the meter is beeping, the
timeout period will be reset.
• Then enter the new User PIN when prompted.
• The MR500 will then ask for the same number to be entered
again for verification. If a different number is entered, the
MR500 will flag an error, otherwise it will accept the User
PIN.
C2468_3
37
Cygnus MR500 Taximeter User Manual
5.5.6 Comms Options
5.5.6.1
UART0/1 Baud Rate
Press and hold SELECT. The current baud rate will be displayed. While
holding the SELECT key, press EXTRAS to select different baud rates.
The default is 9600 baud - this will work with the PT73 receipt printer.
5.5.6.2
UART0/1 Parity
Press and hold SELECT. The current parity will be displayed. While
holding the SELECT key, press EXTRAS to select different parity types.
The default is None - this will work with the PT73 receipt printer.
Currently the default comms port for both printers and mobile data
terminals is UART0.
5.5.6.3
MDT Mode
Press and hold SELECT. The current MDT (Mobile Data Terminal)
system will be displayed. While holding the SELECT key, press
EXTRAS to select the different MDT systems A to D. The correct
system to select depends on the make of MDT installed in the vehicle.
If you do not have a MDT installed then this setting should be system A.
38
© 2009 Cygnus Automotive Limited
5.6 Tariff and Software Information
The “Tariff and Software Information” items are a group of menu
items that provide information on the software version of your
MR500 and the Tariff programmed into it.
Press “SELECT” to
enter the Tariff and
Software Info submenu.
Figure 26: Tariff and Software Information
C2468_3
39
Cygnus MR500 Taximeter User Manual
5.6.1 Serial Number
❢ This item tells you the Serial Number of your MR500. The
number shown here should be the same as the one printed on
the front panel of the unit. If this is not the case then you should
contact Cygnus Automotive for advice.
Figure 27: Serial Number
5.6.2 Tariff Code
In Section 3.1 we described the use of Tariffs to configure the
MR500 for your particular area and application.
This Menu Entry allows you to find out the code of your current
tariff.
Figure 28: Tariff Code
40
© 2009 Cygnus Automotive Limited
❢ Some tariffs have an “End Date” after which they are no longer
valid. This can be used to automatically select a “Deferred”
tariff. To see the End Date (if applicable), press “SELECT”.
5.6.3 Next Code
❢ This option may not be present for some Tariff set-ups.
This displays the code number of the next tariff when deferred
tariffs are being used. Pressing SELECT displays the date on
which this tariff comes into operation. The display is for information
only.
5.6.4 Printer Code
❢ This option may not be present for some Tariff set-ups.
This option displays the code number of the receipt printer settings
currently installed. The printer settings determine how receipts will
look. The display is for information only.
C2468_3
41
Cygnus MR500 Taximeter User Manual
5.6.5 Software Information Sub-Menu
This sub-menu contains a series of pieces of information that allow
your dealer to identify:
• The Software Version of your MR500. This identifies which
features your MR500 has.
• The Software Date of your MR500. This is the date your
meter’s software was “built”.
• The Load Date of your software. This is the date your
MR500 was programmed with its software.
• The Tariff Programmer used to program your meter’s
software.
• The Tariff Programmer used to program your meter’s tariff.
In the case of a query, you may need to provide this
information to your dealer or Cygnus.
Press “SELECT” to access the items and “EXTRAS” to move
between them.
42
© 2009 Cygnus Automotive Limited
5.7 Vehicle Options
The “Vehicle Options” are a group of menu items generally to do
with your vehicle.
Press “SELECT” to
enter the “Vehicle
Options”.
Figure 29: Vehicle Options
C2468_3
43
Cygnus MR500 Taximeter User Manual
5.7.1 Calibration
The MR500 receives a series of voltage pulses from somewhere in
your vehicle in order to work out the distance it has travelled. In
order for this to work correctly, the meter needs to know the
number of these pulses generated per mile or kilometre travelled.
This is known as the calibration.
❢ The number of pulses generated per mile or kilometre varies
between make and model of vehicle. It is important that the
calibration is set correctly for the MR500 to charge correct fares
and record distances accurately.
Calibration in Pulses.
Figure 30: Calibration
44
Units of measurement (Pulses
per Mile or Pulses per
Kilometre).
© 2009 Cygnus Automotive Limited
5.7.2 Pulse Check
❢ The “Pulse Check” facility can be a very useful tool for
checking the pulse signal from your vehicle without having to
remove any seals.
This entry allows you to display a count of the pulses received from the
vehicle. To count pulses:
• Press “SELECT” to start the count.
• At any time during the count, you can press “SELECT”
again to reset it to zero.
• Press “TOTAL” to hold the count. You can restart it again by
pressing “TOTAL” again, or reset it with “SELECT”
• When you have finished, press “REVERT” or “MODE”
Count of pulses
received so far.
Press “SELECT” to
start the pulse count.
Press it again to
reset the pulse count
Figure 31: Pulse Check
C2468_3
Press “REVERT” to
finish counting pulses
and go back to the
“Vehicle Options"
menu”.
The text “PULS”
flashes when the
pulses are being
counted.
Press “TOTAL” to
hold the pulse count.
Press it again to
continue the count.
45
Cygnus MR500 Taximeter User Manual
5.7.3 Speedometer
❢ This feature may not be present for some tariff set-ups
The MR500’s speedometer shows you the vehicle speed either in Miles
per Hour or Kilometres per hour, regardless of the units of
measurement used for the calibration or in the Tariff information.
Vehicle
speed.
Press and hold down
“SELECT” while
changing between
km/h and ml/h.
Figure 32: Speedometer
46
Units of measurement:
Either Miles per Hour or
Kilometres per Hour.
With “SELECT” held
down, press “EXTRAS”
to change between
km/h and ml/h.
© 2009 Cygnus Automotive Limited
5.8 Speed Alarms
❢ This option may not be present for some Tariff set-ups.
The MR500 has two speed alarms.
❢ If the “Movement Warning in STOPPED Mode” feature is in use,
only one speed alarm is available (See Section 8.6)
If you set the speed alarms, the MR500 will warn you if your vehicle
exceeds one of two different speed settings.
Press “SELECT”
to go to the
Speed Alarms.
Figure 33: Speed Alarms
Viewing and Setting the Speed Alarms
The two alarms are shown as “A1
A1”
A2”.
A1 and “A2
A2 To move between
them, press the “EXTRAS” button.
To set a speed alarm:
• Press and hold down the “SELECT” button.
• To turn the alarm on/off, press “REVERT”
C2468_3
47
Cygnus MR500 Taximeter User Manual
• To move the alarm setting down and up, press “TOTAL" or
“EXTRAS”.
• To change the units of measurement, press “MODE”.
The ranges of values allowed are: 16 to 159 km/h, or 10 to 99 ml/h.
“A1” indicates that this is
Alarm Setting 1.
Speed setting,
or OFF.
Press and hold
down “SELECT”
while setting the
speed alarm.
Press “REVERT”
to turn the alarm
ON or OFF.
Press “TOTAL”
to reduce the
setting.
Units of
Measurement
(km/h shown in
this case).
Press
“EXTRAS” to
increase the
setting.
Press “MODE”
to change the
units of
measurement.
Figure 34: Setting a Speed Alarm
When the vehicle exceeds a speed alarm setting, you will hear a
distinctive long followed by a short “beep”.
Note: any changes made to the Speed Alarm setting will not take
effect until the operator has left the menu and returned to the ON,
OFF or FOR HIRE mode.
48
© 2009 Cygnus Automotive Limited
5.9 “Totals Config”
❢ For a full explanation of the totals schemes, please refer to
Section 7. Not available on London meter versions.
The Totals Configuration menu allows you to choose the way the
MR500 stores totals and how it controls access to your meter.
Before you can go to the sub-menu, you must enter either the Totals
PIN number, or the “User” Totals PIN number if it has been set.
Press select to enter the
Totals Config. Submenu. You will need to
use the Totals or User
Totals PIN.
Figure 35: The Totals Config Menu
C2468_3
49
Cygnus MR500 Taximeter User Manual
5.9.1 Totals System
❢ From here you can choose the system of totals to be used by
your MR500. Please refer to Section 6 for a full explanation of
the totals systems available.
To Choose the Totals System
Press and hold
down the “SELECT”
button while
changing the totals
system.
Press “EXTRAS”
to change the
totals system.
Figure 36: Totals System
Totals Systems
The abbreviations used for the available Totals Systems are:
• “BASIC
BASIC”
BASIC – Basic Totals System.
• “LOG
LOG ON”
ON – Log on to meter with PIN number.
❢ Note: If you change the totals system, any users or drivers are
automatically logged off.
50
© 2009 Cygnus Automotive Limited
6 Totals and Conditional Access
❢ The behaviour of the Totals System in the MR500 depends on
the option chosen in the Info Menu (See Section 5.9.1).
This Section gives you a brief overview of the way the MR500 handles
totals. It also shows you how to read the totals and how to reset them.
For more information on the Totals Systems available on the MR500,
please refer to Section 7.
6.1 Totals
The MR500 allows you to record totals for the user(s) of your
vehicle.
This means that you can keep a track on the use of your vehicle,
the money earned, distances travelled etc.
6.2 Conditional Access
If required, the MR500 will only allow access to its main functions
(i.e.: entering HIRED mode and actually charging a fare) to users
who have been given a PIN number.
This control on the use of the meter is what we call conditional
access.
6.3 The Totals Systems
The MR500 has 2 totals systems that you can use. Their
availability depends on the settings in your tariff and on the
Software installed in your unit. However, they are:
• Basic System: This is the simplest of the options, which
allows your MR500 to be used without any PIN numbers at
all (except if you need to reset the totals). The meter just
records one set of totals for you.
C2468_3
51
Cygnus MR500 Taximeter User Manual
• Log on with Totals PIN: This system records the same
totals information as the “Basic” version. However, you
need to log on the meter by entering either the Totals PIN or
the User Totals PIN before using it. Sections 4.2.2 and 4.3
describe where these PIN’s come from.
This section will firstly explain how the MR500 deals with totals
information in general.
6.4 The Totals Information Stored by the MR500
The MR500 has a large internal memory, which it uses to record
totals information.
Totals Items Available
The totals information that can be recorded and displayed or
printed by the MR500 are:
•
•
•
•
•
•
•
•
•
•
•
•
•
•
•
•
Extr Fare”
“Extr
Fare Total of Fare and Extras combined *
“FArE
FArE”
Total Fares *
FArE
“Extr
Extr”
Total Extras *
Extr
PAid diSt”
“PAid
diSt Total Paid Distance *
“UnPd
UnPd diSt”
diSt Total Unpaid Distance
totL diSt”
“totL
diSt Total Distance
“EArn
EArn rAtE”
rAtE Earn Rate
“JoUr
JoUr timE”
timE Total Journey Time *
UnPd timE”
“UnPd
timE Total Unpaid Journey Time
“wAit
wAit timE”
timE Total Waiting Time
“wAit
wAit fare”
fare Total Waiting Fare
“dist
dist fare”
fare Total Distance Fare
“rAtE
rAtE ChnG”
ChnG Total Rate Changes During Hired Mode *
“SPd
SPd AuG”
Average Speed
AuG
“mAx
mAx SPd”
Maximum Speed
SPd
“JoUr
JoUr”
Total Number Of Journeys *
JoUr
In addition to the above, the individual journey information that can
be recorded and displayed or printed by the MR500 for are:
• “strt
strt time”
time Journey Start Time *
52
© 2009 Cygnus Automotive Limited
•
•
•
•
“strt
strt
“end
end
“jour
jour
“rcpt
rcpt
rate”
rate
rate”
rate
numb”
numb
numb”
numb
Journey Start Rate *
Journey End Rate *
Journey Number *
Receipt Number *
In EU countries items marked with an asterisk (*) are required by
the Measuring Instruments Directive. Therefore they are always
present even if they are not selected in the tariff.
Other totals items may be added in future software revisions.
6.5 Totals “Banks”
The MR500 provides the user with 2 sets of totals:
• The resettable “bank”, which may be reset as required.
These can be used for short term monitoring (similar to
resetting the car trip odometer after filling up with fuel).
• The permanent “bank”. The Measuring Instruments
Directive (2004/22/EC) does not permit this bank to be
reset.
6.6 Reading the Totals
To read the MR500’s totals, press the “TOTAL” button in ON or
FOR HIRE modes. On some versions of the MR500, the display
reverts back to the previous mode if you do not press a button for
10 seconds. If the "Log On" totals configuration is selected, the
user will be prompted to enter the Totals or User Totals PIN first.
C2468_3
53
Cygnus MR500 Taximeter User Manual
This indicates
that these are
the “Resettable”
totals.
Press “SELECT”
to change the
“bank” of totals
being viewed.
The value of the totals
item being viewed.
The name of the
totals item being
viewed.
Press “TOTAL” to
move to the next
totals item (e.g.:
Extras).
Figure 37: Viewing the Totals
The display in the rate window can be one of the following:
• “rS
rS”
rS – This means that the “resettable” bank is being
displayed.
• “t
t” – This means that the “permanent” totals are being
displayed.
❢ The Totals are not viewable until a tariff has been installed.
54
© 2009 Cygnus Automotive Limited
6.7 Displaying Journey Summary Information
Individual journey information can be displayed on the MR500. Up
to 650 most recent journeys are available. The exact number
depends on factors such as the number of totals fields included in
the tariff options.
To display this information, press ‘Select’ and ‘Total’ together whilst
in the Totals menu. The display will now alternate between the
date and time of the most recent journey stored. Press ‘Select’ to
scroll through the journeys and press ‘Total’ to scroll through the
information for the individual journey.
Press Select to
scroll through
Journeys
Press Total to scroll
through Journey
Information
Figure 38: Clearing the Totals
C2468_3
55
Cygnus MR500 Taximeter User Manual
6.8 Clearing the Totals
❢ You can clear the totals in the resettable “bank” directly from
the totals menu.
❢ It is not possible to clear an individual total only a bank of
totals.
To clear a bank of totals:
• From the resettable “bank” in the Totals display, press and
hold down “SELECT” and then press “REVERT” as well.
• Release both keys. The meter will display the word "rESEt".
• If you are sure that you want to clear the Totals bank, press
“SELECT”.
Press and hold down
“SELECT” first.
Figure 39: Clearing the Totals
56
With “SELECT” held
down, press
“REVERT”.
© 2009 Cygnus Automotive Limited
7 The Totals/Conditional Access Systems
This section describes the two systems possible on the MR500. You
can choose the system you want in the Totals System menu (Section
5.9.1)
7.1 Basic System
The basic system is designed for use either where only one person
uses the meter or where there is no need to control its use.
When using this system, there is no need to log on or off the meter.
The meter provides you two sets of totals: the “temporary” and
“permanent” banks.
Info Menu Options
If you have selected the Basic system, the Log On/Off (Section
5.3) Info Menu entry is absent from your MR500:
C2468_3
57
Cygnus MR500 Taximeter User Manual
7.2 Log on with Totals PIN
This system provides you with a simple way to control the use of
your MR500 and/or your taxi.
In order to use the meter, you must first “Log On” to it using one of
two PIN’s:
• The Totals PIN as supplied with your meter. (Section 4.2.2)
• The User Totals PIN set by you. (Section 4.3)
These methods are provided to give you the choice of how to
manage the use of your meter/vehicle.
Examples of ways to use the system are:
• Use the built-in Totals PIN yourself to log on and off. If you
leave the meter logged off when not in use, it can prevent
the accidental addition of extra totals. For example, it can
prevent your children from adding extra journeys to your
totals.
• If you set the Totals User PIN, you can use a more easily
remembered number to log on and off as above.
• You can set the Totals User PIN to any value you like. This
can then be given to another user of the meter for 1 or 2
shifts and then changed afterwards.
58
© 2009 Cygnus Automotive Limited
8 Other Features
The MR500 includes some extra features that have not been
mentioned yet in this User Guide and some functions that need further
explanation.
8.1 Totalling the Fare and Extras
❢ There are several options for totalling the fare and extras.
These are set in the Tariff.
As mentioned in Section 2.7, the MR500 can add the fare and
extras together to display a Total Fare.
To add the fare and extras together in STOPPED mode, press the
“TOTAL” button.
Figure 40: Totalling the Fare and Extras
The MR500 may do one of the following:
• When you release the “TOTAL” button, the fare and extras
remain added together until the movement of the vehicle
causes the fare to be increased. At this point they
automatically separate.
• When you release the “TOTAL” button, the fare and extras
remain added together until the vehicle moves enough to
generate 1 road pulse, or the timeout expires (settable in
tariff), whichever happens first.
C2468_3
59
Cygnus MR500 Taximeter User Manual
• When you release the “TOTAL” button, the fare and extras
separate immediately. Also, if the vehicle moves while you
are holding the button down, or the timeout expires (settable
in tariff), the figures separate automatically.
The setting of these options is done in the Tariff programmed into your
MR500.
8.2 The Time Charging Symbol
In Hired mode, the
legend illuminates on the MR500’s display
to indicate that it is charging for time only, i.e.: the vehicle is
travelling below the changeover speed between time and distance
charging.
8.3 Speedometer and Journey Distance
❢ These features are options in the Tariff, so may not be available
on your MR500.
If these features are available in your Tariff, they allow you to
display the speed of your vehicle when in HIRED mode or
STOPPED mode.
❢ The speedometer and distance display can only be activated
from HIRED mode if you have no extras on display.
To active the features in HIRED mode:
• Press “TOTAL” to display the Speedometer. The display is
in the same units as your meter’s Speed Menu.
60
© 2009 Cygnus Automotive Limited
Figure 41: Speedometer
• Press “TOTAL” again to display the distance travelled so far
in this journey. The units of measurement correspond with
the units of your meter’s calibration. “M
M” in the left-hand side
of the Extras Window indicates “Miles”, and “K
K” indicates
“Kilometres”.
• Press “TOTAL” again to return to the normal “extras” display.
Figure 42: Distance Display
C2468_3
61
Cygnus MR500 Taximeter User Manual
8.4 “Tariff Year” Indicator
The MR500 can be programmed in the tariff to show a “Tariff Year”
indicator when FOR HIRE mode is first entered from ON or OFF
modes. The flashing display in the Rate Window can be any two
characters programmed into your tariff.
Flashing Tariff
Year Indicator.
Figure 43: Tariff Year Indicator in FOR HIRE Mode
8.5 Rate Selection
In addition to the normal use of the “SELECT” button to select the
active rate in FOR HIRE, HIRED and STOPPED modes, the
MR500 can be set up to use other buttons to select the rate.
This can be used where there is a complex structure of rates in
your local tariff.
62
© 2009 Cygnus Automotive Limited
8.6 Movement Warning in STOPPED Mode
If this option has been enabled in your tariff, the MR500 gives an
audible warning if your vehicle exceeds 6mph or 10km/h when in
STOPPED mode.
If this feature is in use, only one Speed Alarm is available (See
section 5.8).
8.7 Real Time Clock (“Calendar Control”) Override
❢ In areas where “Calendar Control” is mandatory, this option is
not normally available.
If this option is enabled in your tariff, the MR500 can allow you to
choose any rate from the tariff, ignoring any date and time
information.
To override the default rate (in FOR HIRE mode only):
Press and
hold down
“SELECT”
Press “MODE”
Figure 44: Overriding the Real Time Clock
• Press “MODE” while holding down “SELECT”.
C2468_3
63
Cygnus MR500 Taximeter User Manual
• Select the rate you require by repeatedly pressing
“SELECT”.
• Press “MODE” to enter HIRED mode.
❢ If you do not enter HIRED mode within 10 seconds of pressing
“SELECT” for the last time, the MR500 will revert to its normal
“Calendar Controlled” mode.
❢ When the MR500 has finished the journey and re-enters FOR
HIRE mode, it reverts to its normal “Calendar Controlled” mode
of operation. To override the Real Time Clock for another
journey, you will need to repeat the above procedure.
64
© 2009 Cygnus Automotive Limited
9 Messages/Glossary
If your MR500 produces a message or abbreviation that you do not
understand, use this table for help.
Text
12Hr
24Hr
A
A1
A2
ALRM
APR
AUG
AUTO
BASIC
BRIGHT
CAL
CLK UNSET
CODE
DATE
DEC
DRIVER
DSAB
DSAB IN
DISABLED
EEPR INIT
ENDS
ENTER PIN
ERROR
EXPIRE
EXTR
FARE
FEB
FRI
HELD
INVALID
JAN
JOUR
JUL
C2468_3
Notes
12 hour clock format
24 hour clock format
AM
Speed alarm 1
Speed alarm 2
Alarm clock setting/Speed alarm setting
April
August
Prompt in INFO Menu for setting of Auto Turnoff
feature.
Basic totals system setting.
Display brightness setting.
Calibration
The meter's clock has not been set. Calendar
controlled or automatic functions will be disabled
Code (e.g. Tariff Code)
“Date” from “End Date”. Indicates expiry date of
tariff.
December
Driver
“Disable”. Part of the Disable Feature Info menu
entry.
The meter will be disabled in the number of days
shown.
Meter is disabled. Enter the Disable PIN to enable it.
Initialising the internal non-volatile memory
Tariff end date
Prompt to enter a Pin Number.
Indicates an error condition.
The tariff will expire in the number of days shown
“Extras”. (Totals).
“Fare”. (Totals)
February
Friday
Indicates that a pulse count is “HELD”, or
suspended.
An attempt has been made to set an invalid tariff or
calibration.
January
“Journeys”. (Totals).
July
Section(s)
5.4.1
5.4.1
5.8
5.8
5.4.4, 5.8
5.5.3
7.1, 6.3
5.5.1
5.7.1,
5.6.2
5.6.2
5.4.3
6.4
6.4
5.7.1
6.4
65
Cygnus MR500 Taximeter User Manual
JUN
KMH
LOAD DATE
LOG ON
LOG OFF
MAR
MAY
ML/H
MON
NEXT
NO TARIFF
NO TRF
-NONENOV
OCT
OFF
OFF IN
ON
P
PKM
PML
PDst
PIN
Prin
PULS
RESET TOTL
RS
SAT
SEP
SET
SET FAILED
SET TIME
SOFT TPU
SOFT
66
DATE
June
Kilometres per Hour. (Speedometer, speed alarms)
Software “Load” date. This is the date when your
MR500’s software was programmed into it.
Prompt to Log On to the meter. Also shown when
"log on" totals configuration is selected.
Promp to Log Off from the meter.
March
May
Miles per Hour. (Speedometer, speed alarms)
Monday
Next Tariff Code (Deferred Tariffs)
“No Tariff”. The meter is disabled because there is
no tariff currently installed.
“No Tariff”. Shown in the Info Menu when there is no
tariff currently installed.
No printer receipt
November
October
Feature turned Off, or “disabled”.
2 hours has elapsed with the meter in FOR HIRE
mode with no button pressed or speed pulses
received. The Auto Turnoff feature is about to
activate. Press any button to cancel it.
Feature turned On, or “enabled”.
PM
Pulses per Kilometre. (Calibration)
Pulses per Mile. (Calibration)
Paid Distance. (Totals).
PIN Number
Printer e.g. Printer Code
Pulse Check
Press "SELECT" to reset the Totals bank being
shown. This gives you the chance to change your
mind by pressing “REVERT”. This message may be
shown due to user selection or by the meter because
the Totals are invalid and need resetting.
Indicates that the resettable Totals are being shown
Saturday
September
“Set” indicates that you can set an option. Used in
various menu entries.
The meter failed to set the real time clock
Set the Time. This means that the internal battery
has probably discharged and the clock needs to be
set. Enter the “Clock Set PIN” and set the time and
date. See Dealer for battery replacement.
Tariff Programming unit used to program the meter’s
software.
Date the meter software was compiled
5.7.3, 5.8
5.6
5.3
5.7.3, 5.8
5.6.2
5.6.2
5.5.3
5.7.1
5.7.1
6.4
5.7.1
5.6.5
© 2009 Cygnus Automotive Limited
SOFTWRINFO
SOUND
SPEED
SrNo
SUN
SYS
t
TDst
THU
TIME OPTS
TIME
TOTL
TOTL INVAL
TOTALSCONF
TPU
TRF
TRF EXPIRD
TRF/TPU
TRF/SWINFO
TUE
UNIT
UDst
USER
USER OPTS
USER PIN
UTim
VEHICLOPTS
VERF
VERS
WTim
WED
WRITE FAIL
C2468_3
Software Information sub-menu
Sounder On/Off Info menu entry.
Speed Alarms
Serial Number
Sunday
"System" as in Totals System
Indicates that the permanent Totals are being shown
Total distance (Totals)
Thursday
Time Options Info Menu entry.
The current time in Info Menu, or part of PIN entry
time out warning.
Total of Fare plus Extras (Totals)
The totals are invalid or unreadable. It is not possible
to read the totals or to log on to the meter.
Totals Configuration Info Menu entry.
Tariff Programming Unit
“Tariff”
The tariff has expired
Tariff Programming Unit used to program the Tariff in
the MR500.
Tariff and Software Information Menu entry.
Tuesday
Unit of distance, e.g. miles or kilometres
Unpaid Distance. (Totals)
User PIN Number
User Options Info Menu entry.
User PIN Info menu entry
Unpaid Time (Totals)
Vehicle Options Info Menu Entry.
Prompt for verification of a new PIN number.
Software Version.
Waiting Time (Totals)
Wednesday
A memory error occurred while trying to save the
user Totals or Disable PIN
5.6.5
5.5.2
5.8
5.6.1
5.4
5.9
5.6.5
5.6
6.4
5.5
5.5.4
5.7
4.5
5.6.5
6.4
67
Cygnus MR500 Taximeter User Manual
10 Specifications
Supply Voltage
Dimensions
Operating Temperature Range
Storage Temperature Range
Mass
Dry Heat Test
Damp Heat Test
Cold Test
Supply Fuse Rating
12V nominal (9V-16V).
155 x 49 x 30mm
-10°C to +85°C
-40°C to +85°C
128g Approx.
Tested in accordance with IEC Publication 68-2-2 test B
Tested in accordance with IEC Publication 68-2-30 test D
Tested in accordance with IEC Publication 68-2-1 test A
10A
UK Approvals
Electromagnetic Compatibility: VCA Type Approval Number: e11*72/245*2006/28*4883*00
68
© 2009 Cygnus Automotive Limited
11 MR500 "Alphabet"
C2468_3
69
Cygnus MR500 Taximeter User Manual
12 List Of Figures
Figure 1: Front Panel Features ........................................................................................... 2
Figure 2: Display during Power-Up self test ........................................................................ 3
Figure 3: On Mode .............................................................................................................. 4
Figure 4: For Hire Mode ...................................................................................................... 5
Figure 5: HIRED Mode........................................................................................................ 6
Figure 6: Stopped Mode...................................................................................................... 7
Figure 7: Flowchart of Basic Operations ............................................................................. 8
Figure 8 Flowchart of Advanced Operations ..................................................................... 11
Figure 9: Entering a PIN Number ...................................................................................... 16
Figure 10: Navigating the "Info" Menu............................................................................... 18
Figure 11: Navigating the Info Menu (2) ............................................................................ 18
Figure 12: "Time" Menu Entry: Showing 12 Hour Clock .................................................... 23
Figure 13: Adjusting the Time ........................................................................................... 24
Figure 14: Date Menu Entry Showing Tuesday 7th April 2008. .......................................... 25
Figure 15: Disable Feature Setting.................................................................................... 27
Figure 17: Alarm Clock Setting.......................................................................................... 28
Figure 18: Extended Disable Feature Setting.................................................................... 30
Figure 19: User Options .................................................................................................... 31
Figure 20: Brightness Setting ............................................................................................ 32
Figure 21: Sounder Setting ............................................................................................... 33
Figure 22: Automatic Turn Off ........................................................................................... 34
Figure 23: User PIN .......................................................................................................... 35
Figure 24: Setting a User PIN ........................................................................................... 36
Figure 25: Enter PIN ......................................................................................................... 36
Figure 26: Tariff and Software Information ........................................................................ 39
Figure 27: Serial Number .................................................................................................. 40
Figure 28: Tariff Code ....................................................................................................... 40
Figure 29: Vehicle Options................................................................................................ 43
Figure 30: Calibration........................................................................................................ 44
Figure 31: Pulse Check..................................................................................................... 45
Figure 32: Speedometer ................................................................................................... 46
Figure 33: Speed Alarms .................................................................................................. 47
Figure 34: Setting a Speed Alarm ..................................................................................... 48
Figure 35: The Totals Config Menu ................................................................................... 49
Figure 36: Totals System .................................................................................................. 50
Figure 37: Viewing the Totals............................................................................................ 54
Figure 38: Clearing the Totals ........................................................................................... 55
Figure 39: Clearing the Totals ........................................................................................... 56
Figure 40: Totalling the Fare and Extras ........................................................................... 59
Figure 41: Speedometer ................................................................................................... 61
Figure 42: Distance Display .............................................................................................. 61
Figure 43: Tariff Year Indicator in FOR HIRE Mode .......................................................... 62
Figure 44: Overriding the Real Time Clock ....................................................................... 63
70
© 2009 Cygnus Automotive Limited
C2468_3
71
Cygnus MR500 Taximeter User Manual
13 Index
Display Brightness ·
31
Movement Warning ·
62
E
O
2
End Date · 40
Extras · 2, 6
window · 2
Options · 12
Overriding
Real Time Clock ·
62
24 hour format (time) ·
23
F
A
Fare · 2, 6
window · 2
For Hire Mode · 5, 26
Alarm Clock · 24, 28
Cancelling · 29
Automatic Turn Off ·
32
H
1
12 hour format (time) ·
23
HIRED mode · 26
B
Battery · 3
Baud Rate · 37
Brightness · 31
buttons · 2
C
Calendar Control
Override · 62
Calibration · 43
clock · 3, 4
adjusting · 23
clock symbol · 6, 59
Comms · 37
Conditional Access ·
50, 56
I
Info Menu · 10, 17
accessing · 17
Navigating · 17
Navigating · 18
J
Journey Distance · 59
Journey Summary · 54
72
Parity · 37
Permanent totals · 52,
53
PIN Number
Clock Set · 15
Disable · 14, 26
Supervisory · 48
totals · 15
Totals · 57
User Disable · 27,
33, 37
User Totals · 33, 37,
57
PIN Numbers · 14
built-in · 14
Entering · 15
Setting · 16, 33, 37
User · 15, 27, 33, 37
power · 3
Program Mode · 24
Pulse Check · 44
R
L
Load Date · 41
Log Off · 20
Log On · 20, 56
Rate
window · 2
Real Time Clock
Override · 62
T
Tariff · 38
End Date · 40
Tariff Code · 13, 39
Tariff Programmer ·
41
tariff programming
connector · 2
Tariff Year · 61
Tariffs · 12
Temporary totals · 52,
53
Time · 23
Options · 22
Time Charging
Symbol · 59
Total Fare · 7, 58
Totalling the Fare and
Extras · 58
Totals · 50, 56
Basic · 56
Log On · 57
reading · 52
Totals Banks · 52
Totals Config · 48
Totals Menu · 10
Totals System · 49
Basic · 49
Log On · 49
Multi-Driver · 49
Totals Systems · 20, 50
U
User Options · 30
D
Date Stop · 26
Dealer Option · 26
Disable date · 26
Disable Feature · 14,
26
Warning · 28
P
Software Information ·
41
Software Version · 41
Sounder · 32
Speed Alarms · 46, 62
Speedometer · 45, 59
M
mode
For Hire · 5
HIRED · 6
indicator · 2
STOPPED · 7
S
seals · 2
Selecting a Rate · 61
Serial Number · 39
software · 38, 52
Software Date · 41
V
Vehicle Options · 42


![STATUTORY INSTRUMENTS S.I. No.[ • ] of 20[ • ] SMALL PUBLIC](http://vs1.manualzilla.com/store/data/005664657_1-1d833bc83c9d446d3d2ea05d8407eb41-150x150.png)