1
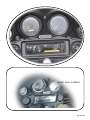
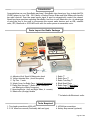
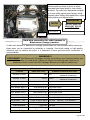
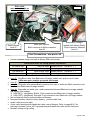
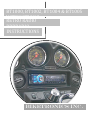
BT1000, BT1002, BT1004 & BT1005 NSTRUCTIONS RETRO RADIO RRRRADIO INSTRUCTIONS BIKETRONICS INC. Splash cover installed Page 2 of 10 Introduction Congratulations on your RetroRadio purchase! RetroRadio ties almost any Sony in-dash AM/FM, CD/MP3 player to your 1996 – 2011 family of Harley Electra Glides and Road Glides with handlebar radio controls. Even the speed sensor signal is used to automatically control the volume! Should you have questions regarding RetroRadio, feel free to call Biketronics Inc. An advantage of using the Sony is the ease to incorporate the newest audio devices such as USB, satellite radio, GPS, Bluetooth or iPOD/MP3 units with the radio system at reasonable costs. Parts Layout for Radio Package 1 F A 2 B 3 C 4 G D 5 E A. Adhesive Vinyl Sheet & Biketronics decal B. Yellow Antenna Wire (Local Reception) C. Zip Ties – 2 each D. Splash Cover for Radio Face (optional accessory) E. Radio Wire Harness ** (Radio Black Connector and Biketronics White Connector) F. Mounting Blocks (Left and Right Sides, 4 - screws) G. Biketronics (Orange) Module 1. 2. 3. 4. 5. Radio ** Radio Face ** Radio Trim Ring ** Black Bezel Plate Radio Cage ** (Not Used – remove and discard) ** Included with Biketronic radio. Tools Required 1. Torx head screwdrivers #25 & #27 2. 3/16" Allen/hex wrench (Preferably ball end type) 3. #2 Phillips screwdriver 4. Harley shop manual (optional) Page 3 of 10 General Information and Notes Road Glide owners – To facilitate easy radio removal and installation remove 2 top nuts and only loosen 2 bottom bolts/nuts on main fairing support bracket. Ultra Classic owners – Removal of Harley OEM radio will disable CB-radio and intercom functions. Biketronics has optional kit/procedure to connect rear speakers to new radio. Compatible Sony in-dash radio units are listed on www.biketronics.com. Typically, any Sony unit that is configured to operate with the optional Sony wired remote control model # RMX-4S will work with the RetroRadio. Care – Avoid direct spray of water on the radio face. Please note that Biketronics Inc. can not be responsible for any damage due to improper installation and/or failure due to water damage. For 1988 and later models, check out the new Splash Covers from Biketronics. The RetroRadio kit is plug–n-play. Do not drill, file or cut. Call Biketronics if you are not sure about installation. BT1000 module – 1998-2005 Electra Glide & Road Glide models BT1002 module – 2006-2011 Electra Glide & Road Glide models BT1004 module – 1996-1997 Electra Glide models BT1005 module – 1998-2011 Electra Glide & Road Glide models Biketronics Inc. Tel.(208) 882-8469 Fax.(208) 882-5938 www.biketronics.com © 2001 – 2011 Biketronics Inc, Moscow ID 83843 ver 030211 General Installation Guidelines Read all instructions FIRST. Disconnect battery cables from Harley battery – negative cable first Go easy…..Don’t force parts! Prior to disassembly, ensure that you have all necessary tools and parts for the job. Protect bike finish using towels and blankets. Before fairing removal, prepare a safe padded area to store fairing. Allow plenty of time – don’t rush the job. Allocate 1-2 hours for completion. When in doubt, re-read the instructions or call Biketronics for assistance. Preparation of Fairing Remove outer fairing (Remove fairing bolts and disconnect headlight wire connector). Remove Harley glove box or stock radio from fairing. Retain the 4 Allen-head bolts. (1996-1997 only) - Remove cradle used to support Harley radio in fairing. Installation of Radio and Electronics Follow instructions and photos #1 to #5 Page 4 of 10 Radio Cage Remove & discard Remove radio face from radio Remove and discard radio cage Black bezel plate is shown after it is slid onto radio from rear and before it is butted against radio trim ring. Textured side of bezel plate is installed facing front of radio. Orientate radio so top is in the up-position. X See Photo #1 Black bezel plate Photo #1 Radio trim ring Adhesive vinyl sheet Radio top Position adhesive vinyl on radio top against black bezel plate. Wrap vinyl sheet on top and down sides of radio. Trim loose ends that extend below sides and back of radio. See Photo #2 Photo #2 Radio top Radio front & Black bezel plate Blind nuts for mounting radio to fairing brackets Phillip screws (2 each side) are inserted in counter-sunk holes to secure mounting blocks to radio Attach mounting blocks (left & right) to radio with supplied Phillip screws. Blocks should protrude above top of radio. Block ends should butt against black bezel plate (small gap is ok). See Photo #3 Mounting blocks Photo #3 Page 5 of 10 Position radio as shown in photo to allow attached black bezel plate to clear Harley brackets. Tip radio front downward and push in to seat radio against inner fairing. Install (loosely) the 4 Harley Allen-head bolts, adjust radio position and tighten bolts. IMPORTANT NOTE! TT INSTALL RADIO ON HEADLIGHT SIDE OF INNER FAIRING See Photo #4 Photo #4 Hard wire connection for radio harness to Biketronics (Orange) module If radio wire harness or Biketronics (Orange) module does not have attached White connector, these wires can be connected by soldering or crimping. Use shrink tubing or high quality electrical tape to insulate the joints. It is important to have good electrical connections to avoid problems. WARNING!!! DISCONNECT the Biketronics (Orange) module from Harley wire harness before you start to solder or crimp wires. Failure to follow this warning can result in an accidental short circuit that MAY damage Biketronics module electronics. Color chart for hard wire connection Function Radio wire color Switched 12 volts Red Constant 12 volts Yellow Biketronics module wire color Red Yellow Ground Black Black Front speaker-Right (+) Gray Gray Front speaker-Right (-) Gray/black stripe Front speaker-Left (+) White Front speaker-Left (-) White/black stripe Amp remote (Do not use as power source for additional accessories) (Do not use as power source for additional accessories) Gray/black stripe White White/black stripe Blue/white stripe Not used (Optional - amplifier) Rear speakers – Right Green & Green/black Not used (Optional - rear speakers) Rear speakers – Left Purple & Purple/black Not used (Optional - rear speakers) Antenna remote Blue Not used Phone attenuate Light blue Not used Orange/white stripe Not used Illumination Refer to radio installation instructions for additional reference Page 6 of 10 Black cable must point straight up Item #1 Radio antenna Item #2 Photo #5 Radio wire harness Black connector & White connector Item #3 Biketronics (Orange) module with Harley (Black) 23 pin connector attached Item #4 Final Connections - see photo #5 Connect speakers using wire leads in Harley OEM wire harness: Harley wire colors for fairing speaker connections Air cleaner side Gray/red stripe Speaker positive (red dot or "+") Air cleaner side Light Green/black stripe Speaker negative Kick stand side Kick stand side White/orange stripe Light Green/white stripe Speaker positive (red dot or "+") Speaker negative Item #1 - Plug Black cable from Biketronics (Orange) module into jack in rear of radio. Cable must point straight up toward windscreen. Item #2 - Plug antenna lead in rear of radio. Item #3 - Plug radio wire harness Black connector into rear of radio and White connector into harness from Biketronics (Orange) module. Item #4 – Depending on model year, make connection between Biketronics (orange module) and Harley wire harness: (1998-2011) - plug Harley (Black) 23 pin connector into Biketronics (Orange) module. (1996-1997) - plug Harley 8 pin and 12 pin connectors into Biketronics (Orange) module. Use included zip ties to secure module and harness. Reconnect battery cables to Harley battery – positive cable first. Install radio face onto radio. Check radio functions with handle-bar radio control buttons. Refer to pages 8 & 9 for Automatic Volume Control (AVC) programming and handle-bar radio control functions. Reinstall fairing and go riding. Page 7 of 10 IMPORTANT NOTE It is UNSAFE to look at the radio while riding. Familiarize yourself with radio controls in the garage. Allow yourself time to normalize working the radio with hand controls and “hearing” the results. Sony radios have a beep that is emitted when control input is given. Keep this feature enabled until you are acclimated to operating the radio without looking at the radio face. Trouble Shooting For handle-bar radio controls to operate, the ⅛" L-shaped plug on Black cable (item #1, photo #5) must be firmly plugged in back of radio with Black cable pointed straight up toward windscreen. There are 2 fuses (radio memory and radio power) in Harley harness that must be operable for radio to turn on (lights on). There is a third fuse located in rear of radio. (1997-2011) - 2 fuses are located behind side cover on kickstand side of Harley. (1996) - 2 fuses are located in fairing below radio and both must be changed to a 5 or 10 amp rating for radio to operate. Do not exceed 10 amp rating. There is a Harley (1998-2005) OEM radio ground wire located on kickstand side of top triple tree cast iron clamp. This ground wire (Black/green stripe) is attached on top surface with a spade connector that can become disconnected and create a dead circuit. Radio sound can be greatly enhanced by the use of tone and equalizer bands. Consult radio instruction manual to access these functions. If handle-bar radio controls start to operate erratically, disconnect negative battery cable from Harley battery for 5 minutes and reconnect. If the problem still persist call Biketronics for assistance. Addition of separate ground wire between radio and bike frame can cure erratic handle-bar controls of radio. Radio has bolt hole (metric M4 x ½" bolt) in rear of unit for ground point. Automatic Volume Control (AVC) Biketronics module comes from factory with AVC setting of 2 for normal operation If you wish to change the setting - perform the following steps: Turn on radio to start AVC programming. AVC information WILL NOT display on radio face. NOTE! Follow “SET AVC” procedure on page 9. The only method to verify successful AVC programming is to ride bike and verify that radio volume varies with speed. Tips and suggestions Harleys can experience problems due to corrosion/age/modifications that may effect normal operations of handle-bar radio control buttons. Set AVC – step #2 (page 9): Automatic volume control depends on # of pushes of LEFT handle-bar radio control button. 1 push = fastest volume gain, 20 pushes = slowest volume gain, 0 pushes = AVC turned off. Typical setting is usually 2 – 7 pushes of LEFT handle-bar radio control button. Left handle-bar radio control buttons – radio volume, tone & balance, AVC programming. Right handle-bar radio control buttons - radio seek/scan, presets & source/mode. Harley ignition must be turned on for radio to operate. Page 8 of 10 Automatic Volume Control (AVC) Programming Function Set AVC Step #1 Step #2 1988-1995 Harley 1996-2011 Harley Left button - Push in/hold for 2 seconds, release Exception – BT1005 module only – Push in/hold for 5 seconds, release Left button - Push right and release 2-7 times (typical) Left button - Push up and release 2-7 times (typical) Step #2 will time out after 2 seconds following last push Step #3 Do not operate controls for 10 seconds to allow programming to reset Step #4 Ride bike to verify AVC program. Volume should change with speed. Repeat above steps to reset AVC if necessary Function Turn off AVC Step #1 1988-1995 Harley 1996-2011 Harley Left button - Push in/hold for 2 seconds, release Exception – BT1005 module only – Push in/hold for 5 seconds, release Step #2 Do not operate controls for 10 seconds to allow programming to reset Turn on AVC Perform above procedure – “Set AVC” Handle-bar Functions Function 1988-1995 Harley 1996-2011 Harley Change volume Change bands (Radio, CD, IPOD, Aux, Satellite, USB) Seek/Scan Left button – Push left or right Left button – Push up or down Right button – Push left or right Right button – Push up or down Seek presets Right button – Push in/release then push right button right (seek up) or push right button left (seek down) Right button – Push in/release then push right button up (seek up) or push right button down (seek down) Right button – Push in/momentary hold/release until desired band is displayed Seek preset mode times out after 4 seconds following last push Change AM/FM bands Adjust tone/balance Turn on radio Function Right button – quick double push in Left button - Push in repeatedly until desired function is displayed then use a following step Left button – Push left or right to adjust function Left button – Push up or down to adjust function Right button – Push in/hold 1988-1995 Harley 1996-2011 Harley Page 9 of 10 Biketronics Warranty Policies General Warranty Information: Warranty applies to the original retail purchaser only and is not transferable. Proof of purchase is required for all warranty claims. Auction Sales Policy: Products purchased through auction type websites, such as EBay, are subject to the return and warranty policies of the seller. Please make sure you understand their service and return policies before any funds are exchanged. Biketronics Inc. will warranty products purchased this way but the customer will be responsible for all shipping costs. Satisfaction Guarantee: Products purchased directly from Biketronics Inc. come with a 30 day satisfaction guarantee. Refunds exclude shipping charges. For a full refund: products must be in excellent condition and kits must be complete in original packaging. *Biketronics products that are purchased through a dealer are subject to the dealers return policy. Warranty Coverage on Aftermarket Radios: Radios purchased from Biketronics Inc. come with the manufactures warranty. Warranty does not cover damage due to improper installation, shipping, handling or water damage caused from failure to use a protective cover. This coverage is handled by the customer through the radio manufacturer. Biketronics Inc can handle this process for a handling fee and all shipping costs. Warranty Coverage on Hogtunes Speakers: Hogtunes speakers purchased from Biketronics Inc. come with the manufactures 20 year warranty. Warranty does not cover damage due to improper installation, shipping, or handling such as punctured surrounds. Warranty Coverage on Hertz Speakers: Hertz speakers purchased from Biketronics Inc. come with a lifetime warranty. Warranty does not cover damage due to improper installation, shipping, or handling such as punctured surrounds. Warranty Coverage on Biketronics Inc. Products: All products manufactured by Biketronics come with a lifetime warranty. Warranty does not cover damage due to improper installation, shipping or handling. Exclusions: Any defects resulting from water damage, fire, acts of nature, misuse, abuse, modification, improper installation, vehicle crash, or any type of impact will void the warranty. We will not be responsible for damages to motorcycles resulting from the use or misuse of the product. In no event shall Biketronics Inc. be liable for any damages whatsoever (including consequential damages, incidental damages, or damages for loss of use, loss of time, inconvenience, or other losses) arising out of the use, misuse, or inability to use our product. Biketronics Inc. reserves the right to change the design of its products without any obligation to modify any previous product. Repair or Replacement: If your product is not functioning properly, please call us at 1(208)/882-8469 as soon as possible so we can assist you in diagnosing and resolving your product problems. In cases where a product is defective, please call us for an RMA (return merchandise authorization) number. If the product is found to be defective and covered under warranty, it will be repaired or replaced at our option. Any charges accrued for removal, installation, reinstallation and shipping will not be covered by this warranty. Damaged or modified equipment: will be subject to a charge equal to the parts and labor required to return the product to as-new condition. This includes damaged wires, connectors, housings and shipping damage. If the product is not found defective Biketronics Inc. will return the product at the customers cost. International Customers: Customer will pay shipping on all warranty services. Page 10 of 10