1
SMV9165SC_GB.fm Page 1 Tuesday, November 18, 2003 4:40 PM
ProGourmet Oven
™
Owner’s Manual
SMV9165SC/BC/WC/CC
Code No. : DE68-02701A
SMV9165SC_GB.fm Page 2 Tuesday, November 18, 2003 4:40 PM
Safety
PRECAUTIONS TO AVOID
POSSIBLE EXPOSURE TO
EXCESSIVE MICROWAVE
ENERGY:
IMPORTANT SAFETY INSTRUCTIONS
(a) Do not attempt to operate this oven with the door open
since open-door operation can result in harmful exposure to
microwave energy. It is important not to defeat or tamper
with the safety interlocks.
(b) Do not place any object between the oven front face and the
door or allow soil or cleaner residue to accumulate on
sealing surfaces.
(c) Do not operate the oven if it is damaged. It is particularly
important that the oven door close properly and that there is
no damage to the
1) Door (bent or dented),
2) Hinges and latches (broken or loosened),
3) Door seals and sealing surfaces.
(d) The oven should not be adjusted or repaired by anyone
except properly qualified service personnel.
• Read all safety instructions before using the appliance.
• Read and follow the specific “PRECAUTIONS TO AVOID POSSIBLE
EXPOSURE TO EXCESSIVE MICROWAVE ENERGY” on this page.
• This appliance must be grounded. Connect only to properly grounded
outlets. See “IMPORTANT GROUNDING INSTRUCTIONS” on page
4 of this manual.
• Install or place this appliance only in accordance with the installation
instructions provided.
• Some items, like whole eggs and food in sealed containers, may
explode if heated in this oven.
• Use this appliance only for its intended use as described in the
manual. Do not use corrosive chemicals or vapors in this appliance.
This type of oven is specifically designed to heat cook food. It is not
designed for industrial or laboratory use.
• As with any appliance, close supervision is necessary when used by
children.
• Do not operate this appliance if it has a damaged cord or plug, if it is
not working properly, or if it has been damaged.
• This appliance should be serviced only by qualified service personnel.
Contact the nearest authorized service facility for examination, repair,
or adjustment.
• Do not cover or block any of the openings on this appliance.
When using any electrical appliance, basic safety precautions
should be followed, including the following:
WARNING
To reduce risk of burns, electric shock, fire, personal injury
or exposure to excessive microwave energy:
WARNING
Always observe Safety Precautions when using your oven.
Never try to repair the oven on your own – there is
dangerous voltage inside. If the oven needs to be repaired,
call 1-800-SAMSUNG for the name of an authorized service
center near you.
SAVE THESE INSTRUCTIONS
2
SMV9165SC_GB.fm Page 3 Tuesday, November 18, 2003 4:40 PM
Safety
Important Safety Instructions, continued
• This over-the-range oven is designed for use over ranges no wider
than 76.2 cm(30 inches). It may be installed over both gas and electric
cooking equipments.
• Do not store this appliance outdoors. Do not use near water – for
example, near a kitchen sink, in a wet basement, or near a swimming
pool, etc.
• Keep the inside of the oven clean. Food particles or spattered oils
stuck to the oven walls or floor can cause paint damage and reduce
the efficiency of the oven.
• Do not immerse cord or plug in water.
• Keep cord away from heated surfaces.
• Do not let cord hang over edge of table or counter.
• When cleaning door and oven surfaces, use only mild, nonabrasive
soaps or detergents applied with a sponge or soft cloth.
• To reduce the risk of fire in the oven:
a. Do not overcook food. Watch appliance carefully if paper, plastic,
or other combustible materials are inside.
b. Remove wire twist-ties from plastic cooking bags before placing
bags in oven.
c. If materials inside the oven ignite, keep the oven door closed, turn
the oven off, disconnect the power cord, or shut off the power at
the fuse or circuit breaker panel. (If the door is opened, the fire may
spread.)
d. Do not use the oven compartment for storage purposes. Do not
leave paper products, cooking utensils, or food in the oven when
not in use.
• Do not cook without the glass tray place on the oven floor. Food will
not cooked properly without the tray.
• Do not defrost frozen beverages in narrow-necked bottles. The
containers can be break.
• Dishes and containers can become hot. Handle with care.
• Carefully remove container coverings, keep your hands and face from
direct steam.
• Remove lids from baby food before heating. After heating baby food,
stir well and test temperature by tasting before serving.
• Do not mount over a sink.
• Do not store anything directly on top of the appliance when it is in
operation.
Important Safety Instructions for using the heater features
(Brown, Combi, Convection, Warm, Preheat, Cook Book Menu, Auto
•
•
•
•
•
•
•
•
•
•
•
•
•
Cook Menu, Speed Cook Menu)
Do not touch hot areas of oven, and always use hot pads, holders or
gloves when removing hot items from the oven.
Do not use these features to heat baby food or bottles.
Do not use these functions for defrosting your food. There is an “Auto
Defrost“ especially for this.
Do not use the warm feature to reheat cold foods. Do not warm food
for more than 1 hour.
Do not use paper, cardboard, plastic or anything containing these
substances.
Do not move oven when it is hot.
Use caution when disposing of hot grease.
Do not clean with metal scouring pads. Residue from pads can contact
electrical parts increasing risk of electric shock.
Do not use paper products when appliance is operated in the Brown,
Combi, Cook Book Menu, Auto Cook Menu Speed Cook Menu mode.
Do not cover racks or any other part of the oven with metal foil unless
special instruction in the cookbook or this manual. This will cause
overheating of the oven.
Use caution when heater features are in use. Heater functions are
Convection, Brown, Combi, Preheat, Warm, Auto Cook Menu, Cook
Book Menu, Speed Cook Menu.
Do not let children use this oven unless under the supervision of an
adult.
Failure to use caution can lead to bodily injury.
SAVE THESE INSTRUCTIONS
3
SMV9165SC_GB.fm Page 4 Tuesday, November 18, 2003 4:40 PM
Safety
THE VENT FAN
IMPORTANT GROUNDING
INSTRUCTIONS
The fan will operate automatically under certain conditions
(see page 27).Take care to prevent the starting and spreading of
accidental cooking fires while the vent fan is in use.
This appliance must be grounded. In the event of an electrical
short circuit, grounding reduces the risk of electric shock by
providing an escape wire for the electric current.
This appliance is equipped with a power cord having a
grounding wire with a grounding plug.
The plug must be plugged into an outlet that is properly installed
and grounded.
• Clean the underside of the microwave oven often. Do not allow grease
to build up on the microwave or the grease filters.
• In the event of a grease fire on the surface units below the microwave
oven, smother a flaming pan on the surface unit by covering the pan
completely with a lid, a cookie sheet or a flat tray.
• Use care when cleaning the grease filters. Corrosive cleaning agents,
such as lye-based oven cleaners, may damage the filters.
• Do not prepare flaming foods under the microwave when the fan is
operating.
• Never leave surface units beneath your microwave oven unattended
at high heat settings. Boilovers cause smoking and greasy spillovers
that may ignite and spread if the microwave vent fan is operating. To
minimize automatic fan operation, use adequate sized cookware and
use high heat on surface units only when necessary.
WARNING
Improper use of the grounding plug can result in a risk of
electric shock.
Consult a qualified electrician or servicer if you do not
understand the grounding instructions or if you are not sure
if the appliance is properly grounded.
Do not use an extension cord with this appliance. If the
power cord is too short, have a qualified electrician or
service technician install an outlet near the appliance.
Liquids, such as water, coffee, or tea may overheat beyond the
boiling point without appearing to boil. Visible bubbling or boiling
when the container is removed from the microwave oven is not
always present. THIS COULD RESULT IN SUDDEN BOILING
OVEN OF VERY HOT LIQUIDS WHEN THE CONTAINER IS
DISTURBED OR A SPOON OR OTHER UTENSIL IS
INSERTED INTO THE LIQUID.
WARNING
Do not cut or remove the third (ground) prong from the
power cord under any circumstances.
NOTE
To reduce the risk of injury to persons:
Connect the oven only to a 20A or over dedicated circuit.
1.
2.
3.
4.
Do not overheat the liquid.
Stir the liquid both before and halfway through heating it.
Do not use straight-sided containers with narrow necks.
After heating, allow the container to stand in the
microwave oven for a short time before removing the
container.
5. Use extreme care when inserting a spoon or other utensil
into the container.
SAVE THESE INSTRUCTIONS
4
SMV9165SC_GB.fm Page 5 Tuesday, November 18, 2003 4:40 PM
Contents
Safety............................................................................................ 2
Contents ....................................................................................... 5
Your New ProGourmetTM oven ................................................... 6
Cooking Instructions ................................................................ 29
Cooking Techniques ............................................................................. 29
General Microwave Tips ....................................................................... 29
Appendix.................................................................................... 30
Checking Parts ....................................................................................... 6
Warranty and Service Information.......................................................... 6
Setting Up Your ProGourmetTM Oven.................................................... 6
Control Panel Buttons ........................................................................... 7
Troubleshooting Guide ......................................................................... 30
Care and Cleaning................................................................................ 30
How to Clean the Outside ..................................................................... 31
Light Bulb Replacement........................................................................ 31
Exhaust Feature ................................................................................... 32
Specifications........................................................................................ 33
Operation...................................................................................... 8
Turning on the Power and Selecting a Display ...................................... 8
Selecting the Weight .............................................................................. 8
Selecting the Sound ............................................................................... 8
Using the Settings feature ...................................................................... 8
Setting the Remind End Signal .............................................................. 9
Selecting the Child Lock......................................................................... 9
Setting the Clock (12HR/24HR) ............................................................. 9
Using the Clock Button........................................................................... 9
Setting the Word Speed ......................................................................... 9
Setting the Daylight Saving Time adjustment......................................... 9
Setting the Demo Mode ......................................................................... 9
Using the Kitchen Timer ....................................................................... 10
Using the Pause/Cancel Button ........................................................... 10
Using the Help Button .......................................................................... 10
Using the Start/+1 min. Button ............................................................. 10
Using the Popcorn Button .................................................................... 10
Reheating Automatically ...................................................................... 11
Using the Power/Auto Defrosting Button.............................................. 11
Auto Defrosting Guide .......................................................................... 12
Using the Cook Book Menu Button ...................................................... 12
Using the Auto Cook Menu Button ....................................................... 15
Using the Speed Cook Menu Button .................................................... 19
Using the Microwave Setting Cooking Times & Power Levels............. 23
Multi-stage Cooking (Maximum of 3 stages) ........................................ 23
Using the More/Less Buttons ............................................................... 23
Warming ............................................................................................... 24
Preheating the oven ............................................................................. 24
Brown ................................................................................................... 24
Convection Cooking ............................................................................. 25
Combination cooking (COMBI 1).......................................................... 25
Combination cooking (COMBI 2).......................................................... 26
Combination cooking (COMBI 3).......................................................... 26
Combination cooking (COMBI 4).......................................................... 27
Turning on the Turntable ...................................................................... 27
Turning on the Light ............................................................................ 27
Turning on the Vent.............................................................................. 27
Warranty..................................................................................... 34
Guía Rápida ............................................................................... 35
Quick Reference........................................................................ 35
Cooking Instructions................................................................. 28
Cooking Utensils .................................................................................. 28
Testing Utensils.................................................................................... 28
5
SMV9165SC_GB.fm Page 6 Tuesday, November 18, 2003 4:40 PM
Your New ProGourmetTM oven
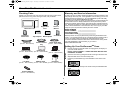
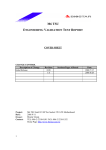
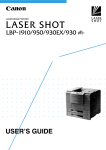
Checking Parts
Warranty and Service Information
Unpack your microwave oven and check to make sure that you have all the
parts shown here. If any part is missing or broken, call your dealer.
To help us to serve you better, please complete the enclosed registration card
and promptly return it by mail. If the registration card is missing, you can call
Samsung Electronics America, Inc., at 1-800-SAMSUNG (1-800-726-7864),
or register on-line at WWW.SAMSUNGUSA.COM
When contacting Samsung, please provide the specific model and serial number information which is usually located in the control panel of the product.
Please record these numbers below, along with the other requested information. Keep this information in a safe place as a permanent record of your purchase to aid in identification in case of theft or loss, and a copy of your sales
receipt as a proof of purchase if warranty service is needed.
Microwave oven
Installation
Instructions
Top Template
Glass Tray
(Part No. : DE74-20016A)
Owner’s
Manual
Registration
Card
MODEL NUMBER
SERIAL NUMBER
DATE PURCHASED
PURCHASED FROM
Wall Template
Ceramic Enamel
Tray
Cook Book
_______________________
_______________________
_______________________
_______________________
Warranty service can only be performed by a Samsung Authorized Service
Center. If you require warranty service, provide the above information with a
copy of your sales receipt to the Samsung Authorized Service Center.
For service assistance and the location of the nearest service center, please
call 1-800-SAMSUNG (1-800-726-7864), or go on-line to
WWW.SAMSUNGUSA.COM
Roller Guide Ring
(Part No. : DE97-00368B)
Setting Up Your ProGourmetTM Oven
1
Charcoal filter
Hardware-kit
Grease Filters
(Part No. : DE63-30016D) (Part No. : DE92-90505E) (Part No. : DE63-00196A)
2
3
4
Low Rack
Medium Rack
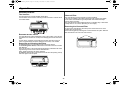
Plug the cord into a grounded outlet. Once plugged in, the display on
your oven will be showed:
ENJOY YOUR COOKING --- PRESS SETTINGS BUTTON FOR
PERSONAL OPTIONS
Open the oven door by pulling the handle on the right side of the door.
Wipe the inside of the oven with a damp cloth.
Place the pre-assembled ring in the indentation in the center of the
oven.
High Rack
(Part No. : DE47-00456C) (Part No. : DE47-00456B) (Part No. : DE47-00456A)
5
Exhaust Adaptor
(Part No. : DE92-90242A)
6
Place the glass tray securely in the center of the pre-assembled roller
guide.
SMV9165SC_GB.fm Page 7 Tuesday, November 18, 2003 4:40 PM
Your New ProGourmetTM oven
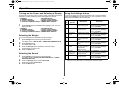
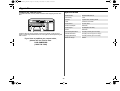
Control Panel Buttons
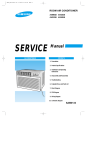
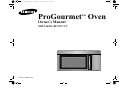
Control Panel Buttons
1.
2.
3.
Convection
Microwave
PreHeat
p.25
p.23
p.24
For better results, preheat to desired temperature
before cooking.
4.
Auto Reheat
p.11
Selects type of dish to be reheated
1
2
3
4
5
6
7
8
9
5.
6.
7.
8.
13
14
15
16
17
18
19
Prev Group, Next Group, Prev Item, Next Item
Cook Book Menu
Auto Cook Menu
Speed Cook Menu
p.12~p.14
p.15~p.19
p.19~p.22
This time-saving function cooks by combining both
microwaving and heating.
9.
More/Less
p.23
Increase or decrease cooking time.
10. Power Level
p.23
Press this button to set a power level other than high.
11. Pause/Cancel
p.10
Press to pause oven or correct a mistake.
12. Turntable
13. Brown
20
p.27
p.24
Browns meat and fish up to 60 minutes.
14. Combi
15. Power/Auto Defrost
21
p.25~p.27
p.11~p.12
Quickly thaws frozen food automatically by weight.
16. Warm
p.24
Keeps food warm at 175 °F for up to one (1) hour
10
11
12
17. Popcorn
18. Settings
22
p.10
p.8~p.9
Press to set non-cooking features.
19. Clock
23
p.9
Sets current time.
20. Kitchen Timer
p.10
Sets kitchen or convenience timer.
24
25
21. Number/Cooking Temperature Buttons
Sets Baking temperature, cooking time, amount,
and power level.
22. Help
p.10
Press to see help information about the feature you are using.
23. Start / 1 min. +
p.10
Press to start cooking. Adds one (1) minute while
oven is operating.
24. Vent
25. Light
7
p.27
p.27
SMV9165SC_GB.fm Page 8 Tuesday, November 18, 2003 4:40 PM
Operation
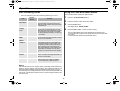
Turning on the Power and Selecting a Display
Using the Settings feature
The first time you plug the power cord into an outlet, or after there has been an
interruption in power, the display will be showed after four seconds
“1-WEIGHT
2-SOUND ON/OFF
3- REMIND ON/OFF
4- CHILD LOCK ON/OFF
5- CLOCK 12HR/24HR
6-WORD PROMPT SPEED
7- DAYLIGHT SAVING ON/OFF 8-DEMO MODE ON/OFF”.
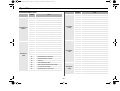
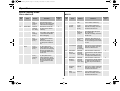
Your new microwave oven can be customized to suit your personal tastes.
Simply press Settings to set these options. For your convenience, all the
options are summarized in the following table:
Item
No.
1
Press Settings button immediately after plugging in your oven. The
display will show
“1-WEIGHT
2-SOUND ON/OFF
3- REMIND ON/OFF
4- CHILD LOCK ON/OFF
5- CLOCK 12HR/24HR
6-WORD PROMPT SPEED
7- DAYLIGHT SAVING ON/OFF 8-DEMO MODE ON/OFF”.
1
2
3
4
Press Settings button and then press the 1 button.
The display shows : LBS OR KG --- PRESS SETTINGS BUTTON
Press Settings button.
The display shows : KG
Press the Settings button repeatedly to select the weight
measurements you wish to use.
Press the Start button.
Selecting the Sound
1
2
3
•
8
Operation
Press Settings, 1 and select by
repeatedly pressing Settings.
To set, press Start.
Sound volume can be
Press Settings, 2 and select by
turned On and Off.
repeatedly pressing Settings.
To set, press Start.
The Remind End Signal Press Settings, 3 and select by
can be turned On and Off. repeatedly pressing Settings.
To set, press Start.
This feature prevents from Press Settings, 4 and select by
using of unsupervised
repeatedly pressing Settings.
To set, press Start.
children.
The clock can display
Press Settings, 5and select by
either 12HR or 24HR time repeatedly pressing Settings.
To set, press Start.
modes.
There are five speeds,
Press Settings, 6 and select by
from Level 1(slowest) to repeatedly pressing Settings.
To set, press Start.
Level 5(fastest).
Default is Level 3.
The time can be advanced Press Settings, 7 and select by
one hour for DST without repeatedly pressing Settings.
resetting the Clock.
To set, press Start.
The Demo Mode can be Press Settings, 8 and select by
turned On and Off.
repeatedly pressing Settings.
To set, press Start.
Display Weight Weight options are
pounds and kilograms.
2
Sound
3
Remind End
Signal
4
Child Lock
5
Clock
6
Word Prompt
Speed
7
Daylight
Savings Time
Adjustment
Demo Mode
8
Press Settings button and then press the 2 button.
The display shows : SOUND VOLUME CONTROLS --- PRESS
SETTINGS BUTTON
Press the Settings button to select Sound ON.
Press again to select Sound OFF.
Press the Start button.
Description
1
Selecting the Weight
You can choose between pounds(LBS) and kilograms(KG).
Settings
options
If there is a power interruption, you will need to reset these options.
SMV9165SC_GB.fm Page 9 Tuesday, November 18, 2003 4:40 PM
Operation
Setting the Remind End Signal
Setting the Word Speed
The Remind End Signal can be set On or Off.
1
1
2
3
Press the Settings button and then press the 3 button.
The display shows :
REMIND END SIGNAL ON/OFF --- PRESS SETTINGS BUTTON
Press the Settings button to select ON.
Press again to select OFF.
Press the Start button. The display returns to the time of day.
To turn Remind End Signal off, repeat steps 1-3 above.
2
3
Press the Settings button and then press the 6 button.
The display shows :
WORD PROMPT SPEED --- PRESS SETTINGS BUTTON
Press the Settings button
The display shows : SLOWEST
Press Settings button repeatedly to select the Word Speed you wish to
use:
SLOWEST, SLOW, NORMAL, FAST, FASTEST
If you continue to press Settings, the settings will cycle in the order
shown here: SLOWEST, SLOW, NORMAL, FAST, FASTEST
Press the Start button
Selecting the Child Lock
4
1
Setting the Daylight Saving Time adjustment
2
3
Press the Settings button and then press the 4 button.
The display shows :
CHILD LOCK ON / OFF --- PRESS SETTINGS BUTTON
Press the Settings button to select Lock ON.
Press again to select Lock OFF.
Press the Start button.
1
2
3
Setting the Clock (12HR/24HR)
1
2
3
Press Settings button and then press the 5 button.
The display will show: CLOCK 12HR/24HR --- PRESS SETTING
BUTTON
Press the Settings button to select 24HR.
Press again to select 12HR.
Press the Start button.
If the clock is set for standard time, this function allows convenient time
changes without needing to reset the clock. Daylight Saving Time begins
for most of the United States at 2 a.m. on the first Sunday of April, and
reverts to Standard time at 2 a.m. on the last Sunday of October.
Setting the Demo Mode
1
Using the Clock Button
1
2
3
Press the Settings button and then press the 7 button.
The display will show:
DAYLIGHT SAVING TIME --- PRESS SETTINGS BUTTON
Press the Settings button to select Time ON.
Press again to select Time OFF.
Press the Start button. Time of day will advance one hour.
If OFF is selected, time will go back one hour.
Press the Clock button.
The display shows : SET CLOCK WITH NUMERIC BUTTON
Use the number buttons to enter the current time.
You must press at least three numbers to set the clock.
For example, if the current time is 5:00, enter 5,0,0.
The display will show: 5:00
Press Clock again. A colon will appear, indicating that the time is set.
If there is a power interruption, you will need to reset the clock.
You can check the current time while cooking is in progress by pressing
the Clock button.
2
3
9
Press the Settings button and then press the 8 button.
The display shows : DEMO MODE ON/OFF --- PRESS SETTINGS
BUTTON
Press the Settings button to select Demo ON.
Press again to select Demo OFF.
Press the Start button
SMV9165SC_GB.fm Page 10 Tuesday, November 18, 2003 4:40 PM
Operation
Using the Kitchen Timer
Using the Start/+1 min. Button
1
This button offers a convenient way to heat food in one-minute increment at
the High power level.
2
3
Press the Kitchen Timer button.
(max. time 99 min. 99 sec.)
The display shows: SET TIME WITH NUMERIC BUTTON
Use the Number buttons to set the length of time to run.
Press the Start button
The display counts down and beeps when the time has elapsed.
1
2
Using the Pause/Cancel Button
Using the Popcorn Button
The Pause/Cancel button allows you to clear instructions you have entered.
It also allows you to pause the oven’s cooking cycle, so that you can check the
food.
•
•
•
•
1
2
To pause the oven during cooking : press Pause/Cancel button once. To
restart, press Start button.
To stop cooking, erase instructions, and return the oven display to the time of
day: press Pause/Cancel button twice.
To clear instructions you have just entered: press Pause/Cancel button
once, then re-enter the instructions.
To cancel a timer setting: press Pause/Cancel button once.
Using the Help Button
Press the Popcorn button.
The display shows: POPCORN 3.5 OZ
Press the button repeatedly to select the serving size you want. The
display will cycle through all available serving sizes. Once you select
the correct serving size, the microwave will begin cooking automatically.
If you don’t need to read all the menu options, simply press the Start
button to begin cooking.
If you want to check the cooking time, press the Popcorn button.
When the cooking time is over, the oven will beep. The oven will then
beep every minute until the door is opened.
Item
Your microwave offers helpful instructions for many procedures.
•
Press the Start/+1 min. button once for each minute you wish to cook
the food. For example, press it twice for two minutes. The time will
display, and the oven starts automatically.
Add minutes to a program in progress by pressing the Start/+1 min.
button for each minute you want to add.
Popcorn
When you need feature information and helpful hints, press the Help button
and then press the button that you want to get information on.
10
Weight
3.5 oz
3.0 oz
1.75 oz
Remarks
•
•
Use one microwave-only bag of popcorn.
Use caution when removing and opening
hot bag from oven.
SMV9165SC_GB.fm Page 11 Tuesday, November 18, 2003 4:40 PM
Operation
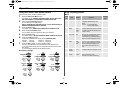
Reheating Automatically
Using the Power/Auto Defrosting Button
To reheat food, select the type of dish and the number of servings you want to
reheat, then the oven will automatically set the reheating time.
To thaw frozen food, set the weight of the food and then the oven will automatically set the defrosting time, power level and standing time.
1
2
Please note that defrosting foods which weigh more than 1.0 lbs will take
several minutes longer than foods which weigh less.
Press the Auto Reheat button.
The display shows :
SELECT ITEM WITH AUTO REHEAT BUTTON
Press the Auto Reheat repeatedly to select the type of dish you wish
to reheat. The initial serving size for each dish is one serving.
The display shows :
PLATE OF FOOD
CASSEROLE
PASTA REHEAT
SOUP REHEAT
1
Press the Power/Auto Defrost button.
The display shows:
SELECT ITEM WITH POWER DEFROST BUTTON
2
Press the Power Defrost button 1 to 4 times and the items below will
appear in sequence on the display:
Press once - MEAT 0.0 LBS
3
4
You can select up to four servings for casseroles, pasta reheat and Soup
Reheat . Only one serving is available for a plate of food.
Use the Number buttons to increase the serving size.
For example, for three servings, press the 3 button(Refer to
the Auto Reheat Chart below for the servings).
The display shows the number of servings you have selected:
3 SERVINGS PRESS START
Press the Start button and reheating will begin.
Press twice - POULTRY 0.0 LBS
Press three times - FISH 0.0 LBS
Press four times - BREAD 0.0 LBS
The display shows: ENTER WEIGHT WITH NUMERIC BUTTON
Auto Reheat Chart
•
3
Enter your desired weight with numeric button.
The display shows: PRESS START
4
Press the Start button
5
When the oven beeps, open the door and turn food over.
Press the Start button to begin defrosting.
Follow the instructions below when Auto Reheating different types of food.
Item
Plate of
Food
Weight
1 serving
Remarks
•
•
Use only pre-cooked, refrigerated foods.
Cover plate with vented plastic wrap or wax
paper.
Contents
•
•
-
3-4 oz. meat, poultry or fish
( up to 6 oz. with bone)
- ½ cup starch (potatoes, pasta, rice, etc.)
- ½ cup vegetables (about 3-4 oz.)
Casserole
Pasta
Reheat
Soup
Reheat
1 to 4 servings
(8 oz./serving) •
•
1 to 4 servings •
(8 oz./serving)
1 to 4 servings
(8 oz./serving)
Use only refrigerated foods.
Cover with lid or vented plastic wrap.
Stir foods well before serving.
11
See page 12 Auto Defrosting Guide.
SMV9165SC_GB.fm Page 12 Tuesday, November 18, 2003 4:40 PM
Operation
Auto Defrosting Guide
•
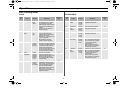
Using the Cook Book Menu Button
The Cook Book menu contains 100 different items
Follow the instructions below when defrosting different types of food.
Food
Standard
Amount
Roast
Beef, Pork
2.5-6.0 lbs.
Steaks,
Chops,
Fish
0.5-3.0 lbs.
Procedure
Start with the food placed fat side down.
After each stage, turn the food over and
shield any warm portions with narrow strips
of aluminum foil.
After each stage, rearrange the food. If there
are any warm or thawed portions of food,
shield them with narrow flat pieces of aluminum foil. Remove any pieces of food that
are nearly defrosted. Let stand, covered, for
5-10 minutes.
Ground
Meat
0.5-3.0 lbs.
After each stage, remove any pieces of food
that are nearly defrosted. Let stand, covered
with foil, for 5–10 minutes.
Whole
Chicken
2.5-6.0 lbs.
Remove giblets before defrosting poultry.
Start defrosting with the breast side down.
After the first stage, turn the chicken over
and shield any warm portions with narrow
strips of aluminum foil. After the second
stage, again shield any warm portions with
narrow strips of aluminum foil. Let stand,
covered, for 30–60 minutes in the refrigerator.
Chicken
Pieces
0.5-3.0 lbs.
After each stage, rearrange or remove any
pieces of food that are nearly defrosted. Let
stand for 10-20 minutes.
Bread
0.1-2.0 lbs.
Arrange rolls in a circle horizontally on
kitchen paper in the middle of turntable.
Turn over after half of defrosting time!
1
Press the Cook Book Menu button.
2
Press the number of item with numeric button.
3
Press the Enter button.
The display shows: PRESS START
4
Press the Start / 1min. + button to begin cooking.
The Cook Book Menu items can be selected in two different ways:
1. Choose the item using the 'Prev Group,Next Group, Prev item, Next
item’ button.
2. Choose the item directly with the Number button.
Notes
Check foods when the oven signals. After the final stage, small sections may
still be icy; let them stand to continue thawing. Do not defrost until all ice crystals have thawed. Shielding roasts and steaks with small pieces of foil prevents the edges from cooking before the center of the food has defrosted. Use
narrow, flat, smooth strips of aluminum foil to cover the edges and thinner sections of the food.
12
SMV9165SC_GB.fm Page 13 Tuesday, November 18, 2003 4:40 PM
Operation
Cook Book Menu Item
Cook No.
Cook No.
28
Rosemary-Roasted Chicken
Crab Cakes with Mustard and Lemon
29
White Chicken Chili
2
Easy Quesadillas
30
Chicken Potpie
3
Prosciutto-and-Parmesan-Wrapped Asparagus
31
Tandoori Chicken
4
Southwestern Layered Bean Dip
32
Roast Turkey Breast
5
Glazed Brie Cheese
33
Apricot-Glazed Chicken
34
Barbecued Chicken
1
Appetizers and
Starters
Main Dishes
- Meat
Food
Food
Main Dishes
- Poultry
6
Orange-Spiced Nuts
7
Curried Shrimp
35
Northern Italian Cornish Hens
8
Baked Bufflo Chicken Wings
36
Oven-Fried Chicken
9
Herbed Goat Cheese Salad
37
Caribbean Chicken Kabobs
10
Portabello Mushroom And Arugula Salad
38
Chicken Paella
11
Creamy Vegetable Soup
39
Chicken Caesar Salad
12
Chinese Hot-and-Sour Soup
40
Chicken Salad with Peanut Sauce
13
All-American Meat Loaf
41
Sole with Tomatoes and Zucchini
14
Beef Stroganoff
42
Sherried Flounder
15
Sirloin Steak Korean-Style
43
Oven-Fried Fish
16
Southwestern Burgers
44
Scrod with Garlicky Bread Crumbs
17
Beef Tamale Pie
45
Salmon with Cucumbers
46
Glazed Salmon with Spinach
Main Dishes
- Fish
18
Flank Steak with Red Onion Salsa
19
Herbed Pork Roast
47
Spiced Salmon Steaks
20
Oven “Barbecued” Spareribs
48
Turkish Swordfish Brochettes
21
Maple-Glazed Pork Tenderloin
49
Tarragon Sea Scallops
22
Spinach-Stuffed Pork Chops
50
Lemon and Shrimp Risotto
23
Jerk Pork
51
Shrimp Scampi
24
Chili-Rubbed Ham Steak
52
Pasta with Three-Tomato Meat Sauce
25
Italian Sausage and Mozzarella Frittata
53
Homestyle Lasagna
26
Veal with Savory Stuffing
54
Pasta with Tomatoes and Broccoli Rabe
27
Glazed Rosemary Lamb Chops
55
Not-Quite Classic Macaroni and Cheese
56
Tuna-Noodle Casserole
57
Oven-Roasted Meatballs with Pasta
Main Dishes
- Pasta
13
SMV9165SC_GB.fm Page 14 Tuesday, November 18, 2003 4:40 PM
Operation
Cook Book Menu Item
Cook No.
Main Dishes
- Vegetarian
Vegetables
and Side
Dishes
Cook No.
Cook No.
Cook No.
RECIPE
RECIPE
80
Double Blueberry Pie
58
Tomato-Spinach Risotto
81
Rustic Apple Tart
59
Oven-Roasted Eggplant Parmesan
82
Holiday Pumpkin-Cheese Pie
60
Tex-Mex Vegetable Enchiladas
83
Autumn Apple Crisp
61
No-Guilt Vegetable Pita Pizzas
84
Southern Peach Cobbler
62
Roasted Asparagus
85
Grandma’s Applesauce Cake
63
Broccoli-Cheese Gratin
86
Chocolate-Banana Pudding Cake
64
Roasted Broccoli with Ginger and Lime
87
Hollywood Starlet Cheesecake
65
Dilled Green Beans
88
Streusel-Topped Raspberry-Jam Bars
66
Garlic-Roasted Peppers
89
Fudge Brownies
67
Cranberry-Orange Relish
90
Lemon Custard Bars
68
Candied Sweet Potatoes
91
New England - Baked Apples
69
Roasted Potato and Green Bean Salad
92
Chocolate Decadence Cookies
70
Rosemary-Garlic Potatoes
93
The Best Oatmeal-Raisin Cookies
71
Twice-Baked Parmesan Potatoes
94
Very Rocky Road Fudge
72
Herbed Potato Fans
95
Double-Chocolate Pizza
73
Potato, Tomato, and Onion Casserole
96
Chocolate Lovers' Fudge Sauce
74
Spaghetti Squash with Tomatoes
97
Hearty Carrot-Bran Muffins
75
Maple-Baked Acorn Squash
98
Harvest Cranberry-Orange Muffins
76
Parmesan-Broiled Squash
99
Use-Up-The-Zucchini Cake
77
Herb-Roasted Butternut Squash
100
Yankee Corn Bread
78
Wilted Spinach with Bacon
79
Parmesan-Crusted Tomato Gratin
Desserts and
Quick Breads
14
SMV9165SC_GB.fm Page 15 Tuesday, November 18, 2003 4:40 PM
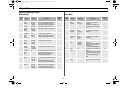
Operation
Using the Auto Cook Menu Button
Auto Cooking Guide
The Auto Cook menu contains 46 different items.
MELT
1
2
3
4
5
6
7
Press the Auto Cook Menu button.
The display shows: PRESS THE PREV/ NEXT GROUP BUTTON
OR THE NUMBER OF ITEM WITH NUMERIC BUTTON
Press the Prev/ Next Group button.
You can select one of eight groups.
‘MELT, KIDS MEALS, INSTANT COOK , COOK, RICE/NOODLE,
BREADS/CAKE,DESSERTS, SNACKS’
Press the Enter button.
The display shows: PRESS THE PREV/ NEXT ITEM BUTTON
Press the Prev/ Next Item button.
you can select one item of the Group which you selected.
Press the Enter button.
The display shows: SELECT SERVING WITH NUMERIC BUTTON
Press the number 2 button.
‘2 servings’ is selected. The display shows: PRESS START
number 1 : 1 serving
number 2 : 2 servings,
number 3 : 3 servings
number 4 : 4 servings.
Press the Start / 1min. + button to begin cooking.
The Auto Cook Menu items can be selected in two different ways:
1. Choose the item using the 'Prev Group,Next Group,Prev item, Next
item’ button.
2. Choose the item directly with the Number button.
Cook
No.
Amount
1
Nachos
1 serving
Place tortilla chips on plate without
overlapping. Sprinkle evenly with
cheese.
Contents : -2 cups tortilla chips
-1/3 cup grated cheese
G
2
Melt
Butter
1 stick
(¼ lb.)
2 sticks
(½ lb.)
Remove wrapping and cut butter in half
vertically. Place butter in dish, cover with
wax paper. Stir well after finishing and
let stand 1-2 min.
G
3
Melt
1 cup
Chocolate chips
Place chocolate chips in a microwavesafe dish. Stir well at half time when the
oven beeps, and re-start the oven.
Unless stirred, the chocolate keeps its
shape even when heating time is over.
G
4
Potato
Skins
1 each
2 each
(5~7 oz./
each)
Cut cooked potato into 4 even wedges.
Scoop or cut out potato flesh, leaving
about ¼" of skin. Place skins in spoke
fashion around plate. Sprinkle with
bacon, onions and cheese. Do not
cover.
G
5
Soften
Cream
Cheese
1 package Unwrap cream cheese and place on
(8 oz.)
microwave-safe dish. Let stand 1-2 min.
6
Soften Ice 1 pint
Cream
½ gallon
Accessory Usage
15
Directions
Accessory
Type
Food
Remove top of carton. Place carton in
center of microwave oven.
Let stand 2 min. after microwaving.
G
G
SMV9165SC_GB.fm Page 16 Tuesday, November 18, 2003 4:40 PM
Operation
Auto Cooking Guide
INSTANT COOK
KIDS MEALS
Cook
No.
7
Food
Baby
Food
Amount
2.5 oz.
4 oz.
6 oz.
Directions
Cook
No.
Accessory
Type
Remove lid from baby food and place in the
center of oven. Check temperature and stir
well before serving. The More/Less button
cannot be used with the baby food button.
G
8
Hot
Dogs
2 each
4 each
Pierce hot dogs, place on plate. When the
oven beeps, add buns and re-start the
oven.
G
9
Pizza
2 slices
Reheat 4 slices
(5 oz./
each)
Put the pizza on a microwave-safe plate
with wide end of slice towards the outside
edge of the plate. Do not let slices overlap.
Do not cover. Before serving, let stand 1-2
min.
G
16
Food
Amount
Directions
Accessory
Type
10
Beverage
½ cup
1 cup
2 cups
Use measuring cup ; do not cover.
Place the beverage in the oven.
After heating, stir well.
G
11
Frozen
Breakfast
4 - 6 oz.
6 - 8 oz.
Remove package from outer
wrapping and follow package
instructions for covering and
standing. After cooking, let stand
1-3 min.
When the oven beeps, stir and
restart the oven.
G
12
Bowl Type
Frozen
Breakfast
5 - 6 oz.
6 - 8 oz.
8 - 9 oz.
Remove package from outer
wrapping and follow package
instructions for covering and
standing.
When the oven beeps, stir and
restart the oven.
G
13
Frozen
Dinner
8 - 10 oz.
11 - 14 oz.
15 - 18 oz.
Remove package from
outerwrapping and follow package
instructions for covering and
standing. After cooking, let stand
1-3 min.
G
14
Frozen
Sandwich
1 each
2 each
Place frozen sandwich in
susceptor "sleeve" (which is in
package) and put on plate.
G
15
Frozen
2 servings
Vegetables 4 servings
Remove from package.
Place the vegetables into a
casserole bowl and add a small
amount of water (2-4Tbsp).
Cover during cooking and stir
before standing.
G
16
Mashed
Potato,
Instant
2 servings
Follow package preparation
4 servings
instructions.
(1 serving =
1/3 cup flakes)
G
17
Pancakes,
Frozen
2 servings
4 servings
(1 serving =
3 pancakes)
A
Place pancakes on ceramic
enamel tray, then place tray on
low rack.
SMV9165SC_GB.fm Page 17 Tuesday, November 18, 2003 4:40 PM
Operation
Auto Cooking Guide
COOK
Cook
No.
18
19
20
RICE/NOODLE
Food
Bacon
Boil
Water
Clams
Amount
2 slices
4 slices
6 slices
½ cup
1 cup
2 cups
2 servings
4 servings
(1 serving
= 6 clams)
Directions
Accessory
Type
Place 2 paper towels on plate
and arrange bacon on towels,
do not overlap. Cover with
additional paper towel. Remove
paper towel immediately after
cooking.
Use More or Less button for
desired crispness.
G
Measure liquid;
pour into microwave-safe
container that is 2 times larger
than amount of liquid.
Example: For 1 cup liquid use a
2 cup or larger dish.
Stir well before and after
heating to prevent erupting.
G
Use large pie plate and place
clams around edge of dish. Add
no water, cover tightly and cook
until clams are open. Remove
opened clams immediately,
recover and cook about 1 more
min or until clams are open.
Discard any unopened clams.
G
21
Fresh
Vegetables
1 serving
2 servings
3 servings
4 servings
(1 serving
= 1 cup)
Remove from package.
Place the vegetables into a
casserole bowl and add a small
amount of water (2-4Tbsp).
Cover during cooking and stir
before standing.
G
22
Mussels
2 servings
4 servings
(1 serving
= 6 mussels)
Use large pie plate and place
mussels around edge of dish.
Add no water, cover tightly and
cook until mussels are open.
Remove opened mussels
immediately, recover and cook
about 1 more min or until
mussels are open. Discard any
unopened mussels.
G
Cook
No.
17
Food
Amount
Directions
Accessory
Type
23
Brown Rice,
Instant
2 servings
4 servings
(1 serving
= ½ cup)
Follow microwave package
preparation instructions.
G
24
Brown Rice,
Slow
Cooked
2 servings
4 servings
(1 serving
= ½ cup)
Follow microwave package
preparation instructions.
G
25
Instant Rice
2 servings
4 servings
(1 serving
= ½ cup)
Follow microwave package
preparation instructions.
G
26
Long Grain
Rice, Sticky
2 servings
4 servings
(1 serving
=½ cup)
Combine rice, water, butter and
salt in a microwave-safe glass
dish.(2 servings use 2 quarts,
4 servings use 3 quarts)
Cover and cook.
Remove from oven and let
stand, covered, for 5 minutes.
Fluff with fork and serve.
G
27
Long Grain
Rice,
Regular
2 servings
4 servings
(1 serving
= ½ cup)
Combine rice, water, butter and
salt in a microwave-safe glass
dish.(2 servings use 2 quart,
4 servings use 3 quarts)
Cover and cook.
Remove from oven and let
stand, covered, for 5 minutes.
Fluff with fork and serve.
G
SMV9165SC_GB.fm Page 18 Tuesday, November 18, 2003 4:40 PM
Operation
Auto Cooking Guide
BREADS / CAKE
Cook
No.
Food
DESSERTS
Amount
Directions
Accessory
Type
28
Biscuits,
Refrigerated
Small
10 each
Preheat oven to 375° F.
Place biscuits on ungreased
ceramic enamel tray, then
place tray on low rack.
A
29
Biscuits,
Refrigerated
medium
8 each
Preheat oven to 375° F.
Place biscuits on ungreased
ceramic enamel tray, then
place tray on low rack.
A
30
Biscuits,
Refrigerated
large
5 each
Preheat oven to 375° F.
Place biscuits on ungreased
ceramic enamel tray, then
place tray on low rack.
A
31
Bread Sticks,
Refrigerated
10.6 oz.
Preheat oven to 375° F.
Place breadsticks on greased
ceramic enamel tray, then
place tray on low rack.
A
32
Cake, mix
18.25 oz.
Preheat oven to 350° F.
Pour batter into 2-8 inch
round cake pans. In the oven,
place one pan with batter on
medium rack, then place
second pan with batter on low
rack.
A+D
33
Cinnamon
Buns,
Refrigerated
10 each
Preheat oven to 375° F. Place
buns on greased ceramic
enamel tray, then place tray
on low rack.
A
34
Crescent Rolls,
Refrigerated
small
8 each
Preheat oven to 375° F. Place
rolls on ungreased ceramic
enamel tray, then place tray
on low rack.
A
35
Crescent Rolls, 5 each
Refrigerated
large
Preheat oven to 375° F. Place
rolls on ungreased ceramic
enamel tray, then place tray
on low rack.
A
Cook
No.
18
Food
Amount
Directions
Accessory
Type
36
Brownies, mix
Preheat oven to 350° F.
Pour batter into a 8x8 inch pan,
then place pan on low rack.
B
37
Cookie Dough, 10 each Preheat oven to 375° F.
Refrigerated,cut
Place 10 cookies on ceramic
From Log
enamel tray, then place tray on
low rack.
A
38
Cookie Dough,
Refrigerated,
pre portioned
10 each Preheat oven to 350° F.
Place 10 cookies on ceramic
enamel tray, then place tray on
low rack.
A
39
Pie Crust,
Refrigerated
1 shell
B
19.5 oz.
Preheat oven to 350° F.
Place dough in glass pie shell
and poke holes in the dough.
Place galss pie shell place on
low rack.
SMV9165SC_GB.fm Page 19 Tuesday, November 18, 2003 4:40 PM
Operation
Auto Cooking Guide
Using the Speed Cook Menu Button
SNACKS
The Speed Cook menu contains 46 different items.
Cook
No.
Food
Amount
Directions
1
Accessory
Type
40
Bite Size
Appetizers,
frozen
2 servings
4 servings
(1 serving =
4~7 each)
Preheat oven to 375° F. Place
appetizers on ceramic enamel
tray, then place tray on
medium rack.
D
41
Fish Sticks
2 servings
4 servings
(1 serving =
6 sticks)
Preheat oven to 400° F.
Place sticks on low rack, then
place rack on ceramic enamel
tray.
B
2 servings
4 servings
(1 serving =
3 oz.)
Preheat oven to 450° F.
Place french fries on ceramic
enamel tray, then place tray
on low rack.
A
2 servings
4 servings
(1 serving =
3 rolls)
Preheat oven to 425° F.
Place egg rolls on ceramic
enamel tray, then place tray
on low rack.
A
2 servings
(6 oz.)
4 servings
(12 oz.)
Preheat oven to 425° F.
Place potato bites on ceramic
enamel tray, then place tyay
on low rack.
A
2
3
4
5
42
43
44
French Fries
Egg Rolls
Potato Bites
6
7
Press the Speed Cook Menu button.
The display shows: PRESS THE PREV/ NEXT GROUP BUTTON
OR THE NUMBER OF ITEM WITH NUMERIC BUTTON
Press the Prev/ Next Group button.
You can select one of the Six Groups.
‘BREAKFAST, CHICKEN, FISH&SEAFOOD, MEATS,
PIZZA/POTATO, SNACKS’
Press the Enter button.
The display shows: PRESS THE PREV/ NEXT ITEM BUTTON
Press the Prev/ Next Item button.
you can select one item of the Group which you selected.
Press the Enter button.
The display shows: SELECT SERVING WITH NUMERIC BUTTON
Press the number 2 button.
‘2 servings’ is selected.
The display shows : PRESS START
Numeric Button
number 1 : 1 serving
number 2 : 2 servings,
number 3 : 3 servings
number 4 : 4 servings.
Press the Start / 1min. + button to begin cooking.
The Speed Cook Menu items can be selected in two different ways:
1. Choose the item using the 'Prev Group,Next Group,Prev item, Next
item button'.
2. Choose the item directly with the Number button.
Accessory Usage
45
Soft Pretzels,
Frozen
2 servings
4 servings
(1 serving
= 1 pretzel)
Preheat oven to 400° F.
Place pretzels on medium
rack, then place rack on
ceramic enamel tray.
C
46
Turnovers,
frozen
2 servings
4 servings
(1 serving =
1 turnover)
Preheat oven to 425° F.
Place turnovers on ceramic
enamel tray, then place tray
on medium rack.
D
19
SMV9165SC_GB.fm Page 20 Tuesday, November 18, 2003 4:40 PM
Operation
Speed Cooking Guide
BREAKFAST
Cook
No.
CHICKEN
Amount
1
French
Toast,
frozen
2 servings
4 servings
(1 serving
= 1 piece)
Place toast on high rack, then
place rack on ceramic enamel tray.
Turn over at half time when the
oven beeps, and re-start the oven
F
2
French
Toast
Sticks,
frozen
2 servings
4 servings
(1 serving
= 5 sticks)
Place sticks on high rack, then
place rack on ceramic enamel tray.
F
Pork
Sausage
Links,
Thin,
Fresh
2 servings
(6 oz.)
4 servings
(12 oz.)
Place links on ceramic enamel tray,
then place tray on high rack.
When the oven beeps, turn over
sausages and re-start the oven.
E
Sausage
Links,
Thin,
frozen
2 servings
4 servings
(1 serving
= 3 links)
Place links on ceramic enamel tray,
then place tray on high rack.
E
Sausage
Patties,
frozen
2 servings
4 servings
(1 serving
= 2 patties)
Place patties on ceramic enamel
tray, then place tray on high rack.
E
3
4
5
Directions
Accessory
Type
Food
6
Smoked
Ham
Slice
1 lb.
Place ham on high rack, then place
rack on ceramic enamel tray.
When the oven beeps, turn over
ham and re-start the oven.
F
7
Toaster
Items
2 servings
4 servings
(1 serving
= 1 piece)
Place toaster item on high rack,
then place rack on ceramic enamel
tray.
Turn over at half time when the
oven beeps, and re-start the oven
F
Waffles,
frozen
2 servings
4 servings
(1 serving
= 2 waffles)
Place waffles on low rack, then
place rack on ceramic enamel tray.
Turn over at half time when the
oven beeps, and re-start the oven
B
8
Cook
No.
20
Food
Amount
Directions
Accessory
Type
Place chicken on high rack,
then place rack on ceramic
enamel tray.
When the oven beeps, turn
over chicken and re-start the
oven.
F
Chicken
2 servings
Breast with (18 oz.)
Rib Cage
4 servings
(36 oz.)
Place chicken on high rack,
then place rack on ceramic
enamel tray.
F
11
Chicken
2 servings
Pieces with (18 oz.)
bone-in
4 servings
(36 oz.)
Place chicken on high rack,
then place rack on ceramic
enamel tray.
F
12
Cornish
Hens
2 servings
4 servings
(2 servings
= 1 hen)
Tie legs together and fold wings
under hen.
Place cornish hens on low rack,
then place rack on ceramic
enamel tray.
Brush hen with melted butter.
B
13
Roast
Chicken
4 lbs.
Fold chicken wings under the
chicken.
Place chicken on low rack, then
place rack on ceramic enamel
tray.
Brush chicken with melted
butter.
B
14
Turkey
Breast
5 lbs.
Place turkey on low rack, then
place rack on ceramic enamel
tray.
B
9
Chicken
Breast
(boneless)
10
2 pieces
4 pieces
(6 oz. each)
SMV9165SC_GB.fm Page 21 Tuesday, November 18, 2003 4:40 PM
Operation
Speed Cooking Guide
FISH & SEAFOOD
Cook
NO.
Food
Amount
MEATS
Directions
Accessory
Type
Flounder Filet 2 servings
(5 oz.)
4 servings
(10 oz.)
Coat both sides of fish with
butter and bread crumbs.
Place fish on microwave-safe
flat dish without overlapping.
G
16
Salmon filets
2 servings
4 servings
(6 oz. each)
Place salmon on high rack,
then place rack on ceramic
enamel tray.
F
17
Sea Scallops
2 servings
(8 oz.)
4 servings
(16 oz.)
Coat scallops with butter and
bread crumbs. Place scallops
on microwave-safe flat dish
without overlapping.
G
18
Shrimp
2 servings
(8 oz.)
4 servings
(16 oz.)
Place shrimp on high rack,
then place rack on ceramic
enamel tray.
When the oven beeps, turn
over shrimp and re-start the
oven.
F
19
Swordfish
Steak
2 servings
(12 oz.)
4 servings
(24 oz.)
Place swordfish steaks on high
rack, then place rack on
ceramic enamel tray. Spray
high rack with non stick spray.
When the oven beeps, turn
over swordfish steaks and restart the oven.
F
Place tuna steaks on high
rack, then place rack on
ceramic enamel tray. Spray
high rack with non stick spray.
When the oven beeps, turn
over tuna steak and re-start
the oven.
F
15
20
Tuna Steak
2 servings
(12 oz.)
4 servings
(24 oz.)
Cook
NO.
21
Food
Amount
Directions
Accessory
Type
21
Beef Roast
4 lbs.
3 lbs.
Place roast on low rack, then place
rack on ceramic enamel tray.
B
22
Filet Mignon
1 ½ inch,
medium
2 each
(12 oz.)
4 each
(24 oz.)
Place beef on high rack, then place
rack on ceramic enamel tray.
When the oven beeps, turn over
beef and re-start the oven.
F
23
Ground Beef
2 servings
(8 oz.)
4 servings
(16 oz.)
Place beef in 2 quart microwavesafe casserole dish, then place
dish on glass tray.
When the oven beeps, stir and restart the oven.
G
24
Hamburgers
2 each
(4 oz./each)
4 each
(4 oz./each)
Place hamburgers on ceramic
enamel tray, then place tray on
high rack. When the oven beeps,
turn over hamburgers and re-start
the oven.
E
25
Lamb Chops 2 servings
1½ inch Thick 4 servings
{1 serving
= 2 chops
(4 oz./chop)}
Place lamb on medium rack, then
place rack on ceramic enamel tray.
When the oven beeps, turn over
lamb and re-start the oven.
C
26
Pork Chops,
Bone-in
1 inch Thick
2 servings
4 servings
(1 serving
= 6 oz. each)
Place pork chops on high rack,
then place rack on ceramic enamel
tray.
When the oven beeps, turn over
pork chops and re-start the oven.
F
27
Pork Chops,
Boneless
½ inch thin
2 servings
4 servings
(1 serving
= 6 oz. each)
Place pork chops on high rack,
then place rack on ceramic enamel
tray. When the oven beeps, turn
over pork chops and re-start the
oven.
F
28
Pork
Tenderloin,
1.5LBS
1 piece
2 pieces
Place pork on medium rack, then
place rack on ceramic enamel tray.
When the oven beeps, turn over
pork and re-start the oven.
C
29
Sirloin Tip
Steak,
½ Inch, 1 LB
medium
well done
Place beef on high rack, then place
rack on ceramic enamel tray.
When the oven beeps, turn over
beef and re-start the oven.
F
SMV9165SC_GB.fm Page 22 Tuesday, November 18, 2003 4:40 PM
Operation
Speed Cooking Guide
MEATS
Cook
No.
SNACKS
Food
Amount
Directions
Cook
No.
F
30
Sirloin Steak
1 Inch, 1½ lb
31
Top Round
medium
Steak
well done
(London Broil)
1 inch,
1 ½ lb
Place steak on medium rack, then
place rack on ceramic enamel tray.
When the oven beeps, turn over
steak and re-start the oven.
Let steak stand for 5 minutes before
slicing.
C
Top Round
medium
Steak
well done
(London Broil)
1 Inch, 2 lbs
Place steak on medium rack, then
place rack on ceramic enamel tray.
When the oven beeps, turn over
steak and re-start the oven. Let steak
stand for 5 minutes before slicing.
C
32
medium Place beef on high rack, then place
well done rack on ceramic enamel tray. When
the oven beeps, turn over steak and
re-start the oven.
Accessory
Type
PIZZA/POTATO
Cook
No.
Food
Amount
Directions
Accessory
Type
33
Frozen Pizza, (1 serving
individual
= about 6 oz.)
Place pizza on ceramic
enamel tray, then place tray
on high rack.
D
34
Frozen Pizza, 20 oz.
12 inch frozen
Place pizza on ceramic
enamel tray, then place tray
on high rack.
D
35
Individual
Deep Dish
Pizza
31.3 oz.
Place pizza on ceramic
enamel tray, then place tray
on high rack.
D
36
Rising Crust
Pizza
12 oz.
Place pizza on ceramic
enamel tray, then place tray
on high rack.
D
37
Baked Potato 2 each
Place potatoes on medium
4 each
rack, then place rack on
(10~13 oz./each) ceramic enamel tray.
C
38
Sweet Potato, 2 servings
Fresh
4 servings
(10 oz./each)
C
Place potatoes on medium
rack, then place rack on
ceramic enamel tray.
22
Food
Amount
1 pack
Directions
Accessory
Type
Place pie on ceramic
enamel tray, then place
tray on low rack.
A
Place nuggets on high
rack, then place rack on
ceramic enamel tray.
F
39
Apple Pie,
frozen
40
Chicken Nuggets 4 - 5 oz.
6 - 7 oz.
41
Cheese Sticks,
frozen
42
Chicken Tenders, 2 servings
Place tenders on ceramic
frozen
4 servings
enamel tray, then place
(5 pieces
tray on high rack.
per serving)
E
43
Chicken Wings,
frozen
2 servings
Place wings on low rack,
4 servings
then place rack on ceramic
(3 wings per enamel tray.
serving)
B
44
Meatballs,
frozen
2 servings
Place meatballs on
4 servings
ceramic enamel tray, then
(3 meatballs place tray on medium rack.
per serving)
C
45
Fried Chicken,
frozen
2 servings
Place chicken on ceramic
4 servings
enamel tray, then place
(1 piece per tray on low rack.
serving)
A
46
Onion Rings
2 servings
4 servings
(4 rings per
serving)
D
2 servings
Place sticks on high rack,
4 servings
then place rack on ceramic
(2 sticks per enamel tray.
serving)
Place fries on ceramic
enamel tray, then place
tray on medium rack.
F
SMV9165SC_GB.fm Page 23 Tuesday, November 18, 2003 4:40 PM
Operation
Using the microwave setting cooking times &
Power levels
Multi-stage Cooking (Maximum of 3 stages)
1
Your oven allows you to set up three different stages of cooking, each with its
own time length and power level. The power level lets you control the heating
intensity from Warm (1) to High (10/Power level).
One-stage Cooking
For simple one-stage cooking, you only need to set a cooking time.
The power level is automatically set at High. If you want to set the power at
any other level, you must set it using the Power Level button.
1
2
3
2
3
4
Press the Microwave Button.
Use the Number buttons to set a cooking time. You can set a time from
one second to 99 minutes, 99 seconds. To set a time over one minute,
enter the seconds too.
For example, to set 20 minutes, enter 2, 0, 0, 0 .
If you want to set the power level to something other than High, press
the Power Level button, then use the number buttons to enter a power
level.
5
Using the More/Less Buttons
Power Levels:
0 = No Power
1 = Warm
2 = Low
3 = Defrost
4 = Medium Low
5 = Medium
Follow steps 1 and 2 in the “One-Stage Cooking” section on the
previous page.
The display shows : THE FIRST STAGE COMPLETED. PRESS
START OR SET THE NEXT STAGE OF MICROWAVE,
CONVECTION, BROWN OR COMBI
When entering more than one cooking stage, the Power Level button
must be pressed before the second cooking stage.
To set the power level at High for a stage of cooking, press the Power
Level button twice.
Press the Microwave Button.
Use the Number buttons to set a cooking time.
Press the Power Level button, then use the number buttons to set the
power level of the second stage of cooking.
The display shows the power level you have set and then
“THE SECOND STAGE COMPLETED. PRESS START OR SET
THE NEXT STAGE OF MICROWAVE, CONVECTION, BROWN
OR COMBI”
Press Start button to begin cooking, or repeat steps 2,3 and 4 to set a
cooking time and power level for a third stage of cooking.
When finished, press Start button.
The More or Less button allows you to adjust the pre-set cooking time.
It only works with 1,2, and 3 stage cooking, MW, Brown, Combi, Convection,
Auto Reheat, Preheat, Warm, Popcorn, Kitchen Timer, Speed Cook,
Auto Cook buttons.
Use the More or Less button only after cooking has begun.
6 = Simmer
7 = Medium High
8 = Reheat
9 = Sauté
10 = High
Power level=High
1
2
3
The display shows :
THE FIRST STAGE COMPLETED. PRESS START OR SET THE
NEXT STAGE OF MICROWAVE, CONVECTION, BROWN OR
COMBI
4
Press the Start button to begin cooking. If you want to change the
power level, press Pause/Cancel button before you press Start
button, and reenter all of the instructions.
Some recipes require different stages of cooking at different temperatures.
You can set multiple stages of cooking with your microwave.
23
To ADD more time to an cooking procedure. Press the '9/More' button.
Each press adds 10 seconds to the cooking time.
To REDUCE the time of an cooking procedure. Press the '1/Less'
button. Each press reduces 10 seconds to the cooking time.
If you press the '9/More' or '1/Less' button after selecting auto cook or
speed cook button, each press adds / reduces the cooking time by 8% .
SMV9165SC_GB.fm Page 24 Tuesday, November 18, 2003 4:40 PM
Operation
Warming
Brown
You can keep food in warm for up to one hour.
Browning adds texture and taste to your food.
When browning, use the medium or high rack.
Use the medium rack when the height of food is so high that the food could
touch the upper heater.
1
2
3
Press the Warm button.
The display shows: SET TIME WITH NUMERIC BUTTON
Use the Number buttons to set a warming time.
(max. time 60 min.)
Press the Start/+1 Min button.
• The side convection heater will operate only.
• The side convection heater will be switched on and off to keep
food warm.
• The temperature of center of oven will remain at 175°F.
1
2
3
Preheating the oven
For convection cooking, it is recommended that you preheat the oven to the
appropriate temperature before placing the food in the oven.
When the oven reaches the requested temperature, it is maintained for
approximately 10 minutes; it is then switched off automatically.
1
2
3
Press the Brown button .
The display shows: SET COOKING TIME WITH NUMERIC
BUTTON
Use the Number buttons to set a cooking time.
(max. time 60 min.)
Press the Start button to begin Browning.
• Convection heater(700W) and upper heater(900W) operate at
the same time.
• The Vent fan operates at low speed at the same time.
Multi-stage Cooking (Maximum of 3 stages)
Press the Preheat button.
The display shows:
ENTER DESIRED TEMP WITH NUMERIC BUTTON
Use the Number buttons to set a Temp up to 400 °F.
(100°F ~ 450°F Temp control.)
Press the Start button.
When the oven reaches the desired temperature, it will chime and the
display shows “PREHEAT DONE, PLACE FOOD IN OVEN”.
When the oven beeps, place the food inside and follow the directions for
“convection baking”, “combination cooking”, or “Browning”.
• Do not put are food in the oven during preheating.
• During preheat, you may hear noise from inside the oven.
This is simply the relay control sounding and is part of normal
operation.
(In mode of Convection, Combi, Brown, Preheat and Warm)
24
1
Follow steps 1 and 2 in the “One-Stage Cooking” section on the
previous page.
The display shows : THE FIRST STAGE COMPLETED. PRESS
START OR SET THE NEXT STAGE OF MICROWAVE,
CONVECTION, BROWN OR COMBI
2
Press the Brown Button.
3
Use the Number buttons to set a second cooking time.
4
The display shows: THE SECOND STAGE COMPLETED. PRESS
START OR SET THE NEXT STAGE OF MICROWAVE,
CONVECTION, BROWN OR COMBI
5
Press Start button to begin cooking, or repeat steps 2 and 3 to set a
cooking time for a third stage of cooking.
When finished, press Start button.
SMV9165SC_GB.fm Page 25 Tuesday, November 18, 2003 4:40 PM
Operation
Convection Cooking
Combination cooking (COMBI 1)
The convection mode uses dry heat to cook and brown food.
A high speed fan circulates hot air inside the oven to heat food quickly and
evenly.
When you cook using convection, you can generally use the low rack .
If cooking a large amount of food, use both the low and medium racks.
When cooking with both racks, switch food from one rack to the other at
half-time.
•
1
2
3
4
5
The combination cooking feature allows the oven to cycle automatically
between microwave and grill for cooking that is moist as well as crisp and
brown.
This type of cooking is ideal for large foods that require a long cooking time
just as the perparation in a conventional oven (such as Hamburgers,
Chicken Breast). In combination cooking mode,use the medium or high
rack to allow air to circulate completely around the dish.
To use combination cooking:
Press the Convection button.
The display shows:
“ENTER DESIRED TEMP WITH NUMERIC BUTTON”.
Use the number button to set a temperature.
Convection cooking temperatures range from 100° F to 450° F.
To maintain a constant temperature, the oven’s door should be kept
closed as much as possible while cooking.
Use the number buttons to set a cooking time (max. time is 60 min).
The display shows: THE FIRST STAGE COMPLETED. PRESS
START OR SET THE NEXT STAGE OF MICROWAVE,
CONVECTION, BROWN OR COMBI
Press Start/1 min.+ to begin to convection cooking.
1
2
3
4
Multi-stage Cooking (Maximum of 3 stages)
1
2
3
4
5
Microwave and Grill
Follow steps 1,2 and 3 in the “One-Stage Cooking” section on the
previous page.
The display shows : THE FIRST STAGE COMPLETED. PRESS
START OR SET THE NEXT STAGE OF MICROWAVE,
CONVECTION, BROWN OR COMBI
Press the CONVECTION Button.
Use the Number buttons to set a second temperature and cooking
time.
The display shows: THE SECOND STAGE COMPLETED. PRESS
START OR SET THE NEXT STAGE OF MICROWAVE,
CONVECTION, BROWN OR COMBI
Press Start button to begin cooking, or repeat steps 2 and 3 to set a
temperature and cooking time for a third stage of cooking.
When finished, press the Start button.
5
Press the Combi button.
The display shows "SELECT MODE WITH COMBI BUTTON"
Press the Combi button again. (COMBI 1)
The display shows:
“MICROWAVE+GRILL --- SET COOKING TIME”
Use the number buttons to set a cooking time.
The display shows "PRESS POWER LEVEL OR START
BUTTON"
(max. time is 60 minutes.)
Microwave Power Levels 10, 30, 50, 70%
The display show the power level your setting and then will show:
“THE FIRST STAGE COMPLETED. PRESS START OR SET THE
NEXT STAGE OF MICROWAVE, CONVECTION, BROWN OR
COMBI”
Press Start/1min + to begin combination cooking.
Multi-stage Cooking (Maximum of 3 stages)
1
2
3
4
5
25
Follow steps 1,2 and 3 in the “One-Stage Cooking” section on the
previous page.
The display shows : THE FIRST STAGE COMPLETED. PRESS
START OR SET THE NEXT STAGE OF MICROWAVE,
CONVECTION, BROWN OR COMBI
Press the Combi Button again(Combi 1)
Use the Number buttons to set a second cooking time.
Press the Power Level button.
The display shows: THE SECOND STAGE COMPLETED. PRESS
START OR SET THE NEXT STAGE OF MICROWAVE,
CONVECTION, BROWN OR COMBI
Press Start button to begin cooking, or repeat steps 2,3 and 4 to set a
cooking time and power level for a third stage of cooking.
When finished, press Start button.
SMV9165SC_GB.fm Page 26 Tuesday, November 18, 2003 4:40 PM
Operation
Combination cooking (COMBI 2)
Combination cooking (COMBI 3)
•
•
Microwave and Convection
Microwave and Browning
The combination cooking feature allows you to cycle automatically between
microwave and Convection cooking.
The food will be moist as well as crisp and brown.
This type of cooking is ideal for large foods that require long cooking times just
as the perparation in a conventional oven (such as large roasts, pizza, and
pie). In combination cooking mode, use the low or medium rack to allow air
to circulate completely around the dish.
To use combination cooking:
The combination cooking feature allows the oven to cycle automatically
between microwave and browning.
The food will be moist as well as crisp and brown.
This type of cooking is ideal for large foods that require long cooking times just
as the perparation in a conventional oven (such as large roasts, pizza, and
pie). In combination cooking mode,use the medium or high rack to allow air
to circulate completely around the dish.
To use combination cooking:
1
1
2
3
4
5
Press the Combi button.
The display shows "SELECT MODE WITH COMBI BUTTON"
Press the Combi button twice. (COMBI 2)
The display shows:
“MICROWAVE+CONVECTION --- SET COOKING TIME”
Use the number buttons to set a cooking time.
The display shows "PRESS POWER LEVEL OR START
BUTTON"
(max. time is 60 minutes.)
Enter Microwave Power Level 10, 30, 50, 70%
Maximum temperature that can be reached during cooking is 425°F.
The display will show the power level your setting and then will
show:
“THE FIRST STAGE COMPLETED. PRESS START OR SET THE
NEXT STAGE OF MICROWAVE, CONVECTION, BROWN OR
COMBI”
Press Start/1min + to begin combination cooking.
2
3
4
5
Press the Combi button.
The display shows "SELECT MODE WITH COMBI BUTTON"
Press the Combi button three times. (COMBI 3)
The display shows:
“MICROWAVE+BROWN --- SET COOKING TIME”
Use the number buttons to set a cooking time.
The display shows "PRESS POWER LEVEL OR START
BUTTON"
(max. time is 60 minutes.)
Enter Microwave Power Level 10, 30, 50, 70%
Maximum temperature that can be reached during cooking is 425°F.
The display will show the power level your setting and then will
show:
“THE FIRST STAGE COMPLETED. PRESS START OR SET THE
NEXT STAGE OF MICROWAVE, CONVECTION, BROWN OR
COMBI”
Press Start/1min + to begin combination cooking.
Multi-stage Cooking (Maximum of 3 stages)
Multi-stage Cooking (Maximum of 3 stages)
1
1
2
3
4
5
Follow steps 1,2 and 3 in the “One-Stage Cooking” section on the
previous page.
The display shows : THE FIRST STAGE COMPLETED. PRESS
START OR SET THE NEXT STAGE OF MICROWAVE,
CONVECTION, BROWN OR COMBI
Press the Combi Button twice(Combi 2).
Use the Number buttons to set a second cooking time.
Press the Power Level button.
The display shows: THE SECOND STAGE COMPLETED. PRESS
START OR SET THE NEXT STAGE OF MICROWAVE,
CONVECTION, BROWN OR COMBI
Press Start button to begin cooking, or repeat steps 2,3 and 4 to set a
cooking time and power level for a third stage of cooking.
When finished, press Start button.
2
3
4
5
26
Follow steps 1,2 and 3 in the “One-Stage Cooking” section on the
previous page.
The display shows : THE FIRST STAGE COMPLETED. PRESS
START OR SET THE NEXT STAGE OF MICROWAVE,
CONVECTION, BROWN OR COMBI
Press the Combi Button three times(Combi 3).
Use the Number buttons to set a second cooking time.
Press the Power Level button.
The display shows: THE SECOND STAGE COMPLETED. PRESS
START OR SET THE NEXT STAGE OF MICROWAVE,
CONVECTION, BROWN OR COMBI
Press Start button to begin cooking, or repeat steps 2,3 and 4 to set a
cooking time and power level for a third stage of cooking.
When finished, press Start button.
SMV9165SC_GB.fm Page 27 Tuesday, November 18, 2003 4:40 PM
Operation
Combination cooking (COMBI 4)
Turning on the Turntable
•
For best cooking results, leave the turntable on.
It can be turned off for large dishes.
Press the Turntable button to turn the turntable on or off.
1
2
3
4
Browning
Press the Combi button.
The display shows "SELECT MODE WITH COMBI BUTTON"
Press the Combi button four times. (COMBI 4)
The display shows:
“BROWN --- SET COOKING TIME”
Use the number buttons to set a cooking time.
The display shows:
THE FIRST STAGE COMPLETED. PRESS START OR SET THE
NEXT STAGE OF MICROWAVE, CONVECTION, BROWN OR
COMBI
Press Start/1min + to begin Browning.
Sometimes the turntable can become too hot to touch.
Be careful touching the turntable during and after cooking.
Turning on the Light
Press to turn the Light button on or off
Press Light once for the high, twice for the medium ,three times for the low
and four times to turn the light off.
Turning on the Vent
The vent fan removes steam and other vapors from rangetop cooking.
Press Vent button once for fan speed turbo, twice for fan speed high, three
times for fan speed medium, four times for fan speed low and five times
to turn the fan off.
Multi-stage Cooking (Maximum of 3 stages)
1
2
3
4
5
Follow steps 1,2 and 3 in the “One-Stage Cooking” section on the
previous page.
The display shows : THE FIRST STAGE COMPLETED. PRESS
START OR SET THE NEXT STAGE OF MICROWAVE,
CONVECTION, BROWN OR COMBI
Press the Combi Button four times. (COMBI 4)
Use the Number buttons to set a second cooking time.
The display shows: THE SECOND STAGE COMPLETED. PRESS
START OR SET THE NEXT STAGE OF MICROWAVE,
CONVECTION, BROWN OR COMBI
Press Start button to begin cooking, or repeat steps 2 and 3 to set a
cooking time for a third stage of cooking.
When finished, press Start button.
Note
The Vent Fan protects the microwave from excess heat rising from the
cooktop below it. It automatically turns on if it senses too much heat.
If you have turned the fan on, you may find that you cannot turn it off.
The fan will automatically turn off when the internal parts are cool. It
may stay on for 30 minutes or more after the cooktop and microwave
controls are turned off.
27
SMV9165SC_GB.fm Page 28 Tuesday, November 18, 2003 4:40 PM
Cooking Instructions
Cooking Utensils
Testing Utensils
Recommended Use
If you are not sure whether a dish is microwave-safe or not, you can perform
this test:
•
Glass and glass-ceramic bowls and dishes — Use for heating or
•
Microwavable plastic wrap — Use to cover. Leave a small opening for
cooking.
•
•
•
•
some steam to escape and avoid placing it directly on the food.
Wax paper — Use as a cover to prevent spattering.
Paper towels and napkins — Use for short-term heating and covering;
they absorb excess moisture and prevent spattering. Do not use recycled
paper towels, which may contain metal and can catch fire.
Paper plates and cups — Use for short-term heating at low
temperatures. Do not use recycled paper, which may contain metal and can
catch fire.
Thermometers — Use only those labeled “Microwave-Safe” and follow all
directions. Check the food in several places. Conventional thermometers may
be used once the food has been removed from the oven.
Limited Use
•
•
•
•
Not Recommended
Glass jars and bottles — Regular glass is too thin to be used in a
•
Paper bags — These are a fire hazard, except for popcorn bags that are
•
Styrofoam plates and cups — These can melt and leave an unhealthy
•
Plastic storage and food containers — Containers such as margarine
Fill 1 cup of glass measuring cup with water and put it inside your oven,
next to the dish you want to test.
2
Press the One Minute + button once to heat them for one minute at
High power.
The water should be warm and the dish you are testing should be cool. If the
dish is warm, then it is absorbing microwave energy and is not acceptable for
use in the microwave.
Aluminum foil — Use narrow strips of foil to prevent overcooking of
exposed areas. Using too much foil can damage your oven, so be careful.
Ceramic, porcelain, and stoneware — Use these if they are labeled
“Microwave-Safe”. If they are not labeled, test them to make sure they can be
used safely. Never use dishes with metallic trim.
Plastic — Use only if labeled “Microwave-Safe”. Other plastics can melt.
Straw, wicker, and wood — Use only for short-term heating, as they can
be flammable.
•
1
microwave, and can shatter.
designed for microwave use.
residue on food.
tubs can melt in the microwave.
28
SMV9165SC_GB.fm Page 29 Tuesday, November 18, 2003 4:40 PM
Cooking Instructions
Cooking Techniques
General Microwave Tips
Stirring
•
Stir foods such as casseroles and vegetables while cooking to distribute heat
evenly. Food at the outside of the dish absorbs more energy and heats more
quickly, so stir from the outside to the center. The oven will turn off when you
open the door to stir your food.
•
•
Arrangement
•
Arrange unevenly shaped foods, such as chicken pieces or chops, with the
thicker, meatier parts toward the outside of the turntable where they receive
more microwave energy. To prevent overcooking, place thin or delicate parts
toward the center of the turntable.
•
•
Dense foods, such as potatoes, take longer to heat than lighter foods. Foods
with a delicate texture should be heated at a low power level to avoid
becoming tough.
Altitude and the type of cookware you are using can affect cooking time.
When using a new recipe, use the minimum cooking time and check the food
occasionally to prevent overcooking.
Foods with a non-porous skin such as potatoes or hot dogs, should be
pierced to prevent bursting.
Frying with heating oil or fat is not recommended. Fat and oil can suddenly
boil over and cause severe burns.
Some ingredients heated faster than others. For example a jelly doughnut will
be hotter than the dough. Keep this in mind to avoid burns.
Home canning in the microwave oven is not recommended because all
harmful bacteria may not be destroyed by the microwave heating process.
Although microwaves do not heat the cookware, the heat from the food is
often transferred to the cookware. Always use pot holders when removing
food from the microwave and instruct children to do the same.
Making candy in the microwave is not recommended as candy can be heated
to very high temperatures. Keep this in mind to avoid injury.
Shielding
•
Shield food with narrow strips of aluminum foil to prevent overcooking. Areas
that need shielding include poultry wing-tips, the ends of poultry legs, and corners of square baking dishes. Use only small amounts of aluminum foil. Larger
amounts can damage your oven.
•
Turning
•
Turn foods over midway through cooking to expose all parts to microwave
energy. This is especially important with large items such as roasts.
•
•
Standing
Guide for Cooking Vegetables in Your
Microwave
Guide for Cooking Eggs in Your Microwave
Foods cooked in the microwave build up internal heat and continue to cook for
a few minutes after the oven stops. Let foods stand to complete cooking,
especially foods such as roasts and whole vegetables. Roasts need this time
to complete cooking in the center without overcooking the outer areas. All liquids, such as soup or hot chocolate, should be shaken or stirred when cooking
is complete. Let liquids stand a moment before serving. When heating baby
food, stir well and test the temperature before serving.
•
•
•
Adding Moisture
•
Microwave energy is attracted to water molecules. Food that is uneven in
moisture content should be covered or allowed to stand so that the heat disperses evenly. Add a small amount of water to dry food to help it cook.
•
•
Venting
•
After covering dish with plastic wrap, you vent plastic wrap by turning back
one corner so excess steam can escape.
•
29
Never cook eggs in the shell, and never warm hard-cooked eggs in the shell;
they can explode.
Always pierce whole eggs to keep them from bursting.
Cook eggs just until set; they become tough if overcooked.
Vegetables should be washed just before cooking. Often, no extra water is
needed. If dense vegetables such as potatoes, carrots and green beans are
being cooked, add about ¼ cup of water.
Small vegetables (sliced carrots, peas, lima beans, etc.) can be cooked faster
than larger ones.
Whole vegetables, such as potatoes, acorn squash or corn on the cob,
should be arranged in a circle on the turntable before cooking. They will be
cooked more evenly if turned over after half the cooking time.
Always place vegetables like asparagus and broccoli with the stem ends
pointing towards the edge of the dish and the tips toward the center.
When cooking cut vegetables, always cover the dish with a lid or vented
microwavable plastic wrap.
Whole, unpeeled vegetables such as potatoes, squash, eggplant, etc., should
have their skin pricked in several spots before cooking to prevent them from
bursting.
For more even cooking, stir or rearrange whole vegetables halfway through
the cooking time.
Generally, the denser the food, the longer the standing time. (Standing time
refers to the time necessary for dense, large foods and vegetables to finish
cooking after they come out of the oven.)
A baked potato can stand on the counter for five minutes before cooking is
completed, while a dish of peas can be served immediately.
SMV9165SC_GB.fm Page 30 Tuesday, November 18, 2003 4:40 PM
Appendix
Troubleshooting Guide
Care and Cleaning
Before you call a repair person for your oven, check this list of possible problems and solutions.
Follow these instructions to clean and care for your oven.
Neither the oven’s display nor the oven operate.
•
•
•
•
•
•
•
•
•
Properly insert the plug into a grounded outlet.
If the outlet is controlled by a wall switch, make sure the wall switch is turned
on.
Remove the plug from the outlet, wait ten seconds, then plug it in again.
Reset the circuit breaker or replace any blown fuse.
Plug another appliance into the outlet; if the other appliance doesn’t work,
have a qualified electrician repair the outlet.
Plug the oven into a different outlet.
•
The oven’s display works, but the power won’t come
on.
•
•
•
•
•
Make sure the door is closed securely.
Check to see if packing material or other material is stuck to the door seal.
Check for door damage.
Press Cancel twice and re-enter all cooking instructions.
•
•
The power goes off before the set time has elapsed.
•
•
If there has not been a power outage, remove the plug from the outlet, wait
ten seconds, then plug it in again. If there was a power outage, the time
indicator will display “ ENJOY YOUR COOKING - - PRESS SETTINGS BUTTON FOR PERSONAL OPTIONS”
Reset the clock and any cooking instructions.
Reset the circuit breaker or replace any blown fuse.
•
The food is cooked too slowly.
•
Make sure the oven is on its own 20 amp circuit line. Operating another
appliance on the same circuit can cause a voltage drop. If necessary, move
the oven to its own circuit.
You see sparks or arcing.
•
Remove any metallic utensils, cookware, or metal ties. If using foil, use only
narrow strips and allow at least one inch between the foil and interior oven
walls.
The turntable makes noises or sticks.
•
•
Clean the turntable, roller ring and oven floor.
Make sure the turntable and roller ring are positioned correctly.
Using your microwave causes TV or radio interference.
•
This is similar to the interference caused by other small appliances, such as
hair dryers. Move your microwave further away from other appliances, like
your TV or radio.
30
Keep the inside of the oven clean. Food particles and spilled liquids can stick
to the oven walls, causing the oven to work less efficiently.
Wipe up spills immediately. Use a damp cloth and mild soap. Do not use
harsh detergents or abrasives.
To help loosen baked on food particles or liquids, heat two cups of water (add
the juice of one lemon if you desire to keep the oven fresh) in a four-cup
measuring glass at High power for five minutes or until boiling. Let stand in
the oven for one or two minutes.
Remove the glass tray from the oven when cleaning the oven or tray. To
prevent the tray from breaking, handle it carefully and do not put it in water
immediately after cooking. Wash the tray carefully in warm sudsy water or in
the dishwasher.
Clean the outside surface of the oven with soap and a damp cloth. Dry with a
soft cloth. To prevent damage to the operating parts of the oven, don’t let
water seep into the openings.
Wash the door window with very mild soap and water. Be sure to use a soft
cloth to avoid scratching.
If steam accumulates inside or outside the oven door, wipe with a soft cloth.
Steam can accumulate when operating the oven in high humidity and in no
way indicates microwave leakage.
Never operate the oven without food in it; this can damage the magnetron
tube or glass tray. You may wish to leave a cup of water in the oven when it is
not in use to prevent damage if the oven is accidentally turned on.
SMV9165SC_GB.fm Page 31 Tuesday, November 18, 2003 4:40 PM
Appendix
How to Clean the Outside
Light Bulb Replacement
Do not use cleaners containing ammonia or alcohol on the microwave oven.
Ammonia or alcohol can damage the appearance of the microwave.
Cooktop Light
Case
1. To replace the bulb(s), first disconnect the power at the main fuse or
circuit breaker panel or pull the plug.
2. Remove the screw at the front of the light cover and lower the cover.
3. Be sure the bulb(s) to be replaced are cool before removing. After
breaking the adhesive seal, remove the bulb by gently turning. Put in
new bulb.
4. Replace the light cover and screw. Connect electrical power to the
oven.
Replace the burned-out bulb with a halogen lamp(120V, 20W).
Clean the outside of the microwave with a sudsy cloth. Rinse and then dry.
Wipe the window with a damp cloth.
Control Panel and Door
Wipe with a damp cloth. Dry thoroughly. Do not use cleaning sprays, large
amounts of soap and water, abrasives or sharp objects on the panel—they
can damage it. Some paper towels can also scratch the control panel.
Door Surface
It’s important to keep the area clean where the door seals against the microwave. Use only mild, nonabrasive detergents applied with a clean sponge or
soft cloth. Rinse well.
Bottom
Oven Light
Clean off the grease and dust on the bottom often.
Use a solution of warm water and detergent.
Replace the burned-out bulb with a halogen lamp(120V, 20W).
1. To replace the oven light, first disconnect the power at the main fuse
or circuit breaker panel or pull the plug.
2. Remove the top grille by taking out the 2 screws(on the front of outer
case. See page 32 for the Removing Charcoal Filter) that hold it in
place.
3. Next, press the snap located above the door near the center of the
oven.
4. Relpace the halogen lamp(120V, 20W).
5. Replace the top grille and 2 screws, Connect electrical power to the
oven.
31
SMV9165SC_GB.fm Page 32 Tuesday, November 18, 2003 4:40 PM
Appendix
Exhaust Feature
The Vent Fan
Charcoal Filter
The exhaust fan has 2 metal reusable grease filters.
A charcoal filter can be used for removing smoke and odors in case the fan is
not vented outside.
The charcoal filter cannot be cleaned. It must be replaced.
If the oven is installed on the wall(or cabinet) and not vented to the outside,
the air will be recirculated through a disposable charcoal filter that helps
remove smoke and odors.
The charcoal filter should be replaced when it is noticeably dirty or discolored
(usually after 6 to 12 months, depending on hood usage).
Removing the Charcoal Filter
To remove the charcoal filter, disconnect power at the main fuse or circuit
breaker panel or pull the plug.
Remove the top grille by removing the 2 screws that hold it in place. Slide the
filter towards the front of the oven and remove it.
Reusable Grease Filters
Screws
The metal filters trap grease released by foods on the cooktop. They also prevent flames from foods on the cooktop from damaging the inside of the microwave.
For this reason, the filters must ALWAYS be in place when the vent fan is
used. The grease filters should be cleaned once a month, or as needed.
Removing and Cleaning the Filters
To remove, slide it to the left using the tab. Pull it down and out.
To clean the grease filters, soak and then swish them around in hot water
and detergent.
Don’t use ammonia or ammonia products because they will darken the metal.
Light brushing can be used to remove embedded dirt.
Rinse, shake and let them dry before replacing.
To replace, slide the filters in the frame slot on the left of the opening. Pull up
and to the right to lock into place.
Remove 2 grille screws to remove the grill
32
SMV9165SC_GB.fm Page 33 Tuesday, November 18, 2003 4:40 PM
Appendix
Specifications
Installing the Charcoal Filter
To install a new filter, remove plastic and other outer wrapping from the new
filter.
Insert the filter into the top opening of the oven as shown. It will rest at an
angle on 2 side support tabs and in front of the right rear tab. Replace the grille
and 2 screws.
If you have a problem you cannot solve,
please call our service line:
1-800-SAMSUNG
(1-800-726-7864)
33
Model Number
SMV9165SC/BC/WC/CC
Oven Cavity
1.6cuft
Controls
10 power levels, including defrost
Timer
99 minutes, 99 seconds
Power Source
120 VAC, 60 Hz
Power Consumption
1650 Watts
Power Output
950 Watts(IEC 705 TEST)
Heater
1600 Watts
Oven Cavity Dimensions
207/8”(W) X 109/32”(H) X 145/32”(D)
Outside Dimensions
297/8”(W) X 1515/16”(H) X 1511/32”(D)
Shipping Dimensions
333/8”(W) X 205/32”(H) X 1913/32”(D)
Net/Gross Weight
76/86 lbs
SMV9165SC_GB.fm Page 34 Tuesday, November 18, 2003 4:40 PM
Warranty
SAMSUNG OVER-THE-RANGE(OTR)
MICROWAVE OVEN
customer adjustments and failure to follow operating instructions,
cleaning, maintenance and environmental instructions that are covered
and prescribed in the instruction book; problems caused by pest
infestations, and overheating or overcooking by user; glass tray or
turntable; reduced magnetron power output related to normal aging.
SAMSUNG does not warrant uninterrupted or error-free operation of the
product.
LIMITED WARRANTY TO ORIGINAL PURCHASER
This SAMSUNG brand product, as supplied and distributed by Samsung
Electronics America, Inc. (SAMSUNG) and delivered new, in the original
carton to the original consumer purchaser, is warranted by SAMSUNG
against manufacturing defects in materials and workmanship for a
limited warranty period of:
THERE ARE NO EXPRESS WARRANTIES OTHER THAN THOSE
LISTED AND DESCRIBED ABOVE, AND NO WARRANTIES
WHETHER EXPRESS OR IMPLIED, INCLUDING, BUT NOT LIMITED
TO, ANY IMPLIED WARRANTIES OF MERCHANTABILITY OR
FITNESS FOR A PARTICULAR PURPOSE, SHALL APPLY AFTER
THE EXPRESS WARRANTY PERIODS STATED ABOVE, AND NO
OTHER EXPRESS WARRANTY OR GUARANTY GIVEN BY ANY
PERSON, FIRM OR CORPORATION WITH RESPECT TO THIS
PRODUCT SHALL BE BINDING ON SAMSUNG. SAMSUNG SHALL
NOT BE LIABLE FOR LOSS OF REVENUE OR PROFITS, FAILURE
TO REALIZE SAVINGS OR OTHER BENEFITS, OR ANY OTHER
SPECIAL, INCIDENTAL OR CONSEQUENTIAL DAMAGES CAUSED
BY THE USE, MISUSE OR INABILITY TO USE THIS PRODUCT,
REGARDLESS OF THE LEGAL THEORY ON WHICH THE CLAIM IS
BASED, AND EVEN IF SAMSUNG HAS BEEN ADVISED OF THE
POSSIBILITY OF SUCH DAMAGES. NOR SHALL RECOVERY OF
ANY KIND AGAINST SAMSUNG BE GREATER IN AMOUNT THAN
THE PURCHASE PRICE OF THE PRODUCT SOLD BY SAMSUNG
AND CAUSING THE ALLEGED DAMAGE. WITHOUT LIMITING THE
FOREGOING, PURCHASER ASSUMES ALL RISK AND LIABILITY
FOR LOSS, DAMAGE OR INJURY TO PURCHASER AND
PURCHASER'S PROPERTY AND TO OTHERS AND THEIR
PROPERTY ARISING OUT OF THE USE, MISUSE OR INABILITY TO
USE THIS PRODUCT SOLD BY SAMSUNG NOT CAUSED DIRECTLY
BY THE NEGLIGENCE OF SAMSUNG. THIS LIMITED WARRANTY
SHALL NOT EXTEND TO ANYONE OTHER THAN THE ORIGINAL
PURCHASER OF THIS PRODUCT, IS NONTRANSFERABLE AND
STATES YOUR EXCLUSIVE REMEDY.
One (1) Year Parts and Labor, Ten (10) Years Parts Warranty for
Magnetron
This limited warranty begins on the original date of purchase, and is
valid only on products purchased and used in the United States. To
receive warranty service, the purchaser must contact SAMSUNG for
problem determination and service procedures. Warranty service can
only be performed by a SAMSUNG authorized service center. The
original dated bill of sale must be presented upon request as proof of
purchase to SAMSUNG or SAMSUNG's authorized service center.
SAMSUNG will repair or replace this product, at our option and at no
charge as stipulated herein, with new or reconditioned parts or products
if found to be defective during the limited warranty period specified
above. All replaced parts and products become the property of
SAMSUNG and must be returned to SAMSUNG. Replacement parts
and products assume the remaining original warranty, or ninety (90)
days, whichever is longer.
In-home service will be provided during the warranty labor period subject
to availability within the contiguous United States. In-home service is not
available in all areas. To receive in-home service, the product must be
unobstructed and accessible to service personnel. If during in-home
service repair can not be completed, it may be necessary to remove,
repair and return the product. If in-home service is unavailable,
SAMSUNG may elect, at our option, to provide for transportation of our
choice to and from a SAMSUNG authorized service center. Otherwise,
transportation to and from the SAMSUNG authorized service center is
the responsibility of the purchaser.
This limited warranty covers manufacturing defects in materials and
workmanship encountered in normal, noncommercial use of this product
and shall not apply to the following, including, but not limited to: damage
which occurs in shipment; delivery and installation; applications and
uses for which this product was not intended; altered product or serial
numbers; cosmetic damage or exterior finish; accidents, abuse, neglect,
fire, water, lightning or other acts of nature; use of products, equipment,
systems, utilities, services, parts, supplies, accessories, applications,
installations, repairs, external wiring or connectors not supplied or
authorized by SAMSUNG which damage this product or result in service
problems; incorrect electrical line voltage, fluctuations and surges;
Some states do not allow limitations on how long an implied warranty
lasts, or the exclusion or limitation of incidental or consequential
damages, so the above limitations or exclusions may not apply to you.
This warranty gives you specific legal rights, and you may also have
other rights which vary from state to state.
To obtain warranty service, please contact SAMSUNG at:
SAMSUNG CUSTOMER CARE CENTER
400 Valley Road, Suite 201, Mt. Arlington, NJ 07856,
Tel: 973-601-6000, Fax: 973-601-6001
1-800-SAMSUNG (1-800-726-7864) and www.SAMSUNGUSA.com
34
SMV9165SC_GB.fm Page 35 Tuesday, November 18, 2003 4:40 PM
Guía Rápida
Función
Quick Reference
Operación
Feature
Operation
Ajuste de Reloj 1. Presione CLOCK.
2. Use botones numéricos para seleccionar hora.
3. Presione CLOCK de nuevo.
Set Clock
1. Press CLOCK.
2. Use number buttons to enter the current time.
3. Press CLOCK again.
Cocinado Fase 1. Use botones numéricos para seleccionar tiempo.
simple
2. Presione START.
One Stage
Cooking
1. Use function buttons to set cooking time.
2. Press START.
Cocinado Start 1. Presione el botón Start / 1 min. + por cada
/1 min. +
minuto de cocción.
2. El tiempo se vera en pantalla y el horno
comenzara.
Start / 1 min. +
Cooking
1. Press the Start / 1 min. + button once for each
minute of cooking.
2. The time will be displayed and the oven will
start.
Descongelado
Automático
1. Presione POWER/AUTO DEFROST.
2. Ingrese el peso del alimento presionando el
botón de POWER/AUTO DEFROST
repetidamente o con los botones numéricos.
3. Presione START.
4. Después de medio tiempo, voltee el alimento, y
presiones START para re iniciar.
Power/Auto
Defrost
1. Press POWER/AUTO DEFROST.
2. Enter weight of food by pressing POWER/AUTO
DEFROST button repeatedly or using the
number buttons.
3. Press START.
4. When the oven beeps, turn food over. Press
START to resume defrosting cycle.
Ajuste de
Niveles de
Poder y
Tiempo de
Cocinado
1. Use botones numéricos para tiempo de cocción.
2. Para seleccionar nivel de poder, presione los
botones numéricos.
3. Presione START para empezar a cocinar.
Set Cooking
Time and
Power Levels
1. Use function buttons to set cooking time.
2. To set higher power level, press POWER
LEVEL and use the number buttons to enter the
power level.
3. Press START to begin cooking.
35
SMV9165SC_GB.fm Page 36 Tuesday, November 18, 2003 4:40 PM
SAMSUNG ELECTRONICS AMERICA, INC.
SERVICE DIVISION
400 VALLEY ROAD, SUITE 201
MOUNT ARLINGTON, NEW JERSEY 07660-0511
1-800-SAMSUNG(1-800-726-7864)
www.samsungusa.com
Samsung Electronics Co., Ltd.
Printed in Korea