1
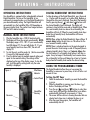
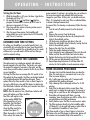
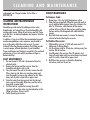
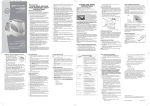
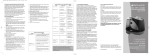
pure indoor living
DIGITAL COOL MIST
HUMIDIFIER
WITH LONG LIFE FILTER
MODEL: BCM658X3-CN
Filter Model: BWF100P-CN
Filter Type: Long Life Wick
Instruction Leaflet
Read instructions before operating. Retain for future reference.
Questions? Comments? Call 1-800-253-2764 in North America.
P L E A S E R E A D A N D S AV E T H E S E
I M P O RTA N T S A F E T Y I N S T R U C T I O N S
When using electrical appliances, basic safety precautions
should always be followed to reduce the risk of fire, electric
shock, and injury to persons, including the following:
1. Read all instructions before using the appliance.
2. To avoid fire or shock hazard, plug the appliance directly
into a 120V AC electrical outlet.
3. Keep the cord out of heavy traffic areas. To avoid fire
hazard, NEVER put the cord under rugs or near heat
registers.
4. DO NOT place humidifier near heat sources such as
stoves, radiators, and heaters. DO locate your humidifier
on an inside wall near an electrical outlet. The humidifier
should be at least 4 inches (10 cm) away from the wall
for best results.
5. NEVER place humidifier in an area where it is accessible
to children. NEVER use humidifier in a closed room,
particularly where a child may be sleeping, resting, or
playing (a closed room may result in excessive
humidity).
6. WARNING: Do not attempt to refill humidifier without
first unplugging the unit from its electrical outlet. Failure
to heed this warning may cause personal injury. Be sure
to unplug the unit by pulling on the plug and not the
cord.
7. Never place anything over moisture outlet when the unit
is running.
8. NEVER drop or insert any object into any openings.
9. DO NOT operate any appliance with a damaged cord or
plug, after the appliance malfunctions, or if it has been
dropped or damaged in any manner. Return appliance to
manufacturer for examination, electrical or mechanical
adjustment, or repair.
10. Use appliance only for intended household use as
described in this manual. Any other use not
recommended by the manufacturer may cause fire,
electric shock, or injury to persons. The use of
11.
12.
13.
14.
15.
16.
17.
18.
19.
20.
21.
attachments not recommended or sold by the
manufacturer may cause hazards.
DO NOT use outdoors.
Always place humidifier on a firm, flat, level surface. A
waterproof mat or pad is recommended for use under
the humidifier. NEVER place it on a rug or carpet, or on a
finished floor that may be damaged by exposure to
water or moisture.
DO NOT allow the Moisture Outlet to directly face the
wall. Moisture could cause damage, particularly to wall
paper.
Humidifier should be unplugged when not in use.
NEVER tilt, move, or attempt to empty unit while it is
operating. Shut off and unplug before removing the
water reservoir and moving the unit.
This humidifier requires daily and weekly maintenance
to operate appropriately. Refer to daily and weekly
cleaning procedures. Use only cleaners and additives
recommended by the manufacturer.
NEVER use detergents gasoline, glass cleaner, furniture
polish, paint thinner, or other household solvents to clean
any part of the humidifier.
Excessive humidity in a room can cause water
condensation on windows and some furniture. If this
happens, turn the humidifier OFF.
Do not use humidifier in an area where humidity level is
in excess of 50%. Use a hygrometer, available at your
local retailer or through the manufacturer, to measure
the humidity.
DO NOT attempt to repair or adjust any electrical or
mechanical functions on this unit. Doing so will void your
warranty. The inside of the unit contains no user
serviceable parts. All servicing should be performed by
qualified personnel only.
Never place housing under water flow, or immerse in
liquids.
THIS APPLIANCE HAS A POLARIZED PLUG (one blade is wider than the
other). To reduce the risk of electric shock, this plug is intended to fit in a
polarized outlet only one way. If the plug does not fit fully in the outlet,
reverse the plug. If it still does not fit, contact a qualified electrician to
install the proper outlet.
DO NOT ATTEMPT TO MODIFY THIS PLUG OR DEFEAT THIS
SAFETY FEATURE IN ANY WAY.
O P E R AT I N G - I N S T R U C T I O N S
22. DO NOT plug in the cord with wet hands: electric shock
could result.
23. DO NOT pour water in any openings other than the
water reservoir.
24. To prevent damage to surfaces, do not place humidifier
under overhanging surfaces.
25. NEVER operate unit without water in the reservoir.
26. Use both hands when carrying full reservoir of water.
PLEASE READ AND SAVE
THESE IMPORTANT
SAFETY INSTRUCTIONS
HOW COOL MIST WORKS
Your Bionaire® Cool Mist humidifier draws dry air through the
rear air intake grill area. This air is then passed through a
moisture-laden wick filter, which retains the minerals and
deposits in the water. The resulting moist air is directed back
into the room from the top air grill.
NOTE: This humidification system provides a cool, invisible
moisture output. It is normal not to see the mist.
NOTE: A humidity level below 20% can be unhealthy and
uncomfortable. The recommended humidity level is between
40%-50%.
PRE-OPERATING INSTRUCTIONS
1. Be sure the humidifier is switched to OFF and the unit is
disconnected from the electrical outlet.
NOTE: This is an electrical appliance and requires attention
2.
Select a location for your humidifier, on a flat level
when in use.
surface, about 4 inches (10 cm) away from the wall. DO
NOTE: If moisture forms on the walls or windows of the
NOT place the humidifier on a finished floor or near
room, turn off the humidifier. The room already has plenty of
furniture, which can be damaged by too much moisture
humidity and additional moisture may cause damage.
or water. Place on a moisture resistant surface.
Consumer Safety Information
Cord and Plug Installation Safety Instructions
The length of cord used on this appliance was selected to
reduce the hazards of becoming tangled in, or tripping over
a longer cord. If a longer cord is necessary an approved
extension cord may be used. The electrical rating of the
extension cord must be equal to or greater than the rating of
the humidifier (refer to the rating information placed on the
humidifier). Care must be taken to arrange the extension
cord so that it will not drape over the countertop or tabletop
where it can be pulled on by children or accidentally tripped
over.
FILLING THE WATER RESERVOIR
1. Remove the reservoir from the housing of the humidifier
by grabbing the handle of the reservoir and pulling
forward. Lift the reservoir out of the housing and bring
to the faucet. Turn the reservoir upside down and twist
off the reservoir cap by turning counter clockwise. Fill
reservoir with cool, fresh tap water. DO NOT fill with
warm water as this may cause leaking. Replace the cap
on reservoir FIRMLY.
2. When full, carry the reservoir to the humidifier and
place it into the housing. There is a locating tab located
on the reservoir base for easy guidance. The reservoir
holds 1.3 gallons of water. The reservoir will immediately
begin to empty into the base.
3. Plug the power cord into a 120V AC electrical outlet.
O P E R AT I N G - I N S T R U C T I O N S
OPERATING INSTRUCTIONS
DIGITAL HUMIDISTAT INSTRUCTIONS
Your humidifier is equipped with a technologically advanced
Digital Humidistat. You can set the humidifier to run
continuously in manual mode or set the Digital Humidistat to
your desired humidity setting. The Digital Humidistat will
automatically turn the humidifier ON or OFF depending on
the preset comfort level. The comfort level ranges between
30% and 65% relative humidity.
To take advantage of the Digital Humidistat, press the mode
( ) button until the speed is set in either High, Medium or
Low and the Auto icon is displayed. Then adjust the humidity
level by pressing the up ( ) and down ( ) buttons until
the desired humidity level is achieved. The display will
continue to show both the room and set humidity level. When
the room humidity level rises above the set humidity, the
humidifier will shut off. When the room humidity level drops
below the set humidity level, the humidifier will turn on
MANUAL MODE INSTRUCTIONS
automatically.
1. Plug the humidifier into a 120V AC electrical outlet.
NOTE: When setting the Digital Humidistat, there will be a 2
2. The display will show the current room humidity. NOTE: minute delay before the unit turns on. This allows for the
The display range is 21% - 90%. If your room humidity most accurate humidity reading.
level falls below 21%, the unit will display 21. If your
NOTE: There is a delayed reaction in the motor designed to
room humidity level rises above 90%, the unit will
prevent the motor from turning on and off frequently due to
display 90.
3. To start the unit, push the mode ( ) button once within changing humidity levels. There is a 2 minute delay after
the unit reaches it’s set humidity level before it will turn on
3 seconds for high manual setting.
again. It may be longer if the humidity level remains above
4. Press the button again for medium manual setting and
the set humidity, but there will always be at least a 2 minute
again for low manual setting. The settings will be
delay when the humidity level reaches the desired setting.
displayed on the top of the display screen. To stop the
unit, scroll through the settings until only the room
humidity is displayed.
USING THE PROGRAMMABLE TIMER
Figure 1
FilterClean®
Indicator
The Digital Humidistat allows the user to program the
humidifier to come on at a preset time, or turn off after a set
amount of time.
Control Panel
Setting the Off Timer
Reservoir Handle
Reservoir
Base
Humidifier
Housing
1. Select the mode and or humidity you want the humidifier
to run in.
2. While the humidifier is running, press the timer ( )
button. The display will show “0”.
3. Press the up ( ) and down ( ) buttons to select how
many hours you would like the humidifier to run before
automatically shutting off in increments of 1 hour.
4. The screen will then return to showing the mode that was
selected and a timer icon to indicate the timer is set.
5. After the preset time expires, the humidifier will
automatically shut off.
O P E R AT I N G - I N S T R U C T I O N S
Setting the On Timer
1. While the humidifier is off, press the timer ( ) button.
The display will show “0”.
2. By pressing the up ( ) and down ( ) buttons,
program the humidifier to turn on up to 24 hours in
advance in increments of 1 hour.
3. The screen will then return to showing a timer icon to
indicate the timer is set.
4. After the preset time expires, the humidifier will
automatically turn on at a preset level of 45% humidity
and 2 hours of run time.
EXTENDED RUN TIME SETTING
By setting your humidifier to a specific humidity level, you
are actually also extending the run time. Since the unit will
turn on and off to maintain the set humidity level, less water
will be used, so you will need to fill the unit less than you
would on manual setting.
REMOVING FILTER FOR CLEANING
Through normal use, waterborne minerals and sediment
become trapped in the wick filters. The harder your water,
the greater the amount of minerals in the water, and the
more often you will be able to monitor the life of your filters
in your humidifier.
The long life filters have an average life of 3 months of use.
Throughout the three months, the filters can be hand washed
with a mild antibacterial dish washing detergent. Please
replace filter after three months of use or when it begins to
turn into a light brown color and filter begins to deteriorate.
The FilterClean® Indicator will allow you to monitor how often
you will need to wash your filter.
NOTE: After 60 minutes of use, FilterClean® Indicator will
move and indicate your filters condition.
New filters will register in the
section reading GOOD filter.
Figure 2
After frequent use of your
humidifier, the FilterClean®
Indicator will let you know
when the filters need to be
washed (See Figure 2).
When the needle is in the Wash
Filter section, this means the
proper amount of moisture is not getting into your air due to
the excessive minerals and sediment that have become
trapped on your filters. At this point, you should wash your
filters. It is important to wash your filters as indicated below
to obtain stated performance level.
To remove filter for cleaning or replacement, follow the steps
below:
1. Turn the unit off and disconnect from the electrical
outlet.
2. Remove the reservoir from the housing.
3. Unlock the housing from the base by turning the lock
knob to the unlocked position.
4. Lift the housing straight up and place to the side.
5. Unlock the wick holder from the base by turning the lock
knob to the unlocked position.
6. Remove the wicks from the wick holder.
7. Follow the weekly cleaning instructions.
8. Insert refreshed or new replacement filters into the wick
holder and lock the wick holder back onto the base.
9. Replace the housing onto the base and lock it into place.
10. Fill the reservoir and place back into housing.
11. Repeat Operating Instructions It will take about 30
minutes for the humidifier to reach maximum output.
FILTER WASHING PROCEDURE
1. The water tray should be cleaned when you clean the
filter. The water tray is a convenient way to carry the
filter to prevent dripping.
2. Mix 1 gallon warm tap water with 1 teaspoon mild
antibacterial dish washing detergent.
3. Fully submerge filter in detergent solution for 15-20
minutes.
4. Dunk filter in detergent solution several times then
gently press to release the soapy water. Be sure not to
wring, pull or scrub filter as this will degrade the filter.
5. Run under cool tap water until there is no soap
remaining. Some discoloration may still be visible, this is
normal and does not affect performance.
6. Gently shake or press the filter to remove excess water.
7. The filter can be put directly into the humidifier while
still damp if it is to be used right away, or allow filter to
dry completely if humidifier is to be stored.
After three months of use or when it begins to turn into a
light brown color and filter begins to deteriorate, please call
the customer service number listed in the manual for a
CLEANING AND MAINTENANCE
replacement part. The part number for this filter is:
BWF100P-CN.
CLEANING AND MAINTENANCE
INSTRUCTIONS
Humidifiers provide comfort by adding moisture to dry,
heated indoor air. To benefit most from the humidifier and
avoid product misuse, follow all instructions carefully. Please
note that this is an electrical appliance and requires attention
when in use.
In addition, if you do not follow the recommended care and
maintenance guidelines, micro-organisms may be able to
grow in the water within the water reservoir. You must
routinely follow the cleaning procedures that follow in order
to ensure proper, efficient operation of your humidifier.
Proper maintenance and cleaning is essential to the continued
performance of your unit and the avoidance of algae or
bacteria build-up.
DAILY MAINTENANCE
1. Be sure the unit is OFF and is disconnected from the
electrical outlet.
2. Remove the housing and the reservoir from the
humidifier and place in sink or tub.
3. Carry the base of the unit to the sink, remove the wick
filters, place in sink, drain any remaining water and
rinse thoroughly to remove any sediment or dirt. Wipe
clean, and dry with a clean cloth or paper towel.
4. Drain the water from the reservoir into the sink and
rinse reservoir thoroughly. Wipe clean, and dry with a
clean cloth or paper towel.
5. Put filter back in, replace the housing, then refill
reservoir with cool tap water as instructed earlier in the
Filling Instructions. Do not overfill.
6. Follow Operating Instructions.
WEEKLY MAINTENANCE
To Remove Scale:
1. Repeat steps 1-4 in the Daily Maintenance section.
2. Clean the base by partially filling the base with one 8-oz
cup of undiluted white vinegar. Leave this solution in the
base for 20 minutes, while cleaning all the interior
surfaces with a soft brush. Remove base scale by wiping
the base with a cloth dampened with undiluted white
vinegar.
3. Rinse with clean warm water to remove the cleaning
solution before disinfecting the reservoir.
To Disinfect Reservoir:
1. Fill humidifier reservoir 1/2 full with water and 1/2
tablespoon of chlorine bleach.
2. Let the solution stand for 20 minutes, swishing every few
minutes. Wet all surfaces.
3. Carefully empty the reservoir after 20 minutes, and
rinse with warm water until you cannot detect any bleach
smell. Dry with a clean cloth or paper towel.
4. Refill the water reservoir as directed in Operating
Instructions, and turn the unit on.
TROUBLESHOOTING
TROUBLESHOOTING
Trouble
Probable Cause
Solution
• Unit does not turn on.
☛ Not plugged in.
☛ Check if timer is activated.
✔ Plug in unit.
✔ Press the mode button to turn on the humidifier.
• Mist output minimal to
none.
☛ Filter has not absorbed water.
☛ Cool mist is invisible.
✔ Wait 30 minutes for filter to absorb water.
✔ Operate in High setting.
• Filter turns brown.
☛ The filter has absorbed
minerals.
✔ Wash your wick filters (BWF100P-CN). Follow the
Filter Washing Procedure located on this manual.
After 3 months of use or when the filter begins
to turn into a light brown color, replace with new
filter (BWF100P-CN). To order, call
1-800-253-2764 or visit www.bionaire.com.
✔ Wick may retain discoloration.
• FilterClean® is not
working.
☛ Takes 60 minutes to register.
✔ Allow the humidifier to run continuously for 60
minutes for the FilterClean® Indicator to reflect
the filter condition.
• Humidifier continuously ☛ Humidity at the humidifier is at ✔ Continue to operate humidifier to raise the room
displays 21%.
or below 21%.
humidity.
• Humidifier continuously ☛ Humidity at the humidifier is
displays 90%.
at or above 90%.
✔ Stop operating the humidifier if the humidity
level is too high.
F R E Q U E N T LY A S K E D Q U E S T I O N S
FREQUENTLY ASKED QUESTIONS
Question
• What are the variables that affect
run time?
Answer
The estimated run time for this humidifier is based on average room
conditions. The actual run time of your humidifier is dependent on numerous
variables such as:
✔ Air exchange in the room where the humidifier is placed.
✔ Room construction of the room where the humidifier is placed.
✔ Temperature of the room where the humidifier is placed.
✔ Humidity levels in the room where the humidifier is placed.
✔ Movement of occupants and the opening and closing of doors in the room
where the humidifier is placed.
✔ Home furnishings in the room where the humidifier is placed.
• How do I remove film on water tank? ✔ See Daily Maintenance instructions. Regular cleaning is recommended.
• How can I extend the run time?
✔ Run your unit on the lowest setting.
✔ If your unit has electronics, set it to your desired humidity level. The unit
will turn on and off, which will extend the run time.
✔ Fill the tank all the way full, place it on the base, let the water empty into
the base until it stops bubbling, then refill the tank full again. This ensures
maximum water capacity and will extend run time.
STORAGE INSTRUCTIONS
STORAGE INSTRUCTIONS
If your humidifier will not be in use for two days or more, or at the end of the season follow these instructions.
1. Clean and dry the humidifier thoroughly as per the “Weekly Maintenance” instructions.
2. Let the humidifier dry completely before storing. Do not store with water inside the base or water reservoir.
3. Remove the reservoir cap. Do not store with the reservoir cap in place.
4. Follow Filter Washing Procedure before storage. Ensure that the filter is completely dry before being stored. Or if the
filters have been used for 3 months or if the filters begin to turn into light brown color, order replacement filters for the
next year's use.
5. Store in a cool dry location.
If you have any questions regarding your product or would like to learn more about other Bionaire® products, please
contact our Consumer Service Department at 1-800-253-2764 or visit our website at www.bionaire.com.
© 2011 Sunbeam Products, Inc. doing business as Jarden Consumer Solutions. All rights reserved. Imported and distributed
by Sunbeam Corporation (Canada) Limited doing business as Jarden Consumer Solutions, 20B Hereford Street, Brampton,
Ontario L6Y 0M1.
Printed In China
WA R R A N T Y I N F O R M AT I O N
1 YEAR LIMITED WARRANTY
Sunbeam Products, Inc. doing business as Jarden Consumer Solutions or if in Canada, Sunbeam Corporation (Canada) Limited
doing business as Jarden Consumer Solutions (collectively “JCS”) warrants that for a period of one year from the date of
purchase, this product will be free from defects in material and workmanship. JCS, at its option, will repair or replace this
product or any component of the product found to be defective during the warranty period. Replacement will be made with a
new or remanufactured product or component. If the product is no longer available, replacement may be made with a similar
product of equal or greater value. This is your exclusive warranty. Do NOT attempt to repair or adjust any electrical or
mechanical functions on this product. Doing so will void this warranty.
This warranty is valid for the original retail purchaser from the date of initial retail purchase and is not transferable. Keep the
original sales receipt. Proof of purchase is required to obtain warranty performance. JCS dealers, service centers, or retail
stores selling JCS products do not have the right to alter, modify or any way change the terms and conditions of this warranty.
This warranty does not cover normal wear of parts or damage resulting from any of the following: negligent use or misuse of
the product, use on improper voltage or current, use contrary to the operating instructions, disassembly, repair or alteration
by anyone other than JCS or an authorized JCS service center. Further, the warranty does not cover: Acts of God, such as fire,
flood, hurricanes and tornadoes.
What are the limits on JCS’s Liability?
JCS shall not be liable for any incidental or consequential damages caused by the breach of any express, implied or statutory
warranty or condition.
Except to the extent prohibited by applicable law, any implied warranty or condition of merchantability or fitness for
a particular purpose is limited in duration to the duration of the above warranty.
JCS disclaims all other warranties, conditions or representations, express, implied, statutory or otherwise.
JCS shall not be liable for any damages of any kind resulting from the purchase, use or misuse of, or inability to use the
product including incidental, special, consequential or similar damages or loss of profits, or for any breach of contract,
fundamental or otherwise, or for any claim brought against purchaser by any other party.
Some provinces, states or jurisdictions do not allow the exclusion or limitation of incidental or consequential damages or
limitations on how long an implied warranty lasts, so the above limitations or exclusion may not apply to you.
This warranty gives you specific legal rights, and you may also have other rights that vary from province to province, state to
state or jurisdiction to jurisdiction.
How to Obtain Warranty Service
In the U.S.A.
If you have any question regarding this warranty or would like to obtain warranty service, please call
1-800-253-2764 and a convenient service center address will be provided to you.
In Canada
If you have any question regarding this warranty or would like to obtain warranty service, please call
1-800-253-2764 and a convenient service center address will be provided to you.
In the U.S.A., this warranty is offered by Sunbeam Products, Inc. doing business as Jarden Consumer Solutions located in Boca
Raton, Florida 33431. In Canada, this warranty is offered by Sunbeam Corporation (Canada) Limited doing business as Jarden
Consumer Solutions, located at 20 B Hereford Street, Brampton, Ontario L6Y 0M1. If you have any other problem or claim in
connection with this product, please write our Consumer Service Department. PLEASE DO NOT RETURN THIS PRODUCT
TO ANY OF THESE ADDRESSES OR TO THE PLACE OF PURCHASE.