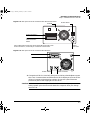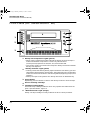
1
HP
SureStore DLT
Internal/External Tape Drive
User’s Guide
DLT 40i/e, DLT 70i/e, DLT 80i/e
dlt.book Page i Monday, February 12, 2001 5:42 PM
HP SureStore DLT
Installation Guiden (Internal Drives)
Refer to:
Before you start:
page 1-2
Check the packing list inside this guide. Check system prerequisites.
Step 1: Check the drive’s SCSI ID
page 1-5
Check the tape drive’s SCSI ID. If necessary change it from the default
of 5 by setting jumpers on the side of the drive.
Step 2: Attach local language labels, if necessary
page 1-7
Step 3: Prepare the mounting bay
Switch off the computer and remove its outer casing. Remove the cover
plate from two adjacent, empty, 5¼-inch, half-height bays. (Keep the
screws.)
page 1-8
Step 4: Attach mounting rails or tray (if required)
Attach any mounting hardware (rails or tray) necessary for your
computer. In the box you will find a tray for use with HP NetServer
L-series and a pair of rails for use with Compaq servers.
page 1-8
Step 5: Install the drive
Slide the tape drive into the bay, but do not fasten with screws yet.
page 1-9
Step 6: Attach power and SCSI cables
Attach a spare power cable from the computer’s internal power supply.
Attach the drive to a spare connector on the SCSI ribbon cable.
page 1-10
Step 7: Secure the drive
Secure the drive in place with the screws. Replace the computer’s cover
and reconnect cables.
page 1-12
For UNIX systems only: Go to the HP SureStore DLT UNIX Configuration Guide
This will enable you to configure your system to support the drive
and to verify the installation.
On Completion
page 1-12
Power on the system and check that the tape drive is operational. Insert
the HP SureStore Tape CD-ROM. It contains drivers, backup software
and various utilities.
Register the tape drive
page 1-4
Overview
Internal Drives—Installation Overview
dlt.book Page ii Monday, February 12, 2001 5:42 PM
Copyright © 1999 Hewlett-Packard Limited.
November 1999
The information contained in this document is
subject to change without notice.
Part Number: C1579-90905
This document contains proprietary information
which is protected by copyright. All rights are
reserved. No part of this document may be
photocopied, reproduced or translated to another
language without the prior written consent of
Hewlett-Packard Limited.
Hewlett-Packard shall not be liable for errors
contained herein or for incidental or consequential
damages (including lost profits) in connection with
the furnishing, performance, or use of this material
whether based on warranty, contract, or other legal
theory.
Printed in the UK
The DLTtape logo is a trademark of Quantum
Corporation in the U.S. and other countries
Windows® is a U.S. registered trademark of
Microsoft Corporation
UNIX® is a registered trademark of X/Open
Company in the U.S. and other countries
Product Details
Write your tape drive details here so you can find them easily if you need them.
Model name:
Model number:
Serial number:
Date purchased/installed:
SCSI ID:
dlt.book Page iii Monday, February 12, 2001 5:42 PM
Contents
Internal Drives—Installation Overview
inside front cover
1 Installing Your Internal Drive
Before You Start 1-2
Registering Your Tape Drive 1-4
Step 1: Check the Drive’s SCSI ID 1-5
Step 2: Attach Local Language Labels if Necessary 1-7
Step 3: Prepare the Mounting Bay 1-8
Step 4: Attach Mounting Rails or Tray (if required) 1-8
Step 5: Install the Drive 1-9
Step 6: Attach Power and SCSI Cables 1-10
Step 7: Secure the Drive 1-12
On Completion 1-12
What Next? 1-13
2 Installing an External Drive
Before You Start 2-2
Step 1: Check the Drive’s SCSI ID 2-5
Step 2: Attach Local Language Labels if Necessary
Step 3: Attach the SCSI Terminator 2-8
Step 4: Connect the SCSI Cable 2-8
Step 5: Connect the Power Cable 2-9
On Completion: 2-10
Registering Your Tape Drive 2-11
What Next? 2-12
2-8
3 Operating the Drive
Front Panel (HP SureStore DLT 80) 3-2
Front Panel (HP SureStore DLT 70) 3-4
Front Panel (HP SureStore DLT 40) 3-6
Operating the Drive 3-8
Using the Cartridge Locking Handle 3-9
The Power-On Self-Test 3-12
iii
dlt.book Page iv Monday, February 12, 2001 5:42 PM
Contents
4 Care of the Drive and Tape Cartridges
Cleaning the Tape Heads 4-2
Types of Tape Cartridges 4-4
Write-Protecting a Cartridge 4-4
Taking Care of Data Cartridges 4-5
Inspecting Cartridges Before Loading and After Unloading
How to detect a lost leader in a tape drive: 4-7
Handling Tape Cartridges 4-7
Labeling Cartridges 4-8
Operating Conditions 4-8
Conditioning Cartridges 4-9
Storing Cartridges 4-9
Transporting Cartridges 4-9
4-6
5 Tape Cartridge Densities and Compression
Density 5-2
Changing the Density and Compression for Writing
5-2
6 Troubleshooting
HP TapeAssure 6-2
If the Self-Test Fails 6-2
Other Problems 6-3
7 Product Specifications and Ordering Information
Product Specification A-2
Ordering Information A-5
8 Customer Support
Warranty B-2
Hewlett-Packard Year 2000 Warranty
Service and Support B-3
Contacting Customer Support B-5
B-3
Index
Regulatory Information
Installation Overview—External Drives
iv
dlt.book Page 1 Monday, February 12, 2001 5:42 PM
1
Installing Your Internal Drive
This chapter describes how to install an internal HP SureStore DLT drive.
• HP SureStore DLT 40i
• HP SureStore DLT 70i
• HP SureStore DLT 80i
Note For an overview of the installation process, see inside the front cover.
dlt.book Page 2 Monday, February 12, 2001 5:42 PM
Installing Your Internal Drive
Before You Start
Before You Start
Check the Contents of the Box
Unpack the box containing the drive and identify the following items:
HP SureStore DLT™ drive
DLTtapeIV™
cartridge
Cleaning
cartridge
Compaq rails
with screws
User’s Guide
(Please discard
unused languages in
recycling bin)
UNIX Configuration
Guide
HP SureStore Tape
CD-ROM containing:
• HP TapeAssure
• TapeAlert utilities
Front panel labels
in different
languages
HP NetServer
L-series
tray
Jumper kit
(five jumpers)
Warranty Registration
Card and
labels
HP SureStore DLT 40i
only: 50-68 pin SCSI
adapter
If any items appear to be missing or damaged, contact your supplier or the
delivery company.
1-2
dlt.book Page 3 Monday, February 12, 2001 5:42 PM
Installing Your Internal Drive
Before You Start
Check System Prerequisites
Before you start installing, make sure that your computer has the
following:
A properly installed and configured SCSI host adapter (SCSI-2 or SCSI-3
compliant)
For optimal performance, Hewlett-Packard recommends that your DLT
drive is placed on a dedicated SCSI bus. If this means you need to install a
new host adapter, contact your supplier. Many host adapters are available,
and your supplier will tell you which are suitable for HP SureStore DLT
drives.
HP SureStore DLT 40i only: An internal SCSI ribbon cable with a spare
50-pin connector
If your computer uses wide SCSI, you need to use the adapter supplied with
the drive that enables you to connect a narrow SCSI device (50 pins) into
the wide SCSI bus (68 pins).
HP SureStore DLT 70i and 80i only: An internal SCSI ribbon cable with a
spare 68-pin connector. The drive requires a wide HBA to perform to
specification, or, in the case of the HP SureStore DLT 80i, an LVD (lowvoltage differential) HBA.
Two adjacent, 5¼-inch, half-height bays in which to install the drive
Note that the depth of the drive — 228.3 mm (9 in) behind the front bezel —
is greater than the depth of most 5¼-inch devices. Make sure that the bays
can accommodate this depth.
Mounting hardware
To install the drive, you may need to fix it to a set of rails or a tray:
• A tray for use with HP NetServer L-series is provided with the drive.
• A pair of rails for use with Compaq servers is provided with the drive.
• For other computers, trays or rails are likely to be supplied with the
system. For Dell rails, see Appendix A for order numbers.
Note Some computer companies use non-standard rails and do not include
spares with the computer. If this is the case with your system, you will
have to order rails from the computer manufacturer before you can install
the tape drive.
If you are not sure what type of rails to use, refer to your computer
documentation. You may want to have this documentation available for
reference during the installation process.
1-3
dlt.book Page 4 Monday, February 12, 2001 5:42 PM
Installing Your Internal Drive
Registering Your Tape Drive
Registering Your Tape Drive
You must register with HP to ensure that you benefit from the full 3-year
warranty period. The second and third years of warranty are subject to
registration within 30 days.
You can register electronically on the internet or you can use the Warranty
Registration card that is provided with your drive.
In order to ensure your registration is complete, there are a number of
questions on the registration card and electronic form that are mandatory.
Other questions are optional. However, the more you feel able to complete,
the better HP can meet your needs. (If you wish, you may register your
drive and choose not to receive any further information from HP.)
If you have internet access, register electronically as described below.
1 Select the “Warranty Registration” topic on the HP SureStore Tape
CD-ROM.
2 Select the “Register on the Web” link. This links you to HP’s Warranty
Registration web site.
3 Complete the registration form. Optional questions are marked with an
“*” and the text is in red.
4 Click the Submit button to forward your registration immediately to HP.
If you do not have internet access:
1 Complete the Warranty Registration card supplied with the drive.
Mandatory questions are in black, bold text.
2 Post or fax the completed form to HP.
1-4
dlt.book Page 5 Monday, February 12, 2001 5:42 PM
Installing Your Internal Drive
Step 1: Check the Drive’s SCSI ID
Step 1: Check the Drive’s SCSI ID
Note For optimal performance, Hewlett-Packard recommends that your DLT
drive be installed on a dedicated SCSI bus. This is shown in figure 1.8.
Your HP SureStore DLT drive is shipped with a default SCSI ID of 5, but
it can be assigned any unused ID. Do not use SCSI ID 7, which is reserved
for the SCSI controller. You can use SCSI ID 0 provided the drive is on a
separate SCSI bus from the boot disk (as is recommended). Available IDs
are as follows:
• HP SureStore DLT 40i: 1 through 6
• HP SureStore DLT 70i and 80i: 1 through 6 and 8 through 15
Checking the SCSI IDs of Existing Devices
If you are installing on a UNIX system, check the UNIX Configuration
Guide for how to determine the SCSI IDs of existing devices.
If you are installing on a Microsoft Windows or NetWare system, install
and run HP TapeAssure from the HP SureStore Tape CD-ROM to check
your computer’s current SCSI configuration. There are HP TapeAssure
versions for Windows NT, Windows 95/98 and NetWare.
To do this, select “HP TapeAssure” from the Welcome page on the CDROM. Once HP TapeAssure is installed, you can run it from the Programs
menu in the Windows Start menu.
Note In Windows 95/98 or Windows NT, you can install HP TapeAssure directly
on the system to which the tape drive is connected. In NetWare, you will
need to install HP TapeAssure on the server from a client workstation
running Windows 95/98 or Windows NT, and then run HP TapeAssure
from the NetWare server console.
HP TapeAssure will check for the presence of a SCSI controller and its
driver software and identify the SCSI IDs of existing SCSI devices. View
the current configuration and determine whether you need to change the
SCSI ID from the default of 5. Exit HP TapeAssure after you view the SCSI
configuration information.
Note If the program does not work correctly or hangs during processing, there
may be a compatibility problem with the SCSI card. The current version of
HP TapeAssure may not support Adaptec 1510 cards (6350 chip set) and
Symbios cards.
1-5
dlt.book Page 6 Monday, February 12, 2001 5:42 PM
Installing Your Internal Drive
Step 1: Check the Drive’s SCSI ID
If you need a different SCSI ID, you must set it by using jumpers on a set
of pins at the side of the drive as shown in figure 1.1.
There should be no jumpers on the block when you receive the drive. This
gives the drive a default SCSI ID of 5.
Figure 1.1 SCSI ID settings on internal drives
Side view of drive
SCSI ID jumper block
Front panel
The jumper block has five pairs of pins that are used as shown in figure 1.2.
Figure 1.2 SCSI ID jumper blocks
SCSI ID pins (three pairs)
HP SureStore DLT 40i
Disable parity. A jumper set across these pins disables parity
checking. Normally you should leave this jumper OFF.
Remote ID present. A jumper across these pins tells the host to
read the SCSI ID from the SCSI ID pins. Place a jumper across
these pins if you want the drive to have an ID other than 5.
SCSI ID pins (four pairs)
HP SureStore DLT 70
i and 80i
Remote ID present. A jumper across these pins tells the host to
read the SCSI ID from the SCSI ID pins. Place a jumper across
these pins if you want the drive to have an ID other than 5.
The SCSI ID pins are used to set the ID as shown in figure 1.3.
Figure 1.3 SCSI ID jumper settings
5 (Default)
0
1
2
3
4
6
HP SureStore DLT 70i
and 80i only:
8
1-6
9
1
1
12
13
14
15
dlt.book Page 7 Monday, February 12, 2001 5:42 PM
Installing Your Internal Drive
Step 2: Attach Local Language Labels if Necessary
To select another ID, refer to figure 1.3:
1 Place a jumper across the left-most pins (Remote ID Present), to tell the
host to read the ID from the pins.
2 Set the ID you want on the pins as shown in figure 1.3.
Whether you change the SCSI ID or not, make a note of the drive’s SCSI
setting on the inside of the front cover of this guide for future reference.
Caution Do not use SCSI ID 7, which is reserved for the SCSI controller
If the drive is on the same SCSI bus as the computer’s hard disks (not
recommended), do not use ID 0, which is normally reserved for the boot
disk.
Termination Power
SCSI bus terminators require power from at least one device on the bus.
HP SureStore DLT drives are set to provide termination power by default.
You should not need to change this.
If you do need to stop the drive from providing of termination power,
remove the jumper on the rightmost jumper pin block on the opposite side
of the drive from the SCSI ID jumper block, as shown in figure 1.4.
Figure 1.4 Location of the termination power block
Side view of drive
No termination power
Termination power
Front panel
Step 2: Attach Local Language Labels if Necessary
A set of labels for the front panel in several different languages is provided
with the drive. Identify those with your local language, peel them from the
backing paper and stick them firmly to the front panel of the drive over the
English-language labels.
1-7
dlt.book Page 8 Monday, February 12, 2001 5:42 PM
Installing Your Internal Drive
Step 3: Prepare the Mounting Bay
Step 3: Prepare the Mounting Bay
Take the following steps to install the tape drive into your computer.
Caution To avoid damaging the computer, ensure that it is powered off before you
install the drive.
Static electricity can damage electronic components. To equalize the
electrostatic charges, touch a bare metal part of the computer (such as the
back plate) before you remove the tape drive from its bag.
a You may need a Phillips, flat-bladed or Torx screwdriver, depending on the
computer you have.
b Perform a normal system shutdown and turn off the computer and any
connected peripherals. Disconnect power cables from the outlet.
c Remove the cover from the computer.
As you work inside the computer, you may have to disconnect the SCSI
cable or power cable from other devices to maneuver the new drive into
place. If you have to do this, make a note of their positions and connections
so that you can replace them correctly later.
d Remove the front cover plates from two spare, adjacent, 5¼-inch, halfheight bays of the computer. Keep the screws for use in step 7.
Step 4: Attach Mounting Rails or Tray (if required)
If your computer requires special rails or other hardware to install the tape
drive, mount them on the tape drive in this step.
Figure 1.5 shows how to use the tray provided with internal drives.
The drives are longer than most 5½-inch devices and some cabinets are not
deep enough for the drives to be inserted fully. For these cabinets, the tray
allows the drive to be fixed so that the front protrudes slightly (position 1).
In deeper cabinets, use position 2, so that the drive is fully inserted.
1-8
dlt.book Page 9 Monday, February 12, 2001 5:42 PM
Installing Your Internal Drive
Step 5: Install the Drive
Figure 1.5 Attaching the tray to the drive
Position 1:
With the fixing screws in the
frontmost holes, the front of the
drive protrudes from the front of
the cabinet.
Use position 1 if there is there is
not enough depth in the cabinet
for position 2.
Position 2:
With the fixing screws in the
rearmost holes, the front bezel of the
drive lies flush on the cabinet.
Use this position if there is enough
depth in the cabinet.
Step 5: Install the Drive
Slide the drive into the open bay. If your computer does not use mounting
hardware, check that the holes in the chassis are aligned with the holes in
the side of the tape drive.
Do not secure the drive with screws at this stage because you may have to
move the drive slightly to get the cables into place.
1-9
dlt.book Page 10 Monday, February 12, 2001 5:42 PM
Installing Your Internal Drive
Step 6: Attach Power and SCSI Cables
Step 6: Attach Power and SCSI Cables
a Attach a spare power cable from the computer’s internal power supply to
the rear of the tape drive, as shown in figure 1.6.
Figure 1.6 Attaching the power cable and SCSI cable
HP SureStore DLT 40i
Rear of drive
SCSI connector
Power connector
HP SureStore DLT 70i
and 80i
Rear of drive
SCSI connector
b Attach the SCSI cable.
1-10
Power connector
dlt.book Page 11 Monday, February 12, 2001 5:42 PM
Installing Your Internal Drive
Step 6: Attach Power and SCSI Cables
Attaching the 50-Pin to 68-Pin Adapter (DLT 40i drives only)
The DLT 40i drive has a 50-pin narrow SCSI connector. If your computer
uses wide SCSI, you will need a cable or adapter that enables you to
connect a narrow SCSI device (50 pins) into the wide SCSI bus (68 pins).
HP provides a wide to narrow SCSI adapter as standard with all internal
tape drives. Plug the adapter into the 68-pin SCSI connector on the
computer and then connect a SCSI cable from the connector to the tape
drive.
Figure 1.7 HP SureStore DLT 40i only: Attaching the SCSI adapter
Connect to a
SCSI cable and
the tape drive
Plug into the computer’s
SCSI connector
• If you are using a new cable, attach the end farthest from the terminator
block to the host adapter and attach one of the connectors to the tape
drive, as shown in figure 1.6.
• If you are using an existing internal cable, simply attach the drive to a
spare connector on the computer’s SCSI ribbon cable. (There may be
other SCSI devices already connected to the cable, though this is not
recommended.)
Figure 1.8 Connecting an internal drive
Terminator block
Tape drive
SCSI ribbon cable
SCSI controller connection
1-11
dlt.book Page 12 Monday, February 12, 2001 5:42 PM
Installing Your Internal Drive
Step 7: Secure the Drive
Step 7: Secure the Drive
a Secure the tape drive to the computer using the screws you removed in
step 3d.
b Replace the cover on the computer and reconnect the power cables.
On Completion
Verify the Installation
Note If you are installing the drive in a UNIX system, go now to the UNIX
Configuration Guide to configure your system to support the drive and to
verify the installation.
Once you have installed the tape drive, you should verify that it is
functioning properly before you store your valuable data. If you have a
Windows NT, Windows 95/98 or NetWare system, the HP TapeAssure
software provided on the HP SureStore Tape CD-ROM will perform a series
of tests to verify that the drive has been properly installed and provide
guidance on what to do if there is a problem.
1 Switch on the computer. The drive will run its self-test, which takes about
13 seconds if no cartridge is loaded. At the end of the self-test, only the
green “Operate Handle” light should be lit (assuming there is no cartridge
in the drive). Read more about the front panel lights in Chapter 3.
2 Verify that the tape drive installation was successful.
If you are installing on a Windows 95/98, Windows NT, or NetWare system,
use HP TapeAssure to verify that the tape drive is operational.
• Select HP TapeAssure from the Windows Start menu. (If you did not
install TapeAssure in Step 1, install it now from the Welcome page on
the HP SureStore Tape CD-ROM.) No other backup software should be
running at the same time.
• Have a blank cartridge ready for the backup and restore test, which you
should perform to check that the drive can write data to tape. (For tape
loading instructions, see page 3-10.)
1-12
dlt.book Page 13 Monday, February 12, 2001 5:42 PM
Installing Your Internal Drive
What Next?
Install Backup Software and Driver
Note If you are installing the drive in a UNIX system, go to the UNIX
Configuration Guide to configure your system to support the drive and to
verify the installation.
Before you can use the tape drive, you will need a backup application with
driver software that supports your tape drive model.
Depending on which backup software you use, the driver may be supplied
on the HP SureStore Tape CD-ROM, your backup software disks, or your
operating system disks. See the appropriate README file in the DRIVERS
directory on the HP SureStore Tape CD-ROM for which drivers are
available for your specific model.
What Next?
If the tape drive has passed the tests run by HP TapeAssure, you can be
confident that you have installed it correctly. You are now ready to put it
to regular use backing up your system. See your backup application’s
documentation for instructions on how to back up and restore data.
Chapter 3 provides details of how to operate your drive. Make sure you
read Chapter 4 regarding the care of the drive and cartridges.
1-13
dlt.book Page 14 Monday, February 12, 2001 5:42 PM
Installing Your Internal Drive
What Next?
1-14
dlt.book Page 1 Monday, February 12, 2001 5:42 PM
2
Installing an External Drive
This chapter describes how to install an external HP SureStore DLT drive.
• HP SureStore DLT 40e
• HP SureStore DLT 70e
• HP SureStore DLT 80e
Note For an overview of the installation process, see inside the back cover.
dlt.book Page 2 Monday, February 12, 2001 5:42 PM
Installing an External Drive
Before You Start
Before You Start
Check the Contents of the Box
Unpack the box containing the drive and identify the following items:
HP SureStore DLT™ drive
Note: the DLT 80e is
narrower than the
drive shown here
DLTtapeIV™
cartridge
Cleaning
cartridge
SCSI
terminator
User’s Guide
(Please discard
unused languages in
recycling bin)
SCSI cable
UNIX Configuration
Guide
Power cable*
HP SureStore Tape
CD-ROM containing:
• HP TapeAssure
• TapeAlert utilities
Front panel labels
in different
languages
Warranty Registration
Card and
labels
If any items appear to be missing or damaged, contact your supplier or
the delivery company.
* Hewlett-Packard supplies the correct power cable for each country. Your power cable may
differ from the illustration.
2-2
dlt.book Page 3 Monday, February 12, 2001 5:42 PM
Installing an External Drive
Before You Start
Check System Prerequisites
To install and use your new tape drive, you will need the following:
A properly installed and configured SCSI host adapter (SCSI-2 or SCSI-3
compliant).
For optimal performance, Hewlett-Packard recommends that your DLT
drive is placed on a dedicated SCSI bus. If this means you need to install a
new host adapter, contact your supplier. Many host adapters are available,
and your supplier will tell you which are suitable for HP SureStore DLT
drives.
HP SureStore DLT drives have the following SCSI characteristics:
• The HP SureStore DLT 40e is an 8-bit narrow single-ended SCSI device,
which can be connected to either a narrow or wide SCSI bus.
• The HP SureStore DLT 70e is a 16-bit fast, wide, single-ended SCSI
device, which must be connected to a wide SCSI host adapter.
• The HP SureStore DLT 80e is an ultra-wide SCSI-2 device, which can
be used with both LVD (low-voltage differential) and single-ended host
bus adapters (HBAs). The drive is not compatible with SCSI-2 highvoltage differential SCSI HBAs.
If you want the full benefits of longer cable lengths and full-speed
compatibility with other LVD devices on the same bus, choose an LVD
compatible HBA.
An appropriate SCSI cable, if the one supplied with the tape drive does not
fit your computer.
• The HP SureStore DLT 40e is provided with a 68-pin to 50-pin cable
with active high-byte termination. Use this if your computer has a
68-pin wide SCSI connector, so that the unused lines in the cable are
terminated properly.
If you need a different cable, for example, if you are installing the drive
on a narrow SCSI bus, see page A-5 for part numbers and descriptions.
HP SureStore DLT 40e drives require a SCSI cable with a 50-pin lowdensity bail connector at one end to connect to the drive.
• HP SureStore DLT 70e is provided with a 68-pin to 68-pin cable, which
connects the drive to a wide SCSI connector.
• HP SureStore DLT 80e is provided with a 68-pin to 68-pin cable, which
connects the drive to an LVD connector or a wide SCSI connector.
If you are installing the drive on a UNIX system, refer to the separate
UNIX Configuration Guide for further information about the systems
supported and software configuration.
2-3
dlt.book Page 4 Monday, February 12, 2001 5:42 PM
Installing an External Drive
Before You Start
Backup software that supports your tape drive.
Replica Backup for Single Server is included with the drive.
Check with your supplier for backup applications compatible with your
tape drive and operating system.
Select a Site for the Drive
You need to find a firm flat surface on which to place the drive. The site
should satisfy the following conditions:
• It should be away from doors and windows that open outside to avoid
sudden changes in temperature.
• It should be reasonably free from dust and excessive humidity. Do not
place the drive on the floor, near a door, near a heavily-traveled
walkway, or near a coffee machine.
• Keep the drive away from laser printers and photocopiers where there
could be a risk of toner entering the drive.
• Avoid placing the drive on furniture that could get knocked.
For more details on the conditions under which the drive should operate,
see “Environmental Specification” on page A-3.
Power Down the Computer
Shut down the operating system on the computer to which the drive is to
be attached and power down the computer.
2-4
dlt.book Page 5 Monday, February 12, 2001 5:42 PM
Installing an External Drive
Step 1: Check the Drive’s SCSI ID
Step 1: Check the Drive’s SCSI ID
Note For optimal performance, Hewlett-Packard recommends that you install
your DLT drive on a dedicated SCSI bus. This arrangement is shown in
figure 2.1.
Your HP SureStore DLT drive is shipped with a default SCSI ID of 5, but
it can be assigned any unused ID in the following ranges:
HP SureStore DLT 40e
1 through 6
HP SureStore DLT 70e/80e
1 through 6, 8 through 15
Do not use SCSI ID 7, which is reserved for the SCSI controller. You can
use SCSI ID 0 provided the drive is on a separate SCSI bus from the boot
disk (as is recommended).
Whether you intend to change the SCSI ID or not, always check the ID
when installing the drive to ensure that it has not accidentally been
changed.
Figure 2.1 Recommended SCSI configuration for an external drive
Host computer
SCSI host adapter
(fitted in the host and
terminated)
DLT drive
SCSI terminator
SCSI cable,
connected one end
to the host adapter,
the other to the drive
2-5
dlt.book Page 6 Monday, February 12, 2001 5:42 PM
Installing an External Drive
Step 1: Check the Drive’s SCSI ID
If you follow this recommendation, the following points apply:
• You can leave the SCSI ID at 5 (the default).
• You must attach the SCSI terminator to one of the SCSI connectors on
the rear of the drive.
If you choose to have other devices on the SCSI bus (not recommended with
a DLT drive):
1 Determine whether you need to change the SCSI ID of the tape drive from
the default of 5.
• If you are installing on a UNIX system, check the UNIX Configuration
Guide for how to determine the SCSI IDs of existing devices.
• If you are installing on a Microsoft Windows or NetWare system, install
and run HP TapeAssure from the HP SureStore Tape CD-ROM to check
your computer’s current SCSI configuration. There are HP TapeAssure
versions for Windows NT, Windows 95/98 and NetWare.
To do this, select “HP TapeAssure” from the Welcome page on the CDROM and follow the instructions on the screen. Once HP TapeAssure is
installed, you can run it from the Programs menu in the Windows Start
menu.
Note In Windows 95/98 or Windows NT, you can install HP TapeAssure directly
on the system to which the tape drive is connected. In NetWare, you will
need to install HP TapeAssure on the server from a client workstation
running Windows 95/98, and then run HP TapeAssure from the NetWare
server console.
HP TapeAssure will check for the presence of a SCSI controller and its
driver software and identify the SCSI IDs of existing SCSI devices. View
the current configuration and determine whether you need to change
the SCSI ID from the default of 5. Exit HP TapeAssure after you view
the SCSI configuration information.
Note If the program does not work correctly or hangs during processing, there
may be a compatibility problem with the SCSI card. The current version of
HP TapeAssure may not support Adaptec 1510 cards (6350 chip set) and
Symbios cards.
2-6
dlt.book Page 7 Monday, February 12, 2001 5:42 PM
Installing an External Drive
Step 1: Check the Drive’s SCSI ID
Figure 2.2 Rear panel of an HP SureStore DLT 40e and 70e drives
SCSI ID
Power switch
SCSI connector 1
SCSI connector 2
with terminator
fitted
Note: HP SureStore DLT 70e drives have 68-pin thumb-screw
SCSI connectors, not the 50-pin connectors shown here.
Power
connector
Figure 2.3 Rear panel of an HP SureStore DLT 80e drive
SCSI connector 1
SCSI ID
SCSI connector 2
Power switch
Power connector
2 Change the SCSI ID. Use a ball-point pen or similar pointed object to press
the + and − buttons above and below the SCSI ID display on the rear of the
drive to increase or decrease the number. Do not use a pencil because
particles of pencil lead might get into the drive.
Caution Both the computer and tape drive check the SCSI ID only at power-on.
Always power-cycle the drive and reboot the computer after you change
the SCSI ID.
2-7
dlt.book Page 8 Monday, February 12, 2001 5:42 PM
Installing an External Drive
Step 2: Attach Local Language Labels if Necessary
Step 2: Attach Local Language Labels if Necessary
A set of labels for the front panel in several different languages is provided
with the drive. Identify those with your local language, peel them from the
backing paper and stick them firmly to the front panel of the drive over the
English-language labels.
Step 3: Attach the SCSI Terminator
You need to attach the SCSI terminator provided with the drive. The
terminator is kept separate from the drive in the box when shipped from
the factory to avoid damage.
1 Connect the SCSI terminator to either of the SCSI
connectors on the rear of the drive.
2 Secure the connector firmly in place.
The only situation in which you do not need to attach
the terminator is if the drive is situated in the middle of the SCSI bus with
some other device at the end. This should not be the case if you follow HP’s
advice to place your DLT drive on its own on a dedicated SCSI bus in order
to achieve optimal performance. If you choose to ignore this
recommendation, plug the SCSI cable of the next device into the second
SCSI connector.
Note HP SureStore DLT 80e only: The terminator supplied with the drive is
multi-mode and automatically senses whether the bus is LVD (low-voltage
differential) and SE (single-ended) and terminates correctly.
Step 4: Connect the SCSI Cable
Caution To avoid damaging the computer or tape drive, ensure that both they and
any other devices attached to the SCSI bus are powered off while you
attach the SCSI cable.
2-8
dlt.book Page 9 Monday, February 12, 2001 5:42 PM
Installing an External Drive
Step 5: Connect the Power Cable
Notes HP SureStore DLT 40e only: If you are installing the drive on a system
that has a 68-pin wide SCSI connector, use the 68-pin to 50-pin cable
provided with the drive. This incorporates active termination so that the
unused lines are properly terminated. Other cables may cause problems.
HP SureStore DLT 80e only: The drive is an ultra-wide SCSI compatible
device. It can be used with both LVD and SE host bus adapters. It cannot
be used with SCSI high-voltage differential HBAs.
Note that if you combine SE and LVD devices on the same bus, the host bus
adapter will automatically switch to single-ended mode and optimum
performance for any device on the bus will be at Ultra speeds and cable
length. This means that the performance of any Ultra2 devices will drop to
that of Ultra devices. All other devices will operate at their optimum speed.
If you connect only LVD devices, the bus will operate in low voltage
differential mode and Ultra2 speeds will be enabled. You can use a
combination of Ultra and Ultra2 devices. Each device will operate at its
optimum speed.
1 Perform a normal system shutdown and turn off the computer and any
connected peripherals. Disconnect power cables from the outlet.
2 Attach one end of the SCSI cable to the free SCSI
connector on the rear of the drive and secure the
connector firmly in place.
3 Connect the other end of the cable to the computer’s
external SCSI connector.
Step 5: Connect the Power Cable
An external HP SureStore DLT drive will operate using any voltage in the
range 100–240 volts. No adjustment is needed. To connect your drive to the
power supply, proceed as follows:
1 Ensure that the power switch on the drive is off (set to 0). See figure 2.3.
2 Connect the power cable to the connector on the rear
of the drive.
3 Plug the other end of the cable into the power outlet.
2-9
dlt.book Page 10 Monday, February 12, 2001 5:42 PM
Installing an External Drive
On Completion:
4 Reconnect the computer and any other peripherals to the outlet.
Note When you power on the system, make sure you power on the DLT drive
first, otherwise the computer will not detect it.
On Completion:
Verify the Installation
Note If you are installing the drive on a UNIX system, go now to the UNIX
Configuration Guide to configure your system to support the drive and to
verify the installation.
Once you have installed the tape drive, you should verify that it is
functioning properly before you store your valuable data. If you have a
Windows 95/98, Windows NT or NetWare system, the HP TapeAssure
software provided on the HP SureStore Tape CD-ROM will perform a series
of tests to verify that the drive has been properly installed and provide
guidance on what to do if there is a problem.
1 Switch on the tape drive.
The drive will run its self-test, which takes about 13 seconds if no cartridge
is loaded. At the end of the self-test, only the green “Operate Handle” light
should be lit (assuming there is no cartridge in the drive). Read more about
the front panel lights in Chapter 3.
2 Switch on the computer.
3 Verify that the tape drive installation was successful.
If you are installing on a Windows 95/98, Windows NT, or NetWare system,
use HP TapeAssure to verify that the tape drive is operational.
• Run HP TapeAssure from the Programs menu in the Windows Start
menu, assuming you installed it in step 1. If you did not, install
HP TapeAssure now by selecting “HP TapeAssure” from the Welcome
page on the HP SureStore Tape CD-ROM.
• Have a blank cartridge ready for the backup and restore test, which you
should perform to check that the drive can write data to tape. (For tape
loading instructions, see page 3-10.)
2-10
dlt.book Page 11 Monday, February 12, 2001 5:42 PM
Installing an External Drive
Registering Your Tape Drive
Install Backup Software and Driver
Note If you are installing the drive on a UNIX system, go to the UNIX
Configuration Guide to configure your system to support the drive and to
verify the installation.
Before you can use the tape drive, you will need a backup application with
driver software that supports your tape drive model.
Depending on which backup software you use, the driver may be supplied
on the HP SureStore Tape CD-ROM, your backup software disks, or your
operating system disks. See the appropriate README file in the DRIVERS
directory on the HP SureStore Tape CD-ROM for which drivers are
available for your specific model.
Registering Your Tape Drive
You must register with HP to ensure that you benefit from the full 3-year
warranty period. The second and third years of warranty are subject to
registration within 30 days.
You can register electronically on the internet or you can use the Warranty
Registration card that is provided with your drive.
In order to ensure your registration is complete, there are a number of
questions on the registration card and electronic form that are mandatory.
Other questions are optional. However, the more you feel able to complete,
the better HP can meet your needs. (If you wish, you may register your
drive and choose not to receive any further information from HP.)
If you have internet access, register electronically as described below.
1 Select the “Warranty Registration” topic on the HP SureStore Tape
CD-ROM.
2 Select the “Register on the Web” link. This links you to HP’s Warranty
Registration web site.
3 Complete the registration form. Optional questions are marked with an
“*” and the text is in red.
4 Click the Submit button to forward your registration immediately to HP.
If you do not have internet access:
1 Complete the Warranty Registration card supplied with the drive.
Mandatory questions are in black, bold text.
2 Post or fax the completed form to HP.
2-11
dlt.book Page 12 Monday, February 12, 2001 5:42 PM
Installing an External Drive
What Next?
What Next?
For Windows systems, if the tape drive has passed the tests run by
HP TapeAssure, you can be confident that you have installed it correctly.
You are now ready to put it to regular use backing up your system. See your
backup application’s documentation for instructions on how to back up and
restore data.
Chapter 3 provides details of how to operate your drive. Make sure you
read Chapter 4 regarding the care of the drive and cartridges.
2-12
dlt.book Page 1 Monday, February 12, 2001 5:42 PM
3
Operating the Drive
dlt.book Page 2 Monday, February 12, 2001 5:42 PM
Operating the Drive
Front Panel (HP SureStore DLT 80)
Front Panel (HP SureStore DLT 80)
6
4
7
1
8
2
9
5
10
3
1 Density and Compression Lights (yellow)
• When a tape is loaded, these lights indicate the density at which the tape is
written and whether compression is used. They indicate native
(uncompressed) capacities of 10.0/15.0, 20.0, 35.0 and 40.0 GB.
• They are also used if you need to write a tape at a density lower than its default
density. See Chapter 5.
2 “Density Override” Light (yellow)
• Flashing: Means the flashing density lights indicate the new density you have
selected through the Density Select button. The new density will not take effect
until the host instructs the drive to start writing at BOT (Beginning of Tape). See
Chapter 5.
• Steady: The tape is being written at a density other than its default density.
3 Select Button
Repeatedly press this button to select a new density at which to write the tape.
4 Slot for Inserting Cartridge
5 Cartridge Locking Handle
Secures the tape cartridge inside the drive. Only operate the handle when the
green “Operate Handle” light is lit.
6 “Write-Protected” Light (orange)
Steady: The tape cartridge currently loaded in the drive is write-protected.
3-2
dlt.book Page 3 Monday, February 12, 2001 5:42 PM
Operating the Drive
Front Panel (HP SureStore DLT 80)
7 “Tape in Use” Light (yellow)
• Steady: The tape is loaded and ready for use.
• Flashing regularly: The cartridge is being loaded, unloaded or rewound.
• Flashing irregularly: A calibration read or write is in progress.
8 “Use Cleaning Tape” Light (yellow)
• Steady: The tape heads need cleaning.
• Flashing: The tape may be damaged.
9 “Operate Handle” Light (green)
• Steady: You can operate the Cartridge Locking Handle to insert or remove a
cartridge.
• Off: Do not operate the handle.
10 Unload Button
• Press this button to unload a tape cartridge. If the drive is busy, it will finish its
current task before unloading the cartridge.
• Only operate the Cartridge Locking Handle to release the tape cartridge when
the “Operate Handle” light is lit.
Density and Compression Lights—Normal Usage
In normal usage, the density lights simply indicate the native
(uncompressed) capacity of the tape cartridge loaded in the drive and
whether the data is compressed.
A new DLTtape IV will cause both the “40.0” light and the “Compress” light
to be lit. The tape’s default capacity of 40 GB can store 80 GB of data using
the drive’s hardware data compression facility with a compression ratio of
2:1. (The actual compression ratio depends on the type of data being
stored.)
Note 10.0 GB type III tape cartridges and 15.0 GB DLTtape IIIxt cartridges are
both indicated by the 10.0/15.0 GB light being lit.
It is possible to write a tape cartridge at a lower density for interchange
with a lower capacity DLT drive. See page 5-2 for details of how to do this
and how to switch hardware data compression on and off.
3-3
dlt.book Page 4 Monday, February 12, 2001 5:42 PM
Operating the Drive
Front Panel (HP SureStore DLT 70)
Front Panel (HP SureStore DLT 70)
6
4
7
1
8
9
5
2
10
3
1 Density and Compression Lights (yellow)
• When a tape is loaded, these lights indicate the density at which the tape is
written and whether compression is used. They indicate native
(uncompressed) capacities of 2.6, 6.0, 10.0/15.0, 20.0 and 35.0 GB.
• They are also used if you need to write a tape at a density lower than its default
density. See Chapter 5.
2 “Density Override” Light (yellow)
• Flashing: Means the flashing density lights indicate the new density you have
selected through the Density Select button. The new density will not take effect
until the host instructs the drive to start writing at BOT (Beginning of Tape). See
Chapter 5.
• Steady: The tape is being written at a density other than its default density.
3 Select Button
Repeatedly press this button to select a new density at which to write the tape.
4 Slot for Inserting Cartridge
5 Cartridge Locking Handle
Secures the tape cartridge inside the drive. Only operate the handle when the
green “Operate Handle” light is lit.
6 “Write-Protected” Light (orange)
Steady: The tape cartridge currently loaded in the drive is write-protected.
3-4
dlt.book Page 5 Monday, February 12, 2001 5:42 PM
Operating the Drive
Front Panel (HP SureStore DLT 70)
7 “Tape in Use” Light (yellow)
• Steady: The tape is loaded and ready for use.
• Flashing regularly: The cartridge is being loaded, unloaded or rewound.
• Flashing irregularly: A calibration read or write is in progress.
8 “Use Cleaning Tape” Light (yellow)
• Steady: The tape heads need cleaning.
• Flashing: The tape may be damaged.
9 “Operate Handle” Light (green)
• Steady: You can operate the Cartridge Locking Handle to insert or remove a
cartridge.
• Off: Do not operate the handle.
10 Unload Button
• Press this button to unload a tape cartridge. If the drive is busy, it will finish its
current task before unloading the cartridge.
• Only operate the Cartridge Locking Handle to release the tape cartridge when
the “Operate Handle” light is lit.
11 Beeper
The beeper sounds at the same time as the “Operate Handle” light is lit to
indicate that it is safe to operate the Cartridge Locking Handle to remove or
insert a tape cartridge.
Density and Compression Lights—Normal Usage
In normal usage, the density lights simply indicate the native
(uncompressed) capacity of the tape cartridge loaded in the drive and
whether the data is compressed.
A new DLTtape IV will cause both the “35.0” light and the “Compress” light
to be lit. The tape’s default capacity of 35 GB can store 70 GB of data using
the drive’s hardware data compression facility with a compression ratio of
2:1. (The actual compression ratio depends on the type of data being
stored.)
Note 10.0 GB type III tape cartridges and 15.0 GB DLTtape IIIxt cartridges are
both indicated by the 10.0/15.0 GB light being lit.
It is possible to write a tape cartridge at a lower density for interchange
with a lower capacity DLT drive. See page 5-2 for details of how to do this
and how to switch hardware data compression on and off.
3-5
dlt.book Page 6 Monday, February 12, 2001 5:42 PM
Operating the Drive
Front Panel (HP SureStore DLT 40)
Front Panel (HP SureStore DLT 40)
4
1
6
7
8
9
2
3
5
10
1 Density and Compression Lights (yellow)
• When a tape is loaded, these lights indicate the density at which the tape is
written and whether compression is used. They indicate native
(uncompressed) capacities of 2.6, 6.0, 10.0 and 20.0 GB.
• They are also used if you need to write a tape at a density lower than its default
density. See Chapter 5.
2 “Density Override” Light (yellow)
• Flashing: Means the flashing density lights indicate the new density you have
selected through the Density Select button. The new density will not take effect
until the host instructs the drive to start writing at BOT (Beginning of Tape). See
Chapter 5.
• Steady: The tape is being written at a density other than its default density.
3 Select Button
Repeatedly press this button to select a new density at which to write the tape.
4 Slot for Inserting Cartridge
5 Cartridge Locking Handle
Secures the tape cartridge inside the drive. Only operate the handle when the
green “Operate Handle” light is lit.
6 “Write-Protected” Light (orange)
Steady: The tape cartridge currently loaded in the drive is write-protected.
3-6
dlt.book Page 7 Monday, February 12, 2001 5:42 PM
Operating the Drive
Front Panel (HP SureStore DLT 40)
7 “Tape in Use” Light (yellow)
• Steady: The tape is loaded and ready for use.
• Flashing regularly: The cartridge is being loaded, unloaded or rewound.
• Flashing irregularly: A calibration read or write is in progress.
8 “Use Cleaning Tape” Light (yellow)
• Steady: The tape heads need cleaning.
• Flashing: The tape may be damaged.
9 “Operate Handle” Light (green)
• Steady: You can operate the Cartridge Locking Handle to insert or remove a
cartridge.
• Off: Do not operate the handle.
10 Unload Button
• Press this button to unload a tape cartridge. If the drive is busy, it will finish its
current task before unloading the cartridge.
• Only operate the Cartridge Locking Handle to release the tape cartridge when
the “Operate Handle” light is lit.
11 Beeper
The beeper sounds at the same time as the “Operate Handle” light is lit to
indicate that it is safe to operate the Cartridge Locking Handle to remove or
insert a tape cartridge.
Density and Compression Lights—Normal Usage
In normal usage, the density lights simply indicate the native
(uncompressed) capacity of the tape cartridge loaded in the drive and
whether the data is compressed.
A new DLTtape IV will cause both the “20.0” light and the “Compress” light
to be lit. The tape’s default capacity of 20 GB can store 40 GB of data using
the drive’s hardware data compression facility with a compression ratio of
2:1. (The actual compression ratio depends on the type of data being
stored.)
Note 10.0 GB type III tape cartridges and 15.0 GB DLTtape IIIxt cartridges are
both indicated by the 10.0 GB light being lit.
It is possible to write a tape cartridge at a lower density for interchange
with a lower capacity DLT drive. See page 5-2 for details of how to do this
and how to switch hardware data compression on and off.
3-7
dlt.book Page 8 Monday, February 12, 2001 5:42 PM
Operating the Drive
Operating the Drive
Operating the Drive
Note Internal drives are powered up and down through the host computer.
To switch on an external drive:
1 Switch the drive on using the power switch on the rear panel of the drive.
• The drive performs its self-test, which takes
about 13 seconds.
• At the end, assuming no tape cartridge is in the
drive, the beeper will sound (not on DLT 80
drives) and only the green “Operate Handle”
light will be lit.
2 You are now ready to load a tape cartridge.
HP SureStore DLT 40e
HP SureStore DLT 70e
Press here to switch on
Press here to switch off
HP SureStore DLT 80
Press here to switch on
Press here to switch off
3-8
dlt.book Page 9 Monday, February 12, 2001 5:42 PM
Operating the Drive
Using the Cartridge Locking Handle
To switch off an external drive:
Caution Only switch off the drive when the Cartridge Locking Handle is down.
Switching off with the handle up can cause problems loading a tape
cartridge when you switch on again.
1 Ensure the green “Operate Handle” light is lit.
If there is a cartridge in the drive, unload it by
pressing the Unload button. Then wait until the
“Operate Handle” light is lit.
2 Switch the drive off using the switch on the rear
panel of the drive.
Using the Cartridge Locking Handle
Only operate the Cartridge Locking handle on the front of DLT drives when
all the following have occurred:
• The beeper has sounded (not on DLT 80 drives).
• The green Operate Handle light is lit steadily.
• A further 5 seconds have elapsed.
If you try to lift the handle before the drive is ready to release the cartridge,
you will probably cause the tape leader to become dislodged.
Note that the handle must be fully in the down position for the power-on
self-test to complete satisfactorily. If the handle is not fully down during
the self-test, the “Operate Handle” light will flash.
3-9
dlt.book Page 10 Monday, February 12, 2001 5:42 PM
Operating the Drive
Using the Cartridge Locking Handle
To load a tape cartridge:
1 Wait until the green “Operate Handle” light is lit.
2 Pull the Cartridge Locking Handle so that it swings up.
Caution Before you load a new tape cartridge into the drive, check
that no blank labels or bits of plastic wrapper are stuck to
the bottom of the cartridge. These could cause the cartridge
to jam in the drive or damage the drive mechanism.
3 Slide the cartridge over the top of the handle.
The cartridge will only go into the drive in the correct
orientation—see the diagram.
4 Push the cartridge in firmly until it reaches a stop.
The cartridge will be flush with the front of the drive. From
this point, the cartridge can only be removed by going
through the unload steps on the next page.
5 Push the Cartridge Locking Handle so that it swings down.
• The “Operate Handle” light goes off.
• The yellow “Tape in Use” light flashes while the tape is
loaded. This takes about 50 seconds.
6 When the yellow “Tape in Use” light is lit, the tape is ready
for use.
3-10
dlt.book Page 11 Monday, February 12, 2001 5:42 PM
Operating the Drive
Using the Cartridge Locking Handle
To unload a tape cartridge:
1 Press the Unload button.
2 The yellow “Tape in Use” light flashes while the tape
is rewound.
This could take up to 2 minutes, depending where on
the tape the drive was last reading or writing.
3 Wait for the beeper to sound (not on DLT 80 drives)
and the green “Operate Handle” light to be lit.
4 Pull the Cartridge Locking Handle so that it swings
up.
5 Remove the cartridge and replace it in its plastic case.
Replace the cartridge in its case immediately to
protect it from dust.
6 Push the Cartridge Locking Handle so that it swings
down.
Caution Make a habit of pushing the handle down after you
remove a cartridge. If the tape drive is powered down
with the handle up, the drive will not accept a
cartridge until you have pushed the handle down and
up twice.
3-11
dlt.book Page 12 Monday, February 12, 2001 5:42 PM
Operating the Drive
The Power-On Self-Test
The Power-On Self-Test
When you power on the HP SureStore DLT drive, it performs a self-test to
check that it is functioning correctly. The test takes about 13 seconds if no
tape cartridge is loaded, and the pattern of front panel lights at the end
tells you the results of the test.
During the test the following occurs:
1 All the lights on the left side of the front panel are lit simultaneously
while the lights on the right side are lit in sequence.
2 The lights go off, leaving the “Tape in Use” light flashing.
3 The self-test finishes. If the test is successful and no cartridge is in the
drive, the only light showing will be the green “Operate Handle” light,
lit steadily.
After a Successful Self-Test
No cartridge in the drive:
• Only the green “Operate Handle” light is lit.
Cartridge in the drive—Cartridge Locking Handle down:
1 The “Tape in Use” light flashes while the drive loads the cartridge.
2 The “Tape in Use” light stops flashing and stays lit; the density and
“Compress” lights show the tape cartridge’s density.
When the “Density Override” light flashes, you can select a new density
if you need to. See page 5-5.
Cartridge in the drive—Cartridge Locking Handle Up:
Caution It is inadvisable to leave a drive in this state.
• The “Operate Handle” light flashes. All other lights are off.
Lower the Cartridge Locking Handle to load the cartridge.
After an Unsuccessful Self-Test
All left side or right side lights flash:
The test has failed. See Chapter 6, “Troubleshooting,” for what to do.
No lights are lit:
The drive is probably not receiving power. Check the power supply. See
Chapter 6 for more details.
3-12
dlt.book Page 1 Monday, February 12, 2001 5:42 PM
4
Care of the Drive and Tape
Cartridges
Apart from ensuring that the drive operates in a safe, clean
environment, the only regular maintenance is to clean the tape heads.
This chapter tells you how to do this and also describes how to look after
and store cartridges so that your data is safe.
dlt.book Page 2 Monday, February 12, 2001 5:42 PM
Care of the Drive and Tape Cartridges
Cleaning the Tape Heads
Cleaning the Tape Heads
When to Clean the Heads
When the yellow “Use Cleaning Tape” light is lit,
use a cleaning cartridge to clean the tape heads.
Using a Cleaning Cartridge
Note Each cleaning cartridge can only be used about 20 times. If the “Use
Cleaning Tape” light remains lit after you have finished a cleaning cycle,
this means the cartridge has reached the end of its life and the heads have
not been cleaned.
Discard the expired cleaning cartridge and use a new one.
To clean the heads:
1 If there is a tape cartridge in the drive, unload and remove it.
2 Insert a cleaning cartridge.
Follow the normal procedure for inserting a cartridge—see “To load a tape
cartridge” on page 3-10.
3 The drive automatically cleans the heads.
The more the cleaning cartridge has been used, the longer this will take,
because the drive has to wind farther to a new portion of tape.
4 When cleaning is complete:
• The “Use Cleaning Tape” light goes off.
• The “Operate Handle” light is lit.
• The beeper sounds (not on DLT 80 drives).
If the “Use Cleaning Tape” light remains lit, the cartridge has reached the
end of its life and the heads were not cleaned. Discard the cleaning
cartridge and repeat the cleaning cycle with a new one.
4-2
dlt.book Page 3 Monday, February 12, 2001 5:42 PM
Care of the Drive and Tape Cartridges
Cleaning the Tape Heads
5 Remove the cleaning cartridge.
6 Write a cross in a box on the cleaning cartridge label.
This records how many times you have used the cartridge. Discard it after
20 uses.
7 Return the cleaning cartridge to its plastic case.
If the “Use Cleaning Tape” light still lights when you load a tape
cartridge after using the cleaning cartridge:
• Make sure that the cleaning cartridge had not expired when you tried to
clean the heads.
• The tape cartridge may be faulty. Try another cartridge and see if “Use
Cleaning Tape” lights again.
If the “Use Cleaning Tape” light flashes while a tape cartridge is
loaded:
The tape cartridge may be damaged. Proceed as follows:
1 If possible, make a copy of any data on the cartridge you want to preserve
onto a new cartridge.
To do this, load the cartridge and restore the data to a temporary directory
on your hard disk. Then back up this temporary directory to a new tape
cartridge.
Alternatively, if the data still exists on your hard disk, simply back it up to
a new tape cartridge directly.
2 Discard the old tape cartridge.
Even if the cartridge appears to work satisfactorily (despite the “Use
Cleaning Tape” light flashing), do not continue to use it. You put your data
at risk and will probably need to use the cleaning cartridge far too often.
4-3
dlt.book Page 4 Monday, February 12, 2001 5:42 PM
Care of the Drive and Tape Cartridges
Types of Tape Cartridges
Types of Tape Cartridges
The drive takes 4-inch cartridges containing ½-inch metal-particle tape.
For normal use, you should use the following tape cartridges with the drive:
Drive
Cartridge
Cartridge
Color
Capacity*
Part No.
HP SureStore DLT 40
DLTtape IV
black
40 GB
C5141F
HP SureStore DLT 70
DLTtape IV
black
70 GB
C5141F
HP SureStore DLT 80
DLTtape IV
black
80 GB
C5141F
* Assuming a compression ratio of 2:1. The compression ratio that can
be achieved in any particular situation depends on the type of data
being stored.
Write-Protecting a Cartridge
If you write-protect a cartridge, the drive can only read data from the tape,
not write to it. Use this setting to protect data on the cartridge from being
erased or overwritten, for example, when you are restoring files from tape.
Note Only alter write-protection when the cartridge is out of the drive.
It is possible to alter write-protection while the cartridge is in the drive,
but it is not advisable. Although the “Write Protect” light reacts
immediately, it may be some time before the new setting is recognized.
For example, if the drive is currently writing data, write-protection will
only come into effect after the drive has finished writing.
4-4
dlt.book Page 5 Monday, February 12, 2001 5:42 PM
Care of the Drive and Tape Cartridges
Taking Care of Data Cartridges
Figure 4.1 Write-protecting a cartridge
Write-protect switch
Orange indicator
To write-protect the
cartridge, slide the switch to
the left so that the orange
indicator shows.
To allow writing, slide
the switch to the right.
To write-protect a cartridge:
Slide the switch at the back of the cartridge to the left so that the orange
indicator shows on the switch.
When the cartridge is loaded in the drive, the orange “Write Protect” light
on the front of the drive will be lit.
To remove write-protection from a cartridge:
Slide the switch to the right so that the orange indicator is hidden.
When the cartridge is loaded in the drive, the “Write Protect” light will be
off.
Taking Care of Data Cartridges
Caution Using a damaged cartridge could put your data at risk and will damage
the drive.
Inserting a faulty cartridge into a drive will damage the tape drive. All
faulty cartridges should be destroyed and must not be inserted into any
other drive.
4-5
dlt.book Page 6 Monday, February 12, 2001 5:42 PM
Care of the Drive and Tape Cartridges
Taking Care of Data Cartridges
A cartridge can become faulty for several reasons. The following are the
most common:
• Dropping the cartridge. Even a reasonably small drop can cause
problems with a DLT cartridge.
• Operating the handle to eject cartridges too soon.
This can cause the tape leader to become detached. Before you lift the
Cartridge Locking handle, wait for the beeper to sound (not on DLT 80
drives) and the green “Operate Handle” light to be lit. Then wait a
further 5 seconds. Do not rush or force operating the handle or rush
removing the cartridge.
Inspecting Cartridges Before Loading and After Unloading
There are some standard checks that you should carry out every time you
load or unload a DLT cartridge. These checks are especially important if
the cartridge has been dropped:
1 Gently turn the cartridge over several times and listen for loose parts.
If anything rattles (even slightly), scrap the cartridge; it must not be
inserted into any tape drive.
2 Examine the cartridge casing for any signs of distortion or cracks.
If there are any faults with the cartridge, scrap the cartridge; it must not
be inserted into any tape drive.
3 Open the cartridge door by releasing the slide lever at the door hinge
(see figure 4.2). Examine the tape loop (the leader) to see that it is in the
correct position (see figure 4.3).
If the leader is out of position or has disappeared, scrap the cartridge; it
must not be inserted into any tape drive. Loading this cartridge into a
drive will cause the leader in the drive to become detached and damage
the tape drive.
Figure 4.2 Checking a cartridge for damage.
Reel lock lever
Tape leader
Release door lock by lifting
the lock with your thumb
4-6
dlt.book Page 7 Monday, February 12, 2001 5:42 PM
Care of the Drive and Tape Cartridges
Taking Care of Data Cartridges
Figure 4.3 Reel lock levers and the reel hub
Cartridge door
Reel lock lever
Reel hub
Reel lock
lever
4 Check the two white reel lock levers.
One is on the same surface as the cartridge door. The other is at the
bottom of the cartridge near the front left corner (see figures 4.2 and
4.3). Both locks should be visible. If they are not, scrap the cartridge; it
must not be inserted into any tape drive.
5 Check that the reel hub is correctly located (flush with the case surface).
If the hub is sunk under the surface, the cartridge could become
misaligned in the drive. If the hub is out of position, gently push the hub
up slightly and see if it will spring back into its correct position. If it does
not, scrap the cartridge; it must not be inserted into any tape drive.
How to detect a lost leader in a tape drive:
Caution Inserting a cartridge with a lost leader in the drive can damage the drive.
If the leader is lost in a cartridge, the tape drive will not accept the
cartridge. It will make a flapping or scraping noise for a few seconds, stop
and repeat the process. The noise is caused by the detached leader going
around in the drive. On the HP SureStore DLT 40, the left-hand lights will
be on and the right-hand lights will flash. On the HP SureStore DLT 70
and DLT 80 the lights on the right-hand side will flash. The drive does not
have to be attached to a computer for this to occur; it can just be powered
on. A drive in this condition cannot be repaired on site.
A cartridge with a lost leader must be discarded.
Handling Tape Cartridges
• Do not drop or bang cartridges. This can displace the tape leader, which
can make the tape unusable and can damage the drive. See “Inspecting
Cartridges Before Loading and After Unloading” on page 4-6 if you do
4-7
dlt.book Page 8 Monday, February 12, 2001 5:42 PM
Care of the Drive and Tape Cartridges
Taking Care of Data Cartridges
drop or bang a cartridge.
• Do not open the cartridge door unnecessarily. This may expose the tape
to contamination or damage.
• Do not touch the tape or leader. Dust and natural skin oils can affect
tape performance.
• When you remove a cartridge from its plastic case, make sure you do not
accidentally pick up a spare label as well. It will cause problems if it is
inserted into the drive along with the cartridge. Store spare labels
separately to avoid this problem.
Labeling Cartridges
Caution Do not stick labels onto a cartridge; they may cause it to jam in the drive
mechanism. Use only the labels supplied with the cartridge.
• To label a cartridge, slide an identification label into the slot on the front
of the cartridge (see figure 4.4). Do not stick labels onto any part of the
cartridge. They could cause problems inside the drive.
• Write on labels only with pens that do not produce debris. Do not use
pencil or water-soluble felt pens.
• Never erase a label or use opaquing fluid—replace it.
Figure 4.4 Labeling a cartridge
Slot for label
Operating Conditions
Cartridges should be used in an environment within the following ranges:
• Temperature: 10°C to 40°C (50°F to 104°F)
• Relative Humidity: 20% to 80% (non-condensing)
4-8
dlt.book Page 9 Monday, February 12, 2001 5:42 PM
Care of the Drive and Tape Cartridges
Taking Care of Data Cartridges
Conditioning Cartridges
If a cartridge has been exposed to conditions outside the operating range,
leave the cartridge in the operating environment for at least 24 hours
before using it. This will avoid problems of condensation.
Storing Cartridges
• Do not place cartridges near sources of electromagnetic interference,
such as under a telephone, or near computer terminals, motors, video or
X-ray equipment.
• Keep cartridges out of direct sunlight and away from heaters.
• Store cartridges in their plastic cases in an environment that satisfies
the following conditions:
– Temperature: 18°C to 28°C (64°F to 82°F)
– Relative Humidity: 40% to 60% (non-condensing)
– Free from dust
• Store cartridges vertically.
Transporting Cartridges
Environmental Conditions
• Make sure there is no condensation in or on the cartridges.
• Avoid exposing cartridges to widely varying temperatures or humidity.
Impact and Vibration
• Do not carry tape cartridges loosely in a box or other container where
they can shake about.
• Avoid dropping or bumping cartridges.
4-9
dlt.book Page 10 Monday, February 12, 2001 5:42 PM
Care of the Drive and Tape Cartridges
Taking Care of Data Cartridges
4-10
dlt.book Page 1 Monday, February 12, 2001 5:42 PM
5
Tape Cartridge Densities and
Compression
This chapter describes how to read and write tape cartridges at different
densities and with or without compression.
For optimum performance, you should use the normal tape cartridge for
your drive at its default setting with compression on. If you do this, you
need not read this chapter.
dlt.book Page 2 Monday, February 12, 2001 5:42 PM
Tape Cartridge Densities and Compression
Density
Density
Note A tape cartridge can only contain data at one density.
Density, as used on the drive’s front panel, means a combination of native
capacity (the capacity of the tape cartridge without using data
compression) and whether data compression is on or off. The actual
capacity using compression depends on the type of data being stored.
When you load a tape cartridge, the lights on the left side of the front panel
show one of the following:
• For a new tape cartridge, the lights show the default density of the tape.
Compression will be set on if it is available for that cartridge type.
• For a tape cartridge containing data, the lights show the density at
which the data was written and whether it is compressed.
If the drive starts writing data to a blank tape cartridge, it will write at the
default density with compression on. If it appends data to a tape cartridge
that already contains data, the drive will write at the same density as the
existing data.
Changing the Density and Compression for Writing
Caution If you load a tape cartridge that already contains data and then write with
a new density, all the existing data on the tape will be lost. A new density
can only be used when writing from Beginning of Tape (BOT).
• For the DLTtape IV tape cartridges you will usually use with an
HP SureStore DLT 40, you can only choose to have compression on or
off.
• With the HP SureStore DLT 70 and 80, you can choose to write at
20.0 GB density if you wish, so that the tape can be read by an
HP SureStore DLT 40.
• On type III tape cartridges, HP SureStore DLT drives allow you to write
data at a different density from the default. You might want to write at
a different density so that the tape cartridge can be read by a lower
capacity drive.
The possibilities are shown in the tables on the next page. The default
settings when you load a new tape cartridge are shown shaded.
5-2
dlt.book Page 3 Monday, February 12, 2001 5:42 PM
Tape Cartridge Densities and Compression
Changing the Density and Compression for Writing
HP SureStore DLT 40
Density Setting
2.6 GB
6.0 GB
Type III
2.6 GB
DLTtape IIIxt
DLTtape IV
Tape Cartridge
10.0 GB
20.0 GB
Native
Compressed
Native
Compressed
6.0 GB
10.0 GB
20 GB*
No
No
No
No
15.0 GB
30 GB*
No
No
No
No
No
No
20.0 GB
40 GB*
HP SureStore DLT 70
Density Setting
Tape
Type III
10.0/15.0 GB
2.6 GB 6.0 GB
20.0 GB
Native Compressed
2.6 GB 6.0 GB 10.0 GB
Native
35.0 GB
Compressed Native Compressed
20 GB*
No
No
No
No
DLTtape IIIxt
No
No
15.0 GB
30 GB*
No
No
No
No
DLTtape IV
No
No
No
No
20.0 GB
40 GB*
35.0 GB
70 GB*
HP SureStore DLT 80
Density Setting
10.0/15.0 GB
20.0 GB
35.0 GB
40.0 GB
Tape
Native
Compress’
Native
Compress’
Native
Compress’
Native
Compress’
Type III
10.0 GB
20 GB*
No
No
No
No
No
No
DLTtape IIIxt
15.0 GB
30 GB*
No
No
No
No
No
No
DLTtape IV
No
No
20.0 GB
40 GB*
35.0 GB
70 GB*
40.0 GB
80 GB*
*compressed capacities assume a 2:1 compression ratio
Note You can appear to set any density with any tape cartridge on the front
panel. However, if the combination of density and tape cartridge is
invalid, as shown in the tables above, the density will switch back to the
default density and compression settings as soon as the drive starts
writing.
The drive cannot provide compression at 2.6 GB or 6.0 GB densities. If you
need to use compression at these densities, use a backup application that
provides software compression. This compresses the data before sending it
5-3
dlt.book Page 4 Monday, February 12, 2001 5:42 PM
Tape Cartridge Densities and Compression
Changing the Density and Compression for Writing
to the drive, instead of the drive compressing the data when it receives it.
Software compression is slower than using the drive’s hardware
compression facility, but it can be equally effective in terms of capacity.
5-4
dlt.book Page 5 Monday, February 12, 2001 5:42 PM
Tape Cartridge Densities and Compression
Changing the Density and Compression for Writing
How to Select Density and Compression
Note Always use the default density (and compression setting) of the tape
cartridge unless you want to write a tape cartridge at a different density
so that it can be read in a lower capacity DLT drive. This will allow you to
store the maximum amount of data on the tape cartridge.
Density and compression changes take effect only when the drive starts
writing at Beginning of Tape. This means that a tape can only ever be
written at one density—entirely with or without compression.
The time you are most likely to want to select the density at which the tape
cartridge is written is immediately after loading the tape cartridge. You
can however select the density at other times.
HP SureStore DLT 40:
• You can select different densities only with type III (not IIIxt) tape
cartridges. With other tape cartridges, the setting will change back to
the default density as soon as the drive starts writing to tape.
• With DLTtape IIIxt and IV tape cartridges you can choose only to have
compression on or off; you cannot change the density.
HP SureStore DLT 70:
• With DLTtape IV cartridges, you can select only 20.0 or 35.0 GB
densities and choose to have compression on or off. If you try to select
another density, the setting will change back to the default density (35
GB) as soon as the drive starts writing to tape.
• With DLTtape IIIxt cartridges, you can only choose to have compression
on or off. Any density setting other than 15.0 GB will automatically
default back to 15.0 GB when the drive starts writing to tape.
• With type III cartridges, you can select densities of 2.6, 6.0 and 10.0 GB.
With the 10.0 GB setting, you can choose to have compression on or off.
HP SureStore DLT 80:
• With DLTtape IV cartridges, you can select only 20.0, 35.0 or 40.0 GB
densities and choose to have compression on or off. If you try to select
another density, the setting will change back to the default density (40
GB) as soon as the drive starts writing to tape.
• With DLTtape IIIxt cartridges, you can only choose to have compression
on or off. Any density setting other than 15.0 GB will automatically
5-5
dlt.book Page 6 Monday, February 12, 2001 5:42 PM
Tape Cartridge Densities and Compression
Changing the Density and Compression for Writing
default back to 15.0 GB when the drive starts writing to tape.
• With type III cartridges, you can only select a density of 10.0 GB. You
can choose to have compression on or off.
To select density and compression:
1Load a tape cartridge in the drive.
The “Tape in Use” light flashes while the tape loads
and calibrates.
2 Wait until the yellow “Tape in Use” light stops flashing.
The density lights will show the tape’s pre-recorded or default density.
3 Repeatedly press the Density Select or Select button until the lights for the
density and compression setting you want are lit.
The sequence in which the lights are lit is as follows:
HP SureStore DLT 40
2.6 GB
6.0 GB
10.0 GB
10.0 GB and “Compress”
20.0 GB
20.0 GB and “Compress”
HP SureStore DLT 70
2.6 GB
6.0 GB
10.0/15.0 GB
10.0/15.0 GB and “Compress”
20.0 GB
20.0 GB and “Compress”
35.0 GB
35.0 GB and “Compress”
HP SureStore DLT 80
10.0/15.0 GB
10.0/15.0 GB and “Compress”
20.0 GB
20.0 GB and “Compress”
35.0 GB
35.0 GB and “Compress”
40.0 GB
40.0 GB and “Compress”
The sequence then repeats.
Note HP SureStore DLT 40 only: To select 15 GB density with a DLTtape IIIxt,
select the 10 GB light.
About two seconds after you have stopped pressing the button, the new
density setting will flash together with the “Density Override” light. The
current (old) density of the tape will be lit steadily.
The drive remembers this request to change density until one of the
following occurs:
• The drive writes from Beginning of Tape at the new density.
• You select yet another density.
• The tape cartridge is unloaded.
• The drive is switched off.
5-6
dlt.book Page 7 Monday, February 12, 2001 5:42 PM
Tape Cartridge Densities and Compression
Changing the Density and Compression for Writing
4 When the drive starts writing at Beginning of Tape, the old density light
goes out, and both the new density lights and the “Density Override” light
are lit.
Example
Suppose you have loaded a type III tape cartridge which has a prerecorded
density of 2.6 GB, and you want to write at 10.0 GB with compression.
When the loading sequence has finished, repeatedly press the Density
Select button until both the 10.0 GB and “Compress” lights are lit.
After about two seconds, the following happens:
• The 2.6 GB light remains lit. (The density has not changed yet; this light
indicates the current density of data on the tape cartridge.)
• The 10.0 GB and “Compress” lights flash, showing the density you have
selected.
• The “Density Override” light flashes, indicating that a change is
pending.
When the drive starts writing from Beginning of Tape, the following
happens:
• The 2.6 GB light goes out.
• The 10.0 GB and “Compress” lights stop flashing and are lit steadily,
indicating that this is now the current density.
• The “Density Override” light is lit, indicating that a change of density
has occurred.
• Any existing data written at 2.6 GB density is lost.
5-7
dlt.book Page 8 Monday, February 12, 2001 5:42 PM
Tape Cartridge Densities and Compression
Changing the Density and Compression for Writing
5-8
dlt.book Page 1 Monday, February 12, 2001 5:42 PM
6
Troubleshooting
This chapter covers what you should do if you have problems with your
drive or the backup process.
For further help, try the Hewlett-Packard Information Service on the
World Wide Web:
http://www.hp.com/support/dlt
and
http://www.hp.com/go/tape
dlt.book Page 2 Monday, February 12, 2001 5:42 PM
Troubleshooting
HP TapeAssure
HP TapeAssure
If your computer runs under Windows 95, Windows NT or Novell NetWare,
you can use the HP TapeAssure software provided on the HP SureStore
Tape CD-ROM as a diagnostic tool if your computer is running.
Insert the HP SureStore Tape CD-ROM, double-click on Setup.exe, and
choose the “Run TapeAssure” option from the main screen. No other
backup software should be running at the same time.
Note If the program does not work correctly or hangs during processing, there
may be a compatibility problem with the SCSI card. The current version of
HP TapeAssure may not support:
• Adaptec 1510 cards (6360 chip set)
• Symbios cards
In order to verify installation of your tape drive, use your backup software
to run a trial backup and restore.
If the Self-Test Fails
If no lights show:
1 Check that the power cord is securely seated at both ends.
2 Check that the power socket is switched on.
3 Check that the drive is switched on (press “I” on the power switch).
4 If the drive still fails to show signs of life, check the power socket with
some other device which you know works.
5 If the power socket is live, there is a problem with the drive. Call for
service.
If all the right side or left side lights flash on the front panel:
There is a fault with the drive.
1 Try turning the power switch on the drive off and then on again.
2 If the problem persists, call for service.
Note If there is a tape cartridge loaded in the drive, try to unload the cartridge
by pressing the Unload button. If this succeeds, try turning the power
switch on the drive off and then on again.
6-2
dlt.book Page 3 Monday, February 12, 2001 5:42 PM
Troubleshooting
Other Problems
Other Problems
If your system does not recognize the drive, perform the following
checks:
The host computer system only identifies which IDs are present on SCSI
buses after power-on or a reset. If you turned the drive on after the host
system, the host will not be aware that the drive is on the bus.
To make the host look for devices on the bus, you need to reset the host. You
should be able to do this using the SCSI management software on your
computer. As a last resort, you could turn the host system off and on again.
Similarly, if you make any changes to SCSI IDs, you need to reset the bus
for the host to recognize the changes.
If the drive still fails to recognize the drive, try the following
checks:
Check the drive’s SCSI connectors:
• Is the SCSI cable firmly seated?
• Is the correct SCSI terminator fitted, and is it firmly seated?
Check the SCSI bus:
• Is the SCSI cable firmly connected to the SCSI connector on the
computer?
• If there are other devices on the SCSI bus, are their IDs all different? If
necessary, change the ID of the drive or other devices. Use
HP TapeAssure on the HP SureStore Tape CD-ROM to find details of
the devices on the bus.
• If there is more than one SCSI bus attached to your system, check that
the system is looking for the drive on the correct SCSI bus.
• Is the bus terminated properly? Only the last device on the bus should
have a SCSI terminator fitted.
Check the system:
• Is the system configured to recognize the correct device at each SCSI ID?
• Is the correct driver for the tape drive installed?
• Look at the SCSI host adapter documentation and backup software
documentation for further advice.
6-3
dlt.book Page 4 Monday, February 12, 2001 5:42 PM
Troubleshooting
Other Problems
If the drive will not accept a tape cartridge:
• Was the drive powered down with the Cartridge Locking Handle up? If
so, push the handle down and up again twice. The green Operate Handle
light should then light and you can insert a cartridge.
Are you having problems backing up or restoring files?
• The problem may lie with the backup application. Look at the
application’s documentation for help.
If the Tape in Use and Write Protect lights both flash:
Lift the Cartridge Locking Handle and lower it again twice to clear the
condition. Alternatively, wait for three minutes and the condition should
clear by itself.
The pattern of lights indicates that the drive has accidentally been put into
Firmware Update mode.
If other problems occur for which you can find no cause:
• Check the termination on the SCSI bus. If the drive is the only device or
the last device on the bus, it must have a terminator fitted. If some other
device is last on the bus, it should have a terminator fitted and the
HP SureStore DLT drive should not.
• HP SureStore DLT 40e only: If the drive is connected to a 68-pin SCSI
connector on the computer, make sure that you have used the cable
provided with the drive. This cable ensures that the extra 18 lines are
properly terminated.
• Check that the ac power source is correctly grounded. Make sure that
the drive and the system are attached to the same ac power line.
• If you are having problems with backing up or restoring files but the
tape drive seems to work correctly, look at the backup software
documentation for advice.
6-4
dlt.book Page 1 Monday, February 12, 2001 5:42 PM
Appendix A
Product Specifications and Ordering
Information
This chapter gives the specifications of the drives and lists part numbers
for cartridges and SCSI cables.
dlt.book Page 2 Monday, February 12, 2001 5:42 PM
Product Specifications and Ordering Information
Product Specification
Product Specification
Physical Specification
External
(80e)
External
(40e/70e)
Internal
(with bezel)
Internal
(no bezel)
Height:
160 mm
(6.30 in)
124 mm
(4.88 in)
86.3 mm
(3.40 in)
82.5 mm
(3.25 in)
Width
175 mm
(6.89 in)
229 mm
(9.0 in)
148.3 mm
(5.84 in)
144.8 mm
(5.70 in)
Depth:
325 mm
(12.80 in)
325 mm
(12.80 in)
243.8 mm
(9.60 in)
228.6 mm
(9.00 in)
Net
Weight:
6.42 kg
(14 lb 2 oz)
6.63 kg
(14 lb 9 oz)
2.90 kg
(4 lb 3 oz)
Performance Specification
HP SureStore DLT 40
HP SureStore DLT 70
HP SureStore DLT 80
81,633 bpi per track
(DLTtape IV)
85,937 bpi per track
(DLTtape IV)
98,250 bpi per track
(DLTtape IV)
40 GB at 2:1 compression
(DLTtape IV)
70 GB at 2:1 compression
(DLTtape IV)
80 GB at 2:1 compression
(DLTtape IV)
Native:
1.5 MB/s
5.0 MB/s
6.0 MB/s
2:1 Compression:
3.0 MB/s
10.0 MB/s
10.0 MB/s
110 ips
150 ips
150 ips
160 ips
175 ips
175 ips
160 ips
175 ips
175 ips
Linear Bit Density:
Capacity:
Transfer Rates
Speeds
Read/write:
Rewind:
Linear Search:
Times (using the normal tape type for the drive)
Rewind:
Load to BOT:
Unload from
BOT:
70s average, 140s max
48s for a prerecorded tape, slightly longer for a new one
17s
Power Requirements
Supply voltage: 100–240 V ac, automatically detected
Power:
A-2
50W maximum
dlt.book Page 3 Monday, February 12, 2001 5:42 PM
Product Specifications and Ordering Information
Product Specification
Interface Specification
HP SureStore DLT 40 Narrow single-ended SCSI-2 (8-bit wide data transfers
:
with parity)
HP SureStore DLT 70 Fast, wide single-ended SCSI-2 (16-bit wide data
:
transfers with parity)
HP SureStore DLT 80 Ultra-wide SCSI-2 (16-bit wide data transfers), which can
:
be used with both LVD (low-voltage differential) and
single-ended host bus adapters.
Environmental Specification
See page 4-5 for advice on using and storing cartridges.
Operating Limits
Temperature: 10°C to 40° C (50°F to 104°F)
Humidity:
20% to 80% non-condensing
Altitude:
0 m to 9 km (0 to 30,000 ft)
Non-operating Limits
Temperature: −40°C to 66° C (−40°F to 151°F)
Humidity:
10% to 95% non-condensing
Altitude:
0 m to 15 km (0 to 50,000 ft)
Cooling (HP SureStore DLT 40i, 70i and 80i only)
Requires air flow of 0.635 m/s (125 linear feet per minute). The
measurement is taken at the front grill under the handle. Air flow should
be from front to back.
Vibration and Shock Tolerance
Operating Vibration
Vibration Type
Sine
Sweep
Frequency Range: 5–500–5 Hz
Upward and downward
Acceleration Level: 0.25g
0.010” DA
22 to 500 Hz
5 to 22 Hz (crossover)
Application:
Sweep rate: 1 octave per minute
X, Y and Z axes
A-3
dlt.book Page 4 Monday, February 12, 2001 5:42 PM
Product Specifications and Ordering Information
Product Specification
Overstress
Vibration Type
Sine
Sweep
Frequency Range: 5–500–5 Hz
Upward and downward
Acceleration Level: 0.50g
0.010” DA
26.1 to 500 Hz
5 to 26.1 Hz (crossover)
Application:
Vertical axis (top/bottom) Sweep rate: 1 octave per minute
Operating Shock
Pulse Shape:
½ sine pulse
Peak Acceleration: 10g
Duration:
10 ms
Application:
X, Y and Z axes, once in each
axis
Non-operating Shock
Pulse Shape:
½ sine pulse
Peak Acceleration: 5g
Duration:
11 ms
Application:
10g in each axis, 35s between shocks, 60 shocks in total
Reliability Specification
HP SureStore DLT 4 HP SureStore DLT 7 HP SureStore DLT 8
0
0
0
Head life (hrs tape motion):
10,000
30,000
30,000
MTBF (hrs @ 100% duty cycle):
200,000
200,000
250,000
Tape life (passes):
500,000
500,000
500,000
Safety and Electromagnetic Emissions Specification
Safety: • UL listed to UL 1950
• UL Certified for Canada: CAN/CSA - C22.2 No. 950
• TUV EN60950/IEC 950
• Class 1 LED Product (IEC 825-1)
EMI: • CE Declaration of Conformity
• C-TICK (AS/NZS 3548)
• VCCI Class 2 (external)
A-4
• CISPR 22 Class A (internal)
• FCC Class B certified (external)
dlt.book Page 5 Monday, February 12, 2001 5:42 PM
Product Specifications and Ordering Information
Ordering Information
Ordering Information
The following HP products are recommended for use with an HP SureStore
DLT drive. They can be ordered from your HP dealer or sales office.
Cartridges
HP Part No.
DLTtape IV cartridge (1800 ft) for HP SureStore DLT 40/70 drives
C5141F
DLTtape cleaning cartridge
C5142A
SCSI Accessories
HP Part No.
SCSI interface cable for HP SureStore DLT 40e drives:
1m 50-pin high-density latch connector to 50-pin lowdensity bail connector (suitable for attaching a DLT 40e to a
computer with a high-density narrow SCSI connector)
K2286
LVD/SCSI interface cables for HP SureStore DLT 70e/80e drives:
0.9m 68-pin high density screw connector to 68-pin high
density screw connector
C5687A
1.5m 68-pin high density screw connector to 68-pin high
density screw connector
C5726A
HP SureStore DLT 40i only: Internal 50-pin SCSI interface cable
HP SureStore DLT 40i only: 68-pin to 50-pin SCSI adapter
C5644-61000
C5710A
Dell Rail Kits
for Dell 2100/2200
for Dell 2300/4100/6100
for Dell 4300/6300
C5731A
C5732A
Dell 86194
A-5
dlt.book Page 6 Monday, February 12, 2001 5:42 PM
Product Specifications and Ordering Information
Ordering Information
A-6
dlt.book Page 1 Monday, February 12, 2001 5:42 PM
Appendix B
Customer Support
This appendix describes Hewlett-Packard’s service and support
arrangements, warranty details, and how to contact HP Customer
Support.
dlt.book Page 2 Monday, February 12, 2001 5:42 PM
Customer Support
Warranty
Warranty
This product carries a 3 Year Express Exchange1 Warranty. You must
register your product with HP within 30 days to ensure you benefit from
the full three-year warranty period. Non-registration will result in the
warranty resorting to 1 year.
Please register via the web (http://www.hp.com/go/tapereg) or by
using the reply card in the box.
The warranty gives you specific legal rights. You may also have other
rights that vary according to where you are located.
Hewlett-Packard warrants its HP SureStore DLT drives against defects in
materials and workmanship for a period of one or three years (depending
on whether the drive is registered), either from the date of delivery or,
where the purchase price includes installation by Hewlett-Packard, from
the date of installation. During the warranty period, Hewlett-Packard will,
at its option, either repair or replace products that prove to be defective.
Should Hewlett-Packard be unable to repair or replace the product within
a reasonable period of time, a refund of the purchase price may be given
upon return of the product.
The warranty on your HP SureStore DLT drive does not apply to defects
resulting from:
• Improper or inadequate maintenance by the customer
• Customer-supplied software or interfacing
• Unauthorized modification or misuse
• Operation outside the environmental specifications for the product
• Use of unsupported media
• Improper site preparation and maintenance
If you choose not to use Express Exchange, your HP SureStore DLT drive
must be returned to the local HP office, or to the reseller from where it was
originally purchased, who will then send it back to HP.
Limited Warranty Statement for USA, Canada, Australia and
New Zealand
HP warrants to you, the end-user customer, that HP hardware, accessories
and supplies will be free from defects in materials and workmanship after
the date of purchase, for the period specified above. If HP receives notice of
1. Express Exchange is available in most countries. In those countries that do not currently support
Express Exchange, support is provided through either the Low End Support Program or the local parts
center. Years 2 and 3 are subject to Product Registration.
B-2
dlt.book Page 3 Monday, February 12, 2001 5:42 PM
Customer Support
Warranty
such defects during the warranty period, HP will, at its option, either
repair or replace products which prove to be defective. Replacement
products may be either new or like-new.
HP warrants to you that HP software will not fail to execute its
programming instructions after the date of purchase, for the period
specified above, due to defects in material and workmanship when properly
installed and used. If HP receives notice of such defects during the
warranty period, HP will replace software media which does not execute its
programming instructions due to such defects.
HP does not warrant that the operation of HP products will be
uninterrupted or error free. If HP is unable, within a reasonable time, to
repair or replace any product to a condition as warranted, you will be
entitled to a refund of the purchase price upon prompt return of the
product.
HP products may contain remanufactured parts equivalent to new in
performance or may have been subject to incidental use.
Warranty does not apply to defects resulting from (a) improper or
inadequate maintenance or calibration, (b) software, interfacing, parts or
supplies not supplied by HP, (c) unauthorized modification or misuse, (d)
operation outside of the published environmental specifications for the
product, or (e) improper site preparation or maintenance.
HP MAKES NO OTHER EXPRESS WARRANTY OR CONDITION
WHETHER WRITTEN OR ORAL. TO THE EXTENT ALLOWED BY
LOCAL LAW, ANY IMPLIED WARRANTY OR CONDITION OF
MERCHANTABILITY, SATISFACTORY QUALITY, OR FITNESS FOR A
PARTICULAR PURPOSE IS LIMITED TO THE DURATION OF THE
EXPRESS WARRANTY SET FORTH ABOVE. Some countries, states or
provinces do not allow limitations on the duration of an implied warranty,
so the above limitation or exclusion might not apply to you. This warranty
gives you specific legal rights and you might also have other rights that
vary from country to country, state to state, or province to province.
TO THE EXTENT ALLOWED BY LOCAL LAW, THE REMEDIES IN
THIS WARRANTY STATEMENT ARE YOUR SOLE AND EXCLUSIVE
REMEDIES. EXCEPT AS INDICATED ABOVE, IN NO EVENT WILL HP
OR ITS SUPPLIERS BE LIABLE FOR LOSS OF DATA OR FOR DIRECT,
SPECIAL, INCIDENTAL, CONSEQUENTIAL (INCLUDING LOST
PROFIT OR DATA), OR OTHER DAMAGE, WHETHER BASED IN
CONTRACT, TORT, OR OTHERWISE. Some countries, states or
provinces do not allow the exclusion or limitation of incidental or
consequential damages, so the above limitation or exclusion may not apply
to you.
B-3
dlt.book Page 4 Monday, February 12, 2001 5:42 PM
Customer Support
Hewlett-Packard Year 2000 Warranty
FOR CONSUMER TRANSACTIONS IN AUSTRALIA AND NEW
ZEALAND: THE WARRANTY TERMS CONTAINED IN THIS
STATEMENT, EXCEPT TO THE EXTENT LAWFULLY PERMITTED,
DO NOT EXCLUDE, RESTRICT OR MODIFY AND ARE IN ADDITION
TO THE MANDATORY STATUTORY RIGHTS APPLICABLE TO THE
SALE OF THIS PRODUCT TO YOU.
Hewlett-Packard Year 2000 Warranty
Subject to all of the terms and limitations of the HP Limited Warranty
Statement provided with this HP Product, HP warrants that this HP
Product will be able to process date data accurately (including, but not
limited to, calculating, comparing, and sequencing) from, into, and between
the twentieth and twenty-first centuries, and the years 1999 and 2000,
including leap year calculations, when used in accordance with the Product
documentation provided by HP (including any instructions for installing
patches or upgrades), provided that all other products (e.g. hardware,
software, firmware) used in combination with such HP Product(s) properly
exchange date data with it. The duration of the Year 2000 warranty
extends through January 31, 2001.
Service and Support
Hewlett-Packard and its authorized dealers stand behind the HP product
you have purchased.
Note Before calling for service or support:
• Check that your drive is installed correctly.
• Check the troubleshooting advice in this User’s Guide and in the
documentation that came with your computer or rack system, the host
adapter and your backup software.
• Check the support pages on Hewlett-Packard’s web site:
http://www.hp.com/support/dlt
B-4
dlt.book Page 5 Monday, February 12, 2001 5:42 PM
Customer Support
Service and Support
Obtaining Technical Support
If you need help, your dealer has the latest information regarding HP
products and services and can provide support under HP’s comprehensive
menu of reseller services. If your dealer is not able to help, you can obtain
support from HP directly either through online services or by telephone.
Obtaining Service
HP provides a free lifetime telephone support service. Contact your local
HP dealer or telephone the relevant number listed on page B-6. You will be
connected to a responsive team waiting to help you.
HP Service Agreements
HP offers a number of service agreements to meet your needs. Contact your
local dealer or local HP office for further information.
Returning Your HP SureStore Tape Drive
HP SureStore tape drives come with a 24-hour three-year Express
Exchange warranty1. When returning a drive, refer to the list below for the
correct telephone number to call. When you call, make sure that you have
the following information available:
• The product name and serial number (see inside front cover)
• Date of purchase
• A description of the product fault
• A contact name for details of the failure
• A contact telephone number
• Your shipping address
The telephone service agent will verify that the unit is faulty and will make
sure that a replacement unit is sent to you within 24 hours. When you
receive the replacement unit, remove it from the packaging and use the
packaging material for returning the faulty unit. All shipment costs are
pre-paid by HP.
Note When returning the drive to HP, any damage caused as a result of
inadequate packaging is your responsibility. Use the original packing
materials whenever possible.
1. 24-hour Express Exchange is not available in all countries (see page B-2). The second and third years
of warranty are available to all customers who register their drives with HP.
B-5
dlt.book Page 6 Monday, February 12, 2001 5:42 PM
Customer Support
Contacting Customer Support
Worldwide Online Services
HP offers electronic services that give you an interactive way to access
information and help on set-up, configuration, installation and operation of
your product. The online services are available on the World Wide Web and
FTP, as well as the country-specific resources listed later in this section.
World Wide Web and FTP
Support information for DLT drives is available from HP’s World Wide
Web Site:
http://www.hp.com/support/dlt
Software drivers, product and support information are available from HP’s
World Wide Web and FTP sites:
World Wide Web: http://www.hp.com/go/tape
FTP: ftp.hp.com/pub/information_storage/surestore
CompuServe
Download software, firmware and support documents; discuss issues in
user forums.
Address: Go HPSYS
Internet E-mail
To leave messages for HP SureStore technical support:
[email protected]
Messages are usually answered within 48 hours.
Contacting Customer Support
North and South America
Mailing Address:
HP SureStore Technical Support
815 14th Street SW, Bldg. E
Loveland, CO 80537 USA
B-6
dlt.book Page 7 Monday, February 12, 2001 5:42 PM
Customer Support
Contacting Customer Support
America Online:
Download software, firmware and support documents; discuss issues in
user forums
Keyword: hpstor
QuickFAX Faxback Service:
Automated system to request product information or technical support
documents to be faxed to you.
Telephone: +1 (800) 368-9673 or +1 (970) 635-1510
Fax Machine:
Faxes are answered in 48 hours or less.
Fax Number: +1 (970) 667-0997
Telephone Support:
Hours of Operation: Monday – Friday, 7am – 5pm (Mountain time)
Telephone: +1 (970) 635-1000
Europe
Mailing Address:
Hewlett-Packard Nederland B.V.
European Customer Support Center
P.O. Box 58144
1040 HC Amsterdam
The Netherlands
America Online/Bertelsmann:
Available in France, Germany, and the UK.
Address: HP
Bulletin Board:
Download software, firmware and support documents; leave messages for
technical support.
Telephone: +31 (495) 546 909
Settings: 8,1,N, 2, 400 to 28,800 baud
HP First Faxback Service:
Automated system to request product information or technical support
documents to be faxed to you free of charge. Available 24 hours a day.
Austria (German) 0660 8128
Belgium (Dutch) 0800 11906
Belgium (French) 0800 17043
Denmark (Danish) 800 10453
B-7
dlt.book Page 8 Monday, February 12, 2001 5:42 PM
Customer Support
Contacting Customer Support
Finland (Finnish) 9800 13134
France (French) 05 90 59 00
Germany (German) 0130 81 00 61
Italy (Italian) 1678 59020
Netherlands (Dutch) 0800 22 2420
Norway (Norwegian) 800 11319
Portugal (Portuguese) 0800 313 342
Spain (Spanish) 900 993 123
Sweden (Swedish) 020 795 743
Switzerland (French) 0800 55 1526
Switzerland (German) 0800 55 1527
United Kingdom (English) 0800 960271
Other European countries (English) +31 (20) 681 5792
Telephone Support:
Hours of Operation: Mon – Fri, 8:30 – 17:00 (Central European time)
No charge for technical support during the warranty period; a per-incident
charge applies after the warranty period.
Austria (German) 0660 6386
Belgium (Dutch) 02 626 88 06
Belgium (French) 02 626 88 07
Denmark (English) 3929 4099
Finland (English) 0203 47288
France (French) 04 50 43 98 53
Germany (German) 0180 5 25 81 43
Ireland (English) 01 662 5525
Italy (Italian) 02 2 641 0350
Netherlands (Dutch) 020 606 8751
Norway (English) 22 11 6299
Portugal (English) 01 441 7199
Spain (Spanish) 902 321 123
Sweden (English) 08 619 2170
Switzerland (French, German, Italian) 0848 80 11 11
United Kingdom (English) 0171 512 5202
Other European countries (English) +44 (171) 512 5202
B-8
dlt.book Page 9 Monday, February 12, 2001 5:42 PM
Customer Support
Contacting Customer Support
Australia
Bulletin Board:
Download software, firmware and support documents, and leave messages
for technical support.
Telephone: (03) 9890 0276
HP First Faxback Service:
Automated system to request product information or technical support
documents to be faxed to you free of charge. Available 24 hours a day.
Telephone: (03) 9272 2627
Fax Machine:
Faxes are answered within 24 hours.
Fax Number: (03) 9272 4099
Telephone Support:
Hours of Operation: Monday-Friday, 7am-7pm Eastern Standard Time
Telephone: (03) 9272 8000
China (PRC)
Mailing Address:
Hewlett Packard Customer Support Center
China World Trade Center
No.1 Jian Guo Men Wai Avenue
P.O.Box: 9401
Beijing 100004
CHINA
HP First Faxback Service:
Automated system to request product information or technical support
documents to be faxed to you free of charge. Available 24 hours a day.
Telephone: +86 (10) 65055280
Fax Machine:
Please include contact information, the name of your HP product, and the
type of computer you have.
Fax Number: +86 (10) 6592 4566
Telephone Support:
Hours of Operation: Monday-Friday, 8:30-17:30
Telephone Number: +86 (10) 6505 3888
B-9
dlt.book Page 10 Monday, February 12, 2001 5:42 PM
Customer Support
Contacting Customer Support
Hong Kong
Fax Machine:
Please include contact information, the name of your HP product, and the
type of computer you have.
Fax Number: +65 274 2033 (Singapore)
Telephone Support:
Telephone: 800 96 7729
India
Mailing Address:
Hewlett Packard India Ltd.
HP Customer Support Centre
Chandiwala Estate
Maa Anandmai Marg
Kalkaji
Dehli -110 019 India
E-mail: [email protected]
Fax Machine: +91 (11) 682 6041
Please include contact information, the name of your HP product, and the
type of computer you have.
Telephone Support: +91 (11) 682 6035
Indonesia
Fax Machine:
Please include contact information, the name of your HP product, and the
type of computer you have.
Fax Number: +65 274 2033 (Singapore)
Telephone Support:
Telephone: +62 (21) 350-3408
Japan
World Wide Web:
Information from HP Japan
http://www.jpn.hp.com
B-10
dlt.book Page 11 Monday, February 12, 2001 5:42 PM
Customer Support
Contacting Customer Support
HP First Faxback Service:
Automated system to request product information or technical support
documents to be faxed to you free of charge. Available 24 hours a day.
Telephone: +81 (3) 3335-8622
Fax Machine:
Please include contact information, the name of your HP product, and the
type of computer you have.
Fax Number: +81 (3) 3335-8338
Telephone Support:
Hours of Operation: Monday – Friday, 9:00 – 12:00, 1:00 – 5:00
Telephone: +81 (3) 3335-8333
Korea
Mailing Address:
Hewlett Packard Customer Support Center
1F, Yongsan Electronic Office
16-58, Hangangro 3-ga, Yongsan-gu,
Seoul, Korea
FTP Site:
Download software and firmware files, as well as technical newsletters for
dealers directly from the Internet.
IP Address (NT Server): 15.32.11.50
Remote access telephone number: (02) 3270-0808
Bulletin Board:
Download software, firmware and support documents; leave messages for
technical support.
Telephone: Hitel: (02) 762-0228
Chollian:(02) 220-2001
Address: Go HPK
World Wide Web:
Information from HP Korea
URL: www.hp.co.kr
HP First Faxback Service:
Automated system to request product information or technical support
documents to be faxed to you free of charge. Available 24 hours a day.
Telephone: (02) 769-0543
B-11
dlt.book Page 12 Monday, February 12, 2001 5:42 PM
Customer Support
Contacting Customer Support
Fax Machine:
Faxes are answered in 48 hours or less.
Fax Number: (02) 3270-0707
Telephone Support:
Hours of Operation: Monday-Friday, 8:30-19:00
Telephone: (02) 3270-0700
080-999-0700 (Toll Free)
Malaysia
Fax Machine:
Please include contact information, the name of your HP product, and the
type of computer you have.
Fax Number: +65 274 2033 (Singapore)
Telephone Support:
Telephone: +60 (03) 295-2566
New Zealand
Bulletin Board:
Download software, firmware and support documents
Telephone: (09) 356 3660
HP First Faxback Service:
Automated system to request product information or technical support
documents to be faxed to you free of charge. Available 24 hours a day.
Telephone: (09) 356 6642
Fax Machine:
Faxes are answered in 24 hours or less.
Fax Number: +61 (3) 9272 4099 (Australia)
Telephone Support:
Hours of Operation: Monday-Friday, 9am-9pm (Auckland time)
Telephone: (09) 356 6640
Philippines
Fax Machine:
Please include contact information, the name of your HP product, and the
type of computer you have.
Fax Number: +65 274 2033 (Singapore)
B-12
dlt.book Page 13 Monday, February 12, 2001 5:42 PM
Customer Support
Contacting Customer Support
Telephone Support:
Telephone: +65 (02) 867-3551
Singapore
Mailing Address:
Hewlett-Packard Far East (Pte) Ltd.
438 Alexandra Road
#07-01/04 Alexandra Point
Singapore 119958
HP First Faxback Service:
Automated system to request product information or technical support
documents to be faxed to you free of charge. Available 24 hours a day.
Telephone: +65 291-7951
Fax Machine:
Faxes are answered in 48 hours or less.
Fax Number: +65 274-2033
Telephone Support:
Hours of Operation: Monday – Friday, 9:00 – 17:00
Telephone: +65 272-5300
Taiwan (ROC)
Mailing Address:
Hewlett Packard Customer Support Center
8F, 337, Fu-Hsing North Road,
Taipei 104, Taiwan, R.O.C.
Bulletin Board:
Download software, firmware and support documents; leave messages for
technical support.
Telephone: (02) 923-3233
Login:
First name: HP
Last name: BBS
HP First Faxback Service:
Automated system to request product information or technical support
documents to be faxed to you free of charge. Available 24 hours a day.
Telephone: (02) 719-5589
Fax Machine:
Faxes are answered in 48 hours or less.
B-13
dlt.book Page 14 Monday, February 12, 2001 5:42 PM
Customer Support
Contacting Customer Support
Fax Number: (02) 514-0276
Telephone Support:
Hours of Operation: Monday – Friday, 8:30 – 17:30
Telephone: (02) 717-9609
Thailand
Fax Machine:
Please include contact information, the name of your HP product, and the
type of computer you have.
Fax Number: +65 274-2033 (Singapore)
Telephone Support:
Telephone: +66 (02) 661-4011
Vietnam
Fax Machine:
Please include contact information, the name of your HP product, and the
type of computer you have.
Fax Number: +65 274-2033 (Singapore)
Telephone Support:
Telephone: +84 (08) 823-4530
B-14
dlt.book Page 1 Monday, February 12, 2001 5:42 PM
Index
A
adapter, SCSI A-5
altitude limits A-3
B
backup software 1-13, 2-4, 2-11
beeper 3-5, 3-7
BOT 5-2
buttons
Density Select 5-5
Select 3-2, 3-4, 3-6, 5-5
Unload 3-3, 3-5, 3-7
C
cables
external power 2-9
external SCSI 2-3, 2-8
internal power 1-10
internal SCSI 1-10
ordering A-5
care and maintenance Ch.5
cartridge see tape cartridges
cartridge locking handle 3-9, 3-10,
4-6
cartridges
inspecting 4-6
looking after 4-5
cleaning cartridge 4-2
cleaning tape heads 4-2
coffee 2-4
CompacTape 4-4
Compress light 3-2, 3-4, 3-6
compression
controlling 5-2
through software 5-3
condensation 4-9
conditioning cartridges 4-9
contacting HP B-5
customer support B-3
telephone numbers B-5
D
data compression
controlling 5-2
through software 5-3
density
changing 5-2
lights 3-2, 3-4, 3-6
Density Override light 3-2, 3-4,
3-6, 5-5
Density Select button 5-5
depth A-2
door, tape cartridges 4-6
driver 1-13, 2-11
dust, avoiding 2-4
E
electromagnetic emissions,
specification A-4
E-mail address B-5
EMC certifications See back of
book
environmental specification A-3
Express Exchange warranty B-2,
B-4
F
flashing lights 6-2
front panel
HP SureStore DLT40 3-6
HP SureStore DLT70 3-4
HP SureStore DLT80 3-2
FTP site B-5
H
handling tape cartridges 4-7
height A-2
Hewlett-Packard Information
Service 6-1
host computer
not recognizing drive 6-3
humidity 4-9
conditioning cartridges 4-9
non-operating limits A-3
operating limits A-3
storing cartridges 4-9
HVD 2-9
I
ID
external drive 2-5
internal drive 1-5
impact, cartridges 4-9
inserting a cartridge 3-10
inspecting cartridges 4-6
installation
external drives Ch.1
internal drives Ch.2
verifying 1-12, 2-10
installation overview
external drives see inside
back cover
internal drives see inside
front cover
interface specification A-3
internal drives
installation Ch.2
power cables 1-10
SCSI connection 1-10
SCSI ID jumpers 1-6
termination jumpers 1-7
internet address 6-1, B-5
J
jumpers
for SCSI ID 1-6
termination 1-7
L
labels, on cartridges 4-8
laser printers, avoiding 2-4
leader, tape cartridges 4-6
detached 4-6
detecting a lost leader 4-7
LEDs see lights
lights
all flashing 3-12, 6-2
compress 3-2, 3-4, 3-6
Density Override 5-5
HP SureStore DLT40 3-6
HP SureStore DLT70 3-4
HP SureStore DLT80 3-2
none lit 3-12, 6-2
Operate Handle 3-5, 3-7, 3-10
Tape in Use 3-3, 3-5, 3-7, 3-10
Use Cleaning Tape 4-2, 4-3
Write-Protected 4-5
load time A-2
Index-1
dlt.book Page 2 Monday, February 12, 2001 5:42 PM
loading a cartridge 3-10
low-voltage differential 2-8
LVD 2-8
LVD host bus adapters 2-3, A-3
reliability specification A-4
returning a drive B-4
rewind time A-2
switching off a drive 3-9
switching on a drive 3-8
S
M
safety certifications See back of
book
safety specification A-4
SCSI
adapter A-5
cables
external drives 2-3, 2-8
internal drives 1-10
checking IDs 2-6
connectors
external drives 2-5
internal drives 1-10
ID
external drive 2-5
internal drive 1-5
ordering accessories A-5
specification A-3
termination
external drives 2-8
internal drives 1-7
SE 2-8
Select button 3-2, 3-4, 3-6, 5-5
self-test 3-8, 3-12
failure 6-2
service agreements B-4
shock, drive tolerance A-3
single-ended SCSI 2-8
siting drives 2-4
software 1-13, 2-4, 2-11
software data compression 5-3
specifications
electromagnetic emissions
tape cartridges
compression, controlling 5-2
conditioning 4-9
density, changing 5-2
door 4-6
handling 4-7
impact and vibration 4-9
inspecting 4-6
labeling 4-8
leader 4-6
loading 3-10
looking after 4-5
lost leader 4-7
ordering A-5
storing 4-9
transporting 4-9
types 4-4
unloading 3-11
write-protecting 4-4
tape heads, cleaning 4-2
Tape in Use light 3-3, 3-5, 3-7, 3-10
flashing 6-4
TapeAssure 1-12, 2-10, 6-2
checking configuration 1-5,
1-12, 2-6
installing 1-5, 2-6
purpose 1-12
verifying installation 1-12
technical support B-3
telephone numbers B-5
temperature
conditioning cartridges 4-8
non-operating limits A-3
operating limits A-3
storing cartridges 4-9
varying 4-9
termination in internal drives 1-7
termination power
in internal drives 1-7
terminators, SCSI 2-8
ordering A-5
testing installation 1-12
times A-2
toner, keeping away from 2-4
transporting cartridges 4-9
maintenance Ch.5
moving cartridges 4-9
N
noise in the drive 4-7
noise level A-3
non-operating limits A-3
O
online services B-4
on-off switch 3-8
Operate Handle light 3-3, 3-5, 3-7,
3-10
operating limits A-3
operating the drive Ch.4
operating too soon 4-6
ordering information A-5
P
packaging B-4
parity checking, disabling 1-6
performance specification A-2
phone numbers B-5
physical specification A-2
positioning drives 2-4
power
external connection 2-9
internal connection 1-10
requirements A-2
switch 2-5
termination 1-7
powering off a drive 3-9
powering on a drive 3-8
power-on self-test 3-12
problems Ch.7
R
radio interference statements
See back of book
rails, attaching to 1-8
rear panel 2-5, 3-8
reel hubs 4-7
registering the drive 1-4, 2-11
regulatory information See back
of book
Index-2
A-4
environmental A-3
interface A-3
performance A-2
physical A-2
reliability A-4
safety A-4
stabilizing see conditioning
static, damage from 1-8
storing cartridges 4-9
support B-3
telephone numbers B-5
T
dlt.book Page 3 Monday, February 12, 2001 5:42 PM
trays, mounting in 1-8
troubleshooting B-3
troubleshooting Ch.7
U
Ultra2 device performance 2-9
unload button 3-3, 3-5, 3-7
unload time A-2
unloading a cartridge 3-11
URL B-5
Use Cleaning Tape light 3-3, 3-5,
3-7, 4-2, 4-3
using a cleaning cartridge 4-2
V
varying 4-9
verifying installation 1-12, 2-10
vibration
cartridges 4-9
drive tolerance A-3
W
warranty 1-4, 2-11, B-2
year 2000 B-3
weight A-2
width A-2
world wide web B-5
Write-Protected light 3-2, 3-4, 3-6,
4-5
flashing 6-4
write-protecting a cartridge 4-4
WWW address 6-1
Y
year 2000 warranty B-3
Index-3
dlt.book Page 4 Monday, February 12, 2001 5:42 PM
Index-4
dlt.book Page 5 Monday, February 12, 2001 5:42 PM
Regulatory Information
Europe
TUV (internal tape drives only)
Declaration of Conformity (according to
ISO/IEC Guide 22 and EN 45014)
Manufacturer:
Hewlett-Packard Company
Address:
Hewlett-Packard Company
Computer Peripherals Bristol
Filton Road
Stoke Gifford
Bristol BS34 8QZ
United Kingdom
declares that the following products
Product Names: HP SureStore DLT 40e/i
HP SureStore DLT 70e/i
HP SureStore DLT 80e/i
conform to the following product specifications
Safety: IEC 950:1991+A1,A2
EN 60950 (1992)+A1,A2
EMC: HP SureStore DLT 40i, DLT 70i:
CISPR 22:1993/EN 55022 (1994): Class A
HP SureStore DLT 40e, DLT 70e:
CISPR 22:1993/EN 55022 (1994): Class B
All drives:
EN50082-1:1992
IEC 801-2:1991/prEN 55024-2 (1992):
4kV CD, 8kV AD
IEC 801-3:1984/prEN 55024-3 (1991):
3V/m
IEC 801-4:1988/prEN 55024-4 (1992):
0.5 kV signal lines, 1.0kV power lines
LED Emission Level
This equipment must be supplied by a SafetyExtra-Low-Voltage (secondary circuit in
accordance with DIN VDE 0805. During
incorporation of the equipment, all requirements of
DIN VDE 0805 must be observed and obeyed.
Herstellerbescheinigung
Diese Information steht im Zusammenhang mit
den Anforderungen der Maschinenlärmverordnung
vom 18. Januar 1991.
Schalldruckpegel Lp <70 dB(A)
• am Arbeitsplatz
• normaler Betrieb
• nach ISO 7779: EN 27779 (Typprüfung)
[This statement is provided to comply with the
requirements of the German Sound Emission
Directive, from 18 January 1991.
Sound pressure Lp <70 dB(A)
• at operator position
• normal operation
• according to ISO 7779: EN 27779 (type test)]
General Approval
NS/G/1234/J/100003
This Hewlett-Packard tape drive meets the General
Approval NS/G/1234/J/100003 requirements.
Korea
HP SureStore DLT 40i, DLT 70i, DLT 80i:
HP SureStore DLT 40e, DLT 70e, DLT 80e:
This equipment has been tested and found to
comply with the limits for a Class 1 LED product,
set out in the international standard for safety of
laser products.
dlt.book Page 6 Monday, February 12, 2001 5:42 PM
Japan
HP SureStore DLT 40i, DLT 70i, DLT 80i:
HP SureStore DLT 40e, DLT 70e, DLT 80e:
U.S.A.
Radio Frequency Interference
Statement (Federal Communications
Commission)
HP SureStore DLT 40i, DLT 70i, DLT 80i:
This equipment has been tested and found to
comply with the limits for a Class A digital device,
pursuant to Part 15 of the FCC Rules.
These limits are designed to provide reasonable
protection against harmful interference when the
equipment is operated in a commercial environment.
This equipment generates, uses, and can radiate
radio frequency energy and, if not installed and
used in accordance with the instruction manual,
may cause harmful interference to radio
communications. Operation of this equipment in a
residential area is likely to cause harmful interference
in which case the user will be required to correct the
interference at his own expense.
HP SureStore DLT 40e, DLT 70e, DLT
80e:
This equipment has been tested and found to
comply with the limits for a Class B digital device,
pursuant to Part 15 of the FCC Rules.
These limits are designed to provide reasonable
protection against harmful interference in a
residential installation. This equipment generates,
uses, and can radiate radio frequency energy and, if
not installed and used in accordance with the
instruction manual, may cause harmful interference
to radio communications. However, there is no
guarantee that interference will not occur in a
particular installation. If this equipment does
cause harmful interference to radio or television
reception, which can be determined by turning the
equipment off and on, you are encouraged to try to
correct the interference by one or more of the
following measures:
• Reorient or relocate the receiving antenna.
• Increase the separation between the equipment
and the receiver.
• Connect the equipment into an outlet on a
circuit different from that to which the receiver
is connected.
• Consult your dealer or an experienced radio/TV
technician for help.
All drives:
Note that if you change or modify the equipment in
a way that is not expressly approved by HewlettPackard, any assurances of safety or performance
can no longer be held to apply, and could result in
violation of Part 15 of the FCC Rules.
Interference
This device complies with Part 15 of the FCC Rules.
Operation is subject to the following two conditions:
(1) this device may not cause harmful interference,
(2) this device must accept any interference
received including interference that may cause
undesired operations.
dlt.book Page 7 Monday, February 12, 2001 5:42 PM
WARNING: Only the double-shielded data cable
supplied by the manufacturer should be used with
external tape drives. Other types of cables could
void the manufacturer's warranty and violate FCC
rules and regulations.
Notice (internal tape drives only)
For use only in UL® listed personal computers.
Canada
Canadian Standards Association
Information Statement
HP SureStore DLT 40i, DLT 70i, DLT 80i:
This digital apparatus does not exceed the Class A
limits for radio noise emissions from digital
apparatus as set out in the radio interference
regulations of the Canadian Department of
Communications.
Le présent appareil numérique n'émet pas de bruits
radioélectriques dépassant les limites applicables
aux appareils numériques de Classe A prescrites
dans le règlement sur le brouillage radioélectrique
édicté par le Ministère des Communications du
Canada.
HP SureStore DLT 40e, DLT 70e, DLT 80e:
This digital apparatus does not exceed the Class B
limits for radio noise emissions from digital
apparatus as set out in the radio interference
regulations of the Canadian Department of
Communications.
Le présent appareil numérique n'émet pas de bruits
radioélectriques dépassant les limites applicables
aux appareils numériques de Classe B prescrites
dans le règlement sur le brouillage radioélectrique
édicté par le Ministère des Communications du
Canada.
Canadian Standards Association
Information Statement
(internal tape drives only)
INSTRUCTION TO USER:
WARNING: This component is only considered to
be approved when installed in CSA certified
equipment evaluated to the standards C22.2 No.
220-M1986 or C22.2 No. 950-M89. The operator
accessibility into the end use enclosure is defined
with strict accordance in the operator’s manual for
the installation of components into the equipment.
INSTRUCTIONS AUX UTILISATEURS:
AVERTISSEMENT : Ce composant n’est considéré
agréé que s’il est installé dans un équipement
certifié CSA selon les normes C22.2 No. 220-M1986
ou C22.2 No. 950-M89. L’accessibilité de l’opérateur
à l’enceinte est définie en stricte conformité avec le
manuel de l’opérateur pour l’installation de
composants dans l’équipement.
dlt.book Page 9 Monday, February 12, 2001 5:42 PM
HP SureStore DLT
Installation Guide (External Drives)
Installation Overview—External Drives
Overview
For further
details, see:
Before you start:
page 2-2
Check the packing list inside this guide. Check system prerequisites.
Step 1: Check the drive’s SCSI ID
page 2-5
Check the tape drive’s SCSI ID on the SCSI ID switch on the rear panel
of the drive. If necessary, change it from the default of 5 by pressing
the indented + or − buttons above and below the SCSI ID number. Use
a ball-point pen or similar pointed object. To prevent particle
contamination, do not use a pencil.
Step 2: Attach local language labels, if necessary
page 2-8
Step 3: Attach the SCSI terminator
page 2-8
Connect the SCSI terminator to either of the SCSI connectors on the
rear of the drive and secure it firmly in place.
Step 4: Connect the SCSI cable
page 2-8
Attach one end of the SCSI cable to the free SCSI connector on the rear
of the drive and secure the connector firmly in place. Connect the other
end of the cable to the computer’s external SCSI connector.
HP SureStore DLT 40e only: If you are installing the drive on a system
that has a 68-pin wide SCSI connector, use the 68-pin to 50-pin cable
provided with the drive.
Step 5: Connect the power cable
page 2-9
Connect the power cable to the connector on the rear of the drive. Plug
the other end of the cable into the power outlet.
For UNIX systems only: Go to the HP SureStore DLT UNIX Configuration Guide
This will explain how to configure your UNIX system to support the drive
and to verify the installation.
On Completion
page 2-10
Power on the system and check that the tape drive is operational.
Insert the HP SureStore Tape CD-ROM. It contains drivers, backup
software, electronic customer registration and various utilities.
Register the tape drive
page 1-4