1
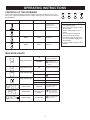
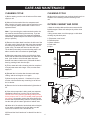
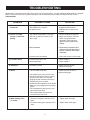
BUILT IN ICE MAKER
MACHINE À GLAÇONS
EQUIPO PARA FABRICAR HIELO
OWNER’S USE AND CARE GUIDE
GUIDE D’UTILISATION ET SOIN DE PROPRIÈTAIRE
GUÍA DEL PROPRIETARIO PARA UTILIZAR Y CUIDAR
MODEL • MODÈLE • MODELO
DIM3225BLSST
• SEE SEPARATE INSTALLATION INSTRUCTIONS
• VOIR LES CONSIGNES D’INSTALLATION SÉPARÉES
• VEA LAS INSTRUCCIONES DE INSTALACIÓN APARTE
V7.06.13.DM
TO OBTAIN WARRANTY SERVICE YOU MUST PROVIDE A VALID PROOF OF
PURCHASE. PLEASE STAPLE YOUR RECEIPT TO THIS PAGE FOR FUTURE
REFERENCE.
------------------------------------------------------------------------------------------------------------------POUR OBTENIR LE SERVICE SUR GARANTIE VOUS DEVEZ FOURNIR UNE
PREUVE D’ACHAT VALIDE. S’IL VOUS PLAIT AGRAFE VOTRE REÇU A CETTE
PAGE POUR LA REFERENCE FUTURE.
------------------------------------------------------------------------------------------------------------------PARA OBTENER SERVICIO DE GARANTÍA, DEBE PROVEER UN RECIBO
ORIGINAL. POR FAVOR ENGRAPE SU RECIBO A ÉSTA PÁGINA EN CASO QUE
NECESITE HACER UN RECLAMO.
IMPORTANT
This machine is intended to produce ice only. It is
not intended for the long-term storage of ice. Move
any excess ice into a freezer for long-term storage
(>6 hours) if you desire to keep it. Ice that is left to
sit in the bucket will melt over time.
IMPORTANT
Cette machine a été conçue pour produire de la
glace seulement. Elle ne doit pas être utilisée pour
stocker de la glace à long terme. Déplacez la glace
en surplus dans un congélateur pour un stockage à
long terme (>6 heures) si vous désirez la garder. La
glace qui reste dans le seau fondra.
IMPORTANTE
Esta máquina está diseñada para producir
solamente hielo. No está diseñada para almacenar
hielo a largo plazo. Traslade el hielo sobrante a un
congelador para almacenarlo a largo plazo (más de
6 horas) si desea conservarlo. El hielo que quede
en la cubeta se derretirá con el tiempo.
TABLE OF CONTENTS
English
Important Safeguards............................................ 1
Grounding Instructions.......................................... 1
Operating Instructions........................................... 2-3
Care and Maintenance.......................................... 4-5
Troubleshooting..................................................... 6-7
Warranty ................................................................ 8
CAUTION
Read and follow all safety rules and
operating instructions before first use of this
product.
Français
Consignes de sécurité importantes.........................9
Mise à la terre ........................................................ 9
Instructions d’utilisation...........................................10-11
Soins et entretien ................................................... 12-13
Dépannage ............................................................ 14-15
Garantie ................................................................. 16
PRÉCAUTION
Veuillez lire attentivement les consignes
de sécurité et les instructions d’utilisation
avant l’utilisation initiale de ce produit.
PRECAUCIÓN
Español
Instrucciones de Seguridad Importantes............... 17
Instrucciones de la Puesta a Tierra....................... 17
Instrucciones de Funcionamiento.......................... 18-19
Limpieza y Mantenimiento..................................... 20-21
Solucion Sugeridad................................................ 22-23
Garantía ................................................................ 24
Lea y observe todas las reglas de seguridad
y las instrucciones de operación antes de
usar este producto por primera vez.
Volts / Hertz / Amps / Watts
115V
60Hz
2.6A
240W
Volts / Hertz / Ampères / Watts
115V
60Hz
2.6A
240W
Volts / Hertz / Amperios / Vatios
115V
60Hz
2.6A
240W
• Makes up to 32LBS daily / Ice box capacity is 25LBS
• Produit jusqu’à 32 lb par jour/capacité de la glacière de 25 lb
• Produce hasta 32 lb al día / La capacidad de la caja de hielo es de 25 lb
Model • Modèle • Modelo
DIM3225BLSST
IMPORTANT SAFEGUARDS
READ ALL SAFETY INFORMATION BEFORE USING
GROUNDING INSTRUCTIONS
WARNING: RISK OF CHILD
ENTRAPMENT!
WARNING
An empty ice maker is a very dangerous attraction
to children. Remove either the gasket, latches, lock
and/or doors from unused or discarded appliances,
or take some other action to guarantee it harmless.
DON’T WAIT, DO IT NOW!
Improper use of the grounding plug can result in a
risk of electric shock.
• This appliance must be grounded. In the event of an
electrical short circuit, grounding reduces the risk of
electric shock by providing an escape wire for the
electric current.
• This appliance is equipped with a power cord that has
a grounding wire and grounding plug. The plug must
be plugged into an outlet that is properly installed and
grounded.
• Consult a qualified electrician or service technician if
the grounding instructions are not completely understood, or if doubt exists as to whether the appliance is
properly grounded.
• If the outlet is a standard 2-prong wall outlet, it is your
personal responsibility and obligation to have it
replaced with a properly grounded 3-prong wall outlet.
• Plug the unit into an exclusive, properly installed
grounded wall outlet.
WARNING
To avoid installation/operation difficulties, refer to
separate installation guide.
IMPORTANT
When installing the unit DO NOT kink the drain
hose!
• This appliance must be grounded. Connect only to a
properly grounded outlet. See “Grounding Instructions”
section.
• Do not operate this appliance if it has a damaged
power cord or plug, if it is not working properly, or if the
appliance has been damaged or dropped.
• Never allow children to operate, play with, or crawl
inside the appliance.
• Never clean appliance parts with flammable fluids. The
fumes can create a fire hazard or explosion.
• Do not store or use gasoline or any other flammable
vapors or liquids in the vicinity of this or any other
appliance. The fumes can create a fire hazard or
explosion.
• Do not splice the power cord that is equipped with this
appliance.
• Keep power cord away from heated surfaces.
• Do not immerse power cord plug or the appliance itself
in water.
• Do not use this product near water, for example in a
wet basement, near a swimming pool or near a sink.
• Do not use corrosive chemicals or vapors in this
appliance.
• Use this appliance only for its intended use, as described in this manual.
• See door surface cleaning instructions in the Care and
Cleaning section(s) of this manual.
• Do not cover or block any openings on the appliance.
• This appliance is intended for household use only. Do
not attempt to operate or store this appliance outdoors.
• This appliance should be serviced only by qualified
service personnel. Contact the nearest authorized
service facility for examination, repair or adjustment.
• Do not under any circumstances cut or remove the
third (ground) prong from the power cord.
• Do not use an adapter plug with this appliance.
• Do not use an extension cord with this appliance. If the
power cord is too short, have a qualified electrician or
service technician install an outlet near the appliance.
WARNING
It is environmentally damaging to release many
types of refrigerant into the atmosphere. Intentionally venting HCFC, CFC, or HFC refrigerant is illegal
and punishable by law. Do not tamper with any of
the refrigerant-containing components of this appliance. Ensure that you are following municipal
bylaws when disposing of this or any other refrigeration appliance.
SAVE THESE INSTRUCTIONS!
1
OPERATING INSTRUCTIONS
CONTROLS OF THE ICE MAKER
The ice maker should be placed where the ambient temperature is between 10-32°C (5090° F.) If the ambient temperature is above or below this range, the performance of the unit
may be affected.
Control
Type
Action
Function Explanation
Button
Press
To turn the ice maker
on/off (press and
hold this button for
approximately 3 seconds)
Button
Press
Small ice
Button
Press
Medium ice
Button
Press
Large ice
INDICATOR LIGHTS
ON
Single Indicator light
Single Indicator light
Single Indicator light
Small ice is selected.
1
FLASHING
ON
Medium ice is selected.
ON
Large ice is selected.
FLASHING
Single Indicator light
Water tank is full
and beeping. (see
troubleshooting section
page 7)
2
Ice bucket is full of ice
ON
Compressor on
OFF
Compressor off
FLASHING
Stand-by mode
Simultaneous
Indicator lights
All on at the
same time
Ice maker low on
water (see troubleshooting section page 7)
Simultaneous
Indicator lights
2 sizes flashing at the
same time for 15
seconds
3
Sensor breakdown
(see troubleshooting section page 7)
Simultaneous
Indicator lights
All icons flashing at
the same time
4
System malfunction
(see troubleshooting
section page 7)
2
Check the water supply
1. Turn off water supply.
2. Disconnect water supply line from
the ice maker.
3. Position water supply line in a
bucket.
4. Turn on water and make sure
water pours into the bucket.
5. Turn water supply off again, then
reconnect the water supply line to
the ice maker.
* If unsure, please contact your local
plumber.
OPERATING INSTRUCTIONS
CHANGING THE SIZE OF ICE
IMPORTANT
NOTE: Ice cube sizes differ by density and not volume. A
large cube is the same size as a small cube but contains
more frozen water.
This machine is intended to produce ice only. It is
not intended for the long-term storage of ice. Move
any excess ice into a freezer for long-term storage
(>6 hours) if you desire to keep it.
1. Ensure the water supply is connected before changing
ice size. The ice maker is automatically set to make
medium ice. If you need to change the ice size, you
can press the corresponding buttons (see previous
page) and the chosen ice size will be indicated by the
corresponding indicator light.
2. If you want to stop making ice but keep the unit on
standby, press the power button for about 3 seconds. All
ice indicator lights will turn off and the power indicator
light will continue flashing. You are now in standby
mode. Do not leave the unit in standby mode in excess
of 6 hours. If you want to start making ice again, press
the power button one more time.
ICE SCOOP
CONTINUOUS WATER CIRCULATION
This appliance comes equipped with a stainless steel ice
scoop that also facilitates the removal of ice from the ice
bucket. Use this scoop to break up any sheets of ice
that fall into the bucket.
This unit operates using a continuous closed cycle of
water, with little or no waste. When the unit is on and the
water container is low, new water is allowed in from the
water source. The water container fills up until the float
on the water tank is triggered. The recirculation pump
cycles water over the evaporator tray continuously until
ice is produced. This process is continuous as long as
the unit is left on.
POWER FAILURE
Most power failures are corrected within a few hours and
should not affect the temperature of your appliance if you
minimize the number of times the door is opened. If the
power is going to be off for a longer period of time, and
you are using the drain pump option (see separate
installation instructions), you will need to manually
drain the water from your unit before next use to
avoid an overflow situation. Refer to ‘Continuous
Drain Installation’ for draining instructions on separate
installation manual. Note: Drain the water from the
exterior drain bucket. (take out the botom back panel to
get to the bucket. See image below)
Any water that enters the drain at the bottom of the ice
maker cavity is not recycled. It goes into a separate
receptacle with a separate drain system that drains out
of the back of the unit. This ensures that you’re always
using clean water.
Note: If the unit is turned off for 24 hours or longer, drain
the water from the recirculation system. (see below)
Note: If you are using the continuous drain option (see
separate installation instructions) the unit may be turned
off during the draining process. If you are using the drain
pump option (see separate installation instructions), you
must keep the unit turned on.
Exterior drain bucket
Bottom back
panel
To drain the water from the system: First turn off
the water supply. Remove the ice bucket, and pull the
rubber drain tube out from its clips at the front of the
internal water reservoir. Slowly lower the rubber drain
tube towards the drain port at the back right side of the
ice maker cavity. The water will evacuate. (see Fig.H on
page 4) When all the water has been drained, replace
the tube. Note: If using the continuous drain option (see
separate installation instructions) and the unit had been
turned off, it may now be turned on again.
Note: When the power is restored the unit will be in
standby mode. The customer has to manually restart the
unit.
MOVING YOUR ICE MAKER
ICE BUCKET
Your ice bucket is designed to be easily removed. To
remove it, lift up the front part of the box then simply pull
it out (see image above.)
3
• Remove all items.
• Securely tape down all loose items (bucket) inside your
appliance.
• Turn the adjustable leg up to the base to avoid
damage.
• Tape the door shut.
• Be sure the appliance stays secure in the upright
position during transportation. Also protect outside of
appliance with a blanket, or similar item.
• The ice maker should be relocated to the coolest area
of the room, away from heat producing appliances, and
out of the direct sunlight.
CARE AND MAINTENANCE
CLEANING CYCLE
CLEANING CYCLE
1) Before starting, turn the unit off and turn off the water
supply to unit.
12) Normal ice production can continue when there is no
evidence of the cleaning solution remaining in the
unit.
2) When all ice has melted from the evaporator and
fallen into the ice bucket, remove the bucket (being careful not to spill any water) and discard or store ice in a
separate freezer.
OUTSIDE CABINET AND DOOR
• Wash the outside cabinet with warm water and mild
liquid detergent. Rinse well and wipe dry with a clean
soft cloth.
• Wring excess water out of the sponge or cloth when
cleaning any electrical parts.
Note: If you are using the continuous drain option, the
unit must be turned off during the next step. If you are
using the drain pump option (see separate installation
instructions), please keep the unit turned on (this allows
pump to operate.)
1. Evaporator cover board
2. Direction plate
3. Water container
4. Drain tube
5. Clips
3) Remove the rubber drain hose from the left rear of the
ice maker cavity. Slowly tilt the drain hose down towards
the drain port at the back right – lower corner of the ice
maker cavity. The water will drain into the drain port.
Tilt the drain hose slowly to ensure that the water is not
able to overflow the ice bucket area. (see Fig.H)
Fig.G
4) When the water stops coming out of the drain hose,
ensure that all water has been drained from water tank
area. (Look inside to check that all water has been
drained from water container area.) Reinstall the drain
hose by pushing it back into the clips.
1
2
5) Fill the water tank with a cleaning solution comprised
of equal parts water and vinegar. Next, turn the water
supply on.
6) Reinstall the ice bucket after the water tank stops
refilling, and the unit begins to run again.
7) Allow the unit to produce 4 - 6 batches of ice, then
turn the unit off and allow any remaining ice to fall into
the ice bucket.
Fig.H
8) Remove the ice bucket and discard all (6) batches of
ice.
9) If the drain pump mode is being used (see separate
installation instructions), turn the unit on at this point.
Unit has to be in the process (operating mode) in order
for the pump to work. If unit is in standby mode pump will
not operate. Once again, remove the rubber drain hose
from left side clips and slowly drain the cleaning solution
into the drain port in bottom right side of cabinet area.
5
4
10) When all of the solution has drained and unit begins
to cool again, reinstall the ice bucket. Make sure the
reservior is full before unit is turned back on.
11) Discard the first 2 batches of ice that fall into the ice
bucket.
4
3
CARE AND MAINTENANCE
YEARLY MAINTENANCE FOR AREAS
WITH HARD WATER
9) When all of the solution has drained, reinstall the ice
bucket. Turn the unit back on, only if using continuous
drain option (see separate installation instructions) and
had previously turned unit off.
1) When all ice has been released from the evaporator
and fallen into the ice bucket, remove the bucket (being
careful not to spill any water) and discard or store ice in
a separate freezer.
10) Discard the first 2 batches of ice that fall into the ice
bucket.
Note: If you are using the continuous drain option
(see separate installation instructions), the unit may be
turned off during the next step. If you are using the drain
pump option (see separate installation instructions), the
unit MUST be turned on. Unit has to be in the process
(operating mode) in order for the pump to work. If unit is
in standby mode pump will not operate.
VACATION TIME
11) Normal ice production can continue when there is no
evidence of the cleaning solution remaining in the unit.
• If the unit will not be used for more than one day,
turn the unit off and drain completely (refer to ‘Continuous Water Circulation for draining instructions.)
• Winterization: If the unit is only used half the year, the
other half it should be kept clean and void of water. Drain
the unit as in the ‘Continuous Water Circulation’ section.
Additionally, be sure to remove any water from the drain
tank. Utilize the “cleaning cycle” on page 4.
Note: Water supply should be turned off, if not it will
keep filling up.
2) Remove the rubber drain tube (4) from the water
container (3.) Slowly tilt the drain hose down towards
the drain port at the back right – lower corner of the ice
maker cavity. The water will drain into the drain port.
(see Fig.H on page 4)
Note: Tilt the drain tube slowly to ensure that the water
does not overflow in the ice bucket area.
3) When the water stops coming out of the drain tube,
look inside to check that all water has been drained from
water container area. Reinstall the drain tube by pushing
it back into the clips.
4) Use a sterile brush to scrape and loosen any hard
water buildup from the water container (3,) ice bucket,
cover board (1) and direction plate (2.) Then, fill the
water container (3) with an approved, non toxic, lime
dissolving cleaning solution such as an ice maker
cleaner sold in stores, or a solution of equal parts water
and vinegar. (see Fig.G on page 4)
5) Next, turn the water supply on, turn the unit back
on only if using continuous drain option (see separate
installation instructions) and had previously turned unit
off, and reinstall the ice bucket. The water container will
refill, and the unit will begin to run again.
6) Allow the unit to produce 4 - 6 batches of ice, then
turn the unit off and allow time for any remaining ice to
fall into the ice bucket.
7) Remove the ice bucket and discard all (6) batches of
ice.
Note: If you are using the continuous drain option (see
separate installation instructions), the unit may be turned
off during the next step. If you are using the drain pump
option (see separate installation instructions), the unit
MUST be turned on.
Note: Water supply should be turned off, if not it will
keep filling up.
8) Once again, remove the rubber drain tube from water
container (3) and slowly drain the cleaning solution into
the drain port in bottom right side of cabinet area. Water
will continue to fill if water is not turned off. (see Fig.H on
page 4)
5
TROUBLESHOOTING
Occasionally, a problem is minor and a service call may not be necessary - use this trouble shooting guide for a possible
solution. If the unit continues to operate improperly, call an authorized service depot or Danby’s toll free number
1-800-263-2629.
PROBLEM
1) The ice maker does
not operate
POSSIBLE CAUSE
SOLUTION
• Not plugged in
• The appliance is turned off
• No power to unit
• Make sure the appliance is
plugged in and turned on.
• Replace fuse or reset circuit
breaker
• The ambient temperature is too high
• The door is opened too often or the
door is ajar
• Reduce ambient temperature
• Make sure the door is closed
and is only opened when
necessary. Ensure that the
gasket is sealing against the
cabinet.
• Dirty condenser
• Remove the front bottom kick
plate from the unit and using a
vacuum, clean the area of the
condensor.
• Incorrect mode is selected
• Select the correct ice size mode
3) Ice maker alarm
• External water tank is full
• Not enough water
• Refer to page 7
• Refer to page 7
4) Vibrations
• Ice maker not level
• Make sure floor is level
• Adjust leveling legs
5) Noise
• The ice maker is not level
• Make sure floor is level or
adjust leveling legs
2) The ice is not big
enough or melts too
quickly
• The rattling noise may come from the
flow of the refrigerant, which is normal
• As each cycle ends, you may hear
gurgling sounds caused by the flow of
refrigerant in your ice maker
• Contraction and expansion of the inside
walls may cause popping and crackling
noises
• The ice dispensing during every cycle
may cause some noise
• The constant water flow noise is a
normal function of the unit.
6) Water leakage from
ice maker
• The water inlet pipe in the back is too
loose
• The water outlet pipe in the back is too
loose
6
• TIghten water inlet pipe
• Tighten water outlet pipe
TROUBLESHOOTING
Occasionally, a problem is minor and a service call may not be necessary - use this trouble shooting guide for a possible
solution. If the unit continues to operate improperly, call an authorized service depot or Danby’s toll free number
1-800-263-2629.
1 “Water tank is full” - troubleshoot using instructions before contacting an authorized service centre.
a) Disconnect from power source. Unscrew the drain cap located on the back of the unit and let out the water (refer to
installation guide)
b) After draining out all the water from the outside water tank, reconnect unit to power and it will continue to run normally.
c) If “drain pump mode” (see separate installation instructions) is being used, please confirm the “drain pump switch” is in the “ON”
position.
2 “Ice maker low on water” - troubleshoot using these instructions before contacting an authorized service centre.
a) Check if outside water supply is functioning normally. Follow “checking the water supply” instructions (above) and wait 30 minutes
for the unit to correct itself.
b) If this doesn’t work, press the power button to restart the unit.
3 “Sensor breakdown” - contact our authorized service center for maintenance.
4 “System malfunction” - System will shut down call an authorized service center.
Visit http://www.profileofgoodtaste.com/ to view a short instillation video.
7
LIMITED IN-HOME APPLIANCE WARRANTY
This quality product is warranted to be free from manufacturer’s defects in material and workmanship, provided that the unit is used under the normal operating
conditions intended by the manufacturer.
This warranty is available only to the person to whom the unit was originally sold by Danby Products Limited (Canada) or Danby Products Inc. (U.S.A.) (hereafter
“Danby”) or by an authorized distributor of Danby, and is non-transferable.
TERMS OF WARRANTY
Plastic parts, are warranted for thirty (30) days only from purchase date, with no extensions provided.
First 24 Months
During the first twenty four (24) months, any functional parts of this product found to be defective, will be repaired or replaced, at warrantor’s option, at no charge to the ORIGINAL purchaser.
To obtain
Service
Danby reserves the right to limit the boundaries of “In Home Service” to the proximity of an Authorized Service Depot. Any appliance
requiring service outside the limited boundaries of “In Home Service” ,it will be the consumer’s responsibility to transport the appliance
(at their own expense) to the original retailer (point of purchase) or a service depot for repair. See “Boundaries of In Home Service”
below. Contact your dealer from whom your unit was purchased, or contact your nearest authorized Danby service depot, where service
must be performed by a qualified service technician.
If service is performed on the unit by anyone other than an authorized service depot, or the unit is used for commercial application, all
obligations of Danby under this warranty shall be void.
Boundaries of
In Home Service
If the appliance is installed in a location that is 100 kilometers (62 miles) or more from the nearest service center your unit must be
delivered to the nearest authorized Danby Service Depot, as service must only be performed by a technician qualified and certified for
warranty service by Danby. Transportation charges to and from the service location are not protected by this warranty and are the
responsibility of the purchaser.
Nothing within this warranty shall imply that Danby will be responsible or liable for any spoilage or damage to food or other contents of this appliance, whether
due to any defect of the appliance, or its use, whether proper or improper.
EXCLUSIONS
Save as herein provided, Danby, there are no other warranties, conditions, representations or guarantees, express or implied, made or intended by Danby or its
authorized distributors and all other warranties, conditions, representations or guarantees, including any warranties, conditions, representations or guarantees
under any Sale of Goods Act or like legislation or statue is hereby expressly excluded. Save as herein provided, Danby shall not be responsible for any damages
to persons or property, including the unit itself, howsoever caused or any consequential damages arising from the malfunction of the unit and by the purchase of
the unit, the purchaser does hereby agree to indemnify and hold harmless Danby from any claim for damages to persons or property caused by the unit.
GENERAL PROVISIONS
No warranty or insurance herein contained or set out shall apply when damage or repair is caused by any of the following:
1) Power failure.
2) Damage in transit or when moving the appliance.
3) Improper power supply such as low voltage, defective house wiring or inadequate fuses.
4) Accident, alteration, abuse or misuse of the appliance such as inadequate air circulation in the room or abnormal operating conditions
(extremely high or low room temperature).
5) Use for commercial or industrial purposes (ie. If the appliance is not installed in a domestic residence).
6) Fire, water damage, theft, war, riot, hostility, acts of God such as hurricanes, floods etc.
7) Service calls resulting in customer education.
8) Improper Installation (ie. Building-in of a free standing appliance or using an appliance outdoors that is not approved for outdoor application).
Proof of purchase date will be required for warranty claims; so, please retain bills of sale. In the event warranty service is required, present this document to our
AUTHORIZED SERVICE DEPOT.
Warranty Service
In-home
Danby Products Limited
PO Box 1778, Guelph, Ontario, Canada N1H 6Z9
Telephone: (519) 837-0920 FAX: (519) 837-0449
1-800-263-2629
04/09
Danby Products Inc.
PO Box 669, Findlay, Ohio, U.S.A. 45840
Telephone: (419) 425-8627 FAX: (419) 425-8629