1
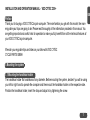
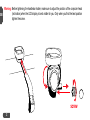
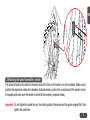
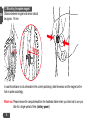
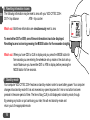
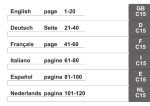
CYCLECOMPUTING
BEDIENUNGSANLEITUNG
INSTRUCTION MANUAL
MANUEL D´INSTALLATION ET D´UTILISATION
MANUALE D´INSTALLAZIONE E FUNZIONAMENTO
INSTALACION Y OPERACIÓN MANUAL
HANDLEIDING
NÁVOD K MONTÁŽI A OBSLUZE
INSTRUKCJA OBSLUGI LICZNIKA
INSTALLATIONS OG BETJENINGSVEJLEDNING
BRUKSANVISNING
BRUKSANVISNING
ASENNUS JA KÄYTTÖOHJEKIRJA
C05+
INSTALLATION AND OPERATION MANUAL - VDO CYTEC C05+
Preface
Thank you for buying a VDO CYTEC bicycle computer. The more familiar you get with this model, the more
enjoyable your trips are going to be. Please read thoroughly all the information provided in this manual. You
are getting important and useful hints for operation to make you fully benefit from all the technical features of
your VDO CYTEC bicycle computer.
We wish you enjoyable trips and rides on your bike with VDO CYTEC
CYCLE PARTS GMBH
1.Mounting the system
1.1 Mounting the handlebar holder
The handlebar holder fits handlebars of any diameter. Before mounting the system, decide if you will be using
your left or right hand to operate the computer and then mount the handlebar holder on the respective side.
Position the handlebar holder, insert the strap and adjust is by tightening the screw.
1
GB
GB
Warning: Before tightening the handlebar holder, make sure to adjust the position of the computer head
(inclination) when the LCD-display is best visible for you. Only when you find the best position
tighten the screw.
screw
2
GB
1.2 Mounting the speed transmitter / sender
The sensor should be mounted on the same side of the fork as the holder is on the handlebar. Make sure to
position the respective rubber shim between fork and sender, position the curved back of the sender next to
the spokes and make sure the sender is aimed at the receiver (computer head).
Important: Do not tighten the cable ties yet. Accurately position the sensor and the spoke magnet first, then
tighten the cable ties.
3
1.3 Mounting the spoke magnet
GB Distance between magnet and sensor should
be approx. 1-5 mm.
1-5mm
1-5mm
In case this distance is not achievable in the current positioning, slide the sensor and the magnet on the
fork or spoke accordingly.
Watch out: Please remove the computerhead from the handlebar holder when you intend not to use your
bike for a longer period of time. (battery power)
4
1.4 Installing battery into computer head
To save battery power, your VDO CYTEC C05+ comes with the battery not yet fitted. Prior to initial use you
have to install the battery first. Insert battery with positive (+) end on top.
Watch out: Once the battery is properly fitted, the computer immediately changes into set-up mode
(see also chapter 5). If you find the computer is not functioning properly after a battery change,
push the AC-button (Auto Clear) on the rear side of the computer to reset.
3V CR 2032
AC
OPEN
AC
AC
CLOSE
5
GB
1.5 Function Indicator
GB Your VDO CYTEC C05+ features a function indicator ((1)).
When you are done mounting the computer, ((1)) flashes at the first rotation of the wheel.
When the wheel-size is properly entered,
actual speed is displayed as well.(see chapter 5).
In case the function-indicator ((1)) is not flashing, please double-check:
Is the computer properly fitted onto the handlebar holder?
Is the spoke magnet accurately positioned opposite the speed transmitter (max 5 mm distance)?
2. Twist-Click mounting of computer onto holder
The Twist-Click mounting has been exclusively developed for the new line of
VDO CYTEC computers. The computerhead is put onto the handlebar and by a
right turn of the computerhead (TWIST) fixed to the holder (CLICK).
It is just as easy to remove the computerhead from the handlebar holder.
Slightly push the computerhead down, twist it to the left, remove computerhead
from handlebar holder.
6
GB
LOCK
UNLOCK
2.CLICK
1.LOCK
1.PRESS
2.UNLOCK
7
GB
3. Information features of your VDO CYTEC C05+
Your VDO CYTEC C05+ provides you with following information:
KMH-MPH
DST
ATM
CLK
ODO
current speed indicated in either KMH or MPH, featuring automatic conversion into MPH
trip counter, counts your trip distance up to 999,99 km or miles.
trip timer, keeps track of the actual riding time featuring automatic start/stop function,
up to 9:59:59 (hrs:min:sec)
clock with 24 h display mode.
odometer, counting distance ridden up to 99,999 KM or M.
4. Operating your VDO CYTEC C05+
Button / Key Covering
Your VDO CYTEC C05+ has 1 operating button / key
8
Function
DST
ATM
CLK
ODO
This button / key has several functions.
All functions of the button / key are outlined in the chart below.
GB
Your display
Button / Key to
Length of pushing What is going on?
indicates following be pushed
the button / key
information
DST-ODO-CLK-ATM push MODE key brief (0.1 sec)
next information from DST or ODO or ATM
is indicated.
ODO
push MODE key long (5 sec)
enter set-up mode for wheelsize and odometer
CLK
push MODE key long (5 sec)
enter set-up mode for clock
DST
push MODE key long (5 sec)
DST and ATM are simultaneously reset to ZERO
Watch out: To avoid resetting DST and ATM by mistake, thoroughly check the information in display
before you push the MODE key for 5 sec.
5. Set-up mode
Your VDO CYTEC C05+ features the following set-up procedures Watch out: Once the battery is properly
fitted, your VDO CYTEC C05+
wheelsize = WS set-up starts out of ODO in display
immediately changes into
clock = CLK
set-up starts out of CLK in display
set-up mode
odometer = ODO set-up starts out of ODO in display
(see also chapter 5.3).
9
GB
5.1 Programming (setting up) your wheelsize
In order for the VDO CYTEC C05+ to indicate your actual speed and your trip distance, the correct
wheelsize has to be entered. Wheelsize is the outer circumference of the wheel including the tire.
following default is entered
wheelsize = WS = 2124 mm
Watch out: Above default is automatically applied after a battery change. After a battery change, the correct
wheelsize for your bike has to be reentered, should you want to have accurate speed displayed,
according to your bike's wheelsize.
5.2 How is the wheelsize precisely determined??
Place the front wheel of your bike with the valve at the bottom, mark this position with a line and push your
bike ahead until exactly one rotation of the front wheel is completed. Draw another line where the valve
now is. Take a ruler and measure the distance between marks 1 and 2 which reflects the wheelsize =
wheel-circumference. The figure measured (in mm) is the wheelsize to be entered into your computer.
Watch out: In case you have selected MPH readout you must enter your wheelsize in mm.
10
Watch out: In case you have selected MPH readout you must enter your wheelsize in mm.
GB
1x
WS in mm
11
GB
5.3 Entering your wheelsize / entering odometer
After initially installing the battery or after a battery change, your VDO CYTEC C05+ automatically switches
into set-up mode for wheelsize and odometer.
Start with Step 3.
You might as well enter the set-up mode for wheelsize and odometer at any time by proceeding as
follows:
Step 1: Call ODO information in your display.
Step 2: Press MODE button for 5 sec. Display shows an alternating flashing symbol for KMH and MPH.
Step 3: By pressing the MODE button you can choose whether you want MPH or KMH readout on your
display. Now you have determined whether your VDO CYTEC C05+ is either measuring in kilometers or
miles.
Step 4: Once you have chosen your measuring unit, the wheelsize value is displayed. After a battery
change, the default value (2124) comes up. In case you have entered wheelsize set-up from ODO
(see step 1), the last value entered will come up.
In case you want to use the default value (2124) after a battery change, just press the MODE button
within 2 seconds.
The default is then automatically set up and the computer returns to regular mode.
12
In case you wish to enter the precise wheelsize you have measured yourself (i.e. 2257), please
proceed with step 5.
GB
Step 5: Not pressing the MODE button with in 2 seconds will make the last digit (2124) flash and change the
value (4-5-6-7...) Once the correct digit (7) comes up, press the mode button. Now the third digit flashes and
changes its value (2127). Once the correct digit (5) comes up, press the mode button. Next to flash is the
second digit (2157). Once the correct digit (2) comes up, press the mode button. Next to flash is the first digit
(2257).
Step 6: When the wheelsize is completely entered, the computer automatically changes into set-up mode for
odometer value. Here you enter your previous totals after a battery change.
In case you do not wish to enter an odometer value, press the MODE button five times. Thereby you exit the
set-up mode and the computer returns to regular display.
For entering an odometer value, wait for the last digit to flash (12345) and automatically change its value.
Once the desired digit comes up, press the mode button. Next to flash is the fourth digit (12345). Once the
desired digit comes up, press the mode button. Proceed until you are done with the first digit, the computer
then will return to regular display mode.
13
Set ODOMETER
GB
Press to Stop
switch to next
5
Press
sec.
to start
Press to select
Press to Stop
switch to next
Press to switch
Press to Stop
switch to next
Press to Stop
switch to next
Press to Stop
switch to next
Press to Stop
switch to next
Return to
main Display
Press to Stop
switch to next
Press to Stop
switch to next
14
2
Please wait
sec.
until counting
Press immediatly
times to end
5
5.4 Setting the clock CLK
Your VDO CYTEC C05+ features a clock with hour and minute display
in 24 h mode To access the clock set-up mode proceed as follows:
GB
Press 5sec.
to start
Step 1: call in the CLK information into your display
Step 2: Press the MODE button for 5 sec.
The set-up mode for the clock starts.
You will see the digit flashing and changing
its value (14...15...16).
Step 3: Once the correcthour figure is
flashing (i.e. 15), press the MODE
button, then the minute figure is flashing
and changing its value.
Step 4: Once the correct minute value is
flashing, press the MODE button, the computer
will then return to regular display mode.
Press to Stop
switch to next
Press to Stop
and quit
Watch out! The time (CLK) has to be reentered after a battery change
15
GB
6. Resetting information to zero
The following information may be reset to zero with your VDO CYTEC C05+:
DST = trip distance
ATM = trip counter
Watch out: Both these information are simultaneously reset to zero
To reset either DST or ATM, one of these informations has to be displayed.
Resetting to zero is done by pressing the MODE button for five seconds straight.
Watch out: When you have ODO or CLK in display and you press the MODE button for
five seconds you are entering the wheelsize set-up mode or the clock set-up
mode. Make sure you have either DST or ATM in display before pressing the
MODE button for five seconds.
7. Stand-by-mode
Your computer VDO CYTEC C05+ features a stand-by-mode in order to save battery power. Your computer
changes into stand-by-mode if it has not received any speed impulses for 5 min or no button has been
pressed in the same period of time. The time of day (CLK) is still displayed in stand-by-mode, though.
By pressing any button or just continuing your ride, this will end stand-by-mode and
return you to the appropriate mode.
16
8 . Battery change
Tip: Take down your total distance and wheelsize prior to battery change.
8.1 Changing the battery in the computer head
see chapter 1.4.
Watch out: old batteries require special disposal
Hg
9. Troubleshooting
This chart outlines possible malfunctions, their causes and solutions.
malfunction
possible cause
solutions
speed display
check for proper distance between
readjusting distance between sensor
does not appear
sensor and magnet
and magnet
sender battery empty
check battery power and
replace if necessary.
computerhead is incorrectly twisted on place computerhead on handlebar
handlebar holder
holder and twist until detent (CLICK)
no wheelsize entered
enter your wheelsize
sender is too distant from computerhead mount sender closer to computerhead
display fades
battery in computer empty
check battery power and replace it if
or disappears
necessary
temperatures below 5° C (40° F) dull
back in normal temperatures, display
display readout
picks up working correctly
17
GB
GB
10. Warranty
We warrant VDO CYTEC models (sensor, computer head and handlebar holder) to the original purchaser
for five years from date of purchase against defects in material and workmanship. This does not cover
the batteries and defects resulting from normal wear and tear, improper care, accidents,
abuse or alteration.
Please take care to retain your receipt of purchase.
In case of legitimate complaints, you are entitled to receive a comparable replacement model. Due to
possible model changes, your model might not be available any more.
You may contact your retailer or store where you purchased your
VDO CYTEC or send the computer directly to us:
CYCLE PARTS GMBH
Grosse Ahlmuehle 33
76865 Rohrbach / Germany
In case of technical queries, call our consumer-service-hotline Tel. +49-6349-9635-10
Technical specifications of VDO CYTEC C05+ are subject to change.
18
Contents
GB
1 computer head
1 handlebar holder with screw
1 wireless transmitter with battery 12 V, type V23GA
1 rubber shim for sensor mount
1 spoke magnet
5 cable ties
1 battery 3 V, type CR 2032
1 installation and operation manual
TIP
The CYTEC tin box easily holds a mini-tool and a spare tube to carry on with your ride.
19