1
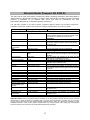
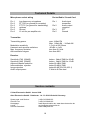
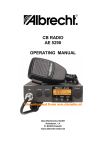
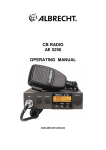
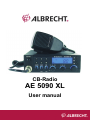
CB-Radio
AE 5090 XL
User manual
Index
Index....................................................................................................................................... 2
Important Note........................................................................................................................ 3
Introduction............................................................................................................................. 3
Accessories included.............................................................................................................. 4
Safety Precautions ................................................................................................................. 4
Front view............................................................................................................................... 5
Country code setting before installation ................................................................................. 5
Installation of the radio ........................................................................................................... 6
Power supply.......................................................................................................................... 6
Antenna connection................................................................................................................ 8
Operation................................................................................................................................ 8
Before switching on ............................................................................................................ 8
Switching on and adjusting volume .................................................................................... 8
Display and backlight settings ............................................................................................ 8
Selecting the operating channel ......................................................................................... 8
Field intensity meter (S-meter) ........................................................................................... 9
RF Gain setting .................................................................................................................. 9
Adjusting SQUELCH (muting) and ASC............................................................................. 9
ASC Noise and Interference Reduction ........................................................................... 10
AM / FM mode switch ....................................................................................................... 10
Special interest channels ................................................................................................. 11
MEMO Modus................................................................................................................... 11
Programming one of the 5 direct channel buttons............................................................ 12
Start channel scan............................................................................................................ 12
Stop channel scan............................................................................................................ 12
Change direction of scan.................................................................................................. 12
Channel scan among direct channels .............................................................................. 12
Dual Watch....................................................................................................................... 13
Emergency Channel CH 9................................................................................................ 13
Transmitting and correct use of microphone .................................................................... 13
Bar graph switching between POWER and MOD ............................................................ 13
Data transfer..................................................................................................................... 14
Gateway Radio ................................................................................................................. 14
MIC Gain setting............................................................................................................... 14
External sockets ................................................................................................................... 14
External loudspeaker........................................................................................................ 14
External S-meter .............................................................................................................. 15
Microphone socket ........................................................................................................... 15
Service and Warranty information ........................................................................................ 15
Troubleshooting................................................................................................................ 15
European 2 years warranty .............................................................................................. 15
Where to find service hints and service documentation ................................................... 16
Disposal and Recycling of Electronics Waste .................................................................. 16
Albrecht Radio Passport AE 5090 XL .................................................................................. 17
Operation only with individual licence .............................................................................. 17
Declaration of Conformity / Konformitätserklärung........................................................... 18
Technical Details .................................................................................................................. 19
Service contacts ................................................................................................................... 19
Short manual AE 5090 XL – Fast to the point ...................................................................... 20
2
Important Note
Congratulations to Your new CB-Radio AE 5090 XL. This CB-Radio corresponds to the
latest European CB standards. As a unique feature, it has a country mode setting,
which allows selecting the operation mode according to the country, where You
intend to use the radio. Please make sure that You program the right country code
before you install and use it the first time!
40 FM
40 channels FM / 4 Watt (former “CEPT” settings with 40
Channels FM according to EN 300 135-2). This mode is free of
charges and licences in nearly all European countries (except
Italy, You must have a licence there for any kind of CB radio).
80/40
For Germany only: 80 channels FM / 4 Watt, 40 channels AM /
1 Watt. Receiving AM-modulated signals on channels 41 to 80 is
possible, but the AM-transmitter is disabled for these channels.
You need no licence to operate the radio in this mode, but in
certain border regions base stations transmitting on channels 41
to 80 in FM is not allowed (or special licence should be applied
for).
40/40
40 channels FM / 4 Watt, 40 channels AM / 1 Watt. Latest
European Standard EN 300 433-2, not yet applied in all
countries. In Belgium, Italy, Spain and Switzerland residents
need a licence to operate the radio, while it is already free of
charges for travellers and licence free for everybody in France,
Finland, Germany, Ireland, the Netherlands, Poland, Slovak
Republic, and Portugal.
Introduction
Your new Albrecht CB Radio AE 5090 XL, developed and manufactured in
accordance with the latest CB regulations, offers you:
• 40 channels FM / 4 watt
or
• 80 channels FM / 4 watt / 40 channels AM / 1 Watt
or
• 40 channels FM / 4 Watts / 40 channels AM / 1 Watt or
• 40 channels FM / 4 Watts / 40 channels AM / 4 Watts (for Poland with 0
KHz offset and Spain with Standard frequency only)
• Channel selection knob on the radio set and UP/DOWN buttons on the
microphone
• Scan modes for up and down frequencies, direct channels and Dual watch
• 5 freely programmable memory positions for stored stations
3
• Multifunction LCD display
• Colour choice and dimmer function (DIM/Light)
• 6-pole microphone socket, suitable for amplifier microphones, selective
calling systems, Packet Radio modems/TNC’s or sound card access for
CB Gateway operation
• Socket for external S-meter
• Socket for external loudspeaker
• Rugged, heavy duty electret microphone
• Conventional Squelch + additional ASC (patent by GPE) noise reduction
system
Please read this operating manual through carefully. This will enable You to make
use of all the functions your new CB Radio has to offer as soon as possible.
Accessories included
Your AE 5090 comes operational with the following accessories:
• mobile mount
• 2 knurled screws for the mobile mount
• 2 rubber washers for the mobile mount
• DC plug-in power cable with looped-in fuse
• spare fuse
• noise-reduced hand-held electret microphone with UP/DOWN buttons
• microphone hanger
• various screws to fasten the radio and microphone fixing devices
• User manual with circuit diagram and Radio Passport
Safety Precautions
People with pacemakers are recommended as a precaution to consult their doctor
before operating the CB radio. Not all types of pacemakers are sufficiently protected
from radiation from a nearby transmitter, so do not assume it is safe to start operation
without checking! Please remember that You are in the immediate vicinity of a
transmitting aerial, particularly when used as a mobile. If Your doctor, or the
manufacturer of the pacemaker, has recommended keeping a certain safe distance
from the aerial, then please follow their instructions!
4
Do not transmit without connecting the aerial and never touch the aerial during
transmission!
Please also take road safety into account! CB Radio (even when only receiving,
especially if volume is turned to maximum) can divert your attention from the road!
Road safety is of course to be given priority! Therefore only use Your ALBRECHT
AE 5090 XL when the traffic situation enables it to be used safely.
Front view
Microphone
volume
Memory-keys
Scan/
Multi-Mode
Button
AM-FMButton
Double potentiometer
Volume, RF Gain
and on/off
DIM-/Light
Button
Double
potentiometer
Squelch / ASC
Dual watch (DW) control
Channel
switch
CH9
Button
ModPowerDisplay
Country code setting before installation
Before You can use Your new CB radio the
first time, You should program it to the
correct country code. Press the SCAN/MultiMode button (1) while the device is still off
and switch on your radio while keeping the
button pressed. Release the button. Now the
multi standard choice 01 to 05 will appear in
the display. Select the mode for Your
country by turning the channel switch (see
the following table and our radio passport).
Switch the radio off and on again after
selection of the country code.
1
5
Mode
01
02
03
04
05
Channel
80 CH
40/40
40
40/40
40/40
Power
4W/1W
4W/1W
4W
4W/4W
4W/4W
Modulation
FM/AM
FM/AM
FM only
FM/AM (only Spain)
FM/AM (only Poland)
with 0 kHz offset
(Poland Frequencies
Re- Programming to another
country code
This is possible at any time,
even after installation and
when the radio is in use. The
procedure is the same like
Your first setting.
Installation of the radio
You can either operate Your ALBRECHT AE 5090 XL in the car or at home as a base
station. For installation as a mobile station in the car, a mobile mount device is
enclosed. Mount the set in such a way that it is not exposed to direct sunlight if
possible, as this would lead to an increase in the temperature and can decrease the
(set’s) working life. The set should also not be installed near a heater. Mount the set
in such a way that it is exposed to as little vibration as possible.
The mobile fixing device should be attached to the dashboard, the tunnel slot or to
any other suitable place using the enclosed tapping screws. Do not install the set in a
place where it could cause injuries in the case of an accident (be particularly careful
to ensure free leg movement). Take care not to damage any underlying wires during
installation!
Then insert the radio into the mobile mount. Secure the set with the large knurled
screws (using the enclosed plastic washers) firmly at the required angle.
Also mount the microphone hanger using the enclosed screws in an easily accessible
place. If a safe mounting of the radio is not possible in Your car or truck with the
supplied mounting bracket, we recommend to use one of our DIN slot mounting kits
suitable for AE 5090 series! Such mounting kits for a free DIN slots are available as
optional accessory items.
In order to prevent interference to the vehicle electronics from transmission in the
vehicle, please make sure to take any mounting instructions from the vehicle
manufacturer for radios and antennas into account.
Power supply
Your AE 5090 XL receives power from the 2 pin plug-in cable.
The red and black wires in the cable are for the power supply. The cable has a
looped-in fuse.
However, You can choose from two methods when connecting to the power supply
(red and black):
Example 1
The Radio should be able to be switched on and off at any time using the
volume / on/off switch.
Connect up the red wire to the positive pole on the vehicle battery (or
elsewhere in the vehicle’s electrical system with permanent plus) or to a 12
Volt external power supply unit.
6
Example 2
The set should be automatically switched on and off with the ignition switch.
Attach the red wire to a part of the vehicle electrical system, which is
interconnected to the ignition.
Connect up the black wire to the negative pole on the vehicle battery or the
power unit or to a well-conductive part of the car body.
An EEPROM memory keeps the channel and country information stored even
if the radio is not connected to power.
Note for all connecting methods:
For EMC reasons, the cable used to connect to the power supply should be no longer
than 3 metres and have sufficient diameter (at 3 meters length not below 1.5 – 2.5
mm2).
If you wish to operate Your set at home from the mains supply then please only use a
stabilized power pack with at least 2 amps permanent current-carrying capacity.
Under no circumstances should You use a car battery charger, as these are not
stabilized and during open circuit reach such high voltage levels that Your radio set
could be destroyed.
The stored country code and all memory channels are kept in an EEPROM-memory.
The memory settings of the radio will be in the same condition after You plug out and
plug in the DC cable.
Never repair a blown fuse with silver paper or with aluminium foil! If the fuses
keep blowing, then please give Your radio set to Your servicing dealer to be
repaired or hand it in to Albrecht’s service station.
The maximum allowed voltage variation for this radio is up to 15.6 volts.
Never exceed this voltage under no circumstances! The transmitting stages
for Your AE 5090 XL are electronically stabilized, and therefore it is
impossible to increase output by means of excessive supply voltage. Such
attempts may lead to serious damage to the radio set but will never increase
output power!
In most truck installation a step down DC-DC converter 24 to12 V is used.
Best CB reception quality is only possible with standard linear voltage
reducers. Switching step down converters may radiate interference signals
due to their technology. Even if such converters have valid approval marks,
the CB range is disregarded by the specifications and we cannot assure
interference free reception. If such a converter should be installed in Your
truck, it is recommended to place the antenna as far away as possible from
DC-DC converters and engine management computers.
7
Antenna connection
Connect Your CB antenna to the ANT socket on the rear side of Your ALBRECHT
AE 5090 XL. Most CB antennas must be tuned to best radiation during installation to
give highest effective communication range. CB specialists do that job with a
standing wave meter to check and adjust the aerial. Tune the aerial to the best
standing wave ratio (SWR) on an intermediate channel e.g. using Channel 1 (26.965
MHz) in 80ch mode or Channel 20 (27,205MHz) in all other modes.
On this channel You should obtain an SWR of approx. 1.5 or less. If the SWR
deteriorates on the highest (Channel 40) and lowest (Channel 41) channels up to a
value of 2.5, then your aerial is still acceptable. SWR above 3 is too bad for good
communication range. A bad SWR may also indicate that there is perhaps an
installation error or missing ground. Problems may be caused through missing
ground, especially in boats and motor homes with fiberglass body. For these cases,
Albrecht offers a special connecting cable with matching box as “artificial ground”
(like AKM 27, order nr. 68440) or use special antennas for groundless installation like
GL 27 (order nr. 6351).
Some antennas, like “Gamma II” are broad banded and do not need any
retuning during installations.
Even if Your AE 5090 XL has a particularly robust transmitter highlevel amplifier stage which can even withstand mismatching of
SWR=3, you should still never transmit without an antenna!
Operation
Before switching on
• Turn SQUELCH and ASC control left (counter clockwise) as far as possible
Switching on and adjusting volume
The on/off switch is combined in the VOLUME control. To switch on:
• Turn VOLUME control (the inner knob) from OFF position slightly clockwise.
LC display and buttons are illuminated. Then turn further until desired volume is
reached.
Display and backlight settings
You can chose between two display- and backlight colours red and blue and two dim
levels for the display and the backlight.
• Press DIM/Light button longer than c. 1,5s to change the colour
• Press DIM/Light button less than c. 1,5s to change the dim level
Selecting the operating channel
On the radio set:
• With the rotary channel knob You can continuously select channels. The present
channel is displayed.
On the microphone:
• Press the ∧ or ∨ button on the microphone briefly, to switch up or down a channel.
8
• Press the respective button longer to run up or down through the channels. The
present channel is displayed.
Field intensity meter (S-meter)
On the bar graph display You can see approximately how strong the receiving signal
is.
The scale under the bar display (S1 to +30) helps with orientation for an input signal
in the stages S1 to S9+30dB.
Please note: the field intensity meter only registers a signal when the muting control
has opened.
RF Gain setting
You can adjust the overall-sensitivity of Your receiver with the RF gain knob, which is
combined with the volume knob (outer ring). Normally, RF gain should be in the full
clockwise position. Sometime You may desire to listen only to nearby stations. Or
You may receive much interference signals. In such cases You can reduce the
sensitivity of Your receiver by turning the knob more counter clockwise.
Please note: Squelch and ASC settings may require re-adjusting in low sensitivity
position.
Adjusting SQUELCH (muting) and ASC
Particularly in FM, noise can be a nuisance on a free channel. To suppress as much
noise as possible, Your radio is equipped not only with an ordinary muting control
(SQUELCH) like all CB radios have, but has also a preinstalled ASC circuit (patented
by GPE). Both circuits can be preset and adjusted independent of each other. Please
be careful with the squelch circuit: it may suppress noise, but if turned too high, it can
also suppress weaker signals.
There is a double potentiometer for both SQUELCH and ASC setting. The inner ring
is for SQUELCH; the outer ring is for ASC.
This is how to adjust the signal strength required to switch on the loudspeaker, using
the (inner) SQUELCH control knob:
The further the control knob is turned to the right, the stronger a signal has to be in
order to be audible through the loudspeaker.
In order to adjust the set to be the most sensitive to incoming signals, switch to a free
channel:
• Use the rotary switch or the microphone buttons to find a free channel,
where no signal is displayed.
• Then turn the SQUELCH control carefully to the right until the noise just
about disappears.
Now the loudspeaker stays off when on a free channel but it switches back on when
receiving even very faint signals.
The muting adjustment is particularly important during channel
scanning. In this mode the point to which the set is adjusted
9
decides whether scanning is stopped at the signal or not.
Therefore You should test the various muting settings for various
signal strengths and get to know this function.
ASC Noise and Interference Reduction
While the Squelch opens and closes statically at a certain preadjusted signal
strength value of the incoming signal, not taking into account interference signals,
the ASC circuit works very smooth and dynamically. It measures the signal to noise
ratio and if interference signals suddenly appear, ASC automatically varies the
threshold point to a safer adjustment and returns to the old adjustment when
interferences are disappearing again.
An example:
You have adjusted the SQUELCH carefully to the most sensitive point while the
engine of Your car was still off. Now You start the engine and switch on the
windshield wiper the squelch circuit will immediately regard the interference of the
engine or wiper as a signal and will open, because the squelch cannot distinguish
between a wanted signal and an unwanted interference.
If You would have preset the ASC at switched-off engine before, the interference
coming from the wiper motor would be detected and the ASC circuit would shift the
threshold point so long automatically, until the interference will disappear.
The radio will remain muted, but stay on the highest sensitivity level during the whole
procedure studied in this example.
That means: in most cases You only need to adjust the ASC knob to Your needs only
once before starting. The setting will be maintained during travelling. The switching
point is no sudden on-off point like the squelch, but a more smooth gliding effect
between on and off. The best point is, where the background noise is just becoming
so weak, that it does no more disturb You. A small background noise may remain.
Please do not turn the ASC knob too much into full
clockwise direction. If You intend to suppress weaker
signals, which You do not like to hear, use the inner Squelch
knob for this purpose and not the ASC knob. A symptom for
too much closed ASC potentiometer is when weak speech still
comes through, but louder speech no more.
AM / FM mode switch
In the two programming modes 40/40 and 80 channels, FM modulation is available
on all channels, but AM-transmitting only on the 40 international CB channels. On all
channels you can switch between AM and FM using the function button AM/FM. The
display shows either AM or FM accordingly.
When You switch on the set the first time it operates on FM.
Please note that in 80 ch mode, on channels 41-80 the operation is limited on AM. To
receive AM-modulated signals on channels 41 to 80 is possible, but the AMtransmitter is disabled for these frequencies. If Your radio is set to AM and You push
the PTT-button, the radio will show Er (error).
10
Special interest channels
There are certain channels, which have established for special purposes:
Channel 1
Channel 9
Channel 16
Channel 19
Channel 40
Call channel on FM
Call and emergency channel, also Trucker channel
on AM in Germany
Water sport channel
Trucker channel on AM in France, Spain and Italy
Calling channel in Switzerland
Channels 11, 29, 34, 39, 61, 71, 80
Voice Gateway Radio (Germany only)
Channels 6, 7, 24, 25, 40, 41, 52, 53, 76, 77
Data transmission (Packet Radio, Germany only)
Some more recommendations have been worked out by the CB clubs. To find out
which channels are suitable for special purposes, please get in touch with the
respective groups or check in CB magazines.
MEMO Modus
Using the 5 direct channel buttons You can switch at any time from the present
channel (normal channel modus) to the 5 programmable stored stations (MEMO
modus) and switch back again.
Recall direct channels
•
Press one of the 5 direct channel buttons briefly. The unit will switch to the preprogrammed channel. The channel number and the button number will be
displayed.
The manufacturer has pre-programmed Your AE 5090 XL for some commonly used
channels:
•
•
•
Channel 1
Channel 4
Channel 9
recommended call channel on FM
recommended as call channel for AM
international calling and emergency channel
In Germany particularly this Channel 9 (in AM) is also used by all truck drivers. This
means: a large number of stations are listening in. In case of an emergency (e.g. in
case of accident etc.) there is a good chance that someone will be listening on Ch 9.
To call other stations, whom You know are listening in on channel 9, you can also
use this channel. Call up the desired station on channel 9. As soon as contact has
been made, agree on a free channel for Your conversation and then channel 9 will be
free again for other calls.
An emergency channel can of course only work if as many stations as possible are
listening in. Therefore listen in to this channel as often as possible.
11
• Channel 19: Trucker channel in France, Spain and Italy (in AM).
• Channel 40 Calling channel in Switzerland- please do not use for data
transmission near to the Switzerland border line!
Programming one of the 5 direct channel buttons
You can re-programme each of the 5 numbers of the memory positions to any
desired channel (e.g. private channels or club channels):
• Choose when in normal modus the desired channel and the modulation
mode AM or FM (where allowed).
• Press the M button briefly (ME for Memory Enable appears on the display)
• Within the next 5 seconds press the desired direct channel button (1 to
5)
The desired channel is now stored on the direct channel button selected. You will see
both channel number (large) and direct button number (small) in the display.
Switching back to normal channel selection
• Simply turn the rotary knob or press up or down on microphone.
• The display of direct button numbers disappears and the channel selection works
again via microphone or rotary knob.
Channel scan
Your AE 5090 XL has an automatic channel scan, which can be used for all channels
and for the stored direct channel numbers.
First choose the mode of operation (normal channel modus or MEMO modus).
Adjust the muting control to the point at which the receiver should open (see also
‘Adjusting squelch’).
Start channel scan
Briefly press the button SCAN.
SCAN appears on the display and the channel scan starts almost immediately by
scanning all the channels down the frequencies.
• The scan is stopped at each signal worth receiving and you can listen in to the
conversation.
If You leave the set alone it will re-start the scan after about 5 seconds and continue
to search for channels in use.
•
•
Stop channel scan
You can stop the scan at any time by pressing the SCAN button a second time.
Pressing the transmission button will also automatically stop the scan modus.
•
•
Change direction of scan
As a special function of the AE 5090 XL You can also change the direction in which
scanning takes place:
• Press the ∨ button on microphone during the scan or turn the rotary knob slightly
to the left: the scan direction will change, i.e. from higher to lower channel
numbers.
Channel scan among direct channels
Switch Your set to MEMO modus by pressing one of the 5 direct channel keys.
•
12
•
Press the SCAN button - the channel scan is now done among the 5 stored
memory positions.
Dual Watch
The transceiver can also observe two channels. This feature is useful when You like
to stay on Your preferred “house” channel, but observe another channel at the same
time.
• Select Your house channel with rotary knob or Up/ Down.
• Press DW briefly. DW will appear in the display.
• Select the other channel with channel knob or Up or Down.
You will now hear the selected last channel (see number in display). Your receiver
switches now automatically again and again for a short moment to Your preferred
house channel. If a signal should be detected there, Dual Watch will stop switching
and You will hear the signal, otherwise it will go back to the other channel.
Emergency Channel CH 9
In the beginning of the CB radio the canal 9 (AM / FM) as an international emergency
call channel was fixed. Today truck drivers use the channel 9 AM mainly as a call
channel. Your AE 5090 XL has got a CH 9-key. When You push this button, only on
this channel transmitting and receiving is possible. When You push the key second
time, all the CB-channels are usable again.
Transmitting and correct use of microphone
With the transmission button (Push To Talk) on the side of the microphone You can
switch between receiving and transmitting:
• Press PTT button to transmit.
The display shows TX .
• Release PTT button again to switch back to receiving.
Before transmitting the first time, make sure that the MIC gain potentiometer above
the mic socket is in the full clockwise position. When the transmission PTT button is
pressed, You can speak from a distance of about 5-10 cm into the microphone. The
modulation amplifier of Your AE 5090 XL is sensitive enough and enables You in
most cases to speak with even more distance, depending on how loud your voice is.
An automatic regulator ensures that your partner always hears your signal at the
same volume.
It is best to test the best distance from the microphone for Yourself with the help of
another station.
Bar graph switching between POWER and MOD
During transmitting, You will normally see the bar graph of the S-meter in the display
as indicator for Your transmitter output power.
•
•
•
Alternatively You may now switch with the MOD-PWR button to Modulation
display instead of Power display. The display shows MOD now.
This will show Your modulation volume in the display and will help to check and
adjust the microphone.
You can toggle with the switch between MOD and POWER display
13
Data transfer
You can connect an interface for data transfer in the microphone socket instead of
the usual provided microphone also other microphones and accessories. In some
countries You may also connect additional devices for the data transfer (Packet
Radio) there. This kind of data transfer is permitted only on certain channels and only
for amateur applications. The following Packet-Radio-Channels are valid only in
Germany! (After the newest official gazette Vfg 3/2008):
Data transmission channels:
6, 7, 24, 25, 40, 41, 52, 53, 76 and 77
Please, take in consideration that channel 40 is used as a calling channel in
Switzerland. So please show “Ham spirit” and do not use channel 40 for data
transmission near to Switzerland!
Gateway Radio
So-called Gateway-Radio is like an automatic relay station, these stations are CB
radios, which are provided by engaged radio CB operators and have got an access to
the Internet. The speech audio signals which are received by the gateways cross the
Internet to other systems (so conversation groups can grow up in a kind of voice over
IP chat rooms). One gateway receives a signal and transmits it to the Internet. Other
gateways receive it from the Internet and transmit it to other CB stations. This can be
done in all directions.
Gateway Radio Channels in Germany are:
11, 29, 34, 39, 61, 71 and 80
Do not be surprised, when You hear CB signals from very far areas on these
channels. It is quiet sure, that these signals are transmitted from a gateway in your
neighbourhood. You can simply participate in these CB chats by simple pressing
Your PTT and talk with them. The only difference to “normal “ CB stations is the fact
that it may be necessary to allow a longer pause between transmit and receive.
MIC Gain setting
For dynamic microphones, the full clockwise position of the MIC gain knob above the
mic socket will be optimised. If You should use the supplied electret or other
preamplified microphones, or if You speak with a very loud voice or in high
surrounding sound environment, we recommend to readjust the potentiometer more
to counter clockwise positions. Start from a medium position and check with another
station!
External sockets
External loudspeaker
Depending on the surrounding noise, it can be advisable to hook up an external
loudspeaker. Standard commercial radio loudspeakers with 4-8 ohms impedance and
2-4 W minimum output can be plugged in.
The cable can be up to 3 metres long. For car loudspeakers, make sure to use a twopin 3.5 mm mono type plug and ensure that none of the loudspeaker connections is
attached to the vehicle chassis!
14
External S-meter
Your AE 5090 XL has an S-Meter socket on the rear side, which allows You to
connect up an external S-Meter to show the relative signal strength. This gives more
exact information than the bar display. Please ask Your authorized dealer about
external S-meters. The S-meter should be installed near the radio set using a cable
no longer than 3 metres. You need a 2.5 mm mono plug to connect it up. The polarity
is positive, i.e. the positive pole of the S-meter is connected to the inner pin, and the
negative pole is on the outside.
Microphone socket
The 6-pole microphone socket on the front side is wired according to the well-known
Albrecht specifications, which also meet the recommendations issued by the German
manufacturers of CB radios.
Apart from the microphone included in the package, You can also hook up other
microphones and accessories.
The microphone socket has been tested and is suitable for nearly all kind of
microphones, even those with amplifiers or selective calling devices. According to the
latest regulations You are also allowed to plug in modems or so-called TNC`s for
data transfer (Packet Radio). However, this type of data transfer is only permitted on
certain channels and only for non-commercial use.
Special regulations apply to data transfer abroad. In Switzerland, for example, Packet
Radio is permitted on channels 21-25, but only with a call signal granted by the
authorities. In some other European countries Packet Radio is not allowed at all.
Service and Warranty information
Troubleshooting
Check at first the power supply and the fuse. A problem max is caused through
power supply, when no light appears after switching on. If the unit works in a strange
way, disconnect the power supply cable, while the radio remains switched on, wait
some time (minimum 10 seconds), and then reconnect power again.
Check the microphone and antenna connector. We think You cannot do more in case
of a problem. Please ask Your dealer or consult our service hints in the Internet. If
You should return the radio to Your dealer for repair, do not forget to describe the
problem as exactly as possible.
European 2 years warranty
The distributor, dealer or retail shop where You bought the radio warrants to the
original retail purchaser of this product that should this product or any part of it, under
normal use and conditions, be proven defective in material or workmanship within 2
years from the date of original purchase, such defect(s) will be repaired or replaced
with new or reconditioned product without charge for parts and repair laboratory. To
obtain repair or replacement within the terms of this warranty, the product is to be
delivered with proof of warranty coverage (e.g. a copy of Your bill of sale),
specification of defect(s), to the distributor, dealer or his authorized repair centre.
Liability for communications range of this product is disclaimed. The warranty does
not apply to any product or part there of which, has suffered or been damaged
through alteration, improper installation, mishandling, misuse, neglect, accident, or by
removal or defacement of the factory serial number label(s). The warranty does not
15
apply to accessory parts or problems caused through not authorized or not
recommended accessories like other than the supplied microphone, external
antennas, external power supplies and overvoltage caused through external power
supplies, lightning or overvoltage defects via antenna or other cables, broken or
damaged acrylic glass windows and cabinet parts.
Please contact the dealer or person where You have purchased Your CB radio.
Where to find service hints and service documentation
The complete technical documentation is updated regularly. You can download the
latest versions of user manuals, technical documents and conformity declaration, as
well as service hints or FAQ’s any time from our technical server under
http://www.hobbyradio.de
If You should have a problem, please have a look to the service hints or frequently
asked questions (FAQ) before You send Your CB radio back to the service centre.
Disposal and Recycling of Electronics Waste
This CB radio has been produced according to the European RoHS
directive and does no more contain certain banned hazardous
substances. Please dispose defective and no more usable electronic
items only via officially allowed collecting points.
The new European WEEE directive does no more allow to dispose
items via household trash. Please contribute to the efficient recycling of
used electronic items!
16
Albrecht Radio Passport AE 5090 XL
The radio may be used in European Countries according to following information, which we publish as
“Radio Passport”. Because the number of countries CB is still changing, the latest version of this radio
passport is published on our Internet Web server and may be downloaded any time.
(http://www.hobbyradio.de or www.alan-germany.de/service)
This CB radio complies to the latest European regulations (R&TTE directive and European harmonised
standards) and has been notified in the countries according to following table: (as of February 2008):
Country
Country switch position
Licence and operating conditions
Operation only with individual licence
Austria
40 FM
Belgium
Italy
40/40 and 40 FM
40/40 and 40 FM
Switzerland and
Liechtenstein
Spain
40/40 and 40 FM
Austria’s legislation does not accept radios with
country switches, please do not use in Austria or ask
Your dealer for a limited 40 CH FM version
AE5090FM!
Residents in Belgium need licence
Licence and regular charges for all CB radios, Truck
drivers may use their radios in FM 40 mode during
travelling in Italy.
Licence and monthly charges for Residents
40/40 and 40 FM
Licence and regular charges for Residents
Operation without licence and charges allowed
Belgium
40FM
40/40
Czech Republic
80/80 mode
Denmark / Lithuania
Finland
40 FM
40/40 and 40 FM
France
Germany
40/40 and 40 FM
80/80, 40/40, 40 FM
Great Britain (UK)
Greece
Hungary, Cyprus
Iceland
Ireland
Luxembourg, Malta
Netherlands
Norway
Estonia, Latvia, Poland,
Slovak Republic and
Portugal
Spain
40 FM UK and 40 FM Europe
40 FM
40 FM
40 FM and 40 AM
40 FM and 40 AM
40 FM
40/40 and 40 FM
40 FM
40 /40 and 40 FM
Slovenia, Sweden
Switzerland and
Liechtenstein
United Kingdom UK
40 FM
40 FM and 40/40
40 FM and 40/40
Free for short-time travellers up to 1 month
Home country licence /Circulation Card accepted for
travellers
Free of licence and charges for all users, but AM
channels are not allowed to be used
Free of licence and charges for all users
Free of licence and charges for all users
(travellers with Circulation Card)
Free of licence and charges for all users
Free of licence and charges for all users except in
some border regions for base stations using channels
41-80 FM
Free of licence and charges for all users
Free of licence and charges for all users
Free of licence and charges for all users
Free of licence and charges for all users
Free of licence and charges for all users
Free of licence and charges for all users
Free of licence and charges for all users
Free of licence and charges for all users
Free of licence and charges for all users
Free of licence and charges for travellers with
Circulation Card
Free of licence and charges for all users
Free of licence and charges for travellers with
Circulation Card
Free of licence and charges for travellers
40 FM
Important Note: Please respect the licence conditions in the above listed countries and do not use the radio
without licence, where necessary. For travelling with Your radio, we recommend to provide a copy of Your home
country licence document and this Radio Passport together with the radio. The above list is based on public
available information, while country specific requirements may change without notice during the harmonisation
process in Europe, we recommend to ask local authorities before travelling.
17
Declaration of Conformity / Konformitätserklärung
We hereby declare that our product: / Wir erklären hiermit, dass unser Produkt
CB-Radio Albrecht AE 5090 XL
satisfies all technical regulations applicable to the product within the scope of EU Council Directives,
European Standards and national frequency applications:/ alle technischen Anforderungen im
Geltungsbereich der EU Richtlinien, europäischer Normen und nationaler Frequenzanwendungen einhält:
73/23/EEC, 89/336/EEC / 2004/108/EG and 99/5/EC
EN 300 135 - 2 V 1.1.1/ EN 300 433- 2 V1.1.2
EN 301 489- 01 V.1.6.1, EN 301 489-13 V1.2.1, EN 60 950-1 :2006
All essential radio test suites have been carried out. /
Alle für das Produkt vorgeschriebenen Funktestreihen wurden durchgeführt.
This declaration is issued under our sole responsibility. Basing on not harmonized frequency
applications, the CB radio may be used only in listed countries according to selected channel
programming. An individual license for operating this radios in AM+FM on 40/40 channels in B, CH, FL,
E, and I is requested by residents of these countries.
In D (where 80/12, 80/40, 40/12 or 40 / 40 FM/AM channels are allowed, CZ (80 FM), EST, F, FIN, IRL, IS, LV, NL,
P, PL, SK the CB operation on 40 / 40 channels in AM + FM is free of license and free of charges. If the radio
is programmed to 40 FM only, it may be used without license and free of charge in CY, CZ, D, DK,
EST, F, FIN, GB, GR, H, IRL, IRL, IS, L, LV, M, N, NL, P, PL, S, SK, SLO except Austria, where radios
with country switches are generally not allowed. Residents of Belgium, Italy, Spain, Switzerland
/Liechtenstein need a CB license in their home country, while travellers from other European countries
may use 40 CH FM during travelling in these countries free of licence and charges. In Belgium use of 40
channels AM is allowed for travellers under the conditions of their home country.
Diese Erklärung wird unter unserer alleinigen Verantwortung abgegeben. Die oben genannten
Funkgeräte dürfen wegen der nicht harmonisierten Frequenzanwendungen in AM+FM in den Ländern B,
CH, FL, E, und I von Bewohnern nur mit gültiger CB-Funkgenehmigung benutzt werden. In D (max. 80
FM / 40 AM Kanäle),CZ (80 FM), EST, F, FIN, IRL, IS, LV, NL, P, PL, SK (40 / 40 Kanäle) ist der CB-Funk
anmelde- und gebührenfrei. Dabei ist in Deutschland mit der Programmierung 80 FM der ortsfeste
Sendebetrieb auf den Kanälen 41-80 in bestimmten Regionen entlang der Grenzen (außer zu CZ) nicht
oder nur mit Sondergenehmigung gestattet.
Mit der Programmierung 40 FM können die Geräte in CY, CZ, D, DK, EST, F, FIN, GB, GR, H, IRL, IRL,
IS, L, LV, M, N, NL, P, PL, S, SK, SLO (außer Österreich, dort sind Funkgeräte mit Länderumschaltung
generell nicht erlaubt, anmelde- und gebührenfrei benutzt werden. Bewohner von Belgien,
Großbritannien, Italien, Spanien und der Schweiz /Liechtenstein benötigen in Ihrem Heimatland eine
Genehmigung (CB Lizenz). Die vorübergehende Benutzung von 40 Kanälen FM durch Reisende aus
anderen europäischen Ländern ist in diesen Ländern jedoch auch anmelde- und gebührenfrei erlaubt. 40
AM ist in Belgien für Reisende erlaubt, wenn die Heimatbestimmungen dies gestatten (z.B. für Reisende aus
Deutschland)
ALAN Electronics GmbH declara, bajo su responsabilidad, que este aparato cumple con lo
dispuesto en la Directiva 99/05/CE, del Parlamento Europeo y del Consejo de 9 de marzo de
1999, transpuesta a la legislación española mediante el Real Decreto 1890/2000, de 20 de
noviembre"
Point of contact/Ansprechpartner: Dipl.-Phys. Wolfgang Schnorrenberg
Place and date of issue:
Lütjensee, 12. 02. 2008
(Signature)
Dipl.-Phys. Wolfgang Schnorrenberg
ALAN Electronics GmbH
This Declaration of Conformity and the Albrecht Radio Passport will be re-issued when necessary and
can be downloaded any time from www.hobbyradio.de
18
Technical Details
Microphone socket wiring
Packet Radio / Sound Card
Pin 1
Pin 2
Pin 3
Pin 4
Pin 5
Pin 6
Pin 1
Low frequency microphone
PTT-RX (on ground for reception)
PTT-TX (on ground for transmitting)
up/down
Ground
12 volt for pre-amplifier etc.
Pin 2
Pin 3
Pin 5
Audio input
transmitter
Audio output
reception
PTT
Ground
Transmitter
Transmitting power
max. 4 Watt FM
Max. 1 Watt AM / 4 Watt AM
1.5 mV at 600 Ohms
-90 dBc = 4 nW
less than 2.0 kHz
less than 90%
Modulation sensitivity
Harmonic and spurious radiations
Max. frequency deviation
AM modulation degree
Receiver
better + 3dbμV EMK for 20 dB
better + 3dbμV EMK for 12 dB
better 66 dBμV EMK
better 60 dBμV EMK
better 48 dB (EN 300 433-1)
2 Watt to 8 Ohm load
Sensitivity (FM) (SINAD)
Sensitivity (AM) (SINAD)
Adjacent channel selection
Intermodulation rejection
Image rejection
Audio output power
Service contacts
© Alan Electronics GmbH Januar 2008
Alan Electronics GmbH - Daimlerstr. 1 k - D- 63303 Dreieich/ Germany
Spare parts- and Service:
Service-Fax:
Homepage:
e-mail:
Service-Download:
(+49) 6103-9481-22
(+49) 6103-9481-60
www.albrecht-online.de, www.alan-electronics.de
[email protected]
www.hobbyradio.de
19
Short manual AE 5090 XL – Fast to the point
The most important functions at a glance
Programming of the corresponding country settings (before first use)
Programming: hold SCAN/Multi-mode key and turn on the radio. Select the desired
mode for Your country by turning the channel switch (see the following table and
radio passport). Switch off and on radio for storing.
Multi Mode Channel
01
80 CH
02
40/40
03
40
04
40/40
05
40/40
Power
4W/1W
4W/1W
4W
4W/4W
4W/4W
Modulation
FM/AM
FM/AM
FM only
FM/AM (only Spain)
FM/AM (only Poland)
VOL/ OFF
turn radio on, set desired volume (counter clockwise = off-position)
DIM/Light
Colour: push longer than 1,5s, Dim level: push less than 1 second
SQ - ASC
Squelch SQ- and ASC-knob (first settings: completely counter clockwise)
Mic-Gain
first setting: middle to completely clockwise
RF-G
completely clockwise for the best receiving results
AM/FM
chose the desired modulation , no function in FM only
ChannelSwitch
select the desired channel (rotary switch or UP/ DOWN at microphone)
ASC
turn clockwise till the noise will just start to mute
SQ
turn clockwise till the lower Signals will disappears
Microphone hold the PTT-button on the side until you finished transmitting (distance
5cm to 10cm
Memory 1- 5 select Memory: 1 - 5
M
Change memory: select channel, press M (Display shows ME) and afterwards
press 1 - 5
© Alan Electronics GmbH, February 2008
20